1
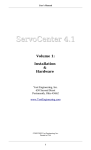
Micro Serial Servo
Controller
User’s Guide
Specifications
PCB size...........................................
Number of servo ports......................
Pulse width range.............................
Resolution........................................
Supply voltage.................................
I/O voltage.......................................
Baud rate..........................................
Current consumption........................
Pololu
© 2005
http://www.pololu.com/
0.91" x 0.91"
8
0.25-2.75 ms
0.5 microsecond (~ 0.05 degree)
5-16 V
0 and 5 V
1200-38400 (auto detect)
5 mA (average)
SSC03A
!
Important Safety Warning
The servo controller module is not intended for young children!
Younger users should use this module only under adult supervision.
By using this product, you agree not to hold Pololu liable for any
injury or damage related to the use or to the performance of this
product. This product is not designed for, and should not be used
in, applications where the malfunction of the product could cause
injury or damage.
Contacting Pololu
You can check the Pololu web site at http://www.pololu.com/ for the latest
information about the servo controller, including color pictures, application examples,
and troubleshooting tips.
We would be delighted to hear from you about your project and about your experience
with our servo controller. You can contact us through our online feedback form or by
email at [email protected]. Tell us what we did well, what we could improve,
what you would like to see in the future, or anything else you would like to say!
Servo Controller Layout and Pinout
protocol
selection
jumper
LEDs: yellow green red
Pololu
© 2005
http://www.pololu.com/
sign
al
reset
logic-level serial output
logic-level serial input
VIN (5-16 V)
GND
Vcc = Vs jumper
RS-232
serial
GND
input
+ –
servo power (4-6 V)
servo 0
servo 1
servo 2
servo 3
servo 4
servo 5
servo 6
servo 7
+ –
2
Connecting the Servo Controller
The servo controller connections are shown on the facing page, and most of the pins are
labeled on the back of the servo controller. All square pads are ground.
Power
The servos are typically powered by their own supply consisting of a 4- or 5-cell
rechargeable battery pack with a nominal voltage of 4.8-6.0 volts. This supply can be
connected to the upper-right corner of the board, or to any of the servo 0 through servo 6
power pins (the connection between the servo 7 pins and the other pins is not designed
to carry the current for all of the servos). The servo supply should be capable of
providing several amps of current. If many servos will be straining simultaneously, the
total current can be close to 10 amps. In such applications, you should use the servo
controller PCB just for signals and separately wire up the power and ground pins of the
servos individually.
The servo controller needs its own power, which can be 5-16 volts. This supply should
be applied to the lower-left corner of the board, at the VIN and GND pins. If the servo
battery pack is above 5 V, it can also power the servo controller. If the servo battery is
under 5 V (a 4-cell pack), the servo controller can be powered by connecting across the
Vcc = Vs jumper (and leaving VIN disconnected).
Please note that both the servo controller and most servos can be destroyed by applying
power incorrectly (either too high of a voltage or reversed voltage).
Control signals
The servo controller requires a logic-level (0-5 V) serial input connected to the logiclevel serial input or an RS-232-leve serial input at the RS-232
pin. Do not use both serial inputs at the same time! The
V+ (red)
servo controller echoes all serial data out of the serial output
pin, and the reset line can be brought low to reset the servo
signal
controller. In most applications, the reset input and serial
(white)
output can be left disconnected.
Servos
When connecting servos, be careful because it is possible to
plug in a servo backwards. Make sure to connect your
servos correctly, or they may be destroyed. The signal
(usually white or yellow) wire should be toward the inside of
the board, and the black wire should be closest to the edge of
the board.
GND
(black)
servo
connector
7
S+
Pololu
© 2005
http://www.pololu.com/
header
(on PCB)
-
3
Using the Servo Controller
The Pololu servo controller performs the processor-intensive task of simultaneously
generating 8 independent servo control signals. The servo controller can generate
pulses from 0.25 ms to 2.75 ms, which is greater than the range of most servos, and
which allows for a servo operating range of over 180 degrees.
Internally, the servo controller maintains a servo position value that is two times the
pulse width, measured in microseconds. Thus, the 1.5 ms neutral position, which is
1500 microseconds long, is represented internally as 3000. The internal values range
from 500 to 5500. Various interface modes allow the user to set the position value for
each servo in multiple ways, which are described below.
Serial Input
The serial commands sent to the servo controller
must be sent eight bits at a time, with no parity and
one stop bit (sometimes abbreviated 8N1). Logiclevel serial input must be non-inverted, meaning
that a zero is sent as a low voltage, and a one is sent
as a high voltage, as shown in the diagram to the
right. Any inverted serial input, whether at logic
levels or at RS-232 levels, may be connected to the
RS-232 serial input.
LSB
5V
MSB
10011010
0V
start bit
stop bit
When you turn on power with your serial input connected, you should either see all of
the LEDs or just the yellow LED turn on. After the servo controller turns on and
determines the communication mode (see below), it waits for a serial input to
determine the baud rate. If the input line is low, it turns all LEDs on and waits for the
line to go high, which is the idle state for the serial line. Once the line is detected to be
high, only the yellow LED is turned on, and the servo controller waits for a serial input.
If the detected baud rate is too high, the red LED will turn on and the green LED will
flash quickly. If the serial rate is too slow, the red LED will turn on and the yellow LED
will flash. From this point on, the servo controller behavior depends on the
communication mode. Once you choose a baud rate, all subsequent transmissions
must be at that same baud rate.
Indicator LEDs
The green LED indicates serial activity: it should flicker whenever the servo controller
receives data. The yellow LED indicates a warning regarding position: either the
absolute or neutral position you have requested is out of range, or a combination of
neutral, range, and 7-bit or 8-bit position caused the internal position variable to go out
of range. The position will just be limited to the max or min, and the yellow LED will
go out when all requested positions are in range. The red LED indicates a fatal error
that prevents further operation (for example, a fatal error could be caused by invalid
serial input).
Pololu
© 2005
http://www.pololu.com/
4
Interface Options
You can communicate with the servo controller using one of two communication
protocols. One of the two interface modes is chosen based on the state of mode
selection jumper when the servo controller is powered up; you cannot change modes
without resetting the servo controller.
Pololu Mode: The default mode, when the jumper is open (no shorting block), is a
Pololu protocol used for controlling multiple serial devices. In this mode, the
servo controller can be on the same serial line as other devices such as our Dual
Serial Motor Controller. This mode also allows access to all of the special features
of the servo controller, such as setting speeds, ranges, and neutral settings.
Mini SSC II Mode: This mode is set by placing the shorting block
over the two jumper pins. This setting allows the servo controller to
respond to the protocol used by the Mini SSC II servo controller made
by Scott Edwards Electronics. This protocol is more simple, but it
only allows the user to specify the desired servo positions in only one
way. In this mode, the servo controller is not compatible with other
Pololu serial peripheral products.
Mini SSC II Mode
Baud Rate. The available baud rate range in this mode is approximately 500-10k
baud, but the Mini SSC II only works at 2400 or 9600 baud. If you want to put a Mini
SSC II servo controller on the same serial line as your Pololu 8-servo controller, you
must use one of the two baud rates that the Mini SSC II can support.
Protocol. To set the servo position, send a sequence of three bytes. The first byte is a
synchronization value that must always be 255. Byte 2 is the servo number, and it can
be 0-254. Byte 3 is the position to which you want the servo to move, also 0-254.
start byte = 0xFF
servo number, 0x00-0xFE
Servo position, 0x00-0xFE
Two motion ranges are available in this mode. Each Pololu servo controller responds
to 16 servo numbers. Addressing the lower 8 will move them within an approximately
90 degree range, while addressing the upper 8 servo numbers will give twice the range.
You can set the group of servo numbers to which your servo controller responds (see
“Setting and Checking the Servo Numbers”). For example, if your servo controller is
set to servo numbers 0, it responds to servo numbers 0-15, and sending the command
sequence [255, 10, 254] will move servo 2 all the way to one extreme of its range in 180
degree mode. If you send servo numbers that are not recognized, the servo controller
will ignore the command. Up to sixteen servo controllers can be connected on one
serial line to control up to 128 servos independently.
Pololu
© 2005
http://www.pololu.com/
5
Pololu Mode
In this mode, there are several options for controlling your servos. As mentioned at the
beginning of this section on page 4, the servo controller holds an internal variable for
each servo, the value of which ranges from 500 to 5500, where the number corresponds
to the pulse length in increments of half of a microsecond. The various commands deal
with setting these internal values. With absolute commands, you simply set the value
for each servo. In 7- and 8-bit modes, you set neutral, range, and direction parameters
for each servo; then, when you send a 7- or 8-bit position command, the servo
controller combines all of the parameters to obtain the actual servo position. Whether
you use absolute commands or not, you can individually control the speed of each servo
and whether the servo is on or off (most servos shut off when they receive no pulses).
This section describes the interface details.
Baud Rate. The available baud rate range in this mode is approximately 2,000-40,000
baud. It is possible for the servo controller to operate at rates as high as 57600 baud, but
the success of the attempt will depend on the exact speed of your serial control source.
The servo controller is not committed to standard baud rates, so if you have a device
that can transmit at a maximum rate of 45,000 baud, try it, and it might work.
Protocol. To communicate with the servo controller, send sequences of five or six
bytes. The first byte is a synchronization value that must always be 0x80 (128). Byte 2
is the Pololu device type number, which is 0x01 for the 8-servo controller. Byte 3 is one
of six values for different commands to the controller; the commands are discussed
below. Byte 4 is the servo to which the command should apply. Bytes 5 and possibly 6
are the data values for the given command. In every byte except the start byte, bit
seven must be clear. Thus, the range of values for bytes 2-6 is 0-0x7F (0-127).
start byte = 0x80 device ID = 0x01 command servo num data 1 data 2
Command 0: Set Parameters (1 data byte)
"
"
"
Bit 6 specifies whether a servo is on or not; a 1 turns the
servo on, and a 0 (default) turns it off.
Bit 5 sets the direction the servo moves, which only
applies to 7- and 8-bit position commands. If the bit is 0
(default), a larger position number causes the output
pulse to get bigger; if the bit is 1, a larger position
number will make the output pulse shorter.
bit 7
bit 0
0x x x x x x x
bits 0-4:
range
bit 5: direction
0 = forward
1 = reverse
bit 6: servo on/off
0 = off
1 = on
Bits 0-4 set the range through which the servo moves in
7- and 8-bit commands. A larger value will give a
bit 7: always 0
larger range, and setting the range to 0 will make the
servo always stay at neutral. Given the same range setting, an 8-bit position
command will move the servo through twice the range of a 7-bit position command.
The default range setting is 15, which will give a range of approximately 180
degrees in 8-bit commands and 90 degrees in 7-bit commands.
Pololu
© 2005
http://www.pololu.com/
6
Pololu Mode (continued)
Command 1: Set Speed (1 data byte)
This command allows you to set the speed at which the servo moves. If the speed is set
to 0 (default), the output pulse will instantly change to the set position. If the speed
value is nonzero, the pulse changes gradually from the old position to the new position.
With a speed of 1, the pulse width changes at 50 microseconds per second; the
maximum speed of 6.35 ms per second is achieved with a speed setting of 127.
Command 2: Set Position, 7-bit (1 data byte)
When this command is sent, the data value is multiplied by the range setting for the
corresponding servo and adjusted for the neutral setting. This command can be useful
in speeding up communications since only 5 total bytes are sent to set a position.
Setting a servo position will automatically turn the servo on.
Command 3: Set Position, 8-bit (2 data bytes)
This command is just like the 7-bit version, except that two data bytes must be sent to
transfer 8 bits. Bit 0 of data 1 contains the most significant bit (bit 7), and the lower bits
of data 2 contain the lower seven bits. (Bit 7 in data bytes must always be 0.) Setting a
servo position will automatically turn the servo on.
Command 4: Set Position, Absolute (2 data bytes)
This command allows direct control of the internal servo position variable. Neutral,
range, and direction settings do not affect this command. Data 2 contains the lower 7
bits, and Data 1 contains the upper bits. The range of valid values is 500 through 5500.
Setting a servo position will automatically turn the servo on.
Command 5: Set Neutral (2 data bytes)
Setting neutral only applies to 7- and 8-bit commands. The neutral value sets the
middle of a range, and corresponds to a 7-bit position value of 63.5 or an 8-bit position
value of 127.5. The neutral position is an absolute position just like in command 4, and
setting the neutral position will move the servo to that position. The default value is
3000. It may be useful to change neutral if you change servos and need to calibrate
your system, or if you cannot get your mechanical linkages to just the right lengths.
Tip: Setting neutral and servo direction can be useful if you have a device, such as a
walking robot, that has multiple symmetrical structures on two sides of a chassis.
Instead of determining a sequence of positions for each leg individually, you can design
a single leg, and then use the same position values for other legs, changing only the
neutral position and direction as necessary.
Pololu
© 2005
http://www.pololu.com/
7
Setting and Checking the Servo Numbers
The micro-servo controller has the unique feature of allowing the user to set the servo
numbers to which the controller responds. By default, the servo controller responds to
servo numbers 0-7 (in Pololu mode), but you can set it to respond to numbers 8-15, 1623, all the way to 120-127. (In Mini SSC II mode, the servo controller would respond
to numbers 0-15, 16-31, all the way through 240-254.) This feature is useful if you
want to use more than one servo controller at a time to control up to 128 independent
servos.
To set the servo numbers, put the servo controller in Pololu mode (shorting block
removed from J1) and send the serial sequence [128, 2, <servonums>], where
<servonums> is a number from 0 through 15. A setting of 0 will make the servo
controller respond to servo numbers 0-7 (in Pololu mode), a setting of 1 will make it
respond to servo numbers 8-15, and so on.
start byte = 0x80
change servo numbers = 0x02
new setting, 0x00-0x10
Upon receiving the command, the servo controller will turn on the red and yellow
LEDs and quickly flash the green LED <servonums> + 1 times. The green LED will
thus quickly flash 1-16 times. The green LED will then pause for approximately 1
second before flashing again. The 8-servo controller must be reset (power turned off
and back on) before it can be used.
If you want to just see the servo numbers setting without changing it, use the above
command, but use the value 16 for <servonums>. The servo number settings will
remain unchanged, but the green LED will flash to indicate the servo numbers, as
described above.
The configuration of the servo controller should only be done once per servo controller,
with only one servo controller on the serial line (otherwise, all units would get set to the
same number, and the whole point is to give them unique numbers!). The number is
stored in a location that can be written thousands of times, but the number should not be
written every time your system is powered up.
Pololu
© 2005
http://www.pololu.com/
8