1
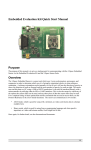
User's Manual
ServoCenter 4.1
Volume 1:
Installation
&
Hardware
Yost Engineering, Inc.
630 Second Street
Portsmouth, Ohio 45662
www.YostEngineering.com
©2002-2009 Yost Engineering, Inc.
Printed in USA
1
User's Manual
Table of Contents
1. Package Checklist........................................................................................................3
2. Function Overview......................................................................................................3
2.1 Introduction..................................................................................................................................3
2.2 Board Overview............................................................................................................................4
2.3 Features and Specifications.........................................................................................................7
2.3.1 Features.........................................................................................................................7
2.3.2 Specifications................................................................................................................8
Physical..............................................................................................................................8
Interface.............................................................................................................................8
Electrical............................................................................................................................8
3 Installation....................................................................................................................9
3.1 General Installation Precautions................................................................................................9
3.2 Installing the ServoCenter 4.1 USB Drivers..............................................................................9
3.2.1 Before Installing Drivers...............................................................................................9
3.2.2 Installing the ServoCenter 4.1 Driver..........................................................................10
3.2.3 Installing the Virtual Com Port Driver........................................................................10
3.2.4 Installing the Drivers via Windows Update................................................................12
3.3 Connecting a Single ServoCenter 4.1 USB Board...................................................................12
3.4 Connecting Multiple ServoCenter 4.1 Boards.........................................................................13
3.4.1 “Daisy-Chaining” Multiple ServoCenter 4.1 USB Boards.........................................13
3.4.2 Using Multiple ServoCenter 4.1 USB Boards on a USB Hub....................................15
3.5 Jumper Settings..........................................................................................................................15
3.5.1 Jumper JP1..................................................................................................................15
3.5.2 Jumper JP2..................................................................................................................16
3.5.3 Jumper JP3..................................................................................................................16
3.5.4 Jumper JP4 .............................................................................................................17
3.6 Board Identification Settings.....................................................................................................17
5. Appendix....................................................................................................................18
5.1 Hexadecimal/Decimal/Binary Conversion Chart....................................................................18
5.2 Serial Cable Diagrams...............................................................................................................18
5.3 ServoCenter 4.1 Circuit Schematic...........................................................................................19
User Notes:.....................................................................................................................20
2
User's Manual
1. Package Checklist
When you purchase this product you receive the following items:
•
ServoCenter 4.1 Controller Board
•
USB Device Cable (Type A to Type B)
•
AC Adaptor ( 9VDC@1500mA, Positive Center)
•
ServoCenter 4.1 User’s Manual & Programming Guide
•
ServoCenter 4.1 Software/Examples CD
Attention: The ServoCenter 4.1 Controller Board contains static sensitive devices.
Avoid touching the circuitry and always handle the board by the edges only.
Caution: Fully read this instruction manual and additional included setup and
programming documentation before operating the ServoCenter 4.1. Misuse of the
ServoCenter 4.1 board could result in equipment damage or injury.
2. Function Overview
2.1 Introduction
The ServoCenter 4.1 is an embedded controller that allows any device with a USB port
or serial port to control standard hobby servo motors, interface to other digital I/O
devices, and read analog inputs. The board provides both a USB and a serial interface
to allow for easy control of the seek position and seek speed of each of up to sixteen
connected servos independently and simultaneously. This independent control scheme
allows one servo to be moving to a position slowly, while another is moving to a
different position quickly, while yet another is moving to another position at a medium
speed. The controller also provides “timed” movement commands that allow the
destination and a time to be provided so that the motor can be made to move to the
specified destination over the specified amount of time.
The ServoCenter 4.1 controller also offers features such as absolute & relative control
command sets, raw/scaled/percentage positional modes, 16 digital I/O channels, 8
analog input channels, a simple yet reliable command protocol accessible in both
binary or ASCII text transmission modes, on-board preset storage capabilities, and onboard settings storage.
The ability to independently control position, speed, and timed movements combined
with the controller's flexible and extensible feature set make ServoCenter 4.1 especially
useful for servo control applications such as robotics, animatronics, motion control,
automation, retail displays, and other areas where independent or coordinated fluid
servo motion is necessary or desirable.
Up to 16 servo motors, 16 digital I/O devices, and 8 analog inputs can be connected to
each ServoCenter 4.1 board and up to 16 ServoCenter 4.1 boards can be “daisychained” together, thus allowing for a total of 256 RC servos, 256 digital I/O channels,
and 128 analog inputs to be controlled independently and simultaneously from one
USB port or RS-232 serial port.
The ServoCenter 4.1 controller can be programmed using a simple command protocol
in either a raw or ASCII text mode. The ServoCenter 4.1 can be controlled via either
the USB or serial port. USB communication is made simple through the use of the
virtual COM port feature of the USB drivers. Example programs illustrating various
programming methods are discussed in this programming guide and are provided on
the included CD, along with the USB drivers for the ServoCenter 4.1.
3
User's Manual
2.2 Board Overview
1. Jumper JP4
2. Power Switch
22. Power LED
3. IN_PWR
21. +5_PWR
4. Jumper JP1
20. Reset Button
5. Jumper JP2
19. Jumper JP3
6. USB Connector Port
18. Voltage Regulator
7. Power Supply Input
8. TTL Serial IN
9. RS232 Serial IN
17. SV_PWR
10. Board ID Switch
11. TTL Serial THRU
16. Digital I/O
DIO0-DIO15
12. RS232 Serial THRU
15. Status LEDs
13. Analog Inputs AD0-AD7
14. Servo Connector S0-S15
1. Jumper JP4 – Jumper J4 determines the power source for the micro-controller. If
the jumper is installed in position 1, the MCU gets power from the USB bus. If the
jumper is installed in position 2, the MCU gets power from the on-board +5v
regulator. The default is position 2.
2. Power Switch – The power switch is used to switch the controller board and the
attached servos off. The board will also not pass information from the serial IN port
to the serial THRU port when turned off. As a convenience, the USB circuitry is
always powered via the USB bus itself thus allowing the USB device to remain
active within the OS even when the ServoCenter 4.1 board is turned off.
3. IN_PWR Connector – These pads act as an alternative power supply input. Input
voltage should be between 6.5VDC and 12VDC. The IN_PWR pins are connected
in parallel with the power supply input barrel jack(7) so can also be used as a
secondary power supply tap.
4. Jumper JP1 - This jumper controls the configuration of the serial communications.
When a jumper is installed in position 1, the module will receive command messages
from the RS-232 serial IN port, the TTL serial IN port, or the USB port. By
removing this jumper, a board can be temporarily disabled without affecting others
in the chain. When a jumper is installed in position 2, the module will be able to
transmit messages to any devices connected to a THRU port. Removing this jumper
prevents the board from passing messages to the THRU ports. This can be useful
when troubleshooting a chain of multiple servo-center controllers.
5. Jumper JP2 - This jumper selects the serial data transfer rate as follows: both
positions removed = 9600bps, position 1 removed and 2 installed = 38400bps,
position 1 installed and position 2 removed = 57600bps, both positions installed =
115200bps. When USB connectivity is used the data rate setting for the “Virtual
Com Port” must match this jumper setting. When daisy-chaining multiple boards,
baud rate settings must match.
4
User's Manual
6. USB Connector Port – The controller can receive control messages from this port.
This port should be connected to a standard USB port on the host computer system.
7. Power Supply Input – Attach a 6.5-12VDC power source that can supply at least
1000Ma supply current. The supply connector should be a 2.1mm x 5.5mm female
connector with a positive center.
8. TTL Serial IN – The controller can receive TTL logic-level control messages from
this port. This is useful when connecting the ServoCenter4.1 board to a standard 0v/
5v asynchronous communication source such as a microcontroller or “Stamp”
controller. This port may also be used to daisy-chain multiple ServoCenter 4.1
boards by connecting the TTL_THRU of a previous board in the chain to the
TTL_IN of a later board in the chain using a 3-pin straight-through cable.
9. RS-232 Serial IN Connector – The controller can receive its control messages from
this port. This port is wired as a DCE port and should be connected with a straightthrough serial cable to a PC serial port or the serial THRU port of another
ServoCenter controller.
10. Board ID Switch – This switch determines the board ID of the ServoCenter
controller board. When multiple boards are “daisy-chained” they each require a
unique board ID setting to be controlled independently.
11. TTL Serial THRU - Messages received on the RS-232 serial IN port, TTL_IN
port, or USB port are sent to the serial THRU port and TTL_THRU port. This port
can be connected with a 3-pin straight-through cable to the TTL_IN port of another
ServoCenter controller.
12. RS-232 Serial THRU Connector – Messages received on the RS-232 serial IN
port, TTL_IN port, or USB port are sent to the serial THRU port and TTL_THRU
port. This port is wired as a DTE port and should be connected with a straightthrough serial cable to the serial IN port of another ServoCenter controller.
13. Analog Inputs AD0-AD7 – These pins each allow an analog input to be connected.
Analog inputs between 0v and +5v can be converted and read. Each analog input
channel also provides a 0v and +5v supply pins for use by connected analog
modules. The 0v pin is toward the bottom of the board, +5 is the center pin, and the
analog input is the top-most pin.
14. Servo Connector S0-S15 – Servos S0 through S15 are connected here. The servos
should always be connected so that the black ( ground ) wire of the servo is toward
the outside edge of the board. The signal pins of the servo connectors can also
double as additional digital outputs by controlling the “disabled state” of a servo
channel.
15. Status LEDs – The status LEDs can be configured to show various status states of
the ServoCenter 4.1 as it is operating.
16. Digital I/O DIO0-DIO15 – Digital I/O DIO0 through DIO15 can be connected
here. Digital I/O pins can be individually configured as inputs or outputs. Each DIO
channel also provides a 0v and +5v supply pins for use by connected digital
modules. The 0v pin is toward the edge of the board, +5 is the center pin, and the
DIO pin is the right-most pin.
5
User's Manual
17. SV_PWR External Power Pads – If a jumper is installed on position 3 of JP3 then
these pads act as a source of external power which may be used to power additional
servos or circuitry at either 4.8VDC or 6.0VDC (depending on jumper JP3 position
2). If the jumper at position 3 of JP3 is not installed then these pads may be used to
connect an external servo power source such as a battery or higher current supply.
18. Voltage Regulator – This component supplies the power for all sixteen servos
when an external power source is not used. During normal operation the regulator
will get HOT. To avoid injury, be careful not to touch the regulator during
operation. To avoid fire, do not allow combustible materials to contact the regulator
during operation. The regulator circuit is equipped with both over-current and overtemperature shutdown circuitry.
19. Jumper JP3 – Position 1 of this jumper write protects the internal setting memory
and preset memory when installed. Position 2 selects the voltage level provided to
the servos as follows: 4.8 volts when installed, 6.0 volts when removed. Position 3
removes the on-board regulator's voltage from the servo connector when removed. It
is necessary to remove this jumper when powering the servos from an external power
source via the SV_PWR pads.
20. Reset Button – This button allows the ServoCenter system to be reset without
cycling the power.
21.+5_PWR Pads – These pads allow access to the regulated +5v MCU power source
from either the internal regulator or the USB bus, depending upon the jumper JP4
setting. If JP4 is not installed in either position, an external +5v power supply may
be used to power the MCU.
22. Power LED – When the MCU power is on the power LED will be lit.
6
User's Manual
2.3 Features and Specifications
2.3.1 Features
•
•
•
•
•
•
•
•
•
•
•
•
•
•
•
•
16 servo channels ( can double as digital outputs ), 16 dedicated digital
input/output channels, 8 dedicated analog input channels.
Supports USB, RS-232 serial, and TTL logic-level serial control. USB
connectivity allows complete servo control via the PC's USB port.
Standard RS-232 or TTL serial control at 9600, 38400, 57600, or 115200 bps.
Virtual COM Port feature makes USB communication just as easy as standard
serial communication code.
Control position, speed, and seek-time of all connected servos simultaneously.
Scaled and percentage motion commands allow maximum, minimum, and
startup position-setting, making complex calibration and motion programming
easier.
Absolute and relative position commands allow for greater programming
flexibility.
Configuration information saved even when the power is off.
Control up to 16 RC servos per board. Daisy-chain up to 16 boards to control
up to 256 servos from one serial or USB port.
Servo channels can be configured to double as additional digital outputs.
Servo channels support a built-in configurable smoothing algorithm thus
allowing smoother, more natural servo motions.
On-board voltage regulator supports both 4.8v and 6.0v servo supply voltages
with over-current / over-temperature protection.
Includes USB device cable and 1500mA AC power supply.
Simple yet robust serial protocol supports both ASCII and binary protocol
modes, thus allowing ease of adaptation to specific needs.
Included ServoCenter ActiveX control and Win32 DLL makes creating
complex control applications fast and easy.
Included example programs get you started quickly. Example programs
included for VC6, VB6, QBASIC, Turbo C, VB.NET, C#.NET, Python, and
GCC/LINUX.
•
Jumper settings allow for flexible configuration and control options.
•
On board pads allow for flexible power supply and battery connection options.
•
•
•
•
•
Control or sense up to 16 I/O device channels per board. Daisy-chain up to
16 boards to achieve up to 256 digital I/O channels from one serial or USB
port.
Digital I/O channels are individually configurable as inputs or outputs and
have configurable internal pull-up resistances.
Digital I/O channels each provide power supply pins to ease connection to
external digital I/O modules.
Connect and read up to 8 analog input channels per board. Daisy-chain up to
16 boards to allow up to 128 analog inputs to be read from one serial or USB
port.
Analog input channels can be read in either 8-bit or 10-bit resolutions.
7
User's Manual
•
•
•
•
•
Analog Input channels each provide power supply pins to ease connection to
external analog input modules.
Preset storage capability allows the saving and loading of up to 64 preset
servo position & digital I/O configurations.
Presets can be loaded instantly or cross-faded in thus allowing smooth
transitions between preset configurations.
User upgradeable firmware allows you to always have the latest features and
updates. Users can also create and upload their own firmware.
Status LEDs provide real-time feedback to aid in trouble-shooting and
installation verification.
2.3.2 Specifications
Physical
Size: 3.775"L x 3.55"W x 1.0"H (9.6cm L x 9.0cm W x 2.5cm H)
Weight: 2.7 oz
Interface
Input Interface: USB Type B port, 9-pin RS-232 DCE interface, 3-pin
TTL serial interface.
Through Interface: 9-pin IBM style RS-232 DTE interface or 3-pin TTL
serial interface.
Data Format (RS-232 only): 8 data bits, no parity, 1 stop bit at 9600,
38400, 57600, or 115200 bps.
Servo Interface: 3-pin standard RC servo connector.
Digital I/O Interface: 3-pin (Ground, +5v, Signal) connector.
Analog Input Interface: 3-pin (Ground, +5v, Signal) connector.
Electrical
Power Supply: 7.5VDC – 12VDC at no less than 1000mA.
Power Jack: 2.1mm x 5.5mm Male Jack, Center Positive.
Servo Power Output: Regulated 4.8VDC or 6.0VDC (selectable) at up to
5A when used with appropriate power supply.
MCU Power Output: Regulated 5.0VDC as up to 800mA.
8
User's Manual
3 Installation
3.1 General Installation Precautions
The ServoCenter 4.1 board allows for several configuration options so that the user can
select the option that best suits the particular need required. In each configuration,
however, the installation procedure is basically the same. When installing or
configuring any ServoCenter 4.1 board, observe the following:
1. Some of the electronic components are sensitive and can be damaged by
electro-static discharge. Avoid touching the circuitry on the board itself and
handle the board only by the edges. Place the board in a static shielding bag
when storing the board for extended periods.
2. Use only the AC adaptor that was provided with the ServoCenter board. If an
alternate power supply is used ensure that it is of appropriate voltage,
amperage and polarity for the board.
3. When making changes in wiring, configuration, and jumper settings, be
careful not to touch the voltage regulator/heat-sink. These components may
get hot and may cause injury if contacted.
4. The regulator and heat-sink of the ServoCenter controller get HOT during
periods of heavy utilization. Avoid placing the ServoCenter board in enclosed
spaces or in close proximity to combustible materials.
5. When connecting servo motors be careful to observe the polarity of the servo
connectors. The black wire should be connected toward the outside edge of
the board. Failure to observe the proper connector polarity could result in
damage to the ServoCenter board and/or the incorrectly connected servos.
6. If an external power source such as an alternate power supply or battery is
connected to the PWR connector, then ensure that the jumper on position 3 of
JP3 is removed.
3.2 Installing the ServoCenter 4.1 USB Drivers
Before the USB capabilities of the ServoCenter 4.1 USB may be used, two drivers must
be installed to the PC that will communicate with the controller board. The first driver
is the Virtual Com Port driver, which will allow your programs to access the
ServoCenter's USB port in the same way that RS-232 serial ports are accessed (for
more information, see Section 4.1). The second driver is the ServoCenter 4.1 USB
driver, which is what allows the PC to communicate with the ServoCenter 4.1 USB.
If only the serial interface is being used, no driver installation should be necessary.
3.2.1 Before Installing Drivers
Windows will automatically prompt you to install these drivers the first time you
connect the ServoCenter 4.1 USB to your PC. If you have the ServoCenter 4.1 CD,
insert it now. If not, you will need to download the ServoCenter 4.1 USB drivers from
http://tech.YostEngineering.com/servoFolder.
9
User's Manual
3.2.2 Installing the ServoCenter 4.1 Driver
Follow the instructions outlined in Section 3.2.3 to install the ServoCenter 4.1 USB
Driver.
3.2.3 Installing the Virtual Com Port Driver
1. When the Found New Hardware Wizard starts, Windows may ask you if you
want to connect to Windows Update to search for drivers. If you see this
prompt, select “No, not this time.”
2. Next, the Wizard will tell you what device a driver is needed for and ask you if
you want to install the software automatically or install it from a specific
location. Choose “Install from a list or specific location (Advanced).”
10
User's Manual
3. Next, you must tell the Wizard where to find the driver you need. Select the
box next to the “Include this location in the search:” option. If you have the
ServoCenter 4.1 CD, provide [CD]:\USB\Drivers as the location. If you
downloaded the drivers from the internet, you will need to specify the folder to
which you saved them.
4. The Found New Hardware Wizard will now install the Virtual Com Port
Driver.
11
User's Manual
5. Upon completion, the Wizard should inform you that the driver was
successfully installed.
3.2.4 Installing the Drivers via Windows Update
When the Found New Hardware Wizard starts, select “Yes, this time only.”
3.3 Connecting a Single ServoCenter 4.1 USB Board
Follow these steps to connect a single ServoCenter 4.1 USB board.
1. Connect the USB port on the ServoCenter 4.1 USB controller board to a free
USB port on your PC using the provided USB cable.
-ORConnect the serial IN connector of the ServoCenter 4.1 USB to the serial port
of your PC (or other serial device) using a 9-Pin Serial Cable (DB9F to
DB9M).
-ORConnect the serial TTL_IN connector of the ServoCenter 4.1 USB to a logiclevel asynchronous serial port of your device.
2. Connect from 1 to 16 servos to the ServoCenter board’s servo ports.
3. Ensure that jumper settings are correct. ( See Section 3.5 )
4. Ensure that the board ID setting is correct. Generally board ID 0 is used in
single board applications, but any board ID can be used. ( See Section 3.6 )
5. Connect the provided 9VDC@1500mA power supply to the ServoCenter
board.
12
User's Manual
9VDC
Adaptor
Digital
I/O Device
Digital
I/O Device
. . .
Serial or USB
Cable
Digital
I/O Device
Servo
Servo
. . .
Servo
Analog
Input Device
Analog
Input Device
. . . InputAnalog
Device
Connecting a Single ServoCenter 4.1 Controller
3.4 Connecting Multiple ServoCenter 4.1 Boards
ServoCenter 4.1 has the capability to have up to 16 boards with unique servo
configurations connected together in a “daisy-chain” arrangement, or connected
independently from a USB “hub” device. This expandability allows for distinct and
precise control of up to 256 servo motors with one USB or serial port.
The ServoCenter boards can be identified from one another programmatically by
assigning each board an Identification Number. This can be achieved via the use of the
block of four switches located on the ServoCenter board. Please refer to Section 3.5
for more information on Identification Numbers.
3.4.1 “Daisy-Chaining” Multiple ServoCenter 4.1 USB Boards
Complete the following steps to “daisy-chain” multiple ServoCenter 4.1 USB Boards:
1. Connect the USB port on the ServoCenter 4.1 USB controller board to a free
USB port on your PC using the provided USB cable.
-ORConnect the serial IN connector of the ServoCenter 4.1 USB to the serial port
of your PC (or other serial device) using a 9-Pin Serial Cable (DB9F to
DB9M).
-ORConnect the serial TTL_IN connector of the ServoCenter 4.1 USB to a logiclevel asynchronous serial port of your device.
13
User's Manual
2. Connect the serial IN connector of the next ServoCenter board to the THRU
port of the previous ServoCenter Board using a 9-Pin Serial Cable (DB9F to
DB9M). Repeat this step for all other boards.
-ORConnect the serial TTL_IN connector of the next ServoCenter board to the
TTL_THRU port of the previous ServoCenter Board using a 3-pin straightthrough cable. Repeat this step for all other boards.
3. Set the Board ID switches for each board to the desired value. This is
important because this ID number is what a controlling program will use to
deliver commands to specific servos on specific controller modules. For more
information on Board ID numbers, refer to Section 3.6.
4. Connect the provided 9VDC@1500mA power supplies to each ServoCenter
board. Each module should be connected with a separate power supply or
should be connected to a single high-current power source.
5. Connect from 1 to 16 servo motors, 1 to 16 digital I/O devices, and 1 to 8
analog input devices to each of the connected ServoCenter boards.
9VDC
Adaptor
Digital
I/O Device
Digital
I/O Device
. . .
Serial or USB
Cable
Digital
I/O Device
Servo
Servo
. . .
Servo
Analog
Input Device
Analog
Input Device
. . .
Analog
Input Device
9-pin RS232 Cable
Or
3-Pin TTL Cable
9VDC
Adaptor
Digital
I/O Device
Digital
I/O Device
. . .
Digital
I/O Device
Servo
Servo
. . .
Servo
Analog
Input Device
Analog
Input Device
. . .
Analog
Input Device
“Daisy-Chaining” Multiple ServoCenter 4.1 Controllers
14
User's Manual
3.4.2 Using Multiple ServoCenter 4.1 USB Boards on a USB Hub
Complete the following steps to control multiple ServoCenter 4.1 USB Boards from a
USB Hub or on multiple USB ports within the PC:
1. Connect a USB Hub to a USB port on your PC or use multiple USB ports on
your PC.
2. Connect a ServoCenter 4.1 USB Module to an open USB port on the hub
using a USB device cable. Repeat this step for all other boards.
3. Set the Board ID switches for each board to the desired value. When multiple
boards are connected to a USB hub, they will show up as separate virtual com
ports and thus may share board IDs. This is important because the virtual com
port number and the board ID number is what a controlling program will use
to deliver commands to specific servos on specific controller modules. For
more information on Board ID numbers, refer to Section 3.6.
4. Connect the provided 9VDC@1500mA power supplies to each ServoCenter
board. Each module should be connected with a separate power supply.
5. Connect from 1 to 16 servo motors, 1 to 16 digital I/O devices, and 1 to 8
analog input devices to each of the connected ServoCenter boards.
Note: While ServoCenter 4.1 will support up to 16 unique Identification Numbers at
one time, any number of ServoCenter boards may be assigned the same ID Number.
The result of this will be that all boards with the same ID number in a chain will
simultaneously move their respective servos to the same positions. This can be done to
obtain synchronized multiple servo movements or to divide high current servos across
multiple boards without consuming additional board IDs. Note, however that when
multiple boards share a board ID, commands that “get” or “read” information from the
board will cause multiple boards to send information simultaneously resulting in
possible corruption of returned data.
3.5 Jumper Settings
The ServoCenter 4.1 USB board has four sets of jumpers to allow various flexible
software and hardware control configurations. The functionality exhibited by these
jumper banks (Section 2.2 Items 1, 4, 5, 19 ) when a jumper is installed is described in
each of the sections below.
3.5.1 Jumper JP1
Jumper JP1 controls the configuration of the serial communications mode. The specific
functionality of jumper JP1 is as follows:
Jumper JP1
Position Effect of Jumper When Installed
1
ServoCenter 4.1 USB board can receive messages from PC.
2
ServoCenter 4.1 USB board will send received messages to THRU ports.
When a jumper is installed in position 1, this ServoCenter board will be able to receive
messages from the PC or controlling device. It is sometimes useful to remove the
position 1 jumper to temporarily disable a board without physically disconnecting it.
15
User's Manual
When a jumper is installed in position 2, this ServoCenter board will transmit received
messages to serial THRU and TTL_THRU ports. This can be useful in troubleshooting
communications issues.
3.5.2 Jumper JP2
Jumper JP2 controls the configuration of the serial communications data rate. When
USB connectivity is used the data rate setting for the “Virtual Com Port” must match
this jumper setting. When daisy-chaining multiple boards, baud rate settings must
match on each board in the chain. The specific functionality of jumper JP2 is as
follows:
Jumper JP2
Position 1
Position 2
Baud Rate Selected
Off
Off
9600bps
Off
On
38400bps
On
Off
57600bps
On
On
115200bps
3.5.3 Jumper JP3
Jumper JP3 controls the servo power options and the system settings write protection.
The specific functionality of jumper JP3 is as follows:
Jumper JP3
Position Effect of Jumper When Installed
1
System settings are write protected.
2
Servo voltage select. Regulated servo power is set to 4.8VDC when installed
and 6.0VDC when removed.
3
Internal regulated servo power is connected to the servo connectors.
When a jumper is installed in position 1, updates to the internal stored controller
settings are prohibited. This is useful for preventing accidental modification of stored
settings once they are entered. The controller will still allow changes to the settings,
but will not allow those changes to be committed to the persistent storage. Thus when
the power is cycled or the system is reset, then the stored settings will be restored.
When a jumper is installed in position 2, the on-board regulator provides 4.8VDC.
When the jumper is removed from this position then the regulator provides 6.0VDC.
When a jumper is installed in position 3, the on-board regulator supplies power to the
servo connectors. When the jumper is removed from this position the regulated power
is disconnected from the servo connectors. This jumper should be removed if an
external power source such as a battery is used to provide the servo power via the
“external power connection”. Removal of this jumper can also act as a quick method of
removing power from the servos without disconnecting their wires. To avoid damage,
never connect an external power source to the “external power connection” while this
jumper is installed.
16
User's Manual
3.5.4 Jumper JP4
Jumper JP4 configures how the ServoCenter 4.1 micro-controller gets power. The
specific functionality of jumper JP4 is as follows:
Jumper JP4
Position Effect of Jumper When Installed
1
MCU is powered via +5VDC from USB bus.
2
MCU is powered via on-board +5VDC regulator.
When a jumper is installed in position 1, the ServoCenter 4.1 micro-controller and
other logic circuitry get power from the USB bus. When a jumper is installed in
position 2, the ServoCenter 4.1 micro-controller and other logic circuitry get power
from the on-board regulator. Jumpers should never be installed in both position 1 and
position 2 simultaneously since this could cause contention between the on-board
regulator and the USB bus.
Note that the USB interface circuitry is always powered from the USB bus regardless
of JP4 settings. This is done as a convenience so that the USB device remains active
within the OS even when the ServoCenter 4.1 board is turned off.
3.6 Board Identification Settings
Board Identification Numbers are set via the blue bank of switches located in the upper
left corner of the ServoCenter 4.1 USB board (see Board Overview, Item 10).
Identification numbers are determined by the position of each switch in the bank. The
settings of the switch indicate the binary representation of the board ID number. Refer
to the table below regarding the switch position/ID number relationship.
Board Identification Settings
1
2
3
4
Board ID
Off
Off
Off
Off
0
Off
Off
Off
On
1
Off
Off
On
Off
2
Off
Off
On
On
3
Off
On
Off
Off
4
Off
On
Off
On
5
Off
On
On
Off
6
Off
On
On
On
7
On
Off
Off
Off
8
On
Off
Off
On
9
On
Off
On
Off
10
On
Off
On
On
11
On
On
Off
Off
12
On
On
Off
On
13
On
On
On
Off
14
On
On
On
On
15
Board IDs can be changed at any time during the operation of the ServoCenter 4.1.
17
User's Manual
5. Appendix
5.1 Hexadecimal/Decimal/Binary Conversion Chart
Decimal
Hex
Binary
0
0
0000
1
1
0001
2
2
0010
3
3
0011
4
4
0100
5
5
0101
6
6
0110
7
7
0111
8
8
1000
9
9
1001
10
A
1010
11
B
1011
12
C
1100
13
D
1101
14
E
1110
15
F
1111
5.2 Serial Cable Diagrams
The diagrams below illustrate the wire connections necessary for ServoCenter 4.1 compatible serial cables.
9-Pin to 9-Pin RS-232 Serial Connection
9 Pin
Connector
9 Pin
Connector
Receive Data
2
2
Transmit Data
3
3
Signal Ground
5
5
9-Pin to 25-Pin RS-232 Serial Connection
9 Pin
Connector
2
3
25 Pin
Connector
Receive Data
2
Transmit Data
5
3
Signal Ground
7
3-Pin TTL Serial TTL_THRU to TTL_IN Connection
3 Pin
TTL_THRU Connector
3 Pin
TTL_IN Connector
Transmit Data 1
1 Receive Data
Signal Ground 2
2 Signal Ground
Receive Data 3
3 Transmit Data
18
User's Manual
5.3 ServoCenter 4.1 Circuit Schematic
19
User's Manual
User Notes:
20