1
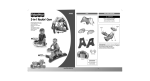
BM-157 USER MANUAL Transmitter 1 SENSITIVITY CH A NNEL 3 5 6 OFF C H1 CH 2 2 7 4 8 1 Soft Antenna 2 Sensitivity Control 3 5 Belt Clip 6 Hanging Hook 7 Power Control / CHANNEL Switch: OFF/ CH1/CH2 Battery Compartment 4 Microphone 8 AC/DC Power Supply Socket 4 Speaker 8 AC/DC Power Supply Socket Receiver CH A NNEL 3 5 6 OFF CH1 CH2 2 VOL UM E 1 7 4 8 1 Soft Antenna 2 Volume Control 3 5 Belt Clip 6 Hanging Hook 7 Power Control / CHANNEL Switch: OFF/ CH1/CH2 Battery Compartment 1. Main LCD Screen Out of range alarm icon Channel:CH01/CH02 “Baby sleeping”icon (energy saving mode) Battery icon Full battery level Low battery level, reminds you to change the batteries Empty and flashing, batteries change is a must “Baby calling”icon: constantly changing display-readouts 2. AC Adaptor The AC Adaptors are low voltage power source that allow you to use your household electricity to run the Baby Monitor. Connect the AC Adaptors to the AC Adaptor Jack in the Parents and Baby Unit. Both plug into any standard volt electrical outlet in your home. It is recommended to turn off the units before plug in or unplug the adaptors. CAUTION: These adaptors were made with a specific design for this product. They cannot be used with any other appliance. Never use a different type of adaptor with Baby Monitor. This product cannot replace responsible adult supervision. This Baby Monitor is intended as an aid. Do not use it as a medical monitor or a substitute for responsible and proper adult supervision. Make sure the Receiver and adaptor cable are always out of child's reach. Do not place the Receiver inside the baby's crib or playpen! The antenna on the Units are fixed, do not try to extend them. Never attempt to modify the product. Avoid using the product near water and expose to rain or moisture. 3. Receiver & Transmitter Battery Installation Locate the battery compartment door on the back of the Units. Open the battery compartment door. Insert 3 * AAA batteries into the Receiver and the Transmitter according to the +/- signs shown in the battery compartment, respectively. Replace battery compartment doors. 4. Battery Tips If the product is not in use for a long time, disconnect both units from the household electrical outlet. And remove the batteries or the exhausted batteries from the units, otherwise battery leakage and corrosion can damage them. Dispose the batteries safely. Non-rechargeable battery is not to be recharged Rechargeable batteries are only to be charged under adult supervision. CAUTION: Danger of explosion if battery is incorrectly replaced. Replace only with the batteries of the same and equivalent type. 5. Transmitter & Receiver Battery Charging If the battery level becomes low, in both LCD displays the empty battery icon, the battery icon and the out of range alarm icon flash, in order to warn you about The low battery level. The receiver also emits a warning tone (BI, BI) continually. 6. Charging the batteries Please charge the rechargeable batteries first time usage. The rechargeable batteries to the transmitter and receiver must not be taken out of the units for charging. The battery icon loops and flashes while charging. It stops flashing when the batteries are fully charged. 7. Charging the transmitter and receiver Connect the power supply unit to the thin plug on the 6V-socket of the unit. Once the power supply unit is connected to the unit, charging automatically begins. The charging time for completely charging empty battery takes 9 hours when the unit is turned off. 8. Remarks Use only the DC adaptors which are included in the package. Plug into any nearby standard household electrical outlet. And connect them with the units. Supply Power: DC 6V 9. Note User can also install 3 alkaline A A A batteries instead of the supplied rechargeable batteries. Or directly operated by the supplied adaptors. 10. Help protect the environment Batteries bearing one of the symbols shown opposite must not be disposed of in normal domestic waste. Instead take them to a collecting point for old batteries or special waste products (as your local authority for details) or return them to the dealer you bought them from. He will ensure they are disposed of safely. 11. Testing Before First Time Usage Test the Transmitter emission and the Receiver reception. Pb Cd Hg Place Transmitter and Receiver in room where you intend to use it. Set both Transmitter and Receiver to the same channel (01 or 02) by switching the OFF/CH1/CH2 channel switch. Selected channel will be shown on the top right corner of the LCD screen. NOTE: It is important that with both units the switch settings are the same because if this is not the case the transmitter and the receiver will not be able to connect to one another. 12. Transmitter emission By using the SENSITIVITY knob you can turn in the sensitivity of the transmitter individually, according to your wishes. As soon as the transmitter transmits a signal the “Baby calling ” icon will be flashed on the LCD screen. During the entire transmission the LCD backlight is activated. If the transmitter hears hardly any noise, it automatically switches to the energy saving mode. “Baby sleeping” icon shown on the LCD screen and the LCD backlight will automatically be turned off. 13. Receiver reception By turning the volume knob from right side the receiver will be turned on. After turning it on the LCD display is activated and indicates you that the unit is ready for operation. The channel being used will be displayed in the top right of the LCD screen. By turning the volume more you can adjust is as you wish. If the unit receives a signal, the LCD backlight lights up automatically during the entire transmission and the “Baby calling” icon flashes. A few seconds after the unit receives no more signals, the receiver is automatically switched to energy saving mode. The “Baby sleeping” icon will be shown and the LCD backlight will automatically turned off. 14. Set Up & Use IMPORTANT! Test sound reception before use and whenever location of transmitter is changed. (Refer to Testing Before First Time Usage) Transmitter detects sound levels within a range of 1 to 2 meters (3 to 6.5 feet) for NORM setting. Place transmitter in the same room with child. Point microphone directly toward child location, such as crib or playing area. Set both Receiver and Transmitter to the same channel (01 or 02) . Push transmitter SENSITIVITY switch to a desired position. Adjust different detecting sound level sensitivity by switching the SENSITIVITY switch. The receiver will go to energy saving mode and “Baby sleeping” icon shown when it doesn't detect sound from the surrounding area. Place receiver where you stay and hear it. Set the receiver to the same channel. Rotate VOLUME knob to adjust volume. Turning off by slide the OFF/CH1/CH2 switch to “OFF” position. 15. Note Position the Transmitter at least 1 meter away from the baby for optimum sound transmission.Unwrap and fully extend power cord for best transmission if adaptor is used. Plug the adaptor into the nearest standard household electrical outlet. 16. Out of Range alarm and Range controls If the receiver is out of the range of the transmitter, it will be signaled to you by a flashing visual range alarm icon shown on the receiver. In addition the range alarm sound “BI BI” from Receiver will be heard continuously. The out of range alarm will be still heard after the connection with the transmitter is broken. Furthermore, the visual and audible range alarm of the receiver is set off if : The connection between transmitter and receiver is broken, such as the transmitter is turned off. The transmitter is turned into a different channel to that of the receiver. The transmitter or receiver is working with a charger with low batteries. 17. Backlight LCD display When Power on / Out of range / Low battery level / Baby calling (i.e. a sound is sent and received), the backlight of the transmitter as well as the receiver will automatically turned on. Once no more signals are sent and received, the backlight is automatically turned off. 18. Belt Clip The transmitter and receiver can both be carried around using the belt clip provided on the rear of each unit. 19. Trouble Shooting Problems Solutions No power. Unit is not turned on. Push the Unit OFF/CH1/CH2 switch to CHI or CH2 position Check if the batteries are installed properly. Make sure the adaptor is connected to the Unit properly if using the adaptor instead of batteries. The Unit may be battery low, change for new batteries. Message not Transmitted. Sound sensitivity level of Transmitter is too low, Turn the Sound Sensitivity level proper position. Units are out of range or lost connection. Move Receiver closer to Transmitter. Ensure both units are in the same channel. Transmitter and Receiver do not show image. Power is turn off. Turn on both Units. Check if both units are in the same channel. Reposition or replace batteries. Hearing static or rustle from Receiver. The Receiver is too near to the transmitter and its volume is high . Increase the distance between the Transmitter and receiver. Reposition or replace batteries. 20. Technical Specifications Power Supply Voltage: Transmitter: 3 AAA rechargeable batteries / alkaline batteries & adaptor : AC 100-240V – DC 6V Receiver : 3 AAA rechargeable batteries / alkaline batteries & adaptor : AC 100-240V – DC 6V Channel : 2 Channels Operation Frequency : Ch1: 864.875 MHZ Ch2: 864.925 MHZ Operating Range: up to 800 metre in ideal conditions Set includes: 1 baby unit, 1 parent unit, 3x AAA rechargeable batteries (for mother unit), 2 adaptors.