1
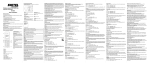
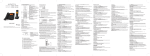
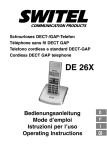
Basic Base station Telephone jack requirements To use this phone, you need a RJ11C type modular telephone jack, which might look like the one pictured here, installed in your home. If you do not have a modular jack, call your local phone company to find out how to have one installed. CAUTION: 1.Use only the power adapter that came with this unit. Using other power adapters may damage the unit. 2.To prevent fire or electrical shock hazard, do not expose this product to rain or moisture. A Cordless DECT/GAP telephone DC59x Operating Instructions Unpacking your phone In the box you will find: - the cordless handset (two handsets with a Twin system, three with a Triple system and four with a Quad system). - the base unit - two rechargeable battery cells for each handset. - a battery compartment cover for each handset. - a telephone line cable for the base unit. - a mains power adapter for the base unit. - charger pods, each with an power adapter, for multihandset system. - an operating instruction ** Keep your sales receipt as it is your guarantee. B A PAGE Button - Press to page all system handsets LCD display items - Displays when the telephone base is within reception range. - Flashes when the telephone base is out of range - Displays when there is a new voice mail message. Available only if you have subscribed to voice mail service from your telephone service provider.) Charging batteries for the first time Before you start to use your telephone make sure that all batteries are fully charged for 16 hours. - Displays when there are new calls Important note: This telephone is not designed for Emergency calls when the mains power fails. For Emergency calls you should have a basic phone that operates without mains power, connected to your line so that you can make calls during a power failure. - Speakerphone is in use Phone Function Keys - Energy saving mode is activated E TALK / SPEAKER - Make or accept a call A F DELETE / INTERCOM - Press to delete the last number or letter entered. - Press to initiate an intercom call or transfer a call. G */ TONE/KEYLOCK Button - Long press to activate or deactivate key lock B C D E F H I J K H MENU/OK/MUTE Button - Press to show menu. - Press to select an item, or to save an entry or setting. - Press to mute a call, press again to resume conversation. I END Button - During a call, press to hang up. - During programming, press to cancel and exit without making changes. - Press and hold to turn the handset on or off. J PHONEBOOK Button - Press to access the phonebook. G A Earpeace B LC Display C R Button - Flash the line D Navigation Button - Up to increase volume or view the Call log - Down to decrease volume. K REDIAL Button - Press to review redial list. L L #/PAUSE/RINGER OFF Button - Press and hold to turn the ringer off. - Press and hold to add a dialing pause when dialing or entering numbers into phonebook. B DND (Do Not Disturb) - Press to turn DND mode on or off - Scrolls to indicate battery charging when handset is in the telephone base or charger. - Flashes and empty when battery level is low - Displays when the ringer is turned off - Displays when the alarm is set. Introduction CAUTION: When using telephone equipment, there are basic safety instructions that should always be followed. Refer to the Important safety instructions section in this user's guide for more information. IMPORTANT: Since cordless phones operate on electricity, you are suggested to have at least one phone in your home that is not cordless, in case of power outage. Important Installation Guidelines Avoid sources of noise and heat, such as motors, fluorescent lighting, microwave ovens, heating appliances and direct sunlight. Avoid areas of excessive dust, moisture and low temperature. Avoid other cordless telephones or personal computers. Never install telephone wiring during a lightning storm. Never install telephone jacks in wet locations unless the jack is specifically designed for wet locations. Never touch non-insulated telephone wires or terminals, unless the telephone line has been disconnected at the network interface. Use caution when installing or modifying telephone lines. Telephone base and charger installation 1.Plug the smaller end of the power adapter into the power jack at the bottom of the telephone base. 2.Plug one end of the telephone line into the jack at the bottom of the telephone base. 3.Plug the other end of the telephone line into a telephone wall jack. 4.Plug the larger end of the power adapter into an electrical outlet not controlled by a wall switch.If you have DSL high speed Internet service, a DSL filter is required (not included). Contact your DSL service provider for more information about DSL filter. CAUTION: Use only the power adaptor that came with this unit. (Telephone base:TENPAO-S003IV0600050 or ESL-IA5060G(6Vdc/500mA), charger: TENPAO-S003IV0600015 or ESL-IA1560G(6Vdc/150mA). Using other power adapters may damage the unit. Contact your local distributor if you need to order replacement for the power adapters. Your phone's base station is supplied with an energy-efficient switching power supply (Input 100~240 VAC, Output 6 VDC, 500 mA). The adaptor input power without load is approx. 0.11 W. The average efficiency is approx. 72 %. The electrical consumption of the base is: - in operation mode (idle/call): approx. 0.5 / 0.65 W - during charging of the handset: approx. 0.53 W The charging station(s) supplied with a telephone set is (are) equipped with an energy-efficient switching power supply (Input 100~240 VAC, Output 6 VDC, 150 mA). The zero load is approx. 0.14 W. The average efficiency is approx. 69.14 %. The charging station has the following power consumption levels: - without a handset: Approx. 0.14 W - while charging the handset: Approx. 0.66 W Battery installation For optimum battery performance, charge the battery for 16 hours before first use. 1.Make sure the battery compartment cover is not attached with the handset. 2.Insert the AAA rechargeable batteries in the battery compartment, matching the +/polarity markings. 3.Align the cover against the battery compartment and slide it upwards until it clicks into place. 4.Charge the handset by placing it in the telephone base or charger. The light on the handset is on when charging. CAUTION: 1.To reduce the risk of fire or personal injury, use only the model (HIGHPOWER - HRF AAA400 or SANIK- SN AAA40H, 400mA 1.2V Ni-MH) which is compatible with this unit. 2. If the handset will not be used for an extended period of time, unplug the batteries and remove them from the handset to prevent possible leakage. Battery safety - CAUTION ONLY use the rechargeable batteries supplied with the handset. DO NOT use non-rechargeable batteries - they may explode and cause damage to your telephone. ECO Mode Both in Call mode as well as in Standby mode, the radiation is reduced considerably as compared to standard, cordless DECT telephones. Advanced settings Dialing mode To change the dialing mode: 1.. 2./: ADV SETTING -> . 3./: DIAL MODE -> . 4./: Select the desired setting -> . Reset This feature allows you to restore all system settings, except the answering system messages and phonebook, to default settings. This feature could be useful, for example, if you have forgotten the security code to access the answering system remotely. 1.. 2./: ADV SETTING -> . 3./: RESET -> . 4.. NOTE: All settings under the BLOCK LIST, PROGRAM DND, CLOCK & ALARM, SETTINGS, HANDSET TONES and ADV SETTING menus in the handset will be restored to default settings, the redial list and call log will also be cleared. Recall time This setting allows you to choose between SHORT, MEDIUM or LONG to accommodate the setting of your telephone service provider for using customer calling service, such as call waiting. To change the recall time: 1.. 2./: ADV SETTING -> . 3./: RECALL TIME -> . 4./: Select the desired setting -> . Registering a handset The telephone system can support up to a total of 5 cordless handsets. Handsets that were included with your main base are pre-registered. To add or re-register a handset: 1.Press and hold on the base for 5 seconds until a beep sounds. 2. when handset displays REGISTER YOUR HANDSET. 3.Enter the PIN (default: 0000) -> . A beep sounds on the handset when the registration is successful. NOTES: 1.An error tone will sound if the registration is not successful. Deregistering a handset 1.. 2./: ADV SETTING -> . 3./: DEREGISTER -> . 4.Enter the PIN (default: 0000) -> . 5./: select the desired handset -> . Handset options Ringer volume You can set the handset ringer volume from level 1 to level 5 or turn the ringer off. 1.. 2./: HANDSET TONES -> . 3./: RING VOLUME -> . 4./: select the desired setting -> . NOTE: Press and hold the key to switch the ringer between on and off when the handset is in idle mode. The icon displays on the screen when ringer off feature is activated. Ringer melody You can select from 10 ringer tones. 1.. 2./: HANDSET TONES -> . 3./: RING MELODY -> . 4./: select the desired setting -> . Key tone The handset can be programmed to emit a tone with each key press. To change the key tone setting: 1.. 2./: HANDSET TONES -> . 3./: KEY BEEP -> . 4./: ON or OFF -> . Display language To change the display language: 1.. 2./: SETTINGS -> . 3./: LANGUAGE -> . 4./: select the desired setting -> . To delete all entries 1.. 2./: BLOCK LIST -> . 3./: select any entry -> . 4./: DELETE ALL -> twice to confirm. Telephone operation Do not disturb When DO NOT DISTURB (DND) mode is activated, all incoming calls will be silent. This feature only silences the ringer, the incoming number, if you have subscribed to the caller ID service from your telephone service provider, will be recorded in the caller ID history as normal. Predial a call 1.Dial the phone number using the dial pad keys. If you make an error while dialing, you can press to erase the last digit entered. 2.Press . Global DND When global DND is activated, all system handsets and the telephone base will be silent when there is an incoming call. Press the DND button on the telephone base to turn this feature on or off. Handset DND You can program individual handset to silence during predetermined time frames. This setting is independent to each handset and only silences the ringer of the handset programmed.To program the DND time for individual handset 1.. 2./: PROGRAM DND -> . 3./: select the desired option -> . ONE TIME: The telephone silences once during the set time. DAILY: The telephone silences daily during the set time. OFF: Turn DND off (settings completed). 4.Enter the desired start time. select . 5.Enter the desired stop time. select . NOTES: When global DND is turned on, individual handset will continue to be in DND mode even after the set DND time on the handset ends. Clock and alarm Equalizer This feature allows you to change the balance of the audio of the handset to best suit your hearing. 1.. 2./: SETTINGS -> . 3./: EQUALIZER -> . 4./: select from NATURAL, BASS or TREBLE. 5.. Date and time You can set the date and time of the telephone system as follows. 1.. 2./: CLOCK & ALARM -> . 3. again: SET DATE/TIME. 4.Enter the current month, day and year. 5.. 6.Enter the current hour and minute. / select AM or PM -> . Energy save This feature enables the handset to operate in energy saving mode. With this feature turned on, the handset will automatically turn the handset backlight off. 1.. 2./: SETTINGS -> . 3./: ENERGY SAVE -> . 4./: ON or OFF -> . NOTE: When ENERGY SAVE is turned on, the icon shows on the handset screen. Time format The display format of time can either be selected as 12 hour or 24 hour. To change your setting: 1.. 2./: CLOCK & ALARM -> . 3./: SET FORMAT -> . 4. again -> TIME FORMAT. 5./: select the desired setting (12 HOURS or 24 HOURS) -> . Block list You can program telephone numbers into the block list so that the telephone silences when a call is received from one of the blocked numbers. The handset shows BLOCK LIST when the programmed numbers call and will not record the number in the caller ID history. Date format The display format of date can either be selected as Month/Day or Day/Month. To change your setting: 1.. 2./: CLOCK & ALARM -> . 3./: SET FORMAT -> . 4./: DATE FORMAT -> . 5./: select the desired setting (MM/DD or DD/MM) -> . To add a new entry 1.. 2./: BLOCK LIST -> . 3. again -> ADD NEW. 4.Enter the desired number -> . To view the list 1.. 2./: BLOCK LIST -> . 3./ to browse through the block list. To edit an entry 1.. 2./: BLOCK LIST -> . 3./: select the desired entry -> . 4./: EDIT CONTACT -> twice. 5.Edit the number by using the key to erase and backspace, then enter new numbers using the dial pad keys and press . To delete an entry 1.. 2./: BLOCK LIST -> . 3./: select the desired entry -> . 4./: DELETE ENTRY -> 3 times to confirm. Alarm The alarm can be programmed to sound once or daily for one minute. The alarm setting is independent to each handset. 1.. 2./: CLOCK & ALARM -> . 3./: ALARM -> . 4./: select the desired alarm option -> . OFF: Turn alarm off (settings completed). ONCE: The alarm sounds once at the set time. DAILY: The alarm sounds daily at the set time. 5.Enter the desired hour and minute -> / select AM or PM. 6.. Alarm tone You can select from 3 alarm melodies. 1.. 2./: CLOCK & ALARM -> . 3./: ALARM TONE -> . 4./: select the desired alarm tone -> . Make a call 1.Press . 2.Dial the phone number after you hear the dial tone. Answer a call Press to answer an incoming call. When there is an incoming call, the screen and dial pad backlight will be on. NOTE: The screen shows the elapsed time as you talk (in hours, minutes and seconds). End a call Press or place the handset in the telephone base or charger to end a call. Speakerphone Anytime during a call, press to switch between speakerphone and normal handset use. When the speakerphone is active, the handset screen shows . NOTE: Using the speakerphone will drain the battery faster than the normal handset use. Volume control You can adjust the volume of the handset or speakerphone anytime during a call. On the handset, press to increase or to decrease the volume. NOTE: Only the listening volume can be adjusted. Make a call using the redial memory The last ten telephone numbers previously dialed are stored in the redial list (up to 24 digits each). 1.Press redial. 2./: select the desired phone number -> to dial. Save a number from the redial list to the phonebook 1.Redial. 2./: select the desired phone number -> . 3./: SAVE NUMBER -> . 4.Enter the name by using the dial pad and then press . 5.Edit the number by using the dial pad if necessary, and then press . Delete number from the redial list 1.Redial. 2./: select the desired phone number -> . 3./: DELETE -> twice to delete the selected number. -OR/: DELETE ALL -> twice to delete all numbers. Mute The mute function allows you to turn off the microphone while on a call. You can hear the other party but the other party cannot hear you. 1.Press during a call. 2.Press again to resume conversation. NOTE: The screen shows MUTE ON when mute feature is activated. Call waiting or call waiting with caller ID service To use call waiting, you must subscribe to call waiting service from your telephone service provider. This feature allows you to receive calls while you are already talking on the phone. You will hear a call waiting alert tone when there is a second incoming call. If you subscribe to both caller ID and call waiting with caller ID services, the second caller's information is displayed after you hear the call waiting alert tone. 1.Press flash to answer the second incoming call. 2.Press flash to switch between calls. Voice mail service The icon flashes on the screen when you have received a new voice mail message from your service provider. IMPORTANT: Voice mail service is different from the answering system. In order to use the voice mail service, you must subscribe to it from your telephone service provider. Using multiple handsets The system allows a maximum of two handsets to have a conversation with an outside call at a time. If a handset is already on a call and you would like to join the call, press on another handset. The call will not be terminated until all handsets hang up. Handset page You can locate a misplaced handset by paging it. 1.Press on the telephone base. All registered handsets beep for one minute. 2.Press on the telephone base or press on any handset to stop paging. Intercom (only applicable for models with multiple handsets) The system allows an intercom call between two handsets registered to the same telephone base. To initiate an intercom call: 1.Press . If your telephone system has only two handsets registered, the intercom call will be automatically directed to the other system handset. If your telephone system has more than two handsets registered, enter the handset number you want to call by using the dial pad 1-5. 2.Press to answer the intercom call on the other handset. 3.To end the intercom call, press . NOTES: 1)The intercom call can be canceled before it is answered by pressing or on the originating handset. 2)If the handset being called does not answer within one minute, the paging will be canceled. To answer an incoming call during intercom You will hear an alert tone when you receive an incoming call during intercom. Press to answer the incoming call and end the intercom. Press to answer the incoming call and put the intercom on hold. Press and hold to switch between intercom and the incoming call. Press and hold to conference with both the incoming call and the intercom. To initiate an intercom during a call You can intercom with another system handset during a call, or invite another system handset to join. 1.Press during a call. If your telephone system has only two handsets registered, the intercom call will be automatically directed to the other system handset. If your telephone system has more than two handsets registered, you will need to enter the handset number you want to intercom to by using the dial pad 1-5. The call is placed on hold while the intercom is established with the other handset. 2.Press to answer the intercom on the other handset. NOTE: The intercom call can be canceled before it is answered by pressing on the originating handset. 3.You can choose from one of the following options for this intercom call. Press and hold to connect both handsets to the call. Press on the originating handset to alternate between the intercom and the call. Press on either handset to terminate the intercom on that handset. The call will continue on the other handset. Push to talk (PTT) (only applicable for models with multiple handsets) You can directly broadcast messages to the speakerphone of any registered handset in the system. If your telephone system has more than two handsets: 1.Press / to select the handset you want to broadcast the message to, or select ALL HANDSET to broadcast to all handsets and then press . 2.PRESS AND HOLD [PTT] TO TALK shows on the screen when the connection is set between the initiating handset and the destination handset. 3.Press and hold the button on either handset to start the broadcast. NOTE: Connection set between handsets lasts for 30 minutes after it is established, or 30 minutes after the last broadcast. You will need to perform the above operation again if you want to initiate a PTT to another system handset or after the 30-minute time out. Phonebook Add a phonebook record 1.. 2./: PHONEBOOK -> . 3. -> ADD NEW. 4.Enter the name (max. 14 character). Press the key to the corresponding character to display the correct letter. See the character table for more information. 5.. 6.Enter the number (max. 20 digits). If you need a pause between digits, press and hold the until a P appears in the display. This will insert a 3-second pause in the dialing sequence. 7.. NOTES: 1.The phonebook is shared by all handsets. Changes made to the phonebook on any one handset apply to all. 2.The directory can store up to 100 entries with up to 20 digits for each telephone number and 14 characters for each name. Character table Use the dial pad and the chart below to enter a name (up to 14 characters). Each press of a particular key displays the character in the following order: Dial pad key Character by number of key presses 1 2 3 4 5 6 space 1 _ < > ? A B C 2 D E F 3 G H I 4 J K L 5 M N O 6 P Q R S T U V 8 W X Y Z 9 0 - / ||| # Save a number to the phonebook 1.. 2./: locate the desired record -> . 3.: COPY TO PHBK. 4.Enter the name by using the dial pad keys if necessary -> . 5.Edit the number by using the dial pad keys if necessary -> . Delete caller ID record 1.. 2./: locate the desired record -> . 3./: DELETE to delete the selected record -> twice. -OR/: DELETE ALL to delete all records -> twice. 7 Troubleshooting guide + NOTE: Press to correct an error. To view/call a phonebook record Records are stored alphabetically in the phone book. To search the phonebook: 1.. NOTE: You can also access the phonebook by pressing and selecting PHONEBOOK. 2./. 3. to call the displayed entry. To search a phonebook entry alphabetically 1.. 2.Press / to scroll to any entry. 3.Press the dial pad key (0-9) that corresponds to the first letter of the entry you are looking for. The closest match in alphabetical order will appear. You can then press / to view the next entry. 4. to view the phone number. -OR to call the displayed entry. Chain dialing This feature allows you to initiate a dialing sequence from numbers stored in the phonebook while you are on a call. This feature is useful if you wish to access another numbers (such as bank account information or access code) from the phonebook. To access a number in the phonebook while on a call: 1.. 2./ to locate the desired entry. 3. to dial the number. Edit a phonebook entry 1.. 2./: locate a desired entry -> . 3./: EDIT CONTACT -> twice. 4.Edit the name by using the key to erase and backspace, then enter new characters using the dial pad keys and press . 5.Edit the number by using the key to erase and backspace, then enter new numbers using the dial pad keys and press . Delete a phonebook entry 1.. 2./: locate the desired entry -> . 3./: DELETE ENTRY. 4. 3 times to confirm. Delete all phonebook entries 1. 2./: select any entry -> 2./: DELETE ALL. 3. twice to confirm. Caller ID Using Caller ID service IMPORTANT: To use the Caller-ID capabilities of this telephone system, you must subscribe to Caller-ID services from your service provider. Check with your telephone service provider for details. Your telephone stores caller ID memory for the 40 most recent calls. Each entry holds up to 20 digits for the telephone number and 14 characters for the name. Review/call from the call log As calls are received and stored, the display is updated to let you know new calls have been received. To scroll through the caller ID records: 1.. 2. to view from the most recent calls, or to view the oldest calls. 3.When the desired record is displayed, press to call. If your telephone system is not operating properly, first try this general reset procedures: 1.Unplug all power adapters from the power outlets. 2.Disconnect the telephone line cord from the base or modular jack. 3.Remove the battery compartment covers and unplug all handset battery packs. 4.After a few minutes, re-install all handset battery packs, making sure that the connectors are snug and the wires are not pinched before replacing all battery compartment covers. 5.Plug the power adapters for the base and any chargers back into their power outlets. Be sure not to use outlets that are controlled by wall switches or timers. 6.Place all handsets in the telephone base or chargers to charge without interruption for at least 30 minutes before use. 7.Plug the line cord into the telephone base or modular jack and verify operation. General Product Care Avoid dropping the handset, as well as other rough treatment to the phone. Clean the phone only with a dry soft cloth. Never use cleaning agents, paint thinner, abrasive powder, alcohol, or other chemical products to clean the unit. Doing so will damage the unit. Retain the original packaging in case you need to ship the phone at a later date. Important Safety Instructions Some of the following information may not apply to your particular product; however, when using telephone equipment, basic safety precautions should always be followed to reduce the risk of fire, electric shock and injury to persons, including the following: 1.Read and understand all instructions. 2.Follow all warnings and instructions marked on the product. 3.Unplug this product from the wall outlet before cleaning. Do not use liquid cleaners or aerosol cleaners. Use a damp cloth for cleaning. 4.Telephones should not be used while you are in a bathtub, shower or pool. Immersion of the telephone or handset in water could cause an electrical shock. 5.Slots and openings in the cabinet back or bottom are provided for ventilation, to protect it from overheating. Do not block or cover these openings. Do not block the openings by placing the product on a bed, sofa, rug, or other similar surface. Do not place this product in a built-in installation unless proper ventilation is provided. 6.Only operate this product from the type of power source indicated on the marking label. If you are not sure of the type of power supply to your home, consult your dealer or local power company. 7.Plug the adapter into an easily accessible electrical outlet near the equipment. 8.Do not allow anything to rest on the power cord. Do not locate this product where the cord will be abused by persons walking on it. 9.Do not overload wall outlets and extension cords as this can result in the risk of fire or electric shock. 10. Never push objects of any kind into this product through cabinet slots as they may touch dangerous voltage points or short out parts that could result in a risk of fire or electric shock. 11. Never spill liquid of any kind on the product. 12.To reduce the risk of electric shock, do not disassemble this product. Opening or removing covers may expose you to dangerous voltages or other risks. Incorrect reassembly can cause electric shock when the appliance is subsequently used. 13. Do not expose the product to extreme temperatures such as areas near a hot radiator, stove or in a hot car. Do not place product upon other consumer electronic products such as; computer monitors, power amplifiers, etc. 14. Do not place lighted candles, cigarettes, cigars, etc., on or near the telephone. 15. Never touch uninsulated telephone wires or terminals unless the telephone line has been disconnected at the network interface. 16. Never install or modify telephone wiring during a lightning storm. 17. Never install jacks or telephones in wet locations. 18. Use caution when installing or modifying telephone lines to prevent electrical shock and/or fire. 19. Under the following conditions, unplug this product from the wall outlet and refer servicing to qualified service personnel: A.The power supply cord or plug is damaged or frayed. B.The product has been exposed to rain or water. C.The product does not operate normally by following the operating instructions. D.The product's cabinet has been damaged. E.The product exhibits a distinct change in performance. 20. Avoid using a telephone during an electrical-storm. There may be a remote risk of electric shock from lightning. 21. Do not use the telephone to report a gas leak in the vicinity of the leak. 22. Do not place this product on an unstable cart, stand, or table. The product may fall, causing serious damage to the product. 23. Only use attachments/accessories specified by the manufacturer. 24. Unplug this apparatus during lightning storms or when unused for long periods of time. IF YOUR PRODUCT UTILIZES BATTERIES, THE FOLLOWING ADDITIONAL PRECAUTIONS SHOULD BE OBSERVED: 1.Use only the type and size battery(ies) specified in the user's manual. 2.Do not use this product if the battery door is removed or missing. 3.Replace batteries that appear to be swollen or have damaged wiring. 4.Do not dispose of the battery(ies) in fire. They may explode. Check with local codes for possible special disposal instructions. 5.Do not open or mutilate the battery(ies). Released electrolyte is corrosive and may cause damage to the eyes or skin. It may be toxic if swallowed. 6.Exercise care in handling battery(ies) in order not to short out the battery(ies) with conducting materials such as rings, bracelets, and keys. The battery(ies) or conductor may overheat and cause burns. 7.Do not attempt to recharge the battery(ies) provided with or identified for use with this product that are not rechargeable. The battery(ies) may leak corrosive electrolyte or explode. 8.Do not attempt to rejuvenate the battery(ies) provided with or identified for use with this product by heating them. Sudden release of the battery(ies) electrolyte may occur causing burns or irritation to eyes or skin. 9.When replacing battery(ies), all batteries should be replaced at the same time. Mixing fresh and discharged batteries could increase internal cell pressure and rupture the discharged battery(ies). (Applies to products employing more than one separately replaceable primary battery.) 10. When inserting battery(ies) into this product, the proper polarity or direction must be observed. Reverse insertion of battery(ies) may result in leakage or explosion. 11. When inserting battery(ies) into this product, do not twist or pinch the wires or allow wires to become pinched in battery door. 12. If storing over 30 days, remove battery(ies) from this product because the battery(ies) could leak and damage the product. 13. Discard “dead” battery(ies) as soon as possible since “dead” batteries are more likely to leak in a product. 14. Do not store this product, or the battery(ies) provided with or identified for use with this product, in high-temperature areas. Batteries that are stored in a freezer or refrigerator for the purpose of extending shelf life should be protected from condensation during storage and defrosting. Batteries should be stabilized at room temperature prior to use after cold storage. 15. If your product uses rechargeable battery(ies), charge the battery(ies) only in accordance with the instructions and limitation specified in the user's guide. 16. Battery safety precautions Do not burn, disassemble, mutilate, or puncture. Like other batteries of this type, toxic materials could be released which might cause injury to persons or property damage. To reduce the risk of fire or personal injury, use only the supplied battery or replacement battery. Keep batteries out of the reach of children. Remove batteries if storing over 30 days. Use only the supplied rechargeable battery or replacement battery. In Case of Problems Service Hotline Should problems arise with the telephone, please refer to the following information first. In the case of technical problems, you can contact our hotline service, Tel. 0900 00 1675 within Switzerland (Swisscom fees at time of going to print: CHF 2.60/min). In the case of claims under the terms of guarantee, please contact your sales outlet. There is a 2 year period of guarantee. Guarantee Problems and solutions Problems Solutions No connection to base station possible - Check that the handset has been registered on the base station with the correct PIN code. The system no longer responds - Reset all the functions to their default settings. - Disconnect the power adapter plug briefly from the power socket. No telephone calls possible - The telephone is not connected properly or is defective. Only use the telephone connection cable supplied. - Test whether the telephone connection is in order by using another telephone. - The power adaptor plug is not plugged in or there is a complete power failure. - The rechargeable batteries are empty or defective. - The handset is too far from the base station. - The wrong dialling mode is set. Connection is disturbed or cut off - The handset is too far from the base station. - The base station is in an unsuitable location. The batteries are empty - The batteries are empty or defective. within a short time - Place the handset in the base station properly. Clean the contact surfaces on the handset and base station with a soft, dry cloth. - Place the handset in the base station for 16 hours. The caller number display (CLIP) does not function Declaration of Conformity This device fulfils the requirements stipulated in the EU directive: 1999/5/EC directive on radio equipment and telecommunications terminal equipment and the mutual recognition of their conformity. Conformity with the above mentioned directive is confirmed by the CE mark on the device.To view the complete Declaration of Conformity, please refer to the free download available on our web site at www.switel.com. - The caller number display (CLIP) is a supplementary service offered by your telephone network provider. Contact your network provider for further information. - The caller has suppressed the transmission of their phone number. SWITEL equipment is produced and tested according to the latest production methods. The implementation of carefully chosen materials and highly developed technologies ensure trouble-free functioning and a long service life. The terms of guarantee do not apply where the cause of equipment malfunction is the fault of the telephone network operator or any interposed private branch extension system. The terms of guarantee do not apply to the batteries or power packs used in the products. The period of guarantee is 24 months from the date of purchase.All deficiencies related to material or manufacturing errors within the period of guarantee will be redressed free of charge. Rights to claims under the terms of guarantee are annulled following tampering by the purchaser or third parties. Damage caused as the result of improper handling or operation, normal wear and tear, incorrect positioning or storage, improper connection or installation or Acts of God and other external influences are excluded from the terms of guarantee. In the case of complaints, we reserve the right to repair defect parts, replace them or replace the entire device. Replaced parts or devices become our property. Rights to compensation in the case of damage are excluded where there is no evidence of intent or gross negligence by the manufacturer.If your device does show signs of a defect within the period of guarantee, please contact the sales outlet where you purchased the SWITEL device, producing the purchase receipt as evidence. All claims under the terms of guarantee in accordance with this agreement can only be asserted at the sales outlet. No claims under the terms of guarantee can be asserted after a period of two years from the date of purchase and hand-over of the product. Disposal In order to dispose of your device, take it to a collection point provided by your local public waste authorities (e.g. recycling centre). According to laws on the disposal of electronic and electrical devices, owners are obliged to dispose of old electronic and electrical devices in a separate waste container. The symbol indicates that the device must not be disposed of in normal domestic waste! Batteries represent a hazard to health and the environment! Never open, damage or swallow batteries or allow them to pollute the environment. They may contain toxic, ecologically hazardous heavy metals. You are legally obliged to dispose of power packs and batteries at the point of sale or in the corresponding containers at collection points provided by local public waste authorities. Disposal is free of charge. The symbols indicate that the batteries must not be disposed of in normal domestic waste and that they must be brought to collection points provided by local public waste authorities. Packaging materials must be disposed of according to local regulations.