1
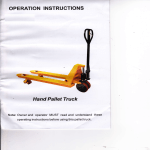
OPERATING INSTRUCTION HANDBOOK HAND PALLET TRUCK WARNING Do not use the truck before reading and understanding these operating instructions. NOTE: Please check the designation of your present type at the last page of this document as well as on the ID-plate. Keep for future reference. Version 12/2012 AC‐SMS‐003_EN 1 FOREWORD Before operating this hand pallet truck read this ORIGINAL INSTRUCTION HANDBOOK carefully and understand the usage of the hand pallet truck completely. Improper operation could create danger. This handbook describes the usage of different hand pallet trucks. When operating and servicing the hand pallet truck, make sure, that it applies to your type. Keep this handbook for future reference. If this or the warning/ caution labels are damaged or got lost, please contact your local dealer for replacement. Chapter 10 describes specialized stipulations and regulations for the American market. Also follow these instructions and stipulations if you operate the truck within the American market! Some described functions are optional and therefore not absolutely necessarily equipped with your truck. ATTENTION: Environmentally hazardous waste, such as batteries, oil and electronics, will have a negative effect on the environment, or health, if handled incorrectly. The waste packages should be sorted and put into solid dustbins according to the materials and be collected disposal by local special environment protection bureau. To avoid pollution, it’s forbidden to throw away the waste randomly. To avoid pollution during the use of the products, the user should prepare some absorbable materials (scraps of wooden or dry duster cloth) to absorb leaking oil in time. To avoid second pollution to the environment, the used absorbable materials should be handed in to special departments in terms of local authorities. Our products are subject to ongoing developments. Because this handbook is only for the purpose of operating /servicing the hand pallet truck, therefore please have understanding, that there is no guarantee out of particular features out of this handbook. NOTE: On this manual, the left sign means warning and danger, which can lead to death or serious injury if not followed. Copyright The copyright remains with the company, mentioned on the CE- certificate at the end of this document. 2 3 TABLE OF CONTENTS 1. 2. 3. 4. CORRECT APPLICATION ............................................................................................5 DESCRIPTION OF THE HAND PALLET TRUCK .........................................................5 a. Main components.......................................................................................................5 b. Main technical data ....................................................................................................6 c. Description of the safety devices and warning labels.................................................8 d. Identification plate ......................................................................................................8 WARNINGS AND SAFETY INSTRUCTIONS................................................................9 COMMISSIONING, TRANSPORTING, STORAGE/ REASSEMBLING .........................9 a. Commissioning – Tiller assembling............................................................................9 b. Hydraulic valve adjustment ......................................................................................10 c. Foot brake (Optional for some models)....................................................................11 d. Progressive- drive- and parking brake (optional for some models) ..........................11 e. Transporting .............................................................................................................11 f. 5. 6. Storage/ Reassembling............................................................................................11 DAILY INSPECTION ...................................................................................................12 OPERATING INSTRUCTIONS....................................................................................12 a. Parking .....................................................................................................................12 b. Lifting .......................................................................................................................12 7. c. Lowering ..................................................................................................................13 d. Moving .....................................................................................................................13 e. Parking-/ Footbrake (optional for some models) ......................................................13 f. Progressive drive- and parking brake (optional for some models) ...........................13 g. Quick Lift (optional for some models).......................................................................13 h. Malfunctions .............................................................................................................14 REGULAR MAINTENANCE........................................................................................14 a. Maintenance.............................................................................................................14 b. Deaeration of the hydraulic system ..........................................................................15 c. Adding hydraulic oil to the pump reservoir ...............................................................15 8. 9. 10. 11. TROUBLE SHOOTING ...............................................................................................15 HYDRAULIC CIRCUIT ................................................................................................16 SPECIALIZED STIPULATIONS FOR THE US- AMERICAN MARKET .......................16 DECLARATION OF CONFORMITY (valid, if sold within the EU) ................................18 4 1. CORRECT APPLICATION It is only allowed to use this hand pallet truck according to this instruction handbook. This truck is a manually operated hand pallet truck designed to lift and transport the rated load on industrial pallets. Do not lift or carry person and don’t use this truck for other purpose than its intended use. A wrong usage can cause human injuries or can damage equipment. The operator/ the operating company has to ensure the correct usage and has to ensure, that this truck is used only by staff, which is trained and authorized to use this truck. The truck has to be used on substantially firm, smooth, level and prepared surfaces. Driving with the load on slopes is not allowed. The load must be placed approximately on the longitudinal centre plane of the table and must be in satisfactory condition. The capacity is marked on the identification plate and depending on the version eventually additionally on the capacity sticker. The operator has to consider the warnings and safety instructions. The hand pallet truck is intended to be used for indoor applications with ambient temperatures between +5C and + 40C. Operating lighting must be minimum 50 Lux. Modification No modifications or alterations to this hand pallet truck which may affect, for example, capacity, stability or safety requirements of the truck, shall be made without the prior written approval of the original truck manufacturer, its authorized representative, or a successor thereof. This includes changes affecting, for example braking, steering, visibility and the addition of removable attachments. When the manufacturer or its successor approve a modification or alteration, they shall also make and approve appropriate changes to capacity plate, decals, tags and operation and maintenance handbooks. By not observing these instructions, the warranty becomes void. 2. DESCRIPTION OF THE HAND PALLET TRUCK a. Main components 7 1 9 (Optional for some models) 12 2 13 10 8 (optional for some models) 3 6 5 Fig.1: Overview 11 5 4 1 2 3 4 5 6 7 8 Chassis Tiller arm Hydraulic pump Lifting mechanism Steering(Front-) wheels Load wheels (single/ tandem) Lever (for MEGA on both sides) Parking-/ Footbrake (Option) 9 Progressive parking and drive brake, lever with drum brake(Optional) Identification plate (ID-plate) Company logo and/or capacity sticker Lifting function instruction sticker Eventually capacity sticker 10 11 12 13 b. Main technical data Fig. 2: Technical data Table 1: Main Technical data for standard version/ other version on request TYPE AC 20/ AC 25/ AC 30 MEGA 26 GIGA 26 DELTA 20 / 26 / 30 2.6 2.6 2.0 / 2.6 / 3.0 76 (PU) / 80 (N) 77 / 78 / 80 200x50 200x50 200x50 82x93 / 82x70 -/ 80x70 80x93 / 80x70 2/2, 2/4 2/2, 2/4 2/4 2/2, 2/4 Load capacity Q(t) 2.0 / 2.5 / 3.0 Service weight kg 68 / 80 / 90 Tyre size, front mm 200x50 180x50 Tyre size, rear (single / tandem) mm 80x93 /80x70 74x93 /74x70 Wheels nr. front, rear 76 76 78 Lift h3(mm) 115 115 115 115 Height of tiller (max.) h14(mm) 1230 1228 1240 1230 Height, lowered h13(mm) 85 85 85 Overall length L1(mm) 1540 1540 50/160/1150 50/160/1150 540, 685 450, 520, 540, 685 Fork dimensions Distance betw. forks 85 75 1540 1562 1) s/e/L(mm) 50/160/1150 b5(mm) 450, 520, 540, 685 53/160/1150 520 540 2) 685 3) ACF TYPE ACF 20L 20H Load capacity Q(t) Service weight kg 63 mm 200x5 Tire size, front Tire size, rear (single / tandem) ACL 20 2.0 80x93 / 80x70 Wheels nr. front, rear ACL 35 2.0 70 0 mm ACE 20 3.5 1.5 1.0 84 87 99 122 235 180x50 200x50 180x50 200x50 180x50 160x50 74x93 / 74x70 82x93 / 82x70 74x93 / 74x70 80x93 / 80x70 50x93 / 50x70 - / 34x58 2/2, 2/4 2/2, 2/4 2/2, 2/4 2/2, 2/4 2/4 114 55 Lift h3(mm) 115 115 115 Height of tiller (max.) h14(mm) 1230 1260 1260 Height, lowered h13(mm) Overall length L1(mm) Fork dimensions Distance betw. forks AC-LOW 85 75 85 1540 75 1540 4) s/e/L(mm) 50/160/1150 b5(mm) 450,520,540,685 85 2190 50/160/1150 5) 60/160/1800 838,850,1000 1230 60/160/1800 540/685 AC20 AC20 AC20 R500 R700 R1000 R1500 540, 685 AC-TWO Load capacity Q(t) 2.0 Reel Diameter mm Service weight kg Tire size, front mm 200x50 Tire size, rear (single / tandem) mm 80x93 / 80x70 78x70 / 65x60 2/2, 2/4 2/2, 2/4 600800 144 8001200 149 Wheels nr. front, rear 7) 1540 1510 37/160/1150 30/160/1120 540,685,838 630, 685 ACZ AC20 400600 35 2190 6) ACR TYPE 51 168 ACZ20H ACS ACZ20L ACS20H ACS20L 1.5 2.0 2.0 12001600 - - - 190 76 75 83 200x50 200x50 180x50 200x50 180x50 80x93 / 80x70 74x93 / 74x70 80x93 / 80x70 74x93 / 74x70 8) 2/2, 2/4 2/2, 2/4 Lift h3(mm) 115 85, 125 115 115 Height of tiller (max.) h14(mm) 1233 1233 1230 1230 Height, lowered h13(mm) Overall length L1(mm) Fork dimensions Distance betw. forks 175 200 187 85 1250,1350,1450,1550,1600,1670 s/e/L(mm) b5(mm) 175 - / - / 800,900,1000,1100,1150,1220 760 850 1000 1540 50/160/1150 1150 The noise level is less than 70dB. 1) L= 800/ 900/ 1000/1100/ 1220 mm optional 2) L= 800/ 1000/ 1220 mm optional 3) L= 800/ 900/ 1000/ 1100/1220 optional ; DELTA 30: s= 60 mm 4) L= 800/ 900/ 1000/ 1100/ 1220 mm optional 5) L= 800/ 900/ 1000/ 1100/ 1220/ 1500/ 1800/ 2000/ 2500/ 3000 mm optional 6) L= 800/ 900/ 1000/ 1150/ 1220/ 1500/ 2000/ 2500/ 3000 mm optional 7) L= 1500/ 2000 mm optional 8) Lift for normal transportation: 85mm, for traverse transportation 85 – 125mm 9) L= 1100/ 1220 mm optional 10) L= 1000/ 1100/ 1220 mm optional 7 85 540, 685 75 1540 9) 60/160/1150 85 75 1540 9) 520, 540, 685 60/160/1150 10) 520, 540, 685 c. Description of the safety devices and warning labels (8 / optional for some models) (9 /optional for some models) Fig. 3: Safety- and warning labels A Operating instruction sticker B Sticker to read this instruction C Identification plate (ID- plate) D Capacity sticker (both sides/ sample, for illustration only, capacity might be different for your type) E Sign warning stay clear stop truck (only US- market, chapter 10 describes further information) F Sign prohibited use (only US- market, chapter 10 describes further information) (8) Parking-/ Footbrake (Option) (9) Progressive parking and drive brake, lever with drum brake (Optional) The safety and warning labels should be placed according to figure 3. The advices on the truck are additional to this handbook. Please follow the operating instructions. If the decals are damaged or missing, please replace them. Your truck might be optional equipped with a parking brake or with a progressive parking and drive brake. How to use this kind of brakes is described in chapter 6. d. Identification plate 1 2 3 4 5 6 7 8 1 Designation, type 2 Serial number Rated capacity 3 Eventually company logo Name and address of the manufacturer Net weight 4 Manufacturing date Option, Wheel combination, fork length, width over the forks 8 7 6 5 If sold to the EU, here the place of the CE marking Fig. 4: ID-Plate 8 3. WARNINGS AND SAFETY INSTRUCTIONS DO NOT Allow other person then the operator to stand in front of or behind the truck when it is moving or lifting/lowering. Overload the truck. Put foot in front of rolling wheel, Injury could result. Use the truck on a slope or inclined surface, the truck may become uncontrollable and create danger. Lift or carry people. People could fall down and suffer severe injury. Use truck with unstable, unbalanced loosely stacked load. Use the truck in explosive atmospheres. Watch difference in floor levels when moving the truck. Load could fall down or the truck could get uncontrollable. Keep watching the condition of load. Stop operating table if load becomes unstable. Practice maintenance work according to regular Inspection. This truck is not designed to be water resistant, therefore use it in dry atmospheres. 4. COMMISSIONING, TRANSPORTING, STORAGE/ REASSEMBLING a. Commissioning – Tiller assembling After receiving our new hand pallet truck you may have to do following before firstly operating the truck: Check if are all parts included and not damaged Do the work according to the daily inspections as well as functional checks. Eventually assemble the truck according to following instructions. The commissioning weight is approximately 10kg / six- pack higher than the product weight. Before assembling, please make sure, that the following supplied parts are included and not damaged: 1 pc axle with hole (4) 2 pc dowel pin (5) [one is already assembled with the axle] 1 pc pre- assembled tiller arm (1) 1 pc pre- assembled chassis with pump unit (6) 9 Fig.5 Tiller assembling (1.Tillerarm / 2.Pin / 3.Nut / 4.Axle with hole / 5.Dowel pin / 6.Chassis with pump unit) Note: The marked number on the tiller arm package and the chassis should be the same. When attaching the handle, you had better squat just in front of the pallet truck. a) Insert the tiller arm(1) into the pump piston, then use a hammer to Fig. 6: Axle assembling insert the axle with hole into the hydraulic pump and tiller arm from the right to the left (Fig. 6 ). b) Set the control lever of the handle to the ‘LOWER’ position, then pass the adjusting nut, adjusting bolt through the hole of the axle with your hand (Fig. 7). c) Press the tiller arm down; take away the pin (2, Fig. 5). d) Set the control lever of the handle to ‘RAISE’ position, then raise the lever plate with the pin (2, Fig. 5) and insert the adjusting bolt into the front slot of lever plate. Note: Keep the adjusting nut under the lever plate. e) Use a hammer to insert the 2nd dowel pin (5, Fig. 5) into the 2nd hole of the axle. The draw-bar is now assembled to the pump. Fig. 7: Side view b. Hydraulic valve adjustment On the tiller of your pallet truck, you will find the control lever, which can be regulated in three positions: Lower : handle up, the lever moves back to the neutral, when released Neutral: handle in center position Raise: handle down If necessary, you can adjust the lever according to following steps (Fig. 8): Lower Neutral Raise Fig. 8: Lever a) If the forks elevate while pumping in the Neutral position, turn the adjusting nut on the adjusting bolt clockwise until pumping action does not raise the forks and the Neutral position works properly. b) If the forks descend while pumping in the Neutral position, turn the adjusting nut counter-clockwise until the forks do not lower. c) If the forks do not descent when the control handle is in the Lower position, turn the adjusting nut clockwise until raising the control handle lowers the forks. Then check the Neutral position according to fig. 8 and be sure that the adjusting nut is in the proper position. d) If the forks do not elevate while pumping in the Raise position, turn the adjusting nut counter- clockwise until the forks elevate while pumping in the Raise position. Then check the Lower and Raise position. 10 c. Foot brake (Optional for some models) If the truck is ordered with a foot brake, please follow the next instructions. The foot brake might be already assembled with the truck. a) Remove the steering wheel (310). b) Put the Holding sleeve (341) in the under parts of pump body (322), and take off the parts from (310) one by one. Fasten the bolt (340) in the fixed hole. c) Install spring (342), brake plate (344), foot pedal (345) and (spring) washer (346) on the fixed seat (341) one by one. Then screw the locknut (347) on the fixed seat (341). d) Install the grease nipple (343). Fig.9 Footbrake d. Progressive- drive- and parking brake (optional for some models) If the truck is equipped with the progressive drive and parking brake, the braking lever as well as the bowden cable already assembled to the tiller arm. a) Turn the pump 90 degree to right side, then pass through the brake cable behind the thrust plate.(Fig.10) b) Put the head of the brake cable into the groove of the hinge pin. c) Then tug the brake cable, let the head of the outer sleeve of the cable into the hole of the holding pin. Fig.10: Progressive drive and parking brake e. Transporting For transporting, remove the load, lower the truck to the lowest position and lash it safe with dedicated lashing straps. f. Storage/ Reassembling For storage, remove the load, lower the truck to the lowest position, grease all in this handbook mentioned greasing points (regularly inspection) and eventually protect the truck against corrosion and dust. Jack the truck safety, so that there will be no flattening after storage. Reassemble the tiller in the opposite direction of the assembling. 11 5. DAILY INSPECTION This chapter describes pre-shift checks before putting the truck into operation. Daily inspection is effective to find the malfunction or fault on the truck and can maximize the lifetime. Check the truck on the following points before operation. Remove load from truck and lower the forks to the lowest position. DO NOT USE THE TRUCK IF ANY MALFUNCTION OR FAULT IS FOUND. Visually check for structural deformation or cracks of arms, forks, or any other component; and unusual noise or binding of the lifting mechanism. Check if there is any oil leakage. Check the vertical creep of the lifting mechanism. Check the smooth movement of the wheels. Check if there are any particles or damages on the wheels. Check if all the bolts and nuts are tightened firmly. If equipped, check the brake. Verify that all labels are in place. 6. OPERATING INSTRUCTIONS When operating the truck, the operator has to wear safety shoes. The truck is intended to be used for indoor applications with ambient temperatures between +5C and + 40C. The operating lighting must be minimum 50 Lux. It is not allowed to use the truck on angled surfaces. Never leave a loaded pallet truck unattended. a. Parking Lower the forks to the lowest position and park the Hand pallet truck on a smooth and even level ground where the truck not disturbs any other operations. If equipped with a brake use the brake for parking the truck acc. to the description further below. 60 0mm Q Fig.11: Load conditions b. Lifting Check that the load does not exceed the loading capacity of the pallet truck. Roll the pallet truck with its forks slowly under the pallet/load until the back end of the fork rests against the load (Fig.11). Shift the operating lever down to the Lifting position. Lift the load by up- and down movements of the tiller arm. The load must be evenly distributed across both forks. DO NOT OVERLOAD THE TRUCK! 12 c. Lowering DO NOT PUT FOOT OR HAND UNDER THE LIFTING MECHANISM. Lower the load by shift the operating lever up to the lowering position carefully. By releasing the lever, the lowering movement will stop. Ensure there is adequate clearance behind, then move the pallet truck away. d. Moving Do not operate the truck on a slope or inclined surface. Watch difference of floor level when moving lifter. Load could fall down Make the load stable to prevent it from falling down. The truck might be not equipped with a brake. In this case the braking distance is longer and depends on the operator. If equipped, release the brake. Move the truck by pushing or pulling the tiller arm. The tiller arm is connected to the steering rollers. The wheels are steered automatically by moving or steering the tiller arm. e. Parking-/ Footbrake (optional for some models) Follow these instructions, if a parking-/footbrake is equipped with the truck (Fig. 1, pos. 8). To apply the brake step on the “LOCK” side of the pedal (Fig. 9, pos.345) until its angle is 45o. To release the brake step on the “MOVE” side of the pedal (Fig. 9, pos.345) until it is in horizontal position. f. Progressive drive- and parking brake (optional for some models) Follow these instructions, if a progressive drive- and parking brake is equipped with the truck (Fig. 1, pos. 9). By pulling the lever of the progressive parking and foot brake, the truck will brake smoothly to the desired adjustment. To park the truck, after fully pulling the lever, the small latch on the braking lever must be moved to the right, then the operator can release the lever. By start operating, the truck, pull the lever and then swing the latch to the left side, then release the lever. Depending on the load conditions the braking behavior is changing. Please do not overstress the brake, it could generate loss in braking capacity. Fig. 12: Lever driveand parking brake g. Quick Lift (optional for some models) When the load is less than 120kg, the pallet truck has the quick-lifting function. It is about 5 times pumping to lift truck from the min. height to max. height. When the load is more than 120kg, the pumping function will automatically switch to a normal lifting speed. 13 h. Malfunctions If there are any malfunctions or the truck is inoperative, please stop using it. Place the truck at a safe place. Avoid further usage. Inform immediately the manager and, or call your service. 7. REGULAR MAINTENANCE Only qualified and trained personnel are allowed to do service on this truck. Before servicing the truck, remove the load and lower the forks to the lowest position. Completely immobilize pallet truck before working on components that might pinch fingers or hands if movement were allowed. Use approved and from your dealer released original spare parts. Please consider that oil leakage of hydraulic fluid can cause failures and accidents. It is allowed to adjust the pressure valve only from trained service technicians. Waste material like oil, used batteries or other must be probably disposed and recycled according to the national regulations and if necessary brought to a recycling company. All bushings and bearings have been lubricated at the factory. To increase their life, regular maintenance is recommended. Using the appropriate grease for the application and lubricate each grease fitting every 6 months. Harsh environments may require more frequent maintenance. If you need to change the wheels, please follow the instructions above. The wheels must be round and they should have no abnormal abrasion. a. Maintenance DAILY Follow chapter 5. MONTHLY Check hydraulic oil level (more frequently for high use applications). All bearings and shafts are provided with long-life grease at the factory. Long-life grease should be applied to the lubrication points at monthly intervals or after each time the truck is cleaned. Clean off dirt and debris. EVERY SIX MONTH Change oil (more frequently if color has substantially darkened or feels gritty). The required hydraulic fluid type is ISO VG32, its viscosity should be 30cSt at 40°C, total volume is about 0.3l. NOTE: If hydraulic oil is milky white in color, water is in the hydraulic system. Change the hydraulic oil immediately. Before starting operating the truck, ensure that all markings and decals are on the right place and not damaged (acc. to Fig. 3). If necessary replace the decals. 14 b. Deaeration of the hydraulic system Air may find its way into the pump during transportation, tilting or usage on uneven ground. It can result in not elevating forks whilst pumping in the Raise position. The air can be removed in the following way: Move the control handle to the Lower position, move then the tiller down several times. Thereafter normal operation can be resumed. c. Adding hydraulic oil to the pump reservoir Ensure forks are in lowered position. Lay pallet truck on either side. Position drain plug of hydraulic cylinder up. Remove the screw plug. Add hydraulic oil until level of oil is at bottom of hole. Replace drain plug, upright the truck 8. TROUBLE SHOOTING If the truck has malfunctions follow the instructions, mentioned under chapter 7. Table 2: Trouble shooting No. Symptom Possible Causes a) Low hydraulic fluid level or impurities in oil. Forks don’t raise, 1 don’t raise fully, or raise slowly b) Control lever is out of adjustment. c) Load is too heavy. Overload release valve is being activated. d) Temperature is too low and the e) Air in the hydraulic oil. b) Follow the procedure for adjusting the control lever in chapter 4. c) Reduce load. d) Move truck to a warmer location. e) Deaerate the hydraulic pump. (see chapter 7) a) Obstacle located under truck, in fork mechanism, etc. a) Use caution removing the obstacle. b) Follow the procedure for adjusting the b) Control lever is out of adjustment. 2 a) Add approved hydraulic fluid or change oil as noted in chapter 7. hydraulic oil has become too thick. Forks don’t lower Corrective action c) Fork was left in a raised position for an control lever in chapter 4 c) Keep fork in the lowest position when not or don’t lower extended time causing exposed piston in use and keep piston rod well fully rod to rust. lubricated d) The piston rod or pump is deformed d) Replace the piston rod or pump due to over-loading or uneven loading. Forks lower without putting 3 the control lever in the “lower” position 4 Oil leakage a) Oil impurities are preventing the a) Drain and replace hydraulic fluid with release valve from fully closing. approved fluid as noted in chapter 7. b) Some hydraulic components or seals are cracked or worn. b) Inspect and replace components as needed. c) Control lever is out of adjustment. c) Follow the procedure for adjusting the control lever in chapter 4 a) Worn or damaged seals a) Replace seals b) Other cracked or worn parts b) Replace damaged parts 15 9. HYDRAULIC CIRCUIT Fig.13: Hydraulic diagram 10. SPECIALIZED STIPULATIONS FOR THE US- AMERICAN MARKET The content in this chapter is specialized for the US-American market. Operating this truck requires knowledge which can be acquired from this instruction handbook. This handbook must be kept available throughout the entire period of use of the truck. YOU MUST BE TRAINED AND CERTIFIED TO OPERATE THIS TRUCK! READ AND OBEY ALL WARNINGS AND INSTRUCTIONS IN THIS MANUAL AND ON THE TRUCK! Only properly trained operators are allowed to operate a powered industrial truck. Your employer must train you and certify, that you are qualified to operate this truck. Depending on the context in this operating manual, the user can refer to several people, including the owner of the truck, anyone who leases or borrows this truck, and the operator as defined in ASME B56.1. Please pay attention to the section in ASME B56.1 concerning the operator. In this standard, it is defined that the safe operation is the responsibility of the operator (ASME B56.1-2003, Part II, section 5.1.1). You and others can be seriously injured or even killed if you don’t use this truck correctly. Before operating your truck, inspect your truck and ensure that it is in correct working order. This truck was designed and built to current industry and government standards. For more information see following: - ASME B56.1 (American Society of Mechanical Engineers) - OSHA §1910.178 (Occupational Safety and Health Act) - ANSI Z535.4 (American National Standards Institute) 16 If not followed, warning indicates hazard situations which may lead to moderate injury. The instructions or precautions to this message must be observed to avoid the potential risk of injury or death. Decals on your hand pallet truck according to chapter 2c: Sign operating instruction (A) Sign warning stay clear stop truck (E) Sign read and follow this instruction (B) Sign capacity (D) (sample, your present truck might have a higher capacity!) Sign prohibited use (F) 17 11. DECLARATION OF CONFORMITY (valid, if sold within the EU) [GB] CE DECLARATION OF CONFORMITY The signatory hereby declares that the machine described below in detail complies with the European Directive 2006/42/EC (Machinery Directive) including amendments as well as the legislative decree to incorporate the directives in national law. The signatory is individually authorized to compile the technical documents. [D] EG-KONFORMITÄTSERKLÄRUNG Der Unterzeichner bescheinigt hiermit, dass die im Einzelnen bezeichnete Maschine den Europäischen Richtlinien 2006/42/EG (Maschinenrichtlinie) einschließlich deren Änderungen sowie dem entsprechenden Rechtserlaß zur Umsetzung der Richtlinien in nationales Recht entspricht. Der Unterzeichner ist bevollmächtigt, die technischen Unterlagen zusammenzustellen. [E] DECLARACIóN DE CONFORMIDAD CE El signatario certifico por medio de la presente que la máquina descrita en esta documentación cumple con la Directiva Europea 2006/42/CE (Directiva de máquinas), incluyendo sus respectivas modificaciones, así como con los Reales Decretos de transposición de la directiva al derecho nacional. El signatario dispone de una autorización individual que le permite compilar la documentación técnica. [F] DECLARATION DE CONFORMITE CE Les signataires certifient par la présente que les machines désignés individuellement satisfont aux directives européennes 2006/42/CE (directive machine), y compris leurs modifications ainsi que les décrets légaux concernant la mise en oeuvre des directives dans le droit national. Les signataires sont respectivement et individuellement autorisés à regrouper les documents techniques. [NL] EG-CONFORMITEITSVERKLARING De ondertekenaars verklaren hiermee, dat de hieronder genoemde machine voldoen aan de Europese richtlijnen 2006/42/EG (Machinerichtlijn), inclusief de wijzigingen en wetgeving voor de omzetting van de richtlijnen in nationaal recht. Ondergetekenden zijn ieder individueel gemachtigd het technisch dossier samen te stellen. [P] DECLARAÇÃO DE CONFORMIDADE CE Os signatários vêm por este meio certificar que os a máquina descritos em pormenor cumprem as directivas europeias 2006/42/CE (directiva relativa a máquinas) incluindo as suas alterações e o respectivo documento legal com vista ao cumprimento das directivas no enquadramento legal nacional. Os signatários estão individualmente autorizados a compilar os documentos técnicos. [I] DICHIARAZIONE DI CONFORMITÀ CE Con la presente i firmatari attestano che la macchina per movimentazione interna è conforme alla direttiva europea 2006/42/CE (Direttiva Macchine), comprese le relative modifiche, nonché al documento legale per la trasposizione di tali direttive nel diritto nazionale. I sottoscritti sono singolarmente autorizzati alla creazione della documentazione tecnica. [BG] EВРОПЕЙСКА ОБЩНОСТ - ДЕКЛАРАЦИЯ ЗА СЪОТВЕТСТВИЕ С настоящото подписаните удостоверяват, че специфицираното тук машината средство отговаря на Европейските директиви 2006/42/EО (Директива за машините), включително на техните изменения, както и на съответното постановление за прилагане на директивите в националното право. Подписаните са съответно упълномощени поотделно да съставят техническата документация. [CZ] EG - PROHLÁŠENÍ O SHODĚ Níže podepsaní tímto potvrzují, že podrobný popis stroje odpovídá Evropským směrnicím 2006/42/EC (směrnice pro strojní zařízení) včetně jejich pozdějších úprav, jakož i příslušným právním výnosům pro uplatnění příslušné směrnice v rámci národního práva. Každý z podepsaných je jednotlivě zplnomocněn k vytvoření technických podkladů. [DK] EF-OVERENSSTEMMELSESERKLÆRING Undertegnede erklærer hermed, at følgende maskine overholder de væsentligste krav i Rådets direktiv 2006/42/EF (Maskindirektivet) om indbyrdes tilnærmelse af medlemsstaternes lovgivning. Alle undertegnede har fuldmagt til selvstændigt at sammensætte det tekniske materiale. [EST] EL vastavusavaldus Настоящим лица, подписавшие документ, удостоверяют, что напольное подъёмно-транспортное средство с силовым приводом в указанной спецификации соответствует Европейским директивам 2006/42/EG (Директива по машинам), включая изменения в них, а также соответствующему правовому документу по трансформации директив в национальное право. Каждое по отдельности лицо, подписавшее документ, имеет полномочия для составления технической документации. [FIN] EU-YHDENMUKAISUUSSELOSTUS Allekirjoittavat todistavat täten, että yksilöity kone vastaa eurooppalaista direktiiviä 2006/42/EY (konedirektiivi) kaikkine muutoksineen sekä säädöksiä, jolla direktiivi on saatettu osaksi kansallista lainsäädäntöä. Allekirjoittajilla on kullakin erikseen valtuudet laatia teknisiä dokumentteja. [GR] ΔΗΛΩΣΗ ΣΥΜΜΟΡΦΩΣΗΣ ΕΟΚ Οι υπογράφοντες βεβαιώνουν διά της παρούσης ότι το συγκεκριμένο μηχάνημα συμμορφώνεται προς την Κοινοτική Οδηγία 2006/42/ΕΚ («Μηχανήματα»), συμπεριλαμβανομένων των τροποποιήσεων, καθώς και των νομοθετικών διαταγμάτων για τη μεταφορά Οδηγιών στην εθνική νομοθεσία. Οι υπογράφοντες είναι σε κάθε περίπτωση εξουσιοδοτημένοι ατομικά να καταρτίσουν τα τεχνικά έγγραφα. [H] EU KONFORMITÁSI NYILATKOZAT Alulírottak ezennel igazolják, hogy a részletesen leírt, a gép megfelel a 2006/42/EK (Gép Irányelv) Európai Irányelveknek, beleértve azok módosításait, valamint az irányelvek nemzeti jogba történő átültetésére irányuló, megfelelő jogi rendelkezést. Továbbá az alulírottak mindegyike rendelkezik meghatalmazással arra nézve, hogy összeállíthatja a műszaki dokumentációt. [LT] ES atitikimơ deklaracija Žemiau pasirašę asmenys patvirtina, kad atskirai aprašytas mašina atitinka Europos Sąjungos direktyvą 2006/42/EB (Mašinų direktyva), įskaitant ir jos pakeitimus bei tai atitinkantį teisės aktą dėl direktyvų įgyvendinimo nacionaliniuose teisės aktuose. Pasirašę asmenys yra atskirai atitinkamai įgalioti sudaryti techninius dokumentus. [LV] ES atbilstības deklarācija Ar šo zemāk parakstījušās personas apliecina, ka detalizēti aprakstītais mašīna atbilst Eiropas Savienības direktīvām 2006/42/EK (Mašīnu direktīva), ieskaitot to izmaiņas, kā arī atbilstošo tiesisko rīkojumu direktīvu pielāgošanai nacionālajai likumdošanai. Parakstījušās personas ir atsevišķi pilnvarotas sastādīt tehniskās dokumentācijas.dokumentācijas. [N] EU-KONFORMITETSERKLÆRING Undertegnede bekrefter hermed at de enkelte betegnede maskin med kraftdrift overensstemmer med de europeiske retningslinjene 2006/42/EC (masinretningslinje) med endringer, samt den tilsvarende rettsforordning til implementering i nasjonal lovgivning. De undertegnede er hver for seg bemyndiget til å sammenstille de tekniske dokumentene. 18 [PL] DEKLARACJA ZGODNOŚCI Z NORMAMI UE Sygnatariusze potwierdzają niniejszym, że wyszczególniony maszyna odpowiada dyrektywie europejskiej 2006/42/WE (Dyrektywa maszynowa) wraz ze zmianami oraz rozporządzeniem prawnym dotyczącym wdrożenia dyrektywy do prawa krajowego. Każdy z sygnatariuszy jest upoważniony do samodzielnego zestawienia dokumentacji technicznej. [RO] DECLARAŢIE DE CONFORMITATE CE Subsemnaţii adeveresc prin prezenta că utilajul de maşină, descris individual, corespunde directivelor europene 2006/42/CE (Directiva privind maşinile) inclusiv modificărilor lor, precum şi actului legislativ corespunzător prentru transpunerea directivelor în dreptul naţional. Semnatarii sunt împuterniciţi individual să redacteze documentaţia tehnică. [RUS] Декларация соответствия стандартам ЕС Настоящим лица, подписавшие документ, удостоверяют, что машина в указанной спецификации соответствует Европейским директивам 2006/42/EG (Директива по машинам), включая изменения в них, а также соответствующему правовому документу по трансформации директив в национальное право. Каждое по отдельности лицо, подписавшее документ, имеет полномочия для составления технической документации. [S] EG-KONFORMITETSFÖRKLARING Undertecknad intygar härmed att den specificerade maskin är tillverkad i överensstämmelse med de Europeiska direktiven 2006/42/EG (Maskindirektivet), inklusive ändringarna i dessa och motsvarande harmoniseringar i nationell rätt.Undertecknade är var och en för sig berättigad att sammanställa de tekniska dokumenten. [SK] vyhlásenie o zhode Podpísané osoby týmto potvrdzujú, že podrobne popísaný stroje zodpovedá európskym smerniciam 2006/42/ES (smernica o strojných zariadeniach) vrátane ich zmien, ako aj príslušnému právnemu výnosu na uplatnenie smerníc v národnom práve. Podpísané osoby sú vždy jednotlivo splnomocnené na zostavovanie technickej dokumentácie. [SLO] EU IZJAVA O SKLADNOSTI Podpisani potrjujemo, da podrobno opisano gnano stroj ustreza Evropski direktivi 2006/42/ES (Direktiva o strojih), vključno z njenimi spremembami in ustrezno pravno uredbo za izvajanje direktiv v nacionalno zakonodajo. Podpisniki so posamično pooblaščeni za sestavljanje tehnične dokumentacije. [TR] AB Uygunluk Açıklaması İmza sahipleri bu yazı ile, belirtilen makine istif aracının Avrupa Yönetmeliklerine 2006/42/EG (Makine Yönetmeliği), bunun getirdiği değişikliklere ve yasal yönetmeliklerin ulusal yasaya göre değişmesi için olan yasal genelgeye uygun olduğunu onaylamaktadırlar. Her bir imza sahibi teknik belgeleri oluşturma konusunda yetkilidir. (1) Type/ Typ/ Tipo/ Modello/ Tyyppi/ Tipo / ΤYΠΟΣ/ Típus/ Tip/ Тип/ Tips/ Tipas/ Tüüp: (2) Serial No./ Serien-Nr./ N°. de série/ Serienummer/ Nº de serie/ Numero di serie/ Serienr./ Sarjanro/ αυξάνων αριθμός/ Seriové číslo/ Szériaszám/ Nr.Seryjny/ Serijska številka/ Výrobné číslo/ Серийный номер/ Seri No./ Seerianr./ Sērijas Nr./ Serijos numeris: (3) Year of constr./ Baujahr/ Année de constr./ Bouwjaar/ Año de constr./ Anno di costruzione/ Produktionsår/ Byggeår/ Tillverkningsår/ Valmistusvuosi / Ano de fabrico / έτος κατασκευής/ Rok výroby/ Gyártási év/ Rokprodukcji / Letnik / Год изготовления / Üretim yılı / Väljalaskeaasta / Izgatavošanas gads / Gamybosmetai (4) Manufacturer or his authorized representative in Community/ Hersteller oder in der Gemeinschaft ansässiger Vertreter/ Fabricant ou son mandataire établi dans la Communauté/ Fabrikant of zijn in de Gemeenschap gevestigde gemachtigde/ Fabricante o representante establecido en la Comunidad/ Construtor ou Representante estabelecido na Comunidade/ Costruttore oppure il suo rappresentante nella Comunità/ Fabrikant eller dennesi Fællesskabet etablerede befuldmægtigede/ Produsent eller agent innen felleskapet/ Tillverkare eller representant inom EU/ Valmistaja tai yhteisömaassa oleva edustaja / V˘robce nebo jeho zastoupení/ Gyártó / producent albo jego przedstawiciel w EG (Wspólnota Europejska)/ Καηαζθεπαζηήο ή όκηινο ηνπηθώλ αληηπξνζώπσλ/ Üretici ya da Bölgedeki Yetkili Temsilci/ Proizvajalec ali pooblaščeni zastopnik s sedežem v EU/ Výrobca alebo zástupca so stálym bydliskom v EÚ / Изготовитель или его представитель, зарегистрированный в стране Содружества/ Tootja või organisatsioonis paiknev esindaja/ Ražotājs vai vietējais uzņēmuma pārstāvis / Gamintojas arba šalyje reziduojantis atstovas: (5) Date/ Datum/ Data/ Fecha/ datum/ Dato/ päiväys/ Kuupäev/ Datums/дата / Dátum/ dátum/ tarih/ ημερομηνία (6) Authorised signatory/ Im Auftrag/ pour ordre/ Incaricato/ Por orden de/ por procuração/ op last van/ på vegne af/ på uppdrag/ Etter oppdrag/ psta./ Ülesandel / pavedus / v.i. / По поручению / megbízásából /длъжностно лице / z pověření / z poverenia / po nalogu / na polecenie / din sarcina / adına / θαη' εληνιή If you can read this text: - Your truck might be sold outside the EU; this declaration is then not valid. - Or the declaration is not complete. In this case please ask for a copy 19