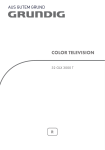
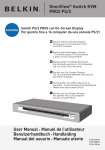
1
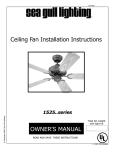
PU Mosin-Nagant/SVT-40 Scope
USER MANUAL
Whether you are in a fast- paced combat situation or defending yourself and your home,
Firefield™ will be by your side, preparing you for victory. Firefield™ offers quality products
with outdoor enthusiasts and paintball fanatics in mind. Whether your weapon of choice is
paintball, airsoft,AR15, shotgun or pistol, Firefield™ can accommodate your preference.
Firefield™ will provide you with high quality and durability for a fraction of competitor
pricing. Firefield™ products consist of boresights, flashlights, laser sights, reflex sights, rails,
mounts, magazines, binoculars and other shooting accessories.
www.fire-field.com
FIREFIELD PU Mosin-Nagat/SVT-40 Scope
One of the most recognizable pieces of rifle equipment is reborn! The Firefield PU Mosin-Nagant scope is
a replication of the Russian PU Scope, originally noted for its precision and distinguished as one of the most
consistently used rifle pieces throughout the Soviet Union during World War II. In capable hands, a MosinNagant sniper rifle fitted with the PU Scope was a formidable weapon and now Firefield users can achieve that
same intensity.
Deutsch
The Firefield PU scope’s metal body, thick lenses, tough mechanism and firm mount allowed
the PU scope to
withstand uncommonly rough conditions and its design is timeless, having been tried and tested throughout the
decades. The Firefield recreation of the PU scope merges a well known, classic design with the latest in optic
technology and stays true to the original three post design, and multicoated, specially shaped lenses that greatly
improve both clarity and accuracy.
The Firefield PU Mosin-Nagant/SVT-40 Scope is available in the standard black matte finish and comes with a
cast iron scope mount, mounting screws and cast iron mount receiver.With a 3.5 times magnification, the user
can see up to 200 yards and windage and elevation knobs provide maximum customization.
The Firefield PU Mosin-Nagant is the “must have” item for any collector, enthusiast or Mosin-Nagant rifle owner
and is protected by the Firefield three year warranty. Firefield-Victory justifies Everything!
Technical Specifications:
Reticle type
3 post
Finish/color
matte black
Magnification
1
3.5x
Objective lens diameter
18mm
Exit pupil diameter
6mm
Eye relief
65mm
Field of view (ft @100yd)
21.4
Diopter adjustment
-0.75
Windage (MOA)
approx. 3.5 per hashmark
Elevation (MOA)
approx. 7per hashmark
Maximum recoil
1300G
Lens coating
Green multi-coated
Waterproof
No
Shockproof
Yes
Mount type
Mosin-Nagant/SVT-40
Dimensions
Weight
174x40x95.4mm
20.2oz
Features:
•
•
•
•
Reliable and durable
Mult-coated lenses
3 post reticle design
3.5x magnification
Included:
• Scope mount
• Lens cloth
• Set pins
DIAGRAM
1) Receiver
2) Scope mount
3) Top and bottom elevation
adjustment screws
4) Windage and elevation
adjustments
5) Thumb screw
6) Objective lens
7) Eyepiece
8) Scope ring screws
4
7
8
6
1
2
3
5
2
WARNING
Before handling this product, read and understand the contents of your firearm’s manual, warnings, and the
Firefield riflescope user manual. Follow all standard safety precautions and procedures during firearm operation.
INSTALLATION
In order to mount the PU scope to a Mosin Nagant rifle, it is necessary to drill and tap mounting holes on the
rifle stock unless already done so. Also, a bent-handle bolt in required because a straight-handle bolt will not
clear the PU scope.Therefore, it is highly recommended to have both the receiver and the PU scope installed
by a professional gunsmith.
After the receiver (1) is installed the scope can be mounted.
1) Unload the weapon. Remove the bolt/fiing pin to ensure the weapon is incapable of firing.
2) Loosen the top and bottom elevation adjustment screws (3) and the thumb screw (5) on the receiver.
3) Install the PU scope mount (2) onto the receiver
4) Tighten the top and bottom elevation adjustments screw and the thumb screw to ensure the scope is in a
fixed position.
5) Check the crosshair alignment. It might be necessary to loosen the scope ring screws (8), and also gently pry
the rings open with a flat head screw driver in order to rotate the PU scope.
6)Once the crosshair is perpendicular, retighten the scope ring screws.
3
BORESIGHTING THE PU SCOPE
Boresighting and test firing should be performed safely on a firing range. Laser boresights are a quick and
accurate method to sight in riflescopes. Below is listed the traditional method of boresighting.
1) When mounting the optical sight on a bolt action rifle, remove the bolt; or when mounting to a semi
automatic rifle, disassemble the rifle until there is a straight line of sight through the bore.
2) Use a target at least 20 yards to 50 yards away when sighting in the riflescope. Look through the bore of the
weapon and locate the bullseye of the target.
3) Sight in the target through the bore and then make windage and elevation adjustments (see “Operating
Windage and Elevation Adjustments” for instructions) to the riflescope until the reticle is centered on the
bullseye.
To verify the optical sight is accurately sighted in, always fire a three-shot test group at 100 yards.
4) If you are still off center, make the necessary amount of adjustments to move the reticle to the center of the
target. At this point mount compensation might be necessary which is covered in the next section.
5) Afterwards, fire a three-shot test group, and use the center of the group to determine final adjustments.
4
WINDAGE AND ELEVATION ADJUSTMENTS
The windage and elevation adjustments are a continuous rotation.The windage adjustments are approximately
3.5 MOA per hashmark.The elevation adjustments are approximately 7 MOA per hashmark. In order to make
windage and elevation adjustments:
1) Rotate the windage and elevation adjustment (4) on the PU scope.
2) Align the threw post reticle to grouping of bullet impacts.
3) Once aligned, tighten the thumb screw (5) with a screw driver to ensure the
scope mount is secure.
WINDAGE AND ELEVATION ADJUSTMENTS MOUNT COMPENSATION
Next, review the image of the reticle. Since the reticle physically moves in the PU scope, a poor sight picture can
result after windage/elevation adjustments.At this point mount compensation is necessary.
An ideal sight image will have the reticle centered in the field of view, as seen in figure 1.
Figure 1
5
In some instances, the reticle will appear too high or too low. In order to compensate this difference, the top
and bottom elevation adjustment screws (3) can be adjusted. For example, in figure 2 the bullet’s point of impact
is high, and the reticle has been centered to this grouping.
To compensate this difference:
1) Return the reticle’s vertical adjustment to the center.
2) Slightly loosen the thumb screw (5) so the mount can adjust.
Figure 2
3) Loosen the bottom elevation adjustment screw (3) and tighten the top elevation adjustment screw (3).
Tighten the top in small increments in order to not over compensate
4) Next retighten the thumb screw (5) with a screw driver.
5) Next apply removable thread locking fluid to ONLY ONE of the adjustment screws. One screw will need to
be capable of being loosened in the event the scope needs to be removed from the receiver.
NOTE: For some, the bullet impact might be too low. In this case the adjustment needed is opposite, loosen the
top adjustment screw and tighten the bottom adjustment screw.
In other instances, the reticle will appear too far left or too far right. In order to compensate this difference, the
scope mount will either need to be shimmed or ground.
6
If the reticle is too far left, the base of the scope mount (2) will need to ground. It is important to grind the base
in small inscrements so as not to grind off too much. It is recommended, however, to have a gunsmith perform
these steps.
GRIND
GRIND
If the reticle is too far right, the base mount will need to be shimmed.Thin metal shims can be made out of thin
sheet metal. Again for best results, it is recommended having a gunsmith perform these steps.
MAINTENANCE
SHIM
Proper maintenance of the optical sight is recommended to ensure longevity. It is recommended that when the
optical sight becomes dirty that it is wiped down with a dry or slighly damp cloth. Blow dirt and debris off all
optics and then clean lenses with a lens cleaning cloth. No futher maintenance is required.
7
WARNING
Do NOT disassemble the PU Scope lens system for any reason. This will void the warranty and could be
hazardous.Any internal work should be handled by the manufacturer.
Never ship back a Firefield prodcut without getting proper authorization beforehand. Doing so could result in
losing the product due to a multitude of reasons.
TROUBLESHOOTING
1) Check the firearm’s mount that it is securely attached.Also, verify the optical sight is mounted securely to
the rifle. If there is any shifting, retighten the mounting system according to the mounting instuctions but do
not overtighten.
2) To check the point of impact relative to windage and elevation adjustments, firing from a shooting rest will
help eliminate shifting during firing.
3) Be sure to use factory-loaded ammunition of the same bullet type, wieght, and preferably, lot number when
sighting in the optical sight.
FIREFIELD WARRANTY
Please visit www.fire-field.com for warranty details and information.
8
MAINTENANCE
Proper maintenance of the riflescope is recommended to ensure longevity. It is recommended that when the
riflescope becomes dirty that it is wiped down with a dry or slightly damp cloth. Blow dirt and debris off all
optics and then clean lenses with a lens cleaning cloth. No further maintenance is required. Not following
instructions can cause damage to the unit and void the warranty.
WARNING
The Firefield riflescopes are nitrogen purged and o-ring sealed unless otherwise noted. DO NOT disassemble
the riflescope for any reason as this will void the warranty and could be hazardous.Any internal work should be
handled by the manufacturer.Any tampering with the purge screw will void the warranty.
9
TROUBLESHOOTING
Never ship back a riflescope without getting proper authorization beforehand. Doing so could result in losing the
riflescope due to a multitude of reasons, i.e. sending it to the wrong address and other problems associated with
unexpected packages.
1) Check the firearm’s mount that it is securely attached. Also, verify the riflescope is mounted securely to the rifle.
If there is any shifting, retighten the mounting system according to the mounting instructions, but do not overtighten.
2) When test firing a rifle to check the point of impact relative to the windage and elevation adjustments, firing from
a shooting rest will help eliminate shifting during firing.
3) Be sure to use factory-loaded ammunition of the same bullet type, weight, and preferably, lot number when
sighting in the riflescope.
FIREFIELD WARRANTY
Please visit www.fire-field.com for warranty details and information.
10
www.fire-field.com