1
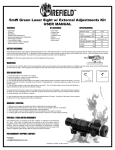
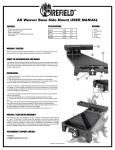
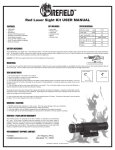
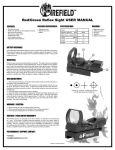
Micro Reflex Sight
USER MANUAL
Firefield delivers high quality and durability to every intense moment. Firefield products
consist of riflescopes, flashlights, laser sights, reflex sights, bore sights, AK and Quad
rail mounts, magazines, binoculars and other shooting accessories. Designed for heart
pounding, fast paced hunting, personal defense, or Xtreme shooting sports - Firefield is the
key to victory.
Firefield technology is designed to serve the next generation of shooters. Transform fear
to power, panic to excitement and chaos to glory with Firefield. Prepare for victory with
the latest Firefield products. Firefield-Victory Justifies Everything!
www.fire-field.com
1
Micro Reflex Sight
The Firefield Micro Sight is the most compact, lightweight reflex sight in the Firefield
reflex sight line. Its compact size improves the shooter’s field of view of the surrounding
environment. Featuring two brightness settings and a red reticle, the Firefield Micro Sight is
designed to maintain peripheral vision and depth perception, allowing the user to keep both
eyes open during use.
Deutsch
The Micro Sight also features a low-profile on/off switch for easy activation for right and left
handed shooters. Perfect for shotguns, rifles, and pistols the Firefield Micro Sight is able to
withstand heavy recoil. Firefield-Victory Justifies Everything!
2
Technical Specifications:
Reticle type
3 moa dot
Reticle color
red
Waterproof IP Standard
Illuminated (yes/no)
Yes
Body material
aluminum
Reticle brightness settings
1-2 and off
Lens coatings
Finish/color
matte black
Anti-reflective
red
Mount type
weaver /
picatinny
Operating temp (°F)
20-140
Dimensions (mm)
45x28x35
2.6
Magnification (x)
Objective lens diameter (mm)
Eye relief (mm)
1
23x16
unlimited
Field of view (m @100m)
15.7
Field of view (ft @100yd)
51.5
Weight (oz)
50yds
Features:
Parallax setting (yds)
Windage and Elevation (MOA)
Maximum recoil (G’s)
3
Battery voltage (v)
1
600G
Battery Type
CR2032
Battery life (hours)
80-150
•
•
•
•
•
3V
IPX3
Accessories:
3 MOA dot
• Lens cloth
1 MOA adjustments • Adjustment
Red illumination
tools
Unlimited Eye relief
Compact Size
DIAGRAM
1)
2)
3)
4)
5)
6)
Objective lens
On/off switch
Windage/Elevation adjustment
Locking screws
Assembly set screws
Mounting Screw
5
4
3
2
1
3
6
4
WARNING
Before handling this product, read and understand the contents of your firearm’s manual, warnings, and the
Firefield reflex sight user manual. Follow all standard safety precautions and procedures during firearm operation.
INSTALLATION
It is recommended to have the reflex sight mounted by a professional gunsmith. However, if attempting to
mount the reflex sight without professional assistance, please read and strictly adhere to the following directions:
1. The Firefield Micro Reflex Sight comes with a built-in weaver/picatinny mount.
2. Unload the weapon. Remove the bolt/firing pin to ensure the weapon is incapable of firing.
3. Install the relfex sight onto a weaver or picatinny base.Tighten the mounting screw (6) between 45-65 inch
pounds of torque.
4. Once the alignment is checked, tighten the mounting screw.Take care not to over tighten the screw.
5. Ensure the reflex sight provides the desired eye relief by moving the weapon into the shooting position
6. Check that the reflex sight is evenly mounted, and then boresight the sight.
5
BORESIGHTING THE REFLEX SIGHT
Boresighting and test firing should be performed safely on a firing range. Laser boresights are a quick and
accurate method to sight in the reflex sight. Below is listed the traditional method of boresighting.
1) When mounting the reflex sight on a bolt action rifle, remove the bolt; or when mounting to a semi
automatic rifle, disassemble the rifle until there is a straight line of sight through the bore.
2) Use a target at least 20 yards to 50 yards away when sighting in the reflex sight. Look through the bore of
the weapon and locate the bullseye of the target.
3) Sight in the target through the bore and then make windage and elevation adjustments (see “Operating
Windage and Elevation Adjustments” for instructions) to the reflex sight until the reticle is centered on the
bullseye.
To verify the reflex sight is accurately sighted in, always fire a three-shot test group at 100 yards.
4) If you are still not centered, make the necessary amount of adjustments to move the reticle to the center
of the target.
5) Again fire a three-shot test group, and use the center of the group to determine final adjustments.
6
OPERATING WINDAGE AND ELEVATION ADJUSTMENTS
Included with the Firefield Micro Reflex Sight is a flat head screwdriver and a MOA
scale dial.These two tools are necessary in adjusting the windage and elevation (3)
1) Loosen the locking screws (4) located on the back of the reflex sight
2) With the sight securely mounted, rest the gun on a solid support and aim
at a target 50 to 100 yards away. All test shots should be done under the same
conditions to achieve maximum accuracy. This includes using the same rest and
same cartridge type. Fire a test group to see where the gun is shooting.
3) Adjust the windage and elevation with the flag head screwdriver until the reticle
is zeroed on the bullet’s point of impact.
4) In order to finely adjust the reticle, insert the flathead screwdriver through the
center of the MOA scale dial. Mark a point of reference on the dial to see how
much adjustment is made to the windage and elevation. 1 div = 1 MOA or 1” at
100yds
5) After adjustments are complete, tighten the locking screws (4)
Note:The windage and elevation adjustments on the Micro Reflex Sight have a continuous rotation,
no clicks. It is neccesary to use the MOA scale dial to make accurate adjustments
7
BATTERY AND ON/OFF OPERATION
INSTALLING THE BATTERY
The Firefield Micro Reflex Sight is powered by one CR2032 battery. Should the reticle grow dim or not
illuminate, the battery needs to be replaced.To install a new battery:
1) Unscrew the assembly set screws (5) counterclockwise with the included allen wrench.
2) Remove the top half of the unit from its base.
3) Remove the battery.
4) Insert the new battery with the positive (+) side facing up and place the top of the unit on the base.
5) Screw the assembly set screws clockwise with the allen wrench until firmly secure. Do not over tighten.
OPERATING THE ON/OFF SWITCH
In order to activate the Firefield Micro Reflex Sight:
1) Locate the on/off switch (2) on the back of the unit.
2) Click the switch right to the middle position for the low brightness level. This level is ideal for low light/
indoor conditions.
3) Click the switch right once more for the high brightness level.This level is ideal for bright, sunny conditions.
4) After use, turn the switch to the off position.
8
MAINTENANCE
Proper maintenance of the reflex sight is recommended to ensure longevity. It is recommended that when
the reflex sight becomes dirty that it is wiped down with a dry or slightly damp cloth. Blow dirt and debris off
all optics and then clean lenses with a lens cleaning cloth. No further maintenance is required. Not following
instructions can cause damage to the unit and void the warranty.
WARNING
Do NOT disassemble the reflex sight for any other reason not stated herein, as this will void the warranty and
could be hazardous. Any internal work should be handled by the manufacturer.
9
TROUBLESHOOTING
Never ship back a product without getting proper authorization beforehand. Doing so could result in losing the
product due to a multitude of reasons, i.e. sending it to the wrong address and other problems associated with
unexpected packages.
1) Check that the firearm’s mount is securely attached. Also, verify the reflex sight is mounted securely to the rifle.
If there is any shifting, retighten the mounting system according to the mounting instructions, but do not overtighten.
2) When test firing a rifle to check the point of impact relative to the windage and elevation adjustments, firing from
a shooting rest will help eliminate shifting during firing.
3) Be sure to use factory-loaded ammunition of the same bullet type, weight, and preferably, lot number when
sighting in the riflescope.
FIREFIELD WARRANTY
Please visit www.fire-field.com for warranty details and information.
10
www.fire-field.com