1
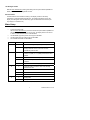
User Guide
Dual Moisture Meter Pro
Pin / Pinless Moisture Meter with remote probe
Model MO265
Introduction
Congratulations on your purchase of the Extech MO265 Moisture Meter. The MO265
detects moisture in wood and other materials such as particle board, carpeting, and
ceiling/bathroom tiles using the non-invasive method (pinless); the MO265 also measures
moisture in sheet rock and other building materials using the pin method. The remote
probe can also be used to make pin measurements. This meter is shipped fully tested
and calibrated and, with proper use, will provide years of reliable service.
Features
•
%WME (wood moisture equivalent) pin moisture reading
•
Relative (REL) pinless moisture reading for non-invasive measurement
•
Remote probe measurements
•
Digital LCD readout with backlighting feature and tri-color LED bargraph
•
Quickly indicates the moisture content of materials
•
Pinless measurement depth to 0.75" (22mm) below the surface
•
Electro-magnetic sensing technology for pinless operation
•
Built-in calibration check and calibration zero
•
Replaceable measurement electrode pins
•
Low battery indication
•
Cap protects pins during storage
•
Cap can be snapped onto the side of the housing during use
•
Complete with 9V battery, replacement pins, protective cap, and pouch case
2
MO265-EU-EN-V1.0-10/10
Description
Meter Description
1.
Electrode pins protective cap (pins underneath)
2.
LCD display
3.
Tri-color Bargraph
4.
HOLD / POWER key
5.
Protective cap attachment
6.
Protective cap holders
7.
MODE button
8.
Remote probe connector plug
9.
Remote Probe
10.
Measurement pins
Notes:
•
Battery/Spare Pin compartment located on the rear of
the instrument
•
Electrode pins located beneath the protective cap
•
Calibration source located at the top of protective cap
•
A tripod mount is located on the rear of the remote probe head
LCD Display Description
1.
Measurement reading
2.
Battery status
3.
Audible alert icon
4.
Measurement mode
5.
Display HOLD icon
Bargraph Display Description
The bargraph indicates WET / DRY measurements using three LED colors: Green
(for dry), Amber (for moderate moisture), and Red (for very moist). As the reading
moves up the bargraph scale from the DRY indicator to the WET indicator, the LED
color changes from green, to amber, and then to red.
3
MO265-EU-EN-V1.0-10/10
Operation
Electrode Pins
CAUTION: The electrode measurement pins are extremely sharp. Use care when
handling this instrument. Cover the pins with the protective cap when the
instrument is not in use.
The electrode pins are replaceable. To insert or replace the pins refer to the illustration
and instructions below. Replacement pins are stored in the battery compartment at the
rear of the meter.
a) Remove the protective cap at the top of the meter by pushing it toward the back
of the meter.
b) To remove the pins, loosen the locknut at the base of the electrode pins
c)
Install the new pins and tighten the locknuts
d) Replace the protective cap
1.
2.
3.
4.
Electrode pins
Locking nuts
Threaded posts
Electrode jacks at top of meter
Pin Measurements
1.
Remove the protective cap to expose the electrode pins. The cap snaps off easily if
it is pushed towards the rear of the meter. The cap can be affixed to the side of the
meter using the protective cap holders (6).
2.
Press the
3.
Press the MODE key to select the Wood Moisture Equivalent (%WME) mode of
operation.
4.
Carefully push the electrode pins a minimum of 0.07” (2mm) into the material under
test. Note that the pins should be inserted into wood perpendicular to the wood’s
fiber structure. For high moisture readings, it may take several minutes for the
meter reading to stabilize.
5.
Take several readings in several locations on the material for the best
representation of the amount of moisture present.
6.
Read the measurement values on the LCD digital display and the LED bar graph
7.
Replace the protective cap when finished.
key to turn the meter ON / OFF.
4
MO265-EU-EN-V1.0-10/10
Pinless Measurements
1.
Ensure that the protective cap is attached to the meter
covering the pins.
2.
Press the
3.
Press the MODE key to select the Relative (REL) mode of
operation.
4.
The pinless moisture detector is located at the rear of the
instrument, just behind the display. Place the meter so that
the sensor is touching the surface of the material under test.
5.
Take several readings in several locations on the material
for the best representation of the amount of moisture present.
6.
Read the measurement values on the LCD digital display and the LED bar graph.
key to turn the meter ON.
Pinless
Sensor
Remote Probe Pin Measurements
IMPORTANT NOTE: The Remote Probe cannot be used at the same time as the meter
probe. Please use one probe or the other but not both at the same time.
1.
Connect the Remote Probe to the right side of the meter using the RJ-11 plug at
the end of the Remote Probe cable.
2.
Remove the protective cap from the remote probe to expose the electrode pins.
The cap snaps off easily if it is pushed long-wise to the side.
3.
Press the
4.
Press the MODE key to select the Wood Moisture Equivalent (%WME) mode of
operation.
5.
Carefully push the electrode pins a minimum of 0.07” (2mm) into the material under
test. Note that the pins should be inserted into wood perpendicular to the wood’s
fiber structure. For high moisture readings, it may take several minutes for the
meter reading to stabilize.
6.
Take several readings in several locations on the material for the best
representation of the amount of moisture present.
7.
Read the measurement values on the LCD digital display and the LED bar graph
8.
Replace the protective cap and disconnect the remote probe when finished.
key to turn the meter ON / OFF.
5
MO265-EU-EN-V1.0-10/10
Calibration Zero for Pinless Mode
1.
Switch the meter to the Pinless mode of operation (REL mode).
2.
Ensure that the meter is not near any objects or surfaces. Hold the meter near the
bottom to avoid contact with the pinless sensor.
3.
Press and Hold the MODE button for 3 seconds until rEL appears in the display.
Release the MODE button and the display will blink for several seconds and then
switch back to the normal display mode.
4.
The display should now read zero indicating that the calibration is complete.
5.
If an E32 error is displayed, try the zero calibration again with the pins further away
from any objects or surfaces.
Calibration Check for Pin Mode
1.
Switch the meter to the Pin mode (%WME).
2.
The two calibration check points are located in the holes at the top of the protective
cap.
3.
Insert the electrode pins into the two holes at the top of the protective cap to make
contact with the test circuit.
4.
The display should read between 17.5 to 18.5 %WME, indicating that the
calibration is verified.
6
MO265-EU-EN-V1.0-10/10
LCD Backlight ON/OFF
With the meter switched ON, pressing and holding both front panel buttons (MODE and
HOLD) switches the LCD backlight ON and OFF.
Data Hold feature
The Data Hold function freezes the reading in the display. Press the HOLD key
momentarily to activate the Data Hold function. The reading will freezee and the ‘key’
display icon will appear. Press the HOLD key again to exit the Data Hold function (the
‘key’ display icon will switch off).
Meter Setup
•
•
•
•
To enter the setup mode:
With the meter switched OFF, press and hold both front panel buttons (MODE and
HOLD buttons) simultaneously for two seconds. The display should now read ‘0 =
x’ where ‘0’ is the OPTION and ‘x’ is the SETTING.
Use the MODE (right arrow) button to change the SETTING.
Use the HOLD button to scroll through the OPTIONS.
The available OPTIONS and SETTINGS:
OPTIONS
SETTINGS
0
0
Switches all settings to ‘0’ (Factory Default*)
1
Others settings can now be changed. In addition,
Backlight switches ON for 30 seconds and then
automatically switches OFF.
0
Audible alert beeps with increasing frequency from a
nominal 17.0 (REL) or 17% (WME) measurement value
upwards
1
Audible alert divided into 3 frequency levels
2
Audible alert beeps when user switches from one mode
to another
3
Beeper OFF. Audio alert display symbol switches OFF
0
Auto Switch OFF is not active. User must manually
switch the unit OFF
1
Auto Switch OFF active. Switches OFF after 3 minutes
2
Auto Switch OFF active. Switches OFF after 5 minutes
3
Auto Switch OFF active. Switches OFF after 10 minutes
0
Backlight OFF
1
Backlight ON
1
2
3
SET-UP INFORMATION
*FACTORY DEFAULT SETTINGS: 0=0, 1=0, 2=0, 3=0
7
MO265-EU-EN-V1.0-10/10
Battery Replacement
If the instrument does not switch ON or displays the low battery symbol, replace the battery
as follows:
1.
2.
3.
4.
Slide off the rear battery compartment cover
Replace the 9V battery
Secure the battery compartment
You, as the end user, are legally bound (EU Battery ordinance) to return all used
batteries, disposal in the household garbage is prohibited! You can hand over
your used batteries / accumulators at collection points in your community or
wherever batteries / accumulators are sold!
Disposal: Follow the valid legal stipulations in respect of the disposal of the
device at the end of its lifecycle
Maintenance
•
•
Always keep the instrument dry
To clean, wipe the meter with a damp cloth. Use a mild detergent if necessary but
never use abrasives or solvents.
Prevent dirt from accumulating at the electrode pins
•
Specifications
Display
Backlit LCD digital display and tri-color LED bargraph scale
Resolution
0.1%
Accuracy
Pin mode: ± (5% rdg + 5 digits)
Measurement principle
Electrical resistance (pins)
Pinless mode is a relative reading only
Electromagnetic sensor (pinless)
Range
0.0 to 99.9 %Relative (pinless)
6.0 to 94.8 %WME (pins)
Electrode pin length
11mm (0.44”)
Electrode pin type
Integrated, replaceable
Power supply
9V alkaline battery
Low Battery Indication
Battery symbol displayed on LCD
Meter housing
Impact-proof plastic
Operating Temperature
0 to 50 C (32 to 122 F)
Operating Humidity
80% Relative Humidity maximum
Dimensions
203 x 58 x 43mm (8 x 2.3 x 1.7”); not including remote probe
Weight
204g. (7.2 oz); not including remote probe
o
o
Copyright © 2010 Extech Instruments Corporation (a FLIR company)
All rights reserved including the right of reproduction in whole or in part in any form.
8
MO265-EU-EN-V1.0-10/10