1
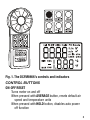
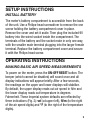
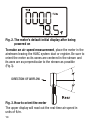
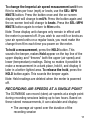
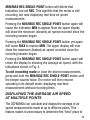
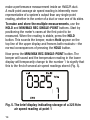
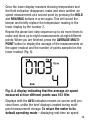
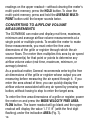
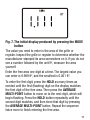
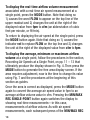
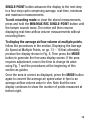
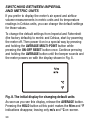
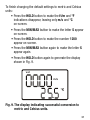
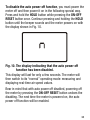
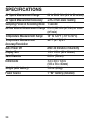
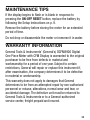
DIGITAL ONE PIECE
AIRFLOW METER WITH
CFM DISPLAY
USER’S MANUAL
DCFM8906
Please read this manual carefully and thoroughly before using this product.
TABLE OF CONTENTS
Introduction . . . . . . . . . . . . . . . . . . . . . . . . . . . . . . . . . . 3
Key Features . . . . . . . . . . . . . . . . . . . . . . . . . . . . . . . . . 4
What’s in the Case . . . . . . . . . . . . . . . . . . . . . . . . . . . . . 4
Product Overview . . . . . . . . . . . . . . . . . . . . . . . . . . 4 – 8
Setup Instructions . . . . . . . . . . . . . . . . . . . . . . . . . . . . . 9
Install Battery . . . . . . . . . . . . . . . . . . . . . . . . . . . . . . . 9
Operating Instructions . . . . . . . . . . . . . . . . . . . . . . 9 – 23
Making Basic Air Speed Measurements . . . . . . 9 – 11
Recording Air Speeds at a Single Point . . . . . . 11 – 13
Displaying the Average Air Speed at
Multiple Points . . . . . . . . . . . . . . . . . . . . . . . 13 – 16
Converting to Airflow Volume Measurements 16 – 19
Switching Between Imperial and Metric Units 20 – 22
Disabling Auto Power Off . . . . . . . . . . . . . . . . . 22 – 23
Specifications . . . . . . . . . . . . . . . . . . . . . . . . . . . . . . . 24
Maintenance Tips . . . . . . . . . . . . . . . . . . . . . . . . . . . . 25
Warranty Information . . . . . . . . . . . . . . . . . . . . . 25 – 26
Return for Repair Policy . . . . . . . . . . . . . . . . . . . . . . . 26
2
INTRODUCTION
Thank you for purchasing General Tools & Instruments’
DCFM8906 Digital One Piece Airflow Meter with CFM Display.
Please read this user’s manual carefully and thoroughly before
using the instrument.
The DCFM8906 is a professional-grade vane anemometer that
can not only measure air speeds exiting an HVAC/R system’s or
blower’s grille or register, but also convert those readings to
airflow volume measurements. The conversions are possible
because the meter makes it easy for an installer or repairman to
enter the free area dimensions of his system’s output ductwork.
The meter can record air speed readings at one point or multiple
points for up to two hours and convert those readings into
displays of average, minimum and maximum air speed or airflow
volume. The unit can hold measurements made in the dark for
later viewing in a brighter area. It also measures ambient air
temperature and displays it simultaneously with air speed or
airflow volume on a large front-panel LCD.
The DCFM8906 can display its air speed and airflow volume
measurements in Imperial or metric units and its temperature
measurements in degrees Fahrenheit or Celsius. A 20-minute
auto power off function (which can be disabled to enable longterm recordings of air speed) helps extend battery life.
The DCFM8906 is powered by one 9V battery (included).
3
KEY FEATURES
• Measures and displays air speed and airflow volume in
Imperial or metric units
• Simultaneously displays temperature in °F or °C
• One-handed operation
• Records average, minimum and maximum air speed at
a single point or multiple points
• Data hold
• Auto power off
• CE and RoHS approved
WHAT’S IN THE CASE
The DCFM8906 comes fully assembled in a custom molded
plastic case along with a “9V” battery and this user’s manual.
PRODUCT OVERVIEW
Figure 1 shows the labels and positions of the six control
buttons on the front of the DCFM8906. The figure also shows
all possible indications on the LCD below the control panel.
Familiarize yourself with the buttons’ functions and the
meanings of the display indications before moving on to the
Setup Instructions.
4
Fig. 1. The DCFM8906’s controls and indicators
CONTROL BUTTONS
ON-OFF RESET
Turns meter on and off
When pressed with AVERAGE button, resets default air
speed and temperature units
When pressed with HOLD button, disables auto power
off function
5
MODE VELOCITY FREE AREA FLOW
When pressed, places meter in airflow volume
measurement mode
Used with HOLD and AVERAGE buttons to enter free
area dimensions
AVERAGE MULTI-POINT
When pressed, calculates and displays average of
stored air speed measurements for up to eight points
Used with HOLD and MODE buttons to enter free area
dimensions in airflow volume measurement mode
When pressed with ON-OFF RESET button, resets default
air speed and temperature units
HOLD
When pressed, holds (freezes) upper display reading
Used with MODE and AVERAGE buttons to enter free
area dimensions in airflow measurement mode
When pressed with ON-OFF RESET button, disables auto
power off function
SEL: MPH KNOTS
In Imperial units mode, cycles through mil/h (mph), knots
and ft/m default settings
In metric units mode, cycles through km/h, knots, and
m/s default settings
6
MIN/MAX REC SINGLE-POINT
When pressed once, meter begins recording air speed at
a single point. Default display is average air speed
since recording began
Next press changes display to real-time air speed
Next two presses change display to minimum and
maximum air speeds since recording began
Next press returns display to average air speed
All possible display indications and their meanings
vel
FLOW
AREA
Hold
PH
Knots
ft/m
m/s
mil/h
km/h
Upper reading is an air speed measurement
Upper reading is an airflow volume measurement
Lit during entry of free area dimensions
Upper and lower readouts are locked (frozen)
Reserved for future use
Air speed unit equal to 1.85 km/hr (kmph) or 1.15
miles/hr (mph). An upper display unit option in both
Imperial and metric modes
Feet per minute. An upper display air speed unit in
Imperial mode
Meters per second. An upper display air speed unit in
metric mode
Miles per hour (mph). An upper display air speed unit in
Imperial mode
Kilometers per hour (kmph). An upper display air speed in
metric mode
7
ft2
m2
cfm
cms
°C
°F
REC
AVG
MIN
MAX
–
Square feet. Lit during entry of free area dimensions in
Imperial mode
Square meters. Lit during entry of free area dimensions
in metric mode
Cubic feet per minute. Unit of airflow volume readings in
Imperial mode
Cubic meters per second. Unit of airflow volume readings
in metric mode
Degrees Celsius. Temperature unit in metric mode
Degrees Fahrenheit. Temperature unit in Imperial mode
Meter is recording air speeds at a single point
Upper reading is average air speed recorded during
session
Upper reading is minimum air speed recorded during
session
Upper reading is maximum air speed recorded during
session
Temperature reading on lower display is a negative
number
Digits of air speed, airflow volume or free area value
8888
(upper reading)
1888
Digits of temperature value. When recording air
(lower reading) speeds at multiple points, indicates point number
(from 1 to 8)
8
SETUP INSTRUCTIONS
INSTALL BATTERY
The meter’s battery compartment is accessible from the back
of the unit. Use a Philips-head screwdriver to remove the one
screw holding the battery compartment cover in place.
Remove the cover and set it aside. Then plug the included 9V
battery into the wired socket inside the compartment. The
terminals of the battery and the socket mate in only one way,
with the smaller male terminal plugging into the larger female
terminal. Replace the battery compartment cover and secure
it with the Philips-head screw.
OPERATING INSTRUCTIONS
MAKING BASIC AIR SPEED MEASUREMENTS
To power on the meter, press the ON-OFF RESET button. The
beeper (which cannot be disabled) will sound once and all
display indications will appear briefly. After a few seconds,
the readings on the upper and lower displays will stabilize.
By default, the upper display reads out air speed in ft/m and
the lower display reads out temperature in degrees
Fahrenheit. These Imperial system defaults are reflected by
three indications (Fig. 2): vel (at upper left), ft/m (to the right
of the air speed digits) and °F (to the right of the temperature
digits).
9
Fig. 2. The meter’s default initial display after being
powered on
To make an air speed measurement, place the meter in the
airstream leaving the HVAC system duct or register. Be sure to
orient the meter so its vanes are centered in the stream and
its axes are as perpendicular to the stream as possible
(Fig.3).
DIRECTION OF AIRFLOW
Fig. 3. How to orient the meter
The upper display will read out the real-time air speed in
units of ft/m.
10
To change the Imperial air speed measurement unit from
ft/m to miles per hour (mph) or knots, use the SEL: MPH
KNOTS button. Press the button once and the on-screen
display unit will change to mil/h. Press the button again and
the on-screen text will change to knots. Press the SEL: MPH
KNOTS button again to return to ft/m units.
Note: These display unit changes only remain in effect until
the meter is powered off. If you wish to use mil/h or knots as
your air speed units on a regular basis, you must make the
change from ft/m each time you power on the meter.
To hold a measurement, press the HOLD button. This
sounds the beeper, makes Hold appear on the top line of the
upper display, and “freezes” both the upper (air speed) and
lower (temperature) readings. Doing so makes it possible to
make a measurement in a dark place, hold it, and display it
later in a better-lighted area. To release the hold, press the
HOLD button again. This sounds the beeper again.
Note: Held readings are deleted when the meter is powered
off.
RECORDING AIR SPEEDS AT A SINGLE POINT
The DCFM8906 can record (store) air speeds at a single point
during recording sessions lasting up to two hours. Based on
these stored measurements, it can calculate and display:
• The average air speed over the duration of the
recording session
11
• The minimum air speed recorded since the session
began
• The maximum air speed recorded since the session
began
These three air speed readings can be very helpful for
comparing the effects of different equipment settings during
an HVAC/R system installation or repair.
To initiate recording, place or secure the meter in the
airstream and press the MIN/MAX REC SINGLE-POINT
button. The REC and AVG indications will initially appear on
the upper display to signify that the meter is now 1) recording
air speeds and 2) calculating and displaying a continuous
moving average of the readings (Fig. 4).
Fig. 4. The initial display after entering recording mode
To change the calculations and displays based on the
recorded measurements, use the MIN/MAX REC SINGLEPOINT button. With AVG showing on the display, pressing the
12
MIN/MAX REC SINGLE-POINT button will delete that
indication, but not REC. This signifies that the meter is still
recording, but now displaying real-time air speed
measurements.
Pressing the MIN/MAX REC SINGLE-POINT button again will
cause the indication MIN to appear. Now the upper display
will show the minimum (slowest) air speed recorded since the
recording session began.
Pressing the MIN/MAX REC SINGLE-POINT button yet again
will cause MAX to replace MIN. The upper display will now
show the maximum (fastest) air speed recorded since the
recording session began.
Pressing the MIN/MAX REC SINGLE-POINT button again will
return the display to showing the average air speed, with the
indications shown in Fig. 4.
To exit recording mode or clear the stored measurements,
press and hold the MIN/MAX REC SINGLE-POINT button until
the beeper sounds twice. The meter will then resume
operating in its default mode: displaying real-time
measurements without recording them.
DISPLAYING THE AVERAGE AIR SPEED
AT MULTIPLE POINTS
The DCFM8906 can calculate and display the average of air
speed measurements made at up to different points. This
feature makes it unnecessary to determine the “best” place to
13
make a performance measurement inside an HVAC/R duct.
A multi-point average air speed reading is inherently more
representative of a system’s output than any single-point
reading, whether in the center of a duct or near one of its sides.
To make and store the multiple measurements, use the
HOLD and MIN/MAX REC SINGLE-POINT buttons. Start by
positioning the meter’s vanes at the first point to be
measured. When the reading is stable, press the HOLD
button. This sounds the beeper, makes Hold appear on the
top line of the upper display and freezes both readouts—the
normal consequences of pressing the HOLD button.
Now press the MIN/MAX REC SINGLE-POINT button. The
beeper will sound and the temperature reading in the lower
display will temporarily change to the number 1 to signify that
this is the first of several air speed readings stored (Fig. 5).
1
Fig. 5. The brief display indicating storage of a 325 ft/m
air speed reading at point 1
14
Once the lower display resumes showing temperature and
the Hold indication disappears, make and store another air
speed measurement at a second point by pressing the HOLD
and MIN/MAX buttons in order again. This will sound the
beeper and briefly replace the temperature reading in the
lower display by the number 2.
Repeat the above two-step sequence up to six more times to
make and store up to eight measurements at eight different
points. When you are finished, press the AVERAGE MULTIPOINT button to display the average of the measurements on
the upper readout and the number of points sampled on the
lower readout (Fig. 6).
Fig. 6. A display indicating that the average air speed
measured at four different points was 103 ft/m
Displays with the AVG indication remain on-screen until you
clear them, unlike the brief displays created during multipoint measurement storage. To return the meter to its
default operating mode—displaying real-time air speed
15
readings on the upper readout—without clearing the meter’s
multi-point memory, press the HOLD button. To clear the
multi-point memory, press and hold the AVERAGE MULTIPOINT button until the beeper sounds twice.
CONVERTING TO AIRFLOW VOLUME
MEASUREMENTS
The DCFM8906 can make and display real-time, maximum,
minimum and average airflow volume measurements at a
single point or multiple points. To enable the meter to make
these measurements, you must enter the free area
dimensions of the grille or register through which the air
source flows. The meter then multiplies this area by air speed
measurement(s) for that point or points to determine any
airflow volume value (real-time, maximum, minimum, or
average) desired.
As a practical matter, General recommends entering the free
air dimensions of the grille or register whose output you are
measuring before measuring the air speed through it. If you
enter the area ahead of time, you can quickly display the
airflow volume associated with any air speed by pressing one
button, without having to stop to enter the target area.
To enter the free area dimensions of a grille or register, power
the meter on and press the MODE VELOCITY FREE AREA
FLOW button. The lower readout will go blank and the upper
readout will display the value 1.111 ft2 (with the first digit
flashing) under the indication AREA (Fig. 7).
16
Fig. 7. The initial display produced by pressing the MODE
button
The value you need to enter is the area of the grille or
register. Inspect the grille or register to determine whether the
manufacturer stamped its area somewhere on it. If you do not
see a number followed by the unit ft2, measure the area
yourself.
Enter the free area one digit at a time. The largest value you
can enter is 9.999 ft2, and the smallest is 0.001 ft2.
To enter the first digit, press the HOLD as many times as
needed until the first (flashing) digit on the display matches
the first digit of the free area. Then press the AVERAGE
MULTI-POINT button to move on to the next digit, which will
begin flashing. Press the HOLD button repeatedly until the
second digit matches, and then store that digit by pressing
the AVERAGE MULTI-POINT button. Repeat the sequence
twice more to finish entering the free area.
17
To display the real-time airflow volume measurement
associated with a real-time air speed measurement at a
single point, press the MODE button. Note that doing so
1) causes the word FLOW to appear on the top line of the
upper readout and 2) changes the unit at the right of the
displayed value from fpm to cfm (an abbreviation of cubic
feet per minute, or ft3/min).
To return to displaying the air speed at the single point, press
the MODE button again. Note that doing so 1) causes the
indicator vel to replace FLOW on the top line and 2) changes
the unit at the right of the displayed value from cfm to fpm.
To display the average, minimum or maximum airflow
volume at a single point, follow the procedures in the section,
Recording Air Speeds at a Single Point, on pp. 11 – 13 that
ultimately produce the display shown in Fig. 4. Then press the
MODE button to generate the free area display screen. If the
area requires adjustment, now is the time to change its value
using Fig. 7 and the procedures at the beginning of this
section as guides.
Once the area is correct as displayed, press the MODE button
again to convert the average air speed value in fpm to an
average airflow volume value in cfm. Pressing the MIN/MAX
REC SINGLE-POINT button again switches the display to
showing real-time measurements—in this case,
measurements of airflow volume. As with air speed
measurements, each subsequent press of the MIN/MAX REC
18
SINGLE-POINT button advances the display to the next step
in a four-step cycle comprising average, real-time, minimum
and maximum measurements.
To exit recording mode or clear the stored measurements,
press and hold the MIN/MAX REC SINGLE-POINT button until
the beeper sounds twice. The meter will then resume
displaying real-time airflow volume measurements without
recording them.
To display the average airflow volume at multiple points,
follow the procedures in the section, Displaying the Average
Air Speed at Multiple Points, on pp. 13 – 16 that ultimately
produce the display shown in Fig. 6. Then press the MODE
button to generate the free area display screen. If the area
requires adjustment, now is the time to change its value
using Fig. 7 and the procedures at the beginning of this
section as guides.
Once the area is correct as displayed, press the MODE button
again to convert the average air speed value in fpm to an
average airflow volume value in cfm. Note that the new
display continues to show the number of points measured at
bottom right.
19
SWITCHING BETWEEN IMPERIAL
AND METRIC UNITS
If you prefer to display the meter’s air speed and airflow
volume measurements in metric units and its temperature
readings in Celsius units, you can change the default settings
for those values.
To change the default settings from Imperial and Fahrenheit
(the factory defaults) to metric and Celsius, start by powering
the meter off. Then power it on in a special way by pressing
and holding the AVERAGE MULTI-POINT button while
pressing the ON-OFF RESET button once. Continue pressing
and holding the AVERAGE button until the beeper sounds and
the meter powers on with the display shown in Fig. 8.
Fig. 8. The initial display for changing default units
As soon as you see this display, release the AVERAGE button.
Pressing the HOLD button at this point makes the ft/m and °F
indications disappear, leaving only m/s and °C on-screen.
20
To finish changing the default settings to metric and Celsius
units:
• Press the HOLD button to make the ft/m and °F
indications disappear, leaving only m/s and °C
on-screen.
• Press the MIN/MAX button to make the letter S appear
on-screen.
• Press the HOLD button to make the number 1200
appear on-screen.
• Press the MIN/MAX button again to make the letter S
appear again.
• Press the HOLD button again to generate the display
shown in Fig. 9.
vel
m/s
Fig. 9. The display indicating successful conversion to
metric and Celsius units.
21
In metric mode, the only airflow volume unit available is cms
(an abbreviation of cubic meters per second, or m3/sec).
Pressing the SEL: MPH KNOTS button repeatedly cycles the
air speed units through three available settings: m/s (the
default), km/h and knots. To change the default metric air
speed measurement unit from m/s to km/h (kilometers per
hour or kmph), press the SEL: MPH KNOTS button once.
Press it again to change the default air speed unit to knots.
To return to displaying measurements in Imperial and
Fahrenheit units, power the meter off and repeat the
bulleted procedure above, adding the following step: After
pressing the HOLD button to make the ft/m and °F
indications disappear, press the HOLD button again. This
replaces the m/s and °C indications with the factory-default
values ft/m and °F.
DISABLING AUTO POWER OFF
To avoid wasting battery charge, the DCFM8906 is
programmed to power off automatically after 20 minutes of
inactivity. Just before this function takes effect, the beeper
will sound three times.
There are times when it is desirable to disable the auto power
off function—for example, to enable recording of air speed or
airflow volume readings for more than 20 minutes.
22
To disable the auto power off function, you must power the
meter off and then power it on in the following special way.
Press and hold the HOLD button while pressing the ON-OFF
RESET button once. Continue pressing and holding the HOLD
button until the beeper sounds and the meter powers on with
the display shown in Fig. 10.
Fig. 10. The display indicating that the auto power off
function has been disabled.
This display will last for only a few seconds. The meter will
then switch to its “normal” operating mode: measuring and
displaying real-time air speed values.
Bear in mind that with auto power off disabled, powering off
the meter by pressing the ON-OFF RESET button undoes the
disabling. The next time the meter is powered on, the auto
power off function will be enabled.
23
SPECIFICATIONS
Air Speed Measurement Range
Air Speed Measurement Accuracy
Sampling Period in Recording Mode
Airflow Volume Measurement Range
Temperature Measurement Range
Temperature Measurement
Accuracy/Resolution
Auto Power Off
Display Size
Vane Diameter
Dimensions
Weight (with battery)
Power Source
24
80 to 5900 ft/m (0.4 to 30 m/sec)
±3% of full-scale reading
1 second
0 to 9,999 cfm (m3/min) or cmm
(m3/min)
14° to 122°F (-10° to 50°C)
±2°F (±1°C)/0.1°
After 20 minutes of inactivity
1.3 x 1.5 in. (33 x 38mm)
2.8 in. (70mm)
7.2 x 3.0 x 1.8 in.
(183 x 76 x 45mm)
7.2 oz. (204g)
1 “9V” battery (included)
MAINTENANCE TIPS
If the display begins to flash or is blank in response to
pressing the ON-OFF RESET button, replace the battery by
following the Setup Instructions on p. 9.
Remove the battery before storing the meter for an extended
period of time.
Do not drop or disassemble the meter or immerse it in water.
WARRANTY INFORMATION
General Tools & Instruments’ (General’s) DCFM8906 Digital
One Piece Meter with CFM Display is warranted to the original
purchaser to be free from defects in material and
workmanship for a period of one year. Subject to certain
restrictions, General will repair or replace this instrument if,
after examination, the company determines it to be defective
in material or workmanship.
This warranty does not apply to damages that General
determines to be from an attempted repair by non-authorized
personnel or misuse, alterations, normal wear and tear, or
accidental damage. The defective unit must be returned to
General Tools & Instruments or to a General-authorized
service center, freight prepaid and insured.
25
Acceptance of the exclusive repair and replacement remedies
described herein is a condition of the contract for purchase of
this product. In no event shall General be liable for any
incidental, special, consequential or punitive damages, or for
any cost, attorneys’ fees, expenses, or losses alleged to be a
consequence of damage due to failure of, or defect in any
product including, but not limited to, any claims for loss of
profits.
RETURN FOR REPAIR POLICY
Every effort has been made to provide you with a reliable
product of superior quality. However, in the event your
instrument requires repair, please contact our Customer
Service to obtain an RGA (Return Goods Authorization)
number before forwarding the unit via prepaid freight to the
attention of our Service Center at this address:
General Tools & Instruments
80 White Street
New York, NY 10013
212-431-6100
Remember to include a copy of your proof of purchase, your
return address, and your phone number and/or e-mail
address.
26
NOTES
____________________________________________
____________________________________________
____________________________________________
____________________________________________
____________________________________________
____________________________________________
____________________________________________
____________________________________________
____________________________________________
____________________________________________
____________________________________________
____________________________________________
____________________________________________
____________________________________________
27
GENERAL TOOLS & INSTRUMENTS
80 White Street
New York, NY 10013-3567
PHONE (212) 431-6100
FAX (212) 431-6499
TOLL FREE (800) 697-8665
e-mail: [email protected]
www.generaltools.com
DCFM8906 User’s Manual
Specifications subject to change without notice
©2011 GENERAL TOOLS & INSTRUMENTS
NOTICE - WE ARE NOT RESPONSIBLE FOR TYPOGRAPHICAL ERRORS.
MAN#DCFM8906 7/13/11


![588-589-00a [Converted]](http://vs1.manualzilla.com/store/data/005638396_1-02d08bb06dde3fa2099be559e669b8e9-150x150.png)