1
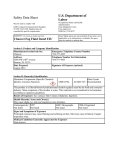
USER GUIDE • WRC483• Kleer-Vu™ Windshield Repair Kit
1. Platform
2. Injector
3. Injector vacuum port
4. Piston screw cap
5. Stainless steel piston rod
6. Center adjusting knob
7. Suction cup
8. Suction cup lifting tab
Before you use the Kleer-Vu™
windshield repair system read this
Instruction Manual and Material
Safety Data Sheets.
The Kleer-Vu™ windshield repair
system contains the following items:
1
1
1
1
1
1
1
1
5
1
75
4
1
High-impact carrying case
Injector assembly
Platform mounting assembly
UV light
Evacuating vacuum pump
Carbide tip scribe
Bottle UV repair resin
Tube UV pit resin
Razor blades
Tub cup mounting lubricant
Injector piston tip seals
Injector cylinder O-rings
Roll UV curing tape
BULLʼS-EYE: Many times
the direct result of flying debris
from the road. Bullʼs-eye
breaks are conical in shape
with the break starting at the
windshieldʼs base and ending at
its surface.
DAISY BREAK: Basically, a
bullʼs-eye break with a couple
of crush marks and maybe one
or two short cracks.
PARTIAL BULLʼS-EYE:
More resembles a sliver than an
actual break. A partial bullʼseye is really an incomplete
bullʼs-eye.
COMBINATION BREAK:
Simply stated, a bullʼs-eye
break with radial cracks.
STAR BREAK: A series of
radial cracks beginning at the
point of impact, a star break
usually has a minimum of three
cracks without an actual conical
bullʼs-eye being present.
RADIAL CRACKS: Normally
the direct result of everyday
road stress, radial cracks are
repairable if no longer than six
inches in length.
This instruction manual contains three (3) sections with
easy-to-follow steps for repairing the six most common
breaks that occur in windshields.
Section 1: Bullʼs-eyes, Star, Daisy, & Combination Breaks
Section 2: Radial Cracks
Section 3: Windshield Pits
SECTION 1
Bullʼs-eyes, Star Breaks, Daisy Breaks and Combination Breaks.
CAUTION: Read the material safety data sheets in this manual before attempting any repairs. Always wear your safety glasses
when working with the KleerVu™ windshield repair system.
1.
Do not attempt to repair a break that has fluid such as water in it. If the break has fluid in it, clean break with rubbing alcohol
and allow to dry in the sun until all alcohol and fluid has evaporated from the break. Entire break area must be completely dry
before proceeding.
2.
Probe the break at the point of impact on the windshield with the carbide scribe. Remove just the loose glass from the break.
Do not dig out the broken glass. If the break is not connected to the point of impact, apply slight pressure directly to the point
of impact with the carbide scribe point. (CAUTION: Do not use excessive pressure as it could enlarge the break). This will connect
the break to the point of impact. Under most conditions the break will visibly change with little pressure applied. This will help the
repair resin flow more easily by opening the break.
3.
Clean around the break with dust-free paper or a cloth towel, being careful to clean away from the break at all times. Do not
use any liquid.
4.
Remove the black piston cap and stainless steel piston rod from the injector. Install an O-ring in the bottom of the injector.
The O-ring must be replaced after ten (10) uses due to wear from repair resin and pressure.
5.
Unscrew the center adjusting knob until it is being held on by just a couple of threads on the bolt coming from the suction
cup. Put a small amount of suction cup mounting lubricant on the outside edges of the suction cup. Place the platform with
the injector on the windshield. Place the injector over the center point of break impact.
6.
Turn the suction cup until the lifting tab can easily be held with your hand. Do not place it over a crack in the windshield
because it will lose its vacuum and allow the platform to come loose. Grasp the adjusting center knob with one hand. Grasp
the suction cup lifting tab with your other hand. Push down on the adjusting knob and lift up on the suction cup, lifting tab
until the suction cup bottoms out on the windshield. Release the suction cup, lifting tab first, then release the pressure off the
center adjusting knob. If the injector is not centered over the point of impact, you can move the cup while on the windshield
with pressure applied to the side of the suction cup for proper alignment. If this does not work, remove and repeat step.
Injector alignment can be determined by looking down through the injector or from inside the vehicle.
7.
Screw down the adjusting knob until it comes in contact with the platform. Then continue to turn the adjusting knob 1/4 to
1/2 turn more.
©2004 Equalizer Rev 5/17/04
WRC483_User_Guide
8.
Install the hand pump vacuum hose to the injector vacuum port.
9.
If you are working in the direct sunlight, the whole windshield must be shaded during the rest of the repair or move the
vehicle into a shaded area out of direct sunlight. In almost all cases it is easier to work in the shade because there is less
chance of the resin hardening before you finish the repair.
10.
Install the piston tip seal on the tip of the stainless steel piston rod. Do not use this seal for more than one repair. The piston
tip seal will start to deteriorate from the repair resin after a couple of hours which could affect the sealing in the cylinder or
it may come off the piston rod inside the cylinder.
11.
Place four to five drops of Kleer-Vu™ repair resin into the injector. More drops may be required for large breaks. Insert the
piston into the injector until the black piston screw cap comes in contact with top of injector.
12.
Now pull a vacuum using the hand vacuum pump attached to the injector. Maintain at least twenty inches of vacuum for
one to two minutes. From inside the vehicle you will be able to see the air being pulled out of the break under vacuum.
13.
Release the vacuum at the valve on the hand pump. To start the pressure cycle, slowly screw down the black piston screw
cap onto the injector. The injector will start to lift off the windshield or some repair resin will come out from under the oring in the bottom of the injector. When this happens, stop. Leave the repair under pressure for about five minutes. From
inside the vehicle watch the repair resin fill the break.
14.
Unscrew the black piston cap from injector until piston cap rests on injector and piston seal is still in cylinder.
15.
Repeat steps 12, 13 and 14 a minimum of two more times. On some hard-to-repair breaks you might have to repeat steps
12, 13 and 14 more than three times.
16.
On last pressure cycle (step 13) uncover windshield (if covered) after about two minutes of pressure being applied to repair.
Expose repair to direct sunlight or place UV light (use suction cup mounting lubricant) on the inside of windshield directly
under repair. Do this for approximately three minutes in direct sunlight or five minutes with UV light.
17.
Disconnect the vacuum hose from hand pump at the injector vacuum port.
18.
Place the 2.5-inch-square plastic sheet below the injector. Unscrew the piston screw cap off the injector but do not remove
from injector. Now unscrew the platform adjusting knob to release the platform-hold-down pressure. Do not remove adjusting knob. Rotate the platform, moving the injector away from the repair. As you do this, place plastic sheet over the repair.
19.
Remove platform assembly from windshield by lifting up on the suction cup lifting tab.
20.
Continue to expose the repair to direct sunlight for approximately five minutes or until repair resin is hard. If you are using
the UV Iight place it over the top of the repair for approximately five minutes or until repair resin is hard.
21.
Remove the plastic sheet from the repair. When the repair resin is hard the plastic sheet should make a tearing sound
during removal.
22.
Place a razor blade above the repair at a 45-degree angle to the windshield. In a slow, slicing action, remove the excess
repair resin from the windshield.
23.
If you have a small pit in the repair, continue on to the pit repair section. If no pits are present, go to step 24.
24.
Clean the windshield. Your repair is finished.
25.
If resin begins to congeal or build up inside the injector, clean with a cotton swab dipped in rubbing alcohol. This does not
have to be done with every repair. Never insert sharp objects into injector.
26.
Remove piston tip seal from piston rod and screw piston back into the injector for storage in repair case. Discard the
piston tip seal.
SECTION 2
Repairing of Radial Cracks
CAUTION: Read the material safety data sheets in this manual before attempting any repairs. Always wear your safety glasses
when working with the Kleer-Vu™ windshield repair system.
1.
You must do this repair inside or in the shade.
2.
The break must be completely dry.
3.
Clean break with a dry, dust-free paper or cloth towel, working away from the break.
4.
Place a bottle of repair resin just above the break. Flow the repair resin onto the windshield just above the break.
It should start to fill up as you work your way across the top of the break. Work as fast as possible doing this part of the
repair. From inside the vehicle you will be able to see what parts of the break have filled and what have not. In the parts
that have not filled, apply more repair resin above the unfilled area. From inside the vehicle, place one finger at the unfilled break
point and apply slight pressure. This will help open the break and enable repair resin to flow into the break. Pressure is generally only
needed for thirty to sixty seconds.
CAUTION: Do not use too much pressure as it could enlarge the crack. The idea is to get as much repair resin into the break as fast as
you can. It is not possible to completely fill the break because the repair resin is not being put into the break under pressure and vacuum.
6.
Cover the repair completely with pieces of UV tape.
7.
Expose repair to direct sunlight or place a UV Iight over the top of repair for about ten minutes or until hardened.
8.
Remove the UV tape after hardening.
9.
Remove excess repair resin from the repair, working your razor blade at a 45-degree angle to the windshield in a
slow, slicing action.
10.
Spray clean the windshield. Your repair is finished.
SECTION 3
How To Use Pit Resin
CAUTION: Read the material safety data sheets in this manual before attempting any repairs. Always wear your
safety glasses when working with the Kleer-Vu™ windshield repair system.
1.
This repair is done best in direct sunlight.
2.
Make sure the pit is clean and free of dirt and fluid.
3.
Place one drop of pit resin in the pit and immediately cover it with a 2.5-inch-square plastic sheet. Using
your finger, push down on the plastic sheet directly over the pit. Then remove your finger. This displaces
the excess pit resin from the pit to give you a nice smooth repair.
4.
Expose the repair to direct sunlight or place a UV Iight over the top of the repair for about five minutes.
5.
When pit resin has hardened, remove plastic sheet. It should make a tearing sound during removal if fully
hardened.
6.
Place a razor blade above the repair at a 45-degree angle to the windshield. In a slow, slicing action, remove
the excess pit resin from the windshield.
7.
Spray clean the windshield. Your repair is finished.
MATERIAL SAFETY DATA SHEET - Windshield repair resin
GENERAL DESCRIPTION
Product Name: Professional Glass Repair. Appearance: Adhesive-Non-yellow. Chemical Name: Methacrylate Adhesive. Product Type: UV Curing Adhesive
I INGREDIENTS
Hazardous Ingredients: Acrylic Acid*. % by Weight: 10-15
*Acrylic Acid has been shown to cause tumors in experimental animals on high dose ingestion. and adverse liver and blood effects on skin contact. In light of the
low concentration of these components in the product it is our best technical judgment that normal use of this product poses no such hazard. These statements are
present only to comply with OSHA Regulations.
II CHEMICAL AND PHYSICAL PROPERTIES
Vapor Pressure: <5mm Vapor. Density: Unknown. Solubility in Water: Low. Boiling Point: >300 deg. F. Appearance: Clear Water White Fluorescent Liquid.
Specific Gravity: 1.036. Odor: Sharp. pH: Does not apply
III HEALTH HAZARD DATA
Symptoms of Overexposure: May cause dermatitis on prolonged contact in sensitive individuals. Toxicity: Skin and eye irritant. Estimated oral LD50 more than
5000mg/kg.. Estimated dermal LD50 more than 2000mg/kg.. Signs and Symptoms of Exposure: Vapors irritate eyes. nose. throat. Liquid is a skin and eye irritant.
Emergency Treatment Procedures
Eye Irritation: Flush at least 15 minutes with water. Obtain medical attention immediately. Inhalation: Remove to fresh air. It symptoms persist. obtain medical
attention. Ingestion: Low toxicity. Do not induce vomiting. Give 1-2 glasses of water or milk and get immediate medical attention. Skin Contact: Wash thoroughly
w/soap and water. Skin: Impermeable gloves Personal Protection: Eyes. safety glasses or goggles required Ventilation: Must be adequate to avoid exceeding TLV.
IV FLAMMABILITY AND EXPLOSIVE PROPERTIES
Flash Point: 193 deg. F. Explosive Limits (% by volume in air). Extinguishing Media: C02. Foam. Dry Chemical. Unusual Fire or Explosion Hazards:
Hazardous products formed by fire or thermal decomposition. Traces of toxic fluorides may be formed at flame temperature. Method: TCC. Lower: DNA%.
Upper: DNA%. Compressed Gases Name: None. Pressure at Room Temperature: DNA
V REACTIVITY DATA
Stability: Stable. Hazardous Polymerization: May Not Occur. Incompatibility: None. Hazardous Decomposition Products (Non-Thermal): None
VI SPILL OR LEAK PROCEDURES
Spill or Leak: Large Spill: Dike area to prevent spreading. Absorb material with vermiculite. sand or other inert absorbing material. Place in closed container.
Disposal: Landfill or incinerate following EPA and local regulations.
VII STORAGE. HANDLING AND SHIPPING
Storage: Store below 110 deg .F to preserve shelf life. Avoid unnecessary exposure to light before use. Handling: Avoid prolonged skin contact. Keep away from
eyes. Avoid prolonged breathing of fumes. Shipping Regulations: Proper Shipping: DOT Acrylic Acid. Inhibited. Solution RQ. IATA: Acrylic Acid. Inhibited. Solution
MATERIAL SAFETY DATA SHEET - Windshield Repair Resin (Pit Resin)
GENERAL DESCRIPTION
Product Name: Pit Resin. Chemical Name: Methacrylate Adhesive
I INGREDIENTS
Hazardous Ingredients: Acrylic Acid*. % by Weight: Less than 7
*Acrylic Acid has been shown to cause tumors in experimental animals on high dose ingestion. and adverse liver and blood effects on skin contact. In light of the
low concentration of these components in the product it is our best technical judgment that normal use of this product poses no such hazard.
II CHEMICAL AND PHYSICAL PROPERTIES
Vapor Pressure: Less than 1 10mm @ 75 deg . F. Vapor Density: Unknown. Solubility in Water: Slight. Boiling Point: Greater than 300 deg. F. Appearance:
Clear. Specific Gravity: 1.02. Odor: Pleasant. PH: N/A
III HEALTH HAZARD DATA
Symptoms of Overexposure: May cause dermatitis on prolonged contact in sensitive individuals.
Emergency Treatment Procedures
Eye Irritation: Flush at least 15 minutes with water. Obtain medical attention. Inhalation: Remove to fresh air. If symptoms persist. obtain medical attention.
Ingestion: Low toxicity: Do not induce vomiting. Get immediate medical attention. Skin Contact: Wash thoroughly with soap and water.
IV FLAMMABILITY AND EXPLOSIVE PROPERTIES
Flash Point: Greater than 200 deg . F. Explosive Limits (% by volume in air). Extinguishing Media: C02. Foam. Dry Chemical. Unusual Fire or Explosion
Hazards: Toxic fumes may be evolved upon exposure to heat or open flame. Method: TCC. Lower: DNA. Upper: DNA
V REACTIVITY DATA
Stability: Stable. Hazardous Polymerization: May Not Occur. Incompatibility: None
VI SPILL OR LEAK PROCEDURES
Spill or Leak: Large Spill: Dike area to prevent spreading. Absorb material with vermiculite. sand or other inert absorbing material. Place in closed container.
Disposal: Landfill or incinerate following EPA and local regulations
VII STORAGE. HANDLING AND SHIPPING
Storage: Store below 110 deg . F to preserve shelf life. Protect from light. Handling: Avoid prolonged skin contact. Keep away from eyes. Shipping: DOT: Not
Applicable. IATA: Not Applicable