1
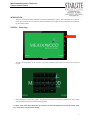
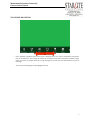
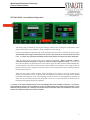
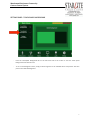
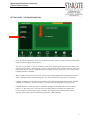
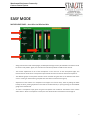
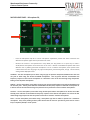
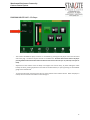
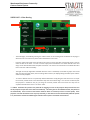
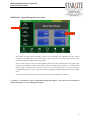
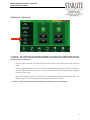
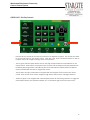
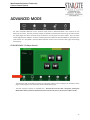
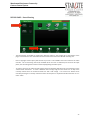
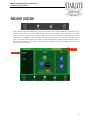
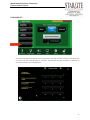
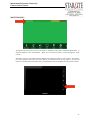
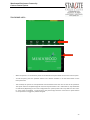
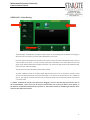
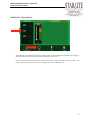
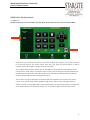
Meadowood Retirement Community
Crestron Control System
Auditorium/Club Room
Crestron Control System Manual
1
Meadowood Retirement Community
Crestron Control System
Table of Contents
INTRODUCTION…………………………………………………………………………..……………Page 4
Startup/Splash Page.……………………………………………………………………..………………………………….Page 4
Touch Panel Navigation……..……………………..…………………….………………………………………………..Page 5
Settings Page – Room/Mode Configuration…….…………..…………….……………………………………..Page 6
Settings Page – Touch Panel Background……………………………...…………………………………………..Page 7
Settings Page – System Information……..……………………………...…………………………………………..Page 8
EASY MODE………………………………………………………………………………………………Page 9
Microphones Page – Auto Mics and Wireless Mics……………..…………………….……………………..Page 9
Microphones Page – Microphone EQ……………………………………………………………………….……..Page 10
Program Inputs Page – AV Plate Volumes....…………………………………………………………………...Page 11
Program Inputs Page – CD Player…………......…………………………………………………………………...Page 12
Monitor Page – Monitor Volume & Routing………………………………………….…………………………Page 13
Video Page – Video Routing………………………………………….…………………………………………………Page 14
Video Page – Laptop/Dining Hall Inputs.……………………….…………………………………………………Page 15
Video Page – Video Volumes….…………………………………….…………………………………………………Page 16
Video Page – Projector Controls………….……………………….………………………………………….………Page 17
Video Page – LCD Controls……………….……………………….…………………………………………….………Page 18
Video Page – Blu-ray Controls……………….……………………….……………………………………….………Page 19
Lights Page – Locked/Unlocked Panel Access……..…………………………………..…….………………..Page 20
Lights Page – Lighting Presets………………………………………………………………………………………….Page 21
Lights Page – Lighting Controls………………………………………………………………………………………..Page 22
2
Meadowood Retirement Community
Crestron Control System
Table of Contents (Continued)
ADVANCED MODE……………………………………………………………………………..……Page 23
Introduction……………….……………………………..…………………………………………………………………...Page 23
Record Page – Record Routing…………………………………………………………………………………………Page 24
Record Page – Record Controls……………………………………………………………………………………….Page 25
MOVIE MODE…………………………………………………………………………………………Page 26
Password Set……………………………………………..……………..………………………………………….…...Page 27
Master Volume………..………………………………………………………………………………………………...Page 28
Touch Panel Lock……..………………………………….……………………………………………………..……...Page 29
System Shutdown……….………..……………………………………………………………………..……………..Page 30
CLUB ROOM.…………………………………………………..………………………….………Page 31
Microphones/Aux In Page – Mic/AV Plate Volumes………………………………………………………...Page 31
Microphones/Aux In Page – CD Player…………………………………………………………………………....Page 32
Video Page – Video Routing…………………………………………………………………………………………....Page 33
Video Page – Video Volume…………………………………………………………………………………………....Page 34
Video Page – LCD Controls..…………………………………………………………………………………………....Page 35
Video Page – Movie Mode Projector Controls…………………………………………………………………Page 36
Video Page – Movie Mode Blu-Ray Controls……………………………………………………………………Page 37
Master Volume………………………………………………………………………………….……………………….Page 38
Touch Panel Lock……………………………………………………………………………….……………………….Page 39
System Shutdown…..………………………………………………………………………….……………………….Page 40
3
Meadowood Retirement Community
Crestron Control System
INTRODUCTION –
- There are three touch panels available to control the Auditorium system. One is located in the Front-OfHouse (F.O.H.) desk, one is on the front house right wall next to stage, and one is located in the clubroom
by the entrance doors.
STARTUP – Splash Page
-
To start, touch anywhere on the screen or press power button (shown above) to bring up the password
keypad.
.
-
Enter password to startup the system. This will turn on all of the equipment, put the room into a ready
state and give full access to the touch panel controls.
****Note: If the room status shows that the “System Is On” then the equipment is already on and the room
is in a ready state; only the panel is locked.
4
Meadowood Retirement Community
Crestron Control System
TOUCHPANEL NAVIGATION
-
Once unlocked, navigation of the touch panel is designed to be very easy to understand and operate.
Each of the buttons in the scrolling list located at the bottom of the panel represents a different page.
Swipe the screen to navigate either left or right through the list and press the desired button to jump to
that page.
-
The currently selected page will be highlighted in blue.
5
Meadowood Retirement Community
Crestron Control System
SETTINGS PAGE – Room/Mode Configuration
-
The settings page, accessible by pressing the “Settings” button in the scrolling list at the bottom of the
page, is where the user can see/make a variety of different system settings.
-
Press the Room/Mode Configuration tab on the left hand side of the screen to view/set the system mode.
This should be the first page visited any time the system is first powered on to assure the desired mode
is set. (****Note: The system will remember the last mode selected even after it has been shut down).
-
There are three modes to choose from: Easy, Advanced and Movie. When a selection is made a
confirmation window will appear to confirm or cancel the mode/configuration change. As a basic rule
of thumb Easy Mode is for operation of the room without using the audio console and Advanced Mode is
for operating the room with the audio console. Movie Mode is for watching a movie using the Blu-ray
player in the F.O.H. desk. Using this mode will set the room in a ready state for movie watching and allow
for basic volume control.
-
Along with the system modes, the other options available on this page are for room combining and
dividing. The auditorium can be “combined” with the Club Room to be used as one large space or divided
to be used as two separate rooms. When deciding on how the room is to be configured it is important to
select it on the touch panel as well if the AV system is to be used. This will allow for the audio routes to
be administered appropriately to each speaker.
(****NOTE: If the room is divided certain sources and subpages will not be available on all panels. For instance,
when divided, the projector is not available as a video route destination on the panel in the Club Room nor the
audio only options for AV 1 &2. Similarly, the LCDs will not be an available video route destination on the touch
panels in the Auditorium when the rooms are divided).
6
Meadowood Retirement Community
Crestron Control System
SETTINGS PAGE – TOUCH PANEL BACKGROUND
-
Press the Touchpanel Background tab on the left hand side of the screen to view the touch panel
background color selection tool.
-
To set a new background color, simply scroll through the list of available colors and pictures and then
press on the desired background.
7
Meadowood Retirement Community
Crestron Control System
SETTINGS PAGE – SYSTEM INFORMATION
-
Press the System Information tab on the left hand side of the screen to view connectivity information
about the system’s digital audio processor.
-
The user has the ability to see the connection state of the digital signal audio processor (DSP) to the
Crestron control system. Since the DSP is crucial to the operation of the system (routes all audio), this
information may be useful in troubleshooting if a problem with the audio occurs or if certain button
feedback becomes unavailable.
-
When the DSP is connected to the Crestron system and is working appropriately the LED light next to the
words “Audio DSP Status” will illuminate green. Also, the status will read “Connected” in yellow text.
-
If the DSP is waiting for a connection to the Crestron system the LED light will illuminate yellow and read
“Waiting For Connection”. Discontinue further use of the system until the light turns green or red.
-
If the DSP fails to connect to the Crestron system the LED light will illuminate red and read “Failed To
Connect” or “Not Connected”. This means there is problem with the connection of the DSP to the
Crestron system or that the DSP is simply turned off. At this point further troubleshooting may be
required. If this problem persists call Starlite Productions – (856) 780-8000.
8
Meadowood Retirement Community
Crestron Control System
EASY MODE
MICROPHONES PAGE – Auto Mics And Wireless Mics
-
Along with all of the audio related pages, the Microphones Page will only be available in the bottom scroll
bar when in Easy Mode. Again, this is because the idea of Easy Mode is to not use the console.
-
The volume adjustments for all of the microphones in the room are on the microphones page; this
includes the two wired “Auto” microphone inputs around the room and the two wireless microphones.
-
The different groups of microphone volumes can be accessed using the tabs on the left hand side of the
screen. Pressing on either button group will show the volume controls for that group.
-
Adjustment of the volume of a microphone can happen one of three ways; either by sliding the white
knob up or down, pressing anywhere on the slider to the desired level, or just by pressing on the feedback
gauge to the desired level.
-
To mute a microphone simply press the green microphone icon located at the bottom of the volume
slider column. When a microphone is muted, the icon will illuminate red and have a line thought it.
9
Meadowood Retirement Community
Crestron Control System
MICROPHONES PAGE – Microphone EQ
-
Press the Microphone EQ tab to access microphone equalization presets that were created for the
different microphone types that may be used in the room.
-
Because the console is non-operational in Easy Mode, the EQ presets are a quick way to make a
wired/wireless microphone sound more clear in the room. Because a handheld microphone will sound
different then a podium gooseneck microphone or from a lavaliere microphone; these presets were
created so that the user may plug in any type of microphone, press the EQ preset, and go. The current EQ
setting will be displayed in blue.
Handheld – Use this microphone preset when using any type of dynamic microphone hardwired into the auto
mic jacks or when using the wireless handheld microphones. This EQ preset will best accommodate the
frequency response of this kind of microphone as it will boost some of the mid and high range frequencies
lacking in most dynamic microphones.
Podium – Use this microphone preset when using any type of gooseneck/condenser microphone hardwired into
the auto mic jacks. This EQ preset will best accommodate the frequency response of this kind of microphone as
it will cut some of the low and mid-range frequencies that are prominent in most condenser microphones.
Lavaliere – Use this microphone preset when using the belt pack lavaliere microphones for wireless mics 1&2.
This EQ preset will best accommodate the frequency response of this kind of microphone as it will cut the low
mid and high range frequencies that are prominent and most “sensitive” lavaliere microphones.
None – Use this microphone preset when using a microphone type that is neither a dynamic nor a condenser
microphone. Also, when patching auxiliary audio devices into the auto mic jack this EQ preset can be used to
keep a completely flat EQ in to the system.
10
Meadowood Retirement Community
Crestron Control System
PROGRAM INPUTS PAGE - AV Plate Volumes
-
The program inputs page, accessible by pressing the “Program Inputs” button in the scrolling list at the
bottom of the page, is where the user can adjust the volume of the auxiliary inputs and CD player in the
room.
-
The three AV plates located around the room can be used to play auxiliary audio devices without the need
to turn the projector on and put the screen down. Pressing either of the three location buttons to the
right will select which source is ready to use and will illuminate white.
-
To un-route an audio only source, press and hold the AV# button for 2 seconds. This will clear the route.
***NOTE***
The AV Plates marked AV1 and AV2 are located in the Auditorium. If the rooms are “Combined” the third AV
Plate #3 will be available from the auditorium panels. If the rooms are divided AV 1 and 2 will be available from
the Auditorium panels and AV3 will be available from the Club Room panel.
If the projector power is on the audio only feedback will disappear
It is good practice to mute the “video volume” input before plugging in an aux device to avoid any popping in
the speakers. This can be done on this page by pressing the green video monitor icon on the “Video Volume”
volume control panel so that it displays as red. (See below)
-
Adjustment of the volume of an aux input can happen one of three ways; by either sliding the white knob
up or down, pressing anywhere on the slider to the desired level, or just by pressing on the feedback
gauge to the desired level. ****NOTE: This volume bar says “Video Volume” because it’s the same
volume control that is used for controlling the audio from any video source. In this case, it will just be
adjusting the auxiliary audio input device.
-
To mute an auxiliary input, press the green TV monitor icon on the bottom of the volume column. When
the source is muted, the icon will turn red and have a line through it.
11
Meadowood Retirement Community
Crestron Control System
PROGRAM INPUTS PAGE – CD Player
-
The Tascam CD-200SB CD player controls are accessible by pressing the CD player tab on the left hand
side of the page. The basic transport controls are available here. Because this unit isn’t JUST a CD player
pressing Media Select button will select the desired source from the unit (I.E. CD, SD card, Aux input or
iPod).
-
Adjustment of the volume of the CD Player can happen one of three ways; by either sliding the white
knob up or down, pressing anywhere on the slider to the desired level, or just by pressing on the feedback
gauge to the desired level.
-
To mute the CD Player press the green CD icon on the bottom of the volume column. When the player is
muted, the icon will turn red and have a line through it.
12
Meadowood Retirement Community
Crestron Control System
MONITOR PAGE – Monitor Volume
-
The monitor page, accessible by pressing the “Monitor” button in the scrolling list at the bottom of the
page, is where the user can adjust the volume of the monitor channel and/or route the desired audio
sources to the monitor channel.
-
Press the Monitor Volume tab on the left hand side of the screen to view the volume controls.
Adjustment of the volume of the monitor channel can happen one of three ways; by either sliding the
white knob up or down, pressing anywhere on the slider to the desired level, or just by pressing on the
feedback gauge to the desired level.
To mute the monitor, press the green speaker icon on the bottom of the volume column. When the
monitor is muted, the icon will turn red and have a line through it.
-
MONITOR PAGE – MONITOR ROUTING
-
Press the Monitor Routing tab on the left hand side of the screen to view the monitor routing controls.
From this page the user can route which of the audio sources they would like to send to the monitors.
-
When a monitor is plugged in to one the monitor output panels (stage left or stage right) the user can,
from this screen, select which of the sources they would like to hear in the monitor. If the source is
currently routed to the monitor mix, the speaker icon will illuminate green. To un-route a source simply
press that source’s speaker icon. This will turn the icon red and have a line through it to show it is NOT
routed.
13
Meadowood Retirement Community
Crestron Control System
VIDEO PAGE – Video Routing
-
The Video page, accessible by pressing the “Video” button in the scrolling list at the bottom of the page, is
where the user can control any of the video related items in the room.
-
Press the video routing tab on the left side of the screen to access the video routing tool which is used to
route all video in the room. To route a source simply touch and hold the icon of the desired source and
drag it to the desired destination drop box area below. The source icon will remain in the destination box
if the route was made successfully.
-
The eight sources (all eight ONLY available when the room is combined) are the Blu-ray player in the FOH
desk, the three AV input plates, the two ceiling video cameras, the laptop/dining hall video inputs and the
video recorder playback.
-
To route a different source to a previously defined destination simply drag the new source icon on top of
the currently routed source in the destination drop area and it will change. If no sources are desired, but
the projector is needed to stay on, just drag the currently routed source icon from the drop area to
anywhere outside of the box to “un-route” video.
****NOTE: Each time the system is first powered on dragging a source to the projector drop area will also turn
on the projector and put the screen down automatically. The same goes for the Club Room LCDS, they will turn
on automatically. This is an ease of use feature useful for when it is necessary to show a source quickly. If the
projector is turned off and the screen is put up manually, or the LCDS are turned off manually while the system
is on, this feature will not be available again until the entire system is shut down and restarted.
14
Meadowood Retirement Community
Crestron Control System
VIDEO PAGE – Laptop/Dining Hall Source Select
-
The number of video sources available to show in the auditorium was expanded after the original
installation, and allowed for 3 more video inputs. They are located in the Dining Hall across from the
Auditorium/Club Room labeled AV4, AV5 and AV6.
-
Due to a lack of space on the main video switcher these inputs were combined with the Laptop input
source and run through a smaller video switcher before it reaches the main switcher. As stated on the
previous page, routing any of these four sources to any of the destinations is still done using the
“Laptop/D. Hall Inputs” source in conjunction with this subpage to designate which of the sources is being
used.
-
The currently selected source will be shown with a check in the checkbox of that button.
****NOTE**** The moment a source is selected the subpage will disappear. Also, after a five second time out
without selecting a source, the subpage will disappear.
15
Meadowood Retirement Community
Crestron Control System
VIDEO PAGE – Video Volumes
-
Press the Video Volumes Tab on the left side of the screen to control the volume level of any audio
coming from either of the video sources.
-
Adjustment of the volume of the audio from video can be done in one of three ways; by either sliding the
white knob up or down, pressing anywhere on the slider to the desired level, or just by pressing on the
feedback gauge to the desired level.
-
To mute the audio, press the green TV monitor icon on the bottom of the volume column. When the
monitor is muted, the icon will turn red and have a line through it.
****NOTE: These volume controls are the same controls found on the Program Inputs page
16
Meadowood Retirement Community
Crestron Control System
VIDEO PAGE – Projector Controls
-
Press the Projector Controls Tab on the left side of the screen to control the projector and the projection
screen.
-
From this page the projector can be turned on and off by pressing the power button. If the button is
illuminated green it means the projector is on. Also, the text above this button (see #15 above) will read
Power is On or Off. Also, any video being shown can be muted on this page which means the image will
go black. This done by pressing the Video Mute button, it will illuminate blue when the video is currently
muted. If desired, the image can also be frozen or seemingly “paused”. This is done in the same way by
pressing the Freeze Video button and will also illuminate blue when engaged.
-
Below the projector control buttons is a visual gauge that will show the approximate usage of lamp hours
used on the projector lamp. It is required to change these lamps before their expected lifespans run out
to avoid damage to the projector and to keep the image looking bright. (These lifespans can be found in
the user manual of the projector). It is recommended to call Starlite Productions in ample time before
their life cycle ends to order the proper lamps and have them installed. (When the bar graph reaches the
first bar of red, it is time to order a new lamp).
-
To manually put the screen up or down use the buttons on this page.
****Note: When the room is shut down completely the projector will turn off automatically, and the screen will
go up. Anytime the projector is shutdown it is HIGHLY recommended to wait at least 1 minute and 30 seconds
until the lamps sufficiently cool down before turning the projector back on.
17
Meadowood Retirement Community
Crestron Control System
VIDEO PAGE – LCD Controls
****Note**** The “LCD Controls” Tab will ONLY be available on the panels in the Auditorium when the rooms
are combined. If the rooms are divided, this tab will disappear and control becomes available for the LCDs ONLY
from the panel in the Club Room.
-
Press the LCD Controls Tab on the left side of the screen to access the controls for the LCDs in the Club
Room.
-
From this page the LCD monitors can be turned on and off by pressing the power buttons. If the button is
illuminated green it means the LCD is on. Also, the text above this button (see #16 and #17 above) will
read Power is On or Off.
-
Below the LCD power button are input buttons to switch the LCD between the two used inputs. The
HDMI1 input is for all sources except the cable TV feed which uses the TV input.
****Note**** When the room is shut down completely, the LCDs will turn off automatically.
18
Meadowood Retirement Community
Crestron Control System
VIDEO PAGE – Blu-Ray Controls
-
Press the Blu-ray controls tab to access the controls for the Oppo Blu-ray player. The controls are similar
to the controls found on the remote control. Basic play, stop, pause and search features as well as
transport controls for navigation through menus are found here.
-
The red, green, blue and yellow buttons seen on this page correspond with the colored buttons on the
remote control. These buttons are unique for Blu-ray control and can change functionality dependent on
the Blu-Ray disc being watched. Some Blu-Ray disc menus will utilize the colored buttons for different
actions associated with their disc to navigate their menus.
-
The up, down, left, right and ok buttons correspond with the navigation arrows found on the remote
control. These arrows can be used to navigate through the disc menus and to make page selections.
-
The Blu-ray player is also equipped with a Closed Caption feature for the hearing impaired. To engage the
closed caption feature press the button labeled “CC” on the bottom right hand corner of the screen.
19
Meadowood Retirement Community
Crestron Control System
LIGHTS
Locked Panel Access
-
The lights in the Auditorium and Club Room can be controlled from any one of the three touch panels. If
the panel is locked the controls can be accessed by pressing the light bulb hard button on the right hand
side of the touch panel. To exit the lighting locked page press the light bulb hard button again or the
power hard button.
***NOTE***
The available lighting controls will be dependent on the room configuration. If the rooms are combined, any of
the lights for either of the two rooms will be available from any of the three panels. If the rooms are divided the
lights for the Club Room will only be available from the Club Room panel and the lights for the Auditorium will
only be available from the Auditorium panels.
Unlocked Panel Access
If the panel is unlocked, the lighting page can be accessed by selecting the Lights tab in the bottom scroll bar list or
by pressing the light bulb hard button on the right hand side of the touch panel.
20
Meadowood Retirement Community
Crestron Control System
LIGHTS – Lighting Presets
-
The first page that will appear is the Lighting Presets Page. This is an easy way to turn on the lights in
either of the rooms.
Club Room Main will turn on the Club Room soffit lighting, the Club Room down-light cans and the Club Room
fluorescent square lights to 100%.
Auditorium Main will turn on the Auditorium soffit lighting, and the Auditorium room down-light cans to 100%.
Stage Main will turn on the Stage 1 and Stage 2 lights to 100%.
Pit Main – will turn on all of the pit lighting (down lights, eyeballs and track lighting) to 100%
Camera Lighting Presets
Podium in/on Pit/Stage (L,C,R) – Use these buttons to trigger preconfigured preset lighting levels to best suit the
lighting as per the podium placement. If the podium is placed in the pit area or on stage on the House Left, Center
or Right side, use the corresponding button to automatically tune lighting levels to appropriate side of the
pit/stage.
21
Meadowood Retirement Community
Crestron Control System
LIGHTS – Lighting Controls
-
The lighting controls page, accessible by pressing the Lighting Controls tab in the list on the left hand side
of the page is where the user can manually adjust any of the dimmers/switches found in the two rooms.
CLUB ROOM
HL/HR Soffit – Fader controls to adjust the levels of the house left and house right soffit fixtures.
Down Lights – On/Off controls to turn on/off the room down light cans.
Fluorescent Squares – On/Off controls to turn on/off the room fluorescent square light fixtures.
AUDITORIUM
HL/HR Soffit – Fader controls to adjust the levels of the house left and house right soffit fixtures.
Down Lights – On/Off controls to turn on/off the room down light cans.
Stage 1&2 – Fader controls to adjust the levels of the fixtures on the stage.
Pit Down HL,HC,HR – Fader controls to adjust the levels of the pit down light fixtures (House Left, Center and
Right).
Pit Eyeballs HL,HC,HR – Fader controls to adjust the levels of the pit eyeball fixtures (House Left, Center and Right).
Pit Track HL,HC,HR – Fader controls to adjust the levels of the pit track fixtures (House Left, Center and Right).
22
Meadowood Retirement Community
Crestron Control System
ADVANCED MODE
-
The main noticeable difference on the Crestron touch panels in Advanced Mode is the scroll bar on the
bottom of the screen. Because the audio is being completely controlled and routed using the audio console
the audio pages have been removed except controls for the CD player have been added. Also, the video
record page becomes available. All of the remaining features available in Advanced Mode are operated in the
same manner as in Easy Mode. (See Easy Mode operation earlier in the manual for video, lights and settings
functionality).
CD PLAYER PAGE – CD Player Control
-
The CD Player page, accessible by pressing the “CD Player” button in the scrolling list at the bottom of the
page, is where the user can control the Tascam CD-200-SB cd player.
-
The basic transport controls are available here. Because this unit isn’t JUST a CD player pressing the
Media Select button will select the desired source from the unit (I.E. CD, SD card, Aux input or iPod).
23
Meadowood Retirement Community
Crestron Control System
RECORD PAGE – Record Routing
-
The Record page, accessible by pressing the “Record” button in the scrolling list at the bottom of the
page, is where the user can route video to and record onto the Gefen GTV-HD-PVR recording unit.
-
Due to copyright and anti-piracy laws the Blu-ray source is not available here to be routed to the video
recorder. The six remaining sources (all available when the room is combined) are the three AV input
plates, the two ceiling video cameras and the laptop/dining hall video inputs.
-
To route a source to the video recorder simply touch and hold the desired source icon and drag it to the
“Record Feed” box below. To route a different source simply drag the new source icon on top of the
currently routed source in the Record Feed area and it will change. If no sources are desired to be
recorded just drag the currently routed icon from the drop area to anywhere outside of the box to “unroute” video.
24
Meadowood Retirement Community
Crestron Control System
RECORD PAGE – Record Controls
-
The Record Controls page, accessible by pressing the “Record Controls” button in list at the left of the
screen, is where the user can control the Gefen GTV-HD-PVR recording unit.
-
All of the necessary recording controls are available on this page. The navigation controls for the on
screen menu navigation are found here. Use the arrows to navigate and “Enter” to select.
-
The “Write To Card/HDD” button stands for write to removable card/hard drive disc. This button is used
to specify where the video will be recorded to in the unit, either the removable compact flash card or to
the hard drive inside of the unit. When viewing the on-screen Gefen menu an icon will appear to show
which location was selected.
***NOTE***
If the “REC Playback” source is routed to the preview monitor the user can see the home screen of the Gefen
recorder and its features.
The Gefen recorder will only record in the .M4V video format. If another format is desired it must be converted
on a computer after recording.
25
Meadowood Retirement Community
Crestron Control System
MOVIE MODE
-
Again, the main noticeable difference on the Crestron touch panels in Movie Mode is the scroll bar on the
bottom of the screen. The audio pages are gone and the record page is also unavailable. The other
differences are on the Video Page. Because the Blu-ray is the only source available in Movie Mode the video
routing tab is not available on the Video Page. Also, the movie volume is the sole volume control when in this
mode, so, the video volumes tab is also missing. Just like using the Master Volume controls (explained later in
this manual) the master movie volume is done using the main bar at the top of the page or using the hard
buttons on the panel itself.
26
Meadowood Retirement Community
Crestron Control System
PASSWORD SET –
-
To access the Password Set Page of the touch panel press and hold the bottom button on the tab located
on the left side of the Settings Page for 4 seconds. The password set page will appear. Follow the on
screen instructions to set a new password.
27
Meadowood Retirement Community
Crestron Control System
MASTER VOLUME –
-
The Master Volume Bar at the top of the screen is available in Easy Mode and Movie Mode ONLY. In
Advanced Mode this bar will disappear. Again, this is because all audio is routed through the audio
console.
-
The master volume in Easy Mode or Movie Mode can be adjusted in either one of two ways. Either press
the volume gauge at the top of the screen directly to the desired level (on any page) or use the hard
buttons on the side of the touch panel face. The hard buttons are not available when the panel is locked.
28
Meadowood Retirement Community
Crestron Control System
TOUCHPANEL LOCK –
-
When the system is on the Crestron panels can be locked to keep unwanted access to the control system.
-
To lock the panel, press the “padlock” button in the bottom scrollbar or use the home button on the
touch panel face.
-
This will keep the system on and operational and inaccessible unless the user has the correct password.
The system status on the Splash Page will now read “System Power Is On” under where it says Auditorium
or Club Room (Depending on the room configuration the system power status may differ for each room.
I.E. if the rooms are divided). To gain access to the panel simply touch the screen area or power button
on the panel face to trigger the password keypad.
29
Meadowood Retirement Community
Crestron Control System
SYSTEM SHUTDOWN –
-
To shut down the system press the power button in the bottom scrollbar or power button on touch panel
face (when panel is unlocked) to trigger the power off subpage (shown below).
-
To shut down press the confirm button. This will bring the panel back to the Splash Page. Canceling this
operation will return the panel to the page behind the power down prompt.
****NOTE****
If the room is combined the power prompt shown above will be displayed. Pressing confirm will shut down
the entire space. If the rooms are currently divided, triggering the power off subpage will display a similar
prompt but it will ask the user to power down the “Room”. This will shut down ONLY the room that the
panel is located in.
30
Meadowood Retirement Community
Crestron Control System
CLUB ROOM
-
The Club Room AV functions on the touch panel are only accessible when the rooms are divided. If the
rooms are combined a message will display on the screen saying that all controls except the lighting
controls have been restricted. Access lighting components as usual.
MICROPHONES/AUX IN - Mic and AV Plate Volume Page
-
Pressing Microphones/Aux In in the scrollbar list at the bottom of the page will bring you to the page
shown above. The tab on the left, Microphones and AV Plate Volumes, will give access to the wireless mic
2 controls and AV3 volume panels.
-
Adjustment of the volume of a microphone or AV plate volume can happen one of three ways; either by
sliding the white knob up or down, pressing anywhere on the slider to the desired level, or just by
pressing on the feedback gauge to the desired level.
-
To mute a microphone or AV plate volume simply press the green microphone or green monitor icon
located at the bottom of the volume slider columns. When a microphone or video volume is muted, the
icon will illuminate red and have a line thought it.
31
Meadowood Retirement Community
Crestron Control System
MICROPHONE/AUX IN PAGE – CD Player
-
The Tascam CD-200SB CD player controls are accessible by pressing the CD player tab on the left hand
side of the page. The basic transport controls are available here. Because this unit isn’t JUST a CD player
pressing Media Select button will select the desired source from the unit (I.E. CD, SD card, Aux input or
iPod).
-
Adjustment of the volume of the CD Player can happen one of three ways; by either sliding the white
knob up or down, pressing anywhere on the slider to the desired level, or just by pressing on the feedback
gauge to the desired level.
-
To mute the CD Player press the green CD icon on the bottom of the volume column. When the player is
muted, the icon will turn red and have a line through it.
32
Meadowood Retirement Community
Crestron Control System
VIDEO PAGE – Video Routing
-
The Video page, accessible by pressing the “Video” button in the scrolling list at the bottom of the page, is
where the user can control any of the video related items in the room.
-
Press the video routing tab on the left side of the screen to access the video routing tool which is used to
route all video in the room. To route a source simply touch and hold the icon of the desired source and
drag it to the desired destination drop box area below. The source icon will remain in the destination box
if the route was made successfully.
-
The two sources are the AV3 plate and the Cable TV feed.
-
To route a different source to the LCDs simply drag the new source icon on top of the currently routed
source in the destination drop area and it will change. If no sources are desired, but the TV is needed to
stay on, just drag the currently routed source icon from the drop area to anywhere outside of the box to
“un-route” video.
****NOTE: Each time the system is first powered on dragging a source to the LCDs drop area will also turn on
the TV automatically. This is an ease of use feature useful for when it is necessary to show a source quickly. If
the LCDS are turned off manually while the system is on, this feature will not be available again until the entire
system is shut down and restarted.
33
Meadowood Retirement Community
Crestron Control System
VIDEO PAGE – Video Volumes
-
The Video page, accessible by pressing the “Video” button in the scrolling list at the bottom of the page, is
where the user can control any of the video related items in the room.
-
Press the Video Volume tab on the left side of the screen to access the video volume controls. This
volume represents the level of the audio coming from the AV3 or Cable TV inputs.
34
Meadowood Retirement Community
Crestron Control System
VIDEO PAGE – LCD Controls
-
Press the LCD Controls Tab on the left side of the screen to access the controls for the LCDs in the Club
Room.
-
From this page the LCD monitors can be turned on and off by pressing the power buttons. If the button is
illuminated green it means the LCD is on. Also, the text above this button (see #16 and #17 above) will
read Power is On or Off.
-
Below the LCD power button are input buttons to switch the LCD between the two used inputs. The
HDMI1 input is for all sources except the cable TV feed which uses the TV input.
****Note**** When the room is shut down completely, the LCDs will turn off automatically.
35
Meadowood Retirement Community
Crestron Control System
VIDEO PAGE – Projector Controls
****Note****
The Projector Controls are only available on the Club Room touch panel when the rooms are in Movie Mode.
-
Press the Projector/Screen Controls Tab on the left side of the screen to control the projector and the
projection screen.
-
From this page the projector can be turned on and off by pressing the power button. If the button is
illuminated green it means the projector is on. Also, the text above this button (see #15 above) will read
Power is On or Off. Also, any video being shown can be muted on this page which means the image will
go black. This done by pressing the Video Mute button, it will illuminate blue when the video is currently
muted. If desired, the image can also be frozen or seemingly “paused”. This is done in the same way by
pressing the Freeze Video button and will also illuminate blue when engaged.
-
Below the projector control buttons is a visual gauge that will show the approximate usage of lamp hours
used on the projector lamp. It is required to change these lamps before their expected lifespans run out
to avoid damage to the projector and to keep the image looking bright. (These lifespans can be found in
the user manual of the projector). It is recommended to call Starlite Productions in ample time before
their life cycle ends to order the proper lamps and have them installed. (When the bar graph reaches the
first bar of red, it is time to order a new lamp).
-
To manually put the screen up or down use the buttons on this page.
36
Meadowood Retirement Community
Crestron Control System
VIDEO PAGE – Blu-Ray Controls
****Note****
The Blu-Ray Controls are only available on the Club Room touch panel when the rooms are in Movie Mode.
-
Press the Blu-ray controls tab to access the controls for the Oppo Blu-ray player. The controls are similar
to the controls found on the remote control. Basic play, stop, pause and search features as well as
transport controls for navigation through menus are found here.
-
The red, green, blue and yellow buttons seen on this page correspond with the colored buttons on the
remote control. These buttons are unique for Blu-ray control and can change functionality dependent on
the Blu-Ray disc being watched. Some Blu-Ray disc menus will utilize the colored buttons for different
actions associated with their disc to navigate their menus.
-
The up, down, left, right and ok buttons correspond with the navigation arrows found on the remote
control. These arrows can be used to navigate through the disc menus and to make page selections.
-
The Blu-ray player is also equipped with a Closed Caption feature for the hearing impaired. To engage the
closed caption feature press the button labeled “CC” on the bottom right hand corner of the screen.
37
Meadowood Retirement Community
Crestron Control System
MASTER VOLUME –
-
The Master Volume Bar at the top of the screen is the overall volume of any source going to the Club
Room
-
The master volume can be adjusted in either one of two ways. Either press the volume gauge at the top
of the screen directly to the desired level (on any page) or use the hard buttons on the ride side of the
touch panel face. The hard buttons are not available when the panel is locked.
38
Meadowood Retirement Community
Crestron Control System
TOUCHPANEL LOCK –
-
When the system is on the Crestron panels can be locked to keep unwanted access to the control system.
-
To lock the panel, press the “padlock” button in the bottom scrollbar or use the home button on the
touch panel face.
-
This will keep the system on and operational and inaccessible unless the user has the correct password.
The system status on the Splash Page will now read “System Power Is On” under where it says Auditorium
or Club Room (Depending on the room configuration the system power status may differ for each room.
I.E. if the rooms are divided). To gain access to the panel simply touch the screen area or power button
on the panel face to trigger the password keypad.
39
Meadowood Retirement Community
Crestron Control System
SYSTEM SHUTDOWN –
-
To shut down the system press the power button in the bottom scrollbar or power button on touch panel
face (when panel is unlocked) to trigger the power off subpage (shown below).
-
To shut down press the confirm button. This will bring the panel back to the Splash Page. Canceling this
operation will return the panel to the page behind the power down prompt.
****NOTE****
If the rooms are currently divided, triggering the power off subpage will display a prompt to power down
the “Room”. This will shut down ONLY the room that the panel is located in.
40