1
DEAR MOBILE PHONE USER!
Congratulations on your purchase of the emporiaCAREplus mobile phone!
We have compiled the most important information for you
on a few pages so that you become conversant with you new
mobile telephone quickly.
We wish that you enjoy making telephone calls with your new mobile
phone and remain,
Yours sincerely,
EMPORIA Telecom
Eveline Pupeter
CEO emporia Telecom
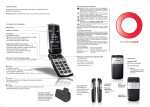
Scope of supply:
CARE
plus
CAREplus
Mobile telephone,
Emergency
Charger cable
Rechargeable
charging station
watch
(RL - V170EU)
battery (AK - V33i)
with wall-mounting
bracket
User Manual
WHAT ARE ALL THE KEYS MEANT FOR?
Hang up / Back / Delete - Key
On/Off - key
– During a call: End the call
To switch the phone on or off: Press for 2 seconds
– In the menu: One step back
– For entering digits or alphabets: Delete
Volume control
Pick up / OK key
– Adjusting the speaker volume
– Dial: Enter the number, then press
– Telephone is ringing:
– Incoming call: Accept
Press to mute-
the ring tone (rings again with the next call)
(Even if the phone is in the charger station –
hands free)
Locking keys
– In the menu: Confirm selection
Prevents keys getting pressed inadvertently.
– On standby (Idle condition):
Press for 2 seconds to switch the phone on or off.
Navigate to the caller list
(dialled, answered, missed)
Arrow keys
–Page in the contacts list and menu
– In standby enter with
into the contacts list
- key
– Press long: Listen to the answering machine
- key
– While entering (SMS, contacts list entry):
Inserting a blank
Star - key
–P
ress long: Last 10 numbers dialled
Hash - key
– Press short 2 times: +
– Press long:
(for country code, e.g. +49 for Germany)
– Press short 3 times: Adding a dialling delay
Missed calls list
ICONS ON THE SCREEN (Also see Chapter 4)
Battery display
Missed call
Silent / Sleep
Alarm on
Call divert
Meeting /
Theatre
Bluetooth on
New SMS
Maximum / Bus
– While entering:
– While entering: Special characters ( . , ? ! ' " ( ) @…)
Switch between capital and small
– Flashes red: Charging or battery capacity very low
alphabets and digits
– L ights up red continuously: Charge complete
– Flashes blue: Missed call
Pocket torch key
– Press for 3 seconds to switch it on
– Press short to switch it off
ATTENTION: Do not shine the torch directly in the
eyes of human beings or animals!
Menu - key
menu
Navigate to the menu
(SMS, Calls list, Contacts list, Settings)
Daily alarm key
Acknowledge the passive alarm set.
May also be programmed as a Favourite key
optionally. (See chapter 6.2 on page 22)
Emergency call button
Rechargeable battery compartment
High-performance Li-Ion rechargeable battery
Signal strength
GPS on
Roaming If you are abroad, this icon
replaces the one for signal strength
and you know that you are now making calls in an external network.
GPS fixed:
Appears if the GPS feature has identified the
location.
3
TABLE OF CONTENTS
1. First steps
6
1.1 Inserting the SIM card . . . . . . . . . . . . . . . . . . . . . . . . . . . . . . . . . . . . . . . . . . 6
1.2 Insert the battery. . . . . . . . . . . . . . . . . . . . . . . . . . . . . . . . . . . . . . . . . . . . . . . 6
1.3 Charge the battery . . . . . . . . . . . . . . . . . . . . . . . . . . . . . . . . . . . . . . . . . . . . . 7
1.4 Switching the phone on / off. . . . . . . . . . . . . . . . . . . . . . . . . . . . . . . . . . . . 8
2. Navigation in the phone
10
2.1 Navigation help in the menu. . . . . . . . . . . . . . . . . . . . . . . . . . . . . . . . . . 11
2.2 Display on time. . . . . . . . . . . . . . . . . . . . . . . . . . . . . . . . . . . . . . . . . . . . . . . 11
3. Making phone calls
12
3.1 Dial with the numeric keypad. . . . . . . . . . . . . . . . . . . . . . . . . . . . . . . . . 12
3.2Redialling. . . . . . . . . . . . . . . . . . . . . . . . . . . . . . . . . . . . . . . . . . . . . . . . . . . . 12
3.3 Call list. . . . . . . . . . . . . . . . . . . . . . . . . . . . . . . . . . . . . . . . . . . . . . . . . . . . . . . 12
3.4Hands-free. . . . . . . . . . . . . . . . . . . . . . . . . . . . . . . . . . . . . . . . . . . . . . . . . . . 12
3.5 Dialling from the contacts list. . . . . . . . . . . . . . . . . . . . . . . . . . . . . . . . . 13
3.6 The Contacts list. . . . . . . . . . . . . . . . . . . . . . . . . . . . . . . . . . . . . . . . . . . . . . 13
3.6.1 Saving numbers and names. . . . . . . . . . . . . . . . . . . . . . . . . . . . . . . . . . . . . . 13
3.6.2 Modifying numbers and names. . . . . . . . . . . . . . . . . . . . . . . . . . . . . . . . . . . 13
3.6.3 Calling a number from the contacts list. . . . . . . . . . . . . . . . . . . . . . . . . . . 14
3.6.4 Searching for names. . . . . . . . . . . . . . . . . . . . . . . . . . . . . . . . . . . . . . . . . . . . . . 14
3.6.5 Saving speed dial numbers: saving the nine most important numbers . . . 14
3.6.6 Using speed dial numbers: calling up the nine most important numbers. 14
3.6.7 Remote maintenance of the contacts list via SMS. . . . . . . . . . . . . . . . . 15
3.6.8 Contacts list settings. . . . . . . . . . . . . . . . . . . . . . . . . . . . . . . . . . . . . . . . . . . . . . 15
4. Information on the standby display
16
5. SMS - Create message and send
18
5.1 Enter text . . . . . . . . . . . . . . . . . . . . . . . . . . . . . . . . . . . . . . . . . . . . . . . . . . . . 18
5.2 Send the text. . . . . . . . . . . . . . . . . . . . . . . . . . . . . . . . . . . . . . . . . . . . . . . . . 20
5.3 SMS confirmation . . . . . . . . . . . . . . . . . . . . . . . . . . . . . . . . . . . . . . . . . . . . 20
5.4 SMS Service Centre Number . . . . . . . . . . . . . . . . . . . . . . . . . . . . . . . . . . 21
4
6. Important menu options
22
6.1 Telephone profiles. . . . . . . . . . . . . . . . . . . . . . . . . . . . . . . . . . . . . . . . . . . . 22
6.2Favourites. . . . . . . . . . . . . . . . . . . . . . . . . . . . . . . . . . . . . . . . . . . . . . . . . . . . 22
6.3 Security settings. . . . . . . . . . . . . . . . . . . . . . . . . . . . . . . . . . . . . . . . . . . . . . 23
6.4 Number of answering machine . . . . . . . . . . . . . . . . . . . . . . . . . . . . . . . 23
7.Tools
24
7.1 Alarm clock . . . . . . . . . . . . . . . . . . . . . . . . . . . . . . . . . . . . . . . . . . . . . . . . . . 24
7.2 Birthday reminder. . . . . . . . . . . . . . . . . . . . . . . . . . . . . . . . . . . . . . . . . . . . 24
7.3Calculator. . . . . . . . . . . . . . . . . . . . . . . . . . . . . . . . . . . . . . . . . . . . . . . . . . . . 25
7.4Calendar. . . . . . . . . . . . . . . . . . . . . . . . . . . . . . . . . . . . . . . . . . . . . . . . . . . . . 25
7.5 SIM services. . . . . . . . . . . . . . . . . . . . . . . . . . . . . . . . . . . . . . . . . . . . . . . . . . 25
7.6Bluetooth. . . . . . . . . . . . . . . . . . . . . . . . . . . . . . . . . . . . . . . . . . . . . . . . . . . . 26
8. Emergency call features
28
8.1 Emporia emergency call feature (Emergency call key). . . . . . . . . . 28
8.1.1 Enabling the emergency call key. . . . . . . . . . . . . . . . . . . . . . . . . . . . . . . . . . 28
8.1.2 Saving the emergency call numbers. . . . . . . . . . . . . . . . . . . . . . . . . . . . . . 29
8.1.3 What needs to be done in an emergency?. . . . . . . . . . . . . . . . . . . . . . . . 29
8.1.4 What happens if the emergency call has been triggered?. . . . . . . . . 30
8.2 Add-ons to the Emporia emergency call feature . . . . . . . . . . . . . . . 32
8.2.1Emporia4CARE . . . . . . . . . . . . . . . . . . . . . . . . . . . . . . . . . . . . . . . . . . . . . . . . . . . 32
8.2.2 Position determination: (GPS). . . . . . . . . . . . . . . . . . . . . . . . . . . . . . . . . . . . . 35
8.2.3 Daily alarm. . . . . . . . . . . . . . . . . . . . . . . . . . . . . . . . . . . . . . . . . . . . . . . . . . . . . . . 38
8.2.4 Battery low alarm. . . . . . . . . . . . . . . . . . . . . . . . . . . . . . . . . . . . . . . . . . . . . . . . . 38
8.2.5 Geo-fence (Zone Alarm). . . . . . . . . . . . . . . . . . . . . . . . . . . . . . . . . . . . . . . . . . 39
8.2.6 Falling alarm. . . . . . . . . . . . . . . . . . . . . . . . . . . . . . . . . . . . . . . . . . . . . . . . . . . . . . 40
8.2.7Emergency call feature and wristwatch. . . . . . . . . . . . . . . . . . . . . . . . . . . 42
8.2.8 Other settings are given in the emergency call settings menu option. . 45
9. The menus at a glance
46
10. General Instructions
48
5
1. FIRST STEPS
1.1 INSERTING THE SIM CARD
You need a SIM card to make phone calls. You can get this from your
network operator.
Please insert this card as follows:
Remove the battery cover.
Insert the SIM card with the golden
contacts facing down and the
missing corner at the bottom left.
1.2 INSERT THE BATTERY
The contacts of the rechargeable
battery must be such that they make
contact with the golden contacts of
6
the mobile phone.
Push the battery cover with slight
pressure in front until it latches.
1.3 CHARGE THE BATTERY
Note: Before using the mobile phone for the first time,
charge the battery for at least 4 hours.
1.3.1Charging with the charger cable
Plug the charger cable into the jack at
the bottom of the mobile phone. Then
insert the main plug in
the socket.
The battery icon on the display indicates
the progress of charging.
The bars in the battery display get filled up = mobile phone is charging;
the bars in the battery display remain visible = charged completely.
1.3.2Charging with the charging
station
Connect the plug of the
charger cable to the back side of the
charging station and insert the
mains plug into the socket.
Finally, place the phone in the
charging station.
7
1.3.3Wall mounting of the charging
station
Alternatively, you may also fix the
charging station on the wall with the
help of the bracket provided. Please
proceed as follows for the installation:
1.Look for a suitable place
near a mains socket.
(Check the distance with the help of
the charging cable.)
2.Drill three holes in advance.
3.Use plugs if necessary.
(not included in the scope of supply)
4.Fix the wall bracket with the help of
appropriate size screws.
(not included in the scope of supply)
5.Place the charging station in the wall
bracket. Ensue that the charging
station gets latched into it cleanly.
6.Connect the plug of the
charger cable to the back side of the
charging station and insert the mains
plug into the socket.
1.4 SWITCHING THE PHONE ON / OFF
- Press the key at least for 2 seconds.
8
1.4.1When switching it on for the first time
1.Depending on the network operator, you will now be asked to enter your
4-digit PIN code. You will find this code in the documentation that you
have received from the network operator: Enter the PIN code and confirm
the input with the - key. (See chapter 6.3 on page 23)
2.You will be asked to set the Language:
Select the desired language as described with
the help of the arrow keys and the - key.
3.You will be asked to set the Time:
Enter the time using the numeric keys.
Confirm the input with the - key.
4.You will be asked to set the Date:
Enter the time using the numeric keys.
Confirm the input with the - key.
5.You will be asked to adjust the Font size on the display:
Using the arrow keys, choose between large and small size.
Confirm the input with the - key.
6.You will be asked to set your number:
Enter the number with the numeric keys and
confirm the input with the - key.
7.You will be asked to set your name:
Enter the name using the keyboard and Save with the - key.
Note: In order to change the date and time subsequently,
navigate in the menu to Settings / Date & Time.
Note: In order to change the font size subsequently,
navigate in the menu to Settings / Font size.
Note: In order to change your own phone number and your name
subsequently, navigate in the menu to Contacts list / My number.
9
2. NAVIGATION IN THE PHONE
–By pressing the - key (on the right side of the phone)
in the standby mode, you navigate to the menu with the
main menu chapters (Messaging, Contacts list, Settings, etc.).
For information on the standby screen, please refer to Chapter 4.
you can navigate in the menu and select
–Using the two arrow keys
the menu option of your choice (e.g. Settings).
Note: If a menu option is highlighted, the corresponding icon is enlarged
slightly. Moreover, the highlighted menu option is displayed at the top border
of the screen.
–Press the - key to choose a menu option.
This key is also used to confirm settings,
as well as to start making and accepting phone calls.
–Press the - key to go back one step in the menu.
–To go to the standby screen, press the
- key repeatedly or keep the - key pressed until the standby screen
appears.
Note: Digits are prefixed to the menu options in the phone. By pressing these
digits (e.g. 4 for Contacts list) you can also open the associated menu option.
menu
10
2.1 NAVIGATION HELP IN THE MENU
Select a menu option without confirming it with , and after a short time an
information text is displayed above this menu option automatically.
Press the - key to hide this text.
Under Settings / Help you can enable or disable this feature.
2.2 DISPLAY ON TIME
If no input is made for a few seconds, the display is switched off in order
to conserve energy. In case of an incoming call or by pressing any key, the
screen switched on automatically.
Under Settings / Display & Sleep / Backlight you can specify the time in seconds
after which the display goes off.
11
3. MAKING PHONE CALLS
3.1 DIAL WITH THE NUMERIC KEYPAD
Use the numeric keypad to enter the phone number always with the area
code. Example: Enter »049789789« for the phone number 789789 with area code
049
–Press to make the phone call.
–End the call with . If the person you have called hangs up first,
pressing is no longer necessary.
3.2 REDIALLING
In order to redial one of the last numbers called,
in the standby screen (See chapter 4 on page 16) long press the
choose the desired number using the arrow keys.
Call the number selected by pressing the - key.
- key and
3.3 CALL LIST
In order to redial one of the last numbers dialled, answered or missed, in the
standby screen (See chapter 4 on page 16) press the - key and choose the
desired number using the arrow keys.
Call the number selected by pressing the - key.
3.4 HANDS-FREE
–During a call, press the - key and select the Hands-free option.
Confirm with the - key.
–The talking distance should be at least 50 cm.
Operating with the charging station
–If you place the mobile phone in the charging station,
it switches automatically to the hands-free mode.
–If you remove the mobile phone from the charging station,
12
the handset speaker is enabled automatically.
Answering a call with the charging station
–Press the -key to answer a call,
and the mobile phone switches automatically to the hands-free mode.
3.5 DIALLING FROM THE CONTACTS LIST
You can save names and numbers in the contacts list.
These are listed in alphabetical order. To call up the Contacts list,
either in the standby screen (See chapter 4 on page 16) press the - key, or
in the menu for go to the Contacts list/Search name.
3.6 THE CONTACTS LIST
The Contacts list enables you to save, modify and search from up to
500 names and numbers. The entries may be saved on the phone or
on the SIM card.
Note: the 500 entries possible pertain to the contacts list internal to the phone.
In addition to this, you can also save phone numbers on your SIM card.
3.6.1Saving numbers and names
1.Go to the menu on Contacts list and open it.
2.Select New contact.
3.Enter the number with the numeric keypad and
confirm the input with the - key.
4.Enter the name using the keyboard and confirm it.
Note: For entering text see Chapter 5.
3.6.2Modifying numbers and names
In the menu under Modify Contacts list/Entry select the number and/or the
name, modify and then confirm.
13
3.6.3Calling a number from the contacts list
and
In the contacts list, select the entry with
make the call be pressing the - key.
3.6.4Searching for names
In the Contacts list you can enter the starting alphabet of the first name or
surname and the search for the entry is made automatically.
If there is no entry existing with the starting alphabet input,
the following appears by way of information: List is empty!
Note: For help on text input of the initial alphabets, refer to Chapter 5.1
3.6.5Saving speed dial numbers: saving the nine most important
numbers
Navigate to the Contacts list/Speed dial keys, in order to save your nine most
important numbers on the number keys to .
Select Speed dial number 1 in order to search for the first number of your
choice from the contacts list and to save it.
Select Speed dial number 2 in order to search for the second number of your
choice and to save it, etc.
Note: the speed dial key 1 may possibly be preconfigured by your network
operator with the number of your answering machine.
3.6.6Using speed dial numbers: calling up the nine most important
numbers
In order to call up a speed dial number that has already been saved,
keep the , , , , , , , or key pressed until dialling starts.
Note: If you have not yet saved any phone number, by pressing the numeric
keys , , , , , , , or you shall be asked to save a number.
14
3.6.7Remote maintenance of the contacts list via SMS
You can have contacts list entries sent via SMS from another
mobile phone (e.g. from relatives, acquaintances)
that are accepted automatically in your contacts list.
You can switch on or switch off this feature in the menu
option Contacts list/SMS in contacts list
or specify that only those persons,
who are saved in your phone,
shall be permitted to send contacts list entries to you.
To do so, this person must send an SMS to you in the following format:
#Name#Number# e.g.: #Tobias#01509876543#
With receipt of the SMS, the phone number is saved automatically in your
contacts list.
3.6.8Contacts list settings
In Contacts list/Contacts list settings you have the following options:
–Save entry in: You specify the destination for your contacts list entries
(SIM card or the phone).
–Memory used: Select the numbers list that is displayed in the contacts list
(SIM card and/or the phone).
–Memory occupied: see how many numbers have already been saved.
–Automatic saving in the contacts list: Configuring the option, of saving or
discarding the number of the caller at the end of a call if the number does
not yet exist in the contacts list.
15
4. INFORMATION ON THE STANDBY DISPLAY
If no applications (phone call, SMS, menu) are
running on the phone, it is in the standby mode.
In the display (=screen) you see the standby screen.
If you are in the menu or in another application,
you can return to the standby screen by pressing
the -key several times.
The following icons may be displayed
in the standby mode:
16
GSM
11:30
20.09.2014
H
Calls
: Provides an indication of the charge status. (See chapter 1.3 on page 7)
: Gives an indication of the instantaneous reception (Signal strength).
: Roaming – appears if you are in an external network, e.g. when you are
abroad
: Headphones connected
: Appears if the alarm is set and switched on.
: Appears if you have enabled the Silent/Sleep profile.
(See chapter 6.1 on page 22)
: Appears if you have enabled the Meeting/Theatre profile.
: Appears if you have enabled the Maximum/Bus profile.
: Appears when an SMS is received. (See chapter 5 on page 18)
: Appears if you have a missed call. (See chapter 3.3 on page 12)
: Appears if all incoming calls are diverted.
: Appears if Bluetooth is switched on. (See chapter 7.6 on page 26)
: Appears if a Bluetooth device is connected.
: Appears if the GPS feature is switched on.
: Appears if the GPS feature has identified the location.
: Appears if geo-fencing is enabled. (See chapter 8.2.5 on page 39)
: Appears if the falling alarm is enabled.
: Appears if the battery alarm is enabled. (See chapter 8.2.4 on page 38)
: Appears if the daily alarm is enabled. (See chapter 8.2.3 on page 38)
: Appears if the emergency call watch is connected.
(See chapter 8.2.7 on page 42)
: Appears if the emergency call watch feature has been switched on,
but the emergency call watch has not been connected
H in blue: Appears if the phone is registered on the emporia4CARE platform or
on a CARE organisation. (See chapter 8.2 on page 32)
H in green: Appears if the phone is registered on the emporia4CARE platform or
on a CARE organisation and friends have been defined who can
localise your position. (See chapter 8.2 on page 32)
H in red: Appears if the phone is de-registered on the emporia4CARE platform or
on a CARE organisation, but friends have been defined who can
localise your position. (See chapter 8.2 on page 32)
17
5. SMS - CREATE MESSAGE AND SEND
You can create text messages with your mobile phone and send them. For
more information on this, refer to the menu under Messages / Create new.
5.1 ENTER TEXT
You have the option to enter numbers and alphabets with the help of the
keypad. Each key provides multiple characters depending on how often you
press the respective key.
You may delete or replace characters subsequently in the text that you have
written.
–The vertical line » |« displays your current position.
-keys.
–You may change your position with the
you jump to one line above or below respectively.
–By long pressing
You may switch between 4 writing modes with the help of the -key:
¢Abc: UPPERCASE & lowercase – Uppercase alphabets only at the beginning
of the sentence
¢abc: only lowercase – all alphabets are written in lowercase
¢ABC: ONLY UPPERCASE – all alphabets are written in uppercase
¢123: Digits
I have made a typing mistake. What now?
–In order to delete individual characters to the left of the vertical line » |«,
short press the key.
–If the key is kept pressed for 3 seconds, all characters to the left of the
vertical line » |« are deleted (e.g., in order to remove complete text passages).
18
All selectable characters and functions are listed here.
D .,-?!'@:;()*1
D mno6öñôœóò
D . , ? ! ' " ( ) @ \ / : _ ; + - * = % & < > £ $
D abc2äàåāâæçáć
D pqrs7ß$ș
D def3đéē€èêë
D tuv8üùûú
D Switching between lowercase and
D ghi4îïíìğı
D wxyz9ŵýÿ
uppercase alphabets as well as the
D jkl5£
D Space; 0; ¬
numeric keys Abc | ABC | abc | 123
¥§€¤[]{}~#¬
This is how calling the characters works.
D press 1 time = j
D press 2 times = k
D press 3 times = l
D press 4 times = 5
D press 1 time = . (Dot)
D press 2 times = , (Comma)
D press 3 times = D press 4 times = ?
Inserting a special character
Press the key:
In the table, you jump, as illustrated,
Symbol
with the key, above,
. , ? ! '
with the key, below,
" ( ) @ \
with the key, to the left and
/ : _ ; +
with the key, to the right.
- * =%&
If you are at the character that you are looking for,
OK Back
press
or ,
in order to insert it into the text.
The following special characters are available:
.,?!'"()@\/:_;+-*=%&<>£$¥§€¤ []{}
~# Space input
19
5.2 SEND THE TEXT
1.Navigate to the Messages menu and select Write new.
2.After writing the text, with the numeric keypad press the -key
and select Send or Send to many.
3.Enter the number manually, or press with the -key on search.
4.Select the desired list (Contacts list or Numbers not saved) with the key,
choose the desired number and confirm it.
The message is now sent to the number selected.
5.3 SMS CONFIRMATION
In order to receive a confirmation message, if the SMS sent by you has been
delivered, enable this option under Messages / SMS settings / SMS confirmation.
Note: With certain network providers this service is chargeable.
20
5.4 SMS SERVICE CENTRE NUMBER
This is the central number of the network operator via which all messages
are handled. Generally, the number of the network operator is already
preconfigured on your SIM card. If this is not the case, please contact your
network operator.
This number can be modified under Messages / SMS settings / Service centre no..
21
6. IMPORTANT MENU OPTIONS
The various menu options are described here in brief so that you can work
easily with them.
6.1 TELEPHONE PROFILES
Under Settings / Ring tones & Signals you can configure and find the settings,
such as, for example, selection of the ringing tunes, ringer volume etc…
This also includes the preconfigured profiles Silent, Meeting and Maximum.
The time that you set when activating the profile specifies when the profile is
deactivated again.
–Silent: All acoustic signals of the mobile phone are disabled.
–Meeting: A double peep tone sounds followed by vibration alert instead of a
ring tone.
–Maximum: All ring tones are set to maximum volume with vibration alert
simultaneously.
6.2 FAVOURITES
Under Settings/Favourites key you can choose the most important function
for you and access this quickly in standby mode by pressing the key.
The functions that can be selected are: Daily alarm, Alarm clock, New message,
Received SMS, Calculator, Calendar, Search name and Ring tones & Signals.
Note: in order to be able to configure the setting described here,
you need the phone code. This is preconfigured: 1234
22
6.3 SECURITY SETTINGS
In the menu under Settings / Security settings / PIN you can modify the PIN
code or switch it off. By switching off the PIN request, problems as a result of
forgetting the PIN code can be prevented,
but however, the phone is not protected against being operated by
unauthorised persons.
6.4 NUMBER OF ANSWERING MACHINE
If you press the key for 3 seconds, you are connected automatically to your
answering machine.
If the answering machine number is not yet saved in your phone or on your
SIM card, you shall be requested to enter the number the first time.
Please refer to the documentation for the number that you have received
from your network provider, or enquire directly with them.
23
7. TOOLS
7.1 ALARM CLOCK
Your mobile phone has an alarm clock.
You can set the time in the Tools/Alarm clock menu.
You can set the alarm time by pressing the number keys.
Press on to save the alarm time.
It appears on the display: Time until alarm ring: 00 Hours 00 Minutes
If the alarm rings, press the key to switch off the alarm.
If you want the alarm to ring again after 5 minutes,
press the key. (possible max. 12 times)
In order to switch off the alarm clock, in the Tools/Alarm clock menu,
select the menu option Off and confirm the choice with the key.
7.2 BIRTHDAY REMINDER
In Tools/Birthday reminder you can save new birthdays
and manage existing birthdays.
You can save birthdays either for contacts From the contacts list or
save only a name (without phone number) under Enter name.
–First enter the date of the birthday (e.g. 27. 03.),
–then save the time of the desired reminder (e.g. 2:00 PM),
–with .
If the birthday arrives, a reminder appears at the time saved. If a number has
been saved for the birthday contact, you can call the person immediately by
pressing the key.
The reminder is terminated with the key.
24
7.3 CALCULATOR
In this menu option, your phone supports you with simple calculations.
7.4 CALENDAR
Your mobile phone has an internal calendar to be able to manage tasks,
birthday reminders and similar.
Brose the calendar:
In the menu on Tools / Calendar. By default, the current month is displayed.
The current day (i.e. today) is highlighted.
Manage the calendar:
1.The highlighted field displays the selected day accordingly.
With the for up, for down, for left and for right
keys, you can select a specific day.
Using you page to the previous month, and with to the next month.
2.Confirm your selection with and the calendar menu is displayed.
Display schedules, Go to date, New schedule, New birthday,
Delete all entries
7.5 SIM SERVICES
You can get information on the availability and use of SIM card services
from your SIM card provider. This is either the network provider or another
provider.
25
7.6 BLUETOOTH
Bluetooth is a feature that, for example, enables making calls with cordless
Bluetooth-enabled headsets.
Switching Bluetooth on & off
Go to the Tools / Bluetooth / Bluetooth on/off in order to switch
on or off. In standby, the Bluetooth icon on the display indicates that
Bluetooth is enabled.
Connecting – first time connection with a headset/headphones
Before using a BT headset for the first time, it must be connected
with the mobile phone:
1.Enable Bluetooth. (If no device is connected yet, the mobile phone starts
searching for other Bluetooth devices automatically.)
2.Under Tools / Bluetooth / Connections search for new devices
and the phone then displays a list of the devices found.
3.Select the desired device with .
4.Save connection as authorised? choose between:
No: after switching off the BT device or even disconnection as a result of
loss of range, the reconnection must be confirmed once again.
Yes: Your mobile phone connects itself once again automatically with the
device.
Note: First set the device to be connected to in the »Pairing mode«. Please
refer to the manufacturer's manual for the procedure to do this.
Note: If, instead of Device connected the request Enter password for the connection: appears, your headset needs a special password. Please refer to
the Operating Manual of your Bluetooth headset for this.
26
Note: Bluetooth switched on and a headset connected needs more power and
thus, reduce the operating time of the mobile phone.
Remove Bluetooth devices that are already connected
Under Tools / Bluetooth / Connections / Manage devices / Delete, select the
undesirable Bluetooth device and confirm with .
Note: The "deleted" Bluetooth device can be connected once again
whenever desired.
27
8. EMERGENCY CALL FEATURES
8.1 EMPORIA EMERGENCY CALL FEATURE (EMERGENCY CALL KEY)
The emporia emergency call feature ensures that you get help
expeditiously at a decisive moment. In an emergency, press the emergency
call key on
the back side of the mobile phone for 3 seconds.
The emergency call key works even when the keypad is locked.
Moreover, the emergency call can also be started by pressing one of the
emergency call keys on an emporia wristwatch.
Attention: this is possible only with the emporia emergency call watch
included in the scope of supply. This must be connected technically with your
emporiaCAREplus before use. (See chapter 8.2.7 on page 42)
8.1.1Enabling the emergency call key
You can switch the emergency call key on or off
in the SOS / Emergency call key on/off menu.
To do this, you need to enter the phone code (preconfigured 1234).
28
8.1.2Saving the emergency call numbers
Define the five emergency call numbers in the Contacts list / Emergency call
numbers / Save emergency call numbers menu.
1.Select one of the numbers from the list to edit.
2.Specify whether this is a private number or
whether it belongs to an aid organisation.
3.Then search for a number in the contacts list and
confirm this with .
4.Repeat the procedure for the remaining emergency call numbers.
Note: In order to prevent the emergency call settings from being changed
inadvertently, to go to the emergency call number menu (as well as tools position determination) it is necessary to enter the phone code.
8.1.3What needs to be done in an emergency?
In an emergency, press the emergency call key on the back side
of the mobile phone for 3 seconds.
The emergency call key works even when the keypad is locked.
–If the pre-alarm under SOS / Emergency call settings / Pre-alarm is switched on,
the warning tone rings for 10 seconds.
–The warning tone is played during the entire emergency call cycle,
so that even the people near you become aware
of the emergency.
29
8.1.4What happens if the emergency call has been triggered?
–The emergency call cycle gets started by pressing the emergency call key.
Up to 5 separate emergency call numbers saved can be called in the
sequence specified until someone accepts the emergency call and
confirms – in all 3 cycles of repetition.
The phone sends an emergency call – SMS to the private emergency call
numbers that notify them about an incoming emergency call. The mobile
phone switches the hands-free feature on with full volume.
–As soon as a private person accepts your call, he must dial the (Zero)
3 times during the first minute of conversation (not you as the one triggering
the emergency call). With this, the emergency cycle is stopped.
In other words, the remaining emergency call numbers are no longer
called up and the on-going emergency call conversation is terminated by
one of the parties.
If an aid organisation is called up, the confirmation is omitted,
since the line is always engaged.
–Parallel to the emergency calls, your position is determined in the
background and the address of your present location is queried. If this
information is available, an SMS with your current position or address is
sent to all emergency call numbers.
–If you are called up within one hour after starting the emergency call
feature, the phone accepts every incoming call. If you would like to end the
feature of automatic answering up to 1 hour after the emergency call, you
must switch your mobile phone off and on again. (Only pressing does
not suffice for the sake of safety.)
30
Please note:
–If you have pressed the emergency call button inadvertently,
press the -key for 3 seconds.
–Dialling the (Zero) three times by the recipient of the emergency call
(not by the party triggering/making the emergency call) ensures
that your emergency call does not end unheard on an answering machine.
–In an emergency call, your phone number is always displayed, even if you
have selected Suppress calling number in the settings.
–The emergency call numbers must already be saved in the contacts list,
in order to be able to be defined as emergency numbers. If no emergency
number is saved, the credit on your card has expired or you are not
permitted into an external network (e.g. roaming not released),
then 112 is dialled automatically by pressing the emergency call key.
–For configuring an aid organisation (Ambulance, police,
fire brigade etc.) as the emergency call number, please contact the
agency in charge, since these settings are individual and within their
competencies.
No liability for any costs incurred shall be assumed if you,
for example, call by mistake.
–When triggering the emergency call, apart from the costs of the phone call,
there are also costs incurred
for the SMS sent.
31
8.2 ADD-ONS TO THE EMPORIA EMERGENCY CALL FEATURE
8.2.1Emporia4CARE
With the extended emergency call functionality, your mobile phone is
technically compatible with the Internet-based platform emporia4CARE
(www.emporia4care.com). With the help of the emporia4CARE – platform,
services such as positioning, remote maintenance of the contacts list entries,
emergency call numbers, settings, friends lists (See chapter 8.2.2 on page 35)
can be used by you, your family members or aid organisations.
For detailed information, please refer to the instructions for emporia4care or
enquire about this with emporia Telecom.
Attention: SMS costs are incurred both for remote configuration as well as for
remote maintenance of your emporia mobile phone via the emporia4CARE
platform. Your mobile phone responds to each enquiry by the platform with
an SMS. Your mobile network operator can give you information bout the
cost per SMS.
HIf this icon lights up in the display of your mobile phone,
it means that your mobile phone has been connected with the
emporia4CARE platform.
Hence, your mobile phone can be maintained remotely via the
emporia4CARE platform, and the geographical location of your mobile
phone can be determined. Please read the explanations on the risk of
misuse given below.
The H can light up in three different colours: blue means that your mobile
phone is connected with emporia4CARE; green means that your mobile
phone has been connected with emporia4CARE and friends have been
defined who can determine your position; red means that your mobile
phone is not connected with emporia4CARE, however, friends have been
defined who can determine your position.
32
Attention: Risk of misuse with emporia4CARE.
You have the option of having your mobile phone registered on the
emporia4CARE platform (www.emporia4care.com). The platform enables
certain persons, who have been registered there (referred to in short in the
following: »User of the platform«) to carry out remote maintenance on your
mobile phone as well as to determine the geographical location of your
mobile phone. You will find an exact description of the functionalities at:
www.emporia4care.com
The functions of remote maintenance and the geographical tracking of
your location can be very useful for you and your family members and
offer support to you. At the same time, however, we cannot rule out the
possibility,that these functions may be misused.
In order to keep a check on the misuse as far as possible,
we have taken the following precautions:
–The registration of your mobile phone on the emporia4CARE platform
needs a confirmation via an SMS sent from your mobile phone.
In order to be sure that this SMS has actually originated from the
person concerned, you shall be informed once again via SMS about the
registration a few weeks after the first registration. Please call up our call
centre at the numbers listed below if you would not like to have your
mobile telephone registered on the emporia4CARE platform any longer.
In this case, the functionalities provided by the emporia4CARE platform
are disabled and your personal information is deleted.
–If your mobile phone is registered with the emporia4CARE platform,
it can be maintained remotely and your geographical position can be
tracked down. In this case, the H icon lights up continuously on the display.
Attention: When the H symbol lights up on the display of your mobile phone,
your mobile phone can be maintained remotely via the emporia4care platform,
and your geographical location can be determined.
33
–You have the right to revoke your consent for registering your mobile
phone with the emporia4CARE platform (and thus, the associated option
of remote maintenance and determination of your geographical location)
at any time and without providing any reasons for the same.
Send an e-mail to [email protected] or
call up the call centre for Germany: +49 1805 91 31 81
call up the call centre for Austria: +43 732 777 717-0 (during normal
working hours).
In case of such cancellation, the functionalities of the platform can no
longer be used and your personal information is deleted. Moreover,
emporia reserves the right to block the functionalities of the platform
either in full or in part, if there are some clues pointing to misuse or misuse
has been claimed by the person concerned.
–Please also note that all emergency call numbers available with
emporia4CARE at the time of registration are deleted and these must be
set up once again.
We would like to prevent any misuse, as far as possible, with the help of
these precautionary measures. At the same time, we cannot rule out or
prevent any instance of misuse completely. If you are using emporia4CARE,
please discuss the manner of use in detail with your family members and
others around you. Make sure that you, your family members and others
around you have a common understanding of the purpose as well as the
type and scope of the utilisation of the functionalities provided by the
platform. Please inform us if you have doubts on the legitimacy of the
utilisation or some clues about any possible misuse.
34
Emporia is authorised to block the functionalities at any point of time.
Emporia will block the functionalities in any case, and delete your personal
information if you exercise your irrevocable right, which you can do at any
time if you:
send an e-mail to [email protected] or
call up the call centre for Germany: +49 1805 91 31 81
call up the call centre for Austria: +43 732 777 717-0.
8.2.2Position determination: (GPS)
Your mobile phone has a GPS (Global Positioning System) module to support
the emergency call feature. With this, it is possible to track the mobile phone
anywhere in the world and to determine your location accurately.
It also serves to give you orientation. If you get lost or any other emergency
arises, quick help can come to your rescue in this manner.
Other users are also in a position to find you quickly.
Note: The GPS functionality cannot be ensured within buildings.
Note: If you do not have any position even after a few minutes, check whether
you have line of sight to the sky (Satellites) and, if necessary, move away from
high building walls.
Note: On account of the inaccuracy of the GPS data, there may be an error in
your position of up to 30 m.
Note: The GPS consumes high power when it is switched on and thus, reduces
the operating time of the mobile phone with continuous operation from 360
to 24 hours.
Note: If you are using your mobile phone in conjunction with an appropriate
service contract with a rescue organisation, for example, depending on the
35
scope of the services, certain settings and features may be enabled and
modified via mobile radio by the respective control centre. This feature must
be agreed to mutually within the scope of the contract agreement and is used
for your protection and comfort.
Switching position determination on & off
You can enable or disable position determination in
the SOS / GPS / Position on/off menu,
and configure the transmission interval for the GPS signal (e.g. 15 min.).
Note: The phone code (preconfigured to 1234) is necessary to do this.
Query and send the current position
Under SOS / GPS / Position settings / My position you can see your position,
if available, in the geographical coordinates, longitude and
Latitude (= GPS data).
Moreover, you have the Options here with Send GPS data to send your position
to friends or to save as "At home" .
36
Enquiring your location by other mobile phones.
Select contacts have the option of enquiring about your current position
from another mobile phone.
These contacts are saved in the Friends list.
No anxiety: Numbers that are not in this list,
cannot determine your position.
Under SOS / GPS / Position settings / Friends list you can see
those in your contacts list can enquire about your position at present.
It is possible to create, delete or modify entries in this friends list via the
emporia4CARE platform and requires the consent of the mobile phone
user. For detailed information, please refer to the emporia4CARE brochure
enclosed or visit www.emporia4care.com
Note: Rescue organisations receive the GPS coordinates for determining the
position. Private recipients receive a Google maps link.
Note: if your device is not receiving any GPS signal at the time of the position
enquiry, the last position saved is sent automatically with an appropriate
note to this effect.
Other settings in the position settings menu option:
–Position "At home": Here, you can save your personal address information
with the associated geographical coordinates.
–Set rest periods: This is where you specify the time of day at which the
position determination should be switched off. This option helps to
conserve the battery.
37
8.2.3Daily alarm
Your emporiaCAREplus is provided with a passive alarm feature
(in the menu option SOS / Daily alarm) that enables you to confirm at
predefined intervals of time (1-25 hours) that you are fit and fine by pressing
the daily alarm key on the side of the mobile phone.
If you do not acknowledge despite the daily alarm set, the emergency call
cycle (See chapter 8.1.4 on page 30) is started automatically.
You can decide by choosing Only SMS or by choosing Call and SMS whether
the emergency call number should be called and notified via SMS,
or should be notified only via SMS.
Note: This feature can be used only if you are associated with an aid
organisation that supports this feature, or with the emporia4CARE platform,
which is free of charge. (See chapter 8.2.1 on page 32)
Note: in order to be able to configure the setting described here, you need the
phone code. This is preconfigured: 1234
8.2.4Battery low alarm
Note: This feature can be used only if you are associated with an aid
organisation that supports this feature, or with the emporia4CARE platform,
which is free of charge. (See chapter 8.2.1 on page 32) The information about
the battery charge level is transmitted only to the emporia4CARE platform or
to the aid organisation directly. No battery status is sent to the emergency call
numbers entered.
If the battery capacity of your rechargeable battery is exhausted, the device
switches off automatically. In order to prevent this, it must be connected to
the mains in time and the battery must be charged.
In the SOS / Low battery alarm menu, you can configure whether and at which
capacity limit if the battery the device should give an alert.
38
You can set 2 different alarm limits: Alarm stage 1 and Alarm stage 2. The setting
is configured in percentage points of a fully charged battery. If the low
battery alarm is enabled and the battery capacity undershoots the specified
limit, an alarm SMS is sent automatically to the aid organisation.
Note: in order to be able to configure the setting described here, you need the
phone code. This is preconfigured: 1234
8.2.5Geo-fence (Zone Alarm)
Note: This feature can be used only if you are associated with an aid
organisation that supports this feature, or with the emporia4CARE platform,
which is free of charge. (See chapter 8.2.1 on page 32)
Your emporiaCAREplus has the feature of making an emergency call to
predefined recipients if the device leaves a predetermined radius. This is
possible with the help of satellite-supported GPS.
Under SOS / Geo-fence / Zone alarm you can switch Geo-fence on or off. If
the zone alarm is switched on, you can specify how often data should be
retrieved from the GPS satellite.
–Under Set zone you can specify the starting point.
For manual input, select: Enter coordinates
or automatically with Instantaneous position.
–Under Radius you can enter the number of metres.
If the predefined radius is exceeded by the mobile phone user, an alarm is
triggered automatically.
Note: The GPS consumes high power when it is switched on and thus, reduces
the operating time of the mobile phone with continuous operation from 360
to 24 hours.
Note: in order to be able to configure the setting described here, you need the
phone code. This is preconfigured: 1234
39
8.2.6Falling alarm
The emporiaCAREplus has in-built position and acceleration sensors that
conform to the latest state-of-the-art technology. These help in det4ecting
falls and trigger an alarm automatically in case of an emergency.
Emporia works with stringent demands on safety, which are not yet covered
by technical features and options available at present.
Note: With the state-of-the-art technology available at present, it is not
possible to detect falls with hundred percent certainty. The falling alarm
is used only as supplementary support. Emporia does not provide any
guarantee that all instance of falling shall be detected.
If you would like to use the falling alarm,
please obey the following instructions:
–The emporiaCAREplus detects a fall best,
if the mobile phone is carried in a vertical position on the body or
when it suspended with a strap around the neck.
–If the falling alarm is enabled, take care to ensure
that the emporiaCAREplus is always kept in the charger cradle.
False alarms can be prevented in this way.
40
Operation:
–In the SOS / Falling alarm on/off menu, you can switch the falling sensor on or
switch it off again.
–The sensitivity of the falling alarm can be adjusted under SOS / Falling
alarm / Settings. You can set one of three stages as desired:
- Insensitive: only heavy falls trigger an alarm
- Normal
- Sensitive: even minor falls trigger an alarm;
however: Risk of a false alarm (without a fall).
–Under SOS / Falling alarm / Settings / Time delay you can specify the time period
(10 to 99 sec.) between a fall that has been detected and the time that the
alarm should be triggered.
If the person who has fallen down gets up again within this time period,
and the mobile phone is lifted up again and brought to a vertical position,
then no alarm is triggered.
The response time set by you help in preventing
a potential false alarm.
Note: in order to be able to configure the setting described here, you need the
phone code. This is preconfigured: 1234
41
8.2.7Emergency call feature and
wristwatch
With the emporiaCAREplus active human
beings are on the safe side.
As a supplement to the proven emporia
emergency call feature, this model is
provided with an emporia emergency call
wristwatch.
In the SOS/watch (Emergency call) menu, you
connect the emergency call feature of your
CAREplus with the emporia emergency
call wristwatch and enable or disable it.
Emergency calls may be triggered either
by the emergency call key on the phone or
by one of the 4 emergency call buttons on
the CAREplus wristwatch.
1
1
2
1
1
1 Emergency call buttons
Removing the transport lock
2 Time setting button
on the wristwatch:
Remove the small plastic plate below the
time setting button, set the time and press the time setting button in once
again.
Preparing to connect the wristwatch with the mobile phone:
–Make sure that the mobile phone is switched on.
–Keep the wristwatch ready.
42
Preparing the mobile phone
1.Go to the menu on SOS and open it.
2.Select Watch (Emergency call) and open it.
Note: in order to be able to configure the setting described here, you need the
phone code. This is preconfigured: 1234
3.Select On/Off (Watch) and open it.
4.Select On and confirm this.
Connect the emergency call watch
5.Select Connect watch and open it.
6.With select Search for devices and open it.
The request is displayed on the screen:
Press the emergency call key on watch for at least 3 seconds!
7.Press one of the 4 emergency call buttons on the wristwatch for
3 seconds.
One red LED in the digit 6 flashes for confirmation.
8.If the mobile phone has got connected to the wristwatch, you shall be
requested to enter a password.
Enter the digit zero 4 times (0000) as the password and confirm this.
9.To confirm that connection has been successful, the message Finished is
displayed on the screen. The icon (emergency call watch) is displayed
on the screen:
43
Disconnecting the connected emergency call watch
1.Go to the menu on SOS and open it.
2.Select Watch (Emergency call) and open it (Menu option 7)
Note: in order to be able to configure the setting described here, you need the
phone code. This is preconfigured: 1234
3.Select On/Off (Watch) and open it.
4.Select Off.
The emporia emergency call watch has been disconnected from
emporiaCAREplus successfully.
The icon (Emergency call watch connected) is no longer displayed,
and instead only the icon for the emergency call watch that is no longer
connected .
Note: The emporia emergency call watch has two batteries, one for the watch
mechanism and the other for triggering the emergency call using wireless.
emporia recommends that you replace both batteries at least once a year.
44
8.2.8 Other settings are given in the emergency call settings menu option
Note: in order to be able to configure the setting described here, you need the
phone code. This is preconfigured: 1234
–Emergency call numbers:
You can save, modify and delete emergency call numbers here.
Refer to chapter 8.1.2 »Saving the emergency numbers«
–Data server no.:
This data server service converts your position data in case of an
emergency and with manual enquiry into a valid address. You can enter
the number of an aid organisation (Line for data) or the number of an
address server here.
–Pre-alarm:
The pre-alarm is a loud warning tone that is played at the beginning of
the emergency call sequence, before the emergency number that has
been entered is called up. If the pre-alarm is set to Off, the emergency call
number is called up immediately. If the pre-alarm is set to On, you can enter
the duration of the pre-alarm in seconds.
Note: The pre-alarm is used in case of an emergency to be
noticed by persons located nearby. They can
provide assistance immediately.
–Emergency call tune: The emergency call tune can be switched on or off here.
With the emergency call tune switched off, the emergency call number
entered is called up immediately without a pre-alarm and without an
emergency call tune.
Note: Switching the emergency call tune off is meaningful only
if the emergency call button us not used to make an emergency call,
but, for example, as a speed dial key.
45
9. THE MENUS AT A GLANCE
Messaging
Create new message
2. Received SMS
3. Sent SMS
4. Unsent SMS
5. Templates
6. SMS blacklist
7. Delete SMS
8. Send contacts list entry via SMS
9. SMS in contacts list
10.SMS settings
OK Back
1.
SMS settings
Service centre no.
2. SMS confirmation
3. Memory full
OK Back
1.
Delete SMS
1. Delete all
2. Received SMS
3. Sent SMS
4. Unsent SMS
5. Templates
OK Back
SOS
Emergency call key
2. GPS
3. Daily alarm
4. Battery low alarm
5. Geo-fence
6. Falling alarm
7. Watch (Emergency call)
8. Emergency call settings
OK Back
1.
Birthday reminder
New birthday
2. Modify birthday
3. Delete birthday
OK Back
1.
Emergency call settings
1. Emergency call numbers
2. Data server no.
3. Pre-alarm
4. Emergency call tune
OK Back
Falling alarm
Falling alarm on/off
2. Settings
OK Back
GPS
1.
Settings
1. Sensitivity
2. Time delay
OK Back
Sensitivity
Insensitive
2. Normal
3. Sensitive
OK Back
1.
46
Tools
Alarm clock
2. Birthday reminder
3. Bluetooth
4. Calculator
5. Calendar
6. SIM services
OK Back
1.
Position
Position settings
OK Back
1.
2.
Position settings
My position
2. Friends list
3. Position at home
4. Set rest periods
OK Back
1.
Directory
Search name
2. New entry
3. My number
4. Emergency call number
5. Speed dial keys
6. Copy entry
7. Modify entry
8. Delete entry
9. Send contacts list entry via SMS
10.SMS in contacts list
11.Contacts list settings
OK Back
1.
Contacts list settings
1. Save entry in
2. Memory used
3. Memory full
4. Automatic saving in the contacts list
OK Back
Emergency call number
Save emergency call number
2. Delete emergency call number
3. Emergency call key
4. Pre-alarm
OK Back
1.
Call lists
Missed calls
2. Dialled numbers
3. Answered calls
4. Call duration
5. Delete
OK Back
1.
Call duration
Displays
2. Delete counter
OK Back
1.
Displays
Last. 00:00:00
Off 00:00:00
On 00:00:00
Every 00:00:00
Back
Setting
Silent / Sleep
2. Ring tones & signals
3. Handset volume
4. Hands-free volume
5. Display & Backlight
6. Date & Time
7. Font size
8. Language
9. Call waiting
10.Call divert
11.Suppress call number
12.Help
13.Network selection
14.Favourites key
15.Automatic keypad lock
16.Number of answering machine
17.Service centre no.
18.SMS in contacts list
19.Speed dial keys
20.Security settings
21.Contacts list settings
22.SMS confirmation
23.Enter 0000
24.SMS menu
25.Reset
OK Back
1.
47
10. GENERAL INSTRUCTIONS
Safety Instructions
– Switch off mobile phones in hospitals or near medical equipment,
since these may possibly become faulty as a result of the mobile phone. If you need medical
devices and aids yourself, please coordinate the use of the mobile phone with your doctor.
– A minimum clearance of 20 cm should be maintained between a pacemaker and the mobile
phone when it is switched on. Hence, never keep the mobile phone in your breast pocket. While
making a call, keep the mobile phone to the ear that is at a greater distance from the pacemaker. If
you expect that there may be a fault in the pacemaker, switch off the mobile phone immediately.
– During operation, the mobile phone transmits radio waves and generates high-frequency
magnetic fields. Make sure to maintain a distance of about 1.5 cm to the body when using the
phone near the body in order to avoid overexposure. If you have any concerns in using the mobile
phone, reduce your talk time and use the hands-free feature.
– Never drive a vehicle while you are holding the mobile phone in your hand. Observe and obey the
respective national legislation and traffic regulations for the use of mobile phones in road traffic.
– Switch the mobile phone off while you are in an aircraft.
– Near petrol stations and other places with explosive goods, such as fuel facilities and blasting sites,
you must switch the mobile phone off since sensitive devices may become faulty or explosions and
fire may be caused.
– Never point the LED pocket torch into the eyes of human beings or animals!
– Mobile phones may cause disturbing noises in TV or radio,
primarily if the mobile phone is used near such a device.
– The high volume of the loudspeaker or headset may cause loss of hearing.
– The device and the accessories may contain small parts.
Keep the device so that it is out of the reach of small children.
– As a precautionary measure, we recommend that you disconnect the charger from the
phone during a thunderstorm.
– The charger disconnects the power supply from the device. The power supply must be located
near the device and must be easily accessible
48
Warranty
The 24-month warranty period (for the watch: 12 months, for the battery: 6 months) begins when
the device is handed over. Please provide evidence of the time point of handing over by the
original purchase receipt (cash slip, invoice) with the IMEI number.
Keep this documentation carefully and in safe custody. Our warranty service is governed by the terms
and conditions of warranty applicable at the time of purchase.
The warranty is valid only if original batteries of emporia have been used.
In the maximum possible scope in accordance with applicable law emporia is not responsible
under any circumstances for the following situations:
– Any loss of data or information.
–Any special or casual loss or damage as well as consequential or collateral damage or loss,
regardless of how they have been caused.
Proper Use
This mobile phone is robust and meant for mobile use. Nonetheless, it must be protected against
moisture (Rain, bathroom,…) and impacts. Do not expose it to direct sunlight.
Any use other than that described above leads to damage to the product, and moreover, this is also
associated with risks, such as, for example, electric shock, fire etc.
The entire product should not be modified, converted and the housing should not be opened.
– The plug-in mains adapter is meant for operation only off a household mains socket of the public
grid supply with 230 Volt / 50 Hz (10/16 A) AC.
– Always keep the batteries so that they are out of the reach of children.
– Never try to remove the jacket (sleeve) from the batteries,
or to cut up, open, crack, bend, puncture or destroy batteries
in any manner.
– Do not use any damaged chargers or rechargeable batteries.
– Use only accessories and rechargeable batteries that have been approved by emporia.
Enquire about this with stockists or specialist shops.
49
Technical Product Description of the emporiaCAREplus mobile
telephone
– Loudspeaker compatible with hearing aids,
M3/T3
– Dual band GSM 900/1800
– Pocket torch - Safety class 3
– Rechargeable battery (replaceable):
AK-V33i – Li-Ion 3.7 V / 1,750 mAh
– Internal antenna, SAR 1.73 W/kg
– Stand-by time: up to 300 hours
– Dimensions: 124 x 59 x 19 mm, 127 gm.
– Talk time: up to 360 minutes
– Display: 2.2" TFT 176 x 220 pixels
– Mains adapter RL - V170EU:
– Operating temperature: 0 - 40°C
In 100-240 V ~ Out 5.0 V —… 550 mA
Note: Applications such as Bluetooth or GPS may reduce the power on time by up to 80 %.
Technical Product Description emporia Emergency call watch
The emporiaCAREplus mobile telephone also has an emergency call triggering feature via
wireless. The system consists of a wireless receiver in the emporiaCAREplus mobile telephone
and a wireless transmitter in the emporia emergency call watch. The radio frequency used is the
»Social Frequency«, which conforms to the ETSI EN 300 200 standard. Both the components meet all
statutory regulations of EN 300 200 Class 1 devices, and they have been tested and released.
– Testing and certification for the social frequency: – Battery for triggering the emergency call:
Radio: EN 300 220-1 V 2.3.1; EN 300 220-2 V 2.3.1
– Social alarm system:
EN 50134-2 : 2000 (Environmental class II)
EN 300 220 narrow-band transmission
– Modulation type: FSK (2FSK);
– Frequency: Range 869.2~869.25 MHz; Centre
Lithium button cell: CR2430
– Voltage: Nominal 3 V; High 3.4 V; Low 2.6 V
– Standby time: 1.5 years
(if emergency is not triggered)
– Usage time: Triggering the emergency call
1,000 times
869.2125 MHz; channel spacing: 25 KHz; 1 channel – Protection class: IP67
– E.R.P: 10 dBm max.
– Operating temperature: 20° ~ 55° C
– Battery for the watch mechanism:
– Atmospheric humidity: 10 % ~ 90 %
50
Silver oxide button cell SR621SW; 1.55 V; 23 mAh
EU Declaration of Conformity
We, Telecom Produktions- und Vertriebs-GmbH & Co.KG., declare herewith that the model of
the device mentioned in the following complies with relevant EC Directives.
Article description: Dual-band mobile phone
Article number: V112
Relevant EC Directives:
Radio equipment/Telecommunication terminal equipment 1999/5/EC R & TTE Directive
1999/5/EC.
2200
The article complies with the following
harmonised EN engineering and basic standards:
Safety and health:EN 60950-1:2006/A12:2011; EN 50360:2001;
EN 62209-1:2006; EN 62209-2:2010;
EN 62479:2010
EMC:EN 301 489-1 V1.9.2; EN 301 489-3 V1.4.1;
EN 301 489-7 V1.3.1; EN 301 489-17 V2.2.1
Radio spectrum:EN 300 328 V1.7.1; EN 301 511 V9.0.2;
EN 300 440-1 V1.6.1; EN 300 440-2 V1.4.1;
EN 300 220-1 V2.3.1; EN 300 220-2 V2.3.1
Emergency call wristwatch:ETSI EN 301 489-1 V1.9.2; ETSI EN 301 489-3 V1.4.1;
EN 50130-4 2003; EN 60950-1 :2006+A12 :2011
Eveline Pupeter 03.03.2013, Linz/Austria
General Manager
51
Disposal
– Disposal of the packaging: The packaging and packing aids are recyclable and should
basically be sent for recycling.
– Disposal of rechargeable batteries: Rechargeable and other batteries should not be
disposed of in household waste!
As a consumer, you are obliged by law to return rechargeable and other batteries. You
may hand them over to the local collection centres of your
municipality or to the local dealer.
– Disposal of your phone: When the product has worn out some day, please do not dispose
it in the household waste. Be environment-friendly and bring it to a material or recycling
centre where old gadgets and appliances are accepted and sent for eco-friendly recycling.
Emporia Telecom Produktions- Emporia Telecom Hotline:
und Vertriebs-GmbH & CoKG
Industriezeile 36
4020 Linz, Austria
Tel.:
Fax:
+43.732.77 77 17-0
+43.732.77 77 17-8
www.emporia.at
2200
Subject to misprints, errors and technical modifications.
Part no.: 54228-GER; GERMAN; V112-IM-V4_G2-201407