1
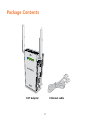
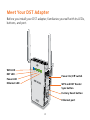
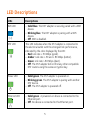
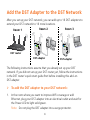
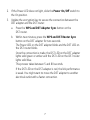
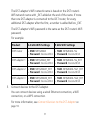
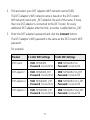
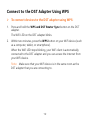
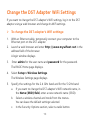
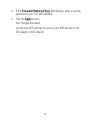
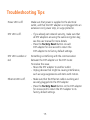
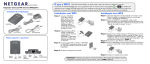
Add-on DST Adapter
Requires Nighthawk R7300 DST Router
Model DST6501
Package Contents
DST Adapter
Ethernet cable
2
Getting Started
You can add up to 16 DST adapter to extend your WiFi network to 16
more locations. The setup is simple and the connection is consistent and
fast. To set up your add-on DST adapter, follow the instructions in this
booklet.
Geek Squad Support
Setup and support are included for one year from your Nighthawk R7300
DST router purchase date. If needed, agents are available 24/7/365 to
help you do the following:
•
Set up your network.
•
Connect your wireless devices such as computers, tablets, gaming
consoles, and mobile phones.
•
Customize your DST adapter settings.
•
Make sure that your network is secure.
Visit www.geeksquad.com, click the CHAT WITH AN AGENT link, and sign
in to chat, or call 1-800-GeekSquad. Be sure to reference your coupon
code, which is GS1337EXB, when you are on the phone or chatting with
an agent.
3
Meet Your DST Adapter
Before you install your DST adapter, familiarize yourself with its LEDs,
buttons, and port.
WiFi LED
DST LED
Power On/Off switch
Power LED
Ethernet LED
WPS and DST Router
Sync button
Factory Reset button
Ethernet port
4
LED Descriptions
LEDs
Descriptions
WiFi LED
• Solid blue. The DST adapter is securely paired with a WiFi
device.
• Blinking blue. The DST adapter is pairing with a WiFi
device.
• Off. WiFi is disabled.
DST LED
This LED indicates when the DST adapter is connected to
the electrical outlet with the strongest link performance,
indicated by the color displayed by the LED:
• Red. Link rate < 50 Mbps (good).
• Amber. Link rate > 50 and < 80 Mbps (better).
• Green. Link rate > 80 Mbps (best).
• Off. The DST adapter did not find any other compatible
DST routers using the same encryption key.
Power LED
• Solid green. The DST adapter is powered on.
• Blinking green. The DST adapter is pairing with another
DST device.
• Off. The DST adapter is powered off.
Ethernet LED
• Solid green . A powered-on device is connected to the
Ethernet port.
• Off. No device is connected to this Ethernet port.
5
Add the DST Adapter to the DST Network
After you set up your DST network, you can add up to 16 DST adapters to
extend your DST network to 16 more locations.
Room 3
Room 2
Room 1
DST router
DST adapter
DST adapter
The following instructions assume that you already set up your DST
network. If you did not set up your DST router yet, follow the instructions
in the DST router’s quick start guide first before installing this add-on
DST adapter.
¾¾ To add the DST adapter to your DST network:
1. In the room where you want to improve WiFi coverage or add
Ethernet, plug your DST adapter into an electrical outlet and wait for
the Power LED to light solid green.
Note:  Do not plug the DST adapter into a surge protector.
6
2. If the Power LED does not light, slide the Power On/Off switch to
the On position.
3. Update the encryption key to secure the connection between the
DST adapter and the DST router:
a. Press the WPS and DST Adapter Sync button on the
DST router.
b. Within two minutes, press the WPS and DST Router Sync
button on the DST adapter for two seconds.
The Power LED on the DST adapter blinks and the DST LED on
the DST router blinks.
Once the connection is made, the DST LED on the DST adapter
lights solid green or amber and the DST LED on the DST router
lights solid blue.
This process takes between 5 and 80 seconds.
If the DST LED on the DST adapter is red, the link performance
is weak. You might want to move the DST adapter to another
electrical outlet with a faster connection.
7
4. Log in to the DST router to update the DST adapter’s firmware and
WiFi settings:
a. Connect a computer or WiFi device to the DST router’s network.
b. Launch a web browser.
c. Enter www.routerlogin.net in the address field of the browser.
A login window displays.
d. Enter admin for the user name and password for the password.
The BASIC Home page displays.
e. Select Remote DST Management.
The Remote DST Management page displays.
f. In the Update DST Adapter Firmware and Update DST Adapter
WiFi Settings sections, click the Update Now buttons next to the
name of your DST adapter to update the DST adapter’s firmware
and WiFi settings.
8
The DST adapter’s WiFi network name is based on the DST router’s
WiFi network name with _EXT added at the end of the name. If more
than one DST adapter is connected to the DST router, for every
additional DST adapter after the first, a number is added before _EXT.
The DST adapter’s WiFi password is the same as the DST router’s WiFi
password.
For example:
Product
2.4 GHz WiFi Settings
5 GHz WiFi Settings
DST router
• SSID. NETGEAR4
• Password. Coconut234
• SSID. NETGEAR4-5G
• Password. Coconut234
DST adapter 1 • SSID. NETGEAR4_EXT
• Password. Coconut234
• SSID. NETGEAR4-5G_EXT
• Password. Coconut234
DST adapter 2 • SSID. NETGEAR41_EXT
• Password. Coconut234
• SSID. NETGEAR4-5G1_EXT
• Password. Coconut234
DST adapter 3 • SSID. NETGEAR42_EXT
• Password. Coconut234
• SSID. NETGEAR4-5G2_EXT
• Password. Coconut234
5. Connect devices to the DST adapter.
You can connect devices using a wired Ethernet connection, a WiFi
connection, or a WPS connection.
For more information, see Connect Devices to the DST Adapter on
page 10.
9
Connect Devices to the DST Adapter
You can connect devices using a wired Ethernet connection, a WiFi
connection, or a WPS connection.
Connect to the DST Adapter Using Ethernet
¾¾ To connect devices to the DST adapter using an Ethernet
connection:
Use an Ethernet cable to connect the Ethernet port on your device to
the Ethernet port on the DST adapter.
Connect to the DST Adapter Using WiFi
¾¾ To connect devices to the DST adapter using WiFi:
1. Open the software utility that manages your WiFi connections on
the computer or WiFi device that you want to connect to your
DST adapter.
This utility scans for WiFi networks in your area.
10
2. Find and select your DST adapter’s WiFi network name (SSID).
The DST adapter’s WiFi network name is based on the DST router’s
WiFi network name with _EXT added at the end of the name. If more
than one DST adapter is connected to the DST router, for every
additional DST adapter after the first, a number is added before _EXT.
3. Enter the DST adapter’s password and click the Connect button.
The DST adapter’s WiFi password is the same as the DST router’s WiFi
password.
For example:
Product
2.4 GHz WiFi Settings
5 GHz WiFi Settings
DST router
• SSID. NETGEAR4
• Password. Coconut234
• SSID. NETGEAR4-5G
• Password. Coconut234
DST adapter 1
• SSID. NETGEAR4_EXT
• Password. Coconut234
• SSID. NETGEAR4-5G_EXT
• Password. Coconut234
DST adapter 2
• SSID. NETGEAR41_EXT
• Password. Coconut234
• SSID. NETGEAR4-5G1_EXT
• Password. Coconut234
DST adapter 3
• SSID. NETGEAR42_EXT
• Password. Coconut234
• SSID. NETGEAR4-5G2_EXT
• Password. Coconut234
11
Connect to the DST Adapter Using WPS
¾¾ To connect devices to the DST adapter using WPS:
1. Press and hold the WPS and DST Router Sync button on the DST
adapter.
The WiFi LED on the DST adapter blinks.
2. Within two minutes, press the WPS button on your WiFi device (such
as a computer, tablet, or smartphone).
When the WiFi LED stops blinking, your WiFi client is automatically
connected to the DST adapter and you can access the Internet from
your WiFi device.
Note:  Make sure that your WiFi device is in the same room as the
DST adapter that you are connecting to.
12
Change the DST Adapter WiFi Settings
If you want to change the DST adapter’s WiFi settings, log in to the DST
adapter using a web browser and change its WiFi settings.
¾¾ To change the DST adapter’s WiFi settings:
1. With an Ethernet cable, temporarily connect your computer to the
Ethernet port on the DST adapter.
2. Launch a web browser and enter http://www.mywifiext.net in the
address field of the browser.
A login window displays.
3. Enter admin for the user name and password for the password.
The BASIC Home page displays.
4. Select Setup > Wireless Settings.
The Wireless Settings page displays.
5. Specify the settings for the 2.4 GHz band and for the 5 GHz band:
a. If you want to change the DST adapter’s WiFi network name, in
the Name (SSID) field, enter a new network name (SSID).
b. Select a wireless channel and mode from the menus.
You can leave the default settings selected.
c. In the Security Options section, select a radio button.
13
d. If the Password (Network Key) field displays, enter a security
password or your DST WiFi network.
e. Click the Apply button.
Your changes are saved.
Use the new WiFi settings to connect your WiFi devices to the
DST adapter’s WiFi network.
14
Troubleshooting Tips
Power LED is off.
Make sure that power is supplied to the electrical
outlet, and that the DST adapter is not plugged into an
extension cord, power strip, or surge protector.
DST LED is off.
• If you already set network security, make sure that
all DST adapters are using the same encryption key;
see the user manual for more details.
• Press the Factory Reset button on each
DST adapter for one second to return the
DST adapter to its factory default settings.
DST LED is amber or
red.
Something is interfering with the communication
between the DST adapters or the DST router.
To resolve this issue:
• Move the DST adapter to another outlet.
• Unplug devices that might be causing interference,
such as surge suppressors and items with motors.
Ethernet LED is off.
• Make sure that the Ethernet cable is working and
securely plugged into the DST adapter.
• Press the Factory Reset button on the DST adapter
for one second to return the DST adapter to its
factory default settings.
15
Support
Thank you for purchasing this NETGEAR product. After installing your device, locate the serial
number on the label of your product and use it to register your product at
https://my.netgear.com. You must register your product before you can use NETGEAR
telephone support. NETGEAR recommends registering your product through the NETGEAR
website.
For product updates and web support, visit http://support.netgear.com.
NETGEAR recommends that you use only the official NETGEAR support resources.
You can get the user manual online at http://downloadcenter.netgear.com or through a link in
the product’s user interface.
For additional support, visit www.geeksquad.com to chat online or call 1-800-GeekSquad.
Setup and support are included for one year from your Nighthawk R7300 DST router
purchase date.
Your Geek Squad support coupon code is GS1337EXB.
Trademarks
© NETGEAR, Inc., NETGEAR and the NETGEAR Logo are trademarks of NETGEAR, Inc. GEEK
SQUAD, the GEEK SQUAD logo, Dead Spot Terminator and the DST logo are trademarks of
Best Buy and its affiliated companies. Any non‑NETGEAR trademarks are used for reference
purposes only.
Compliance
For the current EU Declaration of Conformity, visit
http://support.netgear.com/app/answers/detail/a_id/11621/.
For regulatory compliance information, visit
http://www.netgear.com/about/regulatory/.
See the regulatory compliance document before connecting the power supply.
NETGEAR Inc.
July 2015
350 East Plumeria Drive
San Jose, CA 95134, USA