1
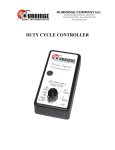
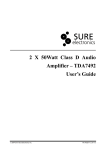
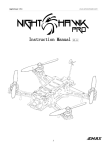
FINETECHNIX LED FLAT PANEL
50WATT, 2’ X 2’ 100~277V, DIMMABLE
10 to 100% dimming
Our supplied wall dimmer works under 100~250VAC input
0-10 DIMMING USER MANUAL
CONTENTS
Key Highlights
Example Installation Photo
Description
Installation
Key Highlights
1. DLC approved (Utility Rebate qualified Product)
2. 4170lm
Approximately 1000lumen higher than competitor product
3. May replace 4 tube T-8 (2f x 4f fixture)
4. No frame assembly needed
5. Operate with AC100~277V
6. Dimmable: Down to 10% (smooth linear dimming)
7. Can connect up to 20 panels onto 1 wall dimmer
8. Type: Ceiling recess type and direct mounting type
9. Limited Warranty: Replacement Parts
5 Year UNRC (Under Normal Running Conditions)
10. Technical support and Warranty Services
Boston E Lab, Inc located in Massachusetts.
781.369.1556, 781.775.0081) [email protected]
Example Installation Photo
DESCRIPTION
Models : FS50VT8-P3C01, FS50VT8-W2C01
Construction : A high performance LED flat panel
designed for installation in drop ceilings(T-bar);
typically used to replace standard 2’x2’ and 2’ x4’
fluorescent fixtures. The profile is slim, only 1.6inches
deep including the junction box, making it ideal for
low depth ceiling cavities.
On/Off : Panels can operate independently, or can be
daisy chained together to work with standard on/off
wall switches.
Dimming : Panels are fully dimmable with a
Finetechnix 0-10V wall dimmer.
Linking : Up to 20 panels can be linked together.
INSTALL (Recess Type)
Panel Light Installation: T-Bar Ceiling Structure
INSTALL
STEP 1
Disassemble junction
box with its cover
using tools by
loosening 4 bolts.
INSTALL
STEP 2
Remove Knock-out
hole using equipment.
INSTALL
STEP 3
Fix the flexible tube or
harness through
Knock-out hole.
Input
AC
Line
INSTALL
STEP 4
1-1. For General Use,
Connect AC wire from
the lighting module
with AC Line of the
SMPS
AC
Line
Dimming
Dial
FEATURES (Wall Dimmer)
0-10 Wall Dimmer
AC in – Blue
0-10V Output
Dim(+) – Red
Dim(-) - Black
Dimming Dial
Power On/Off
SET-UP FOR LINKING PANELS
Dim (+) (Red)
Dim(+) (Blue)
Dim (-) (Black)
Dim(-) (White)
AC (L) Output
AC(L) (Brown)
AC (N) (Blue)
AC (Live)
Input
AC (Neutral)
Input
AC (Ground)
S
M
P
S
INSTALL
STEP 5
1-2. For use dimming
function, refer to the
following diagrams
and pictures,
INSTALL
STEP 6 (0-10 Wall Dimmer)
Blue – AC Live in
Blue – AC Live out
0-10V Output
Dim(+) – Red
Dim(-) - Black
Dimming Dial
Power On/Off
INSTALL
STEP 7
Re-assemble the
SMPS cover on to
SMPS box base.
INSTALL
STEP 8. Safety Wire Hangers:
Prevent from falling
with Safety Wire post
recess panel and prior
to connect wire.
LAY-OUT
Outline Dimension
SET-UP FOR LINKING PANELS
Continue this for each additional panel up to 20pcs
#2
#1
Dim(+)
Dim(-)
AC
L
N
#3
#20
THANK YOU
Boston E Lab, Inc
17 Indian Woods Way, Canton, MA 01890
Tel: 781.369.1556
Cell: 781.775.0081
[email protected]