Transcript
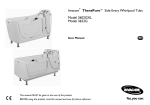
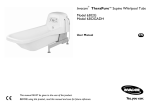
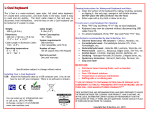
User Manual DEALER: This manual MUST be given to the user of the product. USER: BEFORE using this product, read this manual and save for future reference. Cleaning & Disinfecting TheraPure™ Tubs 1 General 1.1 Symbols Signal words are used in this manual and apply to hazards or unsafe practices which could result in personal injury or property damage. See the information below for definitions of the signal words. WARNING CAUTION Warning indicates a potentially hazardous situation which, if not avoided, could result in death or serious injury. Caution indicates a potentially hazardous situation which, if not avoided, may result in property damage or minor injury or both. 2 Safety 2.1 Warnings WARNING CAUTION Clean and disinfect the tub after EACH use to avoid resident infection and contamination of the tub. DO NOT clean or disinfect the tub when it is occupied. Otherwise injury may occur. Read and understand ALL information on disinfecting BEFORE use. ALWAYS wear rubber gloves, an apron and a face shield when using disinfectant. In case of eye or skin contact, follow procedures on the disinfectant container. NEVER use abrasive cleaners like scouring powder or liquid cleaners containing pumice stone. The use of these types of cleaners will make the gel-coat finish of your tub scratched and dull. NEVER use cleaners containing Iodine, Household Bleach, Bromine, Betadine® or Methylene Blue. The use of these types of cleaners will cause the tub to stain. Use of unapproved cleaners will dry out the rubber seals and gaskets and the tub will not function properly. 3 Cleaning and Disinfection 3.1 Cleaning Detail “A” 1. 2. 3. 4. 5. 6. Use the drain plug to close the drain. Rotate each jet assembly counterclockwise and pull away from the jet casing. (Detail “A”). Remove each impeller cap by rotating it clockwise (Detail “B”). Remove each impeller. Clean the pieces with Dispatch® Cleaner and Disinfectant. Lay the pieces in the bottom of the tub. Spray all surfaces of the tub with Dispatch Cleaner and Disinfectant. Take a long handled brush and thoroughly clean the interior surfaces of the tub and the jet casings. 7. Allow the Dispatch Cleaner and Disinfectant to sit on the surfaces for one minute. 8. Rinse all surfaces and pieces of the jet assemblies with water. 9. Use a clean towel to dry all tub surfaces. 10. Replace the impeller and impeller cap on each jet assembly by rotating them counter clockwise. Disassemble Assemble Jet Casing Sanijet® Logo Jet Assembly CAUTION Detail “B” Cross-threading the jet assembly onto the casing may cause damage to the whirlpool motor. After installation, ensure that the jet assembly is flush against the jet casing. 11. Position the Sanijet® logo and RED indicator at the 11 o’clock position (Detail “A”). 12. Insert the jet assembly into the jet casing and rotate the jet assembly clockwise until it locks into place. Invacare Corporation www.invacare-cc.com USA One Invacare Way Elyria, Ohio USA 44036-2125 Canada 994 Hargrieve Road London, Ontario Canada N6E 1P5 Impeller Cap Impeller Customer Service 1-800-668-2337 Technical Support 1-800-668-2337, Extension 2 © 2010 Invacare Corporation. All rights reserved. Republication, duplication or modification in whole or in part is prohibited without prior written permission from Invacare. Trademarks are identified by ™ and ®. All trademarks are owned by or licensed to Invacare Corporation or its subsidiaries unless otherwise noted. Dispatch® is a registered trademark of The Chlorox Company. Sanijet® is a registered trademark of Maple Industries, LLC, d.b.a. Sanijet. Betadine® is a registered trademark of Purdue Pharma LP. For more information regarding Invacare products, parts, and services, please visit www.invacare-cc.com. Invacare Continuing Care, Inc. is a subsidiary of Invacare Corporation Part No 1167614 Rev A - 11/10