1
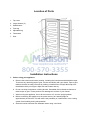
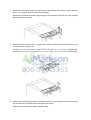
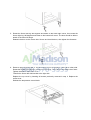
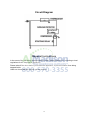
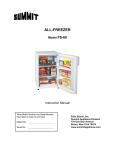
UPRIGHT FREEZER Model Number : UF855L INSTRUCTION MANUAL BEFORE USE, PLEASE READ AND FOLLOW ALL SAFETY RULES AND OPERATING INSTRUCTIONS. Write Serial Number (on back of unit) here: _______________________________ Felix Storch, Inc Summit Appliance Division 770 Garrison Avenue Bronx, New York 10474 www.summitappliance.com Table of Contents Important Safeguards ................................................................................. 2 - 3 Location of Parts .............................................................................................. 4 Installation Instructions ............................................................................... 4 – 8 1. 2. 3. 4. Before using your appliance .................................................................... 4 Installing your appliance .......................................................................... 5 Reversing the door swing .................................................................. 5 – 8 Electrical connection ................................................................................ 8 Operation ...................................................................................................... 8 - 9 1. Before the freezer is plugged in ............................................................... 8 2. When operating for the first time .............................................................. 8 3. Temperature control ............................................................................ 8 - 9 Cleaning and Maintenance ....................................................................... 9 - 10 1. Defrosting ................................................................................................ 9 2. Cleaning ................................................................................................... 9 3. Turning off the unit ................................................................................. 10 Troubleshooting .............................................................................................. 11 1. Troubleshooting guide 2. Normal operation Circuit Diagram ............................................................................................... 12 Disposal Instructions ..................................................................................... 12 Limited Warranty ............................................................................................ 13 1 IMPORTANT SAFEGUARDS Before the freezer is used, it must be properly positioned and installed as described in this manual, so read the manual carefully. To reduce the risk of fire, electrical shock or injury when using this appliance, follow basic precautions, including the following: • Plug into a grounded 3-prong outlet, do not remove grounding prong, do not use an adaptor and do not use an extension cord. • It is recommended that a separate circuit, serving only your freezer, be provided. Use receptacles that cannot be turned off by a switch or pull chain. • Never clean freezer parts with flammable fluids. explosion. Also, do not store or use gasoline or other flammable vapors and liquids in the vicinity of this or any other appliance. • These fumes can create a fire hazard or The fumes can create a fire hazard or explosion. Before proceeding with cleaning and maintenance operations, unplug the freezer or disconnect power. Failure to do so can result in electrical shock or death. • Do not connect or disconnect the electric plug when your hands are wet. • If the supply cord is damaged, it must be replaced by the manufacturer, its service agent or similarly qualified persons in order to avoid hazard. • Do not attempt to repair or replace any part of your freezer unless it is specifically recommended in this manual. All other servicing should be referred to a qualified technician. • DANGER: Risk of child entrapment! Child entrapment and suffocation are not problems of the past. Junked or abandoned appliances are still dangerous, even if they will "just sit in the garage a few days." √ Before you throw away your old refrigerator or freezer, take off the doors. Leave the shelves in place so that children may not easily climb inside. √ • Never allow children to operate, play with or crawl inside the freezer. Use two or more people to move and install the freezer. or other injury. Failure to do so can result in back When moving the appliance, do not tilt it beyond 45° from the upright position. • To ensure proper ventilation for your freezer, the front of the unit must be completely unobstructed. Choose a well-ventilated area with temperatures above 60°F (16°C) and below 90°F (32°C). This unit must be installed in an area protected from the elements such as wind, rain, water spray or drips. • The freezer should not be located next to ovens, grills or other sources of high heat. 2 • The freezer must be installed with an electrical connection in accordance with state and local codes. A standard electrical supply (115-120V AC only, 60 Hz), properly grounded in accordance with the National Electrical Code and local codes and ordinances is required. • If there is a sudden power outage, allow at least 5 minutes before re-powering the unit, in order to protect the compressor. • Do not kink or pinch the power supply cord of the freezer. • The fuse (or circuit breaker) size should be 15 amps. • It is important for the freezer to be leveled in order to work properly. You may need to make several adjustments to level it. • Do not overfill, to allow for free circulation of air. • To avoid damaging your fingers, do not touch frozen food with wet hands. • If the appliance will not be used for a long time, it should be turned off. • Do not use mechanical devices or other means to accelerate the defrosting process. • Do not damage the refrigerant coils. • Do not use solvent-based cleaning agents or abrasives on the interior. These cleaners may damage or discolor the interior. • This appliance is not intended for use by young children or infirm persons without supervision. • This appliance is intended for household use, and should not be used for any other purpose. • This appliance is not intended for use by persons (including children) with reduced physical, sensory or mental capabilities, or lack of experience and knowledge, unless they have been given supervision or instruction concerning use of the appliance by a person responsible for their safety. WARNING --- Do not use mechanical devices or other means to accelerate the defrosting process, other than those recommended by the manufacturer. WARNING --- Do not damage the refrigerant circuit. WARNING --- Do not use electrical appliances inside the food storage compartment of appliance, unless they are of the type recommended by the manufacturer. • • • CAUTION: THIS APPLIANCE IS NOT DESIGNED FOR THE STORAGE OF MEDICINE OR OTHER MEDICAL PRODUCTS. SAVE THESE INSTRUCTIONS 3 Location of Parts 6 1. Top cover 1 2. Large drawers (5) 3. Small drawer 4. Front leg 7 5. Adjustable leg 2 6. Thermostat 7. Door 3 5 4 Installation Instructions 1. Before using your appliance a. Remove the exterior and interior packing, including the foam base and all adhesive tape. To remove any remaining tape or glue, rub the area briskly with your thumb. Tape or glue residue can also be easily removed by rubbing a small amount of liquid dish soap over the adhesive with your fingers. Wipe with warm water and dry. b. Do not use sharp instruments, rubbing alcohol, flammable fluid or abrasive cleaners to remove tape or glue. These products can damage the surface of your freezer. c. When moving the appliance, do not tilt it more than 45° from the upright position. d. Before connecting the appliance to the power source, let it stand upright for approximately 30 minutes. This will reduce the possibility of a malfunction in the cooling system from handling during transportation. e. Clean the interior surfaces with lukewarm water using a soft cloth. 4 2. Installing your appliance WARNING: Keep flammable materials and vapors such as gasoline away from the freezer. • Place your appliance in a well-ventilated area on a floor that is strong enough to support it when fully loaded. To level your appliance, adjust the leg at the front of the appliance. • To ensure proper ventilation for your freezer, leave not less that 12” of space at the top and 4" on both sides and the back. • If you are installing the freezer next to a fixed wall, leave sufficient space on the hinge side to allow for the door to swing open at least 120°. • Locate the appliance away from direct sunlight and sources of heat (stove, heater, radiator, etc.). Direct sunlight can affect the freezer 's coating and heat sources can increase electrical consumption. Extremely cold ambient temperatures may also cause the appliance to perform improperly. • Avoid locating the appliance in moist areas. Too much moisture in the air can promote rusting and will cause frost to form quickly on the evaporator, requiring more frequent defrosting of the appliance. • 3. Never place any weight on the electrical cord. Reversing the door swing The freezer has been built with the door hinges on the right. If you wish to change the opening direction, following the instructions below: NOTES: Unplug the freezer from its electrical outlet. Empty everything in the freezer, including the drawers, food, etc. All parts removed must be saved to reinstall the door. 1. Remove the temperature control knob and remove the screws at the back of the top cover. 5 2. Remove the bolts, then remove the upper hinge that holds the door in place. Lift the door and place it on a padded surface to prevent scratching it. Remove the screws that hold the upper hinge pin, then transfer the hinge pin to the opposite side and tighten the screws. 3. Remove the plug buttons from the upper left holes as illustrated and transfer them to the uncovered holes on right side. Lay the unit on its back against a solid surface at an angle of no more than 45 degree from the vertical. Remove the screws that hold the lower hinge, and then remove the lower hinge. 4. Remove the supporting leg and the screws that hold the lower hinge pin from the lower hinge, transfer them to the opposite side, and tighten the screws. Remove the screws and left hinge, and the left leg. 6 5. Rotate the former left leg 180 degrees and attach to the lower right corner, then rotate the former right leg 180 degrees and fasten to the bottom left corner. The door should be able to attach to the lower left hinge. Reattach the door to the correct side. Secure and level the door, then tighten the fasteners. 6. Remove upper right bracket w/ the door hinge. Remove hinge pin, then flip to other side. Rotate the bracket 180 degrees, and fasten to left side. Fit hinge into the upper hole of door. Tighten the bolts to secure the door. Transfer the former left side bracket to the right side. Replace the top cover by inserting all screws previously removed in step 2. Replace the screw cover. Reinsert the temperature control knob. 7 4. Electrical connection Warning Improper use of the grounded plug can result in the risk of electrical shock. If the power cord is damaged, have it replaced by an authorized service technician. • This appliance should be properly grounded for your safety. The power cord of this appliance is equipped with a three-prong plug which mates with standard three-prong wall outlets to minimize the possibility of electrical shock. • Do not under any circumstances cut or remove the third ground prong from the power cord supplied. • Plug the appliance into an exclusive, properly installed, grounded wall outlet. Any questions regarding power and/or grounding should be directed toward a certified electrician or an authorized Summit service center. • It is recommended that a separate circuit serving only this appliance be provided. a receptacle that cannot be turned off with a switch or pull chain. • The use of extension cords is strongly discouraged. • This appliance requires a standard 115/120-volt, 60 Hz electrical outlet with three-prong ground and a 15-amp fuse. To prevent accidental injury, the power cord should be secured behind the appliance and not left exposed or dangling. Use NOTE: Before performing any type of installation, cleaning or removing a light bulb, turn the thermostat control to 0 (OFF) and then disconnect the unit from the electrical power source. When you are finished, reconnect the freezer to the power source and reset the temperature control to the desired setting. Operation 1. Before the freezer is plugged in, check the following: • All electrical wiring must be undamaged. • Grounding screw must be in place. • The wall outlet must be properly grounded. Check the electrical conditions before plugging in the freezer. 2. When operating for the first time With the freezer empty, turn the thermostat to its highest setting. It should reach a steady temperature in 2 to 3 hours. Then turn the thermostat to its required setting and place foods inside. 3. Temperature control The temperature in the freezer is controlled by turning the knob of the thermostat. A setting of 0 switches the unit off, and 3 is the coldest setting. The closer to the 3 position the knob is 8 set, the lower the temperature becomes. A medium setting is the most suitable for general operation. The freezer's temperature will vary depending on the quantity of foods stored and the frequency of the door opening. In order to maintain good cooling efficiency and save energy, we recommend that you do not overfill the freezer or open the door too frequently. CAUTION: To prevent damage, do not attempt to turn the thermostat clockwise beyond the 3 position. Cleaning and Maintenance 1. Defrosting The freezer must be manually defrosted. This should be done when frost is more than ¼” (5mm) thick. a. Power off the freezer, open the door and remove all food to a cool place. b. Remove the freezer drawers. c. Remove ice and frost, or let it melt naturally. Do not use an electric heater. d. Clean up the remaining water with a clean soft cloth. e. Put the drawers and food back inside the freezer. Power on again. NOTE: If you want to speed up the defrosting process, put a bowl of hot water inside the cabinet and close the door. CAUTION: Never use sharp or metallic instruments (e.g. knives) to remove frost/ice from the evaporator as this will damage the evaporator. A punctured evaporator will cause serious problems. 2. Cleaning The inside of the freezer should be cleaned often. a. Power off the appliance b. Use a soft towel with water or mild, non-abrasive cleanser to scrub away any food residue. c. Wipe with a soft, dry cloth. NOTE: Do not pour water onto the outer walls of the freezer, since this will affect the insulation. Do not use hot water, acid, alkali, gasoline, benzene, caustic cleanser, alcohol, or hard brushes to clean the plastic parts. 3. Turning off the unit 9 If possible, avoid turning off the freezer. Let it work for long periods of time, even if there is no food being stored. This will help keep the appliance working properly for a long time. If you must turn it off and not use it for a long period of time, turn the thermostat knob to 0 (OFF) and unplug the appliance. Follow the information above for cleaning it and keep it in a dry, clean place. Store the freezer with the door slightly open to reduce the formation of mold and to prevent the door gasket from sticking to the cabinet. 10 Troubleshooting If your appliance is not working normally, you may be able to avoid the cost of a service call by checking the following list of common problems: 1. Troubleshooting guide Problem Possible cause Unit stops working. Thermostat is set at 0 (OFF). Power plug is not firmly set in socket. Fuse or circuit breaker needs replacement or resetting. Power is off. You have tried to restart the unit after a power loss without waiting 5 minutes. Thermostat is set too high. Door is not completely closed. Room temperature is too high, or unit is in direct sunlight. The freezer is overloaded with food, hampering cold air flow. Food was put into the unit before being allowed to cool down. Thermostat is set too low. There is too much food in the appliance. The door is not closed, or is opened too frequently. The appliance to too close to a heat source. The base was not removed. The unit was not leveled. The back of the appliance is touching the wall. The unit is not grounded properly. If grounding is OK, turn off and disconnect the appliance and call our service department. Compressor is not working (unit is not cooling). Food does not get cold. Appliance is noisy. Touching the unit causes an electric shock. If your appliance is still not working, please contact an authorized service dealer or call our service department at 1-800-932-4267. 2. Normal operation The following items do not indicate a problem with the appliance; they are part of normal operation: • If there is a sound like water flowing, this is the compressor operating. • If you hear a pinging sound, it is caused by the sudden change of temperature making metallic material in the unit expand or contract. • The compressor is hot. (When the compressor is working, it can reach a temperature of 194°F, or 90°C.) • The exterior sides of the freezer are hot. (The two sides can reach a temperature of 131°F, or 55°C.) • The exterior of the freezer shows condensation. This is caused by a high level of humidity. Dry the surfaces with a clean, soft cloth. 11 Circuit Diagram Disposal Instructions In the event of the unit being damaged beyond repair, please dispose of it according to local regulations for the disposal of appliances. Please take off the doors before you discard the appliance, to prevent children from being trapped inside. Under no circumstances may the unit be dumped. 12 Limited Warranty ONE-YEAR LIMITED WARRANTY Within the 48 contiguous United States, for one year from the date of purchase, when this appliance is operated and maintained according to instructions attached to or furnished with the product, warrantor will pay for factory-specified parts and repair labor to correct defects in materials or workmanship. Service must be provided by a designated service company. Outside the 48 states, all parts are warranted for one year from manufacturing defects. Plastic parts, shelves and cabinets are warranted to be manufactured to commercially acceptable standards, and are not covered from damage during handling or breakage. 5-YEAR COMPRESSOR WARRANTY 1. The compressor is covered for 5 years. 2. Replacement does not include labor. ITEMS WARRANTOR WILL NOT PAY FOR: 1. Service calls to correct the installation of your appliance, to instruct you how to use your appliance, to replace or repair fuses or to correct wiring or plumbing. 2. Service calls to repair or replace appliance light bulbs or broken shelves. Consumable parts (such as filters) are excluded from warranty coverage. 3. Damage resulting from accident, alteration, misuse, abuse, fire, flood, acts of God, improper installation, 4. 5. 6. 7. installation not in accordance with electrical or plumbing codes, or use of products not approved by warrantor. Replacement parts or repair labor costs for units operated outside the United States. Repairs to parts or systems resulting from unauthorized modifications made to the appliance. Expenses for travel and transportation for product service in remote locations. The removal and reinstallation of your appliance if it is installed in an inaccessible location or is not installed in accordance with published installation instructions. DISCLAIMER OF IMPLIED WARRANTIES – LIMITATION OF REMEDIES CUSTOMER'S SOLE AND EXCLUSIVE REMEDY UNDER THIS LIMITED WARRANTY SHALL BE PRODUCT REPAIR AS PROVIDED HEREIN. IMPLIED WARRANTIES, INCLUDING WARRANTIES OF MERCHANTABILITY OR FITNESS FOR A PARTICULAR PURPOSE, ARE LIMITED TO ONE YEAR. WARRANTOR SHALL NOT BE LIABLE FOR INCIDENTAL OR CONSEQUENTIAL DAMAGES. SOME STATES DO NOT ALLOW THE EXCLUSION OR LIMITATION OF INCIDENTAL OR CONSEQUENTIAL DAMAGES, OR LIMITATIONS ON THE DURATION OF IMPLIED WARRANTIES OF MERCHANTABILITY OR FITNESS, SO THESE EXCLUSIONS OR LIMITATIONS MAY NOT APPLY TO YOU. THIS WARRANTY GIVES YOU SPECIFIC LEGAL RIGHTS AND YOU MAY ALSO HAVE OTHER RIGHTS, WHICH VARY FROM STATE TO STATE. WARNING! This product may contain chemicals known to the state of California to cause cancer or birth defects or other reproductive harm. For more information, visit: www.summitappliance.com/prop65 Chemicals known by the manufacturer to be present in this product in concentrations higher than threshold limits: NONE. FELIX STORCH, INC. 770 Garrison Avenue Bronx, NY 10474 Phone: (718) 893-3900 Fax: (718) 842-3093 www.summitappliance.com For parts and accessory ordering, troubleshooting and helpful hints, visit: www.summitappliance.com/support Printed in China 13