1
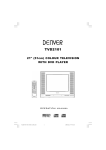
AudioTools™ AWE
Audio Workflow Automation for
Broadcasters, A/V and Film Post Houses,
Game Developers, Music Libraries
and Mastering Facilities
User Manual
Table of Contents
1 Introduction ..................................................................................................... 1
1.1 Audio Processing Workflow Basics........................................................................ 1
1.2 In Use ...................................................................................................................... 2
1.2.1 Example of Use............................................................................................... 3
2 Main Screen ..................................................................................................... 4
2.1 Input Screen ............................................................................................................ 6
2.1.1 File Browser window...................................................................................... 7
2.1.2 Input Structure window................................................................................... 7
2.1.2.1 Hot Folder............................................................................................... 8
2.1.3 File Properties window ................................................................................... 9
2.2 Processing Screen.................................................................................................. 10
2.2.1 Processor Docking ........................................................................................ 14
2.2.1.1 Load, Save, and Set as Default ............................................................. 14
2.3 Output Screen........................................................................................................ 16
2.3.1 Output Structure window.............................................................................. 17
2.3.2 Output Options............................................................................................. 17
2.3.3 Output Folder Location................................................................................. 18
2.3.4 File Properties ............................................................................................... 19
2.3.5 File Name Modifiers ..................................................................................... 19
2.3.6 File Type ....................................................................................................... 20
2.3.7 Sample Rate .................................................................................................. 21
2.3.8 Bit Depth ....................................................................................................... 21
2.3.9 Channel Management ................................................................................... 22
2.3.9.1 Interleave .............................................................................................. 22
2.3.9.2 Uninterleave.......................................................................................... 22
2.3.9.3 Channel Selection ................................................................................. 22
2.3.9.4 Dolby E Decoder .................................................................................. 23
2.3.10 Output Sets.................................................................................................. 23
2.3.10.5 Output Panel Expand/Collapse ........................................................... 25
2.3.10.6 Output Panel Save/Load ..................................................................... 25
2.3.10.7 Output Panel Remove ......................................................................... 25
2.4 Job Queue Screen .................................................................................................. 26
2.4.1 Job List.......................................................................................................... 26
2.4.2 Job Control.................................................................................................... 28
2.4.2.1 Start Queue Button ............................................................................... 29
2.4.2.2 Stop Queue Button................................................................................ 29
2.4.2.3 Resume Queue Button .......................................................................... 30
2.4.2.4 Pause Queue Button.............................................................................. 30
2.4.2.5 Delete Job Button ................................................................................. 30
2.4.2.6 View Log Button .................................................................................. 30
2.4.2.7 Open Job Button ................................................................................... 31
2.4.3 Job Progress .................................................................................................. 31
2.5 Active Job Status window ..................................................................................... 32
2.5.1 Submit Button ............................................................................................... 32
2.5.2 Priority .......................................................................................................... 32
2.5.3 Start Job Queue ............................................................................................. 32
2.6 Preview window.................................................................................................... 33
i
2.6.1 Transport Buttons..........................................................................................33
2.6.2 Slider .............................................................................................................34
2.6.3 Time Display .................................................................................................34
2.6.4 Time Display Format ....................................................................................34
2.6.5 Time Display source .....................................................................................35
2.6.6 Enable Chain .................................................................................................35
2.6.7 Loop ..............................................................................................................36
2.6.8 Pre-Render.....................................................................................................36
3 Menu Items .....................................................................................................37
3.1 The AudioTools AWE Menu ................................................................................37
3.1.1 About AudioTools AWE...............................................................................37
3.1.2 Preferences ....................................................................................................38
3.1.2.1 Output Device .......................................................................................39
3.1.2.2 Default Output Folder ...........................................................................40
3.1.2.3 Auto-Load .............................................................................................41
3.1.2.4 Job Queue Preferences..........................................................................42
3.1.2.5 Appearance Preferences........................................................................43
3.1.2.6 Surround Preferences ............................................................................44
3.1.2.7 Hot Folders Preferences ........................................................................44
3.1.3 Hide AudioTools AWE.................................................................................45
3.1.4 Hide Others ...................................................................................................45
3.1.5 Show All........................................................................................................45
3.1.6 Quit AudioTools AWE .................................................................................46
3.2 File menu ...............................................................................................................46
3.2.1 New ...............................................................................................................46
3.2.1.1 Empty Job .............................................................................................47
3.2.1.2 From Template......................................................................................47
3.2.2 Open ..............................................................................................................47
3.2.3 Open Recent ..................................................................................................48
3.2.4 Save ...............................................................................................................49
3.2.5 Save As..........................................................................................................49
3.2.6 Submit to Job Queue .....................................................................................49
3.2.7 Submit Saved Jobs to Queue.........................................................................49
3.2.8 Save as Job Template ....................................................................................49
3.2.9 View Current Job Log ...................................................................................49
3.3 View menu ............................................................................................................50
3.3.1 Refresh ..........................................................................................................50
3.4 Job menu................................................................................................................50
3.4.1 New Group ....................................................................................................50
3.4.2 New Channel File Group ..............................................................................51
3.4.3 Delete Selected..............................................................................................51
3.4.4 Rename Selected ...........................................................................................51
3.4.5 Dock Selected Processor ...............................................................................52
3.4.6 Close Undocked Processors ..........................................................................52
3.4.7 Scan for Processors .......................................................................................52
3.5 Window menu .......................................................................................................52
3.5.1 Minimize .......................................................................................................52
3.5.2 Zoom .............................................................................................................52
3.5.3 Bring All to Front..........................................................................................53
3.6 Project Window .....................................................................................................53
ii
4 Processors..................................................................................................... 54
4.1 Concatenate ........................................................................................................... 54
4.2 Cut ......................................................................................................................... 55
4.3 Device I/O ............................................................................................................. 56
4.4 Fade In................................................................................................................... 57
4.5 Fade Out ................................................................................................................ 58
4.6 Insert Silence ......................................................................................................... 59
4.7 Mute ...................................................................................................................... 60
4.8 Normalize .............................................................................................................. 61
4.9 Sample Rate Convert............................................................................................. 62
4.10 Trim Time ........................................................................................................... 63
4.11 Volume ................................................................................................................ 64
4.12 Crossfade Edit Points .......................................................................................... 64
iii
iv
Introduction
1 Introduction
Managing audio content efficiently and effectively is a growing problem among media organizations large and small. For audio producers and users, the challenge centers on managing the
growth of digital audio assets through the pipeline of editing, processing, versioning, collaboration, distribution, and archiving. Solving this challenge means:
- knowing where audio assets are stored
- providing protected access
- automating editing and processing where possible
- tracking changes of individual assets, groups of assets, and associated meta-assets
- streamlining the collaboration, approval, and delivery stages of production
- easily archiving and retrieving assets for later use or reproposing
Many audio professionals have developed ad hoc methods for solving these problems: a mixture
of disparate software, hardware, user-driven asset management and version control, and human
“automated” processing (where a person performs the same task over and over). As the scope of
audio workflow grows, so do the complexities and requirements of managing audio workflow and
content: quality control, resource allocation issues, error rates, repeatability. A rich, integrated
environment for digital audio management remains at large.
AudioTools™ Audio Workflow Engine (AWE) is the first step in a streamlined formally architected workflow.
1.1 Audio Processing Workflow Basics
Audio processing workflow can be divided into three basic categories: editing, signal processing,
and format conversion.
Editing includes tasks such as:
- cutting, pasting, and moving audio from one file or timeline to another
- mutes, trimming and inserting silence
- fades, crossfades, gain change, and normalization
- mixing and manipulating channel data
- concatenation
Audio Signal Processing alters the essence of a waveform. Types of signal processors include:
- equalizers and dynamics
- spatial effects such as reverb or modulation
- time and pitch manipulation
- noise reduction
- many more – the list is practically endless
Some types of signal processing are only available in software. Other types are only available in
hardware. Many are available in either, although in this case, for some users, only a certain quality
is available in hardware.
AudioTools™ AWE User’s Manual
page 1
Introduction
Format Conversion is any function that changes the type of data within an audio file. Examples of
format conversion include:
- PCM transcoding, e.g. to/from WAVE, AIFF, MP3, or SDII
- Sample rate and bit-depth conversion
- Perceptual encoding and decoding as in MPEG, Dolby, DTS, AAC and others
Note that, while signal processing is used in functions such as sample rate conversion and perceptual encoding, it is useful to consider Format Conversion as a distinct category within audio production workflow, generally applied during a delivery phase.
We can consider Audio Workflow tasks as either unique tasks or automated tasks. Unique tasks
apply to individual audio files or a subset of audio files within a larger environment. For instance,
within a Pro Tools session, you might apply a fade curve or a DSP effect to a single region or a
group of regions. Likewise, you might convert a single file from 44.1K to 48K to import into a
video session.
Automated tasks apply the same set of processing tools with uniform parameter settings to any
number of files. The advantage of processing audio in an automated mode is that you can set up
your audio processing once for all files and process them without user intervention. Of course, the
scope of the advantage depends on the scope of the task. Sample rate converting a few 3-minute
files is a fairly simple task that you can manually perform easily. However, manually performing
the same sample rate conversion task on 48 tracks in a movie soundtrack session would consume
resources for much longer. Now consider the goal of applying several processing tools to that
same set of files. For instance, applying a fade in, fade out, trim silence, limit, normalize, paste a
2-pop, and sample rate convert quickly becomes a time consuming task that requires sporadic user
intervention and quite a bit of waiting while your computer is tied up performing the calculations.
Automating processes does more than save the time and human resources it takes to perform the
task. By automating a task, we remove the possibility of many human-introduced errors. Reducing the error rate means reducing the time and resources spent on verification and quality control.
AudioTools AWE is a tool for editing, signal processing, encoding, and converting audio files in
an automated mode so they can be used elsewhere. AudioTools AWE is the tool that provides that
automation. The user specifies input files, configures a chain of one or more processors, sets
parameters for each processor, and submits the Job to the Job Queue. All files are automatically
processed and placed in the specified output location.
1.2 In Use
AudioTools AWE consists of four main screens – Input, Processing, Output, and Job Queue.
These four screens correspond to the four steps of audio processing:
1.Specify input files and organize the Job Structure
2.Drop processors in the order of processing and set parameters of each processor.
3.Specify Output details such as destination directory and Job Output format.
AudioTools™ AWE User’s Manual
page 2
Introduction
4.View and control the Job Queue, including Queue State, detailed Status, and Job Priority.
1.2.1 Example of Use
Sometimes it is necessary to perform the same processing operation on multiple soundfiles. Say,
for instance, that you are assembling a CD. You have 12 songs that were recorded and edited at
24-bit/96 kHz. You need to change the bit depth to 16-bits and the sample rate to 44.1 kHz (Figure
1-1).
Output Folder
Input Folder
Song1.aiff
Song2.aiff
Song3.aiff
Song4.aiff
Song5.aiff
Song6.aiff
Song7.aiff
Song8.aiff
Song9.aiff
Song10.aiff
Song11.aiff
Song12.aiff
Convert
24/96 to 16/44.1
Song1.aiff
Song2.aiff
Song3.aiff
Song4.aiff
Song5.aiff
Song6.aiff
Song7.aiff
Song8.aiff
Song9.aiff
Song10.aiff
Song11.aiff
Song12.aiff
Figure 1-1
With AudioTools AWE, this is very easy to do. The entire job is completed with these four simple
steps:
1) Select the input soundfiles
2) Select the process(es)
3) Select the output folder
4) Submit the job for processing.
The rest is handled by AudioTools AWE.
AudioTools™ AWE User’s Manual
page 3
Main Screen
2 Main Screen
Figure 2-2 shows the AudioTools™ Audio Workflow Engine (AWE) main screen.
Screen Selection Tabs
Transport
Job Submission
Figure 2-2
AudioTools™ AWE User’s Manual
page 4
Main Screen
The bottom part of the screen (the Active Job Status window and the Preview window) always
remain the same. The top part of the Main Screen changes, depending on which tab you choose
(see Figure 2-3).
The Input Tab select the audio files or groups of files
you want to process
The Processing Tab select the way you will process the files;
edit, normalize, encode, etc.
The Output Tab select output file location,
format, and name
The Job Queue Tab prioritize, control, and
keep tabs on your jobs
Figure 2-3
The Input screen is where you select soundfiles to be processed.
The Processing screen is where you choose processing operations.
The Output screen is where you choose the location for the output soundfiles, the file format, and
names.
The Job Queue screen is where you can monitor the progress of the Jobs that are being processed.
The Active Job Status window (at the bottom left) is where you submit a new Job for processing.
The Preview window (at the bottom right) lets you listen to soundfiles, both before and after processing.
AudioTools™ AWE User’s Manual
page 5
Main Screen
2.1 Input Screen
Figure 2-4 shows the Input Screen.
File Browser
Input Structure
File Properties
Figure 2-4
AudioTools™ AWE User’s Manual
page 6
Main Screen
2.1.1 File Browser window
On the left is a File Browser window (see Figure 2-5).
Figure 2-5
You can use the File Browser to select Input Soundfiles.
The buttons on the right side of the titlebar let you choose between tree view and column view
(see Figure 2-6).
Figure 2-6
2.1.2 Input Structure window
On the upper right is the Input Structure window. This is where you identify the input soundfiles.
You can copy soundfiles from the File Browser to the Input structure by double clicking on the
file, or by dragging the file to the Input Structure. You can also drag soundfiles from the Desktop
or the Finder.
AudioTools™ AWE User’s Manual
page 7
Main Screen
Input soundfiles are organized into Groups. Your Job can have one Group or multiple Groups.
If you drag a soundfile into an empty Input Structure window, it automatically creates an item
called “Input Group 1” (see Figure 2-7) You can also double-click on a file or folder to add it to
the Input Structure.
Figure 2-7
You can rename the Group by Control Clicking on the Group and selecting “Rename”. You can
create a new Group by going to the Edit menu and selecting “New Group”, or by Control Clicking
on the “Input Structure” title bar and selecting “New Group”.
If you drag a folder of soundfiles into an empty Input Structure window, the folder name will
become the Group name, and the soundfiles will appear under the Group name. Dragging a folder
to any location in the Input Structure window will create a new group with the folder name.
You can drag a folder which has subfolders with soundfiles. The Input Structure will retain the
folder structure, and will identify every soundfile in the folder and all subfolders.
Groups can be removed from the Input Structure by Control Clicking on the Group and selecting
“Delete”. Similarly, soundfiles can be removed by Control Clicking on the soundfile and selecting
“Delete”.
2.1.2.1 Hot Folder
On the right side of the Input Structure titlebar are two buttons for setting up a Hot Folder (see
Figure 2-8).
Figure 2-8
A Hot Folder is an input folder that is automatically watched by AudioTools AWE. When a new
input file appears in the Hot Folder, AudioTools AWE will automatically submit the new Job for
processing.
The button on left activates the Hot Folder feature. The button changes to a lighter color when the
Hot Folder feature is chosen. The button on the right brings up a browser for selecting the folder
to be used as the Hot Folder.
Once a Job is set up using the Hot Folder feature, it must be submitted to the Job Queue in order
for AudioTools AWE to start watching the Hot Folder for new input files.
AudioTools™ AWE User’s Manual
page 8
Main Screen
2.1.3 File Properties window
The File Properties window shows the properties of soundfiles (see Figure 2-9).
Figure 2-9
The File Properties window displays the properties of any soundfile that is selected in the Input
Structure window or the File Browser.
AudioTools™ AWE User’s Manual
page 9
Main Screen
2.2 Processing Screen
Figure 2-10 shows the Processing screen.
Processor List
Processor User Interface
Processing Chain
Figure 2-10
AudioTools™ AWE User’s Manual
page 10
Main Screen
When you first bring up the Processing screen, the Processing Chain and the Processor User Interface sections are blank (see Figure 2-11).
Figure 2-11
AudioTools™ AWE User’s Manual
page 11
Main Screen
The available processors are listed in the Processor List window. To use a processor, double-click
on it or drag it into the Processing Chain window. The processor will appear in the Processing
Chain window as a small box (see Figure 2-12).
User Interface of Selected Processor
Figure 2-12
A window also appears in the upper right. This is the processor’s dialog, where you can adjust the
processor parameters.
AudioTools™ AWE User’s Manual
page 12
Main Screen
You can choose multiple processors to be in the chain (see Figure 2-13).
Processing Chain
Figure 2-13
Each time you double-click on a new processor, the new processor will be added to the end of the
chain.
You can move a processor to a different location on the Chain. Drag it and drop the processor to
the location that you want. A vertical line will appear to show where the processor is being
dropped.
You can also replace a processor with another processor. Drag the new processor over the top of
the existing processor and drop it.
When you click on one of the processors, it becomes selected. The color of the selected box
becomes brighter to indicate that it is selected. The parameters entry dialog for the selected processor appears in the upper right.
A processor can be removed by Control Clicking on the processor and selecting “Delete”. The
entire Chain can be cleared by Control Clicking on an empty area in the Chain, and selecting
“Clear Chain” from the pop-up menu.
AudioTools™ AWE User’s Manual
page 13
Main Screen
2.2.1 Processor Docking
A processor’s user interface can be moved from the Processing Screen to the computer desktop.
When the processor UI is on the desktop, it stays open, even if the processor is not selected in the
Processing Chain. You can have UI’s of multiple processors open at all times.
When the processor UI is on the AudioTools AWE screen, it is said to be “docked”. When the processor UI is on the desktop, it is said to be “undocked”.
If a processor’s UI is too big for all of it to be displayed in the AudioTools AWE screen, it may be
necessary to undock it to reveal the entire UI (see Figure 2-14).
Figure 2-14
2.2.1.1 Load, Save, and Set as Default
If you have output options that you use frequently, you can save them using the Save button, and
recall them using the Load button.
AudioTools™ AWE User’s Manual
page 14
Main Screen
When you click on the Save button, it brings up a dialog (see Figure 2-15).
Figure 2-15
Here, you give your options file a name and hit Save. The options will be saved with a filename
extension of “.Output Options”. This set of options can be retrieve later by clicking on the Load
button.
You favorite output options can become AWE’s default output options. Just select your desired
output options, and then click on the Set As Default button. Now, each time you start a new Job,
these output options will automatically appear in the Output File Format window.
AudioTools™ AWE User’s Manual
page 15
Main Screen
2.3 Output Screen
Figure 2-16 shows the Output Screen.
File Name Modifiers
Output Structure
File Properties
Sample Rate
Output Options
Output Folder Location
File Type
Bit Depth
Figure 2-16
This screen defines where the processed files will be placed and how they will be named.
AudioTools™ AWE User’s Manual
page 16
Main Screen
2.3.1 Output Structure window
On the left side of the Output screen is the Output Structure window (see Figure 2-17).
Figure 2-17
The top lines show the path to the collection of output soundfiles. Beneath that is the structure of
folders and soundfiles. The path is set by the Output Folder Location (see section 2.3.3, Output
Folder Location). The output structure is determined by the Output Options (see section 2.3.2,
Output Options).
2.3.2 Output Options
Figure 2-18 shows the Output Options window.
Figure 2-18
When you select “Generate Folder Structure from Project Structure”, AudioTools AWE generates
output folders with the same names as the input Groups, and the output soundfiles will be in these
folders. These folders are all placed in the Output Folder Location (see section 2.3.3, Output
Folder Location).
When you select “Generate Output to Single Folder”, none of the input Groups will be carried
over to output folders. Instead, all soundfiles will be found in the Output Folder Location.
AudioTools™ AWE User’s Manual
page 17
Main Screen
2.3.3 Output Folder Location
Figure 2-19 shows the Output Folder Location window.
Figure 2-19
The Output Folder Location determines the path and folder that is at the top of the Output Structure. To select the Output Folder, click on the Browse button. This brings up the folder selection
window (see Figure 2-20).
Figure 2-20
Select a folder, and click on the Open button.
AudioTools™ AWE User’s Manual
page 18
Main Screen
2.3.4 File Properties
Figure 2-21 shows the File Properties window on the Output screen.
Figure 2-21
This shows the properties of any selected soundfile or selected Channel File Group in the Output
Structure list. To select a soundfile, just click on the soundfile in the Output Structure List.
Note: The Output File Properties can only be displayed after the Job has been processed. If the
Job is not yet processed, the File Properties window will be blank.
2.3.5 File Name Modifiers
Figure 2-22 shows the File Name Modifiers window.
Figure 2-22
The input filenames are generally used as the output filenames in a Job. The File Name Modifiers
allow you to change the output filenames.
You can add the date, time, or Job name to the beginning (“Prepend”) or end (“Append”) of the
filename. You can also add your own text by typing the text into the Custom textbox.
AudioTools™ AWE User’s Manual
page 19
Main Screen
The Replace option searches the filename for the text that you specify and replaces it with other
text (or no text at all).
2.3.6 File Type
AWE can output files as WAVE (.wav), AIFF (.aif), MP3 (.mp3), and Sound Designer II (.sd2),
AU (8-bit), W64 (64-bit), and AC3 (if used with a Dolby Digital plug-in). If you select WAVE or
MP3, there are additional options. These options become available by clicking on the Options
button (see Figure 2-23).
Figure 2-23
When WAVE output is chosen, there is one option available relating to SD2 input files (see Figure
2-24). This option lets you save the Regions of a SD2 file as separate WAVE output files.
Figure 2-24
AudioTools™ AWE User’s Manual
page 20
Main Screen
When MP3 is output is chosen, the usual MP3 encoding parameters are selectable (see Figure 225), such as the Bit Rate.
Figure 2-25
2.3.7 Sample Rate
AWE has two types of sample rate conversion available:
1) A mastering-quality 64-bit sample rate converter for fixed sample rates of 44.1, 48,
88.2, 96, 176.4, and 192 kHz;
2) A converter that will convert to any custom sample rate you choose.
The mastering-quality sample rate converter lets you choose the trade-off between processing
time and quality, with the pull-down that lists Good (Fast), Better, and Best (Slow).
The Custom sample-rate converter lets you select any output sample rate by typing it into the textbox. The sample rate must be typed in as a number (Hz, not kHz), with no text. The acceptable
range is 8000 to 192000.
The “Set Sample Rate Only (do not resample) does not do a sample rate conversion, but only
rewrites the soundfile to play back at a different rate. This will cause the playback time to be
changed and the pitch to be shifted (similar to “varispeed”).
2.3.8 Bit Depth
AWE can convert files to bit depths of 16-bit, 20, and 24-bit, and to 32-bit floating-point. Dither
is optional.
AudioTools™ AWE User’s Manual
page 21
Main Screen
2.3.9 Channel Management
Clicking on the Channel Management button (just below Bit Depth) brings up the Channel Management window (see Figure 2-26).
Figure 2-26
2.3.9.1 Interleave
This selection will cause grouped mono input channels to be placed into a single interleaved output file.
2.3.9.2 Uninterleave
This selection will cause the channels from an interleaved input file to be written to separate
mono output files.
2.3.9.3 Channel Selection
The “Only write the following channels to output” checkbox lets you decide to output only a subset of all of the channels present.
AudioTools™ AWE User’s Manual
page 22
Main Screen
2.3.9.4 Dolby E Decoder
This option allows you to write each Program in a Dolby E file to a separate output file.
2.3.10 Output Sets
AWE can create multiple output file formats simultaneously.
Let’s say, for instance, that you want your input files to be converted to two different output file
formats, .wav and .mp3. To do this, you will add another output format panel by clicking on the
“Add” button for Output Sets (see Figure 2-27).
Figure 2-27
AudioTools™ AWE User’s Manual
page 23
Main Screen
This adds a second output panel to the output tab (see Figure 2-28).
Figure 2-28
In each output panel you can set the file format and destination. So, in this case, for each file in
AWE’s input tab, AWE will create two output files.
AudioTools™ AWE User’s Manual
page 24
Main Screen
2.3.10.5 Output Panel Expand/Collapse
To simplify the view or save space, each output panel can be collapsed. This is done with the triangle in the upper-left corner of the panel. Then the triangle points down, the panel is expanded.
When the triangle points to the right, the panel is collapsed (see Figure 2-29).
Figure 2-29
2.3.10.6 Output Panel Save/Load
The settings in an output panel can be saved out, and loaded later into another AWE project output
panel. The buttons for saving/loading settings are in the upper-right corner of the panel.
2.3.10.7 Output Panel Remove
Clicking on the Remove button in the upper right corner of an output panel will remove the panel
from the Output tab.
AudioTools™ AWE User’s Manual
page 25
Main Screen
2.4 Job Queue Screen
The Job Queue Screen keeps track of the progress of Jobs submitted for processing (see Figure 230).
Job Queue Control
Job Queue
Job Progress
Figure 2-30
2.4.1 Job List
A Job is a processing task that you submit to the Job Queue. The Job is the complete description
of input files, processing operations, and output files.
The Queue is the list of Jobs that you submitted to be processed. Jobs in the Queue are processed,
first, in the order of priority, and second, in the order that they were submitted.
AudioTools™ AWE User’s Manual
page 26
Main Screen
Figure 2-31 shows the Job List in the Job Queue screen.
Figure 2-31
This is the list of all Jobs currently in the Queue. The status can be Completed, Running (processing), or Queued (waiting to be processed). The Priority determines the order in which the Jobs
will be run (see section 2.5.2, Priority).
AudioTools™ AWE User’s Manual
page 27
Main Screen
2.4.2 Job Control
The Job Queue Control buttons let you control Jobs in the Job Queue (see Figure 2-32).
Figure 2-32
The Start, Stop, Pause, and Resume buttons work on the entire Job Queue, whereas the Delete Job
and the View Log buttons work only on the selected Job.
AudioTools™ AWE User’s Manual
page 28
Main Screen
2.4.2.1 Start Queue Button
This button causes the Job Queue to begin processing. Any Jobs that were stopped and not completed will be processed.
2.4.2.2 Stop Queue Button
This button stops the processing of the Job Queue. If a Job was processing and was interrupted by
the Stop button, it will be labeled as “Stopped” (see Figure 2-33).
Figure 2-33
If a stopped Job is restarted, it starts processing again from the beginning of the Job.
AudioTools™ AWE User’s Manual
page 29
Main Screen
2.4.2.3 Resume Queue Button
If a Job was paused, the Resume button will cause the Job to start processing again. The Queue
remembers which soundfiles were processed when the Job was paused, and resumes processing
with the next unprocessed soundfile in the Job.
2.4.2.4 Pause Queue Button
If a Job is currently processing, this button tells the Queue to finish processing the current soundfile, and then stop. The Queue will remember which soundfiles in the Job have been processed so
that they will not need to be processed again when the Job is resumed.
2.4.2.5 Delete Job Button
This button deletes the selected Job(s) from the Queue.
2.4.2.6 View Log Button
This button brings up the log file for the selected Job (see Figure 2-34).
Figure 2-34
AudioTools™ AWE User’s Manual
page 30
Main Screen
The log file can tell you when a Job was started and completed, and notify you of any errors in
processing.
2.4.2.7 Open Job Button
This takes the selected Job in the Job Queue and loads it back into AudioTools AWE for editing.
Once open, you can change Input files, Output options, and Processor settings. The Job should be
saved after editing, in order to keep the changes.
2.4.3 Job Progress
The Job Progress window shows how close the currently processing Job is to completion (see Figure 2-35).
Figure 2-35
The Active Job progress meter show how much of the entire Job is processed. The Active File
progress meter shows how much of the currently processing soundfile is completed. The “Files
Complete / Total” shows how many soundfiles have completed processing, as compared to the
total number of files in the Job.
AudioTools™ AWE User’s Manual
page 31
Main Screen
2.5 Active Job Status window
Figure 2-36 shows the Active Job Status window.
Currently Active Job
Submit Button
Current Status
Priority
Job Progress
Automatic Queue Start
Figure 2-36
2.5.1 Submit Button
When you have a Job all set up and want it to start processing, you hit the Submit Button.The Job
will be placed in the Job Queue and will start processing immediately if no other Jobs are currently being processed. The Job status will appear to the right of the Job name. This will be the
same status that is displayed on the Job Queue page. The progress bar tells you how much of the
Job is completed.
2.5.2 Priority
You can select a priority level for each Job submitted to the Queue. The priority can be low,
medium, or high. For Jobs that are queued up and waiting to run, high priority Jobs will be processed first, then medium priority Jobs, then low priority Jobs.
Jobs within each "priority" are queued and run based on when they were submitted
2.5.3 Start Job Queue
When selected, this checkbox will cause the Job Queue to start processing when a Job is submitted, if it is not already running.
AudioTools™ AWE User’s Manual
page 32
Main Screen
2.6 Preview window
The Preview window is an audio playback transport that you can use to monitor your soundfiles.
The Preview window can monitor both input soundfiles and output soundfiles. Figure 2-37 shows
the Preview window.
Time Display
Time Format Selectors
Transport
Loop Button
Pre-Render Button
Playback Position Slider
Source File Button
MultiChannel Level Meters
Figure 2-37
You can select an input soundfile for playback by clicking on a soundfile on the Input tab, in
either the File Browser window or the Input Structure window. You can select an output soundfile
for playback by clicking on a file on the Output tab, in the Output Structure window.
Note: The Output file can only be played after the Job has been processed. If you try to play an
Output file before the Job has been processed, you will get an error message.
2.6.1 Transport Buttons
The buttons at the bottom are standard transport buttons. From left to right, they are
Go to start
Rewind
Stop
Play
Fast Forward
Go to end
If you click on the Rewind button multiple times, the rewind speed doubles each time. The same
is true for the Fast Forward button.
AudioTools™ AWE User’s Manual
page 33
Main Screen
2.6.2 Slider
The slider located above the transport buttons can be used to seek to any arbitrary location in the
soundfile.
2.6.3 Time Display
The time display shows hours:minutes:seconds:frames or hours:minutes:seconds:milliseconds,
depending on the format setting (see Section 2.6.4, Time Display Format).
2.6.4 Time Display Format
The top pull-down menu (to the right of the time display) lets you choose the time display format
(see Figure 2-38).
Figure 2-38
The numbered selections are timecode formats. They are displayed as hours:minutes:seconds:frames.
The Real Time format is displayed as hours:minutes:seconds:milliseconds.
The Frames format is only for use with Dolby Digital and Dolby Digital Plus encoded files. The
Frames format shows a single number, which is a count of Dolby-encoded frames.
The Seconds format shows a single number, which is the number of seconds from the start of the
file.
The Sample format shows a single number, which is the number of audio samples from the start
of the file.
There is a check mark next to the format that is currently selected.
AudioTools™ AWE User’s Manual
page 34
Main Screen
2.6.5 Time Display source
The time display source is chosen by the bottom pull-down menu (see Figure 2-39).
Figure 2-39
Source TC will display the timecode in the soundfile. If the soundfile does not have timecode, the
time display will show a series of dashes.
File position shows the amount of time from the start of the soundfile.
File Start shows the timecode at the beginning of the soundfile, if the soundfile has timecode. If
the file does not have timecode, File Start will show all zeros.
File End shows the timecode at the end of the soundfile, if the soundfile has timecode. If the file
does not have timecode, the time display will show the total length of the file.
2.6.6 Enable Chain
If you are playing an Input soundfile and the Enable Chain box is checked, the sound will go
through the Processing Chain that is shown on the Processing tab of the main screen. This will
allow you to adjust the parameters on the Processors and audition the changes. You can adjust the
parameters in real-time during playback.
Individual Processors can be temporarily taken out of the chain by using the bypass feature. There
are 3 ways to activate bypass:
1) Control Click on that Processor and select Bypass from the menu.
2) Click on the Bypass button in the upper-right corner of the Processor (see Figure 2-40).
A red “X” appears in the button when bypass is active.
Figure 2-40
AudioTools™ AWE User’s Manual
page 35
Main Screen
3) Click on the Bypass button at the top of the Processor User Interface (see Figure 2-41).
The Bypass button turns blue to indicate that bypass is active.
Figure 2-41
The Enable Chain feature is automatically selected anytime you are listening to input soundfiles,
and you have the Processing tab selected.
Please note: some Processing plug-ins my not run fast enough for you to listen to them in real
time. If the Processors cannot keep up, you will hear skipping in the playback. This will not affect
the quality of the soundfiles produced by the Job Queue.
2.6.7 Loop
The transport can do looped playback.
The start time and end time of the loop are set by the “In” and “Out” windows under the Loop button. You can type in the times manually, or you can set the times on-the-fly while listening by
using the “Set” buttons.
To perform looped playback, click on the Loop button. The button will change to an amber color
to indicate that looped playback is active. Then click on the Play button on the transport. The
playback will loop indefinitely.
2.6.8 Pre-Render
Some plug-ins will not run fast enough to be auditioned in real time. When a plug-in cannot keep
up, you will hear skipping in the Playback. For these instances, the Pre-Render button can be used
to audition the plug-in. The Pre-Render button will pre-process a length of audio (you specify the
time in the “secs” box), and then play it without skipping.
AudioTools™ AWE User’s Manual
page 36
Menu Items
3 Menu Items
3.1 The AudioTools AWE Menu
Figure 3-42 shows the AudioTools™ Audio Workflow Engine (AWE) menu.
Figure 3-42
3.1.1 About AudioTools AWE
This brings up the About AudioTools AWE window (see Figure 3-43).
Figure 3-43
This window provides information about the software version number, and contact information
for support.
AudioTools™ AWE User’s Manual
page 37
Menu Items
3.1.2 Preferences
This brings up the Preferences window (see Figure 3-44).
Figure 3-44
There are 7 tabs at the top, for choosing:
Output Device Preferences
Folders Preferences
Auto-Load Preferences
Job Queue Preferences
Appearance Preferences
Surround Format Preferences
Hot Folder Preferences
AudioTools™ AWE User’s Manual
page 38
Menu Items
3.1.2.1 Output Device
Figure 3-45
The Output Device Preferences sets the audio output of the Preview window.
The Channels selector lets you choose from 1 to 8 channels of audio (if the soundcard will permit). For each channel, there will be a line for selecting Location, Device, and Output.
Location is the speaker location, such as Left, Right, and Center. A pop-up menu lets you select
from all of the commonly used speaker locations.
Device is the actual physical soundcard used. Generally, Built-In Audio is available on most computers. Any other soundcards connected to your computer will appear on this list. You can choose
to use any soundcard that is available on your computer.
Output is the physical output channel number on the soundcard. For instance, if you are playing 2
channels on a 4-channel soundcard, you might choose Outputs 1 & 2, or Outputs 3 & 4.
AudioTools™ AWE User’s Manual
page 39
Menu Items
3.1.2.2 Default Output Folder
This specifies the default location for output (processed) files (see Figure 3-46).
Figure 3-46
When you choose “Create Processor SubFolder Under the First Input File’s Location”,
AudioTools AWE will use the path of the first soundfile in the Input Structure as the location to
create an Output folder (see the top of the Output Structure list).
When you choose “Use Specified Location”, you can enter a path to be used as the default location of the Output folder.
The “Append Job Name to Path” option applies to both of the previous selections. This option
will add a “/” and the Job name (minus the “.bpj” extension) to the Output folder name.
AudioTools™ AWE User’s Manual
page 40
Menu Items
3.1.2.3 Auto-Load
The Auto-Load preferences determines the operation of automatically loading multichannel input
files (see Figure 3-47).
Figure 3-47
The Auto-Load feature automatically loads all existing channels of a multichannel file group,
based on the channels indicators just before the filename extension. To use this feature, drag the
left-channel file to the Input Structure.
The Numeric Auto-Load looks for a channel number indicator before the filename extension (for
example, “MySoundfile_1.wav”). The Alpha Auto-Load looks for one to three letters before the
filename extension (for example, “MySoundfile_L.wav”). The Auto-Load recognizes that this is
the first of a collection of soundfiles, and it automatically brings the other soundfiles of the collection into the Channel File Group.
AudioTools™ AWE User’s Manual
page 41
Menu Items
3.1.2.4 Job Queue Preferences
Figure 3-48 shows the Job Queue Preferences tab.
Figure 3-48
The Job Queue Preferences instruct AudioTools AWE on how to handle an error while processing
a Job.
“Stop Processing” will stop all processing in the Job Queue when an error occurs.
“Continue Processing on Next File” will stop processing the file that is currently being worked
on, and will go on to process the remaining files in the Job.
“Continue Processing on Next Job” will stop processing of all remaining files in the current Job,
and will start processing the next Job that is listed in the Queue.
AudioTools™ AWE User’s Manual
page 42
Menu Items
3.1.2.5 Appearance Preferences
The Appearance tab lets you show or hide the Processors when AudioTools AWE is deactivated
(when it is not the currently active program) (see Figure 3-49). This automatically gets all of the
Processor UI’s out of the way when you want to switch to another application.
Figure 3-49
AudioTools™ AWE User’s Manual
page 43
Menu Items
3.1.2.6 Surround Preferences
When using interleaved soundfiles, it is necessary to define the channel order. This is set in the
Surround tab of the AudioTools AWE Preferences window (see Figure 3-50).
Figure 3-50
3.1.2.7 Hot Folders Preferences
The Hot Folder feature starts a new job whenever a new soundfile is placed in a Hot Folder. Some
programs, most notably Pro Tools, do not write a soundfile in a single operation, but rather they
write the soundfile in small chunks. To prevent AWE from starting a Job before the soundfile is
completely written, the Hot Folders option lets you set an amount of time for which there is no
AudioTools™ AWE User’s Manual
page 44
Menu Items
activity in writing the input file. This period of inactivity signals that the input file is now complete, and ready for AWE to process ( see Figure 3-51).
Figure 3-51
3.1.3 Hide AudioTools AWE
This removes AudioTools AWE from the desktop. AudioTools AWE is still running in the background.
3.1.4 Hide Others
This removes all running applications from the desktop, except for AudioTools AWE.
3.1.5 Show All
This makes all running applications visible on the Desktop.
AudioTools™ AWE User’s Manual
page 45
Menu Items
3.1.6 Quit AudioTools AWE
This will close the AudioTools AWE application. AudioTools AWE will ask if you want to close
without saving.
3.2 File menu
Figure 3-52 shows the File menu.
Figure 3-52
3.2.1 New
When you select New, a second menu appears (see Figure 3-53).
Figure 3-53
AudioTools™ AWE User’s Manual
page 46
Menu Items
3.2.1.1 Empty Job
This menu selection closes any current Job, and creates a new Job with a blank screen for Input,
Processing, and Output.
3.2.1.2 From Template
The Processing Chain from a Job can be saved as a Job Template (see Section 3.2.8, Save as Job
Template). This Job Template can be used to start a new Job, and automatically load the Processing Chain from a previous Job.
3.2.2 Open
This will open a Job that you have saved previously. If there is currently a Job open, opening
another Job will close the current Job. AudioTools AWE will ask if you want to save the current
Job (see Figure 3-54).
Figure 3-54
AudioTools™ AWE User’s Manual
page 47
Menu Items
A file browse window will come up, for selecting a Job to open. AudioTools AWE Job files have
a “.bpj” extension (see Figure 3-55).
Figure 3-55
3.2.3 Open Recent
When you click on Open Recent, it brings up a list of previously opened Jobs (see Figure 3-56).
Figure 3-56
You can click on any Job in the list to open the Job. You can clear the list of Recent Jobs by clicking on the Clear Menu item.
AudioTools™ AWE User’s Manual
page 48
Menu Items
3.2.4 Save
This saves the current Job under the current file name.
3.2.5 Save As
This saves the current Job under a different filename.
3.2.6 Submit to Job Queue
This submits the current Job to the Job Queue.
The name of the current Job is shown at the top of the main screen. The list of Jobs already in the
Job Queue can be seen on the Job Queue tab of the main screen.
This menu item does the same thing as clicking on the Submit button at the bottom left corner of
the Active Job Status window (seeSection 2.5, Active Job Status window).
3.2.7 Submit Saved Jobs to Queue
This command submits Job or a collection of Jobs to the Job Queue, all at once. To make a collection of Jobs for submission, simply place the Job files (the ones ending in “.bpj”) into a folder.
When you select Submit Saved Jobs to Queue, it will bring up a dialog for selecting a Job or a Job
folder. If a folder is selected, AudioTools AWE will search through that folder and all subfolders,
and load every Job found into the Job Queue.
3.2.8 Save as Job Template
A Job Template saves the Processing Chain and the Processor settings. You can, at a later time,
load this same Processing Chain into AudioTools AWE to use in a different Job.
3.2.9 View Current Job Log
This does the same thing as the View Log Button in the Job Control window (see Section 2.4.2,
Job Control).
AudioTools™ AWE User’s Manual
page 49
Menu Items
3.3 View menu
Figure 3-57 shows the View menu.
Figure 3-57
3.3.1 Refresh
This causes the File Browser to refresh.
3.4 Job menu
Figure 3-58 shows the Job menu.
Figure 3-58
3.4.1 New Group
This creates a new empty Group on your Input Structure. When you click on New Group, a Window comes up asking you to name the new Group (see Figure 3-59).
Figure 3-59
AudioTools™ AWE User’s Manual
page 50
Menu Items
3.4.2 New Channel File Group
Multichannel recordings made of mono soundfiles can be easily grouped using Channel File
Groups. This menu item will bring up a window where you can name the new Channel File Group
(see Figure 3-60).
Figure 3-60
This creates a list of channels to which you can assign soundfiles (see Figure 3-61).
Figure 3-61
3.4.3 Delete Selected
This deletes the selected soundfile(s) or Group(s) from the Input Structure.
3.4.4 Rename Selected
This lets you retype the name on a single selected line (either a soundfile or a Group) in the Input
Structure.
AudioTools™ AWE User’s Manual
page 51
Menu Items
3.4.5 Dock Selected Processor
This moves the selected Processor to the upper right-hand section of the Processing tab of
AudioTools AWE.
3.4.6 Close Undocked Processors
This closes the dialog for all Processors which are not docked (in the upper right-hand section of
the Processing tab of AudioTools AWE). You can still bring up any processor’s user interface (in
the docking area) by selecting that Processor in the Chain.
3.4.7 Scan for Processors
This selection makes AudioTools AWE scan your hard drive looking for all the Processor plug-ins
currently installed on your computer. The list of Processor plug-ins will appear on the Processor
List on the Processing screen (see Section 2.2, Processing Screen).
3.5 Window menu
Figure 3-62 shows the Window menu.
Figure 3-62
3.5.1 Minimize
This removes AudioTools AWE from the desktop and places it on the dock. This is the same as
clicking on the yellow button in the upper left corner of the AudioTools AWE main screen.
3.5.2 Zoom
If AudioTools AWE fills the entire desktop (i.e. is maximized), this will cause it to change to a
smaller size. If AudioTools AWE does not fill the entire screen, this will cause AudioTools AWE
to become bigger and fill the Desktop.
This is the same as clicking on the green button in the upper left corner of the AudioTools AWE
main screen.
AudioTools™ AWE User’s Manual
page 52
Menu Items
3.5.3 Bring All to Front
3.6 Project Window
Currently, AudioTools AWE can only have one Job open at a time. The Job name will appear at
the bottom of the Window menu.
AudioTools™ AWE User’s Manual
page 53
Processors
4 Processors
AudioTools™ Audio Workflow Engine (AWE) is a powerful engine for performing editing and
signal processing operations on multiple files.
AudioTools AWE comes equipped with a number of powerful processors including:
Concatenate
Cut
Device IO
Fade In
Fade Out
Insert Silence
Mute
Normalize
Sample Rate Convert
Trim Time
Volume
4.1 Concatenate
Figure 4-63 shows the dialog for the Concatenate processor.
Figure 4-63
The Concatenate processor will splice another soundfile onto the input file, either at the beginning or at the end (the “head” and the “tail”).
AudioTools™ AWE User’s Manual
page 54
Processors
The “Apply mono audio to all channels” lets you concatenate a mono soundfile to every channel
of a multichannel soundfile.
For information on Crossfade Edit Points, see Section 4.12, Crossfade Edit Points.
4.2 Cut
Figure 4-64 shows the dialog for the Cut processor.
Figure 4-64
The Cut processor removes a section from the soundfile. The processed soundfile is shorter as a
result.
The In Point marks the starting point of the section that is removed, and the Out Point marks the
end of the section that is removed.
The Set In and Set Out buttons let you set the in-point and the out-point on-the-fly why listening
to the soundfile.
For information on Crossfade Edit Points, see Section 4.12, Crossfade Edit Points.
AudioTools™ AWE User’s Manual
page 55
Processors
4.3 Device I/O
Figure 4-65 show the dialog for the Device I/O processor.
Figure 4-65
The Device I/O processor makes it possible to run the audio through external gear. To do this, you
must be able to assign inputs and outputs on a soundcard connected to your computer.
The first thing to do is to set the number of Channels. Next select the Input and Output devices
from the pull-down lists. Any soundcard that is connected to your computer and recognized by
your computer will be on the list.
The Input Channels list and the Output Channel list show how the software audio channels are
mapped to the soundcard’s physical i/o channels.
It takes time for the signal to go out and come back. This will cause the audio to be time shifted to
a later time in the output soundfile. To prevent this, you can apply delay compensation.
AudioTools™ AWE User’s Manual
page 56
Processors
4.4 Fade In
Figure 4-66 shows the dialog for the Fade In processor.
Figure 4-66
The Fade In is processed at the beginning of the soundfile. You can type in a Fade In time, or
you can use the slider to set the Fade In up to 10 seconds.
The Fade In curve can be Linear or Log.
AudioTools™ AWE User’s Manual
page 57
Processors
4.5 Fade Out
Figure 4-67 shows the dialog for the Fade Out processor.
Figure 4-67
The Fade Out is processed at the end of the soundfile. You can type in a FadeOut time, or you
can use the slider to set the Fade Out up to 10 seconds.
The Fade Out curve can be Linear or Log.
AudioTools™ AWE User’s Manual
page 58
Processors
4.6 Insert Silence
Figure 4-68 shows the dialog for the Insert Silence processor.
Figure 4-68
This processor inserts a segment of silence into the soundfile. The soundfile is longer after this
process.
The dialog lets you set the amount of silence to insert, and whether to add it to the beginning or
the end of the soundfile.
For information on Crossfade Edit Points, see Section 4.12, Crossfade Edit Points.
AudioTools™ AWE User’s Manual
page 59
Processors
4.7 Mute
Figure 4-69 shows the dialog for the Mute processor.
Figure 4-69
The Mute processor creates a silent segment by turning the gain down to -∞ dB for that segment.
The Mute process does not change the length of the soundfile.
The Set In and Set Out buttons let you set the in-point and the out-point on-the-fly why listening
to the soundfile.
For information on Crossfade Edit Points, see Section 4.12, Crossfade Edit Points.
AudioTools™ AWE User’s Manual
page 60
Processors
4.8 Normalize
Figure 4-70 shows the dialog for the Normalize processor.
Figure 4-70
The Normalize processor is designed to set different files to the same volume level. The level can
either be based on the Absolute Peak level or the Peak Average level.
The Scan feature lets you find out in advance the Peak levels in the soundfiles, so that you can
make decisions on how much the levels need to be changed.
AudioTools™ AWE User’s Manual
page 61
Processors
4.9 Sample Rate Convert
Figure 4-71 shows the dialog the Sample Rate Convert processor.
Figure 4-71
The Sample Rate Convert processor can accept input sample rates of 44.1kHz, 48kHz, 88.2kHz,
96kHz, 176.4kHz, or 192kHz, and can convert to 44.1kHz, 48kHz, 88.2kHz, 96kHz, 176.4kHz,
or 192kHz.
The Sample Rate Convert processor automatically senses the input sample rate. You select the
output sample rate with the Target Sample Rate pull-down menu.
If the Output File Type (see Section 2.3.6, File Type) is set to Preserve Input Sample Rate, then
the Sample Rate Convert processor determines the sample rate of the soundfiles produced by
AudioTools AWE. If the Output File Format is set to a specific sample rate, then the Output File
Format sample rate is the sample rate used to make the output files. In this case, the Sample Rate
Convert processor determines the sample rate used in the Processor Chain between the Sample
Rate Convert processor and the output. Sometimes this is done if it is determined that intermediate processors might produce better audio at a higher sample rate.
The Conversion Quality lets you choose the trade-off between processing speed and audio quality.
AudioTools™ AWE User’s Manual
page 62
Processors
4.10 Trim Time
Figure 4-72 shows the dialog for the Trim Time processor.
Figure 4-72
The Trim Time processor cuts a segment of audio from the beginning or end of the soundfile. The
soundfile is shorter after this process.
The dialog lets you set the amount of audio to trim, and whether to trim it from the beginning or
the end of the soundfile.
For information on Crossfade Edit Points, see Section 4.12, Crossfade Edit Points.
AudioTools™ AWE User’s Manual
page 63
Processors
4.11 Volume
Figure 4-73 shows the dialog for the Volume processor.
Figure 4-73
The Volume processor applies a constant gain change to the entire soundfile.
You can adjust the volume by moving the volume control knob with the mouse, or by typing a
value into the textbox.
Clicking on the Reset button automatically resets the volume to 0 dB.
4.12 Crossfade Edit Points
For any Processors that create splice points, you are given the option to perform a short crossfade
at the splice points, to avoid the possibility of a click in the audio. These processors include Concatenate, Cut, Insert Silence, Mute, and Trim Time.
Figure 4-74 shows the Crossfade Edit Points controls.
Figure 4-74
When the Crossfade Edit Points checkbox is checked, crossfades are performed at the splice
points. You can choose between a Linear or a Log crossfade.
AudioTools™ AWE User’s Manual
page 64
Processors
This manual is current for AudioTools AWE version 1.5.
Copyright 2007, 2008, 2009, 2010; Minnetonka Audio Software, Inc.
All rights reserved.
AudioTools™ AWE User’s Manual
page 65
AWE AVAILABLE OPTIONS
• SurCode® for Dolby® E Decoder
• SurCode® for Dolby® Digital integrated plug-in
• SurCode® for Dolby® Pro Logic II®
• Dolby® Media Meter
• Master Bundle option powered by iZotope
• Time Stretch • Pitch Shift • Mastering EQ
• Mastering Limiter
• Mastering Reverb • Multi-band Compressor
AudioTools AWE and SurCode are trademarks of Minnetonka Audio Software, Inc.
Dolby®, Pro Logic®, Pro Logic II®, Dolby Digital®, Dolby® E and
Dolby® Media Meter are all registered trademarks of Dolby Laboratories.
DTS®, DTS-HD®, CD-DTS®, and DVD-DTS® are all registered trademarks of DTS, Inc.
VST is a trademark of Steinberg Media Technologies GmbH.
17113 Minnetonka Blvd. Suite 300
Minnetonka, MN 55345 USA
Phone: +1-952-449-6481
www.minnetonkaaudio.com
Ziegelbahn 59
D-41747 Viersen, Germany
Phone +49-2162-1062622
[email protected]


![[デンマークフォン] ID-140 説明書[PDF:220Kb]](http://vs1.manualzilla.com/store/data/006577252_2-27a68f2a6e6f4176dabdc547974bb4cf-150x150.png)