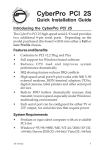
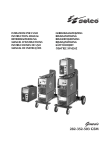
1
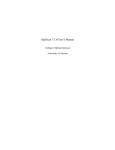
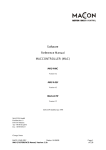
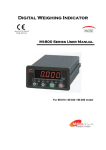
DIGITAL INDICATOR
-USER MANUAL-
DN520N
DACELL
TEL: +82-43-260-2242
FAX: +82-43-260-2242
WEBSITE: http://www.dacell.com
EMAIL:[email protected]
DIGITAL INDICATOR
Content
1. INTRODUCTION ………………………… 2
2. SPECIFICATION ………………………… 3
3. DISPLAY
4. INSTALLATION
………………………… 5
………………………… 9
5. CALIBRATION
………………………… 10
6. SET-UP
………………………… 14
7. INTERFACE
………………………… 29
1
DIGITAL INDICATOR
1. INTRODUCTION
1-1 INTRODUCTION
Thank you very much for purchasing our industrial indicator.
This product has various functions as well as the functions of external interface.
It is designed to satisfy different kinds of requirement in the various industrial sites.
Its external design is also solid and elegant.
It is programmed in user’s friendly way for easy in use and the message display function
is built-in to help user’s easy understanding.
Please ready this instruction manual carefully before you use this product so that you can
use this product properly and apply all the functions of this indicator enough.
1-2 ATTENTION
·
·
·
·
·
Do not drop or impact upon this indicator.
Do not install this item in the place with a direct ray of light or strong vibration.
Do not install this item in the place with high voltage or electric noise.
Turn off the power switch before you connect this item to the external peripheral device.
Do not sprinkle water on this item and always avoid it being exposed to rain.
1-3 SPECIAL FEATURES
· Self- diagnosis and self- error solution feature (Watch-dog) are built-in.
· The external input terminal is built-in. (4 terminals: Function Set-up by external input
set-up mode)
· Shielded counter plan against external Noise.(Photo-Coupler)
· Data Memory feature in case of power failure. (Back-up)
· Lexan Film is used on the display front so that it is safe from dust and moisture.
· RS-232C and Current Loop is installed as standard.
· Various Options.
①
②
③
④
Analog Out-put (V-out) : 0∼10V, 0∼5V(advance order)
Analog Out-put (I-out) : 4∼20mA
Serial I / F : RS-422, RS-485
BCD In-put : Part Number input
-4 ACCESSORIES
·
·
·
·
·
Power Cord : 1 pcs
FUSE : 2 pcs (Cylindrical,250V 10A small-sized)
Load-cell Connector : 1 pcs(N16-05)
Instruction Manual : 1
Relative connector in case of installation of Option
2
DIGITAL INDICATOR
2.SPECIFICATION
2-1.ANALOGUE INPUT & A/D CONVERSION
Input sensitivity
0.45㎶ / D
Zero adjustment Range
- 0.6mV ∼ + 42.0mV
Load-cell impressed Voltage
DC 10V (±5V)
Max signal input Voltage
32mV
Temperature coefficient
ZERO: ±20 PPM / ℃
SPAN: ±20 PPM / ℃
Input Noise
±0.6㎶ P.P
Input Impedance
over 10㏁
A/D Conversion Method
∆∑
A/D Resolution
520,000 Count(19bit)
A/D Conversion rate
200times / Sec
Non-linearity
0.01% FS
2-2. Digital Part
Main
Display
Weight
7-Segment 6 digit RED FND
Size of letters: 20.0(H) ×13.0(W)mm
Sub
Display
*Normal Display
Part Number (2 Digit)
Upper limit (6 Digit)
Lower limit (6 Digit)
7-Segment 14 digit RED FND
Size of letters :9.2(H) ×4.8(W)mm
Value of 1 division
×1, ×2, ×5, ×10, ×20, ×50
Max display value
+550000
Under Zero
"-"Minus Sign
Weight
Part
Display
Status
K e y
Steady, Zero, Tare, Hold, Lower
limit, Upper limit, Completion, Green LED 3Ø
Communication
Status Display 8 Lamps
Number Key, Function Key combined with
12 keys
Number & Function Key
3
DIGITAL INDICATOR
2-3. GENERAL SPECIFICATION
Power for use
Temperature for use
Humidity for use
Product Size
Product Weight
SMPS Free Voltage (85V~265V)
-5℃ ~ 40℃
Under 85% Rh (No water drop
should be formed)
(W)193 Х (H)100 Х(D)140
About 1.5Kg
◆ Note: Because of continuing technological advancements, specifications,
models and options are subject to change without notice
2-4. OPTIONS
OP1
Analog Out : V - out(0∼10V)
OP2
Analog Out : I - out(4∼20mA)
OP3
Serial I/F : RS 422, RS 485
OP4
BCD in - put
OP5
BCD Out - put
◆ Serial print I/F, RS-232C and Current Loop are installed as standard.
4
DIGITAL INDICATOR
3. DISPLAY (DISPLAY & KEY BOARD PART)
3-1. STATUS LAMP (▼)
· STEADY
: Lamp is on when weight is stable.
· ZERO
: Lamp is on when weight is “0”.
· TARE
: Displayed when the tare weight is set up.
· HOLD
: Displayed when Hold is set for the weight display value.
(Peak-Hold, sample-Hold)
· Lower Limit Display
: Displayed in case of lower limit Relay ON output.
· Upper Limit Display
: Displayed in case of upper limit Relay ON output.
· Completion Display : Displayed when weighing is completed.
· RTxD
Display : Displayed when communication DATA is transmitted. (Serial I/F)
5
DIGITAL INDICATOR
3-2. KEY OPERATION
- It is used to return the weight display to zero.
Available within 2%, 5%, 10%, 20%, 100% of maximum capacity.
(KEY “1” is used to input the setting values.)
- It is used to check the weight excluding the tare while the tare is already set
or to check the weight including tare.
(KEY “2” is used to input the setting values.)
- It is used to input with Key for starting weighing while Packer Mode(F21-2)is set.
- It is to use memorize the weight values you want to weight by setting each part.
Press “4” Key and then press Part Number you want. The memorized setting value will be displayed
and controlled by the value displayed.
(KEY “4” is used to input the setting values.)
- It is used to change or confirm the setting value of BIN.
Press “5” KEY and then press Bin Number you want. Then press “ENTER”. The memorized value will
be displayed and controlled by the value displayed.
(KEY “5” is used to input the setting values.)
- It is used to input with Key for stopping weighing while Packer Mode(F21-2)is set.
-
It is used to check and change the lower limit value.
▶ Lower limit check : Press
key. After checking the lower limit, press
key to
key. After changing lower limit value, press
key to
return automatically.
▶ Lower limit change : Press
change lower limit value.
- It is used to check and change the Upper limit value.
▶ Upper limit check
key. After checking upper limit, press
: Press
key to return
automatically.
▶ Upper limit Change : Press
key. After changing upper limit value, press
key to
change the upper limit value.
- It is used to match the exact target value by setting up the amount of the difference
in elevation. Relay output is controlled in advance as much as the difference in elevation
of the material in the air.
▶ Difference in elevation check : Press
key. After checking the difference, press
key to return automatically. .
▶ Difference in elevation change : Press
key. After changing the difference, press
key to change the difference in elevation.
- It is used to print manually.
(KEY “0” is used to input the setting values.)
While carrying out calibration, it is used to change the value of 1 graduation. Each time “0”
is pressed, it will be increased as ×1, ×2, ×5,….
- This key is used to cancel while inputting setting value.
6
DIGITAL INDICATOR
It is used to use secondary function key of each Key..
In case of calibration, it is used to process in reverse way.
It is used to change F-Function
- It is used to save the input of each setting value.
It is used to proceed weight calibration.
It is used to save F-Function Data.
※ HIDDEN KEY
You can change key number if you press the other key within 2 seconds
after you press “CLEAR” Key.
To display and change TIME
To display and change DATE
To display and change CODE
To print total
To print subtotal
To display and change SERIAL
To display and change lower limit
To display and change upper limit
To delete total printer data
To delete subtotal printer date
7
DIGITAL INDICATOR
3-3. REAR PANEL
②
③
①
④
⑤
-Power Switch :
①POWER
-Fuse :
⑥
⑦
Power ON/OFF Switch
AC 250V 10A
-AC IN : This product can be used in AC 85V ~ 265V since it uses SMPS power.
②OPTION 1,2
- When OPTION BOARD is installed, I/F connector will be equipped.
- ANALOG out, Serial I/F, etc
-EXC + (+5V)
PIN1 (RED)
-EXC - (-5V)
PIN2 (WHITE)
CONNECTOR
-SIG+
PIN3 (BLUE or BLACK)
(N-16)
-SIG-
PIN4 (GREEN)
-SHIELD
PIN5 (OUTER COVER)
③LOAD CELL
- It is used to control the equipment from the external operation panel.
④Remote-in-put
(1.Start, 2.Stop, 3.Container, 4.Remove container)
* Refer to external input mode F-11
6 Terminals (Relay Output a Contact Point):
⑤ Relay-out
Each relay function will be set according to F-21 setting. * Refer to F-21
output Mode
⑥External
Output
(Printer, CURRENT,
- RS-232C / CURRENT LOOP are built-in as standard
Computer
( GND,TXD1,CL1,CL2,RXD,GND,TXD )
communication))
- When LOCK pin header is built-in here, data can be protected from certain
⑦ISP
(DATA LOCK PIN)
external reasons of static electricity or system fault.
* When this Lock pin header is built in, data cannot be saved by pressing keys
on front for Function Setting since Lock function is being operated. Please
remove lock pin header before you do Setting again.
8
DIGITAL INDICATOR
INSTALLATION
4-1. EXTERNAL DIMENSION & CUTTING SIZE
(EXTRNAL SIZE ×mm)
9
DIGITAL INDICATOR
5. CALIBRATION
What is Calibration?
This is to match the displayed numerical value and the actual weight value for displaying
weight.
5-1. ZERO CALIBRATION
“0” is a point to be a standard for displaying weight of indicator.
Please carry out Zero Calibration so that “0”can be displayed when all the mechanism is
fixed on the weight sensor load-cell. (Early load offsetting of Load-Cell)
5-2. SPAN CALIBRATION
This is to set the linearity so that display value from “0” to maximum weight and the actual
weight can be matched for displaying the weight of indicator.
▶ TO ENTER SPAN CALIBRATION
While pressing "3" KEY, please turn the power ON. Then, TEST will be shown at display.
At this stage, please press “3” Key again and then SET.CAL will be displayed.
Press ENTER Key and then d__XX will be shown at display.
EX
▶ When Power is OFF
① While pressing"3" KEY, turn the power ON – TEST displayed.
② Press “3” Key -
SET.CAL. displayed.
③ Press ENTER Key – “d__XX”
▶ How to carry out SPAN CALIBRATION
There are 5 steps for Span Calibration. Each step will be carried out by Enter key. Please
use Clear Key to return to previous step.
Î Move to next step: Use ENTER Key
Î Return to previous step: Use CLEAR Key
10
DIGITAL INDICATOR
Ⅰ. STEP 1
This step is to set the value of 1 division. (Unit of minimum display division)
Here, “d” stands for Division and it indicates “the value of 1 division
(Minimum division display)”
This value change is shown in order of “01-02-05-10-20-50” each time 0 Key
is pressed. After it stopped at a desired value – a certain value of 1 division,
press ENTER Key so that the value can be memorized as “the value of one
division” and then move to the next step.
Ⅱ. STEP 2
This step is to set the maximum display capacity.
Here, “CAPA” stands for Capacity and it indicates the maximum display capacity
that can be weighed by scale. You should input your desired maximum display
capacity value instead of an optional numerical value currently displayed.
To input, please input the number you want by using the number Key on Key
Board and then press ENTER Key so that the current value will be memorized
and move to the next step.
***
Î Please do not set (Value of 1 division/MAX display capacity) to be over (1/20,000)
When it is over (1/20,000), Error message will be displayed. You can use up to 1/20,000 only.
Ⅲ. STEP 3
This step is to confirm the current “0” status of scale.
After you check the currently displayed value, please press “ENTER” Key.
And then the gauge bar will goes up for about 3 seconds.
You will move to the next step automatically.
Ⅳ. STEP 4
SPAN” will be shown on capacity display and then it will be changed to
“CAPA” value which is the value in STEP 2.
If standard span weight of CAPA is not ready here, please prepare for a span
standard weight that is over 10% of CAPA value and then input the value by
using numerical Key and then press “ENTER” Key so that you can move to the
next step.
At this stage, “UP” means you have to put the prepared span standard weight
on scale.
After you put on the span standard weight on scale and when the capacity is
stable enough without any impact or vibration, please press “ENTER” KEY so
that Gauge bar can go up for about 3 seconds and you can move to the next
step.
11
DIGITAL INDICATOR
Ⅴ. STEP 5
This span is to display the calculated Span constant.
If indicator displays this condition, it means Span calculation is finished.
If constant value is between 0.50000~1.50000, span is normally calibrated.
If constant value is not between 0.50000~1.50000, you need to do the Span
calibration once again so that you can use the scale with better accuracy.
After span constant is displayed, C_End._ will be displayed and slowly
flashing for about 3 seconds to test the condition of display. Then it will
be displayed as “normal operation mode” for measuring.
Now, Span Calibration is completed.
★★
→ When you do setting weight:
When (Value of one division/Max. display capacity) less than 1/5,000,
you need to prepare for a standard weight that is over 10% of Max display division
and then set the value. When it is more than 1/5,000, you need to prepare for a standard
weight that is over 20% of Max display division and then set the value. This is to do the span
calibration with better accuracy.
- If you do the setting a weight over Max display division, an Error Message
“Err 04” will be displayed.
- If you do the setting a weight below 10 % of Max display division,
an Error Message “Error 05” will be displayed.
12
DIGITAL INDICATOR
5-3. Error Display and Troubleshooting
No.
MESSAGE
CAUSE
SOLUTION
It is displayed when Max. display
1
Err 01
division/value of one division is
over
20,000
- Please re-input the value of Max display
division and one division so that Max. display
division/ value of one division is less than
10,000
It is displayed when standard weight - Please re-input a standard weight setting
4
Err 04
setting
is
over
Maximum
display value less than Maximum display division by
division.
using number Key.
It is displayed when standard weight
5
Err 05
setting is less than 10% of Maximum
display division.
- Please re-input standard weight setting
value less over 10% of one division.
- Please check if standard weight exceeds the
6
Err 06
It is displayed when Amp and Gain is
too big.
value you already set. If so, please set the
standard
weight
according
to
the
value
correctly.
- Please check if standard weight is less than
7
Err 07
It is displayed when Amp and Gain is
too small.
the value you already set. If so, please set
the standard weight according to the value
correctly.
-Please check surroundings and remove any
8
Err A
It is displayed when weight value is vibration.
fluctuated during calibration.
-Check defect of scale.
-Check scale connection or wiring condition.
9
Err _8
It is displayed if wrong data is
entered for F-Function
13
- Check the data and re-enter.
DIGITAL INDICATOR
6. SET-UP
6-1. SET-UP
●SUMMARY
It is to set F-FUNCTION properly according to the actuator of scale and surroundings so that
the scale can be operated on the optimized condition.
▶ ENTERING SET-UP
When Power is OFF, please keep pressing “3” Key, and then Power will be ON and the main display
will show “TEST”.
Now press “3” Key again and the main display will show “SET. CAL”.
Then press “CLEAR” Key and “F01-XX” will be displayed.
EX
▶ When Power is OFF
① Keep pressing "3" KEY to make Power ON and have “TEST___” displayed.
② Press "3"Key again – “SET. CAL” displayed.
③ Press “CLEAR” Key – “F01-XX” displayed.
※“Χ"is an optional number.
▶ FHOW TO CHANGE FUNCTION NUMBER FOR F-FUNCTION
To change function number of F-Function, you need to press CLEAR Key. Each time you press
it, the function number will be increased.
Function number will be increased from “F01-XX” to “F52-XX” and it returns to “F01-XX”.
If you want to change “F01-XX” to “F30-XX” directly, please ender “30” with number Key and
press “CLEAR.” “F30-XX” will be called right away.
EX
▶ Current Display - “F01-01”
① Press CLEAR Key – “F02-XX”
② Press CLEAR Key again – “F03-XX”
③ Function number is increased continuously each time CLEAR Key is pressed.
▶ To change“F01-XX”to “F80-XX”when current display is F01-XX”
① Press “3” Key – “F01-03”
② Press“2” Key – “F01-32”
③ Press “CLEAR” Key – “F32-XX”
14
DIGITAL INDICATOR
▶ HOW TO CHANGE SETTING FOR F-Function
To change setting for F-Function, you need to ender the number you want with number Key and
press “ENTER” Key so that it will be saved in the internal Memory and the change is completed.
Please remember if you enter only number Key and don’t press “ENDER” Key the value cannot be
saved.
EX
▶ To change current display “F06-05” to “F06-08”:
① Press “8” Key – “F06-08”
② Presses “ENTER” Key so that it can be saved in the internal memory.
※ You must press “ENTER” Key when the setting value is changed
to the number you want to save the value in the internal memory.
TEST Mode
TEST
TEST Mode Title
TEST1
Analog TEST Mode
This mode is to test Analogue.
TEST2
Key TEST Mode
This mode is to test front keys.
TEST3
SET.CAL Mode
You can set F-Function or capacity.
TEST4
DISPLAY TEST Mode
TEST5
RELAY OUT TEST Mode
TEST6
External Input TEST Mode
TEST7
Initial Analogue TEST Mode
TEST8
Setting DATA Printer Output TEST
Mode
Description
This mode is to check if front display is normal.
This mode is to check if Relay output is normal when
there is RELAY.
This mode is to check if external input is normal.
This mode is to check the initial analogue value that
is without any weight setting.
This mode is to print F-Function setting value by
using printer.
- How to return to the first step - TEST -
You need to press
On TEST3 mode, press
to escape from each mode.
to return to TEST mode again.
15
DIGITAL INDICATOR
6-2. F-FUNCTION LIST
F-Function
Contents
Division
F00
F01
F02
F03
F04
F05
F06
F07
F08
F09
F10
F11
F12
F14
F21
F22
F23
F24
F25
F30
F31
F32
F33
F34
F35
F36
F40
F41
F42
F43
F44
F45
F46
F47
F48
F49
F52
F77
F80
F81
F89
F90
F91
Select Set-Up&Calibration
Set the location of decimal point
Zero Memory Mode
MOTION BAND Range
ZERO TRACKING Range
Set AUTO ZERO Range
Digital Filter Range
ZERO, TARE Key Operation Mode
Set ZERO Key Operation Range
Set TARE Key Operation Range
Set HOLD Function
Set External Input
Appoint Code Number
HOLD OFF Time
Select Weighing Mode
Divided into “CLR” and Input “ENTER”
0, 0.0, 0.00, 0.000
Normal(0), Back – UP(1)
0, 1, 2, 3
0, 1, 2, 3
00∼99
1∼9
Steady(0), Unsteady(1)
2%(0), 5%(1), 10%(2), 20%(3), 100%(4)
10%(0), 20%(1),50%(2),100%(3)
Weighing Completion Relay ON Delay Time
Weighing Completion Relay ON Time
Weighing Judging Relay ON Delay Time
Peak-hold(0), Sample hold(1),8Sec Average Hold(2)
0,1,2,3,4,5
0,1,2
0.0 ∼ 9.9 Sec
1,2,3,4
0.0 ∼ 9.9 Sec
0.0 ∼ 9.9 Sec
0.0 ∼ 9.9 Sec
0.0 ∼ 9.9 Sec
NO(0), ODD(1), EVEN(2)
0 ∼ 9 , 115200 bps ∼ 2400 bps
0 : Stream Mode, 1 : Stable Mode, 2:PRINT KEY
Weighing Judging Relay ON Time
Set Serial 2 Parity Bit
Set Serial 2 Communication Speed
Serial 2 Communication Mode
0:One-way Transmit Mode, 1:COMMAND MODE, 2:LCD MODE
Serial 2 Communication Method
Set ID NUMBER
1∼99
0 : Basic FORMAT , 1 : Basic+Time , 2 : CAS FORMAT
Transmit Data FORMAT
Select BCC Mode
0 : BCC No Use 1 : BCC Use
Set Weighing Unit Print
0:kg, 1:g, 2:ton
0 :F80 Setting , 1 : Steady Lamp
Select Data Output with Auto Printer
Set Printing Format
0 : Consecutive Print, 1 : Individual Print
Set removing printer subtotal Memory
0 : Remove Subtotal Grand 1 : Auto remove
Set paper feeding
1Count increase= 1 Line increase
Control the interval 1 line to the next line
Set printer line interval
0 : Print weight value, 1 : Print Max. Min. Average
Subtotal Print Mode
Select PRINT Font
0 : Korean 1 : English
PRINT Delay Time
0∼9.9
Select Auto, Manual for Printer
0,1
Select Key Tare Operation
0: Key Tare No Use,1: Key Tare Useable
FUNCTION AUTO SETTING
. AUTO FUNCTI0N SETTING
Set NEAR ZERO(EMPTY) Range
x x x x x x
Set Zero Display Range
x x x x x x
Confirm Calibration SPAN Constant Value
x. x x x x x
Confirm & Change Date (Year,Month,Date)
x x. x x. x x
Confirm & Change Time (Hour,Min,Sec)
x x. x x. x x
16
DIGITAL INDICATOR
(●Factory Default)
SET LOCATION OF DECIMAL POINT
F01
●
0
No Decimal Point
0
1
One decimal place
0.0
2
Two decimal places
0.00
3
Three decimal places
0.000
ZERO MEMORY MODE
F02
●
0
Normal Mode
1
Back-up Mode
* On normal condition, it doesn’t remember the weight on scale if power failure or Power OFF.
Thus, you need to make Power ON after removing the weight from scale.
* On Back-up condition, it remembers the initial zero value when power failure or Power OFF. So if
there is a weight on scale when Power is on, it displays the same weight value.
If the weight is already removed, you need to press “ZERO" Key to make Zero value re-saved.
SET MOTION BAND RANGE
0
F03
1
∫
3
It is to set a certain weight change range per hour to show or not to
show its steadiness.
0 : Weak Vibration
~
3 : Strong Vibration
* If weight change range in setting time is within A/D count setting Range, it regards this condition
as steady. To have speedy steady condition, please have a big number when the surroundings have strong
vibration and please have a small number when the surroundings have weak vibration.
SET ZERO TRACKING COMPENSATION RANGE
F04
1
0
The zero tracking compensation function will automatically bring the
∫
display back to “Zero” when there are small deviations caused by
3
dust, wind, temperature etc.
17
DIGITAL INDICATOR
Ex) When Maximum display division is 120.00Kg and the value of one division is set as 0.05Kg:
F04 is set as “3.”
If weight change is within 250g in 0.75 Sec,
displays shows “0” automatically.
4.5digit
(0.25Kg)
t
0.75 Sec
If weight change is over 250g in 0.75
Sec, the changed value will be shown
SET AUTO-ZERO RANGE
00
F05
20
It returns the displayed value to “0” when the weight is less than
∫
setting value and steady.
99
※
With this mode, you can automatically set “Zero” without pressing “Zero” Key before you do measuring again. (When
the remaining value is less than the setting value).
※ EX) In case of a scale with Max display weight is 120.00Kg and the value of one division is 0.02Kg, F05 is set as
30: when the remaining weight is + (0.02∼0.30Kg) and steady lamp is ON, it automatically sets “Zero” and the display
will be returned to “0.00KG”.
DIGITAL FILTER RANGE
F06
5
1
Weak
Weak Vibration
∫
↕
↑
9
Strong
Strong Vibration
More Sensitive
Less Sensitive
※ This mode should be used after compensating the setting value according to the surrounding condition
(surrounding vibration).
※ To make the speed of display reply faster, please set the setting value small.
ZERO. TARE KEY OPERATION
F07
●
0
“ZERO”and “TARE” Keys are operated only when weight is steady.
1
“ZERO”and “TARE” Keys are operated even there is change in weight.
SET ZERO KEY RANGE
F08
●
0
Within 2% of Maximum Capacity
1
Within 5% of Maximum Capacity
2
Within 10% of Maximum Capacity
3
Within 20% of Maximum Capacity
4
Within 100% of Maximum Capacity
18
DIGITAL INDICATOR
SET TARE KEY OPERATION RANGE
F09
●
0
Within 10% of Maximum Capacity
1
Within 20% of Maximum Capacity
2
Within 50% of Maximum Capacity
3
Within 100% of Maximum Capacity
SET HOLD FUNCTION
●
F10
0
Held when maximum weight is detected: Peak-Hold
1
Display is held when Hold key is pressed or external input is made: Sample Hold
2
Held for 8 sec averaging weight if Hold Key is pressed or external input is
made : Average Hold
EXTERNAL INPUT MODE
구
●
F11
분
IN1
IN2
IN3
IN4
0
START
STON
TARE
REMOVE TARE
1
START/STOP
TARE/REMOVE TARE
ZERO
PRINT
2
ZERO
TARE/REMOVE TARE
DECIDE
PRINT
3
ZERO
TARE/REMOVE TARE
HOLD
REMOVE HOLD
4
ZERO
TARE
REMOVE TARE
PRINT
5
ZERO
TOTAL
PRINT
SUBTOTAL
APPOINT CODE NUMBER MODE
●
F12
0
Fixed
1
increased 1 by each measuring work
2
decreased 1 by each measuring work
SET HOLD OFF TIME
0.0
F14
00
∫
To set Hold Off time from 0.0sec to 9.9sec.
9.9
SELECT WEIGHING MODE
●
F21
1
Relay out mode 1(Limit)
2
Relay out mode 2(Packer)
3
Relay out mode 3(Checker1)
4
Relay out mode 4(Checker2)
5
Relay out mode 5(Checker3)
19
DIGITAL INDICATOR
RELAY OUTPUT
RELAY OUTPUT
1
2
3
4
5
Limit
Packer
Cherker1
(Weight select)
Cherker2
(press-fit control)
Cherker3
(Weight decide)
OUT 1
OUT 2
OUT 3
OUT 4
OUT 5
OUT 6
SP1
SP2
Completed
Lower limit NG
Upper limit NG
ZERO
SP1
SP2
Completed
Lower limit NG
Upper limit NG
ZERO
SP1(Low)
SP2(Hi)
OK
Lower limit NG
Upper limit NG
ZERO
SP1(Low)
SP2(Hi)
OK
Lower limit NG
Upper limit NG
ZERO
SP1(Low)
SP2(Hi)
OK
Lower limit NG
Upper limit NG
ZERO
20
DIGITAL INDICATOR
21
DIGITAL INDICATOR
22
DIGITAL INDICATOR
23
DIGITAL INDICATOR
24
DIGITAL INDICATOR
25
DIGITAL INDICATOR
WEIGHING COMPLETION RELAY OUTPUT DELAY TIME ( F21-01 : Packer Mode SETTING)
Delay time from the start of SP4 relay operation until the start of
Completion Relay Operation can be set.
0
F22
10
∫
99
*Note
00 : Finish signal (Relay Output) when weight is stable.
01 : Finish signal (Relay Output) after 0.1 sec.
99 : Finish signal (Relay Output) after 9.9 sec.
WEIGHING COMPLETION RELAY OUTPUT ON TIME ( F21-01 : Packer Mode SETTING)
Weighing completion Relay On time can be set.
0
F23
10
∫
99
*Note
00 : Weighing Completion Relay continued.
01 : Finish signal (Relay Output) for 0.1 sec.
99 : Finish signal (Relay Output) for 9.9 sec.
26
DIGITAL INDICATOR
WEIGHING COMPLETION RELAY OUTPUT DELAY TIME ( Checker Mode)
Delay time from weighing completion until the start of Judging Relay
Operation can be set.
00
F24
10
∫
99
*Note
01 : Judging signal (Relay Output) after 0.1 sec.
99 : Judging signal (Relay Output) after 9.9 sec.
WEIGHING JUDGING RELAY OUTPUT ON TIME ( Checker Mode)
Weighing Completion Relay ON time can be set.
00
F25
10
∫
99
*Note
01 : Judging signal (Relay Output) after 0.1 sec.
99 : Judging signal (Relay Output) after 9.9 sec.
WEIGHING NG RELAY OUPUT ON TIME (t5)
F28
10
00
~
99
Weighing completion Relay ON time can be set.
* Note
01 : Relay ON for 0.1 sec.
99 : Relay ON for 9.9 sec
※ SERIAL I/F
27
DIGITAL INDICATOR
SERIAL COMMUNICATION : PARITY BIT SETTING
●
F30
0
No Parity
1
Odd Parity
2
Even Parity
SERIAL COMMUNICATION : SELECT COMMUNICATION SPEED
F31
●
0
1
115,200 bps
76,800 bps
2
57,600 bps
3
38,400 bps
4
28,800 bps
5
19,200 bps
6
14,400 bps
7
9,600 bps
8
4,800 bps
9
2,400 bps
SERIAL COMMUNICATION MODE ( WHEN F33 IS SET AS “0”)
●
F32
0
Stream Mode: Always output weight value continuously.
1
Steady Mode: Data output as soon as measuring is steady.
2
Data output when Print Key is pressed.
SERIAL COMMUNICATION METHOD
●
F33
0
One-way transmit Mode
1
Command Mode
2
LCD Mode
4
External display mode
ID NUMBER SETTING
F34
1
1∼99
ID number is to identify each device.
TRANSMIT DATA FORMAT
●
F35
0
Basic FORMAT
1
Basic FORMAT + Time
2
CAS FORMAT
BCC SELET MODE
28
DIGITAL INDICATOR
F36
●
0
BCC No Use.
1
BCC Use.
· Refer to description on Serial I/F
※ CENTRONICS PARALLEL OUT (PRINTER I/F)
SET WEIGHING UNIT PRINT
●
F40
0
Kg
1
g
2
ton
SELECT DATA OUTPUT IN CASE OF AUTO PRINT
●
0
F41
1
Automatic print is operated when weight is less than the setting
value of F80 (near Zero) and increased again to be steady.
Automatic print is operated when Steady lamp for weight on scale
is OFF and then ON again.
SET PRINT FORMAT
F42
●
0
Consecutive Print: Serial and weight will be printed consecutively.
1
Individual Print: Print will be made each time measuring is done.
SET PRINT SUBTOTAL GRAND MEMORY REMOVE
F43
●
0
1
Remove Subtotal: Press Clear Key and then press SUB Key.
Remove Grand: Press Clear Key and then press Grand Key
Remove Subtotal, Grand automatically once printing is done.
CONTROL PAPER FEEDING ONCE PRINTIN IS COMPLETED
0
F44
4
∫
9
1 Count increase = 1 Line increase
(This will be applied only to individual print and subtotal print.)
SET PRINT LINE INTERVAL
0
F45
1
∫
9
When print output, print 1 line and then adjust the interval to
the next line.
1 Count increase = 1 Line increase
(This will be applied only to consecutive print.)
29
DIGITAL INDICATOR
SUBTOTAL PRINT MODE
F46
●
0
Output weight value in case of printing subtotal.
1
Print Max. Min and Average value in case of printing subtotal.
SELECT PRINT FONT
F47
●
0
Korean
1
English
PRINT DELAY TIME
0.0
F48
00
∫
9.9
Set print delay time from 0.1 to 9.9 sec
0.0 sec: No use for print delay time
PRINTER AUTO OR MANUAL SELECT MODE
F49
●
0
MANUAL MODE
1
AUTO MODE
SET KEY TARE OPERATION MODE
F52
●
0
Key Tare No Use
1
Key Tare Use Available
FUNCTION AUTO SETTING MODE
F77
This is to automatically set the setting value of Function to the initial factory default..
** If other setting value is applied, please do not access to F77 Mode.
SET NEAR ZERO(EMPTY) RANGE
This is near Zero range to check the emptiness of scale.
F80
0.10
EX) 000: Weight display is “0”: Near Zero Relay is operated.
010: Weight display is below 10”: Near Zero Relay is operated.
150: Weight display is below “150”: Near Zero Relay is operated.
SET ZERO DISPLAY RANGE
This is to set the zero display range.
F81
XXXXXX
EX) If 50 is set, the numbers less than 50 will be all displayed
as “0.”
CHECK CALIBRATION SPAN CONSTANT
30
DIGITAL INDICATOR
On SET-UP Mode, KEY 89 and then “CLEAR” KEY is pressed, SPAN constant will be
displayed on weight section. Once you check the SPAN constant, please return to
previous menu by pressing “CLEAR" Key. If you change SPAN constant, please press
“ENTER" Key and then”CLEAR" Key.
*Note: Please do not change constant at random since a tolerance can be caused between
F89
the actual weight values.
※ REFERENCE
If there is a mall tolerance on weight value. You can adjust it by changing SPAN constant.
EX) Actual weight value: 100Kg. Indicator display value: 105Kg, F89 Constant
1.23456
How to change = (Actual weight value ÷ Indicator display value) X F89 Constant =
(100÷105) X 1.23456 = 1.17577)
Once you change the current F89 constant 1.23456 to 1.17577, the indicator display value will
be shown as 100Kg
CONFIRM & CHANGE DATE (YEAR, MONTH, DATE)
F90
You can confirm or change current date.
CONFIRM & CHANGE TIME (HOUR, MINUTE, SECOND)
F91
You can confirm or change current time.
31
DIGITAL INDICATOR
7. INTERFACE
7-1. Serial Interface
● RS-232C Serial Interface
RS-232C Interface is sensitive to electric noise..
Therefore, please do the wiring separately from the wires of AC Power Cable or other
electric wires and you must use Shield Cable for it.
Communication Mode: You can set on F-Function(F30∼F35).
▶ Signal Format
①Type: EIA-RS-232C
②Method: Half-Duplex, asynchronous method, Stream
③Baud-rate: 2400,4800,9600,14400,19200,28800,38400,57600,76800,115200 can be selected.
④Data bit: 7 or 8(No, Parity)
⑤Stop bit: 1
⑥Parity bit: Even, Odd, No, Parity can be selected
⑦Code: ASCII
1
+9V
0
-9V
LSB
1
0
2
3
4
5
Data bit
MSB
6
Stop bit
Parity bit
Start bit
⑧Data format(1)
,
Header1
,
K
Header2
Data(8)
▶ Header 1
- OL: OVER LOAD, UNDER LOAD
- ST: Display Stable
- US: Display unstable
▶ Header 2
- NT: NET WEIGHT
- GS: GROSS WEIGHT
32
g
unit
CR
LF
DIGITAL INDICATOR
▶ Data on number
- 2B (H): "+"PLUS
- 2D (H): "-"MINUS
- 2O (H): " "SPACE
- 2E (H): "."Decimal point
▶ UNIT
- Kg
⑨Data format(2)
,
,
K
Lamp Status
Header1
Header2
Data(8)
g
CR
Blank
ID NO.
unit
▶ Header 1
- OL: OVER LOAD, UNDER LOAD
- ST: Display Stable
- US: Display Unstable
▶ Header 2
- NT: NET WEIGHT
- GS: GROSS WEIGHT
▶ ID Number: To be set on F33
▶ Lamp Status: Shows current lamp’s ON and OFF Status
bit7
bit6
bit5
bit4
bit3
bit2
bit1
bit0
1
Stable
1
Hold
Print
Gross Weight
Tare
Zero
▶ Data on Number
- 2B (H): "+"PLUS
- 2D (H): "-"MINUS
- 2O (H): " "SPACE
- 2E (H): "."Decimal point
▶ UNIT
- Kg
33
LF
DIGITAL INDICATOR
▶ CONNECTION TO PC (Personal Computer) AND OTHER DEVICES.
PERSONAL COMPUTER
9 PIN(STANDARD)
3: TxD
RxD : 2
2: RxD
TxD : 3
5: SG
SG : 5
INDICATOR
▶RS-232C Circuit
2. RxD
3. TxD
5. SG
34
DIGITAL INDICATOR
7-2 Current Loop Interface
Current Loop Interface is stronger than RS232C against electric noise. Therefore, it is more
suitable for medium distance transmit. (about100M)
▶ Transmission Mode
Same as RS232C
▶ Signal Format
Same as RS232C
1
0
20mA
0mA
▶ Data Format
Same as RS232C
▶ Connection to External Display and other devices
INDICATOR
EXTERNAL DISPLAY
1 : RxD
C/L
2 : RxD
C/L
▶ Current Loop Circuit Schematic
35
DIGITAL INDICATOR
7-3. RS-422 Series Communication (Option 04)
RS-422 is to transmit signal by voltage difference. Therefore, it is more stable than other
communication methods against electric noise.
Please do wiring separately from AC Power Cable and other electric wires. Also you must use
exclusive Shield Cable(over 0.5Φ) for communication.
Recommended distance for use is within 1.2Km.
▶ SIGNAL FORMAT
① TYPE : RS-422
② FORMAT: ⓐ Baud-Rate: 300∼115200 can be selected.
ⓑ Data Bit: 7 or 8 (No Parity)
ⓒ Stop: 1
ⓓ Parity Bit: Even, Odd, No Parity can be selected.
ⓔ Code: ASCII
1
1.5V
Potential
0
difference
LSB
0
1
Start 1 bit
2
3
4
5
Data bit
MSB
6
Parity bit
Stop 1 bit
▶ One-Way Transmit MODE
STX (1)
ID.NO. (2)
Header1 (2)
1.
COMMAND (4)
Header2 (2)
DATA (14)
DATA (8)
Header1
- Stable
- Unstable
- Over Load
2. Header2
- Net Weight
- Net Hold Weight
- Gross Weight
- Gross Hold Weight
3. UNIT
- kg
t
4. DATA
- Weight including sign and decimal point
5. BCC = Σi %(MOD) 127(7FH) ^(XOR) 136(88H)
36
BCC (1)
ETX (1)
UNIT (2)
DIGITAL INDICATOR
▶ COMMAND MODE
( READ COMMAND )
TO → INDICATOR
STX ID. NO.
RTIM
STX ID. NO.
RDAT
BCC ETX
STX ID. NO.
RSNO
BCC ETX
STX ID. NO.
RCNO
BCC ETX
STX ID. NO.
RPNO
BCC ETX
STX ID. NO.
RTAR
BCC ETX
STX ID. NO.
RCWT BCC
STX ID. NO.
RSUB
BCC ETX
ETX
BCC ETX
명령어 설명
INDICATOR 응답
Command to transmit Time
data of indicator
Command to transmit Date
data of indicator
Command to transmit Serial
Number
Command to transmit Code
Number
Command to transmit Part
Number
Command to transmit “KEY
Tare” Weight
Command
to
transmit
“Current weight”
Transmit time DATA(6)
- STX ID.NO. RTIM 000000 BCC ETX
Transmit date DATA(6)
- STX ID. NO. RDAT 000000 BCC ETX
Transmit S/N (6)
- STX ID. NO. RSNO 000000 BCC ETX
Transmit code number (6)
- STX ID. NO. RCNO 000000 BCC ETX
Transmit P/N(2)
- STX ID. NO. RPNO 00 BCC ETX
Transmit KEY Tare (6)
- STX ID. NO. RTAR 000000 BCC ETX
Transmit currently measured weight
- STX ID. NO. RCWT DATA1 BCC ETX
- STX ID. NO. RSUB P/N(2) CODE_BUF(6)
COUNT(6) S.T.W(8) UNIT
Command
to
“Subtotal”
transmit
transmit
STX ID. NO.
RGRD
BCC ETX
Command
“Total”
STX ID. NO.
RFIN
BCC ETX
Command
to
measuring status
STX ID. NO.
RCWD BCC
STX ID. NO.
RSP1
BCC ETX
STX ID. NO.
RSP2
BCC ETX
STX ID. NO.
RFRE
BCC ETX
STX ID. NO.
RUND
BCC ETX
STX ID. NO.
ROVE
BCC ETX
ETX
to
BCC ETX
No decimal point.
transmit
Command to transmit all the
current data memorized in
the indicator
Command to transmit SP1
DATA
Command to transmit SP2
DATA
Command to transmit the
difference in elevation Data
Command to transmit lower
limit DATA
Command to transmit upper
limit DATA
RGRD P/N(2) CODE(6)
G.T.W(8) UNIT BCC ETX
No decimal point
Transmit measuring status (FN: finished,
RN: under measuring)
- STX ID. NO.
RFIN
FN (Measuring
completion 6 digit weight) BCC ETX
- STX ID. NO. RFIN RN BCC ETX
Transmit “Current weight”
- STX ID. NO. RCWD DATA2 BCC ETX
- STX ID.NO.
Transmit SP1 DATA(6)
- STX ID.NO. RSP1 000000 BCC ETX
Transmit SP2 DATA(6)
- STX ID.NO. RSP2 000000 BCC ETX
Transmit the difference in elevation
DATA(6)
- STX ID.NO. RFRE 000000 BCC ETX
Transmit lower limit DATA(4)
- STX ID.NO. RUND 0000 BCC ETX
Transmit upper limit DATA(4)
- STX ID.NO. ROVE 0000 BCC ETX
※ DATA1 (14), RCWT
HEADE1 (2)
HEADE2 (2)
Weight including sign, decimal point(8)
UNIT (kg or t)(2)
※ DATA2 (38) , RCWD
DATE (6)
TIME (6)
P/N (2)
CODE (6)
S/N (6)
37
KEY TARE (6)
(F52 ,1)
NET.W (6)
DIGITAL INDICATOR
▶ COMMAND MODE
( WRITE COMMAND)
TO → INDICATOR
명령어 설명
INDICATOR 응답
STX ID. NO.
WTAR
STX ID. NO.
BCC ETX
Command to set “TARE”
STX ID. NO.
STX ID. NO.
WTRS
STX ID. NO.
BCC ETX
Command “TARE RESET”
STX ID. NO.
STX ID. NO.
WZER
STX ID. NO.
BCC ETX
Command to set “ZERO”
STX ID. NO.
WPRT
STX ID. NO.
WSPR
STX ID. NO.
WGPR
STX ID. NO.
BCC ETX
BCC ETX
BCC ETX
WDAT DATE
STX ID. NO.
BCC
ETX
ex) STX ID.NO WDAT 00000000 BCC
ETX
STX ID. NO.
WTIM TIME
BCC
ETX
ex) STX ID.NO WTIM 000000 BCC
ETX
STX ID. NO.
WSNO S/N(6)
BCC
ETX
ex) STX ID.NO WSNO 000000 BCC
ETX
STX ID. NO.
WPNO P/N(2)
ETX
ex) STX ID.NO WPNO 00
STX ID. NO.
BCC
BCC ETX
WCNO C/N(6)
BCC
ETX
ex) STX ID.NO WCNO 000000 BCC
ETX
Command to carry out
“PRINT”
Command to carry out
“SUB-PRINT”
Command to carry out
“GRAND-PRINT”
Command to change the date
on Timer memorized in
indicator.
STX ID. NO.
STX ID. NO.
STX ID. NO.
STX ID. NO.
STX ID. NO.
STX ID. NO.
STX ID. NO.
STX ID. NO.
Command to change the time
on Timer memorized in
indicator.
STX ID. NO.
Command to change
“Serial” memorized
inside.
STX ID. NO.
Command to change “PART
NUMBER” to the DATA that is
now being transmitted
Command to change “CODE”
to the DATA that is now being
transmitted.
38
STX ID. NO.
STX ID. NO.
STX ID. NO.
STX ID. NO.
STX ID. NO.
STX ID. NO.
WTAR ACK BCC ETX
or
WTAR NAK BCC ETX
WTRS ACK BCC
or
WTRS NAK BCC
ETX
WZER ACK BCC
or
WZER NAK BCC
ETX
WPRT ACK BCC
or
WPRT NAK BCC
ETX
WSPR ACK BCC
or
WSPR NAK BCC
ETX
WGPR ACK BCC
or
WGPR NAK BCC
ETX
WDAT ACK BCC
or
WDAT NAK BCC
ETX
WTIM WCK
or
WTIM NAK
ETX
ETX
ETX
ETX
ETX
ETX
BCC ETX
BCC ETX
WSNO ACK BCC
or
WSNO NAK BCC
ETX
WPNO ACK BCC
or
WPNO NAK BCC
ETX
WCNO ACK BCC
or
WCNO NAK BCC
ETX
ETX
ETX
ETX
DIGITAL INDICATOR
STX ID. NO.
WHOL
STX ID. NO.
BCC ETX
Command to set “HOLD”
STX ID. NO.
STX ID. NO.
WHRS
STX ID. NO.
BCC ETX
Command “HOLD RESET”
STX ID. NO.
STX ID. NO.
WSTC
BCC ETX
Command
“SUB TOTAL CLEAR”
“Command
WGTC
STX ID. NO.
BCC ETX
GRAND TOTAL
CLEAR”
STX ID. NO.
STX ID. NO.
STX ID. NO.
STX ID. NO.
STX ID. NO.
STX ID. NO.
WSTR
BCC ETX
“Command
START”
STX ID. NO.
STX ID. NO.
STX ID. NO.
WSTO
BCC ETX
Command
“STOP”
STX ID. NO.
STX ID. NO.
WSP1 SP1(6)
BCC
ETX
ex) STX ID.NO WSP1 000000 BCC
ETX
STX ID. NO.
WSP2 SP2(6)
BCC
ETX
ex) STX ID.NO WSP2 000000 BCC
ETX
STX ID. NO.
WFRE 낙차(6)
BCC
ETX
ex) STX ID.NO WFRE 000000 BCC
ETX
STX ID. NO.
WUND 하한(4)
BCC
ETX
ex) STX ID.NO WUND 0000 BCC ETX
STX ID. NO.
WOVE 상한(4)
BCC
ETX
ex) STX ID.NO WOVE 0000 BCC ETX
Command to change “SP1”to
the data value that is now
being transmitted.
Command to change “SP2”to
the data value that is now
being transmitted.
Command to change
“Difference in elevation” to
DATA value that is currently
transmitting. “
Command to change
“Lower limit ” to DATA value
that is currently
transmitting.
Command to change
“Upper limit” to DATA value
that is currently transmitting
STX ID. NO.
STX ID. NO.
STX ID. NO.
STX ID. NO.
STX ID. NO.
STX ID. NO.
STX ID. NO.
STX ID. NO.
STX ID. NO.
STX ID. NO.
WHOL ACK BCC
or
WHOL NAK BCC
ETX
WHRS ACK BCC
or
WHRS NAK BCC
ETX
WSTC ACK BCC
or
WSTC NAK BCC
ETX
WGTC ACK BCC
or
WGTC NAK BCC
ETX
WGTC ACK BCC
or
WGTC NAK BCC
ETX
WGTC ACK BCC
or
WGTC NAK BCC
ETX
WCNO ACK BCC
or
WCNO NAK BCC
ETX
WCNO ACK BCC
or
WCNO NAK BCC
ETX
WFRE ACK BCC
or
WFRE NAK BCC
ETX
WUND ACK BCC
or
WUND NAK BCC
ETX
WOVE ACK BCC
or
WOVE NAK BCC
ETX
ETX
ETX
ETX
ETX
ETX
ETX
ETX
ETX
ETX
ETX
ETX
※ ACK = Reception Completed (Normal Operation), NAK = Bad Reception (Retry Transmission)
39
DIGITAL INDICATOR
▶ CONNECTION TO PC (Personal Computer) AND OTHER DEVICES.
PERSONAL COMPUTER
9 PIN(Standard)
TXD+
RXD+ 6
TXD-
RXD- 7
RXD-
TXD- 8
RXD+
TXD+ 9
INDICATOR
Connection in case of using 422 Option Card
7-4. PRINTER INTERFACE (Option 01)
It is a serial Interface method and this method can be used for the connection to all printers
communicated by this communication method. Print Format is programmed conforming to YJ-350(S/D,
S/T).
▶ Connector Pin Assignment
핀 번호
신 호
설 명
구 분
1
NC
STROBE Signal
Output
2
RXD
Data Input
Input
3
TXD
Data Output
Output
4
NC
-
”
5
GND
GROUND
Output
6
NC
-
”
7
NC
-
”
8
NC
-
”
9
NC
-
”
40
DIGITAL INDICATOR
7-5. ANALOG OUT(0~10V)INTERFACE(Option 02)
This Option is to transmit display weight value by Voltage out to the external devices (such
as Recoder, P.L.C Main Control etc.) controlled by analog signal.
▶ SPECIFICATIONS
Output Voltage
0~10V DC Output
Accuracy
Over 1/1000
▶ CONNECTOR (9P D-TYPE Female) & Circuit
※ This Voltage Output generates analog voltage (0~10V) compared to the weight display
signal input.
▶ ADJUST (Refer to the details at Page33. )
① At dispatch, it is set as 0V with weight display “0” and 10V with maximum load.
② It is set accurately when output voltage is measured by DIGITAL MULTI-METER.
Please do the detailed adjustment for VR1 (Zero on Analog out PCB) and VR2 (SPAN) inside
of indicator.
※ Note: This Analogue out output is printed after converting displayed weight value (Micro
Process DATA) to Analogue value by D/A converter.
The accuracy of D/A converter is below 1/4000. Therefore, users should use the device with
accuracy below 1/3000
This is not suitable for the device that requires high accuracy over 1/3000.
▶ CONNECTOR
9 Pin D-TYPE Female Connector
1 : HI(+)
5 : Lo(-)
EX
If you need 0~5VDC 1~5VDC Output,
please ask us in advance before we dispatch the product.
41
DIGITAL INDICATOR
7-6. ANALOG OUT(4~20㎃)INTERFACE(Option 03)
This Option is to transmit display weight value by Current out to the external devices (such
as Recoder, P.L.C Main Control etc.) controlled by analog signal.
▶ SPECIFICATIONS
Output Current
4~20㎃ for Available Range, Output Range is 2~22㎃
Accuracy
Over 1/1000
Temperature Coefficient
0.01%℃
MAX Load Impedance
500Ω MAX.
▶ When weight display is 0, Output current 4㎃ will be made. When weight display is maximum
display capacity, 20㎃ will be made.
▶ This should not connected any other device’s GND Line or Body GND or any other similar device
since Lo(-) circuit is not GND.
*Equivalent
Circuit
▶ ADJUST
1. At dispatch, it is set as 4㎃ with weight display “0” and 20㎃ with maximum load.
2.If you don’t get accurate output when you measure output current with DIGITAL MULTI-METER,
please do the detailed adjustment on VR₁(ZERO), VR₂(SPAN) on Analog Out PCB inside
the indicator.
※ Note: This Analogue out output is printed after converting displayed weight value
(Micro Process DATA) to Analogue value by D/A converter.
The accuracy of D/A converter is below 1/4000. Therefore, users should use the device
with accuracy below 1/3000
This is not suitable for the device that requires high accuracy over 1/3000.
▶ CONNECTOR
9 Pin D-TYPE Female Connector
1: HI (+)
5: Lo (-)
42
DIGITAL INDICATOR
- PRINTER SPECIFICATION 1. Interface : RS232C Serial
2. Protocol : 9600 bps , No Parity, 8, 1
3. Column : 30 Column
4. Korean Font type : Combination Type
5. Emulation : EPSON TM-T88II
YJ-350 Printer
GND
GND1
RXD
TXD1
TXD
RXD1
- Print Format –
Consecutive,
Subtotal, Total
Printing
Consecutive,
Subtotal,
Total
Printing
in
English
INDICATOR
Individual
Printing
Individual Printing in
English
43