1
Machine Automation Controller
NJ-series
CPU Unit
Software
User’s Manual
NJ501-1300
NJ501-1400
NJ501-1500
CPU Unit
W501-E1-01
OMRON, 2011
All rights reserved. No part of this publication may be reproduced, stored in a retrieval system, or transmitted, in any form, or
by any means, mechanical, electronic, photocopying, recording, or otherwise, without the prior written permission of
OMRON.
No patent liability is assumed with respect to the use of the information contained herein. Moreover, because OMRON is
constantly striving to improve its high-quality products, the information contained in this manual is subject to change without
notice. Every precaution has been taken in the preparation of this manual. Nevertheless, OMRON assumes no responsibility
for errors or omissions. Neither is any liability assumed for damages resulting from the use of the information contained in
this publication.
Introduction
Introduction
Thank you for purchasing an NJ-series CPU Unit.
This manual contains information that is necessary to use the NJ-series CPU Unit. Please read this
manual and make sure you understand the functionality and performance of the NJ-series CPU Unit
before you attempt to use it in a control system.
Keep this manual in a safe place where it will be available for reference during operation.
Intended Audience
This manual is intended for the following personnel, who must also have knowledge of electrical systems (an electrical engineer or the equivalent).
• Personnel in charge of introducing FA systems.
• Personnel in charge of designing FA systems.
• Personnel in charge of installing and maintaining FA systems.
• Personnel in charge of managing FA systems and facilities.
For programming, this manual is intended for personnel who understand the programming language
specifications in international standard IEC 61131-3 or Japanese standard JIS B3503.
Applicable Products
This manual covers the following products.
• NJ-series CPU Units
• NJ501-1300
• NJ501-1400
• NJ501-1500
NJ-series CPU Unit Software User’s Manual (W501)
1
Relevant Manuals
Relevant Manuals
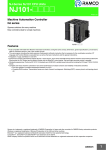
There are three manuals that provide basic information on the NJ-series CPU Units: the NJ-series CPU
Unit Hardware User’s Manual, the NJ-series CPU Unit Software User’s Manual (this manual), and the
NJ-series Instructions Reference Manual.
Most operations are performed from the Sysmac Studio Automation Software. Refer to the Sysmac Studio Version 1 Operation Manual (Cat. No. W504) for information on the Sysmac Studio.
Other manuals are necessary for specific system configurations and applications.
Read all of the manuals that are relevant to your system configuration and application to make the most
of the NJ-series CPU Unit.
NJ-series User’s Manuals
CJ-series Special Unit Operation
Manuals for NJ-series CPU Unit
NJ-series Troubleshooting Manual
NJ-series CPU Unit Built-in
EtherNet/IP Port User´s Manual
NJ-series Motion Control
Instructions Reference Manual
NJ-series CPU Unit Built-in
EtherCAT Port User´s Manual
NJ-series CPU Unit Motion
Control User´s Manual
NJ-series Instructions
Reference Manual
NJ-series CPU Unit
Software User´s Manual
NJ-series CPU Unit
Hardware User´s Manual
Basic information
Introduction to NJ-series Controllers
Setting devices and hardware
Using motion control
Using EtherCAT
Using EtherNet/IP
Using CJ-series Units
Software settings
Using motion control
Using EtherCAT
Using EtherNet/IP
Programming
Using motion control
Using EtherCAT
Using CJ-series Units
Programming error processing
Testing operation and debugging
Using motion control
Using EtherCAT
Using EtherNet/IP
Troubleshooting and managing
errors in an NJ-series Controller
Use the
relevant
manuals for
references
according to
any error that
occurs.
Maintenance
Using EtherCAT
Using EtherNet/IP
Using CJ-series Units
2
NJ-series CPU Unit Software User’s Manual (W501)
Manual Configuration
Manual Configuration
NJ-series CPU Unit Hardware User’s Manual (Cat. No. W500)
Section
Description
Section 1
Introduction
This section provides an introduction to the NJ-series Controllers and their features,
and gives the NJ-series Controller specifications.
Section 2
System Configuration
This section describes the system configuration used for NJ-series Controllers.
Section 3
Configuration Units
This section describes the parts and functions of the configuration devices in the NJseries Controller configuration, including the CPU Unit and Configuration Units.
Section 4
Installation and Wiring
This section describes where and how to install the CPU Unit and Configuration Units
and how to wire them.
Section 5
Troubleshooting
This section describes the event codes, error confirmation methods, and corrections
for errors that can occur.
Section 6
Inspection and Maintenance
This section describes the contents of periodic inspections, the service life of the Battery and Power Supply Units, and replacement methods for the Battery and Power
Supply Units.
Appendices
The appendices provide the specifications of the Basic I/O Units, Unit dimensions,
load short-circuit protection detection, line disconnection detection, and measures for
EMC Directives.
NJ-series CPU Unit Software User’s Manual (Cat. No. W501)
(This Manual)
Section
Description
Section 1
Introduction
This section provides an introduction to the NJ-series Controllers and their features,
and gives the NJ-series Controller specifications.
Section 2
CPU Unit Operation
This section describes the variables and control systems of the CPU Unit and CPU
Unit status.
Section 3
I/O Ports, Slave Configuration, and
Unit Configuration
This section describes how to use I/O ports, how to create the slave configuration
and unit configuration and how to assign functions.
Section 4
Controller Setup
This section describes the initial settings of the function modules.
Section 5
Designing Tasks
This section describes the task system and types of tasks.
Section 6
Programming
This section describes programming, including the programming languages and the
variables and instructions that are used in programming.
Section 7
Simulation, Transferring Projects to
the Physical CPU Unit, and Operation
This section describes simulation of Controller operation and how to use the results
of simulation.
Section 8
CPU Unit Status
This section describes CPU Unit status.
Section 9
CPU Unit Functions
This section describes the functionality provided by the CPU Unit.
Section 10
Communications Setup
This section describes how to go online with the CPU Unit and how to connect to
other devices.
Section 11
Example of Actual Application Procedures
This section describes the procedures that are used to actually operate an NJ-series
Controller.
Section 12
Troubleshooting
This section describes the event codes, error confirmation methods, and corrections
for errors that can occur.
Appendices
The appendices provide the CPU Unit specifications, task execution times, systemdefined variable lists, data attribute lists, CJ-series Unit memory information, CJseries Unit memory allocation methods, and data type conversion information.
NJ-series CPU Unit Software User’s Manual (W501)
3
Manual Configuration
NJ-series CPU Unit Motion Control User’s Manual (Cat. No. W507)
Section
Description
Section 1
Introduction to the Motion Control
Function Module
This section describes the features, system configuration, and application flow for the
Motion Control Function Module.
Section 2
Motion Control Configuration and
Principles
This section outlines the internal structure of the CPU Unit and describes the configuration and principles of the MC Function Module.
Section 3
Configuring Axes and Axes Groups
This section describes the concept of axes and axes groups, the settings for axes
that are required for the MC Test Run operations to function on the Sysmac Studio,
and the instructions for creating and configuring axes and axes groups using the Sysmac Studio.
Section 4
Checking Wiring from the Sysmac
Studio
This section describes the MC Test Run operations of the Sysmac Studio. You can
use the MC Test Run operations to monitor sensor signals, check Servomotor wiring,
and more, all without any programming.
Section 5
Motion Control Parameters
This section provides information on the axis parameters and axes group parameters
that are used for motion control.
Section 6
Motion Control Programming
This section provides the specifications of a motion control program and the operating procedures that are required up through actual program development.
Section 7
Manual Operation
This section describes manual operation when the MC Function Module is used
together with an OMRON G5-series Servo Drive.
Section 8
Homing
This section describes homing.
Section 9
Motion Control Functions
This section describes the motion control functions that are used when connected to
OMRON G5-series Servo Drives with built-in EtherCAT communications.
Section 10
Sample Programming
This section describes basic application methods for homing, error monitoring, and
other functions, and provides programming samples for absolute positioning, cam
operation, and other axis operations.
Section 11
Troubleshooting
This section describes the items to check when problems occur in the MC Function
Module. It includes error diagnosis and countermeasures for error indications, and
error diagnosis and countermeasures for operating conditions.
Appendices
The appendices describe settings and connection methods for OMRON G5-series
Servo Drive objects.
NJ-series Instructions Reference Manual (Cat. No. W502)
Section
Section 1
Instruction Set
This section provides a table of the instructions that are described in this manual.
Section 2
Instruction Descriptions
This section describes instruction specifications in detail.
Appendices
4
Description
The appendices provide a table of error codes and other supplemental information to
use instructions.
NJ-series CPU Unit Software User’s Manual (W501)
Manual Configuration
NJ-series CPU Unit Built-in EtherCAT Port User’s Manual
(Cat. No. W505)
Section
Description
Section 1
Introduction
This section provides an overview of EtherCAT communications, describes the system configuration and specifications, and provides operating procedures.
Section 2
Part Names and Slave Settings
This section provides the part names and describes the slave settings and Sysmac
device functions.
Section 3
EtherCAT Communications
This section describes the different types of EtherCAT communications, EtherCAT
settings, and state transitions.
Section 4
EtherCAT Network Wiring
This section describes how to connect and wire an EtherCAT network.
Section 5
Setting Up EtherCAT Communications with the Sysmac Studio
This section describes how to set the network configuration information and how to
check EtherCAT communications from the Sysmac Studio.
Section 6
Process Data Communications and
SDO Communications
This section describes the timing of communications, response times, and special
instructions for process data communications and SDO communications. It also provides sample programming.
Section 7
System-defined Variables That Are
Related to the Built-in EtherCAT Port
This section describes the system-defined variables that are related to the built-in
EtherCAT port.
Section 8
Example of Operations for EtherCAT
Communications
This section provides a series of example operations for when an NJ-series CPU Unit
is connected to slaves.
Section 9
Troubleshooting
This section describes the event codes, error confirmation methods, and corrections
for errors that can occur for EtherCAT communications. It also describes how to
replace slaves.
Appendices
The appendices describe the relation of EtherCAT communications to overall CPU
Unit status, packet monitoring functions, and multi-vendor application.
NJ-series CPU Unit Software User’s Manual (W501)
5
Manual Configuration
NJ-series CPU Unit Built-in EtherNet/IP Port User’s Manual
(Cat. No. W506)
Section
Description
Section 1
Introduction
This section provides an overview and the specifications of the built-in EtherNet/IP
port on an NJ-series Controller. It introduces EtherNet/IP communications and
describes the system configuration and operating procedures.
Section 2
Installing Ethernet Networks
This section describes the Ethernet network configuration devices, network installation, and cable connection methods.
Section 3
System-defined Variables Related to
the Built-in EtherNet/IP Port
This section describes the system-defined variables that are related to the built-in
EtherNet/IP port.
Section 4
Determining IP Addresses
This section describes how to set IP addresses for built-in EtherNet/IP ports.
Section 5
Sysmac Studio Settings for the
Built-in EtherNet/IP Port
This section describes the settings that are required for EtherNet/IP communications.
Section 6
Testing Communications
This section describes how to perform communications test with EtherNet/IP nodes
to confirm that the built-in EtherNet/IP port is set correctly.
Section 7
Tag Data Link Functions
This section introduces tag data link communications and describes the settings that
are required to use tag data links.
Section 8
Message Communications
This section describes how to use CIP message communications for devices on the
EtherNet/IP network, e.g., to read and write data.
Section 9
Socket Service
This section describes how to use socket communications to send and receive data
with TCP/UDP.
Section 10
FTP Server
This section describes how to use the FTP server to download and upload files in the
SD Memory Card to and from FTP clients.
Section 11
Automatic Clock Adjustment
This section describes how to automatically get clock information from an NTP server
to update the clock information in the CPU Unit.
Section 12
SNMP Agent
This section describes how to use the SNMP to manage the built-in EtherNet/IP port
as an SNMP agent.
Section 13
Communications Performance and
Communications Load
This section describes tag data links communications, adjustment of the communications load, and communications time.
Section 14
Troubleshooting
This section describes how to use event codes and network status to confirm errors
and corrections for them.
Appendices
The appendices provide a functional comparison of EtherNet/IP between NJ-series
CPU Units and other series, and describe EDS file management, Windows firewall
settings for connections from computers, and details on memory used for CJ-series
Units.
NJ-series Motion Control Instructions Reference Manual
(Cat. No. W508)
Section
6
Description
Section 1
Introduction to Motion Control
Instructions
This section gives an introduction to motion control instructions supported by NJseries CPU Units.
Section 2
Variables and Instructions
This section describes the variables and instructions for the Motion Control Function
Module.
Section 3
Axis Command Instructions
This section describes the instructions that are used to perform single-axis control for
the MC Function Module.
Section 4
Axes Group Instructions
This section describes the instructions to perform multi-axes coordinated control for
the MC Function Module.
Section 5
Common Command Instructions
This section describes the instructions that are used for both axes and axes groups.
Appendices
The appendices describe the error codes that are generated by the instructions.
NJ-series CPU Unit Software User’s Manual (W501)
Manual Configuration
NJ-series Troubleshooting Manual (Cat. No. W503)
Section
Description
Section 1
Overview of Errors
This section describes the errors that can occur on an NJ-series Controller, the operation that occurs for errors, and methods to confirm errors.
Section 2
Error Troubleshooting Methods
This section describes how to handle errors.
Section 3
Error Tables
This section lists all of the error events that can occur on NJ-series Controllers.
Sysmac Studio Version 1 Operation Manual (Cat. No. W504)
Section
Description
Section 1
Introduction
This section provides an overview and lists the specifications of the Sysmac Studio
and describes its features and components.
Section 2
Installation and Uninstallation
This section describes how to install and uninstall the Sysmac Studio.
Section 3
System Design
This section describes the basic concepts for designing an NJ-series System with the
Sysmac Studio and the basic operating procedures.
Section 4
Programming
This section describes how to create programs with the Sysmac Studio.
Section 5
Online Connections to a Controller
This section describes how to go online with a Controller.
Section 6
Debugging
This section describes how to debug the programs online on the Controller or debug
it offline with the Simulator.
Section 7
Other Functions
This section describes Sysmac Studio functions other than system design functions.
Section 8
Reusing Programming
This section describes how to reuse the programs that you create with the Sysmac
Studio.
Section 9
Support Software Provided with the
Sysmac Studio
This section describes the Support Software that is provided with the Sysmac Studio.
Section 10
Troubleshooting
This section describes the error messages that are displayed when you check a program on the Sysmac Studio and how to correct those errors.
Appendices
The appendices describe the following:
Driver Installation for Direct USB Cable Connection
Specifying One of Multiple Ethernet Interface Cards
Online Help
Simulation Instructions
NJ-series CPU Unit Software User’s Manual (W501)
7
Manual Structure
Manual Structure
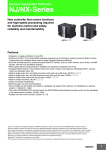
Page Structure
The following page structure is used in this manual.
Mounting Units
Level 1 heading
Level 2 heading
Level 3 heading
Connecting Controller Components
Gives the current
headings.
4 Installation and Wiring
Level 2 heading
4-3
Level 3 heading
4-3-1
The Units that make up an NJ-series Controller can be connected simply by pressing the Units together
and locking the sliders by moving them toward the back of the Units. The End Cover is connected in the
same way to the Unit on the far right side of the Controller.
A step in a procedure
1
Join the Units so that the connectors fit exactly.
Hook
Indicates a procedure.
Hook holes
Connector
4-3 Mounting Units
4
The yellow sliders at the top and bottom of each Unit lock the Units together. Move the sliders
toward the back of the Units as shown below until they click into place.
Move the sliders toward the back
until they lock into place.
Lock
Release
Slider
Gives the number
of the main section.
Precautions for Correct Use
Special information
The sliders on the tops and bottoms of the Power Supply Unit, CPU Unit, I/O Units, Special I/O
Units, and CPU Bus Units must be completely locked (until they click into place) after connecting
the adjacent Unit connectors.
Icons indicate
precautions, additional
information, or reference
information.
Manual name
4-3-1 Connecting Controller Components
2
Page tab
4-9
NJ-series CPU Unit Hardware User’s Manual (W500)
This illustration is provided only as a sample. It may not literally appear in this manual.
Special Information
Special information in this manual is classified as follows:
Precautions for Safe Use
Precautions on what to do and what not to do to ensure safe usage of the product.
Precautions for Correct Use
Precautions on what to do and what not to do to ensure proper operation and performance.
Additional Information
Additional information to read as required.
This information is provided to increase understanding or make operation easier.
Note References are provided to more detailed or related information.
8
NJ-series CPU Unit Software User’s Manual (W501)
Manual Structure
Precaution on Terminology
In this manual, “download” refers to transferring data from the Sysmac Studio to the physical Controller
and “upload” refers to transferring data from the physical Controller to the Sysmac Studio.
For the Sysmac Studio, synchronization is used to both upload and download data. Here, “synchronize”
means to automatically compare the data for the Sysmac Studio on the computer with the data in the
physical Controller and transfer the data in the direction that is specified by the user.
NJ-series CPU Unit Software User’s Manual (W501)
9
Manual Structure
10
NJ-series CPU Unit Software User’s Manual (W501)
Sections in this Manual
Sections in this Manual
1
Introduction
10
Communications
Setup
1
10
2
11
3
12
4
A
5
I
CPU Unit
Operation
11
3
I/O Ports, Slave
Configuration, and
Unit Configuration
12
Troubleshooting
4
Controller Setup
A
Appendices
6
5
Designing Tasks
I
Index
7
2
6
Example of Actual
Application Procedures
8
Programming
9
7
Simulation, Transferring Projects to
the Physical CPU Unit, and Operation
8
CPU Unit Status
9
CPU Unit Functions
NJ-series CPU Unit Software User’s Manual (W501)
11
Sections in this Manual
12
NJ-series CPU Unit Software User’s Manual (W501)
CONTENTS
CONTENTS
Introduction............................................................................................................... 1
Relevant Manuals...................................................................................................... 2
Manual Configuration............................................................................................... 3
Manual Structure ...................................................................................................... 8
Sections in this Manual.......................................................................................... 11
Read and Understand this Manual ........................................................................ 19
Safety Precautions ................................................................................................. 23
Precautions for Safe Use ....................................................................................... 28
Precautions for Correct Use .................................................................................. 34
Regulations and Standards ................................................................................... 37
Unit Versions........................................................................................................... 39
Related Manuals ..................................................................................................... 42
Terminology ............................................................................................................ 44
Revision History ..................................................................................................... 48
Section 1
1-1
Introduction
The NJ-series Controllers ....................................................................................................... 1-2
1-1-1
1-1-2
Features...................................................................................................................................... 1-2
Introduction to the System Configurations.................................................................................. 1-4
1-2
Specifications .......................................................................................................................... 1-6
1-3
Overall Operating Procedure for the NJ-series Controller .................................................. 1-8
1-3-1
1-3-2
Section 2
2-1
CPU Unit Operation
Internal Operation of the CPU Unit ........................................................................................ 2-2
2-1-1
2-1-2
2-2
Overall Procedure....................................................................................................................... 1-8
Procedure Details ....................................................................................................................... 1-9
Internal Software Configuration of the CPU Unit ........................................................................ 2-2
Overview of Tasks....................................................................................................................... 2-3
Variables and I/O...................................................................................................................... 2-5
2-2-1
2-2-2
Types of Variables....................................................................................................................... 2-5
Variables and I/O Assignments................................................................................................... 2-8
2-3
Control Systems .................................................................................................................... 2-12
2-4
CPU Unit Status ..................................................................................................................... 2-17
2-5
CPU Unit Data and Data Retention ...................................................................................... 2-18
2-5-1
CPU Unit Data .......................................................................................................................... 2-18
NJ-series CPU Unit Software User’s Manual (W501)
13
CONTENTS
Section 3
3-1
3-2
I/O Ports, Slave Configuration, and Unit Configuration
Overview of Procedures for the Slave and Unit Configurations ......................................... 3-2
Creating the EtherCAT Slave Configuration ......................................................................... 3-5
3-2-1
3-2-2
3-3
Creating the Unit Configuration ............................................................................................. 3-7
3-3-1
3-3-2
3-3-3
3-4
Section 4
4-2
4-4
Overview of the Controller Setup........................................................................................... 4-2
Initial Settings for the PLC Function Module ........................................................................ 4-4
Introduction ................................................................................................................................. 4-4
Controller Setup .......................................................................................................................... 4-4
Task Settings............................................................................................................................... 4-5
Unit Configuration and Unit Setup............................................................................................... 4-9
Initial Settings for Special Units........................................................................................... 4-11
Initial Settings for the Motion Control Function Module.................................................... 4-13
4-4-1
4-4-2
Introduction ............................................................................................................................... 4-13
Setting Methods ........................................................................................................................ 4-14
4-5
Initial Settings for the EtherCAT Master Function Module ................................................ 4-15
4-6
Initial Settings for the EtherNet/IP Function Module.......................................................... 4-16
Section 5
5-1
5-2
Designing Tasks
Overview of Task Designing Procedure ................................................................................ 5-2
Task System ............................................................................................................................. 5-5
5-2-1
5-2-2
5-2-3
5-2-4
5-2-5
5-2-6
5-2-7
5-2-8
5-2-9
5-2-10
5-2-11
5-2-12
5-3
Introduction ................................................................................................................................. 5-5
Specifications .............................................................................................................................. 5-6
Basic Operation of Tasks ............................................................................................................ 5-6
Assigning I/O Refreshing to Tasks ............................................................................................ 5-12
Assigning Tasks to Programs.................................................................................................... 5-13
Parameters for Primary Periodic Task and Periodic Tasks........................................................ 5-13
Ensuring Concurrency of Variable Values between Tasks ........................................................ 5-15
Synchronizing Variable Access from Outside the Controller with Task Execution .................... 5-18
Instructions Related to Tasks .................................................................................................... 5-19
System-defined Variables Related to Tasks.............................................................................. 5-19
Errors Related to Tasks............................................................................................................. 5-20
Monitoring Task Execution Status and Task Execution Times .................................................. 5-23
Task Design Example and I/O Response Times ................................................................. 5-26
5-3-1
5-3-2
5-3-3
5-3-4
14
Introduction ............................................................................................................................... 3-17
Axis Variables and Axes Group Variables ................................................................................. 3-18
Creating and Using Axes and Axis Variables ............................................................................ 3-19
Controller Setup
4-2-1
4-2-2
4-2-3
4-2-4
4-3
I/O Ports and Device Variables ................................................................................................. 3-11
Registering Device Variables .................................................................................................... 3-15
Creating the Axes and Assigning Them to the Servo Drives/Encoder Input Slaves....... 3-17
3-5-1
3-5-2
3-5-3
4-1
Introduction ................................................................................................................................. 3-7
Creating the Unit Configuration................................................................................................... 3-7
Verifying the Unit Configuration................................................................................................. 3-10
I/O Ports and Device Variables ............................................................................................. 3-11
3-4-1
3-4-2
3-5
Introduction ................................................................................................................................. 3-5
Creating the EtherCAT Slave Configuration ................................................................................ 3-5
Checking the Task Execution Time ........................................................................................... 5-26
Checking the System Service Monitoring Settings ................................................................... 5-27
Examples of Task Design.......................................................................................................... 5-28
System Input and Output Response Times .............................................................................. 5-29
NJ-series CPU Unit Software User’s Manual (W501)
CONTENTS
Section 6
Programming
6-1
Overview of Programming Procedures ................................................................................. 6-3
6-2
POUs (Program Organization Units)...................................................................................... 6-5
6-2-1
6-2-2
6-2-3
6-2-4
6-2-5
6-2-6
6-2-7
6-2-8
6-3
Variables ................................................................................................................................. 6-27
6-3-1
6-3-2
6-3-3
6-3-4
6-3-5
6-3-6
6-3-7
6-3-8
6-3-9
6-3-10
6-3-11
6-3-12
6-4
Section 7
Simulation ................................................................................................................................ 7-2
Differences between the Simulator and the Physical CPU Unit.................................................. 7-3
Simulation Programs .................................................................................................................. 7-3
Executing a Simulation ............................................................................................................... 7-4
Sysmac Studio Online Operations.............................................................................................. 7-4
Simulation Debugging................................................................................................................. 7-5
Estimation of Execution Times ................................................................................................... 7-6
Servo Drive Signal Processing Emulation .................................................................................. 7-6
Transferring the Project to the CPU Unit and Test Run ....................................................... 7-7
7-2-1
7-2-2
7-2-3
7-3
Array Specifications for Input Variables, Output Variables, In-Out Variables .......................... 6-108
Structure Variables for Input Variables, Output Variables, In-Out Variables ........................... 6-108
Master Control ........................................................................................................................ 6-109
Simulation, Transferring Projects to the Physical CPU
Unit, and Operation
7-1-1
7-1-2
7-1-3
7-1-4
7-1-5
7-1-6
7-1-7
7-2
Instructions ............................................................................................................................. 6-102
Basic Understanding of Instructions ....................................................................................... 6-102
Operation for Instruction Errors .............................................................................................. 6-105
Programming Precautions.................................................................................................. 6-108
6-7-1
6-7-2
6-7-3
7-1
Programming Languages ......................................................................................................... 6-65
Ladder Diagram Language ....................................................................................................... 6-65
Structured Text Language......................................................................................................... 6-71
Instructions .......................................................................................................................... 6-102
6-6-1
6-6-2
6-6-3
6-7
Constants.................................................................................................................................. 6-61
Types of Constants ................................................................................................................... 6-61
Programming Languages ..................................................................................................... 6-65
6-5-1
6-5-2
6-5-3
6-6
Variables ................................................................................................................................... 6-27
Types of Variables..................................................................................................................... 6-27
Types of User-defined Variables in Respect to POUs .............................................................. 6-28
Attributes of Variables............................................................................................................... 6-29
Data Types................................................................................................................................ 6-30
Derivative Data Types ............................................................................................................... 6-38
Array Specifications and Range Specifications for Data Types ................................................ 6-44
Variable Attributes..................................................................................................................... 6-50
Changes to Variables for Status Changes ................................................................................ 6-57
Function Block Instances.......................................................................................................... 6-59
Monitoring Variable Values ....................................................................................................... 6-59
Restrictions on Variable Names and Other Program-related Names ....................................... 6-60
Constants (Literals) ............................................................................................................... 6-61
6-4-1
6-4-2
6-5
What Are POUs? ........................................................................................................................ 6-5
Overview of the Three Types of POUs ....................................................................................... 6-6
Differences between Programs, Functions, and Function Blocks............................................... 6-7
Details on Programs ................................................................................................................... 6-7
Details on Function Blocks ......................................................................................................... 6-8
Details on Functions ................................................................................................................. 6-17
Operation That Applies to Both Functions and Function Blocks............................................... 6-22
POU Restrictions ...................................................................................................................... 6-24
Transferring the Project............................................................................................................... 7-7
Checking I/O Wiring.................................................................................................................... 7-7
MC Test Run ............................................................................................................................... 7-7
Starting Operation ................................................................................................................... 7-8
NJ-series CPU Unit Software User’s Manual (W501)
15
CONTENTS
Section 8
8-1
8-2
CPU Unit Status
Overview of CPU Unit Status.................................................................................................. 8-2
State Changes.......................................................................................................................... 8-3
8-2-1
8-2-2
8-2-3
8-2-4
Section 9
9-1
CPU Unit Functions
Data Management, Clock, and Operating Functions............................................................ 9-3
9-1-1
9-1-2
9-1-3
9-2
Forced Refreshing..................................................................................................................... 9-28
Changing Present Values.......................................................................................................... 9-32
Online Editing............................................................................................................................ 9-34
Data Tracing .............................................................................................................................. 9-35
Event Logs ............................................................................................................................. 9-43
9-6-1
9-6-2
9-6-3
9-6-4
9-7
Verification of Operation Authority............................................................................................. 9-17
CPU Unit Names and Serial IDs ............................................................................................... 9-19
Protection .................................................................................................................................. 9-21
CPU Unit Operation Restrictions for the User Program Execution ID....................................... 9-25
Debugging .............................................................................................................................. 9-28
9-5-1
9-5-2
9-5-3
9-5-4
9-6
SD Memory Card Operations.................................................................................................... 9-10
Specifications of Supported SD Memory Cards, Folders, and Files ......................................... 9-11
SD Memory Card Operation Instructions .................................................................................. 9-12
FTP Server................................................................................................................................ 9-12
File Operations from the Sysmac Studio................................................................................... 9-13
SD Memory Card Life Expiration Detection .............................................................................. 9-13
List of System-defined Variables Related to SD Memory Cards............................................... 9-13
SD Memory Card Self-diagnostic Functions ............................................................................. 9-14
Exclusive Control of Access to the SD Memory Card ............................................................... 9-15
Security .................................................................................................................................. 9-17
9-4-1
9-4-2
9-4-3
9-4-4
9-5
Basic I/O Units ............................................................................................................................ 9-7
Special Units ............................................................................................................................... 9-8
SD Memory Card Operations................................................................................................ 9-10
9-3-1
9-3-2
9-3-3
9-3-4
9-3-5
9-3-6
9-3-7
9-3-8
9-3-9
9-4
Clearing All Memory.................................................................................................................... 9-3
Clock ........................................................................................................................................... 9-3
RUN Output................................................................................................................................. 9-6
Management Functions for CJ-series Units.......................................................................... 9-7
9-2-1
9-2-2
9-3
When Power Is Turned ON.......................................................................................................... 8-3
Operating Mode Changes ........................................................................................................... 8-3
When Downloading Data from the Sysmac Studio to CPU Unit ................................................. 8-6
Status for Controller Errors ......................................................................................................... 8-7
Introduction ............................................................................................................................... 9-43
Detailed Information on Event Logs .......................................................................................... 9-44
Controller Events (Controller Errors and Information) ............................................................... 9-49
User-defined Events (User-defined Errors and Information)..................................................... 9-50
Using the Sysmac Studio to Back Up and Restore Data ................................................... 9-57
9-7-1
Section 10
Backing Up and Restoring the Present Values of Battery-backup Memory .............................. 9-57
Communications Setup
10-1 Communications System Overview..................................................................................... 10-2
10-1-1
Introduction ............................................................................................................................... 10-3
10-2 Connection Configuration for Sysmac Studio.................................................................... 10-4
10-2-1
10-2-2
Configurations That Allow Online Connections......................................................................... 10-4
Configurations That Do Not Allow Online Connections............................................................. 10-6
10-3 Connection Configurations between Controllers, and between Controllers and Slaves 10-7
10-3-1
10-3-2
16
Connection Configurations between Controllers....................................................................... 10-7
Connection Configuration between Controllers and Slaves .................................................... 10-10
NJ-series CPU Unit Software User’s Manual (W501)
CONTENTS
10-4 Connection Configurations with HMIs and Devices with Serial Communications ....... 10-11
10-4-1
10-4-2
Section 11
Connections to HMIs .............................................................................................................. 10-11
Connections to Devices with Serial Communications............................................................. 10-11
Example of Actual Application Procedures
11-1 Example Application ............................................................................................................. 11-2
11-1-1
11-1-2
System Configuration ............................................................................................................... 11-2
Operation .................................................................................................................................. 11-3
11-2 Overview of the Example Procedure ................................................................................... 11-4
11-2-1
11-2-2
11-2-3
11-2-4
11-2-5
11-2-6
Section 12
Wiring and Settings .................................................................................................................. 11-4
Software Design ....................................................................................................................... 11-4
Software Settings from the Sysmac Studio .............................................................................. 11-5
Programming with the Sysmac Studio...................................................................................... 11-8
Simulation with the Sysmac Studio........................................................................................... 11-9
Checking Operation and Actual Operation ............................................................................. 11-10
Troubleshooting
12-1 Operation after an Error ........................................................................................................ 12-2
12-1-1
12-1-2
12-1-3
Overview of NJ-series Status ................................................................................................... 12-2
Fatal Errors in the CPU Unit ..................................................................................................... 12-3
Non-fatal error in CPU Unit....................................................................................................... 12-4
12-2 Troubleshooting................................................................................................................... 12-11
12-2-1
12-2-2
12-2-3
12-2-4
12-2-5
Checking to See If the CPU Unit Is Operating........................................................................ 12-11
Troubleshooting Flowchart for Non-fatal Errors ...................................................................... 12-12
Error Table .............................................................................................................................. 12-12
Error Descriptions ................................................................................................................... 12-17
Troubleshooting Errors That Are Not in the CPU Unit ............................................................ 12-36
Appendices
A-1 Specifications ..........................................................................................................................A-3
A-1-1
A-1-2
A-1-3
General Specifications................................................................................................................ A-3
Performance Specifications ........................................................................................................ A-4
Function Specifications............................................................................................................... A-8
A-2 Calculating Guidelines for Task Execution Times..............................................................A-16
A-2-1
A-2-2
Calculating the Average Task Execution Times ........................................................................ A-16
Example of Calculating the Average Task Execution Time and Setting the Task Period .......... A-24
A-3 System-defined Variables .....................................................................................................A-26
A-3-1
A-3-2
A-3-3
A-3-4
A-3-5
A-3-6
A-3-7
System-defined Variables for the Overall NJ-series Controller (No Category) ......................... A-26
PLC Function Module, Category Name: _PLC ......................................................................... A-30
PLC Function Module, Category Name: _CJB ......................................................................... A-31
Motion Control Function Module, Category Name: _MC .......................................................... A-33
EtherCAT Master Function Module, Category Name: _EC....................................................... A-34
EtherNet/IP Function Module, Category Name: _EIP .............................................................. A-38
Meanings of Error Status Bits ................................................................................................... A-45
A-4 Specifications for Individual System-defined Variables ....................................................A-47
A-4-1
A-4-2
A-4-3
A-4-4
A-4-5
A-4-6
System-defined Variables for the Overall NJ-series Controller (No Category) ......................... A-47
PLC Function Module, Category Name: _PLC ......................................................................... A-54
PLC Function Module, Category Name: _CJB ......................................................................... A-55
Motion Control Function Module, Category Name: _MC .......................................................... A-59
EtherCAT Master Function Module, Category Name: _EC....................................................... A-61
EtherNet/IP Function Module, Category Name: _EIP .............................................................. A-68
A-5 CPU Unit Data Retention and Other Attributes...................................................................A-76
A-6 Contents of Memory Used for CJ-series Units ...................................................................A-80
NJ-series CPU Unit Software User’s Manual (W501)
17
CONTENTS
A-6-1
A-6-2
A-6-3
A-6-4
A-6-5
CIO Area ...................................................................................................................................A-80
Auxiliary Area ............................................................................................................................A-82
Holding Area .............................................................................................................................A-83
DM Area ....................................................................................................................................A-83
EM Area ....................................................................................................................................A-84
A-7 Variable Memory Allocation Methods ..................................................................................A-85
A-7-1
A-7-2
Variable Memory Allocation Rules ............................................................................................A-85
Important Case Examples.........................................................................................................A-88
Index
18
NJ-series CPU Unit Software User’s Manual (W501)
Read and Understand this Manual
Read and Understand this Manual
Please read and understand this manual before using the product. Please consult your OMRON representative
if you have any questions or comments.
Warranty and Limitations of Liability
WARRANTY
OMRON's exclusive warranty is that the products are free from defects in materials and workmanship for a
period of one year (or other period if specified) from date of sale by OMRON.
OMRON MAKES NO WARRANTY OR REPRESENTATION, EXPRESS OR IMPLIED, REGARDING NONINFRINGEMENT, MERCHANTABILITY, OR FITNESS FOR PARTICULAR PURPOSE OF THE
PRODUCTS. ANY BUYER OR USER ACKNOWLEDGES THAT THE BUYER OR USER ALONE HAS
DETERMINED THAT THE PRODUCTS WILL SUITABLY MEET THE REQUIREMENTS OF THEIR
INTENDED USE. OMRON DISCLAIMS ALL OTHER WARRANTIES, EXPRESS OR IMPLIED.
LIMITATIONS OF LIABILITY
OMRON SHALL NOT BE RESPONSIBLE FOR SPECIAL, INDIRECT, OR CONSEQUENTIAL DAMAGES,
LOSS OF PROFITS OR COMMERCIAL LOSS IN ANY WAY CONNECTED WITH THE PRODUCTS,
WHETHER SUCH CLAIM IS BASED ON CONTRACT, WARRANTY, NEGLIGENCE, OR STRICT
LIABILITY.
In no event shall the responsibility of OMRON for any act exceed the individual price of the product on which
liability is asserted.
IN NO EVENT SHALL OMRON BE RESPONSIBLE FOR WARRANTY, REPAIR, OR OTHER CLAIMS
REGARDING THE PRODUCTS UNLESS OMRON'S ANALYSIS CONFIRMS THAT THE PRODUCTS
WERE PROPERLY HANDLED, STORED, INSTALLED, AND MAINTAINED AND NOT SUBJECT TO
CONTAMINATION, ABUSE, MISUSE, OR INAPPROPRIATE MODIFICATION OR REPAIR.
NJ-series CPU Unit Software User’s Manual (W501)
19
Read and Understand this Manual
Application Considerations
SUITABILITY FOR USE
OMRON shall not be responsible for conformity with any standards, codes, or regulations that apply to the
combination of products in the customer's application or use of the products.
At the customer's request, OMRON will provide applicable third party certification documents identifying
ratings and limitations of use that apply to the products. This information by itself is not sufficient for a
complete determination of the suitability of the products in combination with the end product, machine,
system, or other application or use.
The following are some examples of applications for which particular attention must be given. This is not
intended to be an exhaustive list of all possible uses of the products, nor is it intended to imply that the uses
listed may be suitable for the products:
• Outdoor use, uses involving potential chemical contamination or electrical interference, or conditions or
uses not described in this manual.
• Nuclear energy control systems, combustion systems, railroad systems, aviation systems, medical
equipment, amusement machines, vehicles, safety equipment, and installations subject to separate
industry or government regulations.
• Systems, machines, and equipment that could present a risk to life or property.
Please know and observe all prohibitions of use applicable to the products.
NEVER USE THE PRODUCTS FOR AN APPLICATION INVOLVING SERIOUS RISK TO LIFE OR
PROPERTY WITHOUT ENSURING THAT THE SYSTEM AS A WHOLE HAS BEEN DESIGNED TO
ADDRESS THE RISKS, AND THAT THE OMRON PRODUCTS ARE PROPERLY RATED AND
INSTALLED FOR THE INTENDED USE WITHIN THE OVERALL EQUIPMENT OR SYSTEM.
PROGRAMMABLE PRODUCTS
OMRON shall not be responsible for the user's programming of a programmable product, or any
consequence thereof.
20
NJ-series CPU Unit Software User’s Manual (W501)
Read and Understand this Manual
Disclaimers
CHANGE IN SPECIFICATIONS
Product specifications and accessories may be changed at any time based on improvements and other
reasons.
It is our practice to change model numbers when published ratings or features are changed, or when
significant construction changes are made. However, some specifications of the products may be changed
without any notice. When in doubt, special model numbers may be assigned to fix or establish key
specifications for your application on your request. Please consult with your OMRON representative at any
time to confirm actual specifications of purchased products.
DIMENSIONS AND WEIGHTS
Dimensions and weights are nominal and are not to be used for manufacturing purposes, even when
tolerances are shown.
PERFORMANCE DATA
Performance data given in this manual is provided as a guide for the user in determining suitability and does
not constitute a warranty. It may represent the result of OMRON's test conditions, and the users must
correlate it to actual application requirements. Actual performance is subject to the OMRON Warranty and
Limitations of Liability.
ERRORS AND OMISSIONS
The information in this manual has been carefully checked and is believed to be accurate; however, no
responsibility is assumed for clerical, typographical, or proofreading errors, or omissions.
NJ-series CPU Unit Software User’s Manual (W501)
21
Read and Understand this Manual
22
NJ-series CPU Unit Software User’s Manual (W501)
Safety Precautions
Safety Precautions
Definition of Precautionary Information
The following notation is used in this manual to provide precautions required to ensure safe usage of an
NJ-series Controller. The safety precautions that are provided are extremely important to safety. Always
read and heed the information provided in all safety precautions.
The following notation is used.
WARNING
Caution
Indicates a potentially hazardous situation which, if not avoided,
could result in death or serious injury. Additionally, there may be
severe property damage.
Indicates a potentially hazardous situation which, if not avoided,
may result in minor or moderate injury, or property damage.
Precautions for Safe Use
Indicates precautions on what to do and what not to do to ensure safe usage of the product.
Precautions for Correct Use
Indicates precautions on what to do and what not to do to ensure proper operation and performance.
NJ-series CPU Unit Software User’s Manual (W501)
23
Safety Precautions
Symbols
The circle and slash symbol indicates operations that you must not do.
The specific operation is shown in the circle and explained in text.
This example indicates prohibiting disassembly.
The triangle symbol indicates precautions (including warnings).
The specific operation is shown in the triangle and explained in text.
This example indicates a precaution for electric shock.
The triangle symbol indicates precautions (including warnings).
The specific operation is shown in the triangle and explained in text.
This example indicates a general precaution.
The filled circle symbol indicates operations that you must do.
The specific operation is shown in the circle and explained in text.
This example shows a general precaution for something that you must do.
24
NJ-series CPU Unit Software User’s Manual (W501)
Safety Precautions
WARNING
During Power Supply
Do not touch any of the terminals or terminal blocks while the power is being
supplied. Doing so may result in electric shock.
Do not attempt to take any Unit apart. In particular, high-voltage parts are
present in the Power Supply Unit while power is supplied or immediately after
power is turned OFF. Touching any of these parts may result in electric
shock. There are sharp parts inside the Unit that may cause injury.
Fail-safe Measures
Provide safety measures in external circuits to ensure safety in the system if
an abnormality occurs due to malfunction of the CPU Unit, other Units, or
slaves or due to other external factors affecting operation. Not doing so may
result in serious accidents due to incorrect operation.
Emergency stop circuits, interlock circuits, limit circuits, and similar safety
measures must be provided in external control circuits.
The Controller outputs may remain ON or OFF due to deposition or burning
of the output relays or destruction of the output transistors. As a countermeasure for such problems, external safety measures must be provided to
ensure safe operation of the system.
The CPU Unit will turn OFF all outputs from Basic Output Units in the following cases.
•
•
•
•
•
If an error occurs in the power supply
If the power supply connection becomes faulty
If a CPU watchdog timer error or CPU reset occurs
If a major fault level Controller error occurs
While the CPU Unit is on standby until RUN mode is entered after the
power is turned ON
External safety measures must be provided to ensure safe operation of the
system even if the outputs turn OFF.
If external power supplies for slaves or other devices are overloaded or shortcircuited, the voltage will drop, outputs will turn OFF, and the system may be
unable to read inputs. Provide external safety measures in controls with monitoring of external power supply voltage as required so that the system operates safely in such a case.
NJ-series CPU Unit Software User’s Manual (W501)
25
Safety Precautions
WARNING
Fail-safe Measures
Unintended outputs may occur when an error occurs in variable memory or
in memory used for CJ-series Units. As a countermeasure for such problems, external safety measures must be provided to ensure safe operation of
the system.
Provide measures in the communications system and user program to
ensure safety in the overall system even if errors or malfunctions occur in
data link communications or remote I/O communications.
If there is interference in remote I/O communications or if a major fault level
error occurs, output status will depend on the products that are used.
Confirm the operation that will occur when there is interference in communications or a major fault level error, and implement safety measures.
Correctly set all of the EtherCAT slaves.
The NJ-series Controller continues normal operation for a certain period of
time when a momentary power interruption occurs. This means that the NJseries Controller may receive incorrect signals from external devices that are
also affected by the power interruption. Accordingly, take suitable actions,
such as external fail-safe measures and interlock conditions, to monitor the
power supply voltage of the external device as required.
You must take fail-safe measures to ensure safety in the event of incorrect,
missing, or abnormal signals caused by broken signal lines, momentary
power interruptions, or other causes. Not doing so may result in serious accidents due to incorrect operation.
Voltage and Current Inputs
Make sure that the voltages and currents that are input to the Units and
slaves are within the specified ranges.
Inputting voltages or currents that are outside of the specified ranges may
cause accidents or fire.
Downloading
Always confirm safety at the destination before you transfer a user program,
configuration data, setup data, device variables, or values in memory used
for CJ-series Units from the Sysmac Studio. The devices or machines may
perform unexpected operation regardless of the operating mode of the CPU
Unit.
26
NJ-series CPU Unit Software User’s Manual (W501)
Safety Precautions
Caution
Application
Do not touch any Unit when power is being supplied or immediately after the
power supply is turned OFF. Doing so may result in burn injury.
Wiring
Be sure that all terminal screws and cable connector screws are tightened to
the torque specified in the relevant manuals. The loose screws may result in
fire or malfunction.
Online Editing
Execute online editing only after confirming that no adverse effects will be
caused by deviations in the timing of I/O. If you perform online editing, the
task execution time may exceed the task period, I/O may not be refreshed
with external devices, input signals may not be read, and output timing may
change.
NJ-series CPU Unit Software User’s Manual (W501)
27
Precautions for Safe Use
Precautions for Safe Use
Disassembly and Dropping
• Do not attempt to disassemble, repair, or modify any Units. Doing so may result in malfunction or fire.
• Do not drop any Unit or subject it to abnormal vibration or shock. Doing so may result in Unit malfunction or burning.
Mounting
• The sliders on the tops and bottoms of the Power Supply Unit, CPU Unit, I/O Units, Special I/O Unit,
and CPU Bus Units must be completely locked (until they click into place) after connecting the adjacent Unit connectors.
Installation
• Always connect to a ground of 100 Ω or less when installing the Units. A ground of 100 Ω or less must
be installed when shorting the GR and LG terminals on the Power Supply Unit.
Wiring
• Follow the instructions in this manual to correctly perform wiring.
Double-check all wiring and switch settings before turning ON the power supply.
• Use crimp terminals for wiring.
Do not connect bare stranded wires directly to terminals.
• Do not pull on the cables or bend the cables beyond their natural limit.
Do not place heavy objects on top of the cables or other wiring lines. Doing so may break the cables.
• Mount terminal blocks and connectors only after checking the mounting location carefully.
Be sure that the terminal blocks, expansion cables, and other items with locking devices are properly
locked into place.
• Always remove any dustproof labels that are on the top of the Units when they are shipped before
you turn ON the power supply. If the labels are not removed, heat will accumulate and malfunctions
may occur.
• Before you connect a computer to the CPU Unit, disconnect the power supply plug of the computer
from the AC outlet. Also, if the computer has an FG terminal, make the connections so that the FG
terminal has the same electrical potential as the FG (GR) terminal on the Power Supply Unit. A difference in electric potential between the computer and Controller may cause failure or malfunction.
• If the external power supply to an Output Unit or slave has polarity, connect it with the correct polarity.
If the polarity is reversed, current may flow in the reverse direction and damage the connected
devices regardless of the operation of the Controller.
Power Supply Design
• Do not exceed the rated supply capacity of the Power Supply Units in the NJ-series Controller. The
rated supply capacities are given in the NJ-series CPU Unit Hardware User’s Manual
(Cat. No. W500).
If the capacity is exceeded, operation may stop, malfunctions may occur, or data may not be backed
up normally for power interruptions.
Use NJ-series Power Supply Units for both the NJ-series CPU Rack and Expansion Racks.
Operation is not possible if a CJ-series Power Supply Unit is used with an NJ-series CPU Unit or an
NJ-series Power Supply Unit is used with a CJ-series CPU Unit.
28
NJ-series CPU Unit Software User’s Manual (W501)
Precautions for Safe Use
• Do not apply voltages or connect loads to the Output Units or slaves in excess of the maximum ratings.
• Surge current occurs when the power supply is turned ON. When selecting fuses or breakers for
external circuits, consider the above precaution and allow sufficient margin in shut-off performance.
Refer to the relevant manuals for surge current specifications. Refer to the NJ-series CPU Unit Hardware User’s Manual (Cat. No. W500) for surge current specifications.
• If the full dielectric strength voltage is applied or turned OFF using the switch on the tester, the generated impulse voltage may damage the Power Supply Unit. Use the adjustment on the tester to gradually increase and decrease the voltage.
• Apply the voltage between the Power Supply Unit's L1 or L2 terminal and the GR terminal when testing insulation and dielectric strength. You do not have to disconnect the LG and GR terminals to perform these tests.
• Do not supply AC power from an inverter or other device with a square-wave output. Internal temperature rise may result in smoking or burning. Always input a sinusoidal wave with the frequency that is
given in the NJ-series CPU Unit Hardware User’s Manual (Cat. No. W500).
• Install external breakers and take other safety measures against short-circuiting in external wiring.
Turning ON the Power Supply
• It takes up to approximately 10 to 20 s to enter RUN mode after the power is turned ON. During that
time, outputs will be OFF or will be the values specified in the Unit or slave settings, and external
communications cannot be performed. Use the RUN output on the Power Supply Unit, for example, to
implement fail-safe circuits so that external devices do not operate incorrectly.
• Configure the external circuits so that the power supply to the control system turns ON only after the
power supply to the Controller has turned ON. If the power supply to the Controller is turned ON after
the control power supply, temporary errors may result in incorrect control system signals because the
output terminals on Output Units may momentarily turn ON when power supply is turned ON to the
Controller.
Actual Operation
• Check the user program, data, and parameter settings for proper execution before you use them for
actual operation.
Turning OFF the Power Supply
• Never turn OFF the power supply to the Controller when the BUSY indicator is flashing. While the
BUSY indicator is lit, the user program and settings in the CPU Unit are being backed up in the builtin non-volatile memory. This data will not be backed up correctly if the power supply is turned OFF.
Also, a major fault level Controller error will occur the next time you start operation, and operation will
stop.
• Do not turn OFF the power supply or remove the SD Memory Card while SD Memory Card access is
in progress (i.e., while the SD BUSY indicator flashes). Data may become corrupted, and the Controller will not operate correctly if it uses corrupted data. To remove the SD Memory Card from the CPU
Unit while the power supply is ON, press the SD Memory Card power supply switch and wait for the
SD BUSY indicator to turn OFF before you remove the SD Memory Card.
• Do not disconnect the cable or turn OFF the power supply to the Controller when downloading data
or the user program from Support Software.
• Always turn OFF the power supply to the Controller before you attempt any of the following.
• Mounting or removing I/O Units or the CPU Unit
• Assembling the Units
• Setting DIP switches or rotary switches
• Connecting cables or wiring the system
• Connecting or disconnecting the connectors
NJ-series CPU Unit Software User’s Manual (W501)
29
Precautions for Safe Use
The Power Supply Unit may continue to supply power to the rest of the Controller for a few seconds
after the power supply turns OFF. The PWR indicator is lit during this time. Confirm that the PWR
indicator is not lit before you perform any of the above.
Operation
• Confirm that no adverse effect will occur in the system before you attempt any of the following.
• Changing the operating mode of the CPU Unit (including changing the setting of the Operating
Mode at Startup)
• Changing the user program or settings
• Changing set values or present values
• Forced refreshing
• Always sufficiently check the safety at the connected devices before you change the settings of an
EtherCAT slave or Special Unit.
• If two different function modules are used together, such as when you use CJ-series Basic Output
Units and EtherCAT slave outputs, take suitable measures in the user program and external controls
to ensure that safety is maintained in the controlled system if one of the function modules stops. The
relevant outputs will stop if a partial fault level error occurs in one of the function modules.
• Always confirm safety at the connected equipment before you reset Controller errors with an event
level of partial fault or higher for the EtherCAT Master Function Module.
When the error is reset, all slaves that were in any state other than Operational state due to a Controller error with an event level of partial fault or higher (in which outputs are disabled) will go to Operational state and the outputs will be enabled.
Before you reset all errors, confirm that no Controller errors with an event level of partial fault have
occurred for the EtherCAT Master Function Module.
• Always confirm safety at the connected equipment before you reset Controller errors for a CJ-series
Special Unit. When a Controller error is reset, the Unit where the Controller error with an event level
of observation or higher will be restarted.
Before you reset all errors, confirm that no Controller errors with an event level of observation or
higher have occurred for the CJ-series Special Unit. Observation level events do not appear on the
Controller Error Tab Page, so it is possible that you may restart the CJ-series Special Unit without
intending to do so.
You can check the status of the _CJB_UnitErrSta[0,0] to _CJB_UnitErrSta[3,9] error status variables
on a Watch Tab Page to see if an observation level Controller error has occurred.
Battery Backup
• The user program and initial values for the variables are stored in non-volatile memory in the CPU
Unit. The present values of variables with the Retain attribute and the values of the Holding, DM, and
EM Areas in the memory used for CJ-series Units are backed up by a Battery. If the Battery is not
connected or the Battery is exhausted, the CPU Unit detects a Battery-backup Memory Check Error.
If that error is detected, variables with a Retain attribute are set to their initial values and the Holding,
DM, and EM Areas in memory used for CJ-series Units are cleared to all zeros. Perform thorough
verifications and provide sufficient measures to ensure that the devices perform safe operation for the
initial values of the variables with Retain attributes and the resulting operation.
Debugging
• Forced refreshing ignores the results of user program execution and refreshes I/O with the specified
values. If forced refreshing is used for inputs for which I/O refreshing is not supported, the inputs will
first take the specified values, but they will then be overwritten by the user program. This operation
differs from the force-set/reset functionality of the CJ-series PLCs.
30
NJ-series CPU Unit Software User’s Manual (W501)
Precautions for Safe Use
• You cannot upload or download information for forced refreshing with the Sysmac Studio.
After downloading data that contains forced refreshing, change to RUN mode and then use the Sysmac Studio to perform the operation for forced refreshing.
Depending on the difference in the forced status, the control system may operate unexpectedly.
• Do not specify the same address for the AT specification for more than one variable.
Doing so would allow the same entity to be accessed with different variable names, which would
make the user program more difficult to understand and possibly cause programming mistakes.
General Communications
• When you use data link communications, check the error information given in the status flags to make
sure that no error has occurred in the source device. Write the user program to use the received data
only if there is no error. If there is an error in the source device, the data for the data link may contain
incorrect values.
• Unexpected operation may result if inappropriate data link tables are set. Even if appropriate data link
tables have been set, confirm that the controlled system will not be adversely affected before you
transfer the data link tables. The data links start automatically after the data link tables are transferred.
• All CPU Bus Units are restarted when routing tables are transferred from Support Software to the
CPU Unit. Restarting these Units is required to read and enable the new routing tables. Confirm that
the system will not be adversely affected by restarting before you transfer the routing tables.
• Tag data links will stop between related nodes while tag data link parameters are transferred during
Controller operation. Confirm that the system will not be adversely affected before you transfer the
tag data link parameters.
EtherNet/IP Communications
• All related EtherNet/IP nodes are reset when you transfer settings for the built-in EtherNet/IP port
(including IP addresses and tag data links settings). This is performed to read and enable the settings. Confirm that the system will not be adversely affected by resetting nodes before you transfer
the settings.
• If EtherNet/IP tag data links (cyclic communications) are used with a repeating hub, the communications load on the network will increase. This will increase collisions and may prevent stable communications. Do not use repeating hubs on networks where tag data links are used. Use an Ethernet
switch instead.
EtherCAT Communications
• Make sure that the communications distance, number of nodes connected, and method of connection
for EtherCAT are within specifications.
Do not connect EtherCAT communications to EtherNet/IP, a standard in-house LAN, or other networks. An overload may cause the network to fail or malfunction.
• Malfunctions or unexpected operation may occur for some combinations of EtherCAT revisions of the
master and slaves. If you disable the revision check in the network settings, use the Sysmac Studio to
check the slave revision settings in the master and the actual slave revisions, and then make sure
that functionality is compatible in the slave manuals or other references. You can check the actual
slave revisions from the Sysmac Studio or on slave nameplates.
• After you transfer the user program, the CPU Unit is restarted. Communications with the EtherCAT
slaves are cut off for up to 45 seconds. During that period, the slave outputs behave according to the
slave settings.
Before you transfer the user program, confirm that the system will not be adversely affected.
• If the Fail-soft Operation parameter is set to stop operation, process data communications will stop
for all slaves when an EtherCAT communications error is detected in a slave. For this reason, if Servo
Drives are connected, the Servos for all axes will be turned OFF. Make sure that the Fail-soft Operation parameter setting results in safe operation when a device error occurs.
NJ-series CPU Unit Software User’s Manual (W501)
31
Precautions for Safe Use
• EtherCAT communications are not always established immediately after the power supply is turned
ON. Use the system-defined variables in the user program to confirm that communications are established before attempting control operations.
• If frames sent to EtherCAT slaves are lost due to noise or other causes, slave I/O data is not communicated, and the intended operation is sometimes not achieved. If noise countermeasures are
required, use the _EC_InDataInvalid (Input Data Disable) system-defined variable as an interlock
condition in the user program.
Refer to the NJ-series CPU Unit Built-in EtherCAT Port User’s Manual (Cat. No. W505) for details.
The slave outputs behave according to the slave settings. Refer to the manuals for the slaves for
details.
• When an EtherCAT slave is disconnected, communications will stop and control of the outputs will be
lost not only for the disconnected slave, but for all slaves connected after it. Confirm that the system
will not be adversely affected before you disconnect a slave.
• If you disconnect the cable from an EtherCAT slave to disconnect it from the network, any current
communications frames may be lost. If frames are lost, slave I/O data is not communicated, and the
intended operation is sometimes not achieved. Perform the following processing for a slave that
needs to be replaced.
Program the _EC_InDataInvalid (Input Data Disable) system-defined variable as an interlock condition.
Set the Impermissible Number of Continuous Timeouts setting in the EtherCAT master to at least
2.
Refer to the NJ-series CPU Unit Built-in EtherCAT Port User’s Manual (Cat. No. W505) for details.
Motion Control
• Confirm the axis number carefully before you perform an MC Test Run.
• The motor is stopped if communications are interrupted between the Sysmac Studio and the CPU
Unit during an MC Test Run. Connect the communications cable between the computer and CPU
Unit securely and confirm that the system will not be adversely affected before you perform an MC
Test Run.
• Always execute the Save Cam Table instruction if you change any of the cam data from the user program in the CPU Unit or from the Sysmac Studio. If the cam data is not saved, the previous condition
will be restored when the power is turned ON again, possibly causing unexpected machine operation.
• The positive drive prohibit input (POT), negative drive prohibit input (NOT), and home proximity input
(DEC) of the Servo Drive are used by the MC Function Module as the positive limit input, negative
limit input, and home proximity input. Make sure that the signal widths for all of these input signals are
longer than the control period of the MC Function Module. If the input signal widths are shorter than
the control period, the MC Function Module may not be able to detect the input signals, resulting in
incorrect operation.
Battery Replacement
• The Battery may leak, rupture, heat, or ignite. Never short-circuit, charge, disassemble, heat, or incinerate the Battery or subject it to strong shock.
• Dispose of any Battery that has been dropped on the floor or otherwise subjected to excessive shock.
Batteries that have been subjected to shock may leak if they are used.
• UL standards require that only an experienced engineer replace the Battery. Make sure that an experienced engineer is in charge of Battery replacement.
• Apply power for at least five minutes before changing the Battery. Install a new Battery within five
minutes (at 25°C) of turning OFF the power supply. If power is not supplied for at least 5 minutes, the
saved data may be lost.
32
NJ-series CPU Unit Software User’s Manual (W501)
Precautions for Safe Use
Unit Replacement
• We recommend replacing the Battery with the power turned OFF to prevent the CPU Unit’s sensitive
internal components from being damaged by static electricity and to prevent malfunctions. The Battery can be replaced without turning OFF the power supply. To do so, always touch a grounded piece
of metal to discharge static electricity from your body before you start the procedure.
After you replace the Battery, connect the Sysmac Studio and clear the Low Battery Voltage error.
• Make sure that the required data, including the user program, configurations, settings, variables, and
memory used for CJ-series Units, is transferred to a CPU Unit that was replaced and to externally
connected devices before restarting operation.
Be sure to include the routing tables, network parameters, and other CPU Bus Unit data, which are
stored in the CPU Unit.
Disposal
• Dispose of the product and Batteries according to local ordinances as they apply.
• The following information must be displayed for all products that contain primary lithium batteries with
a perchlorate content of 6 ppb or higher when shipped to or transported through the State of California, USA.
Perchlorate Material - special handling may apply.
See www.dtsc.ca.gov/hazardouswaste/perchlorate.
• The CPU Unit contains a primary lithium battery with a perchlorate content of 6 ppb or higher. Place
the above information on the individual boxes and shipping boxes when shipping finished products
that contain a CPU Unit to the State of California, USA.
NJ-series CPU Unit Software User’s Manual (W501)
33
Precautions for Correct Use
Precautions for Correct Use
Storage, Mounting, and Wiring
• Do not operate or store the Controller in the following locations. Operation may stop or malfunctions
may occur.
• Locations subject to direct sunlight
• Locations subject to temperatures or humidity outside the range specified in the specifications
• Locations subject to condensation as the result of severe changes in temperature
• Locations subject to corrosive or flammable gases
• Locations subject to dust (especially iron dust) or salts
• Locations subject to exposure to water, oil, or chemicals
• Locations subject to shock or vibration
• Take appropriate and sufficient countermeasures when installing the Controller in the following locations.
• Locations subject to strong, high-frequency noise
• Locations subject to static electricity or other forms of noise
• Locations subject to strong electromagnetic fields
• Locations subject to possible exposure to radioactivity
• Locations close to power lines
• Before touching a Unit, be sure to first touch a grounded metallic object in order to discharge any
static build-up.
• Install the Controller away from sources of heat and ensure proper ventilation. Not doing so may
result in malfunction, in operation stopping, or in burning.
• An I/O bus check error will occur and the Controller will stop if an I/O Connecting Cable’s connector is
disconnected from the Rack. Be sure that the connectors are secure.
• Do not allow foreign matter to enter the openings in the Unit. Doing so may result in Unit burning,
electric shock, or failure.
• Do not allow wire clippings, shavings, or other foreign material to enter any Unit. Otherwise, Unit
burning, failure, or malfunction may occur. Cover the Units or take other suitable countermeasures,
especially during wiring work.
• For EtherCAT and EtherNet/IP, use the connection methods and cables that are specified in the NJseries CPU Unit Built-in EtherCAT Port User’s Manual (Cat. No. W505) and the NJ-series CPU Unit
Built-in EtherNet/IP Port User’s Manual (Cat. No. W506). Otherwise, communications may be faulty.
• Use the rated power supply voltage for the Power Supply Units. Take appropriate measures to ensure
that the specified power with the rated voltage and frequency is supplied in places where the power
supply is unstable.
• Make sure that the current capacity of the wire is sufficient. Otherwise, excessive heat may be generated. When cross-wiring terminals, the total current for all the terminals will flow in the wire. When
wiring cross-overs, make sure that the current capacity of each of the wires is not exceeded.
• Do not touch the terminals on the Power Supply Unit immediately after turning OFF the power supply.
Residual voltage may cause electrical shock.
• If you use reed switches for the input contacts for AC Input Units, use switches with a current capacity
of 1 A or greater.
If the capacity of the reed switches is too low, surge current may fuse the contacts.
34
NJ-series CPU Unit Software User’s Manual (W501)
Precautions for Correct Use
Error Processing
• In applications that use the results of instructions that read the error status, consider the affect on the
system when errors are detected and program error processing accordingly. For example, even the
detection of a minor error, such as Battery replacement during operation, can affect the system
depending on how the user program is written.
Unit Replacement
• If you replace a CPU Bus Unit or Special I/O Unit, refer to operation manual for the Unit for information on the data required for individual Units and redo the necessary settings.
• The absolute encoder home offset is backed up with a Battery in the CPU Unit.
When you change the combination of the CPU Unit and Servomotor, e.g., when you add or replace a
Servomotor, define home again.
To restore the information without changing the CPU Unit-Servomotor combination, remove the absolute encoder home offset from the data to restore.
Task Settings
• If a Task Period Exceeded error occurs, shorten the programs to fit in the task period or increase the
setting of the task period.
Motion Control
• Use the system-defined variable in the user program to confirm that EtherCAT communications are
established before you attempt to execute motion control instructions. Motion control instructions are
not executed normally if EtherCAT communications are not established.
• Use the system-defined variables to monitor for errors in communications with the slaves that are
controlled by the motion control function module. Motion control instructions are not executed normally if an error occur in slave communications.
• Before you start an MC Test Run, make sure that the operation parameters are set correctly.
• Do not download motion control settings during an MC Test Run.
EtherCAT Communications
• Do not disconnect the EtherCAT slave cables during operation. The outputs will become unstable.
• Set the Servo Drives to stop operation if an error occurs in EtherCAT communications between the
Controller and a Servo Drive.
Battery Replacement
• Be sure to install a replacement Battery within two years of the production date shown on the Battery
label.
• Turn ON the power after replacing the Battery for a CPU Unit that has been unused for a long time.
Leaving the CPU Unit unused again without turning ON the power even once after the Battery is
replaced may result in a shorter Battery life.
• When you replace the Battery, use the CJ1W-BAT01 Battery Set.
NJ-series CPU Unit Software User’s Manual (W501)
35
Precautions for Correct Use
SD Memory Cards
• Insert the SD Memory Card all the way.
• Do not turn OFF the power supply to the Controller during SD Memory Card access. The files may be
corrupted.
If there is a corrupted file in the SD Memory Card, the file is automatically deleted by the restoration
function when the power supply is turned ON.
36
NJ-series CPU Unit Software User’s Manual (W501)
Regulations and Standards
Regulations and Standards
Conformance to EC Directives
Applicable Directives
• EMC Directives
• Low Voltage Directive
Concepts
z EMC Directive
OMRON devices that comply with EC Directives also conform to the related EMC standards so that
they can be more easily built into other devices or the overall machine. The actual products have
been checked for conformity to EMC standards.*
Whether the products conform to the standards in the system used by the customer, however, must
be checked by the customer. EMC-related performance of the OMRON devices that comply with EC
Directives will vary depending on the configuration, wiring, and other conditions of the equipment or
control panel on which the OMRON devices are installed. The customer must, therefore, perform the
final check to confirm that devices and the overall machine conform to EMC standards.
* Applicable EMC (Electromagnetic Compatibility) standards are as follows:
EMS (Electromagnetic Susceptibility): EN 61131-2 and EN 61000-6-2
EMI (Electromagnetic Interference): EN 61131-2 and EN 61000-6-4 (Radiated emission: 10-m regulations)
z Low Voltage Directive
Always ensure that devices operating at voltages of 50 to 1,000 VAC and 75 to 1,500 VDC meet the
required safety standards. The applicable directive is EN 61131-2.
z Conformance to EC Directives
The NJ-series Controllers comply with EC Directives. To ensure that the machine or device in which
the NJ-series Controller is used complies with EC Directives, the Controller must be installed as follows:
• The NJ-series Controller must be installed within a control panel.
• You must use reinforced insulation or double insulation for the DC power supplies connected to
DC Power Supply Units and I/O Units.
• NJ-series Controllers that comply with EC Directives also conform to the Common Emission Standard (EN 61000-6-4). Radiated emission characteristics (10-m regulations) may vary depending
on the configuration of the control panel used, other devices connected to the control panel, wiring, and other conditions.
You must therefore confirm that the overall machine or equipment complies with EC Directives.
NJ-series CPU Unit Software User’s Manual (W501)
37
Regulations and Standards
Conformance to Shipbuilding Standards
The NJ-series Controllers comply with the following shipbuilding standards. Applicability to the shipbuilding standards is based on certain usage conditions. It may not be possible to use the product in
some locations. Contact your OMRON representative before attempting to use a Controller on a
ship.
Usage Conditions for NK and LR Shipbuilding Standards
• The NJ-series Controller must be installed within a control panel.
• Gaps in the door to the control panel must be completely filled or covered with gaskets or other
material.
• The following noise filter must be connected to the power supply line.
Noise Filter
Manufacturer
Cosel Co., Ltd.
Model
TAH-06-683
Trademarks
• Sysmac and SYSMAC are trademarks or registered trademarks of OMRON Corporation in Japan
and other countries for OMRON factory automation products.
• Windows, Windows 98, Windows XP, Windows Vista, and Windows 7 are registered trademarks of
Microsoft Corporation in the USA and other countries.
• EtherCAT is a registered trademark of Beckhoff Automation GmbH for their patented technology.
• The SD logo is a trademark of SD-3C, LLC.
Other company names and product names in this document are the trademarks or registered trademarks of their respective companies.
Software Licenses and Copyrights
This product incorporates certain third party software. The license and copyright information associated with this software is available at http://www.fa.omron.co.jp/nj_info_e/.
38
NJ-series CPU Unit Software User’s Manual (W501)
Unit Versions
Unit Versions
Unit Versions
A “unit version” has been introduced to manage CPU Units in the NJ Series according to differences in
functionality accompanying Unit upgrades.
Notation of Unit Versions on Products
The unit version is given on the ID information label of the products for which unit versions are managed, as shown below.
Example for NJ-series NJ501-@@@@ CPU Unit:
ID information label
Unit model
NJ501 - 1500
Unit version
Ver.1.@@
PORT1 MAC ADDRESS: @@@@@@@@@@@@
PORT2 MAC ADDRESS: @@@@@@@@@@@@
Lot No. DDMYY@
xxxx
Lot number and serial number
MAC address
The following information is provided on the ID information label.
Item
Description
Unit model
Gives the model of the Unit.
Unit version
Gives the unit version of the Unit.
Lot number and
serial number
Gives the lot number and serial number of the Unit.
DDMYY: Lot number, @: For use by OMRON, xxxx: Serial number
“M” gives the month (1 to 9: January to September, X: October, Y: November, Z: December)
MAC address
Gives the MAC address of the built-in port on the Unit.
Confirming Unit Versions with Sysmac Studio
You can use the Unit Production Information on the Sysmac Studio to check the unit version of the CPU
Unit, CJ-series Special I/O Units, CJ-series CPU Bus Units, and EtherCAT slaves. The unit versions of
CJ-series Basic I/O Units cannot be checked from the Sysmac Studio.
z CPU Unit and CJ-series Units
1
Double-click CPU/Expansion Racks under Configurations and Setup in the Multiview
Explorer. Or, right-click CPU/Expansion Racks under Configurations and Setup and select
Edit from the menu.
The Unit Editor is displayed for the Controller Configurations and Setup layer.
NJ-series CPU Unit Software User’s Manual (W501)
39
Unit Versions
2
Right-click any open space in the Unit Editor and select Production Information.
The Production Information Dialog Box is displayed.
Simple Display
Detailed Display
In this example, “Ver.1.0” is displayed next to the unit model.
The following items are displayed.
CPU Unit
CJ-series Units
Unit model
Unit model
Unit version
Unit version
Lot number
Lot number
Rack number, slot number, and unit number
z EtherCAT Slaves
1
Double-click EtherCAT under Configurations and Setup in the Multiview Explorer. Or, rightclick EtherCAT under Configurations and Setup and select Edit from the menu.
The EtherCAT Configuration Tab Page is displayed for the Controller Configurations and Setup
layer.
2
Right-click the master in the EtherCAT Configurations Editing Pane and select Display Production Information.
The Production Information Dialog Box is displayed.
The following items are displayed.
Node address
Type information*
Serial number
* If the model number cannot be determined (such as when there is no ESI file), the vendor ID, product
code, and revision number are displayed.
40
NJ-series CPU Unit Software User’s Manual (W501)
Unit Versions
Unit Version Notation
In this manual, unit versions are specified as shown in the following table.
Product nameplate
“Ver.1.0” or later to the right of
the lot number
Notation in this manual
Unit version 1.0 or later
NJ-series CPU Unit Software User’s Manual (W501)
Remarks
Unless unit versions are specified, the information in this manual
applies to all unit versions.
41
Related Manuals
Related Manuals
The following manuals are related to the NJ-series Controllers. Use these manuals for reference.
Manual name
NJ-series CPU Unit
Hardware User’s Manual
Cat. No.
W500
Model numbers
NJ501-@@@@
Application
Description
Learning the basic specifications of the NJ-series
CPU Units, including introductory information,
designing, installation, and
maintenance. Mainly hardware information is provided.
An introduction to the entire NJ-series system is
provided along with the following information on
a Controller built with an NJ501 CPU Unit.
• Features and system configuration
• Introduction
• Part names and functions
• General specifications
• Installation and wiring
• Maintenance and inspection
Use this manual together with the NJ-series
CPU Unit Software User’s Manual (Cat. No.
W501).
NJ-series CPU Unit Software User’s Manual
W501
NJ501-@@@@
Learning how to program
and set up an NJ-series
CPU Unit. Mainly software
information is provided.
The following information is provided on a Controller built with an NJ501 CPU Unit.
• CPU Unit operation
• CPU Unit features
• Initial settings
• Programming based on IEC 61131-3 language specifications
Use this manual together with the NJ-series
CPU Unit Hardware User’s Manual (Cat. No.
W500).
NJ-series CPU Unit
Motion Control User’s
Manual
W507
NJ501-@@@@
Learning about motion
control settings and programming concepts.
The settings and operation of the CPU Unit and
programming concepts for motion control are
described. Use this manual together with the
NJ-series CPU Unit Hardware User’s Manual
(Cat. No. W500) and NJ-series CPU Unit Software User’s Manual (Cat. No. W501).
NJ-series Instructions
Reference Manual
W502
NJ501-@@@@
Learning about the specifications of the instruction
set that is provided by
OMRON.
The instructions in the instruction set (IEC
61131-3 specifications) are described. When
programming, use this manual together with the
NJ-series CPU Unit Hardware User’s Manual
(Cat. No. W500) and NJ-series CPU Unit Software User’s Manual (Cat. No. W501).
NJ-series Motion Control
Instructions Reference
Manual
W508
NJ501-@@@@
Learning about the specifications of the motion control instructions that are
provided by OMRON.
The motion control instructions are described.
When programming, use this manual together
with the NJ-series CPU Unit Hardware User’s
Manual (Cat. No. W500), NJ-series CPU Unit
Software User’s Manual (Cat. No. W501) and
NJ-series CPU Unit Motion Control User’s Manual (Cat. No. W507).
CJ-series Special Unit
Manuals for NJ-series
CPU Unit
W490
W498
W499
W491
Z310
W492
W494
W497
CJ1W-@@@@
Learning how to use CJseries Units with an NJseries CPU Unit.
The methods and precautions for using CJseries Units with an NJ501 CPU Unit are
described, including access methods and programming interfaces. Manuals are available for
the following Units.
Analog I/O Units, Insulated-type Analog I/O
Units, Temperature Control Units, ID Sensor
Units, High-speed Counter Units, Serial Communications Units, and DeviceNet Units.
Use these manuals together with the NJ-series
CPU Unit Hardware User’s Manual (Cat. No.
W500) and NJ-series CPU Unit Software User’s
Manual (Cat. No. W501).
42
NJ-series CPU Unit Software User’s Manual (W501)
Related Manuals
Application
Description
NJ-series CPU Unit Builtin EtherCAT Port User’s
Manual
Manual name
W505
Cat. No.
NJ501-@@@@
Model numbers
Using the built-in EtherCAT
port on an NJ-series CPU
Unit.
Information on the built-in EtherCAT port is provided. This manual provides an introduction and
provides information on the configuration, features, and setup.
Use this manual together with the NJ-series
CPU Unit Hardware User’s Manual (Cat. No.
W500) and NJ-series CPU Unit Software User’s
Manual (Cat. No. W501).
NJ-series CPU Unit Builtin EtherNet/IP Port
User’s Manual
W506
NJ501-@@@@
Using the built-in EtherNet/IP port on an NJ-series
CPU Unit.
Information on the built-in EtherNet/IP port is
provided. Information is provided on the basic
setup, tag data links, and other features.
Use this manual together with the NJ-series
CPU Unit Hardware User’s Manual (Cat. No.
W500) and NJ-series CPU Unit Software User’s
Manual (Cat. No. W501).
NJ-series Troubleshooting Manual
W503
NJ501-@@@@
Learning about the errors
that may be detected in an
NJ-series Controller.
Concepts on managing errors that may be
detected in an NJ-series Controller and information on individual errors are described.
Use this manual together with the NJ-series
CPU Unit Hardware User’s Manual (Cat. No.
W500) and NJ-series CPU Unit Software User’s
Manual (Cat. No. W501).
Sysmac Studio Version 1
Operation Manual
W504
SYSMACSE2@@@
Learning about the operating procedures and functions of the Sysmac Studio.
Describes the operating procedures of the Sysmac Studio.
CX-Integrator
CS/CJ/CP/NSJ-series
Network Configuration
Tool Operation Manual
W464
Learning how to configure
networks (data links, routing tables, Communications Unit settings, etc.).
Describes operating procedures for the CX-Integrator.
CX-Designer User’s
Manual
V099
Learning to create screen
data for NS-series Programmable Terminals.
Describes operating procedures for the CXDesigner.
CX-Protocol Operation
Manual
W344
Creating data transfer protocols for general-purpose
devices connected to CJseries Serial Communications Units.
Describes operating procedures for the CX-Protocol.
NJ-series CPU Unit Software User’s Manual (W501)
43
Terminology
Terminology
Term
absolute encoder home offset
array specification
AT
axes group
Axes Group Variable
axis
Axis Variable
basic data type
cam data variable
CJ-series CPU Unit
Constant
Controller
Controller error
Controller event
Controller information
derivative data type
device variable
download
edge
44
Description
This data is used to restore in the CPU Unit the actual position of a Servo Drive with
an absolute encoder. The offset is the difference between the command position
after homing and the absolute data that is read from the absolute encoder.
One of the variable specifications. An array variable contains multiple elements of
the same data type. The elements in the array are specified by serial numbers
called subscripts that start from the beginning of the array.
One of the attributes of a variable.
This attribute allows the user to specify what is assigned to a variable. An I/O port
or an address in memory used for CJ-series Units can be specified.
A functional unit that groups together axes within the Motion Control Function Module.
A system-defined variable that is defined as a structure and provides status information and some of the axes parameters for an individual axes group.
An Axes Group Variable is used to specify an axes group for motion control instructions and to monitor the command interpolation velocity, error information, and
other information for the axes group.
A functional unit within the Motion Control Function Module. An axis is assigned to
the drive mechanism in an external Servo Drive or the sensing mechanism in an
external Encoder Input Slave Unit.
A system-defined variable that is defined as a structure and provides status information and some of the axis parameters for an individual axis.
An Axis Variable is used to specify an axis for motion control instructions and to
monitor the command position, error information, and other information for the axis.
Any of the data types that are defined by IEC 61131-3.
They include Boolean, bit string, integer, real, duration, date, time of day, date and
time, and text string data types.
"Basic data type" is used as opposed to derivative data types, which are defined by
the user.
A variable that represents the cam data as a structure array.
A cam data variable is an array structure that consists of phases and displacements.
Any of the CJ-series Units that can be used with an NJ-series Controller.
One of the attributes of a variable.
If you specify the Constant attribute for a variable, the value of the variable cannot
be written by any instructions, ST operators, or CIP message communications.
The range of devices that are directly controlled by the CPU Unit.
In the NJ-series System, the Controller includes the CPU Rack, Expansion Racks,
and EtherCAT slaves (including general-purpose slaves and Servo Drives).
Errors that are defined by the NJ-series System.
“Controller error” is a collective term for major fault level, partial fault level, minor
fault level, and observation Controller events.
One of the events in the NJ-series System. Controller events are errors and information that are defined by the system for user notification. A Controller event
occurs when the system detects a factor that is defined as a Controller event.
Information that is defined by the NJ-series System that is not an error. It represents an information Controller event.
A data type that is defined by the user. Structures, unions, and enumerations are
derivative data types.
A variable that is used to access a specific device through an I/O port.
To transfer data from the Sysmac Studio to the Controller with the synchronization
operation of the Sysmac Studio.
One of the attributes of a variable.
This attribute makes a BOOL variable pass TRUE to a function block when the variable changes from FALSE to TRUE or when it changes from TRUE to FALSE.
NJ-series CPU Unit Software User’s Manual (W501)
Terminology
Term
enumeration
enumerator
EtherCAT Master Function Module
EtherNet/IP Function Module
event log
Event Setup
FB
forced refreshing
FUN
function
function block
function module
general-purpose slave
global variable
I/O map settings
I/O port
I/O refreshing
information
Initial Value
Description
One of the derivative data types. This data type takes one item from a prepared
name list of enumerators as its value.
One of the values that an enumeration can take expressed as a character string.
The value of an enumeration is one of the enumerators.
One of the function modules. This function module controls the EtherCAT slaves as
the EtherCAT master.
One of the function modules. This function module controls the built-in EtherNet/IP
port.
A function that recognizes and records errors and other events.
Settings that define user-defined errors and user-defined information.
An acronym for "function block."
Forcing the refreshing of an input from an external device or an output to an external device, e.g., when the user debugs a program.
Addresses that are subject to forced refreshing can still be overwritten from the
user program.
An abbreviation for "function."
A POU that is used to create an object that determines a unique output for the
same input, such as for data processing.
A POU that is used to create an object that can have a different output for the same
input, such as for a timer or counter.
One of the functional units of the software configuration of the CPU Unit.
Any of the EtherCAT slaves that cannot be assigned to an axis.
A variable that can be read or written from all POUs (programs, functions, and function blocks).
Settings that assign variables to I/O ports. Assignment information between I/O
ports and variables.
A logical interface that is used by the CPU Unit to exchange data with an external
device (slave or Unit).
Cyclic data exchange with external devices that is performed with predetermined
memory addresses.
One of the event levels for Controller events or user-defined events. These are not
errors, but appear in the event log to notify the user of specific information.
One of the attributes of a variable. The variable is set to the initial value in the following situations.
•
inline ST
instruction
literal
local variable
main memory
major fault level Controller error
MC Test Run
memory used for CJ-series units
When power is turned ON
•
When the CPU Unit changes to RUN mode
•
When you specify to initialize the values when the user program is transferred
•
When a major fault level Controller error occurs
ST programming that is included within a ladder diagram program.
The smallest unit of the processing elements that are provided by OMRON for use
in POU algorithms. There are ladder diagram instructions (program inputs and outputs), function instructions, function block instructions, and ST statements.
A constant expression that is used in a user program.
A variable that can be accessed only from inside the POU in which it is defined.
“Local variable” is used as opposed to “global variable.”
Local variables include internal variables, input variables, output variables, in-out
variables, and external variables.
The memory inside the CPU Unit that is used by the CPU Unit to execute the OS
and user program.
An error for which all NJ-series Controller control operations stop. The CPU Unit
immediately stops user program execution and turns OFF the loads for all slaves
and Units (including remote I/O).
A function to check motor operation and wiring from the Sysmac Studio.
One type of I/O memory in an NJ-series CPU Unit. It contains addresses that can
be directly specified by the user.
It can be accessed only with variables with an AT attribute. This memory is used to
access CJ-series Units and CJ-series networks.
NJ-series CPU Unit Software User’s Manual (W501)
45
Terminology
Term
minor fault level Controller error
Motion Control Function Module
motion control instruction
Network Publish
observation
partial fault level Controller error
PDO communications
periodic task
PLC Function Module
POU
primary periodic task
process data communications
program
Range Specification
Retain
SDO communications
Servo Drive/encoder input slave
slave and Unit configurations
Special Unit Setup
structure
46
Description
An error for which part of the control operations for one of the function modules in
the NJ-series Controller stop.
An NJ-series CPU Unit continues operation even after a minor fault level Controller
error occurs.
One of the function modules. The MC Function Module performs motion control
based on commands from the motion control instructions that are executed in the
user program.
A function block instruction that executes motion control.
The Motion Control Function Module supports instructions that are based on function blocks for PLCopen motion control as well as instructions developed specifically for the Motion Control Function Module.
One of the attributes of a variable.
This attribute allows you to use CIP message communications or tag data links to
read/write variables from another Controller or from a host computer.
One of the event levels for Controller events or user-defined events.
These are minor errors that do not affect control operations, but appear in the event
log to notify the user of specific information.
An error for which all of the control operations for one of the function modules in the
NJ-series Controller stop.
An NJ-series CPU Unit continues operation even after a partial fault level Controller
error.
An abbreviation for process data communications. Data is exchanged between the
master and slaves on a process data communications cycle. (The process data
communications cycle is the same as the task period of the primary periodic task.)
A tasks for which user program execution and I/O refreshing are performed each
period.
One of the function modules. This function module executes the user program,
sends commands to the Motion Control Function Module, and provides an interface
to the USB and SD Memory Card.
An acronym for "program organization unit." A POU is a unit in a program execution
model that is defined in IEC 61131-3.
A POU contains an algorithm and a local variable table and forms the basic unit
used to build a user program.
There are three types of POUs: programs, functions, and function blocks.
The task with the highest priority.
One type of EtherCAT communications in which process data objects (PDOs) are
used to exchange information cyclically and in realtime. Process data communications are also called PDO communications.
Along with functions and function blocks, one of the three types of POUs.
Programs are assigned to tasks to execute them.
One of the variable specifications. You can specify a range for a variable in
advance. The variable can take only values that are in the specified range.
One of the attributes of a variable. The values of variables with a Retain attribute
are held at the following times. (Variables without a Retain attribute are set to their
initial values.)
•
When power is turned ON after a power interruption
•
When the CPU Unit changes to RUN mode
•
When you specify to not initialize the values when the user program is transferred
One type of EtherCAT communications in which service data objects (SDOs) are
used to transmit information whenever required.
Any of the EtherCAT slaves that is assigned to an axis. In the NJ-series System, it
would be a Servo Drive or Encoder Input Slave Unit.
A generic term for the EtherCAT configuration and Unit configuration.
A generic term for the settings for a Special Unit, including the settings in allocated
DM Area words.
One of the derivative data types. It consists of multiple data types placed together
into a layered structure.
NJ-series CPU Unit Software User’s Manual (W501)
Terminology
Term
synchronization
Sysmac Studio
system common processing
system service
system-defined variable
task
task period
union
Unit configuration
upload
user program
user-defined event
user-defined variable
variable
variable memory
Description
A function that automatically compares the information in the NJ-series Controller
with the information in the Sysmac Studio, displays any differences and locations in
a hierarchical form, and can be used to synchronize the information.
A computer software application for setting, programming, debugging, and troubleshooting NJ-series Controllers. It also provides operations for motion control and a
Simulator.
System processing that is performed by the CPU Unit to perform I/O refreshing and
the user program execution within a task. Exclusive control of variables between
tasks, data trace processing, and other processing is performed.
Processing that is performed by the CPU Unit in unused time between task processing. The system service includes communications processing, SD Memory
Card access processing, self-diagnosis processing, and other processing.
A variable for which all attributes are defined by the system and cannot be changed
by the user.
An attribute that defines when a program is executed.
The interval at which the primary periodic task or a periodic task is executed.
One of the derivative data types. It allows you to handle the same data as different
data types.
The configuration information for the Units that are set on the Sysmac Studio. This
information tells what Unit models are connected to the CPU Unit and where they
are connected.
To transfer data from the Controller to the Sysmac Studio with the synchronization
operation of the Sysmac Studio.
All of the programs in one project.
One of the events in the NJ-series System. These events are defined by the user.
“User-defined events” is a generic term for user-defined errors and user-defined
information.
A variable for which all of the attributes are defined by the user and can be changed
by the user.
A representation of data, such as a numeric value or character string, that is used in
a user program.
You can change the value of a variable by assigned the required value. “Variable” is
used as opposed to “constant,” for which the value does not change.
A memory area that contains the present values of variables that do not have AT
specifications. It can be accessed only with variables without an AT attribute.
NJ-series CPU Unit Software User’s Manual (W501)
47
Revision History
Revision History
A manual revision code appears as a suffix to the catalog number on the front and back covers of the
manual.
Cat. No. W501-E1-01
Revision code
Revision code
01
48
Date
July 2011
Revised content
Original production
NJ-series CPU Unit Software User’s Manual (W501)
1
Introduction
This section provides an introduction to the NJ-series Controllers and their features,
and gives the NJ-series Controller specifications.
1-1 The NJ-series Controllers . . . . . . . . . . . . . . . . . . . . . . . . . . . . . . . . . . . . . . . 1-2
1-1-1
1-1-2
Features . . . . . . . . . . . . . . . . . . . . . . . . . . . . . . . . . . . . . . . . . . . . . . . . . . . . . . 1-2
Introduction to the System Configurations . . . . . . . . . . . . . . . . . . . . . . . . . . . . 1-4
1-2 Specifications . . . . . . . . . . . . . . . . . . . . . . . . . . . . . . . . . . . . . . . . . . . . . . . . . 1-6
1-3 Overall Operating Procedure for the NJ-series Controller . . . . . . . . . . . . . 1-8
1-3-1
1-3-2
Overall Procedure . . . . . . . . . . . . . . . . . . . . . . . . . . . . . . . . . . . . . . . . . . . . . . 1-8
Procedure Details . . . . . . . . . . . . . . . . . . . . . . . . . . . . . . . . . . . . . . . . . . . . . . 1-9
NJ-series CPU Unit Software User’s Manual (W501)
1-1
1 Introduction
1-1
The NJ-series Controllers
The SYSMAC NJ-series Controllers are next-generation machine automation controllers that provide
the functionality and high-speed performance that are required for machine control. They provide the
safety, reliability, and maintainability that are required of industrial controllers.
The NJ-series Controllers provide the functionality of previous OMRON PLCs, and they also provide the
functionality that is required for motion control. Synchronized control of I/O devices on high-speed
EtherCAT can be applied to vision systems, motion equipment, discrete I/O, and more.
OMRON offers the new Sysmac Series of control devices designed with unified communications specifications and user interface specifications. The NJ-series Machine Automation Controllers are part of
the Sysmac Series. You can use them together with EtherCAT slaves, other Sysmac products, and the
Sysmac Studio Automation Software to achieve optimum functionality and ease of operation. With a
system that is created from Sysmac products, you can connect components and commission the system through unified concepts and usability.
Sysmac Studio
Automation Software
Multitasking, Synchronized Control
Sequence control
Motion control
NJ-series Controller
IEC programming
EtherCAT control network
I/O controls
1-1-1
Servo Drives and Inverters
Machine vision
Features
Hardware Features
z Standard-feature EtherCAT Control Network Support
All CPU Units provide an EtherCAT master port for EtherCAT communications. EtherCAT is an
advanced industrial network system that achieves faster, more-efficient communications. It is based
on Ethernet. Each node achieves a short fixed communications cycle time by transmitting Ethernet
frames at high speed. The standard-feature EtherCAT control network allows you to connect all of
the devices required for machine control (e.g., I/O systems, Servo Drives, Inverters, and machine
vision) to the same network.
z CJ-series Units
In addition to EtherCAT network slaves, you can also mount CJ-series Basic I/O Units and Special
Units on the I/O bus.
1-2
NJ-series CPU Unit Software User’s Manual (W501)
1 Introduction
All CPU Units provide an EtherNet/IP port for EtherNet/IP communications. EtherNet/IP is a multivendor industrial network that uses Ethernet. You can use it for networks between Controllers or as
a field network. The use of standard Ethernet technology allows you to connect to many different
types of general-purpose Ethernet devices.
z Standard-feature USB Port
You can connect the computer that runs the Support Software directly to the CPU Unit.
1-1 The NJ-series Controllers
z Standard-feature EtherNet/IP Communications Port
1
z Standard-feature SD Memory Card Slot
z Highly Reliable Hardware
The NJ-series Controllers provide the hardware reliability and RAS functions that you expect of a
PLC.
Software Features
z Integrated Sequence Control and Motion Control
An NJ-series CPU Unit can perform both sequence control and motion control. You can simultaneously achieve both sequence control and multi-axes synchronized control. Sequence control,
motion control, and I/O refreshing are all executed in the same control period. The same control
period is also used for the process data communications cycle for EtherCAT. This enables precise
sequence and motion control in a fixed period with very little deviation.
z Multitasking
You assign I/O refreshing and programs to tasks and then specify execution conditions and execution order for them to flexibly combine controls that suit the application.
z Programming Languages Based on the IEC 61131-3 International Standard
The NJ-series Controllers support language specifications that are based on IEC 61131-3. To these,
OMRON has added our own improvements. Motion control instructions that are based on PLCopen
standards and an instruction set (POUs) that follows IEC rules are provided.
z Programming with Variables to Eliminate Worrying about the Memory Map
You access all data through variables in the same way as for the advanced programming languages
that are used on computers. Memory in the CPU Unit is automatically assigned to the variables that
you create so that you do not have to remember the physical addresses.
z A Wealth of Security Features
The many security features of the NJ-series Controllers include operation authority settings and
restriction of program execution with IDs.
z Complete Controller Monitoring
The CPU Unit monitors events in all parts of the Controller, including mounted Units and EtherCAT
slaves. Troubleshooting information for errors is displayed on the Sysmac Studio or on an NS-series
PT. Events are also recorded in logs.
NJ-series CPU Unit Software User’s Manual (W501)
1-3
1-1-1 Features
You can access an SD Memory Card that is mounted in the CPU Unit from the user program.
1 Introduction
z Sysmac Studio Automation Software
The Sysmac Studio provides an integrated development environment that covers not only the Controller, but also covers peripheral devices and devices on EtherCAT. You can use consistent procedures for all devices regardless of the differences in the devices. The Sysmac Studio supports all
phases of Controller application, from designing through debugging, simulations, commissioning,
and changes during operation.
z A Wealth of Simulation Features
The many simulation features include execution, debugging, and task execution time estimates on a
virtual controller.
1-1-2
Introduction to the System Configurations
The NJ Series supports the following system configurations.
z Basic System Configurations
The NJ-series basic configurations include the EtherCAT network configuration, CJ-series Unit configuration, and the Support Software.
EtherCAT Network Configuration
You can use the built-in EtherCAT master port on the CPU Unit to connect to general-purpose terminals for analog and digital I/O and to Servo Drives and encoder input slaves. An EtherCAT network
configuration enables precise sequence and motion control in a fixed cycle with very little deviation.
CJ-series Unit Configuration
In addition to the EtherCAT network, you can mount CJ-series Basic I/O Units and Special Units. CJseries Units can be mounted both to the CPU Rack where the CPU Unit is mounted and to Expansion Racks.
Support Software
The Support Software is connected to the peripheral USB port on the CPU Unit with a commercially
available USB cable. You can also connect it to the built-in EtherNet/IP port on the CPU Unit with
Ethernet cable.
Support Software
CJ-series Unit
Configuration
Peripheral USB port
Sysmac Studio
NJ-series Controller
Power
Supply Unit
LAN
CJ-series Units
CPU Unit
USB
Or
CPU Rack
EtherNet/IP
EtherCAT Network
Configuration
Built-in EtherNet/IP port
EtherCAT
Built-in EtherCAT port
Servo Drive/encoder
input slaves
1-4
General-purpose slaves
NJ-series CPU Unit Software User’s Manual (W501)
1 Introduction
• Host computers, HMIs, and other NJ-series Controllers are connected to the built-in EtherNet/IP
port on the CPU Unit.
• A DeviceNet network is connected to a DeviceNet Unit. A serial communications network is connected to a Serial Communications Unit.
Host computer
NJ-series Controller
HMI
1-1 The NJ-series Controllers
z Network Configurations
1
EtherNet/IP
1-1-2 Introduction to the System Configurations
EtherNet/IP
Built-in EtherNet/IP port
Example: Serial Communications Unit
NJ-series Controller
Power Supply Unit
General-purpose device
with serial communications
CPU Unit
Serial
DeviceNet
Example: DeviceNet Unit
z Support Software
You can use the following Support Software to set up, monitor, and debug an NJ-series Controller.
Sysmac Studio
The Sysmac Studio is the main Support Software that you use for an NJ-series Controller. On it, you
can set up the Controller configurations, parameters, and programs, and you can debug and simulate operation.
Other Support Software
The following Support Software is also included in the Sysmac Studio Software Package Standard
Edition.
Configuration software
Application
Sysmac Studio
The Sysmac Studio is used for sequence control, motion control, and all other
operations except those described below.
Network Configurator
The Network Configurator is used for tag data links on the built-in EtherNet/IP
port.
CX-Integrator
The CX-Integrator is used for remote I/O communications with a DeviceNet
Unit.
CX-Protocol
The CX-Protocol is used for protocol macros with Serial Communications
Units.
CX-Designer
The CX-Designer is used to create screens for NS-series PTs.
NJ-series CPU Unit Software User’s Manual (W501)
1-5
1 Introduction
1-2
Specifications
This section gives the main specifications of the NJ-series Controllers.
Item
Program capacity
Memory
capacity
for variables
Programming
Memory for
CJ-series
Units (Can
be specified with
AT specifications for
variables.)*1
NJ501-1400
NJ501-1500
20 MB (execution objects and variable tables (including variable names))
Variables with Retain
attribute (Does not include
Holding, DM, and EM Area
memory for CJ-series Units.)
2 MB
Variables without Retain
attribute (Does not include
CIO and Work Area memory
for CJ-series Units.)
4 MB
CIO Area
6,144 words (CIO 0 to CIO 6143)
Work Area
512 words (W0 to W511)
Holding Area
1,536 words (H0 to H1535)
DM Area
32,768 words (D0 to D32767)
32,768 words × 25 banks (E0_00000 to E18_32767)
EM Area
Maximum number of connectable Units
Unit configuration
NJ501-1300
Maximum per CPU Rack or Expansion Rack: 10 Units
Entire Controller: 40 Units
Number of Expansion Racks
3 max.
I/O capacity
2,560 points max. plus EtherCAT slave I/O capacity
Power Supply Unit for CPU Rack and
Expansion Racks
NJ-P@3001
Controllable Servo Drives
OMRON G5-series Servo Drives with Built-in EtherCAT
Communications
Recommended unit version: Version 2.1 or later
Controllable encoder input terminals
OMRON GX-series GX-EC0211/EC0241 EtherCAT Remote
I/O Terminals
Recommended unit version: Version 1.1 or later
Control method
Control commands using EtherCAT communications
Position control (Cyclic Synchronous Position Control Mode)
Control modes
Torque control (Cyclic Synchronous Torque Control Mode)
Motion
control
Number of
controlled
axes
Maximum number of controlled axes
16 axes
32 axes
64 axes
Single-axis control
16 axes max.
32 axes max.
64 axes max.
Linear interpolation control
4 axes max. per
axes group
Circular interpolation control
2 axes per axes group
Number of axes groups
Cams
Number of cam data points
Number of cam tables
1-6
Velocity control (Cyclic Synchronous Velocity Control Mode)
32 axes groups max.
65,535 points max. per cam table
1,048,560 points max. for all cam tables
640 tables max.
NJ-series CPU Unit Software User’s Manual (W501)
1 Introduction
Item
Built-in
EtherNet/IP port
NJ501-1500
Supported services
Sysmac Studio connection
Physical layer
USB 2.0-compliant B-type connector
Transmission distance
5 m max.
Communications protocol
TCP/IP, UDP/IP, and BOOTP client
Supported services
Sysmac Studio connection, tag data link, CIP message communications, socket service, FTP server, automatic clock
adjustment (NTP client), SNMP agent, and DNS client
Physical layer
10Base-T or 100Base-TX
Media access method
CSMA/CD
Modulation
Baseband
Topology
Star
Baud rate
100 Mbps (100Base-TX)
Transmission media
STP (shielded, twisted-pair) cable of Ethernet category 5 or
higher
Transmission distance
100 m max. (distance between hub and node)
Number of cascade connections
There are no restrictions if a switching hub is used.
CIP service: Tag data links
(cyclic communications)
---
Communications
Built-in
EtherCAT
port
NJ501-1400
Number of connections
32
Permissible
communications band
1,000 pps*2 including heartbeat
Number of tag
sets
32
Communications protocol
Special protocol for EtherCAT
Supported services
CoE (PDO communications and SDO communications)
Synchronized communications
DC (distributed clock)
Physical layer
100Base-TX
Modulation
Baseband
Baud rate
100 Mbps (100Base-TX)
Duplex mode
Auto
Topology
Line, daisy chain, and branching
Transmission media
Use a shielded twisted-pair cable (double shielding with aluminum tape and braiding) of Ethernet category 5 (100BaseTX) or higher.
Transmission distance
Distance between nodes: 100 m max.
Maximum number of slaves
192
*1 Timers, counters, index registers, data registers, and Task Flags cannot be specified.
*2 Means packets per second, i.e., the number of communications packets that can be sent or received in one second.
NJ-series CPU Unit Software User’s Manual (W501)
1-7
1-2 Specifications
Peripheral
USB port
NJ501-1300
1
1 Introduction
1-3
Overall Operating Procedure for the
NJ-series Controller
This section gives the overall operating procedure of the NJ-series Controllers and then describes it in
more detail.
1-3-1
Overall Procedure
The overall procedure to use an NJ-series Controller is given below.
Step 1. Software Design
Design the overall system configuration, task configuration, programs, and variables.
Step 1-1 Designing I/O and Processing
Step 1-2 Designing Tasks
Step 1-3 Designing Programs
Step 2. Software Setups and Programming
Create the system configurations that you designed in step 1 on the Support Software and assign the variables. Create the tasks and programs, and debug them,
e.g., with simulations.
Step 2-1 Slave and Unit Configurations
Step 2-2 Controller Setup
Step 2-3 Programming
Step 2-4 Offline Debugging
Step 3. Mounting and Setting Hardware
Mount the Units and make the required hardware settings.
Step 4. Wiring
Connect the network cables and wire the I/O.
Step 5. Confirming Operation and Starting Actual System
Operation
Connect the Support Software to the physical system and download the project.
Check operation on the physical system and then start actual system operation.
1-8
NJ-series CPU Unit Software User’s Manual (W501)
1 Introduction
1-3 Overall Operating Procedure
for the NJ-series Controller
1-3-2
Procedure Details
Step 1. Software Design
Step
Description
Reference
Step 1-1
Designing I/O and
Processing
• External I/O devices and unit configuration
• Refresh periods for external devices
• Program contents
Section 3 Configuration
Units in NJ-series CPU Unit
Hardware User’s Manual
(Cat. No. W500)
1
Step 1-2
Designing Tasks
•
•
•
•
•
4-2-3 Task Settings
1-3-2 Procedure Details
Task configuration
Relationship between tasks and programs
Task periods
Slave and Unit refresh times
Exclusive control methods for variables between tasks
Step 1-3
Designing Programs
POU (Program
Organization Unit)
Design
• Programs
• Functions and function blocks
• Determining the algorithm languages
Section 6 Programming
Variable Design
• Defining variables that you can use in more than one POU and
variables that you use in only specific POUs
• Defining the variables names for the device variables that you use
to access slaves and Units
• Defining the attributes of variables, such as the Name and Retain
attributes
• Designing the data types of variables
6-3 Variables
Step 2. Software Setups and Programming
Step
Description
Sysmac Studio Oper- Reference
ations
Project Creation
1. Create a project in the Sysmac Studio.
2. Insert a Controller.
New Project Button
NJ-series CPU Unit Software User’s Manual (W501)
Insert − Controller
Sysmac Studio Version 1
Operation Manual (Cat. No.
W504)
1-9
1 Introduction
The following Controller Configurations and Setup and the Programming and Task Settings can be performed in either order.
Step 2-1
Slave and Unit
Configurations
1) Creating the Slave
and Unit Configurations
Creating the slave configuration and Unit
configuration either offline or online. (For
online configuration, make the online connection that is described in step 5.)
EtherCAT Slave Setting
Editor
Unit Editor
3-2 Creating the EtherCAT
Slave Configuration
2) Assigning Device
Variables to I/O Ports
Registering device variables in variable
tables (Variable names are user defined or
automatically created.)
I/O Map
3-4 I/O Ports and Device
Variables
Configurations and
Setup − Motion Control Setup
3-5 Creating the Axes and
Assigning Them to the
Servo Drives/Encoder Input
Slaves
3-3 Creating the Unit Configuration
(The following step is for motion control.)
3) Creating the Axes
and Assigning Them
to the Servo
Drive/Encoder Input
Slaves
Creating the axes and setting them as real
axes or virtual axes. Creating axes groups
to perform interpolated axes control.
Step 2-2
Controller Setup
Setting the following parameters from the
Sysmac Studio
Section 4 Controller Setup
Setting the initial values for the PLC
Function Module
Configurations and
Setup − Controller
Setup − Operation
Settings
4-2 Initial Settings for the
PLC Function Module
Initial settings for Special Units
Configurations and
Setup − CPU/Expansion Racks
4-3 Initial Settings for Special Units
(To use motion control)
Setting the initial settings for the
Motion Control Function Module
Configurations and
Setup − Motion Control Setup
4-4 Initial Settings for the
Motion Control Function
Module
Setting the initial values for the Ether- Configurations and
CAT Function Module
Setup − EtherCAT
4-5 Initial Settings for the
EtherCAT Master Function
Module
Setting the initial values for the Ether- Configurations and
4-6 Initial Settings for the
Net/IP Function Module
Setup − Controller
EtherNet/IP Function ModSetup − Built-in Ether- ule
Net/IP Port Settings
1-10
NJ-series CPU Unit Software User’s Manual (W501)
1 Introduction
Global Variable Table
Editor
2) Writing Algorithms
for POUs
Writing the algorithms for the POUs (programs, function blocks, and functions) in
the required languages
Programming Editor
3) Setting the Tasks
Making task settings
Configurations and
Setup − Task Settings
Step 2-4
Offline Debugging
Checking the algorithms and task execution times on the Simulator (virtual controller)
Local Variable Table
Editor
Sysmac Studio Version 1
Operation Manual (Cat. No.
W504)
6-3 Variables
Section 6 Programming
NJ-series Instructions Reference Manual (Cat. No.
W502) and NJ-series
Motion Control Instructions
Reference Manual (Cat. No.
W508)
4-2-3 Task Settings
Section 7 Simulation, Transferring Projects to the Physical CPU Unit, and Operation
Step 3. Mounting and Setting Hardware
Step
Description
Reference
1. Mounting
• Connecting adjacent Units
• Mounting to DIN Track
4-3 Mounting Units in NJseries CPU Unit Hardware
User’s Manual (Cat. No.
W500)
2. Setting Hardware • Setting the node addresses of the EtherCAT slaves
Operation manuals for the
• Setting unit numbers on the rotary switches on the front of the Spe- EtherCAT slaves and Special Units
cial Units
NJ-series CPU Unit Software User’s Manual (W501)
1-11
1
1-3-2 Procedure Details
• Registering the variables used by more
than one POU in the global variable
table with Sysmac Studio
• Registering the local variable table for
each program
• Registering the local variable table for
each function block and function
1) Registering Variables
1-3 Overall Operating Procedure
for the NJ-series Controller
Step 2-3
Programming
1 Introduction
Step 4. Wiring
Step
Description
Reference
1. Connecting
Ethernet Cable
• Connecting the built-in EtherCAT port
• Connecting the built-in EtherNet/IP port
4-4 Wiring in NJ-series CPU
Unit Hardware User’s Manual (Cat. No. W500)
2. Wiring I/O
• Wiring I/O to EtherCAT slaves
• Wiring Basic I/O Units and Special Units
Operation manuals for the
EtherCAT slaves and 4-4
Wiring in NJ-series CPU
Unit Hardware User’s Manual (Cat. No. W500)
• Checking wiring
6-4-2 Performing Online
Debugging in Sysmac Studio Version 1 Operation
Manual (Cat. No. W504)
• Connecting USB Cable
• Connecting the built-in EtherNet/IP port
Sysmac Studio Version 1
Operation Manual (Cat. No.
W504)
3. Connecting the
Computer That
Runs the Sysmac
Studio
Step 5. Confirming Operation and Starting Actual System Operation
Step
Description
Sysmac Studio
Operations
Reference
1. Online Connection to Controller
and Project Download
1. Make the settings for communications
with the Controller, connect online, and
download the user program, Controller
Configurations, and Controller Setup.
(Perform this step before you create
the slave configuration or Unit configuration from the mounted Units in step
2-1.)
Controller − Communications Setup
Section 7 Simulation, Transferring Projects to the Physical CPU Unit, and Operation
Controller − Synchronization
Note Use the Synchronize Menu of the
Sysmac Studio to download the
project.
2. Cycle the power supply.
1-12
NJ-series CPU Unit Software User’s Manual (W501)
1 Introduction
Section 7 Simulation, Transferring Projects to the Physical CPU Unit, and Operation
Perform automatic operation in RUN
mode.
Section 7 Simulation, Transferring Projects to the Physical CPU Unit, and Operation
NJ-series CPU Unit Software User’s Manual (W501)
1
1-13
1-3-2 Procedure Details
3. Actual Controller
Operation
1. Example: Check the wiring by performing forced-refreshing with user-specified values from the I/O Map or Ladder
Editor.
2. Example (for motion control): Use the
MC Test Run operations in PROGRAM
mode to check wiring, motor rotation
directions for jogging, travel distances
for relative positioning (e.g., for electronic gear settings), and homing operation.
3. Perform manual operation in RUN
mode.
4. Debug the actual control system.
1-3 Overall Operating Procedure
for the NJ-series Controller
2. Operation Check
on Controller
1 Introduction
1-14
NJ-series CPU Unit Software User’s Manual (W501)
2
CPU Unit Operation
This section describes the variables and control systems of the CPU Unit and CPU Unit
status.
2-1 Internal Operation of the CPU Unit . . . . . . . . . . . . . . . . . . . . . . . . . . . . . . . . 2-2
2-1-1
2-1-2
Internal Software Configuration of the CPU Unit . . . . . . . . . . . . . . . . . . . . . . . 2-2
Overview of Tasks . . . . . . . . . . . . . . . . . . . . . . . . . . . . . . . . . . . . . . . . . . . . . . 2-3
2-2 Variables and I/O . . . . . . . . . . . . . . . . . . . . . . . . . . . . . . . . . . . . . . . . . . . . . . 2-5
2-2-1
2-2-2
Types of Variables . . . . . . . . . . . . . . . . . . . . . . . . . . . . . . . . . . . . . . . . . . . . . . 2-5
Variables and I/O Assignments . . . . . . . . . . . . . . . . . . . . . . . . . . . . . . . . . . . . 2-8
2-3 Control Systems . . . . . . . . . . . . . . . . . . . . . . . . . . . . . . . . . . . . . . . . . . . . . . 2-12
2-4 CPU Unit Status . . . . . . . . . . . . . . . . . . . . . . . . . . . . . . . . . . . . . . . . . . . . . . 2-17
2-5 CPU Unit Data and Data Retention . . . . . . . . . . . . . . . . . . . . . . . . . . . . . . . 2-18
2-5-1
CPU Unit Data . . . . . . . . . . . . . . . . . . . . . . . . . . . . . . . . . . . . . . . . . . . . . . . . 2-18
NJ-series CPU Unit Software User’s Manual (W501)
2-1
2 CPU Unit Operation
2-1
Internal Operation of the CPU Unit
This section describes the internal configuration of an NJ-series CPU Unit.
2-1-1
Internal Software Configuration of the CPU Unit
Software Configuration
The CPU Unit has the following internal software configuration.
Motion Control
Function Module
EtherNet/IP
Function Module
EtherCAT Master
Function Module
PLC Function Module
OS
The software in the NJ-series CPU Units is divided into modules that are called function modules. The
basic function module, which is the PLC Function Module, runs on top of the OS.
The other modules run on top of the PLC Function Module.
A description of each function module is given in the following table.
Function module name
Description
PLC Function Module
This function module controls overall scheduling, executes the user program,
interfaces the CJ-series Units,* sends commands to the other function modules, and interfaces the USB connector and SD Memory Card.
Motion Control Function
Module
This function module executes motion processing based on target values (such
as the position or velocity target value) from the motion control instructions in
the user program. It outputs command values, controls status, and obtains
information through the EtherCAT Master Function Module.
This function module functions as an open-loop controller that outputs command values for Servo Drives.
EtherCAT Master Function
Module
This function module communicates with the EtherCAT slaves as the EtherCAT
master.
EtherNet/IP Function Module
This function module performs EtherNet/IP communications.
* Some CJ-series Units can also be connected to an NJ-series CPU Unit.
2-2
NJ-series CPU Unit Software User’s Manual (W501)
2 CPU Unit Operation
2-1 Internal Operation of the CPU Unit
Function Module Execution Relationship
The execution relationship between the function modules is shown below.
NJ-series CPU Unit
PLC functionality
Motion Control
Function Module
EtherCAT Master
Function Module
EtherNet/IP
Function Module
Task
Settings
2
PLC Function
Module
The Scheduler in the PLC Function Module schedules processing according to the task settings in the
PLC Function Module. The Scheduler controls the time that is allocated to execution of processing for
the PLC functionality and by the other function modules.
2-1-2
Overview of Tasks
Tasks
Tasks are used to specify user program execution and I/O refreshing in the CPU Unit. They are also
used to specify execution conditions and execution priorities. (Here, I/O refreshing includes cyclic data
exchange with EtherCAT slaves and CJ-series Units.) Some tasks are executed periodically.
Period
Primary periodic
task
Period
Task
Periodically
executed tasks
Task
Task
Period
Periodic tasks
Task
Period
Period
Task
Task
z Periodically Executed Tasks
Periodically executed tasks are broadly classified into the following two types based on execution
priority.
• Primary periodic task: This task has the highest execution priority. It is always executed in the
specified period. There can only be one primary periodic task.
The EtherCAT process data communications cycle and motion control period are also executed in
the same period.
• Periodic tasks: These tasks have a lower execution priority than the primary periodic task. Periodic tasks are executed during the unused time between executions of the primary periodic task.
Periodic tasks are executed on periods that are multiples of the primary periodic task period.
Refer to 5-2-3 Basic Operation of Tasks for details on tasks.
NJ-series CPU Unit Software User’s Manual (W501)
2-3
2-1-2 Overview of Tasks
Scheduler
2 CPU Unit Operation
Overview of Task Processing
The following processing is performed with tasks. This example shows processing for the primary periodic task.
Period
Period
Task
Task
● Processing in the Primary Periodic Task
I/O
refreshing
System
common
processing
User program execution
Motion control
instructions
Motion control
System
common
processing
Requests for processing of motion control instructions
Program 1 Program 2 Program 3
Program 128
(maximum)
z I/O Refreshing
Data I/O is performed for CJ-series Basic I/O Units, CJ-series Special Units, and EtherCAT slaves.
• You can refresh I/O in the primary periodic task or the priority-16 periodic task (the periodic task
with the highest execution priority).
• I/O refreshing is assigned by slave or by Unit.
• I/O refreshing is performed in all operating modes (PROGRAM and RUN modes).
• The I/O refresh processing time depends on the type and number of Configuration Units that are
used in the Controller. The processing time for each Unit is constant.
z User Program Execution
More than one program can be assigned to one task. Programs are executed in the order that they
are assigned.
z Motion Control
Motion control is executed based on commands from the user program. Motion control instructions
are executed only in the primary periodic task.
z System Common Processing
System common processing consists of condition evaluation for motion inputs, processing for data
tracing, exclusive control of variables, processing for tag data links, and other processing.
Refer to 5-2-3 Basic Operation of Tasks for details.
2-4
NJ-series CPU Unit Software User’s Manual (W501)
2 CPU Unit Operation
2-2
Variables and I/O
2-2-1
Types of Variables
An NJ-series CPU Unit uses variables to access the memory space from instructions in the user program. A variable is a named data element in memory.
2
The following table lists the types of variables.
Major classification
Middle classification
Minor classification
Application
These variables are used
internally in the Controller.
Device variables
Device variables for CJseries Units
CJ-series Basic I/O Units
CJ-series Special Units
Device variables for Ether- EtherCAT slaves
CAT slaves
3. System-defined variables
Cam data variables
These variables are used
for Servo Drives, encoder
input slaves, and internally
in the Controller.
System-defined variables
for PLC Function Module
These variables are used
internally in the Controller.
System-defined variables
for motion control
MC Common Variable
Axis Variables
Axes Group Variables
These variables are used
for Servo Drives, encoder
input slaves, and internally
in the Controller.
System-defined variable
for EtherNet/IP
Built-in EtherNet/IP port
System-defined variables
for EtherCAT master
Built-in EtherCAT master
port
User-defined Variables
The user defines all of the attributes of a user-defined variable. Refer to 6-3 Variables for details on
user-defined variables.
Semi-user-defined Variables
You use these variables to access specific devices and data. You can change some of the attributes of
these variables.
The semi-user-defined variables include the following two types of variables for devices and data.
z Device Variables
Device variables are used to access data in slaves and Units. The data is accessed through logical
interface ports that are called I/O ports.
NJ-series CPU Unit Software User’s Manual (W501)
2-5
2-2-1 Types of Variables
1. User-defined variables
2. Semi-user-defined variables
2-2 Variables and I/O
This section describes the types of variables that are used with an NJ-series CPU Unit and the control
systems that are used by an NJ-series CPU Unit.
2 CPU Unit Operation
NJ-series CPU Unit
Program
Mounted Unit
Device variable
Instruction
I/O port
CJ-series Unit
(Basic I/O Unit or
Special Unit)
EtherCAT
EtherCAT slave to which
an axis is not assigned
Device variables are assigned to the I/O ports that are automatically created when you create the
EtherCAT Slave Configuration or Unit Configuration in the I/O Map of the Sysmac Studio.
You can access the following devices.
Type of variable
Device variables for CJ-series Units
Device variables for EtherCAT
slaves
Device to access
Data to access
CJ-series Basic I/O Units
Real I/O data in Basic I/O Units
CJ-series Special Units
Operating data (allocated CIO Area
words) and setup data (allocated
DM Area words) for Special Units
EtherCAT slaves to which axes
are not assigned
PDO mapping data for EtherCAT
slaves (specific objects allocated for
PDO communications)
Refer to 3-4-1 I/O Ports and Device Variables and 3-4-2 Registering Device Variables for details.
z Cam Data Variables
For information on cam data variables, refer to the NJ-series CPU Unit Motion Control User’s Manual (Cat. No. W507).
2-6
NJ-series CPU Unit Software User’s Manual (W501)
2 CPU Unit Operation
System-defined Variables
The system-defined variables are specific to a function module. There are system-defined variables for
each function module.
The following table lists the types of system-defined variables that are available.
Function module
Type of system-defined variable
PLC Function Module
2-2 Variables and I/O
System-defined variables are provided in advance in an NJ-series CPU Unit. The names and all
attributes are defined by the system. They have specific functions. You cannot change the name or any
other attributes.
System-defined variables for PLC Function Module
System-defined variables for motion control*
EtherNet/IP Function Module
System-defined variables for EtherNet/IP
EtherCAT Master Function Module
System-defined variables for EtherCAT master
2
2-2-1 Types of Variables
Motion Control Function Module
Refer to A-3 System-defined Variables for details on system-defined variables.
* The following table lists the types of system-defined variables that are provided for motion control.
System-defined variables for
motion control
Description
MC Common Variable
This system-defined variable is used to monitor the common status of the Motion Control Function
Module.
Axis Variables
Each of these system-defined variables is a structure that provides information on an axis (such as
physical quantities, status, and error information). They are used to access the EtherCAT slave that is
assigned to the axis. These EtherCAT slaves are accessed without the use of I/O ports.
Axes Group Variables
Each of these system-defined variables is a structure for an axes group. An axes group contains multiple axes. These variables are used for interpolated motions.
Refer to 3-5-2 Axis Variables and Axes Group Variables for details.
NJ-series CPU Unit Software User’s Manual (W501)
2-7
2 CPU Unit Operation
2-2-2
Variables and I/O Assignments
The NJ-series CPU Unit assigns I/O and variables as shown below.
User program
Variables
Device variables
Axis variables
User-defined variables
I/O ports
I/O ports
Memory used for
CJ-series Units
Assigned axes
I/O
General-purpose
EtherCAT slaves
OMRON Servo Drive or encoder input
slaves, or supported Servo Drive or
encoder input slaves from other
companies
CJ-series Units
Operating data
Setup data
Assigned memory
areas
Application
Type of variable to use
Interfacing
EtherCAT
slaves
You can access slaves through the objects that are
assigned for PDO communications.
Device variables for EtherCAT slaves
Using motion control instructions
Axis Variables
Interfacing CJseries Units
Basic I/O Units
Device variables for CJ-series Units
Special Units
Operating data and setup data
Device variables for CJ-series Units
Assigned memory area data
User-defined variables with AT specifications in memory used for CJ-series Units
Refer to 3-4 I/O Ports and Device Variables for details.
Interfacing EtherCAT Slaves
The interface method that you use to access an EtherCAT slave depends on the type of slave.
• Accessing Slaves through the Objects That Are Assigned for PDO Communications:
You can access slaves through the objects that are assigned for PDO communications for Servo
Drives/encoder input slaves and general-purpose slaves.*
* All slaves other than Servo Drives and encoder input slaves are called general-purpose slaves.
• Using Motion Control Instructions:
You can use motion control instructions to implement motion control for Servo Drives and encoder
input slaves. Motion control Instructions cannot be used for slaves from other manufacturers that
are not supported.
Applicable slaves General-purpose slaves (all
slaves except for Servo
Drives and encoder input
slaves)
Access method
Accessing slaves
through the objects that
are assigned for PDO
communications
Supported.
Using motion control
instructions
Not supported.
2-8
Servo Drive and encoder input slaves
OMRON products or supported products from other
manufacturers
Supported.
Unsupported products
from other manufacturers
Not supported.
NJ-series CPU Unit Software User’s Manual (W501)
2 CPU Unit Operation
z Accessing Slaves through the Objects That Are Assigned for PDO
Communications
You use device variables for EtherCAT slaves.
2-2 Variables and I/O
CPU Unit
EtherCAT slaves to which
axes are not assigned
I/O Ports
Device Variables
00
Variable
InBit00
to
EtherCAT
2
to
2-2-2 Variables and I/O Assignments
15
Variable
InBit15
z Using Motion Control Instructions
You use the Axis Variables in the system-defined variables.
CPU Unit
EtherCAT slaves to which
axes are not assigned
System-defined Variables
Assigned axis
Axis Variable
EtherCAT
Assigned axis
Axis Variable
EtherCAT
Refer to 3-5-2 Axis Variables and Axes Group Variables for details.
NJ-series CPU Unit Software User’s Manual (W501)
2-9
2 CPU Unit Operation
Interfacing CJ-series Units
z Accessing Basic I/O Units
You use device variables for CJ-series Units.
CPU Unit
Device Variables
Basic I/O Units
I/O Ports
00
Variable
Ch1_In00
to
to
15
Variable
Ch1_In15
Refer to3-4-1 I/O Ports and Device Variables and 3-4-2 Registering Device Variables for details.
z Accessing Special Units
There are two ways to access Special Units.
Using Device Variables to Specify Operating Data and Setup Data
You use device variables for CJ-series Unit to specify operating data (allocated CIO Area words) and
setup data (allocated DM Area words) for Special Units.
CPU Unit
Device Variables
Example: Analog Input Unit
I/O Ports
• Operating Data
Variable
Ch1_RdAI
Variable
Ch1_SensErr
• Setup Data
Variable
• Operating Data
Input 1 converted
value
Input 1 disconnection
detection
• Setup Data
Input 1 enable setting
Ch1_InChUseCfg
Variable
Ch1_AveCfg
Input 1 mean value
processing setting
Refer to 3-4-1 I/O Ports and Device Variables and 3-4-2 Registering Device Variables for details.
2-10
NJ-series CPU Unit Software User’s Manual (W501)
2 CPU Unit Operation
Using User-defined Variables to Specify Memory Area Addresses
You use user-defined variables to specify memory area addresses that are assigned to Special
Units. The address to access is specified with an AT specification.
User-defined Variables
Addresses in memory for
CJ-series Units are
specified with AT
specifications.
2-2 Variables and I/O
CPU Unit
Example: DeviceNet Unit
Words and Bits in Memory
Used for CJ-series Units
Example: Fixed allocations
for remote I/O
Variable
Fixed Allocations for
Remote I/O
CIO
3200.00
Slave
CIO
3201.00
Slave
2
%3200.00
2-2-2 Variables and I/O Assignments
Variable
%3201.00
You use user-defined variables to specify the memory area addresses for Special Units.
• Addresses in fixed allocations for DeviceNet Units
• Addresses in user-specified allocations for DeviceNet Units from the CX-Integrator
• Addresses in expansion memory for High-speed Counter Units
• Addresses in expansion memory for Analog I/O Units
Refer to 6-3-8 Variable Attributes for information on the AT Specification attribute.
Additional Information
The Network Publish attribute for user-defined variables that are used for tag data links for EtherNet/IP must be set to Input or Output.
Refer to 6-3-8 Variable Attributes for information on the Network Publish attribute.
NJ-series CPU Unit Software User’s Manual (W501)
2-11
2 CPU Unit Operation
2-3
Control Systems
This section describes the control systems that are used by the NJ-series CPU Units.
Types of Control
An NJ-series CPU Unit can perform two types of control: sequence control and motion control.
(1)
You execute sequence control with instructions other than motion control instructions in the user
program.
(2)
You execute motion control with motion control instructions in the user program for EtherCAT
Servo Drives and encoder input slaves that are assigned to axes.
NJ-series CPU Unit
User program in PLC
Function Module
CJ-series Units
(1) Sequence Control
Basic I/O Units
Execution
I/O ports
Device variables
Instructions
other than
motion
control
instructions
Execution
Execution
Motion
control
instructions
2-12
Axis Variables and Axes
Group Variables
(2)Motion Control
Special Units
EtherCAT
EtherCAT slaves to
which axes are not
assigned
EtherCAT
Servo Drives,
encoder input slaves,
and other slaves
assigned to axes
Every
Motion Control
period
Function Module
EtherCAT
Master
Function
Module
• Profile
processing
• Synchronization
Etc.
Every
period
Data is refreshed on a
fixed control period.
NJ-series CPU Unit Software User’s Manual (W501)
2 CPU Unit Operation
Relationship between Control Period and Tasks
If you assign the programs to the primary periodic task, user program execution, motion control, and
refreshing for EtherCAT slaves are all executed in a constant period.
CPU Unit
User program
control period
Control period
Control period
Control period
(1)
(1)
(1)
Periodic task
Motion control period
2
Periodic task
Periodic task
Motion control period
Motion control period
(2)
EtherCAT
communications
cycle
Communications cycle
Communications cycle
Communications cycle
I/O refreshing
I/O refreshing
I/O refreshing
Units/slaves
Units/slaves
(3)
Units/slaves
Processing is performed in a constant period. The following periods all have the same length: (1) user
program control period, (2) motion control period, and (3) EtherCAT slave refresh period.
NJ-series CPU Unit Software User’s Manual (W501)
2-3 Control Systems
You assign programs to the periodically executed tasks to execute the user program. Motion control and
EtherCAT communications are synchronized with the primary periodic task, which has the highest execution priority of all of the periodically executed tasks.
2-13
2 CPU Unit Operation
The Difference between Sequence Control and Motion Control
z Sequence Control System
The PLC Function Module executes the instructions in the user program to access the mounted
Basic I/O Units, mounted Special Units, and EtherCAT slaves without axis assignments through variables and I/O ports.
The data is exchanged on the same period as shown below.
Task period of the primary periodic task = Process data communications cycle
NJ-series CPU Unit
CJ-series Basic I/O Units
and Special Units
PLC Function Module
User
program
execution
Slaves
EtherCAT Master
Function Module
Sequence control periods
(periods of primary periodic task and
periodic tasks)
2-14
Processing in slaves
EtherCAT
Process data communications cycle
(EtherCAT data transmission cycle)
This is same as the primary periodic task
period.
Data refresh periods in slaves
(depends on the slave)
NJ-series CPU Unit Software User’s Manual (W501)
2 CPU Unit Operation
z Motion Control System
The PLC Function Module sends motion control commands to the MC Function Module when
motion control instructions are executed in the user program.
The data is exchanged on the same period, as shown below.
Task period of primary periodic task = Motion control period = Process data communications cycle
CJ-series Basic I/O
Units and Special Units
NJ-series CPU Unit
2
PLC Function Module
User
program
execution
Slaves
Motion
control
instructions
Sequence control periods
(periods of primary periodic
task and periodic tasks)
2-3 Control Systems
The MC Function Module then performs motion control processing based on those commands and
sends the results of processing as commands to the EtherCAT Servo Drive that is assigned to the
axis.*1
Motion
control
processing
by MC
Function
Module
EtherCAT
Master
Function
Module
Motion control period (=
primary periodic task
period)
EtherCAT
Processing in slaves
Process data communications
cycle (EtherCAT data transmission cycle)
This is same as the primary
periodic task period.
Data refresh periods in slaves
(depends on the slave)
Sequence control periods
(periods of primary periodic task and
priority-16 periodic task)
*1 You must use the Sysmac Studio to assign an axis to an EtherCAT slave to control it from the Motion Control
Function Module. This allows you to use motion control instructions in the user program to send commands to
the Motion Control Function Module, and to read information from the Motion Control Function Module. You
cannot use the Motion Control Function Module to control EtherCAT slaves to which axes are not assigned.
You must control these slaves directly from the user program.
*2 The timing of the execution of motion control instructions depends on the task to which the program that contains the instructions is assigned. For details, refer to 5-3-4 System Input and Output Response Times.
NJ-series CPU Unit Software User’s Manual (W501)
2-15
2 CPU Unit Operation
Additional Information
Instruction Types in Terms of Control Systems
In terms of the control systems, the instructions can be broadly separated into the following two
types of instructions.
Type of instruction
Definition
All instructions other than motion
control instructions (sequence control)
These instructions are executed in the user program in the
PLC Function Module and processing for them is completed
there.
Motion control instructions
These instructions are executed in the user program in the
PLC Function Module to send commands to the Motion Control Function Module.
MC_Home (Homing), MC_Move (Positioning), MC_CamIn
(Start Cam Operation), and instructions for other motion control operations
For details on motion control instructions, refer to the NJ-series Motion Control Instructions Reference Manual (Cat. No. W508). For details on other instructions, refer to the NJ-series Instructions Reference Manual (Cat. No. W502).
2-16
NJ-series CPU Unit Software User’s Manual (W501)
2 CPU Unit Operation
2-4
CPU Unit Status
2-4 CPU Unit Status
This section describes the status of an NJ-series CPU Unit.
Power ON
Startup state
Ready state
Operating modes
2
Error occurs.
PROGRAM
mode
Error state
Error reset.
RUN mode
An NJ-series CPU Unit can be in any of three states: startup state, ready state, or error state
The CPU Unit is ready to operate 10 to 20 seconds after the power supply is turned ON. All outputs
from Basic Output Units are OFF during this time. External communications are also not performed.
This period is called the startup state.
When the CPU Unit enters the ready state, it will change to the operating mode that you specify in
advance, RUN mode or PROGRAM mode (This is called the Startup Mode). In RUN mode, the user
program is executed. In PROGRAM mode, the user program is not executed. You use this mode to
transfer the project (including the user program) and check I/O wiring.
If an error occurs while the CPU Unit is in ready state, the CPU Unit will change to error state. Depending on the error that occurs, all or part of CPU Unit operation will stop. When the error is reset, the CPU
Unit returns to the ready state.
Item
Controller error
Major fault level
Partial fault level
Minor fault level
Definition
Serious errors that prevent
all system controls.
Errors that prevent the
operation of a function
module other than the
PLC Function Module.
Errors that prevent a portion of function module
control.
User program execution in
CPU Unit
Stopped.
Continued.
Continued.
Resetting error
Not possible.
Operation of the function
module where the error
occurred is stopped
(Motion Control Function
Module, EtherCAT Master
Function Module, or EtherNet/IP Function Module).
Possible
Possible
Refer to Section 8 CPU Unit Status, Section 12 Troubleshooting, and the NJ-series Troubleshooting
Manual (Cat. No. W503) for details on the CPU Unit states.
NJ-series CPU Unit Software User’s Manual (W501)
2-17
2 CPU Unit Operation
2-5
CPU Unit Data and Data Retention
2-5-1
CPU Unit Data
The data in the CPU Unit are listed below.
Type of data
Description
The user program contains all of the programs that are assigned to
tasks.
User Program
POUs (program organization units)
Unit Configuration and
Unit Setup
These are the definitions of the programs, functions, and function
blocks. Each algorithm is written as a ladder diagram or in structured
text. The local variable table for each POU is also included. The local
variable tables include the initial values of the variables.
• The Unit Configuration and Unit Setup contain information on the
Unit configuration that enables the CPU Unit to recognize the Units.
This information is used to automatically create I/O ports.
• Initial settings for Special Units
EtherCAT
Slave Configuration
This is the EtherCAT slave configuration.
Process
Data Table
The process data table contains the device variables,
axis variables, and process data.
EtherThe EtherCAT Master Settings contain parameter
CAT Con- EtherCAT
figuratio Master Set- settings for the EtherCAT Master Function Module,
n
tings
such as the communications cycle.
Operation
Settings
The Operation Settings contain information that is used to change the
software operation of the CPU Unit.
Built-in
EtherNet/IP Port
Settings
The Built-in EtherNet/IP Port Settings contain the following settings:
Task Settings
Axes
Motion
Control
Setup
Axes
Groups
TCP/IP settings, Ethernet settings, DHCP settings, DNS settings,
FTP settings, NTP settings, and SNMP settings
The Task Settings contain settings for the task types, number of tasks,
task execution conditions, task names, programs executed in the task,
and other task settings.
The Motion Control Setup contains data for the axes and axes groups.
The axes are assigned to Servo Drive and encoder EtherCAT slaves.
The settings consist of Axis Variables, Axes Group Variables, and
motion control parameter settings. The Axis Variables and Axes
Group Variables are structure array variables.
Cam Data
The cam data includes cam tables that consist of phase/displacement
data for use in cam operation for motion control instructions. This data
can be read and saved as cam data variables, which are structure
array variables.
Event Setting Tables
The Event Setting Tables are set to create user-defined errors and
user-defined information.
Data Trace Settings
The Data Trace Settings include settings for trigger conditions.
Tag Data Link Tables
2-18
Network configuration
information
The I/O Map contains assignment information between the variables
and the I/O ports that are automatically created based on the Unit
Configuration.
I/O Map
Controller Setup
Always
retained.
The global variable table lists attribute information for the variables
that are shared by all POUs. The global variable table includes the initial values of the variables.
Global Variable Table
Controller Configuration
s and
Setup
Retention
The Tag Data Link Tables contain the tag data link settings for EtherNet/IP (tags, tag sets, and connection information).
NJ-series CPU Unit Software User’s Manual (W501)
2 CPU Unit Operation
Variable
memory
Variables without a
Retain attribute
Description
The Variable Memory contains the present values of variables that do
not have AT specifications. There are variables with and without the
Retain attribute.
Variables with a Retain
attribute
Retention
Not
retained.
Retained if
a Battery is
connected.
Not
retained.
Memory Used for CJ-series Units
This is the Holding, DM, and EM Areas for CJ-series Units.
Retained if
a Battery is
connected.
System Time
This is the time information that is used inside the CPU Unit.
Event Log Data
The event logs include the error log for the CPU Unit and Special
Units and logs of events other than errors, such as when the power
supply was turned ON and OFF and when operation started.
Retained if
a Battery is
connected.
Absolute Encoder Home Offset
Data
This data is used to restore the actual position of a Servo Drive with
an absolute encoder in motion control. The offset is the difference
between the command position after homing and the absolute data
that is read from the absolute encoder.
NJ-series CPU Unit Software User’s Manual (W501)
2
2-5-1 CPU Unit Data
This is the CIO and Work Areas for CJ-series Units.
2-5 CPU Unit Data and Data Retention
Type of data
2-19
2 CPU Unit Operation
2-20
NJ-series CPU Unit Software User’s Manual (W501)
I/O Ports, Slave Configuration,
and Unit Configuration
3
This section describes how to use I/O ports, how to create the slave configuration and
unit configuration, and how to assign functions.
3-1 Overview of Procedures for the Slave and Unit Configurations . . . . . . . . 3-2
3-2 Creating the EtherCAT Slave Configuration . . . . . . . . . . . . . . . . . . . . . . . . 3-5
3-2-1
3-2-2
Introduction . . . . . . . . . . . . . . . . . . . . . . . . . . . . . . . . . . . . . . . . . . . . . . . . . . . 3-5
Creating the EtherCAT Slave Configuration . . . . . . . . . . . . . . . . . . . . . . . . . . . 3-5
3-3 Creating the Unit Configuration . . . . . . . . . . . . . . . . . . . . . . . . . . . . . . . . . . 3-7
3-3-1
3-3-2
3-3-3
Introduction . . . . . . . . . . . . . . . . . . . . . . . . . . . . . . . . . . . . . . . . . . . . . . . . . . . 3-7
Creating the Unit Configuration . . . . . . . . . . . . . . . . . . . . . . . . . . . . . . . . . . . . 3-7
Verifying the Unit Configuration . . . . . . . . . . . . . . . . . . . . . . . . . . . . . . . . . . . 3-10
3-4 I/O Ports and Device Variables . . . . . . . . . . . . . . . . . . . . . . . . . . . . . . . . . . 3-11
3-4-1
3-4-2
I/O Ports and Device Variables . . . . . . . . . . . . . . . . . . . . . . . . . . . . . . . . . . . 3-11
Registering Device Variables . . . . . . . . . . . . . . . . . . . . . . . . . . . . . . . . . . . . . 3-15
3-5 Creating the Axes and Assigning Them to the Servo Drives/Encoder Input
Slaves . . . . . . . . . . . . . . . . . . . . . . . . . . . . . . . . . . . . . . . . . . . . . . . . . . . . . . 3-17
3-5-1
3-5-2
3-5-3
Introduction . . . . . . . . . . . . . . . . . . . . . . . . . . . . . . . . . . . . . . . . . . . . . . . . . . 3-17
Axis Variables and Axes Group Variables . . . . . . . . . . . . . . . . . . . . . . . . . . . 3-18
Creating and Using Axes and Axis Variables . . . . . . . . . . . . . . . . . . . . . . . . . 3-19
NJ-series CPU Unit Software User’s Manual (W501)
3-1
3 I/O Ports, Slave Configuration, and Unit Configuration
3-1
Overview of Procedures for the Slave
and Unit Configurations
This section provides an overview of the procedures for the Slave and Unit Configurations.
The shaded steps in the overall procedure that is shown below are related to the Slave and Unit Configurations.
Step 1. Software Design
Step 1-1 Designing I/O and Processing
Step 1-2 Designing Tasks
Step 1-3 Designing Programs
Step 2. Software Setups and Programming
Step 2-1 Slave and Unit Configurations
Step 2-2 Controller Setup
Step 2-3 Programming
Step 2-4 Offline Debugging
Step 3. Mounting and Setting Hardware
Step 4. Wiring
Step 5. Confirming Operation and Starting Actual System
Operation
Refer to 1-3 Overall Operating Procedure for the NJ-series Controller for details.
3-2
NJ-series CPU Unit Software User’s Manual (W501)
3 I/O Ports, Slave Configuration, and Unit Configuration
Create the EtherCAT Slave Configuration (if EtherCAT is used) and the
Unit Configuration (if CJ-series Units are used).
• Create the EtherCAT Configuration.
Reference
3-2 Creating
the EtherCAT
Slave Configuration
EtherCAT slave configuration
Sysmac Studio
CPU
Unit
3-3 Creating
the Unit Configuration
EtherCAT
3-1 Overview of Procedures for the Slave and Unit
Configurations
Step 1
Slave configuration information
3
Created in the EtherCAT Configuration Setup.
• Create the Unit Configuration.
Unit configuration
Sysmac Studio
Unit configuration information
CPU
Unit
Created in the Unit Configuration and Unit Setup
Step 2
Reference
Assign device variables to I/O ports.
• Register the device variables.
Sysmac Studio
2-2-1 Types of
Variables
Registering the device variables
Slave/Unit
I/O port
Device variable
Assign a new device
variable or a variable
from a variable table for
each I/O port.
3-4 I/O Ports
and Device
Variables
Created in the I/O Map.
NJ-series CPU Unit Software User’s Manual (W501)
3-3
3 I/O Ports, Slave Configuration, and Unit Configuration
Step 3
Create the axes and assigning them to the Servo Drives and encoder
input slaves (if motion control is used).
1. Create the axes.
2. Assign the axes to the Servo Drives and encoder input slaves in the EtherCAT configuration.
EtherCAT slave configuration
Axis Setup
Servo Drives
Axes
Sysmac Studio
Axis variable a
Assigned.
A
CPU
Unit
Reference
3-5 Creating
the Axes and
Assigning
Them to the
Servo
Drives/Encoder
Input Slaves
EtherCAT
Axis variable b
B
A
Axis variable c
B
C
D
C
Servo Drives/encoder input slaves
Axis variable d
Encoder input slave
D
Assigned in the Axis Setup.
3-4
From the EtherCAT Configuration Setup
NJ-series CPU Unit Software User’s Manual (W501)
3 I/O Ports, Slave Configuration, and Unit Configuration
Creating the EtherCAT Slave
Configuration
This section describes how to create the EtherCAT Slave Configuration of an NJ-series CPU Unit.
3-2-1
Introduction
Use the Sysmac Studio EtherCAT Editor to create the EtherCAT slave configuration that is detected as
“correct” by the CPU Unit.
3-2 Creating the EtherCAT Slave Configuration
3-2
EtherCAT master
CPU Unit
3
3-2-1 Introduction
EtherCAT
EtherCAT
slave
EtherCAT
slave
EtherCAT
slave
Slave configuration
Create the configuration with the
EtherCAT Editor of the Sysmac Studio.
The I/O ports are automatically registered for the slaves in the configuration. Assign device variables to
the I/O ports. You can specify device variables in the programs to access the slaves.
3-2-2
Creating the EtherCAT Slave Configuration
You can use either of the following two methods to create the EtherCAT slave configuration.
Method 1 Creating the Slave Configuration Offline
z Procedure to Open the EtherCAT Editor Tab Page
1
Double-click EtherCAT under Configurations and Setup in the Multiview Explorer. Or, rightclick EtherCAT under Configurations and Setup and select Edit from the menu.
The EtherCAT Editor Tab Page appears in the Configurations and Setup Layer.
z Registering Slaves
Procedure to Register Slaves in the Topology Display
1
Drag a slave from the Toolbox to the master in the Topology Display.
The slave is added under the master.
2
In the same as in step 1, drag a slave from the Toolbox to the slave to connect it to in the Topology Display.
The slave is added under the previous slave.
NJ-series CPU Unit Software User’s Manual (W501)
3-5
3 I/O Ports, Slave Configuration, and Unit Configuration
Procedure to Delete Slaves in the Topology Display
1
Right-click the slave to delete and select Delete from the menu.
The slave is deleted.
Procedure to Copy and Paste Slaves in the Topology Display
1
2
Right-click the slave to copy and select Copy from the menu.
Right-click the slave to connect it to and select Paste from the menu.
The slave is pasted.
Method 2 Reading the Actual Slave Configuration Online
Connect the Sysmac Studio online to the actual network to read the slave configuration.
Additional Information
After the EtherCAT Slave Configuration is registered for the Servo Drives and encoder input
slaves, Axis Variables are automatically created when you create the axes. Refer to 3-5 Creating
the Axes and Assigning Them to the Servo Drives/Encoder Input Slaves.
3-6
NJ-series CPU Unit Software User’s Manual (W501)
3 I/O Ports, Slave Configuration, and Unit Configuration
3-3
Creating the Unit Configuration
3-3-1
Introduction
Use the Unit Editor in the CPU/Expansion Racks Tab Page of the Sysmac Studio to create the Unit
Configuration that is recognized as correct by the CPU Unit.
Create the Unit configuration with
the Unit Editor of the Sysmac Studio.
3-3 Creating the Unit Configuration
This section describes how to create the Unit Configuration of an NJ-series CPU Unit.
Unit configuration
3
Special Unit
Special Unit
Basic I/O Unit
When the power is turned ON, an automatic check is performed to determine whether the “correct” Unit
Configuration matches the physical Unit configuration. The I/O ports are automatically registered for
Units that are specified in the Unit Configuration. Assign device variables to the I/O ports. The device
variables are used in the programs to access the Units in the Unit configuration.
Additional Information
You can start an NJ-series Controller with mounted Units without creating or transferring a Unit
Configuration to the Controller, but I/O ports and device variables are not created automatically,
so you will not be able to access the Units from the programs.
3-3-2
Creating the Unit Configuration
You can use either of the following two methods to create the Unit Configuration.
Method 1 Creating the Unit Configuration Offline and Transferring It
Create the Unit Configuration that is to be considered as “correct” with the Unit Editor of the Sysmac
Studio. After you create Unit Configuration with the Unit Editor, you download it along with the user program to the CPU Unit.
Sysmac Studio
1. Created offline.
CPU Unit
2. Download.
NJ-series CPU Unit Software User’s Manual (W501)
3-7
3-3-1 Introduction
Basic I/O Unit
CPU Unit
3 I/O Ports, Slave Configuration, and Unit Configuration
Create the Unit configuration with the Unit Editor. Use one of the following procedures to display the
Unit Editor.
• Double-click CPU/Expansion Racks under Configurations and Setup in the Multiview Explorer.
• Or, right-click CPU/Expansion Racks under Configurations and Setup and select Edit from the
menu.
Model information
Displays the model number, product name, vendor name, and specifications
information for the selected Unit.
Unit information
Displays device information for the selected Unit, such as the rack number,
slot number, unit number, device name, number of unit numbers assigned,
response time, and error information.
Rack information
Click the tab to the right of a rack to view its power consumption and size.
z Registering Units
Procedure to Change the Power Supply Unit Model
1
Right-click the Power Supply Unit and select Change Model from the menu.
The Change Model Dialog Box is displayed.
2
Select the Power Supply Unit, and then click the OK Button.
Procedure to Insert Units
1
Drag the selected Unit from the Model Selection Pane to the Unit Editor. The Unit is inserted.
Procedure to Change the Unit Model
1
2
Right-click the Unit and select Change Model from the menu. The Changing Unit Model Dialog
Box is displayed.
Select the Unit and then click the OK Button. The Unit is changed to the selected model.
Procedure to Delete Units
1
Right-click the Unit to delete and select Delete from the menu. The Unit is deleted.
Procedure to Copy and Paste Units
1
2
3-8
Right-click the Unit to copy and select Copy from the menu.
Right-click at the location where you want to insert the Unit and select Paste from the menu.
The Unit is pasted.
NJ-series CPU Unit Software User’s Manual (W501)
3 I/O Ports, Slave Configuration, and Unit Configuration
z Creating Expansion Racks
Procedure to Add Expansion Racks
Right-click at any location where there are no Units and select Add Rack from the menu. The
Rack is added.
Procedure to Delete Expansion Racks
1
2
Select a Unit of the Rack to delete.
Right-click at any location where there are no Units and select Delete Rack from the menu.
The Rack is deleted.
Procedure to Delete All Racks and Units
1
Right-click at any location where there are no Units and select Clear All from the menu. All
Racks and Units are deleted.
Make the following settings for the Configuration Units in the Unit Editor.
Device Names
Enter names for the Configuration Units. The device names that you set are used in the device variables that you use to access the Configuration Units.
Input Response Times
Set the input response times of the Basic I/O Units for the slots on each rack.
Unit Numbers
Set the unit numbers for the CPU Bus Units and Special I/O Units that are mounted.
Method 2 Reading the Unit Configuration Online from the Actual
Mounted Units and Transferring It
This method can be used to treat the current physical Unit configuration as the “correct” configuration.
The Sysmac Studio is connected online to the physical Units to read the Unit configuration. The user
program is then created accordingly. Then you download the Unit Configuration and user program to
the CPU Unit.
NJ-series CPU Unit Software User’s Manual (W501)
3-9
3
3-3-2 Creating the Unit Configuration
z Configuration Unit Settings
3-3 Creating the Unit Configuration
1
3 I/O Ports, Slave Configuration, and Unit Configuration
Sysmac Studio
1. Read.
Configuration of physical Units
CPU Unit
2. Download.
3-3-3
Verifying the Unit Configuration
You can perform the following Unit configurations comparison with the Sysmac Studio.
z Comparison between the Unit Configuration on the Sysmac Studio
(Computer) and the Physical Unit Configuration
You can compare the Unit Configuration on the Sysmac Studio with the physical Unit configuration
to see if they match before the first time you download the Unit Configuration to the CPU Unit from
the Sysmac Studio.
Sysmac Studio
Unit Configuration
Compared.
CPU Unit
Configuration of physical Units
z Comparison between the Unit Configuration on the Sysmac Studio
(Computer) and the Unit Configuration in the Physical CPU Unit
You can compare the Unit Configuration on the Sysmac Studio with the Unit Configuration Information that is stored in the CPU Unit to see if they match before you download the Unit Configuration to
the CPU Unit from the Sysmac Studio.
Sysmac Studio
Unit Configuration
Compared.
CPU Unit
Unit Configuration Information
3-10
NJ-series CPU Unit Software User’s Manual (W501)
3 I/O Ports, Slave Configuration, and Unit Configuration
3-4
I/O Ports and Device Variables
3-4-1
I/O Ports and Device Variables
I/O Ports
An I/O port is a logical interface that is used by the CPU Unit to exchange data with external devices
(slaves and Units). I/O ports are automatically created when you create the slave and Unit configurations on the Sysmac Studio. You assign device variables to I/O ports to enable accessing the slaves
and Units from the user program.
3-4 I/O Ports and Device Variables
This section describes the I/O ports and device variables that you use to access the EtherCAT slaves
and CJ-series Units of an NJ-series Controller.
3
CPU Unit
3-4-1 I/O Ports and Device Variables
User program (or external communications)
Variables
Device variables
I/O ports are logical interfaces used by
the CPU Unit to exchange data with
external devices.
I/O ports
Outside of
the CPU Unit
EtherCAT
slaves
I/O ports
CJ-series
Units
I/O ports are automatically registered in the I/O Map when you create the EtherCAT Slave Configuration
or Unit Configuration in the Sysmac Studio, or when you read either of these configurations from the
physical Controller from the Sysmac Studio. You can check the I/O ports that were registered in the I/O
Map of the Sysmac Studio.
I/O Map
NJ-series CPU Unit Software User’s Manual (W501)
3-11
3 I/O Ports, Slave Configuration, and Unit Configuration
I/O Port Names
z EtherCAT Slaves
The following I/O port names are used for Remote I/O Terminals.
Example for a 16-point Remote I/O Terminal: Bit00 to Bit15
For other slaves, all or part of the object names that are defined in the EtherCAT object dictionary
are used.
Example for Analog Input Unit: CH0_input16-bit
Examples for the R88D-KN50H-ECT: Position actual value and Digital inputs
z CJ-series Basic I/O Units
I/O port names are created according to the following rules.
Rules for I/O Port Names for Basic I/O Units
Inputs
Outputs
Ch@_Out@@
Ch@_In@@
Terminal number: 00 to 15
Terminal number: 00 to 15
16-bit words: 1 to 4
16-bit words: 1 to 4
I/O Port Names for Specific Numbers of I/O Points
Number of
input points
Number of output points
8 points
16 points
32 points
64 points
I/O port names
Inputs
Ch1_In
Data type
WORD
Outputs
Ch1_Out
Data type
WORD
Ch1_In00 to Ch1_In07
BOOL
Ch1_Out00 to Ch1_Out07
BOOL
Ch1_In
WORD
Ch1_Out
WORD
Ch1_In00 to Ch1_In15
BOOL
Ch1_Out00 to Ch1_Out15
BOOL
Ch1_In
WORD
Ch1_Out
WORD
Ch1_In00 to Ch1_In15
BOOL
Ch1_Out00 to Ch1_Out15
BOOL
Ch2_In
WORD
Ch2_Out
WORD
Ch2_In00 to Ch2_In15
BOOL
Ch2_Out00 to Ch2_Out15
BOOL
Ch1_In
WORD
Ch1_Out
WORD
Ch1_In00 to Ch1_In15
BOOL
Ch1_Out00 to Ch1_Out15
BOOL
Ch2_In
WORD
Ch2_Out
WORD
Ch2_In00 to Ch2_In15
BOOL
Ch2_Out00 to Ch2_Out15
BOOL
Ch3_In
WORD
Ch3_Out
WORD
Ch3_In00 to Ch3_In15
BOOL
Ch3_Out00 to Ch3_Out15
BOOL
Ch4_In
WORD
Ch4_Out
WORD
Ch4_In00 to Ch4_In15
BOOL
Ch4_Out00 to Ch4_Out15
BOOL
z CJ-series Special Units
I/O port names are determined by the model number of the Unit and the functionality.
Examples for a CJ1W-AD041-V1 Analog Input Unit:
Ch1_PkHdCmd, Ch1_AveCfg, etc.
3-12
NJ-series CPU Unit Software User’s Manual (W501)
3 I/O Ports, Slave Configuration, and Unit Configuration
Device Variables
Slave and Unit Configuration
Information created.
Slave and Unit Configurations
I/O ports
created.
Variables assigned to I/O ports:
Device variables
I/O ports
Device variables
Assigned.
ch1_In00
J01_ch1_In00
ch1_In01
J01_ch1_In01
ch1_In02
J01_ch1_In02
3-4 I/O Ports and Device Variables
In an NJ-series Controller, external devices (slaves and Units) are not assigned to specific memory
addresses in the CPU Unit. Rather, variables are assigned to the I/O ports. These variables are called
device variables.
3
CPU Unit
User program (or external communications)
Variables
Device variables
Variables are assigned to I/O ports.
These variables are called device
variables.
I/O ports
I/O ports
Outside of
the CPU Unit
General-purpose
EtherCAT slaves
CJ-series
Units
Refer to 2-2-1 Types of Variables for the relationship of device variables to other variables.
NJ-series CPU Unit Software User’s Manual (W501)
3-13
3-4-1 I/O Ports and Device Variables
You can specify device variables in the user program or in external communications to access the
devices (slaves or Units).
3 I/O Ports, Slave Configuration, and Unit Configuration
z Device Variable Attributes
Device variables are registered in the variable table specified in the Variable Type Column under the
following conditions.
Attribute
Variable Name
Setting
Changes to settings
Automatically generated variables: [device_name] +
[I/O_port_name]
Allowed.
The default device names are as follows:
• For EtherCAT slaves, an E followed by a sequential number starting from 001.
• For CJ-series Units, the device names start with a J followed by a sequential number starting from 01.
Refer to 3-4-1 I/O Ports and Device Variables for more
information on I/O Port Names.
If entered manually, the variable name is the string you
enter.
Data Type
According to the data type of the I/O port.
Allowed.
AT Specification
• Device variables for EtherCAT slaves:
ECAT://node#[node_number]/[I/O_port_name]
• Device variables for CJ-series Units:
IOBus://rack#[rack_number]/slot#[slot_number]/[I/O_por
t_name]
Not allowed.
Retain
• Device variables for EtherCAT slaves: Not retained.
• Device variables for CJ-series Units assigned to the
Operating Data (CIO Area): Not retained
Device variables for CJ-series Units assigned to the
Setup Data (DM Area): Retained
Not allowed.
Initial Value
None
Allowed.
Constant
None
Allowed.
Network Publish
Do not publish.
Allowed.
Edge
None
Not allowed.
Refer to 6-3-4 Attributes of Variables for the meanings of the attributes.
Additional Information
• You can specify forced refreshing for I/O ports in the I/O Map. You can force real I/O to turn ON
or OFF to check the wiring.
• You can choose the variable table (global variable table or local variable table for one POU) in
which to register a device variable in the I/O Map.
3-14
NJ-series CPU Unit Software User’s Manual (W501)
3 I/O Ports, Slave Configuration, and Unit Configuration
3-4-2
Registering Device Variables
There are three ways to assign a device variable.
• Manually enter a new device variable name.
• Automatically create device variable names.
• Select variables from the variable table.
Manually Entering Device Variable Names
You can enter a device variable name manually. You assign device variables using this method in the
following case.
3-4 I/O Ports and Device Variables
You assign device variables to I/O ports in the I/O Map of the Sysmac Studio. As a result, the device
variables are registered in the variable table.
3
• To assign your own name for a slave I/O terminal or a Basic I/O Unit.
Use the following procedure.
Create the slave configuration information or Unit configuration information.
Select an I/O port in the I/O Map and enter a variable name in the Variable Column.
Device variables are automatically assigned to the I/O ports for each slave or Unit. These device
variables are also automatically registered in the variable table specified in the Variable Type
Column.
Automatically Creating New Device Variable Names
The device variables are named automatically from a combination of the device name and the I/O port
names. You assign device variables using this method in the following cases.
• When you do not want to spend time manually entering device variable names.
• To automatically create device variable names to use to access operating data and setup data for
Special Units.
Use the following procedure.
1
2
Create the slave configuration information or Unit configuration information.
Set a device name in the EtherCAT Editor or the Unit Editor.
The possible default device names are as follows:
• For slaves, the device names start with an E followed by a sequential number starting from
001.
• For Units, the device names start with a J followed by a sequential number starting from 01.
3
Right-click a slave, Unit, or one or more I/O ports in the I/O Map, and then select Create Device
Variable from the menu.
NJ-series CPU Unit Software User’s Manual (W501)
3-15
3-4-2 Registering Device Variables
1
2
3 I/O Ports, Slave Configuration, and Unit Configuration
Automatically created Device Variables
Device variables are automatically assigned to the I/O ports for each slave or Unit. These device
variables are also automatically registered in the variable table specified in the Variable Type
Column.
Additional Information
We recommend that you set the device names.
Selecting from the Registered Variables
Select a registered variable in the I/O Map. You assign device variables using this method in the following cases.
• To create slave configuration information or Unit configuration information after you start programming.
• To reuse programs from another project.
1
2
3
Enter the programs.
Create the slave configuration information or Unit configuration information.
Select a variable that was created in a program from the list in the I/O Map to assign it to an I/O
port.
Select a user-defined variable that has already been
registered in the global variable table.
Additional Information
To remove the variable assigned to an I/O port, clear the Variable Column or right-click the variable and select Reset Assignment from the menu. The device variable assignment is removed.
However, removing the assignment does not delete the variable from the variable table where it
is registered.
3-16
NJ-series CPU Unit Software User’s Manual (W501)
3 I/O Ports, Slave Configuration, and Unit Configuration
Creating the Axes and Assigning
Them to the Servo Drives/Encoder
Input Slaves
This section describes how to create axes in the NJ-series Controller and how to assign the axes to the
Servo Drives and encoder input slaves.
3-5-1
Introduction
When you use the Motion Control Function Module for operation with EtherCAT Servo Drive or encoder
input slaves, create axes in the Sysmac Studio and define them as EtherCAT servo axes or encoder
axes. At a result, Axis Variables are automatically created as system-defined variables.
3-5 Creating the Axes and Assigning Them to the Servo
Drives/Encoder Input Slaves
3-5
3
Controlled by the Motion Control Function Module.
EtherCAT master
Axis B
Axis A
Functional units within the
Motion Control Function Module
Created.
Created.
Axis variable A
3-5-1 Introduction
CPU Unit
Axis variable B
Assigned.
Assigned.
EtherCAT
EtherCAT
slave
Servo Drive/encoder Servo Drive/encoder
input slave
input slave
You can specify an Axis Variable in a motion control instruction in the user program to easily access and
perform operations with Servo Drives and encoder input slaves.
NJ-series CPU Unit Software User’s Manual (W501)
3-17
3 I/O Ports, Slave Configuration, and Unit Configuration
3-5-2
Axis Variables and Axes Group Variables
The following table lists the types of Axis Variables and Axes Group Variables.
Type of variable
Axis Variables
Application
System-defined axis
variables
Axis Variables automatically created
when axes are created with the Sysmac Studio
Axes Group Variables
Device to access
An Axis Variable is
The EtherCAT slave
used to control a sin- (Servo Drive or
gle axis.
encoder input slave)
that is assigned to
the axis
System-defined
An Axes Group Variaxes group variables able is used for
multi-axes coordiAxes Group Varinated control.
ables automatically
created when axes
groups are created
with the Sysmac
Studio
The EtherCAT
slaves (Servo Drive
or encoder input
slaves) that are
assigned to the axes
group
Creation method
Provided by the system.
You must create an
axis with Sysmac
Studio and assign
the device to the
axis.
Provided by the system.
You must create an
axes group with the
Sysmac Studio.
Refer to the NJ-series Motion Control Instructions Reference Manual (Cat. No. W508) for details on
Axis Variables and Axes Group Variables.
Specifying Axis and Axes Group Variables
The variables can be specified with variable names that are created with the Sysmac Studio or with
system-defined variable names.
Type
Names
Axis Variables
Axes Group Variables
Variable names created with the
Sysmac Studio
MC_Axis***
MC_Group***
(“***” is assigned in ascending order
from 000 in the order the variables
are created.) You can change the
names as required.
(“***” is assigned in ascending order
from 000 in the order the variables
are created.) You can change the
names as required.
System-defined variable names
_MC_AX[0..63]
_MC_GRP[0..31]
(The array element numbers are
assigned in ascending order from 0
in the order the variables are created.)
(The array element numbers are
assigned in ascending order from 0
in the order the variables are created.)
Application
There are two ways to use Axis Variables and Axes Group Variables.
1) Specifying Axes and Axes Groups in Motion Control Instructions:
If you specify an axis or axes group for an I/O variable for a motion control instruction, you can
perform operations for the OMRON Servo Drive or encoder input slave.
2) Monitoring Axis Variable Members:
You can use instructions to monitor the actual position, error information, or other information
on the Servo Drives and encoder input slaves.
3-18
NJ-series CPU Unit Software User’s Manual (W501)
3 I/O Ports, Slave Configuration, and Unit Configuration
Details on Axis Variables
1. Assume that you create an axis with an axis name of A on the Sysmac Studio. An Axis Variable with a variable name of A is created automatically based on the system-defined axis variable. The Axis Variable consists of Axis Basic Settings, Unit Conversion Settings, I/O, operating
status, current values, error status, and warning status.
2. You specify the axis variable name A for the in-out variable of a motion control instruction. With
the axis variable name, you can access the OMRON Servo Drive or encoder input slave, or supported Servo Drive or encoder input slave from another company and perform operations for it.
3. You can specify the Axis Variable to use instructions as required to monitor the actual position,
error information, or other information on the Servo Drive or encoder input slave.
NJ-series CPU Unit
2. An axis or axes group is specified for a
motion control instruction.
An Axis Variable is made
under a different name.
Axis Variable
Axis variable name: MC_Axis***
System-defined Variable
_MC_AX[]
Axis basic settings and unit conversions
Axis variable name: MC_Axis***
Motion
control
instruction
I/O
Operating status and current values
3-5-3 Creating and Using Axes and Axis Variables
Only the axis variable
name is specified.
3
1. The axis MC_Axis*** is created on the Sysmac Studio.
Global Variable Table
Axis basic settings and unit conversions
The data types
cannot be
changed.
Error/warning status
I/O
Operating status and current values
Error/warning status
3. You can monitor the members of the axis variable with instructions.
The values can be read and written with instructions.
A.××
Value of a member of
the Axis Variable
Assigned
axis
Control operations
3-5-3
EtherCAT
OMRON Servo Drives or
encoder input slaves, or
supported Servo Drives or
encoder input slaves from
other companies
Creating and Using Axes and Axis Variables
You can create and use axes and Axis Variables as described below.
1
Right-click Axis Settings under Configurations and Setup − Motion Control Setup in the
Multiview Explorer and select Add − Axis Settings from the menu.
If necessary, you can change the axis variable names from the default names of MC_Axis***.
(“***” is incremented from 000 in the order that the axis variables are created.)
2
Assign the axes that you created to Servo Drives or encoder input slaves in the EtherCAT Slave
Configuration of the Sysmac Studio.
NJ-series CPU Unit Software User’s Manual (W501)
3-5 Creating the Axes and Assigning Them to the Servo
Drives/Encoder Input Slaves
Additional Information
3-19
3 I/O Ports, Slave Configuration, and Unit Configuration
Set the Axis Basic Settings from the Sysmac Studio.
Classification
Axis Basic Settings
3
Parameter name
Setting
Axis Number
Axis numbers are automatically set in the order that the axes
are created.
Axis Use
Select Used Axis.
Axis Type
Select a servo axis or encoder axis.
Input Device/
Output Device
Specify the node address of the EtherCAT slave that is
assigned to the axis.
Use the Sysmac Studio to specify the settings required for Test Mode operation (Unit Conversion, Count Mode, Limits, etc.) and the settings required for actual system operation. Then
transfer the settings to the CPU Unit with the project.
]
4
In the user program, an axis variable name is specified for the in-out variable Axis in motion control instructions.
For the axis variable name, specify the axis name (axis variable name) that was specified in the
Motion Control Setup or the system-defined variable _MC_AX[0..63].
You can execute motion control for the assigned Servo Drive or encoder input slave. An example
that specifies the axis variable name MyAxis1 is shown below.
Example:
In-out variable Axis
MyAxis1On
Specify an axis
variable name.
MC_Power
MyAxis1
Axis
Enable
ServoOn
Axis
MyAxis1
MyAxis1OnStatus
Status
Busy
MyAxis1OnBusy
Error
MyAxis1OnError
ErrorID
MyAxis1OnErrorID
Refer to 3-5-2 Axis Variables and Axes Group Variables for information on Axis Variables.
3-20
NJ-series CPU Unit Software User’s Manual (W501)
Controller Setup
This section describes the initial settings of the function modules.
4
4-1 Overview of the Controller Setup . . . . . . . . . . . . . . . . . . . . . . . . . . . . . . . . . 4-2
4-2 Initial Settings for the PLC Function Module . . . . . . . . . . . . . . . . . . . . . . . 4-4
4-2-1
4-2-2
4-2-3
4-2-4
Introduction . . . . . . . . . . . . . . . . . . . . . . . . . . . . . . . . . . . . . . . . . . . . . . . . . . .
Controller Setup . . . . . . . . . . . . . . . . . . . . . . . . . . . . . . . . . . . . . . . . . . . . . . . .
Task Settings . . . . . . . . . . . . . . . . . . . . . . . . . . . . . . . . . . . . . . . . . . . . . . . . . .
Unit Configuration and Unit Setup . . . . . . . . . . . . . . . . . . . . . . . . . . . . . . . . . .
4-4
4-4
4-5
4-9
4-3 Initial Settings for Special Units . . . . . . . . . . . . . . . . . . . . . . . . . . . . . . . . . 4-11
4-4 Initial Settings for the Motion Control Function Module . . . . . . . . . . . . . 4-13
4-4-1
4-4-2
Introduction . . . . . . . . . . . . . . . . . . . . . . . . . . . . . . . . . . . . . . . . . . . . . . . . . . 4-13
Setting Methods . . . . . . . . . . . . . . . . . . . . . . . . . . . . . . . . . . . . . . . . . . . . . . . 4-14
4-5 Initial Settings for the EtherCAT Master Function Module . . . . . . . . . . . . 4-15
4-6 Initial Settings for the EtherNet/IP Function Module . . . . . . . . . . . . . . . . 4-16
CJ2 CPU Unit Hardware User’s Manual
4-1
4 Controller Setup
4-1
Overview of the Controller Setup
This section provides an overview of the Controller Setup.
The shaded steps in the overall procedure that is shown below are related to the Controller Setup.
Step 1. Software Design
Step 1-1 Designing I/O and Processing
Step 1-2 Designing Tasks
Step 1-3 Designing Programs
Step 2. Software Setups and Programming
Step 2-1 Slave and Unit Configurations
Step 2-2 Controller Setup
Step 2-3 Programming
Step 2-4 Offline Debugging
Step 3. Mounting and Setting Hardware
Step 4. Wiring
Step 5. Confirming Operation and Starting Actual System
Operation
Refer to 1-3 Overall Operating Procedure for the NJ-series Controller for details.
4-2
CS/CJ/NSJCJ2 Series Instructions Reference Manual(W474)
4 Controller Setup
Controller Setup
Reference
z Initial Settings Related to the PLC Function Module:
Controller Setup:
z Initial Settings for Special Units:
Unit Configuration and Setup: Initial settings for the Special Units
4-3 Initial Settings for Special
Units
z Initial Settings for the Motion Control Function Module:
4-4 Initial Settings for the
• Axis Parameters: Motion control parameters for single-axis operation
Motion Control
• Axes Group Parameters: Motion control parameters for multi-axes coor- Function Moddinated operation
ule
• Cam data: Phase and displacement setting tables for cam motions
z Initial Settings for the EtherCAT Master Function Module:
4-5 Initial Settings for the
EtherCAT Master Parameters in the EtherCAT Configuration:
EtherCAT MasParameter settings for the EtherCAT master process data communications ter Function
cycle, and other settings
Module
z Initial Settings for the EtherNet/IP Function Module:
4-6 Initial Settings for the
Ethernet Port Setup: EtherNet/IP Port TCP/IP Settings, Ethernet Settings,
EtherNet/IP
and other settings
Function Module
CS/CJ/NSJCJ2 Series Instructions Reference Manual(W474)
4-3
4-1 Overview of the Controller Setup
4-2 Initial Settings for the
Startup Mode, Write Protection, System Service MoniPLC Function
toring Settings, and other settings
Module
4
4 Controller Setup
4-2
Initial Settings for the PLC Function
Module
This section describes the initial settings that are required for the PLC Function Module.
4-2-1
Introduction
The initial settings for the PLC Function Module are listed below.
• Controller Setup
• Task Settings
Select Configurations and Setup − Controller Setup and Configurations and Setup − Task Settings on the Sysmac Studio to make these settings
4-2-2
Controller Setup
]
Operation Settings Tab Page
z Basic Settings
The Operation Settings are for functions supported by the CPU Unit, such as the definitions of operations when the power is turned ON or when the operating mode changes.
Parameter
Setting
group
Description
Set value
Operation
Settings
Startup Mode
Sets the CPU Unit’s
operating mode at startup.
SD Memory
Card Setting
Memory Card
Diagnosis at
Startup
Sets whether to execute Do not check.
self-diagnosis (file sysCheck.
tem check and recovery)
on the inserted SD Memory Card when the power
is turned ON.
4-4
RUN or PROGRAM mode
Default
Update timing
Changes in
RUN mode
RUN mode
When downloaded to
CPU Unit
Not allowed.
Do not check.
When downloaded to
CPU Unit
Not allowed.
CS/CJ/NSJCJ2 Series Instructions Reference Manual(W474)
4 Controller Setup
Parameter
Security Setting
4-2-3
Description
Set value
Default
Update timing
Changes in
RUN mode
System Service Execution Interval
[ms]
Sets the interval of system service execution.
10 ms to 1 s
10 ms
When downloaded to
CPU Unit
Not allowed.
System Service Execution Time
Ratio [%]
Sets the ratio of execution for monitoring system services in relation
to overall processing of
the CPU Unit.
5% to 50%
10%
When downloaded to
CPU Unit
Not allowed.
Write Protec- Automatically enables
tion at Startup write protection when
you turn ON the power
supply to the Controller.
Do not use.
Do not use.
When power
is turned ON
Supported.
Use.
Task Settings
z Task Settings
4-2 Initial Settings for the PLC Function Module
System Service Monitoring Settings
Setting
group
4
The Task Settings are used to add and set up tasks.
4-2-3 Task Settings
Parameter
Task Type
Setting
group
Description
Sets the task type.
Update
timing
Changes in
RUN mode
Set value
Default
Priority-4 primary periodic
task
Priority-4 primary periodic
task
When downloaded to
CPU Unit
Not allowed.
Automatically
set according
to the task
type.
Primary periodic task: 4
When downloaded to
CPU Unit
Not allowed.
Text string
PrimaryTask
When downloaded to
CPU Unit
Not allowed.
Priority-16
periodic task
Priority-17
periodic task
Priority-18
periodic task
Execution Pri- Sets the task execution
ority
priority.
Task Name
Sets the task name.
CS/CJ/NSJCJ2 Series Instructions Reference Manual(W474)
4-5
4 Controller Setup
Setting
group
Parameter
Period/Execution Conditions
Description
Sets the task period.
Set value
Default
Primary periodic task:
500 µs, 1 ms,
2 ms, or 4 ms
Primary periodic task:
1 ms
Periodic
tasks: 1 ms,
2 ms, 3 ms,
4 ms, 5 ms,
8 ms, 10 ms,
15 ms, 20 ms,
25 ms, 30 ms,
40 ms, 50 ms,
60 ms, 75 ms,
or 100 ms
Update
timing
Changes in
RUN mode
When downloaded to
CPU Unit
Not allowed.
Periodic
tasks: 10 ms
Task Period
Exceeded
Detection
Sets whether to detect
an error when the task
period is exceeded.
• Detect.
(Minor fault
level Controller error
generated.)
• Do not
detect.
(Store an
observation level
log record.)
Detect
When downloaded to
CPU Unit
Not allowed.
Task Timeout
Detection
Time
Sets the task execution
timeout time. A Task
Execution Timeout Error
occurs when the timeout time is exceeded.
Primary periodic task and
periodic
tasks: Task
period × 1 to
Task period ×
5
Primary periodic task and
periodic
tasks:
5 periods
When downloaded to
CPU Unit
Not allowed.
Variable
Access Time
[%]
Sets the percentage of
the task period to assign
to variable access from
outside the Controller.
1% to 50%
3%
When downloaded to
CPU Unit
Not allowed.
z I/O Control Task Settings
The I/O Control Task Settings are used to set the timing of refresh execution of inputs and outputs.
4-6
CS/CJ/NSJCJ2 Series Instructions Reference Manual(W474)
4 Controller Setup
Parameter
Set value
Sets the task to use to
refresh the specified Units
or slaves.
PrimaryTask or
PeriodicTask
Default
Changes in
RUN mode
Update timing
PrimaryTask
When downloaded to CPU
Unit
Not allowed.
z Program Assignment Settings
The Program Assignment Settings are used to assign the programs to tasks and set the program
execution order.
4-2 Initial Settings for the PLC Function Module
Task Name
Description
4
Description
Set value
Program Execution Order
Assigns the programs to the
specified tasks and sets the
order of program execution
within the tasks.
Assign the programs in the
order to execute
them from top to
bottom.
Default
Update timing
Program0
When downloaded to CPU
Unit
Changes in
RUN mode
4-2-3 Task Settings
Parameter
Not allowed.
z Settings for Exclusive Control of Variables in Tasks
The Settings for Exclusive Control of Variables in Tasks are used to set the tasks that refresh specified global variables and the tasks that access specified global variables.
Item
Each Task
Parameter
Description
Variables to
be refreshed
Sets the variables to refresh in the
primary periodic task or periodic
task.
Data Type
Sets the data type of variable.
Variable Com- Sets a comment for the variable.
ment
Accessing
Task
Set
value
Default
None
Update timing
When downloaded to
CPU Unit
Changes in
RUN mode
Not allowed.
None
None
Sets the tasks that access the variable.
CS/CJ/NSJCJ2 Series Instructions Reference Manual(W474)
4-7
4 Controller Setup
z Task Execution Status Monitor
The Task Execution Status Monitor displays the execution status of the programs.
z Task Execution Time Monitor
The Task Execution Time Monitor displays the execution times of the tasks.
4-8
CS/CJ/NSJCJ2 Series Instructions Reference Manual(W474)
4 Controller Setup
4-2-4
Unit Configuration and Unit Setup
4-2 Initial Settings for the PLC Function Module
z Unit Information
4
4-2-4 Unit Configuration and Unit Setup
z Settings for All Units
Set the device names.
Device names are automatically created when Units are added in the Unit Editor.
Default names: “J” followed by serial numbers that start from 01
We recommend that you change the name to one that is suitable to the device.
Additional Information
The device names that are set here are placed before the I/O port name when device variables
are automatically created.
z Special Units
Set the unit numbers of the Special Units.
Precautions for Correct Use
Make sure you set the same unit numbers as the unit numbers that are set on the rotary
switches on the front of the Special Units. If they are not the same, operation will be according to
the unit numbers that are set on the front-panel rotary switches.
CS/CJ/NSJCJ2 Series Instructions Reference Manual(W474)
4-9
4 Controller Setup
z Basic I/O Units
The following settings are made in the Unit Information of the Basic I/O Units.
Access point
Unit Information
Setting
group
Basic Input
Unit Input
Response
Note Set the Time
information for
each
slot.
4-10
Set
values
Description
Sets the input response time (ON
response time = OFF response
time) of the Basic Input Unit. You
can set this value in increments from
0 to 32 ms. You can increase the
value to reduce chattering and the
effects of external noise. If you
decrease the value, shorter input
pulses are received (but the pulses
must be longer than the task
period).
No filter
0.5 ms,
1 ms,
2 ms,
4 ms,
8 ms,
16 ms,
or
32 ms
Default
8 ms
Update timing
When power
is turned ON
or the CPU
Unit is reset
Changes in
RUN mode
Not allowed.
CS/CJ/NSJCJ2 Series Instructions Reference Manual(W474)
4 Controller Setup
4-3
Initial Settings for Special Units
This section describes the initial settings that are required for the Special Units.
Method 1: Setting from the Unit Setting Pane of the Sysmac Studio
1
2
Select the Unit in the Unit Configuration and Setup.
Specify the settings in the Unit Settings Tab Page shown below.
4-3 Initial Settings for Special Units
You can use any of the following methods to set the initial settings of the Special Units.
4
3
Connect the CPU Unit online and transfer the settings to the CPU Unit.
Method 2: Using the Sysmac Studio to Specify Initial Settings for the
I/O Ports in the I/O Map
1
2
Use the I/O Map in the Sysmac Studio to set values for the I/O ports.
Restart the Unit, reset the Controller, or cycle the power supply to the Controller.
Method 3: Using the Sysmac Studio to Specify Initial Settings for the
Device Variables of the CJ-series Units
1
Use the Sysmac Studio to specify the initial values for the device variables of the CJ-series
Units.
CJ2 CPU Unit Hardware User’s Manual
4-11
4 Controller Setup
2
Download the variable table from the Sysmac Studio to the CPU Unit.
Select the Clear the present values of variables with Retain attribute Check Box.
3
Restart the Unit, reset the Controller, or cycle the power supply to the Controller.
Method 4: Using Instructions to Set the Device Variables for the CJseries Units
1
Set the values for the device variables for the CJ-series Unit at the start of operation from the
user program (e.g., use the MOVE instruction) and then restart the Unit.
Example:
MOVE
P_First_RunMode
First RUN
Period Flag
UINT#16#0101
EN
ENO
In
Out
Unit0_RangeCfg
Instance
ResetUnit
_SIO_No00
Execute
Done
UnitNo
Busy
Error
ErrorID
Instance.Done
Processing after restarting
Precautions for Safe Use
When you restart a Special Unit after you change the settings, confirm the safety of the devices
at the connection target before you restart the Unit.
4-12
CS/CJ/NSJCJ2 Series Instructions Reference Manual(W474)
4 Controller Setup
Initial Settings for the Motion Control
Function Module
This section describes the initial settings that are required for the MC Function Module.
4-4-1
Introduction
The initial settings for the Motion Control Function Module are called motion control parameters. Motion
control parameters include the following parameters.
• Axis Parameters: Settings for single-axis control
• Axes Group Parameters: Settings for multi-axes coordinated control
Sysmac Studio
Set the parameters in the
Motion Control Setup.
NJ-series CPU Unit
4-4 Initial Settings for the Motion Control Function Module
4-4
4
Built-in nonvolatile memory
Download.
Upload.
Axis Parameter Settings
Axes group
parameter settings
When power is turned ON
When downloaded.
Read and check
data.
User program
MC_Write instruction
4-4-1 Introduction
Motion control
parameters
Main memory
Axis Parameter Settings
Axes Group
Parameter Settings
Temporarily changes
some parameters.
CS/CJ/NSJCJ2 Series Instructions Reference Manual(W474)
4-13
4 Controller Setup
4-4-2
Setting Methods
You can use either of the following methods to set motion control parameters.
Method 1: Setting the Motion Control Setup in the Sysmac Studio
Right-click Axis Settings from under Configurations and Setup - Motion Control Setup in the Sysmac Studio and make the settings in the Axis Setting Table.
Download the motion control parameters to the CPU Unit to save them in the non-volatile memory in
the CPU Unit. The downloaded settings are enabled when the power is turned ON or a download is performed.
Method 2: Setting with the MC_Write Instruction
You can temporarily overwrite some motion control parameters with the MC_Write instruction.
For details, refer to the NJ-series Instructions Reference Manual (Cat. No. W502).
4-14
CS/CJ/NSJCJ2 Series Instructions Reference Manual(W474)
4 Controller Setup
Initial Settings for the EtherCAT
Master Function Module
This section describes the initial settings that are required for the EtherCAT Master Function Module.
The initial settings for the EtherCAT Master Function Module are listed below.
• Device names
• Total Cable Length
• Fail-soft Operation Settings
• Wait Time for Slave Startup
• PDO Communications Timeout Detection Count
• Revision Check Method
• Serial Number Check Method
Double-click EtherCAT under Configurations and Setup and then select the master on the Sysmac
Studio. The Initial Setting Tab Page for the EtherCAT Master Function Module is displayed.
Refer to the NJ-series CPU Unit Built-in EtherCAT Port User’s Manual (Cat. No. W505) for details.
CJ2 CPU Unit Hardware User’s Manual
4-15
4-5 Initial Settings for the EtherCAT Master Function Module
4-5
4
4 Controller Setup
4-6
Initial Settings for the EtherNet/IP
Function Module
This section describes the initial settings that are required for the EtherNet/IP Function Module.
The initial settings for the EtherNet/IP Function Module are listed below.
• TCP/IP Settings
• Link Settings
• FTP Settings
• NTP Settings
• SNMP Settings
• SNMP Trap Settings
• FINS Settings
Select Configurations and Setup − Controller Setup − Built-in EtherNet/IP Port Settings on the
Sysmac Studio to make these settings
Refer to the NJ-series CPU Unit Built-in EtherNet/IP User’s Manual (Cat. No. W506) for details.
4-16
CS/CJ/NSJCJ2 Series Instructions Reference Manual(W474)
Designing Tasks
This section describes the task system and types of tasks.
5-1 Overview of Task Designing Procedure . . . . . . . . . . . . . . . . . . . . . . . . . . . . 5-2
5-2 Task System . . . . . . . . . . . . . . . . . . . . . . . . . . . . . . . . . . . . . . . . . . . . . . . . . . 5-5
5-2-1
5-2-2
5-2-3
5-2-4
5-2-5
5-2-6
5-2-7
5-2-8
5-2-9
5-2-10
5-2-11
5-2-12
Introduction . . . . . . . . . . . . . . . . . . . . . . . . . . . . . . . . . . . . . . . . . . . . . . . . . . . 5-5
Specifications . . . . . . . . . . . . . . . . . . . . . . . . . . . . . . . . . . . . . . . . . . . . . . . . . . 5-6
Basic Operation of Tasks . . . . . . . . . . . . . . . . . . . . . . . . . . . . . . . . . . . . . . . . . 5-6
Assigning I/O Refreshing to Tasks . . . . . . . . . . . . . . . . . . . . . . . . . . . . . . . . . 5-12
Assigning Tasks to Programs . . . . . . . . . . . . . . . . . . . . . . . . . . . . . . . . . . . . 5-13
Parameters for Primary Periodic Task and Periodic Tasks . . . . . . . . . . . . . . 5-13
Ensuring Concurrency of Variable Values between Tasks . . . . . . . . . . . . . . . 5-15
Synchronizing Variable Access from Outside the Controller
with Task Execution . . . . . . . . . . . . . . . . . . . . . . . . . . . . . . . . . . . . . . . . . . . . 5-18
Instructions Related to Tasks . . . . . . . . . . . . . . . . . . . . . . . . . . . . . . . . . . . . . 5-19
System-defined Variables Related to Tasks . . . . . . . . . . . . . . . . . . . . . . . . . 5-19
Errors Related to Tasks . . . . . . . . . . . . . . . . . . . . . . . . . . . . . . . . . . . . . . . . . 5-20
Monitoring Task Execution Status and Task Execution Times . . . . . . . . . . . . 5-23
5-3 Task Design Example and I/O Response Times . . . . . . . . . . . . . . . . . . . . 5-26
5-3-1
5-3-2
5-3-3
5-3-4
Checking the Task Execution Time . . . . . . . . . . . . . . . . . . . . . . . . . . . . . . . .
Checking the System Service Monitoring Settings . . . . . . . . . . . . . . . . . . . .
Examples of Task Design . . . . . . . . . . . . . . . . . . . . . . . . . . . . . . . . . . . . . . .
System Input and Output Response Times . . . . . . . . . . . . . . . . . . . . . . . . . .
NJ-series CPU Unit Software User’s Manual (W501)
5-26
5-27
5-28
5-29
5-1
5
5 Designing Tasks
5-1
Overview of Task Designing
Procedure
This section provides an overview of the task designing procedure.
The shaded steps in the overall procedure that is shown below are related to the task designing procedure.
Step 1. Software Design
Step 1-1 I/O Processing Design
Step 1-2 Designing Tasks
Step 1-3 Designing Programs
Step 2. Software Setups and Programming
Step 2-1 Slave and Unit Configurations
Step 2-2 Controller Setup
Step 2-3 Programming
Step 2-4 Offline Debugging
Step 3. Mounting and Setting Hardware
Step 4. Wiring
Step 5. Confirming Operation and Starting Actual System
Operation
Refer to 1-3 Overall Operating Procedure for the NJ-series Controller for details.
5-2
NJ-series CPU Unit Software User’s Manual (W501)
5 Designing Tasks
Designing the Tasks
Reference
z Design the task configuration.
5-2-3 Basic
Operation of
Design the task configuration based on the I/O response performance that
Tasks
is required by the controlled devices.
5-2-4 Assigning I/O Refreshing to Tasks
Devices (slaves/Units)
Primary periodic task
Priority-16 Periodic Task
Assign the slaves and Units to
the task for I/O refreshing.
z Determine which programs to assign to the primary periodic
task, and to the priority-16 to priority-18 periodic tasks.
5-2-5 Assigning Tasks to
Programs
z Design the exclusive control methods for variables between
tasks.
5-2-7 Ensuring
Concurrency of
Variable Values
Design the exclusive control methods for variables between tasks when the between Tasks
same global variables are used in different tasks.
z Design the tasks to access variables from outside of the
Controller.
5-2-8 Synchronizing Variable
Access from
Design the tasks to enable synchronizing accessing variables in the CPU Outside the
Unit from outside of the Controller (including EtherNet/IP tag data links) Controller with
with the execution of a program in a specific task.
Task Execution
Task Settings on the Sysmac Studio
Setting the Tasks
Reference
z Initial Settings for the PLC Function Module:
4-2 Initial Settings for the
Task Settings: Task Periods, I/O Settings, Program Assignments, Task
PLC Function
Interface Settings, and other settings
Module
NJ-series CPU Unit Software User’s Manual (W501)
5-3
5-1 Overview of Task Designing Procedure
z Determine whether to use the primary periodic task or the
priority-16 periodic task for the I/O refreshing of each Unit and
slave.
5-3 Task
Design Example and I/O
Response
Times
5
5 Designing Tasks
Offline Debugging with the Sysmac Studio
Desktop Operation Check
Reference
z Perform desktop debugging of sequence control and motion
control with the Simulator (virtual controller).
z Monitor the task execution times in the Task Execution Time
Monitor Display.
Section 7 Simulation, Transferring Projects to
the Physical
CPU Unit, and
Operation
5-2-12 Monitoring Task Execution Status and
Task Execution
Times
5-4
NJ-series CPU Unit Software User’s Manual (W501)
5 Designing Tasks
5-2
Task System
This section describes the task system used by NJ-series Controllers.
5-2-1
Introduction
Tasks
Tasks are used to assign an execution condition and execution order to a series of processes, such as
I/O refreshing and user program execution.
There are two kinds of tasks, as shown in the following table. They are defined by their execution conditions and execution priorities.
Primary
periodic
task
1
Task execution priority
4 (fixed)
0 to 3
16, 17, or 18
Definition
Main processing content
The primary periodic task is executed
once every task period. It has higher priority than any other task. Motion control
and EtherCAT communications are executed on the primary periodic task
period.
I/O refreshing, user program execution, and
motion control
The periodic tasks are executed once
every task period.
The processing that can
be performed depends on
the task execution priority.
5
• Execution priority 16:
I/O refreshing and user
program execution
• Execution priority 17 or
18: User program execution
The CPU Unit periodically executes both the primary periodic task and periodic tasks.
(The interval in which the CPU Unit executes the primary periodic task or a periodic task is called the
task period.)
Primary periodic task
Fixed
period
Task period
Periodic task
Fixed period (an
integer multiple of
the task period of
the primary
periodic task)
Task period
From 1 to 128 programs can be assigned to one task. The programs that are assigned to a task are
executed in the order that they are assigned. Execution of the all of the programs assigned to each task
is called user program execution.
Exchanging data with CJ-series Units or EtherCAT slaves is called I/O refreshing.
You can assign I/O refreshing for each slave and Unit to the primary periodic task or priority-16 periodic
task. (By default, refreshing for all slaves and Units is assigned to the primary periodic task.)
NJ-series CPU Unit Software User’s Manual (W501)
5-5
5-2-1 Introduction
Periodic
tasks
Number
of tasks
5-2 Task System
Type of
task
5 Designing Tasks
Task Configurations
Primary periodic task
I/O refreshing
User program execution
Priority-16 periodic task
I/O refreshing
User program execution
Priority-17 periodic task
Motion control
User program execution
Examples of Task Separation
For example, if you separate the tasks by the I/O response performance that is required by the controlled devices, you can achieve the control performance that is required for devices that need highspeed response and execute programming that requires more processing time in separate tasks.
5-2-2
Specifications
Item
Specification
Type of task
• Primary periodic task
• Periodic task
Numbers of tasks
• Primary periodic task: 1
• Periodic tasks: 0 to 3 tasks
Number of programs per
task
128 max.
Task period of the primary
periodic task
500 µs, 1 ms, 2 ms, or 4 ms
Task periods of periodic
tasks
Set the task period of each periodic task to an integer multiple of the task period of
the primary periodic task.
Any of the following can be set.
Task period of the
primary periodic
task
5-2-3
Task periods that you can set for periodic
tasks
500 µs
1 ms, 2 ms, 3 ms, 4 ms, 5 ms, 8 ms, 10 ms, 15 ms,
20 ms, 25 ms, 30 ms, 40 ms, 50 ms, 60 ms,
75 ms, or 100 ms
1 ms
1 ms, 2 ms, 3 ms, 4 ms, 5 ms, 8 ms, 10 ms, 15 ms,
20 ms, 25 ms, 30 ms, 40 ms, 50 ms, 60 ms,
75 ms, or 100 ms
2 ms
2 ms, 4 ms, 8 ms, 10 ms, 20 ms, 30 ms, 40 ms,
50 ms, 60 ms, or 100 ms
4 ms
4 ms, 8 ms, 20 ms, 40 ms, 60 ms, or 100 ms
Basic Operation of Tasks
Task Execution Priority
The CPU Unit executes the task with the highest execution priority first.
If the execution conditions are met for another task with a higher execution priority while a task is under
execution, the task with the higher execution priority is given priority in execution.
5-6
NJ-series CPU Unit Software User’s Manual (W501)
5 Designing Tasks
• The primary periodic task has the highest execution priority. The Controller executes it with a higher
priority than any other task.
• There are three execution priority levels for periodic tasks.
High
Numbers of tasks
4 (fixed)
Primary
periodic task
1
Priority-16
periodic task
0 or 1
16
Execution
priority
(0 to 63)
17
18
Priority-17
periodic task
0 or 1
Priority-18
periodic task
0 or 1
Overall Operation
Tasks operate with the task period of the primary periodic task (called the primary period) as the standard period.
• The primary periodic task and periodic tasks are processed during the task periods even in PROGRAM mode. The user program is executed in RUN mode.
• I/O refreshing is executed according to the task periods.
• The CPU Unit executes system services, such as communications processing, during the unused
time between executions of all of the tasks.
z Primary Periodic Task Only
Primary period
Execution priority
Primary period
High
Primary
periodic
task
IO
UPG
System
services
MC
IO
UPG
SS
MC
SS
A double line means
that all processing for
that task has been
completed.
Low
A dotted line represents a transition to another task.
IO: Indicates I/O refreshing (data outputs and then data inputs).
UPG: User program execution.
MC: Indicates motion control.
SS: Indicates system services.
NJ-series CPU Unit Software User’s Manual (W501)
5-7
5
5-2-3 Basic Operation of Tasks
• The Controller executes a periodic task once during multiple primary periods.
For example, if the task period of the primary periodic task is set to 1 ms and the task period of the
priority-16 periodic task is set to 4 ms, the priority-16 periodic task is executed once while the primary
periodic task is executed four times.
5-2 Task System
Low
5 Designing Tasks
z Primary Periodic Task, Priority-16 Periodic Task, and Priority-17 Periodic Task
Primary period
Execution priority
High
Primary
periodic task
IO UPG MC
Primary period
Primary period
Primary period
IO UPG MC
IO UPG MC
Primary period
IO UPG MC
IO UPG MC
Task period
Priority-16
periodic task
IO UPG
IO UPG
UPG
Task period
Priority-17
periodic task
UPG
UPG
System
services
SS
Low
Note The execution order of tasks does not depend on the above execution priority order alone. For details, refer
to Task Execution Order, below.
Task Execution Order
The execution order of tasks does not depend only on the execution priority order. A task with a lower
execution priority is sometimes executed even during execution of a task with a higher execution priority.
The execution order of tasks depends only on the following points.
• The primary periodic task is never interrupted to execute any other task.
• When the execution of the primary periodic task is completed, execution of the priority-16 periodic
task is started.
Precautions for Correct Use
When you exchange data between tasks, use exclusive control of variables between the tasks to
ensure proper operation. Refer to 5-2-7 Ensuring Concurrency of Variable Values between Tasks
for details.
Operating Mode
Tasks are executed in both RUN mode and PROGRAM mode. User program execution is not performed
in PROGRAM mode.
Processing of Tasks and System Services
z Primary Periodic Task
The primary periodic task has the highest execution priority. It executes processes with high speed
and high precision.
In every period, this task performs system common processing, I/O refreshing, user program execution, and motion control. Unlike periodic tasks, the primary periodic task performs motion control
processing (MC).
5-8
NJ-series CPU Unit Software User’s Manual (W501)
5 Designing Tasks
Task period*1 = Primary period (fixed)
Task execution time*2 (varies)
User program
execution
System
common
processing 2
System
common
processing 1
Input data
processing
Output data
processing
Refreshing
Motion
control
Control processing
I/O refreshing
*1: Task period
The CPU Unit executes tasks in this fixed period. This is a preset, fixed time.
*2: Task execution time
This is the actual time it takes from the point that the execution condition is
met until execution is completed.
Processing
Processing contents
• Output refresh data is created for Output Units that refresh I/O.
• If forced refreshing is set, the forced refreshing values are reflected in the output
refresh data.
Refreshing
• This process exchanges data with I/O.
Input data
processing
• Input refresh data is loaded from Input Units that refresh I/O.
• If forced refreshing is set, the forced refreshing values are reflected in the input
refresh data that was read.
System common processing 1
• Processing for exclusive control of variables in tasks (when accessing tasks are
set)
• Motion input processing is performed.
• Data trace processing (sampling and trigger checking) is performed.
User program execution
• Programs assigned to tasks are executed in the order that they are assigned.
Motion control*
• The motion control commands from the motion control instructions in the user
program execution are executed.
• Processing the motion outputs for I/O refreshing in the next primary periodic task.
System common processing 2
• Processing for exclusive control of variables in tasks (when refreshing tasks are
set)
• Processing for variables accessed from outside of the Controller is performed to
maintain concurrency with task execution (executed for the variable access time
that is set in the Task Settings).
Note If there is communications processing for EtherNet/IP tag data links and
refreshing tasks are set for the tags (i.e., variables with a Network Publish
attribute), variable access processing is performed as part of system common
processing 2.
* When there are motion control instructions in user program execution in the primary periodic task, the CPU Unit
executes the results from those instructions immediately afterward in motion control processing. The CPU Unit
outputs the results to the Servo Drives during I/O refreshing in the next primary periodic task.
Task period = Primary period (fixed)
When the CPU Unit executes a motion
control instruction, it executes the result of
that instruction in motion control processing
immediately afterward.
Refreshing
Input data
processing
Output data
processing
MC_
System common
processing 2
User
program
execution
Motion
control
Refreshing
I/O refreshing
Control processing
Input data
processing
System
common
processing 1
Output data
processing
I/O refreshing
During output data processing in the next primary
period, the CPU Unit sends the results of motion
control processing to the Servo Drive via EtherCAT.
When there is a motion control instruction in user program execution in the periodic task, the CPU
Unit executes the result from that instruction in the motion control processing (MC) of the next primary periodic task.
For details, refer to 5-3-4 System Input and Output Response Times.
NJ-series CPU Unit Software User’s Manual (W501)
5-9
5
5-2-3 Basic Operation of Tasks
Output data
processing
5-2 Task System
I/O refreshing
5 Designing Tasks
z Periodic Tasks
A periodic task executes its programs every task period, which is an integer multiple of the primary
period. You can use 0 to 3 periodic tasks.
The priority-16 periodic task can also refresh I/O.
Processing for periodic tasks that do not control I/O is different from processing for periodic tasks
that do control I/O.
Periodic Tasks That Do Not Control I/O
Task period (fixed)
Task execution time (varies)
* The Controller will temporarily interrupt the
execution of a periodic task in order to
execute a task with a higher execution
priority.
*
*
User
program
execution
System
common
processing 2
System
common
processing 1
Control processing
Processing
Processing contents
System common processing 1
• Processing for exclusive control of variables in tasks (when accessing
tasks are set)
• Data trace processing (sampling and trigger checking) is performed.
User program execution
• Programs assigned to tasks are executed in the order that they are
assigned.
System common processing 2
• Processing for exclusive control of variables in tasks (when refreshing
tasks are set)
• Processing for variables accessed from outside of the Controller is performed to maintain concurrency with task execution (executed for the
variable access time that is set in the Task Settings).
Note If there is communications processing for EtherNet/IP tag data links
and refreshing tasks are set for the tags (i.e., variables with a Network Publish attribute), variable access processing is performed as
part of system common processing 2.
Periodic Tasks That Control I/O
Task period (fixed)
Task execution time (varies)
*
*
Processing
I/O refreshing
System
common
processing 1
Input data
processing
Output data
processing
Refreshing
User
program
execution
System
common
processing 2
Control processing
I/O refreshing
5-10
* The Controller will temporarily
interrupt the execution of a
periodic task in order to execute a
task with a higher execution
priority.
Processing contents
Output data
processing
• Output refresh data is created for Output Units that refresh I/O.
• If forced refreshing is set, the forced refreshing values are reflected in the
output refresh data.
Refreshing
• This process exchanges data with I/O.
Input data
processing
• Input refresh data is loaded from Input Units that refresh I/O.
• If forced refreshing is set, the forced refreshing values are reflected in the
input refresh data that was read.
NJ-series CPU Unit Software User’s Manual (W501)
5 Designing Tasks
Processing
Processing contents
System common processing
1
• Processing for exclusive control of variables in tasks (when accessing
tasks are set)
• Data trace processing (sampling and trigger checking) is performed.
User program execution
• Programs assigned to tasks are executed in the order that they are
assigned.
System common processing
2
• Processing for exclusive control of variables in tasks (when refreshing
tasks are set)
• Processing for variables accessed from outside of the Controller is performed to maintain concurrency with task execution (executed for the variable access time that is set in the Task Settings).
Note If there is communications processing for EtherNet/IP tag data links and
refreshing tasks are set for the tags (i.e., variables with a Network Publish attribute), variable access processing is performed as part of system common processing 2.
System services are the processes other than task processing that the CPU Unit executes. System
services include the following processes.
System service
Description
• Processing of service requests from the Sysmac Studio or an HMI, such
as CIP commands
Built-in EtherNet/IP port service
• Processing of message service requests, such as CIP commands, from
the Sysmac Studio, an HMI, host computers, or other Controllers
• EtherNet/IP tag data link communications processing
Note If there is communications processing for EtherNet/IP tag data links
and refreshing tasks are set for the tags (i.e., variables with a Network
Publish attribute), variable access processing is performed as part of
system common processing 2 for the task that is set as the refreshing
task and not as a system service.
Service for CJ-series Special
Units
• Event servicing for CJ-series Special Units
• Execution of communications instructions (CIP)
Note The CPU Unit exchanges data between CJ-series Special Units and
their allocated memory words during I/O refreshing.
SD Memory Card service
• Access from FTP client
• SD Memory Card operations from the Sysmac Studio
• Execution of SD Memory Card instructions
Self-diagnosis
• Hardware error detection
System services are executed during the unused time between executions of all of the tasks, as
shown below.
High
Primary
periodic task
Primary period
IO UPG MC
IO UPG MC
IO UPG MC
IO UPG MC
IO UPG MC
Task period
Priority-16
periodic task
IO UPG
IO UPG
Task period
Low
Priority-17
periodic task
UPG
System services are executed
during the unused time between
executions of the tasks.
System
services
NJ-series CPU Unit Software User’s Manual (W501)
5-11
5
5-2-3 Basic Operation of Tasks
USB port service
Execution priority
5-2 Task System
z System Services
5 Designing Tasks
System Service Monitoring Settings
You can use the Basic Settings in the Operation Settings of the Sysmac Studio to set the execution
time interval and execution time percentage of monitoring for system services.
Access
point
Operation
Settings,
Operation
Settings
Tab, Basic
Settings
Setting
group
System
Service
Monitoring Settings
Setting [unit]
Set
values
Description
Default
Update
timing
Changes
in RUN
mode
System Service Execution Interval
[ms]
Sets the interval of
system service
execution.
10 ms
to 1 s
10 ms
When
transferred to
CPU Unit
Not
allowed.
System Service Execution Time
Ratio [%]
Sets the ratio for
monitoring system
service execution.
5% to
50%
10%
When
transferred to
CPU Unit
Not
allowed.
Precautions for Correct Use
• The System Service Monitoring Settings are used to monitor whether the specified system
service execution time can be obtained. System services will not necessarily be executed for
the specified time.
• To increase the system service processing time, increase the task period or take other steps to
increase the unused time between task execution.
• If the system service monitoring setting is too high for the unused time between task execution, an Insufficient System Service Time Error occurs and user program execution stops. Set
system service monitoring setting to the minimum value that is required to meet the response
performance for the required system services.
• Depending on the execution of system service processing, a Task Period Exceeded Error may
occur for the priority-17 or priority-18 periodic task. Design the tasks so that the task processing for the priority-17 and priority-18 periodic tasks is completed even if system service processing is performed for the times that is specified in the system service monitoring setting.
5-2-4
Assigning I/O Refreshing to Tasks
CJ-series Units and EtherCAT slaves are assigned to the tasks. You can assign them to the following
tasks.
Classification
Assigned
unit
CJ-series
Units
By Unit
EtherCAT
slaves
By slave
I/O refresh target
Basic I/O Units
Tasks to which assignment is possible
Primary periodic task and priority-16 periodic task
Special I/O Units
CPU Bus Units
Slaves assigned to axes
Primary periodic task
Other slaves
Primary periodic task and priority-16 periodic task
z Sysmac Studio Setting Procedure
Set the tasks in which to perform I/O refreshing for the slaves and Units in the I/O Control Task Settings on the Task Settings Tab Page of the Sysmac Studio.
For details, refer to I/O Control Task Settings on page 4-6.
5-12
NJ-series CPU Unit Software User’s Manual (W501)
5 Designing Tasks
Precautions for Safe Use
If two different function modules are used together, such as when you use CJ-series Basic Output Units and EtherCAT slave outputs, take suitable measures in the user program and external
controls to ensure that safety is maintained in the controlled system if one of the function modules stops.
The relevant outputs will stop if a partial fault level Controller error occurs in one of the function
modules.
Refer to 12-1 Operation after an Error for details on partial fault level Controller errors.
Accessing I/O from the User Program
You use device variables to access I/O ports from the user program. Access the device variables
from a program in the task that is set as the I/O control task.
5-2 Task System
5-2-5
Assigning Tasks to Programs
You assign the programs to execute to tasks. (You can assign up to 128 programs to one task.)
Order of Program Execution
5
The order of execution of the programs in a task is set with the Sysmac Studio.
Assign programs to tasks and set the order of program execution within the tasks in the Program
Assignment Settings on the Task Settings Tab Page of the Sysmac Studio.
For details, refer to 4-2-3 Task Settings.
POUs That You Can Assign to Tasks
From 0 to 128 programs can be assigned to one task.
You cannot assign the same program to more than one task.
5-2-6
Parameters for Primary Periodic Task and Periodic Tasks
The parameters for primary periodic task and periodic tasks are given below.
NJ-series CPU Unit Software User’s Manual (W501)
5-13
5-2-5 Assigning Tasks to Programs
z Sysmac Studio Setting Procedure
5 Designing Tasks
Parameters for Primary Periodic Task
Parameter
Task Type
Execution priority
Task Name
Period/
Execution Conditions
Task period
Setting range
Default
Specify the primary periodic task.
---
Always 4.
---
Text string
---
500 µs, 1 ms, 2 ms, or 4 ms
1 ms
Specify whether to detect an error if
the task execution time exceeds the
specified task period.
Detect.
Update
timing
When
transferred to
CPU Unit
Changes
in RUN
mode
Not
allowed.
* The process
data communications cycle in
the EtherCAT
settings will be
the same as this
period.
Task Period Exceeded Detection
• Detect (a minor fault level Controller
error is generated).
• Do not detect (an observation is
recorded in event log).
Refer to Task Period Exceeded Error
on page 5-21 for details.
Task Timeout Detection Time
Set the time to detect timeouts if task
execution does not end, e.g., if there is
an infinite loop. Set a multiple of the
task period.
1 to 5
Refer to Task Execution Timeout Error
on page 5-22 for details.
5
Variable Access Time [%]
Set the percentage of the task period
to assign to variable access.
1% to 50%
Refer to Variable Access Time Ratio
on page 5-19 for details.
3%
Parameters for Periodic Tasks
Parameter
Task Type
Setting range
Default
You can set any of the following.
---
Priority-16 periodic task
Priority-17 periodic task
Update
timing
When
transferred to
CPU Unit
Changes
in RUN
mode
Not
allowed.
Priority-18 periodic task
Execution priority
Automatically set to 16, 17, or 18.
Text string
---
Task period
Refer to 5-2-2 Specifications
10 ms
The same as for the primary periodic
task.
The same
as for the
primary
periodic
task.
Task Name
Period/
Execution
Conditions
Task Period Exceeded Detection
Task Timeout Detection Time
Variable Access Time [%]
5-14
---
NJ-series CPU Unit Software User’s Manual (W501)
5 Designing Tasks
z Sysmac Studio Setting Procedure
Add and set the tasks in the Task Settings under Configurations and Setup on the Sysmac Studio. For details, refer to Task Settings on page 4-5.
5-2-7
Ensuring Concurrency of Variable Values between Tasks
If more than one task reads or writes the same global variable, you can use either of the following
two methods to ensure the concurrency of the value of the global variable between the tasks.
Method 1: Write the global variable from only one task and read the variable from the other tasks.
Use the settings for exclusive control of variables in tasks.
Method 2: Lock other tasks so that they cannot write to the global variable.
Use the task exclusive control instructions.
Method 1: Settings for Exclusive Control of Variables in Tasks
You can specify the task that refreshes a global variable and the tasks that access the global variable. This ensures the concurrency of the value of the global variable from the point of view of the
tasks that access the variable.
A single task is set to write the value of a specified global variable. That task is called the refreshing
task. If a refreshing task is specified, other tasks cannot write the value of the global variable.
The tasks that read the value of the global variable (called accessing tasks) are also specified in
advance.
Read only
Accessing
task: Task B
Refreshing
Read/write
task: Task A
Global variable
Refreshing task is specified.
Refreshing task: Task A
Read only
Accessing
task: Task C
z Application Example
The refreshing task specification is used to ensure the concurrency of the value of a global variable
within a periodic task when the variable is written in the primary periodic task.
Refreshing task
Accessing task
Program
Program
Read/write
External variable GVar1
Read only
Global variable GVar1
External variable GVar1
The most recent value of the
variable at the end of refreshing
task execution is read at the start
of accessing task execution.
NJ-series CPU Unit Software User’s Manual (W501)
5-15
5
5-2-7 Ensuring Concurrency of Variable Values between Tasks
If a refreshing task is not specified for a global variable, the value of the variable can be written at
any time by any of the tasks, so the value will change depending on when it is read.
5-2 Task System
z Introduction
5 Designing Tasks
z System
If a refreshing task is set for a global variable, the accessing task, at the start of accessing task execution, always reads the most recent value of the variable that was written at the completion of
refreshing task execution.
Task period of task A
Refreshing
task: Task A
Task period of task A
Refreshing
task: Task A
Write
Global variable
Task period of task A
Refreshing
task: Task A
Write
Write
Value of
Global variable
variable is read.
Value of variable Global variable
is not read.
Accessing task:
Task B
Accessing task:
Task B
Value of variable
is not read.
Accessing task:
Task B
Task period of task B
This will allow you to maintain the concurrency of the values of global variables within the tasks without performing any special programming.
If an instruction that writes the value to a global variable is used in the accessing task, an error will
occur when you check the program on the Sysmac Studio.
z Restrictions
• Only one refreshing task can be set for each global variable. If it is necessary to write a global
variable from more than one task, use the task exclusive control instructions described below to
ensure concurrency.
• If you specify a refreshing task for a structure or union variable, you must specify only one refreshing task for the entire structure or union variable. You cannot specify a different refreshing task for
different structure or union members.
• If you specify a refreshing task for an array variable, you must specify only one refreshing task for
the entire array variable. You cannot specify a different refreshing task for different array elements.
z Sysmac Studio Setting Procedure
Set the global variables for which to specify refreshing tasks, and set the accessing tasks in the Settings for Exclusive Control of Variables in Tasks on the Task Settings Tab Page on the Sysmac Studio.
For details, refer to Settings for Exclusive Control of Variables in Tasks on page 4-7.
Method 2: Task Exclusive Control Instructions
Use the task exclusive control instructions (Lock and Unlock instructions) when it is necessary to
write the value of a global variable from more than one task.
The Lock and Unlock instructions are used to prevent execution of program regions between Lock
and Unlock between different tasks.
Refer to information on the Lock and Unlock instructions in the NJ-series Instructions Reference
Manual (Cat. No. W502) for details.
Example:
If execution of region 1 in task B is attempted during execution of region 1 in task A, region 1 in task
B is not executed until execution of region 1 in task A is completed, even if the execution priority of
task B is higher. Here, execution of region 1 in task A is given priority.
5-16
NJ-series CPU Unit Software User’s Manual (W501)
5 Designing Tasks
Task A
Program
Lock instruction
Global variable
Refreshed.
Task B
Higher priority
Program
Region 1
Execution is not
started until
execution of
region 1 in task A
is completed.
Unlock
Lock instruction
Region 1
Unlock
When execution of region 1 in task A is completed, region 1 in task B is executed, as shown below.
Task A
5-2 Task System
Program 1
Lock
Task B
Program 2
Refreshed.
Region 1
Global variable
Lock
Standby
Unlock
Region 2
Executed.
Global variable
5
Refreshed.
Unlock
Precautions for Correct Use
• Do not make the locked regions any longer than necessary. If the lock regions are too long, the
task execution period may be exceeded.
• Always use the Lock and Unlock instructions in a pair in the same section of the same POU.
NJ-series CPU Unit Software User’s Manual (W501)
5-17
5-2-7 Ensuring Concurrency of Variable Values between Tasks
Exclusive control of execution
is achieved with the Lock and
Unlock instructions in region 1
of program 1 and region 2 of
program 2.
5 Designing Tasks
5-2-8
Synchronizing Variable Access from Outside the Controller with
Task Execution
Introduction
To synchronize variable access from outside the Controller with task execution, make the settings for
exclusive control in tasks in the Task Settings. Also, particularly when using tag data links, set the
Variable Access Time in the Task Settings of the Sysmac Studio.
You can use the following methods to access global variables from outside of the Controller.
• EtherNet/IP tag data links
• Accessing variables from an NS-series PT
• Accessing variables from the Sysmac Studio (Synchronization with task execution is achieved
only for writing.)
• Accessing variables with CIP communications from a host computer
External device
Controller
CPU Unit
Execution of task a
To synchronize
these
Refreshing task settings
Set task a as the
refreshing task for global
variable A.
Global variable A
Variable Access Time
Ensure sufficient time to access
global variable A.
Settings for Exclusive Control of Variables in Tasks (Refreshing
Task Settings)
When accessing global variables* from outside of the Controller, you can set a specific task as the
refreshing task for those global variables to synchronize with the execution of programs in that task.
Particularly when using EtherNet/IP tag data links, always set the same task as the refreshing task for
tags in the same tag set (variables with a Network Publish attribute) to ensure concurrency between the
tags in the tag set.
* You cannot set a refreshing task for the following assigned global variables. The tasks that are given below are
automatically set as the refreshing task.
• Device variables for EtherCAT slaves: Task set as the I/O control task
• Device variables for CJ-series I/O Units: Task set as the I/O control task
• Device variables for CJ-series Special Units: Primary periodic task
• Variables with AT specifications in memory used for CJ-series Units: Primary periodic task
Sysmac Studio Setting Procedure
Set the global variables for which to specify refreshing tasks, and set the accessing tasks in the Settings for Exclusive Control of Variables in Tasks on the Task Settings Tab Page on the Sysmac Studio.
For details, refer to Settings for Exclusive Control of Variables in Tasks on page 4-7.
5-18
NJ-series CPU Unit Software User’s Manual (W501)
5 Designing Tasks
Variable Access Time Ratio
Set the variable access time for accessing variables from outside of the Controller to ensure concurrency between accessing variables from outside of the Controller and task execution.
Refer to the NJ-series CPU Unit Built-in EtherNet/IP Port User’s Manual (Cat. No. W506) for the setting
procedure for the Variable Access Time to use tag data links.
5-2-9
Instructions Related to Tasks
The following instructions are supported to read the status of the current task, to determine if execution
is in progress for other tasks, and to perform exclusive control for regional concurrency between tasks.
Instruction
GetMyTaskStatus
Instruction name
Introduction
Reads the following status of the current task.
Determine Task
Status
Determines if the specified task is currently in execution.
Lock
Lock Tasks
Starts a lock between tasks.
Unlock
Unlock Tasks
Stops a lock between tasks.
Task_IsActive
Last Task Execution Time, Maximum Task Execution Time, Minimum
Task Execution Time, Task Execution Count, Task Period Exceeded
Flag, and Task Period Exceeded Count
Execution of any other task with a
lock region with the same lock
number is disabled.
The following system-defined variables are provided for each task to show task status.
Example: The Task Period Exceeded Flag for the task named MainTask is _MainTask_Exceeded.
Do not use this variable in the user program. There may be a delay in updating it and concurrency problems in relation to the error status of the function module. It is used only to sample the task status for
data tracing from the Sysmac Studio.
You can also use the GetMyTaskStatus and Task_IsActive instructions to read task status from the user
program. You cannot access the following variables directly through system-defined variables.
Variable name
_TaskName_Active
Meaning
Task Active Flag
Description
TRUE during task execution.
Data
type
R/W
BOOL
R
FALSE when task execution is not in
progress.
_TaskName_LastExecTime
Last Task Execution Time
Gives the last execution time of the task.
TIME
R
_TaskName_MaxExecTime
Maximum Task
Execution Time
Gives the maximum value of the task execution time.
TIME
R
_TaskName_MinExecTime
Minimum Task
Execution Time
Gives the minimum value of the task execution time.
TIME
R
NJ-series CPU Unit Software User’s Manual (W501)
5-19
5
5-2-9 Instructions Related to Tasks
5-2-10 System-defined Variables Related to Tasks
5-2 Task System
Read Current Task
Status
5 Designing Tasks
Variable name
Meaning
_TaskName_ExecCount
Data
type
Description
Number of Task
Executions
Contains the number of executions of the
task.
R/W
UDINT
R
If the present value exceeds the maximum
value of the data type, the present value
returns to 0 and the count is continued.
_TaskName_Exceeded
Task Period
Exceeded Flag
TRUE if the task period was exceeded.
FALSE if task execution is completed
within the task period.
BOOL
R
_TaskName_ExceedCount
Task Period
Exceeded Count
Contains the number of times that the task
period was exceeded.
UDINT
R
If the present value exceeds the maximum
value of the data type, the present value
returns to 0 and the count is continued.
Flag Operation
z Task Active Flag (_TaskName_Active)
Task period
Primary
periodic task:
TaskA
IO UPG MC
IO UPG MC
IO UPG MC
_TaskA_Active
Task period
Priority-16
periodic task:
TaskC
IO
UPG
IO
UPG
_TaskC_Active
z Task Period Exceeded Flag (_TaskName_Exceeded)
Task period
Primary
periodic task:
TaskA
IO
IO
IO
M
C
UPG
UPG
M
C
IO
UPG
M
C
Period exceeded.
TaskA Exceeded
5-2-11 Errors Related to Tasks
This section describes the following errors.
• Task Period Exceeded Error
• Motion Control Period Exceeded Error
• Task Execution Timeout Error
• I/O Refreshing Timeout Error
• Insufficient System Service Time Error
5-20
NJ-series CPU Unit Software User’s Manual (W501)
5 Designing Tasks
Task Period Exceeded Error
A Task Period Exceeded Error occurs if the task execution time exceeds the specified task period.
This is a minor fault level Controller error. Operation continues even when this error occurs.
It can occur for the primary periodic task and periodic tasks.
Task Period Exceeded Errors can be disabled in the settings. Use the Task Period Exceeded Detection
setting in the Task Settings of the Sysmac Studio. The default setting is to detect the error.
Primary period
Primary
periodic task
IO
UPG
MC
Primary period
Primary period
IO
Primary period
IO
IO
UPG
MC
MC
UPG
Task Period Exceeded
Error occurred.
I/O is refreshed as follows if task processing is not completed within the task period.
5-2 Task System
Even if detection of Task Period Exceeded Errors is disabled, information will be output to the following
if task processing is not completed within the period: Task Period Exceeded Flag
(_TaskName_Exceeded), Task Period Exceeded Count (_TaskName_ExceedCount), Controller Error
Status (_ErrSta), and the event log.
Outputs: The values from the previous period are output.
5
Inputs: Refresh values for inputs are not reflected in the user program.
Error name
Task Period
Exceeded Error
Error level
Minor fault
Correction
Review the task settings and programs and download the project
again. Cycle the power supply or reset the CPU Unit to reset the error.
Precautions for Correct Use
If the Task Period Exceeded Error occurs, shorten the programs to fit in the task period or
increase the setting of the task period.
Motion Control Period Exceeded Error
A Motion Control Period Exceeded Error occurs if the motion control processing (MC) is not completed
within the primary period (i.e., the motion control period) twice in a row. A partial fault level Controller
error will occur in the Motion Control Function Module. A Task Period Exceeded Error will occur at the
same time.
z Motion Control Period Exceeded Error
Error name
Motion Control
Period Exceeded
Error
Error level
Minor fault
NJ-series CPU Unit Software User’s Manual (W501)
Correction
Reduce the amount of processing in the programs or increase the
control period within the range that does not adversely affect operation.
5-21
5-2-11 Errors Related to Tasks
z Task Period Exceeded Error
5 Designing Tasks
Task Execution Timeout Error
A Task Execution Timeout Error occurs if task processing is not completed within the specified Task
Execution Timeout Time.
This is a major fault level Controller error. Execution of the user program stops when the error occurs.
This error also occurs when normal task operation is not possible due to errors in program logic, such
as infinite loops.
Timeout Detection Time
Primary period
Primary
periodic task
Primary period
IO
Primary period
Primary period
IO
UPG
Task Execution Timeout Error occurred.
Infinite loop
z Task Execution Timeout Error
Error name
Error level
Task Execution
Timeout Error
Correction
Major fault
Review the task settings and download the user program again.
The power supply must be cycled or the CPU Unit reset.
I/O Refreshing Timeout Error
An I/O Refreshing Timeout Error occurs when I/O refreshing is not completed within the period twice
in a row.
This is a major fault level Controller error. Execution of the user program stops when the error
occurs.
This error occurs only for the primary period task and, if I/O refreshing is set, the priority-16 period
task.
Primary period
Primary
periodic task
IO
UPG
Primary period
M
C
IO
Task Period Exceeded Error occurs.
Primary period
UPG
M
C
Primary period
Primary period
IO
UPG
M
C
I/O Refreshing Timeout Error occurs.
z I/O Refreshing Timeout Error
Error name
I/O Refreshing
Timeout Error
5-22
Error level
Major fault
Correction
Review the task settings and download the project again.
The power supply must be cycled or the CPU Unit reset.
NJ-series CPU Unit Software User’s Manual (W501)
5 Designing Tasks
Insufficient System Service Time Error
An Insufficient System Service Time Error occurs if the time that is specified in the time that is set for
the system service monitoring setting cannot be obtained.
This is a major fault level Controller error. Execution of the user program stops when the error
occurs.
z Insufficient System Service Time Error
Error name
Insufficient System Service Time
Error
Error level
Major fault
Correction
Review the task settings and the system service monitoring settings and download the project again.
The power supply must be cycled or the CPU Unit reset.
You can use online operations from the Sysmac Studio to monitor the task execution status and task
execution times.
Monitoring Task Execution Status
5
z Sysmac Studio Operation
Place the Sysmac Studio online with the CPU Unit and select Task Settings − Task Execution Status Monitor. The following tab page is displayed.
5-23
5-2-12 Monitoring Task Execution Status and Task Execution Times
You can monitor the execution status of the programs in all of the tasks (started/stopped) from the
Sysmac Studio.
NJ-series CPU Unit Software User’s Manual (W501)
5-2 Task System
5-2-12 Monitoring Task Execution Status and Task Execution Times
5 Designing Tasks
Task Execution Time Monitor
You can monitor the execution time of each task from the Sysmac Studio.
z Values You Can Monitor from the Sysmac Studio
Connect online to the CPU Unit from the Sysmac Studio and click the Task Execution Time Monitor
Button on the Task Settings Tap Page. The following display appears.
The items that you can monitor depends on whether you connect to the physical Controller or to the
Simulator.
Connected to the Controller
Connected to the Simulator
5-24
NJ-series CPU Unit Software User’s Manual (W501)
5 Designing Tasks
You can monitor the following items.
Monitor item
Task execu- Min.
tion time*1
Average
Max.
Set period
Description
The minimum value of the task execution time.
The maximum value of the task execution time.
The maximum value of the task execution time.
The specified task period.
Connected Connected
to the Con- to the Simtroller
ulator
Displayed.
Not displayed.
Displayed.
Period exceeded
This interval is the time required to execute only the task itself. It is the same as the task execution time for
the primary periodic task. For periodic tasks, this is the task execution time minus the time to execute
other tasks and the time for system services that were executed between the point that the execution condition is met until execution is completed.
Task period (fixed)
Task execution time (varies)
Real processing time of task (varies)
User program
execution
System common
processing 2
System common
processing 1
Refreshing
Control processing
Input data
processing
Output data
processing
I/O refreshing
Real processing time of task (varies)
Precautions for Correct Use
The above values when connected to the Simulator of the Sysmac Studio may contain more
error in comparison to the times when connected to the physical Controller. Use them as guidelines. Always confirm operation while connected to the physical Controller to study the designs
and before starting actual system operation.
NJ-series CPU Unit Software User’s Manual (W501)
5-25
5
5-2-12 Monitoring Task Execution Status and Task Execution Times
*2
5-2 Task System
If the task execution time exceeds the task
period (i.e., if the Task Period Exceeded Flag
system-defined variable is TRUE), the amount
by which the time was exceeded is displayed in
the bar.
Task execution count
Displays the number of executions of the task.
The value of the Task Execution Count systemdefined variable is displayed.
The time ratios are displayed with bars for the
None
Displayed.
Real processing time of
system common processing, I/O refreshing,
tasks*2
user program execution, and motion control processing. (Specific time values are not displayed.)
Average estiThe estimated average value of the real promation
cessing time of task is displayed.
Max estimation The estimated maximum value of the real processing time of task is displayed.
*1 This is the actual time required from the point that task execution was started until it was completed. This
interval includes both the time to execute other tasks and the time for system services that were executed
from when task execution was started until it was completed.
5 Designing Tasks
5-3
Task Design Example and I/O
Response Times
This section provides information on estimating task execution times, information on confirming system
service monitoring settings, an example of task designing, and information on I/O response times.
The primary periodic task and periodic tasks of an NJ-series CPU Unit operate according to the specified task periods. If the actual execution time exceeds the task period, an error occurs.
This section uses an example that consists of one primary periodic task to describe estimation and
appraisal methods.
Precautions for Safe Use
The execution times in the physical Controller depends on the logic operations that are performed in the user program, the presence of communications commands and data links, on
whether data tracing is performed, and on other factors. Before starting actual operation, you
must test performance under all foreseeable conditions on the actual system and make sure that
the task periods are not exceeded and that suitable communications performance is achieved.
5-3-1
Checking the Task Execution Time
Always design your system so that the average and maximum task execution times that are estimated with the methods that are described in this section sufficiently fit within the specified task periods.
z Desktop Calculations
First, refer to A-2 Calculating Guidelines for Task Execution Times to make a rough estimate of the
average task execution time on paper. You cannot estimate the maximum value on paper.
z Estimating with the Simulator on the Sysmac Studio
Use the Task Execution Time Monitor of the Simulator on the Sysmac Studio to estimate the average and maximum task execution times. Use the following procedure to check operation on the Simulator.
1
2
3
4
5
6
Create the Unit and slave configurations, create the global variables and device variables, and
create the axes (to create the Axis Variables).
Create the programs to check.
Set up the tasks and build the project.
Start the Simulator in Execution Time Estimation Mode.
Set the Expanded number of I/O points for CJ-series Unit parameter in the Task Execution Time
Monitor to create user-defined variables for specified CJ-series Special Units and set the sizes
of the expansion areas (e.g., fixed I/O allocation areas for the DeviceNet Master Unit) for AT
specifications (i.e., the number of output words and the number of input words). These sizes are
used to calculate the I/O refresh time for the specific Special Units.
Estimate the task execution times in the Task Execution Time Monitor.
You can check the following values in the Task Execution Time Monitor when you start the Simulator
in Execution Time Estimation Mode.
5-26
NJ-series CPU Unit Software User’s Manual (W501)
5 Designing Tasks
• Values That You Can Monitor with the Task Execution Time Monitor in the Simulator
Connected to the Simulator
Additional Information
You can check the following values when connected to the Simulator of the Sysmac Studio. You
cannot check these values when connected to the physical Controller.
• CPU usage: Displays how much of the task period is used by the total of the maximum estimated task processing time and the system service processing time for the specified system
service monitoring settings. If CPU usage exceeds 100%, it means that there is not sufficient
time for task processing and the system service monitoring settings.
• Real processing time of tasks: This is the time that was required for the task from when task
execution is started until it is completed. The time to execute other tasks that were executed
from when task execution was started until it was completed is not included.
z Calculating Times on the Physical Controller
5
Connected to the Controller
• The minimum, average, and maximum values of the task execution time.
• The degree to which the period is exceeded and the task period exceeded count
The maximum values that are displayed on the Sysmac Studio are the results of operation on the
physical Controller. As described previously, the maximum value of the task execution time varies
depending on the internal status of the physical Controller. As a result, the maximum values
obtained here may be exceeded in actual operation. Use the following maximum values as guidelines.
Estimated Maximum Values for Task Execution Times Based on Information
from the Physical Controller
• Task period of 500 µs: Average value of task execution time + (Average value of task execution time − Minimum value of task execution time) + 100 µs
• Task period of 1, 2, or 4 ms: Average value of task execution time + (Average value of task execution time −
Minimum value of task execution time) + 120 µs
Checking the System Service Monitoring Settings
System services are executed during the unused time between executions of all of the tasks.
The CPU Unit monitors the percentage of the task period that is used for execution of system services
based on the System Service Monitoring Settings in the Controller Setup. The system service execution times must be greater than the values in the System Service Monitoring Settings. If they are not, an
Insufficient System Service Time Error occurs and user program execution is stopped. You must therefore ensure that there is sufficient time available.
In a configuration that consists of only a primary periodic task, the system service execution time is the
task period minus the task execution time. By default, system service execution time is monitored at
10% of the task period. Therefore, you would design the system so that the average task execution time
was less than 90% of the task period.
NJ-series CPU Unit Software User’s Manual (W501)
5-27
5-3-2 Checking the System Service Monitoring Settings
You can check the following values in the Task Execution Time Monitor when you are connected to
the physical Controller.
5-3-2
5-3 Task Design Example and I/O Response Times
• The average and maximum values of the task execution time
• Real processing time of task (estimated average values)
• System common processing time, I/O refreshing time, user program execution time, and motion control
time (Bar graphs show the amount by which the task period is exceeded.)
• CPU usage
5 Designing Tasks
However, some system servicing is executed in parallel with task execution. Also, the task execution
time varies greatly with the external environment. Therefore, you cannot judge system performance
based on this one condition. Use it as a guideline.
5-3-3
Examples of Task Design
This section describes the steps that are required for an example that consists of one primary periodic task. In any actual application or for specific conditions, you may need to change the order of
the design steps or consider different elements. This example is therefore for reference only.
1
2
3
Find the I/O response times that are required for the system from the equipment specifications.
From the system I/O response times, determine the task period for the primary periodic task.
See if the task execution time fits into the task period that you found in step 2, above.
Then, work on paper or use the Task Execution Time Monitor of the Sysmac Studio to estimate
the average and maximum values of the task execution time.
4
See if the system service times are within the monitor settings.
If you use the Sysmac Studio, check the CPU usage.
5
Use the physical Controller to see if the task execution time fits into the task period.
Place the Sysmac Studio online with the physical Controller and use Task Execution Time Monitor to check the task execution times.
z If it is necessary to alter the user program, consider the following corrections
for the task configuration.
• Separating a task
• Changing program assignments
• Changing the task period
z If a task is separated, the periodic task will vary greatly with the unused time
for primary periodic task execution.
For a periodic task, use twice the average and maximum values calculated for the task execution
time to set the task period and then fine-tune the setting from there.
5-28
NJ-series CPU Unit Software User’s Manual (W501)
5 Designing Tasks
5-3-4
System Input and Output Response Times
The times that are required for the system to produce an output after it receives an input are described
in this section.
The input response times and output response times between external devices and the slaves and
Units must be added to the system I/O response times.
Sequence Control with Basic I/O Units
Refreshing between Basic I/O Units and external devices is performed in the primary periodic task or
the priority-16 periodic task.
The I/O response times that include EtherCAT communications times are given below.
z Performing Control with the Programs in the Primary Periodic Task
The Controller makes a response in the following I/O response time.
Minimum I/O response time = Primary period
5-3 Task Design Example and I/O Response Times
The I/O response times depend on various conditions.
Example: Controlling Unit A and Unit B with the Primary Periodic Task
Unit A
5
Unit B
Primary period (t)
IO UPG
M
C
IO UPG
M
C
IO UPG
M
C
Task period 1 (e.g., t × 3)
Priority-16
periodic task
UPG
Note: The above diagram shows only one input and one output.
However, the I/O response time may be as follows depending on the timing of the input from the
Unit.
Maximum I/O response time = Primary task period × 2
z Performing Control with the Programs in the Priority-16 Periodic Task
The Controller makes a response in the following I/O response time.
Minimum I/O response time = Priority-16 periodic task period
Example: Controlling Unit A and Unit B with the Priority-16 Periodic Task
Unit B
Unit A
IN
OUT
Primary period
Primary
periodic task
IO UPG MC
IO UPG MC
IO UPG MC
IO UPG MC
Task period
Priority-16
periodic task
IO UPG
IO UPG
Note: The above diagram shows only one input and one output.
NJ-series CPU Unit Software User’s Manual (W501)
5-29
5-3-4 System Input and Output Response Times
Primary
periodic task
5 Designing Tasks
However, the I/O response time may be as follows depending on the timing of the input from the
Unit.
Maximum I/O response time = Priority-16 periodic task period × 2
Sequence Control with EtherCAT Slaves
For EtherCAT slaves, EtherCAT communications with external devices is performed for I/O refreshing in
the primary periodic task.
The I/O response times that include EtherCAT communications times are given below.
z Performing Control with the Programs in the Primary Periodic Task
The Controller makes a response in the following I/O response time.
Minimum I/O response time = Primary period (= process data communications cycle)
Example: Controlling EtherCAT Input Slave A and EtherCAT Output Slave B with the Primary Periodic Task
Slave A
Slave B
Process data
communications period =
Primary period (t)
Primary
periodic task
IO UPG
M
C
IO UPG
M
C
IO UPG
M
C
Task period 1 (e.g., t × 3)
Priority-16
periodic task
UPG
Note: The above diagram shows only one input and one output.
However, the I/O response time may be as follows depending on the timing of the input from the
slave.
Maximum I/O response time = Primary period (= process data communications cycle) × 2
z Performing Control with the Programs in the Priority-16 Periodic Task
The Controller makes a response in the following I/O response time.
I/O response time = Priority-16 periodic task period
Example: Controlling EtherCAT Input Slave A and EtherCAT Output Slave B with the Priority-16 Periodic Task
Slave A
Slave B
IN
OUT
Process data
communications cycle
= Primary period (t)
Primary
periodic task
IO UPG MC
IO UPG MC
IO UPG MC
IO UPG MC
Task period
Priority-16
periodic task
IO UPG
IO UPG
Note: The above diagram shows only one input and one output.
However, the I/O response time may be as follows depending on the timing of the input from the
slave.
Maximum I/O response time = Priority-16 periodic task period × 2
5-30
NJ-series CPU Unit Software User’s Manual (W501)
5 Designing Tasks
Performing Motion Control with Motion Control Instructions
Motion control instructions access the Servo Drives and encoder input slaves to which axes are
assigned.
In either case, the motion control instructions are processed in the motion control processing (MC)
section of the primary periodic task.
The I/O response times that include EtherCAT communications times are given below.
z Programming Motion Control Instructions in the Primary Periodic Task
The motion control instructions are processed in the next motion control processing (MC) section of
the primary periodic task. The results of processing are output via EtherCAT communications to the
Servo Drive to which the axis is assigned during the I/O refresh period in the next primary periodic
task.
The Controller makes a response in the following I/O response time.
I/O response time = Primary period (= process data communications cycle)
Slave A
Servo A
IN
Execution command
Process data
communications cycle
= Primary period (t)
Primary period (t)
IO UPG MC
Processing is performed in the
motion control processing (MC)
section in the next primary period.
IO UPG MC
5
IO UPG MC
MC_
Motion control
instructions
executed.
Commands to Servo A are sent via
EtherCAT communications when I/O is
refreshed in the next primary period.
Task period 1 (e.g., t × 3)
Priority-16
periodic task
UPG
Note: The above diagram shows only one input and one output.
However, the I/O response time may be as follows depending on the timing of the input from the
slave.
Maximum I/O response time = Primary period (= process data communications cycle) × 2
z Programming Motion Control Instructions in the Priority-16 Periodic Task
The motion control instructions are processed in the next motion control processing (MC) section of
the primary periodic task after the priority-16 periodic task. The results of processing are output via
EtherCAT communications to the Servo Drive to which the axis is assigned during the I/O refresh
period in the next primary periodic task.
The Controller responds in the following I/O response time regardless of the execution timing of the
motion control instructions.
Minimum I/O response time = Priority-16 periodic task period +
Primary period (= process data communications cycle)
NJ-series CPU Unit Software User’s Manual (W501)
5-31
5-3-4 System Input and Output Response Times
Primary periodic
task
5-3 Task Design Example and I/O Response Times
Motion control instructions can be used in the primary periodic task and in a priority-16 periodic
task.
5 Designing Tasks
Slave A
Servo A
IN
Execution command
Process data
communications cycle
= Primary period (t)
Primary
periodic task
IO
UPG MC
IO
UPG MC
IO
UPG MC
Processing is performed in
the motion control processing
(MC) section of the next
primary periodic task.
IO
Commands to Servo A are sent via
EtherCAT communications when I/O
is refreshed in the next primary period.
Task period (e.g., t × 2)
Task period (e.g., t × 2)
Priority-16
periodic task
UPG MC
UPG
MC_
UPG
MC_
Motion control instructions executed.
Motion control instructions executed.
Note: The above diagram shows only one input and one output.
However, the response time may be as follows depending on the timing of the input from the slave.
Maximum I/O response time = Priority-16 periodic task period +
Primary period (= process data communications cycle) × 2
If more than one axis is controlled by the programs in the priority-16 periodic task, they can be
started at the same time. (This is the same as controlling more than one axis in the primary periodic
task.)
Axis A
5-32
Motion control
instructions
Axis B
Motion control
instructions
Axis C
Motion control
instructions
Start commands
are output at the
same time.
NJ-series CPU Unit Software User’s Manual (W501)
5 Designing Tasks
Additional Information
Reference: Reading the Values of Axis Variables in the Priority-16 Periodic Task
• Values are not written to axis variables when motion control instructions are executed in the
priority-16 periodic task. They are written in the motion control processing (MC) section of the
next primary periodic task.
Primary period (t)
Primary
periodic task
IO UPG MC
IO UPG MC
IO UPG MC
IO UPG MC
IO UPG MC
Task period 1 (e.g., t × 3)
Priority-16
periodic task
Axis
variables
read.
UPG
FB
They are written in the motion control
processing section in the next primary
periodic task.
Motion control instructions
executed.
The most recent values of the axis variables
are read at the start of execution of the
programs in the priority-16 periodic task.
Values are not written to axis variables
when motion control instructions are
executed in the priority-16 periodic task.
• The results of execution of motion control instruction in the previous priority-16 periodic task
are read as the value of the axis variable in the next priority-16 periodic task.
Primary
periodic task
IO UPG MC
IO UPG MC
IO UPG MC
IO
UPG MC
IO UPG MC
Standby
Task period 1 (t × 3)
Priority-16
periodic task
Axis
variables
read.
UPG
FB
Motion control instructions executed.
Axis
variables
read.
UP
G
FB
Motion control
instructions executed.
The results of execution in the
previous priority-16 periodic task
are read as the values of the axis
variables.
NJ-series CPU Unit Software User’s Manual (W501)
5
5-3-4 System Input and Output Response Times
Primary period (t)
5-3 Task Design Example and I/O Response Times
• If an axis variable is read in the priority-16 periodic task, the most recent values of the axis
variable when the program execution for the priority-16 periodic task started are read. These
values show the results of motion control processing in the immediately proceeding primary
periodic task.
5-33
5 Designing Tasks
5-34
NJ-series CPU Unit Software User’s Manual (W501)
Programming
This section describes programming, including the programming languages, and the
variables and instructions that are used in programming.
6-1 Overview of Programming Procedures . . . . . . . . . . . . . . . . . . . . . . . . . . . . 6-3
6-2 POUs (Program Organization Units) . . . . . . . . . . . . . . . . . . . . . . . . . . . . . . 6-5
6-2-1
6-2-2
6-2-3
6-2-4
6-2-5
6-2-6
6-2-7
6-2-8
What Are POUs? . . . . . . . . . . . . . . . . . . . . . . . . . . . . . . . . . . . . . . . . . . . . . . . 6-5
Overview of the Three Types of POUs . . . . . . . . . . . . . . . . . . . . . . . . . . . . . . 6-6
Differences between Programs, Functions, and Function Blocks . . . . . . . . . . 6-7
Details on Programs . . . . . . . . . . . . . . . . . . . . . . . . . . . . . . . . . . . . . . . . . . . . 6-7
Details on Function Blocks . . . . . . . . . . . . . . . . . . . . . . . . . . . . . . . . . . . . . . . 6-8
Details on Functions . . . . . . . . . . . . . . . . . . . . . . . . . . . . . . . . . . . . . . . . . . . 6-17
Operation That Applies to Both Functions and Function Blocks . . . . . . . . . . 6-22
POU Restrictions . . . . . . . . . . . . . . . . . . . . . . . . . . . . . . . . . . . . . . . . . . . . . . 6-24
6-3 Variables . . . . . . . . . . . . . . . . . . . . . . . . . . . . . . . . . . . . . . . . . . . . . . . . . . . . 6-27
6-3-1
6-3-2
6-3-3
6-3-4
6-3-5
6-3-6
6-3-7
6-3-8
6-3-9
6-3-10
6-3-11
6-3-12
Variables . . . . . . . . . . . . . . . . . . . . . . . . . . . . . . . . . . . . . . . . . . . . . . . . . . . .
Types of Variables . . . . . . . . . . . . . . . . . . . . . . . . . . . . . . . . . . . . . . . . . . . . .
Types of User-defined Variables in Respect to POUs . . . . . . . . . . . . . . . . . .
Attributes of Variables . . . . . . . . . . . . . . . . . . . . . . . . . . . . . . . . . . . . . . . . . .
Data Types . . . . . . . . . . . . . . . . . . . . . . . . . . . . . . . . . . . . . . . . . . . . . . . . . . .
Derivative Data Types . . . . . . . . . . . . . . . . . . . . . . . . . . . . . . . . . . . . . . . . . .
Array Specifications and Range Specifications for Data Types . . . . . . . . . . .
Variable Attributes . . . . . . . . . . . . . . . . . . . . . . . . . . . . . . . . . . . . . . . . . . . . .
Changes to Variables for Status Changes . . . . . . . . . . . . . . . . . . . . . . . . . . .
Function Block Instances . . . . . . . . . . . . . . . . . . . . . . . . . . . . . . . . . . . . . . . .
Monitoring Variable Values . . . . . . . . . . . . . . . . . . . . . . . . . . . . . . . . . . . . . .
Restrictions on Variable Names and Other Program-related Names . . . . . .
6-27
6-27
6-28
6-29
6-30
6-38
6-44
6-50
6-57
6-59
6-59
6-60
6-4 Constants (Literals) . . . . . . . . . . . . . . . . . . . . . . . . . . . . . . . . . . . . . . . . . . . 6-61
6-4-1
6-4-2
Constants . . . . . . . . . . . . . . . . . . . . . . . . . . . . . . . . . . . . . . . . . . . . . . . . . . . . 6-61
Types of Constants . . . . . . . . . . . . . . . . . . . . . . . . . . . . . . . . . . . . . . . . . . . . 6-61
6-5 Programming Languages . . . . . . . . . . . . . . . . . . . . . . . . . . . . . . . . . . . . . . 6-65
6-5-1
6-5-2
6-5-3
Programming Languages . . . . . . . . . . . . . . . . . . . . . . . . . . . . . . . . . . . . . . . 6-65
Ladder Diagram Language . . . . . . . . . . . . . . . . . . . . . . . . . . . . . . . . . . . . . . 6-65
Structured Text Language . . . . . . . . . . . . . . . . . . . . . . . . . . . . . . . . . . . . . . . 6-71
NJ-series CPU Unit Software User’s Manual (W501)
6-1
6
6 Programming
6-6 Instructions . . . . . . . . . . . . . . . . . . . . . . . . . . . . . . . . . . . . . . . . . . . . . . . . . 6-102
6-6-1
6-6-2
6-6-3
Instructions . . . . . . . . . . . . . . . . . . . . . . . . . . . . . . . . . . . . . . . . . . . . . . . . . . 6-102
Basic Understanding of Instructions . . . . . . . . . . . . . . . . . . . . . . . . . . . . . . . 6-102
Operation for Instruction Errors . . . . . . . . . . . . . . . . . . . . . . . . . . . . . . . . . . . 6-105
6-7 Programming Precautions . . . . . . . . . . . . . . . . . . . . . . . . . . . . . . . . . . . . . 6-108
6-7-1
6-7-2
6-7-3
6-2
Array Specifications for Input Variables, Output Variables, In-Out Variables . 6-108
Structure Variables for Input Variables, Output Variables, In-Out Variables . 6-108
Master Control . . . . . . . . . . . . . . . . . . . . . . . . . . . . . . . . . . . . . . . . . . . . . . . . 6-109
NJ-series CPU Unit Software User’s Manual (W501)
6 Programming
6-1
Overview of Programming
Procedures
This section provides an overview of programming procedures.
The shaded steps in the overall procedure that is shown below are related to programming.
Step 1. Software Design
6-1 Overview of Programming Procedures
Step 1-1 Designing I/O and Processing
Step 1-2 Designing Tasks
Step 1-3 Designing Programs
Step 2. Software Setups and Programming
Step 2-1 Slave and Unit Configurations
Step 2-2 Controller Setup
Step 2-3 Programming
6
Step 2-4 Offline Debugging
Step 3. Mounting and Setting Hardware
Step 4. Wiring
Step 5. Confirming Operation and Starting Actual System
Operation
Refer to 1-3 Overall Operating Procedure for the NJ-series Controller for details.
NJ-series CPU Unit Software User’s Manual (W501)
6-3
6 Programming
POU (Program Organization Unit) Design
z Determine which processes to put into which POUs and design
the POUs.
Reference
6-2 POUs (Program Organization Units)
Note Functions cannot contain function block instructions or function blocks.
z Determine which languages, such as ladder diagrams, inline
ST, and ST, to use to create each process.
6-5 Programming Languages
Note Inline ST is structured text that is written as an element of a ladder diagram.
Variable Design
Reference
z Design the user-defined variables that you need to create.
6-3-1 Variables
6-3-2 Types of
Variables
z Separate variables into those that you use in more than one
POU (global variables) and variables that you use in only
specific POUs (local variables).
z Determine if you need to automatically generate the variable
names for the device variables that you use to access slaves
and Units or if you need to define them yourself.
z Design the attributes for the variables.
Variable Name, Data Type, AT Specification, Initial Value, Retain, Constant, and Network
Publish
Decide the data types of your variables (including array specifications, range specifications,
structures, and enumerations).
z Keep the following precautions in mind when you design
variables.
• Retention:
Set the Retain attributes to determine the values that are used for variables when the power
supply is turned ON or when the operating mode changes.
• Structures:
When a structure is used for a variable in an instruction, design the program to use the same
structure data type for the input parameter, output parameter, or in-out parameter.
Example: Communications Instructions
• Array Specifications:
When an array variable is used for the variable for an instruction, design the program to use
an array variable for the input parameter, output parameter, or in-out parameter.
Examples: Shift Instructions, Stack Instructions, and Table Instructions
• AT Specifications:
Use AT specifications for the variables used for input parameters to certain instructions.
Example: Fixed or user I/O allocations for DeviceNet Units
• Network Publishing:
Design the variables for EtherNet/IP tag data links.
6-4
6-3-3 Types of
User-defined
Variables in
Respect to
POUs
2-2-2 Variables
and I/O Assignments
6-3-4 Attributes
of Variables
6-3-5 Data
Types
6-3-6 Derivative Data Types
6-3-4 Attributes
of Variables
6-3-5 Data
Types
6-3-6 Derivative Data Types
NJ-series CPU Unit Software User’s Manual (W501)
6 Programming
6-2
POUs (Program Organization Units)
The user program that runs on an NJ-series CPU Unit is made from a combination of POUs (program
organization units).
This section describes the configuration and specifications of POUs.
Refer to the Sysmac Studio Version 1 Operation Manual (Cat. No. W504) for details on creating POUs
in the Sysmac Studio.
6-2-1
What Are POUs?
There are three types of POUs, as described below.
• Programs
A program corresponds to a main routine. It is the main type of POU that is used for algorithms.
You can place any instruction, function, or function block in the algorithm of a program.
• Function Blocks (FBs)
A function block can output different values even with the same inputs. Function blocks are executed
when they are called from a program or another function block.
• Functions (FUNs)
A function always outputs the same values for the same inputs. Functions are executed when they
are called from a program, another function, or a function block.
NJ-series CPU Unit Software User’s Manual (W501)
6
6-2-1 What Are POUs?
The POUs consists of a combination of these three types of POUs. You can create many POUs.
You assign the programs to tasks to execute them.
6-2 POUs (Program Organization Units)
A POU (program organization unit) is a unit that is defined in the IEC 61131-3 user program execution
model. A POU includes a local variable table and an algorithm (i.e., a series of code or logic). It is the
basic unit used to build the user program.
You combine POUs to build a complete user program.
6-5
6 Programming
6-2-2
Overview of the Three Types of POUs
]
Programs
z Executing Programs and Execution Conditions
• You execute a task to execute the programs that are assigned to that task.
• Programs are always executed.
z Notation
• The POUs must include at least one program. You can assign up to 128 programs to a single task.
]
Function Blocks (FBs)
z Executing Function Blocks and Execution Conditions
• You can call function blocks from programs or other function blocks to execute them.
• Function blocks are always executed.
• If you want a function block to execute only when a condition is met, you must define an input variable that sets the execution condition.
z Notation
• You can use any instruction, user-defined function, or user-defined function block in the algorithm
of a function block.
• You can retain the values of internal variables. Therefore, you can retain status, such as for timers
and counters.
• There are both user-defined and system-defined function blocks.
User-defined function blocks are called user-defined function blocks. System-defined function
blocks are sometimes called FB instructions.
For details on function blocks, refer to 6-2-5 Details on Function Blocks.
]
Functions
z Executing Functions and Execution Conditions
• You can call functions from programs, other functions, or function blocks to execute them.
• The EN input variable specifies the execution condition. A function is executed only once each
time EN changes to TRUE.
z Notation
• You cannot use FB instructions or user-defined function blocks in algorithms.
• The values of internal variables are not retained. Therefore, the output value remains constant.
• There are both user-defined and system-defined function blocks.
User-defined functions are called user-defined functions. System-defined functions are sometimes called FUN instructions.
For details on functions, refer to 6-2-6 Details on Functions.
6-6
NJ-series CPU Unit Software User’s Manual (W501)
6 Programming
6-2-3
Differences between Programs, Functions, and Function Blocks
Item
POU type
Programs
Function blocks
Executed upon execution of assigned task.
Called from a program or another function block.
Called from a program, function, or
function block.
Supported.
Supported.
Not supported.
User-defined functions Supported.
Supported.
Not supported.
User-defined function
blocks
Supported.
Not supported.
Execution method
Any instructions
Algorithm
Supported.
Functions
Execution condition
variable.
The hierarchical relationships between programs, functions, and function blocks are shown in the following figure.
Task
Program 1
Program 2
Functions
Function blocks
6
6-2-4
6-2-3 Differences between Programs, Functions, and Function Blocks
Function blocks
Functions
Functions
Details on Programs
]
Program Structure
Programs consist of a local variable table and an algorithm.
You can use any function or function block in the algorithm of a program.
Program
Local variable table
Task
Program
Assigned.
Program
Algorithm
FUN
FB
You cannot call programs from other POUs.
NJ-series CPU Unit Software User’s Manual (W501)
6-2 POUs (Program Organization Units)
Executed each period. Executed each period. Specify the execution
Specify the execution condition with the EN
condition with an input input.
6-7
6 Programming
]
Program Execution Conditions
Programs are executed when the task they are assigned to is executed.
z Order of Execution
You can set the order of execution of all programs in a task. You specify this order under Task Setup
− Program Assignments in the Sysmac Studio.
z Related System-defined Variables
Programs all have the following system-defined variables in the local variables (i.e., internal variables).
Variable
name
P_First_Run
Mode
Meaning
First RUN
Period Flag
Function
TRUE for one period when PROGRAM mode
changes to RUN mode.
Data
type
Read/write
BOOL
Read
Use this flag to perform initial processing when the
CPU Unit begins operation.
6-2-5
P_PRGER
Instruction
Error Flag
This flag changes to and remains TRUE when an
instruction error occurs. After this flag changes to
TRUE, it stays TRUE until the program changes it
back to FALSE.
BOOL
Read/write
P_CY
Carry Flag
This flag is updated by some instructions.
BOOL
Read
Details on Function Blocks
Procedure to Create Function Blocks
A function block consists of a function block definition that is made in advance and instances that are
used in the actual programs. Create function blocks in the following order.
1
Creating the Function Block Definition
Create the algorithm.
2
Placing an Instance of the Function Block Definition in a Program
Call the function block definition from a program or another function block.
You can call the same function block definition from more than one program or function block.
After you place an instance of a function block definition in a program or in another function
block, you can manipulate and execute it as an independent entity.
6-8
NJ-series CPU Unit Software User’s Manual (W501)
6 Programming
]
Structure of Function Blocks
In a ladder diagram, function blocks are represented as rectangular boxes as shown below. Refer to the
Expressing Functions in ST on page 6-18 for details about how to express function blocks in ST.
Function blocks consist of the following parts.
• Function Block in Ladder Diagram:
Instance name
Function block name or instruction name
In-out variable
MyFB_instance
MyFB
TRIG
Q
In
InQ
Input parameter
InQ
SetValue
Result
6-2 POUs (Program Organization Units)
SET
Output variable
OUT
RESULT
Input variable Output variable Output parameter
Algorithm
• Function Block Settings
When you create an instance of a function block definition, make the following settings.
Settings of a function block instance in a program
Instance name
6
Function block name
Local Variable Table
Input
variables
In-out
variables
Output
variables
6-2-5 Details on Function Blocks
Input parameters
Output parameters
Internal variables
Algorithm
• Written as a ladder diagram or in ST.
• You can use any instructions,
user-defined functions, and userdefined function blocks.
Created in the Function Definition
z Function Block Name or Instruction Name
This is the function block name or instruction name assigned in the function block definition when
the function block is created.
z Instance Name
You give an instance name to a function block instance in a program to enable managing it. You
specify an instance name when you call a function block definition from a program or another function block.
NJ-series CPU Unit Software User’s Manual (W501)
6-9
6 Programming
z Algorithm
You can code the algorithm either as a ladder diagram or in ST. You can use any instruction, userdefined function, or user-defined function block in the algorithm.
z Local Variable Table
The local variable table is used to define input variables, output variables, in-out variables, internal
variables, and external variables.
Refer to Variable Designations for Function Blocks on page 6-11 for details.
z Parameters
Input Parameters to Input Variables
An input parameter passes a value to an input variable in a function block when function block execution begins. An input parameter can be either a variable or a constant.
Output Parameters from Output Variables
An output parameter receives a value from an output variable in a function block when function block
execution is completed. A variable is given as the parameter.
In-Out Parameters Shared between In-Out Variables
The value of the in-out parameter changes within the function block. The same variable is used for
both the input and output.
Additional Information
You can omit input and output parameters. Refer to information on operation when parameters
are omitted in 6-2-7 Operation That Applies to Both Functions and Function Blocks for details.
]
Calling Function Blocks from ST
The following example shows how to call function blocks from ST.
instance_name(input_variable_1:=input_parameter_1, ... input_variable_N:=input_parameter_N,inout_variable_1:=in-out_parameter_1, ... in-out_variable_N:=inout_parameter_N,output_variable_1=>output_parameter_1, ...
output_variable_N=>output_parameter_N);
You can also omit input variable names and other variable names, and give only the parameters. (If you
do, the parameters must be given in the order that they are given in the function block definition.) Also,
the number of parameters must match the number of input variables and other variables in the function
block definition.
TON_instance
a
c
TON
b
In
Q
PT
ET
d
Function Blocks Expressed in ST:
Instance name
TON_instance(In:=a, PT:=b, Q=>c, ET=>d);
TON_instance(In:=a, PT:=b, Q=>c); (*The ET output is omitted here.*)
TON_instance(a,b,c,d); (*Input and output variables are omitted here.*)
6-10
NJ-series CPU Unit Software User’s Manual (W501)
6 Programming
Refer to Function Block Calls in ST Language Statement on page 6-94 for details.
]
Variable Designations for Function Blocks
Instance Name
Function block definition name
or instruction name
Value is assigned.
Input parameter
Variable assignment
itself is passed.
In-out variable
Internal
variables
Output
variable
Output parameter
Variable assignment itself is passed.
In-Out variable
In-out parameter
The specifications for variables in function blocks are given below.
Variables
Input variables
Number
1 to 64
Specification
Input variables are used as input arguments within the function block. They cannot be changed inside the function block.
Output variables
1 to 64
In-out variables
0 to 64
Output variables are used as output arguments from the function block.
• The output parameters are set to the values of the output variables at the end
of function block execution.
• You cannot specify a constant for an output parameter. You must specify a variable.
• At least one BOOL output variable (including ENO) is required.
• You can omit output parameter connections. If you omit an output parameter,
the value of the output variable is not assigned to any parameter.
• You can access the values of output variables from outside of the function
block. Access these values with the following format: InstanceName.OutputVariableName. However, you cannot write values directly to an output variable.
In-out variables are used as inputs to and outputs from the function block. They
can be changed inside the function block.
• The value of an in-out parameter is passed to an in-out variable and the value
of the in-out variable is then passed to the in-out parameter.
• You cannot specify a constant for an in-out parameter. You must specify a variable.
• If you change the value of an in-out variable within a function block, the value of
the in-out parameter changes at that time.
• You cannot omit in-out parameters.
NJ-series CPU Unit Software User’s Manual (W501)
6-11
6
6-2-5 Details on Function Blocks
• When the function block is executed, the input variables are set to the values of
the input parameters.
• You can specify either constants or variables for input parameters.
• Omitting Input Parameters:
Refer to information on operation when parameters are omitted in 6-2-7 Operation That Applies to Both Functions and Function Blocks.
• At least one BOOL input variable is required.
• You can specify to detect when the variable changes to TRUE or changes to
FALSE.
• You can access the values of input variables from outside of the function block.
Access these values with the following format: InstanceName.InputVariableName. However, you cannot write values directly to an input variable.
6-2 POUs (Program Organization Units)
In-out parameter
Input
variable
Value is assigned.
6 Programming
Variables
Number
Specification
Internal variables
No limit
Internal variables are used for temporary storage within a function block.
External variables
No limit
External variables are used to access global variables.
EN
0
An EN variable cannot be used in a function block. (This applies to both userdefined function blocks and FB instructions.)
ENO
0 or 1
Generally, this is a BOOL output variable that is set to TRUE for a normal end,
and to FALSE for an error end.
• The values of internal variables are retained regardless of whether the function
block is executed.
• Internal variables can have Retain attributes.
• You cannot access the values of internal variables from outside of the function
block.
• You can also omit it for some FB instructions.
• Refer to ENO, below, for details.
Refer to 6-3-4 Attributes of Variables on setting variable attributes.
Additional Information
If you define an external variable with the same name as a global variable in a function block, it is
defined automatically based on that global variable.
z ENO
• When ENO is FALSE, the previous values of all other output variables are retained.
6-12
NJ-series CPU Unit Software User’s Manual (W501)
6 Programming
Function Block Definitions and Instances
A function block consists of a function block definition that is made in advance and instances that are
then used in the actual programs. All instances of a function block are based on the function block definition.
A function block definition consists of an algorithm and a local variable table.
z Function Block Instance
You can create instances of a function block definition to process different I/O data in the same way.
Program POU
Instance name
FB1_1
Function block definition name
FB1
Variable
declarations
Algorithm
Memory area
reserved.
Memory area
Memory for
instance
FB1_1
6
6-2-5 Details on Function Blocks
Memory for
instance
FB1_2
Instance name
FB1_2
Function block definition name
FB1
Variable
declarations
Memory area reserved.
Algorithm
Instances cannot be read from other programs or function blocks. If an instance with the same name
as another instance is placed in a different program or another function block, that instance will operate as a completely separate instance.
NJ-series CPU Unit Software User’s Manual (W501)
6-2 POUs (Program Organization Units)
When you place an instance of a function block definition in a program or another function block, the
function block definition is treated as a part of that program or function block.
Function block definitions that are called from a program or another function block are called
instances.
Every instance of a function block has an identifier known as an instance name associated with it,
and every instance uses memory.
6-13
6 Programming
Array Specifications for Instances
Array specifications can be made for instances. You can indirectly specify an array element number
with a variable to execute multiple instances with one instance name. Furthermore, you can switch
input sources and output destinations and effectively execute multiple instances with a single
instance name if you use an array specification for the input parameter and output parameter and
specify the element numbers with the same variable.
Example:
Not Using an Array to Specify Instances
timer0
Using an Array to Specify Instances
FOR
TON
ENO
UINT#0
Initval
Index
UINT#4
Endval
UINT#1
Stepval
OUT[0]
IN[0]
In
PT[0]
EN
Q
PT
ET
timer1
timer[i]
TON
IN[1]
PT[1]
TON
OUT[1]
In
OUT[i]
IN[i]
Q
PT
i
ET
PT[i]
timer2
In
Q
PT
ET
EN
Here, array variables are
used to specify instances of
the function block definition
TON and all input parameters
and output parameters. All of
the element numbers are
incremented to execute five
instances in succession.
NEXT
TON
IN[2]
PT[2]
OUT[2]
In
Q
PT
ET
timer3
Variable Table
TON
IN[3]
PT[3]
OUT[3]
In
Q
PT
ET
timer4
TON
In
6-14
Data type
ARRAY [0..4] OF BOOL
OUT
ARRAY [0..4] OF BOOL
PT
ARRAY [0..4] OF TIME
timer
ARRAY [0..4] OF TON
i
UINT
OUT[4]
IN[4]
PT[4]
Variable name
IN
PT
Q
ET
NJ-series CPU Unit Software User’s Manual (W501)
6 Programming
Execution Conditions for Function Blocks
Function blocks do not have an EN input like functions. They are executed each period.
Processes That Require Constant Data Monitoring
Case
Normal operation
Algorithm in FB
Executed.
Normal end
ENO
TRUE
Operations other than ENO
Output parameters: Values are updated
according to the internal algorithm.
In-out parameters: Values are updated
according to the internal algorithm.
Error end
FALSE
Output parameters: Retained
Inside a master control
region
Executed when the state of
the power flow input is
FALSE.
User-specified
One of the above, depending on the value
of ENO.
Refer to 6-5-2 Ladder Diagram Language for details on power flow output and parameter output.
You can specify the edge for an input variable to make the variable TRUE only when the input
parameter changes to TRUE.
Instance
A
Variable A
FB
6-2 POUs (Program Organization Units)
In-out parameters: Values are updated
according to the internal algorithm.
X
6
Instance X
6-2-5 Details on Function Blocks
Specifies detecting a change to TRUE.
You can specify falling edges too.
Instance
A
Variable A
FB
X
Instance X
NJ-series CPU Unit Software User’s Manual (W501)
Specifies detecting a change to FALSE.
6-15
6 Programming
Accessing Variables in a Function Block from Outside the Function
Block
You can access the input and output variables of a function block from outside the function block. Variables are written as follows:
InstanceName.VariableName
Example: To Access Output Variable B of Function Block Instance FB1_Instance
FB1_Instance.B
You can access the input and output variables for a function block only within the program that contains
the function block. However, you cannot access these variables from within other function block
instances even if they are in the same program. You cannot access them from other programs.
Program P1
FB1_Instance
FB1
B
A
Can be accessed.
Input and Output Variables for FB1
• Access is possible only from within program P1.
• Access is not possible from program P2.
• Access is not possible from within FB2.
FB1_Instance.B
Cannot be
accessed.
FB2_Instance
FB2
C
D
Program P2
Cannot be
accessed.
FB2_Instance.B
The in-out variables, and input variables for some instructions, cannot be accessed from external
devices.
Refer to the NJ-series Instructions Reference Manual (Cat. No. W502) for details.
6-16
NJ-series CPU Unit Software User’s Manual (W501)
6 Programming
6-2-6
Details on Functions
Structure of Functions
In a ladder diagram, functions are represented as rectangular boxes as shown below. Refer to
Expressing Functions in ST on page 6-18 for details about how to express functions in ST. A function
consists of the following parts.
Function in Ladder Diagram:
Function name or instruction name
EN input
6-2 POUs (Program Organization Units)
ENO output
MyFUN
EN
ENO
Return value
Para1
In1
Para2
In2
Input parameters
ret_val
Out1
Input variables
Output1
Output variable
Output parameter
z Function Name or Instruction Name
This is the function name or instruction name assigned in the function definition when the function is
defined.
Functions do not have instance names.
z Algorithm
You can code the algorithm either as a ladder diagram or in ST. You can use any instructions, functions, or user-defined functions in the algorithm of a function. You cannot use any FB instructions or
user-defined function blocks. You also cannot use a differentiated instruction (e.g., R_TRIG or UP).
Function
Local variable table
EN
Input parameter
Input
variable
In-out
variable
Output
variable
(return value)
Output parameter
Internal variables
Algorithm
Instructions (except for
FB instructions)
FUN
NJ-series CPU Unit Software User’s Manual (W501)
6-17
6-2-6 Details on Functions
z Instance Name
6
6 Programming
z Local Variable Table
A local variable table defines the input variables, output variables, in-out variables, internal variables,
and external variables.
Refer to Variable Designations for Functions below for details.
z Parameters
Input Parameters to Input Variables
An input parameter passes a value to an input variable in a function when function execution begins.
An input parameter can be either a variable or a constant.
Output Parameters from Output Variables
An output parameter receives a value from an output variable in a function when function execution
is completed. A variable is given as the parameter.
In-Out Parameters Shared between In-Out Variables
The value of the in-out parameter changes within the function. The same variable is used for both
the input and output.
Expressing Functions in ST
The following example shows how to call functions from ST.
return_value:=function_name (input_variable_1:=input_parameter_1, ...
input_variable_N:=input_parameter_N,in-out_variable_1:=in-out_parameter_1, ... inout_variable_N:=in-out_parameter_N,output_variable_1=>output_parameter_1, ...
output_variable_N=>output_parameter_N);
However, you can also omit the return value.
You can also omit input variable names and other variable names, and give only the parameters. (If you
do, the parameters must be given in the order that they are given in the function definition.) Also, the
number of parameters must match the number of input variables and other variables in the function definition.
Functions Expressed in ST:
MAX
Para1
In1
Para2
In2
Para_MAX
Function name
Para_MAX := MAX(In1:=Para1, In2:=Para2);
Para_MAX := MAX(Para1, Para2);
(*The input variables are omitted here.*)
Refer to Function Calls in ST Language Statements on page 6-97 for details.
6-18
NJ-series CPU Unit Software User’s Manual (W501)
6 Programming
Variable Designations for Functions
Function name
name or
or instruction
instructionname
name
Value is assigned.
Return value
Value is assigned.
Input parameter
Variable assignment
itself is passed.
Value is assigned.
Input
variable
In-out variable
Internal
variables
Output parameter
Variable assignment
itself is passed.
Output
variable
In-out variable
In-out parameter
The specifications for variables in functions are given below.
Variables
Input variables
Number
0 to 64
Specification
Input variables are used as input arguments within the function. They cannot be
changed inside the function.
Output variables
0 to 64
Output variables are used as output arguments from the function.
• The output parameters are set to the values of the output variables at the end
of function execution.
• You cannot specify a constant for an output parameter. You must specify a
variable.
• At least one BOOL output variable (including ENO and the return value) is
required.
• You can omit output parameter connections.
If you omit an output parameter, the value of the output variable is not
assigned to any parameter.
• You cannot access the values of output variables from outside of the function.
In-out variables
0 to 64
In-out variables are used as inputs to and outputs from the function. They can be
changed inside the function.
• In-out parameters (variable designations) are directly passed to or received
from the in-out variables.
• You cannot specify a constant for an in-out parameter. You must specify a variable.
• If you change the value of an in-out variable within a function, the value of the
in-out parameter changes at that time.
• You cannot omit in-out parameters.
• You cannot access the values of in-out variables from outside of the function.
Internal variables
No limit
Internal variables are used for temporary storage within a function.
• The value is not retained after execution is completed.
• You cannot access the values of internal variables from outside of the function.
NJ-series CPU Unit Software User’s Manual (W501)
6-19
6
6-2-6 Details on Functions
• When the function is executed, the input variables are set to the values of the
input parameters.
• You can specify either constants or variables for input parameters.
• Omitting Input Parameters:
Refer to information on operation when parameters are omitted in 6-2-7 Operation That Applies to Both Functions and Function Blocks.
• Unlike function blocks, you cannot specify to detect changes to TRUE or
FALSE.
• You cannot access the values of input variables from outside of the function.
• Some of the instructions provided by OMRON can have varying numbers of
input variables, but you cannot make a user-created function that has a varying number of input variables.
6-2 POUs (Program Organization Units)
In-out parameter
Return value parameter
6 Programming
Variables
Number
Specification
External variables
No limit
External variables access global variables.
EN
1
This is a BOOL input variable used to execute the function.
• The function is executed when EN is TRUE.
• You must have one EN variable. (This applies to both user-defined functions
and FUN instructions).
ENO
0 or 1
Generally, this is a BOOL output variable that is set to TRUE for a normal end,
and to FALSE for an error end.
• You can omit the ENO variable from user-defined functions.
• Refer to ENO, below, for details.
Return value
1
The return value is the value that is returned from the function to the POU that
called the function.
The return value is the value that is returned to the calling instruction. It represents the results of the process after the algorithm in the function is executed.
• Each function must have one return value.
• You can specify enumerations of all basic data types. You cannot specify an
array, structure, or union.
• Refer to Return Values, below, for details.
Refer to 6-3-4 Attributes of Variables for details on setting variable attributes.
Additional Information
You can register global variables as external variables in a function variable table to access global variables. We recommend that you create your functions so that they produce output values
uniquely based on their input parameter values. Algorithms that access global variables and use
them to affect the output values are not recommended. When you check the program on the
Sysmac Studio, a message will appear that says that it is not recommended to use global variables in functions. Take appropriate measures if necessary.
z ENO
• When ENO is FALSE, the previous values of all other output variables are retained.
6-20
NJ-series CPU Unit Software User’s Manual (W501)
6 Programming
z Return Values
• Return values are blank in ladder diagrams.
Case
Ladder diagram notation
ST language notation
Using return values
EN
Variable i
variable_q:=
MyFUN1(variable_i);
MyFUN1
ENO
Variable q
IN
Not using a return
value
EN
Variable i1
Variable i2
In1
In2
OutEQ
Variable q1
OutGT
OutGE
OutNE
Variable q4
OutLT
OutLE
• The calling instruction is not required to use the return value in either a ladder diagram or ST.
MyFUN
EN
Definition of MyFUN
ENO
Variable q
Variable i
IN
IF IN>100
MyFUN:=100;
ELSE
MyFUN:=IN;
END_IF;
Execution Conditions for Functions
A function is executed when EN is TRUE. The function stops processing when EN changes to FALSE.
Input variables
EN = TRUE
Algorithm in FUN
Executed.
Normal end
ENO
TRUE
Operations other than ENO
Output parameters: Values are updated according to
the internal algorithm.
In-out parameters: Values are updated according to
the internal algorithm.
Error end
FALSE
Output parameters: Values are retained.
In-out parameters: Values are updated according to
the internal algorithm.
EN = FALSE
Not executed.
FALSE
Output parameters and in-out parameters: Values
are retained.
Inside a master
control region
Not executed.
FALSE
Output parameters and in-out parameters: Values
are retained.
NJ-series CPU Unit Software User’s Manual (W501)
6-21
6
6-2-6 Details on Functions
• If you set the return value within a function algorithm, set the value to a variable with the same
name as the function.
For example, the return value of a function called MyFUN is MyFUN.
6-2 POUs (Program Organization Units)
MyFUN2(In1:=variable_i1,In2:=v
ariable_i2,
OutEQ=>variable_q1,
OutNE=>variable_q4 );
MyFUN2
6 Programming
Example:
BOOL variable A
Algorithm within function
MyFUN
in
EN
MyFUN
ENO
P_On
BOOL variable B
in
Function
execution
You can change ENO with the
algorithm in the function.
ENO
BOOL variable A
BOOL variable B
6-2-7
Operation That Applies to Both Functions and Function Blocks
Using or Omitting EN and ENO
The following table shows when you can use and when you can omit EN and ENO in functions and
function blocks.
POU
FB
FUN
6-22
EN
ENO
User-defined
functions
Cannot be used.
Can be used or omitted.
A compiling error occurs if you try to define
EN in the variable table from the Sysmac
Studio.
You define ENO as an output variable in
the Sysmac Studio.
Instruction
All FB instructions do not use EN.
Some instructions use ENO, and others
do not.
User-defined
functions
Required.
Can be used or omitted.
When you create a function, the Sysmac
Studio automatically adds EN to the variable table by default.
You define ENO as an output variable in
the Sysmac Studio.
Instruction
All FUN instructions use EN.
Some instructions use ENO, and others
do not.
NJ-series CPU Unit Software User’s Manual (W501)
6 Programming
Operation When Parameters Are Omitted
You can omit both input and output parameters.
Operation when omitted
Parameters omitted in
FB
FUN
Input parameters to input
variables
• When the first time the instance is executed, the
initial value is used.
• Thereafter, the function block is executed with the
previous value (if the input variable is omitted, the
initial value is always used).
The initial value is used for
operation.
Can be omitted.
In-out parameters to/from
in-out variables
You can omit the output
parameter. If it is omitted,
You can access the results of the operation outside
of the instruction by using InstanceName.OutputVari- there is no way to retrieve
the result of the operation.
ableName.*
Cannot be omitted.
Cannot be omitted.
* You can access the input and output variables of a function block from outside of the function block (but only
within the same program) with InstanceName.VariableName. However, you cannot access the input and output
variables of a function from outside the function.
FBinstance
FB
Omitted.
Done
6-2 POUs (Program Organization Units)
Output parameters from
output variables
6
Can be specified by using InstanceName.Done.
Operation for Parameter Errors
The following operation occurs when there is an error in an input parameter, output parameter, or in-out
parameter.
z Errors in Input Parameters
If an error is detected in an input parameter, the function or function block is not executed and ENO
is FALSE. The power flow output is also FALSE, but all other values are retained.
Example:
Function
EN
x[i]
IN1
x[10]
IN2
ENO
OUT2
FALSE
abc Retained.
Variable Table
Variable name Array
Example when variable i is outside the
range of the elements in array variable x
NJ-series CPU Unit Software User’s Manual (W501)
x
[ 1 .. 10 ]
Data type
INT
6-23
6-2-7 Operation That Applies to Both Functions and Function Blocks
FBinstance.Done
6 Programming
z Errors in Output Parameters
If an error is detected in an output parameter, all values after that parameter are not output but their
values are retained.
Example:
Function
EN
ENO
IN1
OUT1
x[9]
IN2
OUT2
x[i]
OUT3
x[10] Retained.
Example when variable i is outside the
range of the elements in array variable x
Not output.
z Errors in In-Out Parameters
If an error is detected in an in-out parameter, the function or function block is not executed and ENO
is FALSE. The power flow output is also FALSE, but all other values are retained.
Function
EN
x[i]
INOUT--
OFF
ENO
--INOUT
X
x[i]
xyz Retained.
Example when variable i is outside the
range of the elements in array variable x
Recursive Calling
The following recursive calls are not allowed for functions or function blocks. They will result in an error
when you compile the user program on the Sysmac Studio.
• A function or function block cannot call itself.
• A called function or function block cannot call the calling parent.
6-2-8
POU Restrictions
This section describes the restrictions in the creation of POUs.
Names
Refer to 6-3-12 Restrictions on Variable Names and Other Program-related Names for restrictions on
POU names and function block instance names.
Passing Multiple Arguments
If you need to pass multiple arguments to a function or function block, use an array specification or
structure to pass the required data.
This will make your program simpler. However, be aware that if you use an in-out variable, the data
passed to the function block or function as a parameter is written and the original data is not retained.
6-24
NJ-series CPU Unit Software User’s Manual (W501)
6 Programming
Additional Information
Specifying an Array Variable or Structure Variable as a Parameter
You can also specify an array variable or a structure variable as an input or output parameter.
However, it will take longer to pass and receive data for these data types in comparison to a variable with a basic data type (depending on the size). Therefore, when handling array variables or
structure variables in a function block, we recommend that you design them in such a way that
these variables are passed to and received from in-out variables.
Example 1: Specifying an Array
Program Variable Table
FB
x
IN1
OUT1
Do not assign INT variable x [0..199] to the function block input variable
IN1 (Data type of the IN1 input variable in the function block:
ARRAY[0..199] OF INT).
FB
x
INOUT
INOUT
Instead, assign INT variable x [0..199] to the INOUT in-out variable of
the function block. (Data type of INOUT in-out variable in the function
block: ARRAY[0..199] OF INT)
6-2 POUs (Program Organization Units)
Variable name Data type
x
ARRAY[0..199] OF INT
6
Example 2: Specifying a Structure Variable
Program Variable Table
6-2-8 POU Restrictions
Variable name
x
Data type
MyStructure
FB
x
IN1
OUT1
Do not assign MyStructure variable x to the IN1 input
variable of the function block (Data type of IN1 input
variable of the function block: MyStructure).
INOUT
Instead, assign MyStructure variable x to the INOUT in-out
variable of the function block. (Data type of INOUT in-out
variable of the function block: MyStructure)
FB
x
INOUT
NJ-series CPU Unit Software User’s Manual (W501)
6-25
6 Programming
Nesting Levels
Calling another function block from a function block that was called from a program is called nesting.
You can nest function blocks up to eight levels deep.
You can nest user-defined functions and user-defined function blocks up to eight levels deep total.
Program
Nesting level 1
Nesting level 2
FB1
FB1
6-26
FB2
NJ-series CPU Unit Software User’s Manual (W501)
6 Programming
6-3
Variables
In the NJ-series System, variables are used to exchange I/O information with external devices, to perform data calculations, and to perform other processes. This section describes variable designations in
detail.
Refer to the Sysmac Studio Version 1 Operation Manual (Cat. No. W504) for details on setting variables
with the Sysmac Studio.
6-3-1
Variables
Variables store I/O data for exchange with external devices or temporary data that is used for internal
POU processing. In other words, a variable is a container for data with a name, data type, and other
attributes.
You do not need to assign a memory address to a variable. However, you can assign a specific memory
address if necessary (see note). The NJ-series CPU Unit automatically allocates memory addresses in
the memory area for variables.
6-3-2
Types of Variables
Variables are broadly classified into the following three types.
6-3 Variables
Note This is done to use specific functions for some CJ-series Special Units. You must specify the CJ-series Unit
memory address in the AT Specification attribute of the variable. Refer to AT Specification on page 6-51 for
details.
6
z User-defined Variables
z Semi-user-defined Variables
These variables are used to access specific devices and data. There are two types of semi-userdefined variables: device variables and cam data variables. Refer to 2-2-1 Types of Variables and 34-1 I/O Ports and Device Variables for details on device variables.
z System-defined Variables
System-defined variables are provided in advance in an NJ-series CPU Unit. The names and all
attributes are defined by the system. They have specific functions. System-defined variables are
supplied for each function module. Refer to A-3 System-defined Variables for details.
Refer to 2-2-1 Types of Variables for details on the different types of variables.
NJ-series CPU Unit Software User’s Manual (W501)
6-27
6-3-1 Variables
The user defines all of the attributes of a user-defined variable. The rest of this section describes
user-defined variables.
6 Programming
6-3-3
Types of User-defined Variables in Respect to POUs
There are six types of user-defined variables as defined according to their function in a POU.
Type of user-defined variable
POU type
Programs
FB
FUN
Internal variables
Supported.
Supported.
Supported.
Input variables
Not supported.
Supported.
Supported.
Output variables
Not supported.
Supported.
Supported.
In-out variables
Not supported.
Supported.
Supported.
Global variables
Supported (see note).
Supported (see note).
Supported (see note).
External variables
Supported.
Supported.
Supported.
Local variables
Note You can define global variables as external variables to access the global variables through the external variables.
Local Variables
Local variables can be read and written only in the POU (program, function, or function block) in which
it is defined. Local variables are the same as internal variables if the POU is a program. If the POU is a
function block or a function, “local variable” is a collective term for internal variables, input variables,
output variables, in-out variables, and external variables.
z Internal Variables
An internal variable can be used only within one POU. An internal variable is declared in the local
variable table for the POU. You cannot access the values of internal variables from outside of the
POU. You can declare internal variables with the same names in different POUs. Each of those variables is assigned to a different memory area.
z Input Variables
When a POU is called, the input variables are assigned to the values of the input parameters from
the calling POU. An input variable is declared in the local variable table of the POU.
z Output Variables
Before processing a POU is completed, the output parameters returned to the calling POU are
assigned to the output variables. An output variable is declared in the local variable table of the
POU.
z In-Out Variables
When a POU is called, the in-out variables are assigned to the in-out parameters themselves (variable designations) from the calling POU. If you change the value of an in-out variable within a POU,
the value of the in-out parameter changes at that time. An in-out variable is declared in the local variable table of the POU.
z External Variables
External variables are used to access data outside of a POU. You can access global variables from
POUs.
6-28
NJ-series CPU Unit Software User’s Manual (W501)
6 Programming
Global Variables
A global variable is declared in the global variable table.
Device variables that are automatically generated from the Unit configuration and slave configuration
and axis/axes group variables that are generated from the Axis Setting Table are automatically registered as global variables.
6-3-4
Attributes of Variables
You can set the following attributes for variables.
Variable Attributes According to Variable Type
z Attributes of Variables
Attribute
Description
Specification
Default
Data Type
The data type defines the format of the
data that is stored in the variable.
If you want to handle a specific address
for a CJ-series Unit as a variable, specify
the address to assign to that variable.
• Not specified.
• Specify.
Not specified.
AT Specification
Specify whether to retain the value of the
variable in the following cases.
• Retain: Value specified on the left is
retained if there is a
Battery.
• Non-retain: Changes
to initial value.
Non-retain: Reset
to initial value
6
Initial Value
Depends on the
data type. (Refer to
the section on initial
values.)
6-3-4 Attributes of Variables
Retain
• When power is turned ON after a
power interruption
• When the CPU Unit changes to RUN
mode
• When operation for a major fault level
Controller error has occurred.
You can select to set or not set an initial
value.
Initial value setting: Specify the value of
the variable in the following cases and do
not specify the Retain attribute.
Initial Value
6-3 Variables
Variable Name
The variable name is used to identify the
variable.
INT
• Yes
• None
• When power turned ON
• When operating mode changes
• When a major fault level Controller
error occurs
If the initial value is not set, the value is
not retained.
Constant
If you set the Constant attribute, you can
set the initial value of the variable when it
is downloaded, but you cannot overwrite
the value afterwards.
Network Publish
This attribute allows you to use CIP com- • Do not publish
munications and data links to read/write • Publish Only
variables from outside of the Controller.
• Input
• Output
NJ-series CPU Unit Software User’s Manual (W501)
Specify making the
value a constant or not
a constant.
Do not publish
6-29
6 Programming
Attribute
Description
Specification
An Edge attribute allows you to detect
when the input parameter of a function
block changes to TRUE or changes to
FALSE. This can be used only on BOOL
input variables.
Edge
• None
• Change to TRUE
• Change to FALSE
Default
None
Additional Information
Exclusive Control between Tasks
You can restrict writing to global variables to a single task to prevent changes to the values of
global variables during processing. Specify this as a task setting, not as a variable attribute.
z Attributes Supported by Each Type of Variable
Type of variable
Function
blocks
Functions
6-3-5
Data
Type
AT Specification
Retain
Initial
Value
Constant
Network
Publish
Edge
Supported.
Supported.
Supported.
Supported.
Supported.
Supported.
Supported.
Not supported.
Internal
variables
Supported.
Supported
Supported
Supported
Supported
Supported
Not supported.
Not supported.
External
variables
Not supported.
Not supported.
Not supported.
Not supported.
Not supported.
Supported.
Not supported.
Not supported.
Internal
variables
Supported.
Supported.
Supported.
Supported.
Supported.
Supported.
Not supported.
Not supported.
Input variable
Supported.
Supported.
Not supported.
Supported.
Supported.
Supported.
Not supported.
Supported.
Output
variables
Supported.
Supported.
Not supported.
Supported.
Not supported.
Not supported.
Not supported.
Not supported.
In-out
variables
Supported.
Supported.
Not supported.
Not supported.
Not supported.
Supported.
Not supported.
Not supported.
External
variables
Not supported.
Not supported.
Not supported.
Not supported.
Not supported.
Supported.
Not supported.
Not supported.
Internal
variables
Supported.
Supported.
Not supported.
Not supported.
Supported.
Supported.
Not supported.
Not supported.
Input variables
Supported.
Supported.
Not supported.
Not supported.
Supported.
Supported.
Not supported.
Not supported.
Output
variable
Supported.
Supported.
Not supported.
Not supported.
Not supported.
Not supported.
Not supported.
Not supported.
In-out
variables
Supported.
Supported.
Not supported.
Not supported.
Not supported.
Supported.
Not supported.
Not supported.
External
variables
Not supported.
Not supported.
Not supported.
Not supported.
Not supported.
Supported.
Not supported.
Not supported.
Global variables
Programs
Variable
Name
Data Types
The Data Type attribute defines the type of data and range of data that is expressed by a variable.
The amount of memory that is allocated when you declare a variable depends on the data type of that
variable. The more memory allocated, the larger the range of values that the variable can express.
The data types for the input, output, and in-out variables of instructions depend on the instruction. Set
the data types of input, output, and in-out parameters for the instruction arguments according to the
data types of the input, output, and in-out variables for that instruction.
6-30
NJ-series CPU Unit Software User’s Manual (W501)
6 Programming
Basic Data Types and Derivative Data Types
There are two kinds of data types: basic data types, which have predefined specifications, and derivative data types, which are defined according to user specifications.
z Basic Data Types
The different kinds of basic data types are listed below.
Classification
Definition
A data type with a value of either TRUE or FALSE.
Bit string
A data type that represents a value as a bit string.
Integer
A data type that represents an integer value.
Real number
A data type that represents a real number.
Duration
A data type that represents a time duration (days, hours, minutes, seconds, and
milliseconds).
Time of day
A data type that represents a specific time of day (hour, minutes, and seconds).
Date
A data type that represents a date (year, month, and day).
Date and time
A data type that represents a date and time (year, month, day, hour, minutes,
seconds, and milliseconds).
Text string
A data type that contains a value that represents a text string.
There are a total of twenty different basic data types. The specifications are given in the following
table.
6-3 Variables
Boolean
The meanings of the data size and alignment columns in the following table are as follows:
6
• Data size: The actual size of the value.
• Alignment: The unit used to allocate memory.
Data type
Boolean
BOOL
16 bits
2 bytes
FALSE or TRUE
BOOL#1, BOOL#0, TRUE or FALSE
BYTE
8 bits
1 byte
BYTE#16#00 to FF
BYTE#2#01011010
WORD
16 bits
2 bytes
WORD#16#0000 to FFFF
BYTE#2#0101_1010
32 bits
4 bytes
DWORD#16#00000000 to
FFFFFFFF
BYTE#16#5A
64 bits
8 bytes
LWORD#16#000000000000000
0 to FFFFFFFFFFFFFFFF
SINT
8 bits
1 byte
SINT#-128 to +127
100
INT
16 bits
2 bytes
INT#-32768 to +32767
INT#2#00000000_01100100
32 bits
4 bytes
DINT#-2147483648 to
+2147483647
INT#8#144
64 bits
8 bytes
LINT#-9223372036854775808 to
+9223372036854775807
INT#16#64
USINT
8 bits
1 byte
USINT#0 to +255
UINT
16 bits
2 bytes
UINT#0 to +65535
UDINT
32 bits
4 bytes
UDINT#0 to +4294967295
64 bits
8 bytes
ULINT#0 to
+18446744073709551615
Bit strings
DWORD
LWORD
DINT
Integers
LINT
ULINT
Data size
Alignment
NJ-series CPU Unit Software User’s Manual (W501)
Range of values
Notation
6-3-5 Data Types
Classification
You can also use the “_” character as a separator.
INT#10#100
−100
6-31
6 Programming
Classification
Data type
Data size
32 bits
Alignment
4 bytes
REAL
64 bits
Real numbers
8 bytes
Range of values
Notation
REAL#−3.402823e+38 to
−1.175494e-38
REAL#3.14
0
3.14
−1.175494e-38 to 3.402823e+38
−3.14
+∞ /−∞
1.0E+6
LREAL#−1.79769313486231e
1.234e4
LREAL#3.14
+308 to −2.22507385850720e308
LREAL
0
2.22507385850720e-308 to
1.79769313486231e+308
+∞ /−∞
64 bits
Durations
8 bytes
TIME
T#-9223372036854.775808ms
(T#106751d_23h_47m_16s_854.77
5808ms) to
T#12d3h3s
T#+9223372036854.775807ms
(T#+106751d_23h_47m_16s_85
4.775807ms)
TIME#16d_5h_3m_4s
T#3s56ms
TIME#6d_10m
T#12d3.5h
T#10.12s
T#61m5s (Equivalent to T#1h1m5s)
TIME#25h_3m
64 bits
Date
8 bytes
DATE
D#1970-01-01 to D#2106-02-06
(January 1, 1970 to February 6,
2106)
Add “DATE#”, “date#”, “D#”, or “d#” to the
beginning of the string and express the date
in the yyyy-mm-dd format.
Example:
d#1994-09-23
64 bits
Time of day
8 bytes
TIME_OF
_DAY
TOD#00:00:00.000000000 to
TOD#23:59:59.999999999
(00:00:0.000000000 to
23:59:59.999999999)
Add “TIME_OF_DAY#”, “time_of_day#”,
“TOD#”, or “tod #” to the beginning of the
string and express the time of day in the hhmm-ss format.
Example:
tod#12:16:28.12
64 bits
Date and time
DATE_
AND_
TIME
(Number of
single-byte
characters
plus 1) × 8
bits
Text strings
8 bytes
STRING
1 byte
DT#1970-01-0100:00:00.000000000 to
DT#2106-02-0623:59:59.999999999 (January 1,
1970 00:00:0.000000000 to July
21, February 6, 2106,
23:59.999999999 seconds.)
Add “DT#” or “dt#” to the beginning of the
string and express the date and time in the
yyyy-mm-dd-hh:mm:ss format.
The character code is UTF-8.
0 to 1,986 bytes*1*2 (0 to 1,985
single-byte alphanumeric characters)
Enclose the string in single-byte single quotation marks (‘).
Example:
dt#1994-09-23-12:16:28.12
Example:
‘OMRON’‘PLC’
A NULL character is added to the
end of text strings. The number
of bytes is therefore the number
of single-byte characters plus 1.
Note You must set the number
of bytes used by a
STRING variable (number
of single-byte alphanumeric characters plus 1) in
the Sysmac Studio. The
default setting is 256
bytes.
*1 For single-byte alphanumeric characters, this is equal to 0 to 1,985 characters. For Japanese, this is approximately equal to 0 to 661 characters.
*2 If you want to insert tabs, vertical tab codes, or other special characters, use a dollar sign ($) as an escape
character before them. Refer to Escape Character List on page 6-64.
6-32
NJ-series CPU Unit Software User’s Manual (W501)
6 Programming
Precautions for Correct Use
The total amount of memory required by all variables is not equal to the total of the data sizes of
each of those variables. This is because the first position where data is stored in memory is automatically set to a multiple of the alignment value for that data type. This results in some empty
space in memory between data types. For example, even if the data types are the same, the
overall memory space required depends on the order of data types, as shown below.
Example:
DWORD -> DWORD -> WORD: Requires a total of
10 bytes.
DWORD -> WORD -> DWORD: Requires a total of
12 bytes.
Byte
First byte
First byte+1
First byte+2
First byte+3
First byte+4
First byte+5
First byte+6
First byte+7
First byte+8
First byte+9
Byte
First byte
First byte+1
First byte+2
First byte+3
First byte+4
First byte+5
First byte+6
First byte+7
First byte+8
First byte+9
First byte+10
First byte+11
DWORD data
The beginning of the
data type is a
multiple of four.
DWORD data
The beginning of the
data type is a
multiple of two.
WORD data
DWORD data
WORD data
The beginning of the
data type is a multiple
of two.
Not used.
DWORD data
The beginning of the
data type is a multiple of
four, i.e., first byte + 8.
6
z Derivative Data Types
Description
Structures
This data type consists of multiple data types placed together into a single layered structure.
Unions
This data type allows you to handle the same data as different data types
depending on the situation.
Enumerations
This data type uses one item from a prepared name list as its value.
Refer to 6-3-6 Derivative Data Types for details.
z Specifications for Data Types
The following array specifications and range specifications are possible for all data types.
Type
Description
Array specification
An array is a group of elements with the same data type. You specify the number
(subscript) of the element from the first element to specify the element. You can
specify arrays for both basic data types and derivative data types.
Range specification
You can specify a specific range for a data type in advance.
You can specify a range for any integer basic data type.
Refer to 6-3-7 Array Specifications and Range Specifications for Data Types for details.
NJ-series CPU Unit Software User’s Manual (W501)
6-33
6-3-5 Data Types
A derivative data type is a data type with user-defined specifications. Derivative data types are registered in the Data Type View in the Sysmac Studio. The following is a list of the derivative data
types.
Type
6-3 Variables
You must be aware of the alignment values for different data types when you exchange data
such as structure variables between devices so that you can properly align the position of the
data in memory. Refer to A-7 Variable Memory Allocation Methods for details.
6 Programming
Restrictions on Using Data Types
A list of the data types that you cannot use in different POUs is given below.
POU type
Unusable data types
Type of variable
Programs
FUN
FB
Basic data types
Derivative data types
Local variables (i.e., internal variables)
None
Global variables
None
Input variables, output variables, and in-out
variables
None
Internal variables
None
Return values
None
A structure or union
Input variables, output variables, and in-out
variables
None
Unions
Internal variables
None
Unions
Bit String, Real Number, and Text String Data Formats
This section describes the data formats for bit string data, real number data, and text string data.
z Bit String Data Format
Bit 0 is the least significant bit of a bit string variable. Bit values are represented by values of either 1
or 0. However, you can also represent the value of a single bit as a BOOL variable where 1 equals
TRUE and 0 equals FALSE.
Bit 7
BYTE#16#3B
Bit 0
0 0 1 1 1 0 1 1
One-bit extraction
TRUE
z Real Numbers (REAL and LREAL Data)
REAL and LREAL data have a real number data format. This section describes how to express real
numbers and how to perform data processing with real number data types.
Data Size
REAL data is 32 bits, while LREAL data is 64 bits.
Data Formats
The floating-point format is a way to express a real number as a combination of a sign, an exponent,
and a mantissa. To express a real number as shown below, the value of s is the sign, the value of e
is the exponent, and the value of f is the mantissa.
• REAL Data
Number = (−1)s2e−127(1+f × 2−23)
• LREAL Data
Number = (−1)s2e−1023(1+f × 2−52)
This floating-point format follows the IEEE 754 standard. The formats are given below.
Sign Exponent
REAL data (32 bits) s
31 30
e
f
23 22
Sign Exponent
LREAL data (64 bits) s
e
63 62
52 51
6-34
Mantissa
0
Mantissa
f
0
NJ-series CPU Unit Software User’s Manual (W501)
6 Programming
Example: Expressing −86.625 as REAL Data
1
2
3
4
5
This is a negative number, so s =1.
86.625 in binary is 1010110.101.
Normalizing this value gives us 1.010110101 × 26.
From the above expression we can determine that e−127 = 6, so e = 133 (or 10000101 in
binary).
Next we take the value after the decimal part of 1.010110101, which is 010110101. This is not
enough for the 23-bit mantissa, so f is this number with the required amount of zeroes added to
the end. Therefore, f = 01011010100000000000000.
Therefore, you can express −86.625 as shown in the following figure.
REAL data (32 bits)
Sign Exponent
Mantissa
1 10000101 01011010100000000000000
31 30
23 22
0
Valid Ranges
Data type
−∞
Negative numbers
0
Positive numbers
+∞
REAL
−∞
−3.402823e+38 to −1.175494e-38 0
+1.175494e−38 to
+3.402823e+38
+∞
LREAL
−∞
−1.79769313486231e+308 to
−2.22507385850720e−308
+2.22507385850720e−308 to
+1.79769313486231e+308
+∞
REAL −3.402823e+38
LREAL −1.79769313486231e+308
6
REAL +3.402823e+38
LREAL +1.79769313486231e+308
6-3-5 Data Types
−∞
0
+∞
0
REAL −1.175494e−38
LREAL −2.22507385850720e−308
REAL +1.175494e−38
LREAL +2.22507385850720e−308
Special Values
Values such as positive infinity, negative infinity, +0, −0, and nonnumeric data are called special values. Nonnumeric data refers to data that you cannot express as a floating-point number and therefore cannot be treated as a numeric value. Although +0 and −0 both mathematically mean 0, they
are different for the purpose of data processing. This is discussed later in this section. The values for
the sign s, exponent e, and mantissa f of special numbers are given in the following table.
Data type name
REAL
Special values
Sign s
Exponent e
Mantissa f
+∞
0
255
0
−∞
1
255
0
+0
0
0
0
−0
1
0
0
Nonnumeric
---
255
Not 0
NJ-series CPU Unit Software User’s Manual (W501)
6-3 Variables
The valid ranges for REAL and LREAL data are shown in the following table. There are a range of
values that you cannot express as you approach 0.
6-35
6 Programming
Data type name
LREAL
Special values
Sign s
Exponent e
Mantissa f
+∞
0
2047
0
−∞
1
2047
0
+0
0
0
0
−0
1
0
0
Nonnumeric
---
2047
Not 0
Subnormal Numbers
You cannot use the floating-point format to express values close to 0 (i.e., values with an extremely
small absolute value). Therefore, you can use subnormal numbers to expand the valid range of numbers near 0. You can use subnormal numbers to express values with a smaller absolute value than
with the normal data format (normal numbers). Any number where the exponent e = 0 and the mantissa f ≠ 0 is a subnormal number and its value is expressed as shown below.
• REAL Data
Number = (−1)s2−126(f × 2−23)
• LREAL Data
Number = (−1)s2−1022(f × 2−52)
Example: Expressing 0.75 × 2−127 as REAL Data
1
2
3
4
This is a positive number, so s = 0.
0.75 in binary is 0.11.
From (0.11)2 × 2−127 = 2−126(f × 2−23) we can see that f = (0.11)2 × 222.
From the above expression, f = 01100000000000000000000.
Therefore, you can express 0.75 × 2−127 as shown in the following figure.
Sign
REAL data (32 bits)
Exponent
0 00000000
31 30
Mantissa
01100000000000000000000
23 22
0
Subnormal numbers have less effective digits than normal numbers. Therefore, if a calculation with
normal numbers results in a subnormal number or if a subnormal number results in the middle of
such a calculation, the effective digits of the result may be less than the effective digits of a normal
number.
Data Processing
The floating-point format expresses only an approximate value. Therefore, there may be a difference
between the floating-point number and its true value. There is also a limited number of effective digits for these values. Therefore, the following actions are taken when you perform calculations with
the floating-point format.
Rounding
If the real value exceeds the effective digits of the mantissa, the value is rounded off according to the
following rules.
• The result of the calculation will be the closest value to the value that can be expressed as a floating-point number.
• If there are two values that are the closest to the real value (e.g., if the real value is the median
value of two approximate values), the mantissa with a least significant bit value of 0 is selected as
the result of the calculation.
6-36
NJ-series CPU Unit Software User’s Manual (W501)
6 Programming
Overflows and Underflows
An overflow occurs when the absolute value of the true value is larger than the maximum value that
can be expressed in the floating-point format. An underflow occurs when the absolute value of the
true value is smaller than the minimum value that can be expressed in the floating-point format.
• If an overflow occurs and the true value is positive, the result of the calculation is positive infinity. If
the true value is negative, the result of the calculation is negative infinity.
• If an underflow occurs and the true value is positive, the result of the calculation is positive zero. If
the true value is negative, the result of the calculation is negative zero.
Special Value Calculations
Calculations that involve special values (i.e., positive infinity, negative infinity, +0, −0, and nonnumeric data) are performed according to the following rules.
• Addition of positive and negative infinity results in nonnumeric data.
• Subtraction of two infinite values of the same sign results in nonnumeric data.
• Multiplication of +0 or −0 with infinity results in nonnumeric data.
• Division of +0 by itself, −0 by itself, or infinity by itself results in nonnumeric data.
• Addition of positive and negative zero results in positive zero.
• Subtracting +0 from itself or −0 from itself results in +0.
6-3 Variables
• Any arithmetic that involves nonnumeric data results in nonnumeric data.
• Comparison instructions (such as for the Cmp instruction) treat +0 and −0 as equal.
• If you compare nonnumeric data with anything else, the result is always not equal.
z Text String Data Format
All STRING variables are terminated with a NULL character (character code BYTE#16#00).
6
When you use a variable of a different data type, the data type is automatically converted in some
cases. You can also perform the conversion yourself with a data type conversion instruction.
Data Type Conversion
All variables must have data types. Programs must operate properly according to these data types.
For example, the left and right sides of an assignment expression should normally use the same
data type. In some cases, however, it may be necessary to assign data of a different data type to a
variable in order to program something successfully.
Example:
var3 := var1;
Assigning a value to a variable of a different data type
var1 is a variable of data type INT.
var3 is a variable of data type REAL.
In order to assign the data in var1 to the data type of var3, the data must first be converted. This type
of conversion is called “data type conversion” or just “type conversion” for short.
z When Data Type Conversion Occurs
Converting between data types occurs in the following two cases.
(1) Conversion by User Execution of Data Type Conversion Instructions
(2) Automatic Conversion for Assignments and Instructions
• ST assignments
• Connecting lines in ladder diagrams
NJ-series CPU Unit Software User’s Manual (W501)
6-37
6-3-5 Data Types
Converting Data Types
6 Programming
6-3-6
Derivative Data Types
A derivative data type has a configuration that is based on one of the basic data types. The following is
a list of the derivative data types.
• Structures
• Unions
• Enumerations
Refer to 6-3-12 Restrictions on Variable Names and Other Program-related Names for restrictions on
the number of characters in data type names and other restrictions when you create a derivative data
type.
Additional Information
NJ-series Controllers come with three different types of system-defined derivative data types.
• System-defined variables that are structures
• Structures used for input, output, and in-out variables for instructions
• Structures for Special Unit expansion memory (You must register these in the Unit Editor to
use them.)
Structures
A structure is a derivative data type that groups together data with the same or different variable types.
You can easily change data and add new data if you place your data into a structure.
For example, you can define a “Box” structure that has three members (Width, Height, and Depth) in
order to organize and group your data.
You can then use this structure data type to add a variable called Box1. You can then use it to access
the different levels of the data by placing a period after the variable name followed by the name of the
data you want to access. For example, Box1.Width or Box1.Height.
If you need to create a new variable to store more box data, you can perform the same steps to add a
new variable called Box2 to the variable table.
Height of Box2
Height of Box3
Height of Box1
Structure Variable Box2
Structure Variable Box3
Structure Variable Box1
Member
Member
Member
Height
Height
Height
Width
Width
Width
Depth
Depth
Depth
When a structure is used for a variable in an instruction, it is necessary to select a structure for the input
parameter, output parameter, or in-out parameter, and register the variable.
Example: Communications Instructions
6-38
NJ-series CPU Unit Software User’s Manual (W501)
6 Programming
z Expressing Structure Variables and Structure Variable Members
Specifying Members
The individual pieces of data that make up a structure are called “members.” You can express individual members of a structure by putting a period after the variable name that represents the entire
structure followed by the member name that you want to access. You can even have a structure that
is the member of another structure.
Example:
abc.x: Member x of structure variable abc
abc.Order.z: Member z of member structure variable Order of structure variable abc
Specifying the Structure
The structure represents all members that make up the structure. A structure is expressed by the
name of the structure variable. In the example above, you would write abc.
z Creating a Structure
1
Create a structure data type in the Data Type Table.
Specify the data type name, members, and the data type.
Data Type Table
Member
Data type
RGB
red
INT
green
INT
blue
INT
ItemNo
INT
Color
RGB
ITEM
6
Specify the member name and the structure data type from above as the data type and register
the variable in the variable table.
Variables
Desk
red
Data type RGB
green
blue
Variable Table
Chairs[0]
Variable name
Data type
Desk
RGB
Chairs
ARRAY[0..1]OF ITEM
ItemNo
Color
red
green
blue
Chairs[1]
Data type ITEM
ItemNo
Color
red
green
Data type ITEM
blue
NJ-series CPU Unit Software User’s Manual (W501)
6-39
6-3-6 Derivative Data Types
2
6-3 Variables
Name
6 Programming
z Structure Specifications
Item
Structure names
Specification
Names are not case sensitive. Prohibited characters and character length restrictions
are the same as for variable names.
Member data types
Classification
Basic data
types
Derivative data
types
Data type
Boolean, bit string, integer, real, duration, date,
time of day, date and time, or text string data
Supported.
Array of Boolean, bit string, integer, real, duration, date, time of day, date and time, or text
string data
Supported.
Arrays (see note), unions, and enumerations
Supported.
Note Recursions and loops are not allowed. (An
error will occur when the program is
checked.)
Array specifications for structures, unions, and
enumerations
Supported.
Not supported.
POU instances
Member attributes
Usage
Member Name
Comment
Number of members
1 to 2,048
Nesting depth of
structures
Maximum of 8 levels (however, a member name must be 511 bytes or less, including the
variable name)
Maximum size of
one structure variable
No restrictions
z Arrays and Structures
You can set an array in which the elements are structures. You can also set a structure in which the
members are arrays.
z Instructions That Take a Structure as a Parameter
Some instructions pass structure variables as parameters. To do so, specify the structure variable as
the input parameter.
Example: Passing a Member of a Structure Variable to the MOVE Instruction and Passing a Structure Variable to the MOVE Instruction
6-40
NJ-series CPU Unit Software User’s Manual (W501)
6 Programming
When Not Using a Structure
When Using a Structure
Variable Table
Data Type Table
Variable name
Color1_red
Color1_green
Color1_blue
Color2_red
Color2_green
Color2_blue
Name
RGB
Data type
UINT
UINT
UINT
UINT
UINT
UINT
Member
red
Data type
UINT
green
blue
UINT
UINT
Variable Table
Color1_green:=255;
Color1_red:=128;
Color2_red:= Color1_red;
Color2_green:= Color1_green;
Color2_blue:= Color1_blue;
Variable name
Color1
Color2
Data type
RGB
RGB
Color1.green:=255;
Color1.red:=128;
Color2:= Color1
Some instructions take a predefined structure variable as an input variable.
Example: The Port input variable for the Serial Communications Instructions (which specifies the target port) is a structure with a data type name of _sPORT. When you use one of these
instructions, follow the procedure provided below to create a user-defined structure variable and specify that variable for the input parameter to the instruction.
The system-defined data type for the instruction is registered in the Sysmac Studio in advance.
Select that system-defined data type in the Sysmac Studio and add a user-defined structure
variable to the variable table.
2
3
Use the user program or initial values to set the member values of that structure.
Specify the structure variable for the input parameter to the instruction.
Unions
A union is a derivative data type that enables access to the same data with different data types. You can
specify different data types to access the data, such as a BOOL array with 16 elements, 16 BOOL variables, or a WORD variable.
z Expressing Unions and Union Members
Specifying Members
When you define a union, you must name each data type that can be accessed. These names are
called members. You can express individual members of a union by putting a period after the variable name that represents the entire union followed by the member name that you want to access.
Example:
Define the data type as a union as shown for My Union in the following example.
Data Type Definition
NJ-series CPU Unit Software User’s Manual (W501)
6-41
6
6-3-6 Derivative Data Types
1
6-3 Variables
Passing Values to System-defined Structure Input Variables for Certain
Instructions
6 Programming
Name
Member
My Union
Data type
data
WORD
bit
ARRAY [0..15] OF BOOL
Variable Table
Variable name
Data type
Output
My Union
Output.bit[0]:
This notation specifies the 0th element, or value at bit 00, of union Output when it is treated
as a 16-bit BOOL array variable.
Output.data:
This notation specifies the value when union Output is treated as a single WORD variable.
Specifying the Union
The union represents all members that make up the union. Unions are expressed by the name of the
union variable. In the example above, you would write Output.
z Creating Unions
1
Create a union data type in the Union Table.
Specify the data type names and different data types of the members of the union.
2
Specify the union data type from above as the data type and register the variable in the variable
table.
Example:
Here, OUT16_ACCESS is defined as the data type of a union. The members of this union are a
BOOL array with 16 elements and a WORD variable. The variable Output is registered with a data
type of OUT16_ACCESS. You can now read/write variable Output as a BOOL value for any of the 16
bits and as a WORD value.
Data Type Definitions
Name
Member
OUT16ACCESS
BoolData ARRAY[0..15] of BOOL
ByteData ARRAY[0..1] of BYTE
WordData WORD
Variable name
Data type
Output
OUT16ACCESS
BoolData
[15]
Data type
BoolData
[8]
BoolData
[0]
BoolData
[7]
ByteData
[1]
ByteData
[0]
WordData
Output.WordData := WORD#16#1234;
BoolData
ByteData
WordData
15
14
13
12
0
0
0
1
11
10
9
8
7
6
5
4
3
2
1
0
0
16#12
0
1
0
0
0
1
1
0
16#34
1
0
0
6
5
4
3
2
1
0
*
*
1
*
*
*
*
*
Bit 04 of ByteData[1] is TRUE
Bit 11 of WordData is TRUE
*
*
*
*
16#1234
Output.BoolData[11] :=TRUE;
BoolData
ByteData
WordData
6-42
15
14
*
*
13
12
11
10
9
8
7
*
*
No change
NJ-series CPU Unit Software User’s Manual (W501)
6 Programming
z Union Specifications
Item
Data types that
can be specified
for members
Specification
Classification
Data type
Usage
Basic data
types
Boolean and bit strings
Supported.
BOOL and bit string data array specifications
Supported.
Derivative data
types
Array specification for structures, unions, and
enumerations
Not supported.
POU instances
Number of members
4 max.
Setting initial values
Not supported. Always zero.
Not supported.
z Restrictions
• The initial values for unions are always zero.
6-3 Variables
• You cannot move unions.
• You cannot specify unions for parameters to POUs.
Enumerations (ENUM)
z Expressing Enumerations
When you define an enumeration, you must define the possible values of the variable as enumerators and give the enumeration a name.
z Creating Enumerations
1
Create an enumeration data type in the Enumeration Table.
Set the enumerators and their values for the enumeration.
2
Specify the enumeration data type from above as the data type and register the variable in the
variable table.
Example:
Here, Color is defined as the data type of an enumeration. For this example, we will set three
enumerators: red, yellow, and green. The numbers associated with these enumerators are as follows: red = 0, yellow = 1, green = 2. The variable DiscColor is registered with a data type of
Color. You can now select between three different enumerators for the variable DiscColor: red,
yellow, and green. This will in turn write the appropriate value of 0, 1, or 2 to the variable DiscColor.
NJ-series CPU Unit Software User’s Manual (W501)
6-43
6
6-3-6 Derivative Data Types
An enumeration is a derivative data type that uses text strings called enumerators to express variable
values. To use an enumeration, you must first set the values that can be obtained from that variable as
enumerators (text strings). Use enumerations to make it easier for humans to understand the meaning
behind the values of a variable.
6 Programming
Enumeration Table
Data type
Color
Enumerator
red
yellow
green
Variable Table
Variable name
DiscColor
FB
(Color)
IN
red
ENUM
Value
0
1
2
Data type
Color
z Enumeration Specifications
Item
Enumerator names
Values
Specification
Enumerator names consist of single-byte alphanumeric characters. They are not case
sensitive. Prohibited characters are the same as for variable names. A compiling error
will occur if you specify the same enumerator more than once. A compiling error will
occur if you specify an enumerator with the same name as a variable in the user program or if you specify an enumerator that already exists in another enumeration.
Valid range: Integers between −2,147,483,648 and 2,147,483,647
Values do not have to be consecutive.
A compiling error will occur if you specify the same value more than once.
Note You cannot perform size comparisons with enumeration variables. You can only
test to see if the enumerators are the same.
Number of enumera- 1 to 2,048
tors
z Value Checks
When a value is written to an enumerated variable through execution of an instruction, an error will
not occur even if that value is not defined as one of the enumerators of that variable.
6-3-7
Array Specifications and Range Specifications for Data Types
You can specify the following attributes for variables with each data types.
• Array specifications
• Range specifications
Array Specifications (ARRAY[]OF)
Use an array specification for a data type that handles a group of data with the same attributes as a single entity. You can use an array specification for the basic data types and derivative data types. Arrays
are useful when you want to handle multiple pieces of data together as you would, for example, coordinate values for motion control.
z Expressing Arrays and Array Elements
Specifying Elements
The individual pieces of data that make up an array are called “elements.”
The elements of an array are expressed by adding a subscript (element number) from the start of
the array to the name of the variable that represents the entire array.
Enclose the subscript in single-byte braces []. Subscripts can be either constants or variables. In ST,
you can also use expressions to express subscripts.
Examples:
6-44
NJ-series CPU Unit Software User’s Manual (W501)
6 Programming
Variable Table
Variable name
Data type
Mem
ARRAY[0..99] OF INT
x:=10;
Mem[x]: This expression specifies the xth element of the array variable Mem (the variable x
has a value of 10, so this would point to the 10th element).
Variable Table
Variable name
Data type
Data
ARRAY[0..99] OF INT
x:=10;
y:=20;
Data[x+y]: This expression specifies the x+yth element of the array variable Data (the variable
x has a value of 10 and variable y has a value of 20, so this would point to the 30th element).
Specifying An Array (i.e., the Entire Array)
z Creating an Array
1
2
Enter “A” into the Data Type Column of the variable table and select ARRAY[?..?] OF ? from the
list of possible data type name candidates.
Variable Table
Variable name
abc
Data type
ARRAY [ 0 .. 4 ] OF INT
Represents the data type of the array variable.
Represents the last number of the elements of the array.
Represents the first number of the elements of the array.
abc[0]
abc[1]
abc[2]
Array
abc[3]
abc[4]
NJ-series CPU Unit Software User’s Manual (W501)
6-45
6
6-3-7 Array Specifications and Range Specifications for Data Types
Enter the number of the first element in the array for the left question mark and the last number
for the right question mark in the “[?..?]” section. Next, enter the data type for the question mark
in the “OF ?” section and register the variable.
6-3 Variables
The array represents all elements that make up the array. Arrays are expressed by the name of the
array variable. In the above examples, the arrays are written as Mem and Data.
6 Programming
z Array Variable Specifications
Item
Specification
Maximum number
of elements for an
array variable
65535
Element numbers
0 to 65535
The number for the first element in an array does not have to be 0.
Subscripts
Constants: Integer value between 0 and 65535
Variables:
Classification
Data type
Integer
Basic data type
Derivative data
types
Usage
SINT, INT, DINT, USINT, UINT,
or UDINT
Supported.
LINT or ULINT
Not supported.
Boolean, bit string, real, duration, date, time of
day, date and time, or text string data
Not supported.
Structures, unions, and enumerations
Not supported.
Not supported.
POU instances
Arithmetic expressions: Arithmetic expressions can be specified only in ST.
Example: y:= x[a+b];
z Dimensions of Array Variables
You can regard the elements of a one-dimensional array as one-dimensional data lined up in a single row. You can set two-dimensional and three-dimensional arrays in the same way. The array elements are expressed by adding the same number of subscripts to the array variable name as the
number of dimensions. Arrays can have a maximum of three dimensions.
Two-dimensional Array Specifications
0
Variable Table
1
2
3
0
Variable name Data type
abc
1
ARRAY [0..5 .. 0..3 ] OF INT
2
abc[ 2 , 3 ]
3
4
5
Three-dimensional Array Specifications
Variable Table
Variable name Data type
2
Y( 0 . 2 )
ITEM
1
Z( 0 . 3 )
X( 0 . 1 )
0
0
1
0
1
2
ARRAY [ 0..1, 0..2, 0..3 ] OF INT
3
z Arrays and Structures
You can set an array in which the elements are structures. You can also set a structure in which the
members are arrays.
6-46
NJ-series CPU Unit Software User’s Manual (W501)
6 Programming
Arrays with Structure Elements
Variables
abc[1].x
abc[1].y
Date Type Table
Data type
Str
Member
x
y
Member
INT
DINT
abc[4].x
abc[4].y
Variable Table
Variable name
Data type
abc
ARRAY [1..4 ] OF Str
Structure with Array Members
Variables
abc[1].x[0]
abc[1].x[1]
abc[1].y
Data Type Table
Data type
Str
Member
x
y
Data type
ARRAY [0..1] OF INT
DINT
Variable Table
abc
ARRAY [1..4 ] OF Str
z Instructions with an Array Parameter
Some instructions pass array variables as parameters. To do so, specify only the name of the array
variable as the input parameter.
Example:
Passing a Single Array Element to the MOVE Instruction and Passing an Array to the
MOVE instruction
x[0]
Out
In
y[0]
Variable Table
Moves INT variable x[0] to y[0]
Variable name
Data type
x
ARRAY [ 0 .. 199 ]OF INT
y
ARRAY [ 0 .. 199 ]OF INT
Specifying the Array
MOVE
EN
ENO
In
Out
x
y
Moves INT variable x[0..199] to y[0..199]
Restrictions:
When you move an array variable, it must be moved to a variable of the same data type with the same range of element numbers.
Additional Information
You cannot specify part of a multi-dimensional array as a parameter.
MOVE
×
EN
x[0]
In
×
Variable Table
ENO
Out
y[0]
Variable name
Data type
x
ARRAY [ 0..9 , 0..9 , 0..9 ]OF INT
y
ARRAY [ 0..9 , 0..9 , 0..9 ]OF INT
MOVE
x[0,1]
EN
ENO
In
Out
y[0,1]
z Array Protection
The following errors occur if you attempt to access an element that exceeds the number of elements
in an array.
NJ-series CPU Unit Software User’s Manual (W501)
6
6-3-7 Array Specifications and Range Specifications for Data Types
Specifying One Element in the Array
MOVE
ENO
EN
6-3 Variables
abc[4].x[0]
abc[4].x[1]
abc[4].y
Variable name Data type
6-47
6 Programming
When the Subscript Is a Constant
An error is displayed when you input the variable or when you check the program on the Sysmac
Studio.
MOVE
Variable Table
EN
Variable name Data type
x
255
ARRAY [1..10] OF INT
In
[11]
Out
When the Subscript Is a Variable
The CPU Unit checks for subscripts that are out of range when instructions are executed. When a
subscript variable exceeds the range of the elements of the array variable, an instruction error
occurs.
Variable Table
Variable name Data type
x
ARRAY [1..10] OF INT
255
MOVE
EN
In
Out
If the value of variable i exceeds 10,
an instruction error occurs.
[i]
Range Specifications
Use the range specification to restrict the values of the following integer variables to specific ranges of
values.
Classification
Data type
Integers
SINT, INT, DINT, LINT, USINT, UINT, UDINT, and ULINT
You can check to make sure that the entered value is within the allowed range in the following cases.
• When you specify an initial value for a variable
• When you write a value to a variable with CIP message communications
z Making a Range Specification
Input the start point and end point after the data type name in the Data Type Column in the variable
table.
Start point: The minimum value that you can store in the variable.
End point: The maximum value that you can store in the variable.
Example:
Variable Table
Variable name
abc
Data type
INT (0 ,100)
The end point of the range specification
The start point of the range specification
abc
6-48
Range specification: Minimum 0 to maximum 100
NJ-series CPU Unit Software User’s Manual (W501)
6 Programming
z Specifications of Range Specifications
Item
Data types that
you can specify
Specification
Variables only
Case
User program
Operation
An error does not occur and the value is written.
The CPU Unit does not perform a range check
when the value of a variable changes due to the
execution of an instruction.
When the value is
an integer
Operation for
attempts to write
out-of-range
value
Communications
Write from the
Sysmac Studio
or a CIP message
A command error occurs.
For an element of
an integer array
variable
For a member of an
integer structure
Tag data links
(both via builtin EtherNet/IP
ports and EtherNet/IP Units)
An error occurs if you attempt to write to a single
member that specifies a range. An error does not
occur if you attempt to write to a structure that
contains a member for which a range is specified.
Input refreshing from slaves
and Units
An error does not occur and the value is written.
Forced refreshing values
An error does not occur and the value is written.
6-3 Variables
For an integer struc- A command error does not
ture
occur and the value is writFor an integer array ten.
6
6-3-7 Array Specifications and Range Specifications for Data Types
NJ-series CPU Unit Software User’s Manual (W501)
6-49
6 Programming
Precautions for Correct Use
Variables with range specifications are not checked for changes in variable values that result
from the execution of instructions in the user program. To check the range of values for a variable
that are set from execution of the user program, use instructions that perform range checks.
Variable Table
Variable name
Data type
Variable x
INT(10, 100)
ChkRange
MOVE
EN
EN
Variable x
Variable x
Variable i
In
In
Variable i
Out
Val
You cannot perform any checks beforehand if you set data with arithmetic processing results. In
this case, check the range of values after arithmetic processing (e.g., ADD).
Variable Table
ADD
EN
Variable tmp
Variable name
Data type
Variable A
INT(10, 100)
In1
In2
ChkRange
MOVE
EN
EN
Variable tmp
Variable tmp
Variable A
In
Variable A
In
Out
Val
If the results of the arithmetic
processing are within the range, set
variable A to the value.
Make sure that the initial value is within the range specified for the Range Specification. If the initial value field on the Sysmac Studio is left blank, an initial value of 0 is used. This applies even if
a range that does not include 0 is set for a Range Specification.
6-3-8
Variable Attributes
This section describes the variable attributes other than the Variable Name and Data Type.
Variable Name
The variable name is used to identify the variable. Each variable in a POU must have a unique name.
However, you can declare local variables with the same variable name in different POUs. These are
treated as two separate variables. You cannot declare a local variable with the same variable name as a
global variable.
Refer to 6-3-12 Restrictions on Variable Names and Other Program-related Names for restrictions on
variable names.
6-50
NJ-series CPU Unit Software User’s Manual (W501)
6 Programming
AT Specification
Use the AT Specification attribute to specify the internal I/O memory address of a variable in memory
used for CJ-series Units. AT specifications are used mainly to specify specific memory addresses for
the following Special Units.
• Addresses in fixed allocations for DeviceNet Units
• Addresses in user-specified allocations for DeviceNet Units from the CX-Integrator
• Addresses in expansion memory for High-speed Counter Units
• Addresses in expansion memory for Process I/O Units
If this attribute is not set, the variable is automatically assigned to an address in variable memory.
Additional Information
When you assign a device variable to an I/O port, they are automatically given an AT specification internally.
z Allocation Areas
Area
6-3 Variables
You can specify addresses in the following areas.
Expression
CIO
CIO 0 to CIO 6143
Work
W0 to W511
Holding
H0 to H1535
DM
D0 to D32767
EM
E0_0 to E18_32767
6
Variable data type
BOOL
6-3-8 Variable Attributes
The following table gives the data assignments by variable data type.
Assignment position
You can specify an assignment for each bit.
You can specify bit 0 or bit 8 of the specified CJ-series address as the start
position of the data assignment.
BYTE/SINT/USINT
Example 1: AT Specification at Bit 0 of D100 (%D100)
D100: 16#**12....One-byte data (12) is stored from bit 0.
Example 2: AT Specification at Bit 8 of D100 (%D100.8)
D100: 16#12**....One-byte data (12) is stored from bit 8.
WORD/INT/UINT
DWORD/DINT/UDINT
REAL
Stored in increments of the data size from bit 0 of the specified CJ-series
address.
LWORD/LINT/ULINT
LREAL
STRING
TIME
DATE
TIME_OF_DAY
DATER_AND_TIME
You can specify bit 0 or bit 8 of the specified CJ-series address as the start
position of the data assignment.
Stored in increments of the data size from bit 0 of the specified CJ-series
address.
z Variables for Which You Can Set AT Specifications
AT specifications are made separately for each variable. Set them for all elements and members of
array, structure, and union variables.
NJ-series CPU Unit Software User’s Manual (W501)
6-51
6 Programming
z Attributes of Variables with AT Specifications
Specification
Name
Supported.
Data Type
Supported.
Remarks
Supported.
An error occurs if the setting of the Retain attribute does not
agree with the attribute of the CJ-series Unit memory where the
address is assigned.
Supported.
Set the initial value setting to None if you want to use the memory
value as it is.
Constant
Supported.
You cannot write to a constant with an instruction.
Network Publish
Supported.
Retain
Initial Value
Not supported.
Edge
(You can specify the Edge attribute only for function block input
variables.)
z Entering and Displaying AT Specifications
When you specify the AT Specification attribute, input the following in the Allocated Address Box of
the variable table in the Sysmac Studio. The following is displayed in the Allocated Address Box of
the variable table or the I/O Map.
Type of variable
Entries and displays in the AT
field.
Example
User-defined variables with AT
specifications to word addresses
%[word_address]
%D100
User-defined variables with AT
specifications to bit addresses
%[word_address].[bit_position]
%W0.00
The following variables are also allocated an address internally. The following is displayed in the
Allocated Address Box.
Type of variable
Displays in the AT field.
Example
IOBus://rack#[rack_number]/slot#[
slot_number]/[I/O_port_number]
Basic I/O Units:
IOBus://rack#0/slot#1/Ch1_In/Ch1
_In00
Device variables for CJ-series
Units
Special Units:
IOBus://rack#0/slot#1/PeakHoldCmd/ch1_PeakHoldCmd
Device variables for EtherCAT
slaves
ECAT://node#[node_number]/[I/O
_port_name]
ECAT://node#1/Input1
Axis Variables
MC://_MC_AX[]
MC://_MC_AX[1]
Axes Group Variables
MC://_MC_GRP[]
MC://_MC_GR[1]
Precautions for Correct Use
You can assign the same address to more than one variable. However, this is not recommended
as it reduces readability and makes the program more difficult to debug. If you do this, set an initial value for only one of the variables. If you set a different initial value for each individual variable, the initial value is not stable.
Additional Information
You cannot use an AT specification for an EtherCAT slave. Always specify the device variables
for EtherCAT slaves.
6-52
NJ-series CPU Unit Software User’s Manual (W501)
6 Programming
Retain
Use the Retain attribute to specify whether a variable should retain its value in the following cases.
• When power is turned ON after power interruption
• When the operating mode is changed
• When a major fault level Controller error occurs
If the Retain attribute is not set, the value of the variable is reset to its initial value in the above situations.
You can specify the Retain attribute when you need to retain the data that is stored in a variable (such
as the manufacturing quantities) even after the power to the Controller is turned OFF.
For a variable with an AT specification, the setting of the Retain attribute must agree with address in the
memory area where the address is assigned.
(Retained areas: Holding, DM, and EM Areas
Non-retained areas: CIO and Work Areas)
z Conditions Required to Enable the Retain Attribute
The CPU Unit must contain a Battery.
When you download the user program, select the Clear the present values of variables with Retain
attribute Check Box.
z Operation with and without the Retain Attribute
6-3 Variables
z Using Initial Values for Retain Variables
6
The following table shows when variable values are retained or not.
Values of variables
When power is turned ON after power interruption
Retain attribute specified
Retained.
Retain attribute not
specified
Not retained.
When the operating mode is changed
When a major fault level Controller error occurs
When you download the
user program
When the Clear the
present values of variables with Retain
attribute Check Box is
selected.
When the check box is
not selected.
Not retained.
z Variables for Which You Can Specify the Retain Attribute
AT specifications are made separately for each variable. Set them for all elements and members of
array, structure, and union variables.
Initial Value
The variable is set to the initial value in the following situations.
• When power is turned ON
• When changing between RUN mode and PROGRAM mode
• When you select the Clear the present value of variables with Retain attribute Check Box, and download the user program
• When a major fault level Controller error occurs
NJ-series CPU Unit Software User’s Manual (W501)
6-53
6-3-8 Variable Attributes
Case
6 Programming
You can set an initial value for a variable in advance so that you do not have to write a program to initialize all of the variables. For example, you can preset data such as a recipe as initial values. You do not
have to set any initial values.
z Types of Variables That Can Have Initial Values
You can set initial values for only some types of variables. A list is provided below.
Type of variable
Initial Value
Global variables
Supported.
Internal variables
Input variables
Output variables
Return values of functions
Not supported.
In-out variables
External variables
z Enabling an Initial Value
You can specify whether a variable has an initial value when you create the variable.
Initial Value Specified
Initial value
Initial value
Or
(Blank)
3.14
No Initial Value Specified
Initial value
None
The following table shows the variables for which you can set an initial value.
Type
Basic data type variables
Example
Enabling an Initial Value
aaa
Supported.
Arrays
bbb
Supported.
Elements
bbb[2]
Not supported.
Structures
ddd
Supported.
Members
ddd.xxx
Not supported.
Unions
eee
Not supported (initial values are always 0).
Members
eee.word
Initial values are always 0.
Enumerated variables
ccc
Supported.
POU instances
instance
Not supported.
Array variables
Structure variables
Union variables
z When Initial Values Are Set
The initial value is assigned to the variable at the following times.
• When power is turned ON
• When the operating mode changes from PROGRAM to RUN mode or from RUN to PROGRAM
mode
• When you select the Clear the present value of variables with Retain attribute Check Box, and
download the user program
• When a major fault level Controller error occurs
6-54
NJ-series CPU Unit Software User’s Manual (W501)
6 Programming
z When the Initial Value Specification Is Left Blank
The following initial values are used for variables for which the initial value specification is left blank.
Data type
Default initial value
Boolean data and bit strings
BOOL, BYTE, WORD, DWORD, or
LWORD
0
Integers
SINT, INT, DINT, LINT, USINT,
UINT, UDINT, or ULINT
0
Real numbers
REAL and LREAL
0.0
TIME
T#0S
DATE
D#1970-01-01
TIME_OF_DAY
TOD#00:00:00
DATE_AND_TIME
DT#1970-01-01-00:00:00
STRING
‘ ‘(blank character)
Durations, dates, and times of
day
Text strings
z Initial Value of Array Variables
Data type
• You can specify an initial value for each element.
• To specify initial values, you must specify a value or leave the specification
blank for each element.
z Initial Values for Derivative Data Types
You do not specify an initial value for the data type itself. You set an initial value for each individual
variable.
Data type
Initial value specifications
• You can specify an initial value for each member.
• To specify initial values, you must specify a value or leave the specification
blank for each element.
Unions
• Initial values cannot be specified. Always zero.
Enumerations
• Initial values can be specified.
z Variables That Do Not Apply Initial Values
For the following variables, initial values are not applied when the power is turned ON, and the values before the power interruption are retained.
• Variables with Retain attribute
• Variables with AT specifications (retained areas or DM, Holding, or EM Area specifications only)
Precautions for Correct Use
If the CPU Unit has no Battery, the above variables are also initialized.
Constant
If you specify the Constant attribute, the value of the variable cannot be written by any instructions, ST
operators, or CIP message communications. Setting the Constant attribute will prevent any program
from overwriting the variable. The values of variables with a Constant attribute cannot be written from
instructions after the initial value is set. If there is an instruction in a POU that attempts to write a value
to a variable with the Constant attribute, an error will occur when the user program is compiled.
NJ-series CPU Unit Software User’s Manual (W501)
6-55
6
6-3-8 Variable Attributes
Structures
6-3 Variables
Array specifications
Initial value specifications
6 Programming
z Operation
If there is an instruction or operator in a POU that attempts to write a value to a variable with the
Constant attribute, the following operations will occur.
Source
Operation for attempts to write the value
An error is detected during the program check. The Sysmac
Studio checks the program when it is complied. A compiling
error occurs at that time.
User program
Communications
Writing from Sysmac Studio
Not supported.
CIP messages
A command error occurs.
Tag data links
An error occurs when a tag data link starts. The tag data link will
continue to operate. However, the values of variables with the
Constant attribute are not written.
Input refreshing from slaves and Units
An error does not occur and the value is written.
Forced refreshing
z Range for Constant Attribute Specification
The Constant attribute is specified separately for each variable. Set them for all elements and members of array, structure, and union variables.
Additional Information
You cannot write to variables with the Constant attribute from the user program.
Network Publish
The Network Publish attribute allows a variable to be read/written from external devices (other Controllers, host computers, etc.) through CIP message communications or tag data links. If this attribute is not
set, you can read/write the variable only from the Controller that declared the variable and external
devices (other Controllers, host computers, etc.) cannot read/write that variable.
Variables that have been published to the network are called network variables. There are no restrictions on the number of network variables you can have. You can publish as many variables to the network as you need.
z Network Publish Specifications
There are three specifications for publishing variables to the network: Publish Only, Input, and Output. The specifications are given in the following table.
Network Publish
Do not publish
Publish
6-56
Specifications
You cannot access a variable with this attribute from external devices.
However, Support Software can still access the variable regardless of
this setting.
Publish Only
You can access a variable with this attribute from external devices
through CIP communications. Tag data links are not possible for variables with this attribute setting.
Input
You can access a variable with this attribute from external devices
through CIP communications or a tag data link. For tag data links, this
will be a variable for data input (from another CPU Unit to the local CPU
Unit).
Output
You can access a variable with this attribute from external devices
through CIP communications or a tag data link. For tag data links, this
will be a variable for data output (from the local CPU Unit to another
CPU Unit).
NJ-series CPU Unit Software User’s Manual (W501)
6 Programming
z Ranges for Published to the Network
The Network publish attribute is specified separately for each variable. Set them for all elements and
members of array, structure, and union variables.
Edge
The Edge attribute makes the variable pass TRUE to a function block when a BOOL variable changes
from FALSE to TRUE or from TRUE to FALSE. You can specify the Edge attribute only for BOOL input
variables to function blocks.
z Application
Use the Edge attribute when you want the function block to accept the input only when the input
parameter changes from FALSE to TRUE or from TRUE to FALSE. For example, you can use this
attribute when you want to execute the function block any time there is a change detected in an input
parameter.
z Operation
• If you specify a change to TRUE, the input variable changes to TRUE only when the input parameter connected to that input variable changes from FALSE to TRUE.
Specification
Value of input parameter
Change to TRUE
Change to FALSE
6-3-9
FALSE to TRUE
TRUE
Other
FALSE
TRUE to FALSE
TRUE
Other
FALSE
---
Changes according to the input
parameter value.
6
Changes to Variables for Status Changes
The values of variables in the CPU Unit will change as shown in the following table when the power is
turned ON, when the operating mode changes, when the variable table is downloaded, when a major
fault level Controller error occurs, or during online editing.
When operating
mode changes
Retain attribute
of variable
Non-retain
When power is
turned ON
Type of variable
Change from
PROGRAM to
RUN mode or
RUN to PROGRAM mode
After downloading
When the Clear the
present values of
variables with
Retain attribute
Check Box is
selected.
User-defined variables and device
variables
• If initial values are set, the variables change to the initial values.
Device variables
with AT specifications
16#00
CIO, Work, and
Timer memory
areas for CJseries Units
16#00
When the check
box is not
selected.
• If initial values are not set, the variables change to 16#00.
NJ-series CPU Unit Software User’s Manual (W501)
6-57
6-3-9 Changes to Variables for Status Changes
None
Value of variable
6-3 Variables
• If you specify a change to FALSE, the input variable changes to TRUE only when the input parameter changes from TRUE to FALSE.
6 Programming
When operating
mode changes
Retain attribute
of variable
Type of variable
After downloading
When power is
turned ON
Change from
PROGRAM to
RUN mode or
RUN to PROGRAM mode
When the Clear the
present values of
variables with
Retain attribute
Check Box is
selected.
No change (retains
value before power
interruption).
No change (i.e.,
the values in RUN
mode are
retained).
When retain condition* is met, retains
value before download.
User-defined variables
When retain condition* is not met
• If initial values are
not set, the variables change to
16#00.
Device variables
for CJ-series
Units
Holding, DM, EM,
and Counter
memory areas for
CJ-series Units
When retain condition* is met
• If initial values are
set, the variables
change to the initial values.
• If initial values are
not set, the variables change to
16#00.
• If initial values are
set, the variables
change to the initial values.
Retain
When the check
box is not
selected.
• If initial values are
set, the variables
change to the initial values.
• If initial values are
not set, the variables change to
16#00.
The value in memory at the specified
address, regardless
of the retain condition*
• If initial values are
set, the variables
change to the initial values.
Retains value
before download
regardless of retain
condition.*
Retains value
before download
regardless of retain
condition.*
• If no initial values
are set, the variables retain their
value before the
download.
* Retain condition: Indicates that the following conditions are met both before and after transfer.
• The variable name is the same.
• The data type name and data type size are the same.
• The Retain attribute is specified.
6-58
NJ-series CPU Unit Software User’s Manual (W501)
6 Programming
Retain attribute
of variable
Non-retain
Type of variable
User-defined variables and device variables
CIO and Work memory areas for CJseries Units
User-defined variables and device variables
When a major fault level
Controller error occurs
Variable added to a POU
for online editing.
Variable in a POU for
online editing.
• If initial values are set,
the variables change to
the initial values.
• If initial values are set,
the variables change to
the initial values.
No change
• If initial values are not
set, the variables
change to 16#00.
• If initial values are not
set, the variables
change to 16#00.
16#00
No change
No change (retains value
before error).
• If initial values are set,
the variables change to
the initial values.
• If initial values are not
set, the variables
change to 16#00.
Retain
No change
Holding, DM, and EM
memory areas for CJseries Units
Forced refreshing
status
Cleared.
No change
6-3 Variables
Others
During online editing
6-3-10 Function Block Instances
Function block instances are added to and displayed in the local variable table as a data type.
6
Additional Information
6-3-11 Monitoring Variable Values
You can monitor the value of variables from a Watch Tab Page on the Sysmac Studio.
1
2
Select Watch Tab Page from the View Menu. The Watch Tab Page is displayed.
Establish an online connection with the Controller and register the variables in one of the following ways.
(1) Enter the variable in the name cell in the Watch Tab Page.
(2) Drag variables to the Watch Tab Page from an editor or variable table.
3
The present values of the variables are displayed.
NJ-series CPU Unit Software User’s Manual (W501)
6-59
6-3-10 Function Block Instances
A function block instance is treated as a local variable (i.e., internal variable) of the program in
which the instance is created. As such, the instance is added to and displayed in the local variable table of the program. You cannot treat these instances as global variables.
6 Programming
6-3-12 Restrictions on Variable Names and Other Program-related
Names
The following is a list of restrictions on program-related names.
Character Restrictions
Program-related
name
Variable name
(including POU
instance names)
POU definition
names
Data type
Structure member
names and union
member names
Enumerators
Task names
Full paths of variable names
Device names
Section names
Axis names
Axes group names
Cam table names
Applicable characters
z
•
•
•
•
Usable characters
0 to 9, A to Z, and a to z
Single-byte kana
_ (underlines)
Multibyte characters (e.g., Japanese)
Refer to Reserved Words below
for a list of the reserved words.
Reserved
words
Refer to
Reserved
Words
below.
z Characters that cannot be used
together
• A text string that starts with a
number (0 to 9)
• Strings that start with “P_”
• A text string that starts in an
underline (_) character
• A text string that contains more
than one underline (_) character
• A text string that ends in an
underline (_) character
• Any text string that consists of
an identifier and has a prefix or
postfix which contains more
than one extended empty space
character (i.e., multi-byte spaces
or any other empty Unicode
space characters)
Multibyte
character
compatibility
Supported.
Case
sensitivity
Not case
sensitive.
Maximum
size (not
including
NULL)
127 bytes
Character
encoding
UTF-8
63 bytes
Network variable: 255
bytes
Other: 511
bytes
127 bytes
Case
sensitive.
Not case
sensitive.
Reserved Words
If any names are the same as a reserved word, an error will occur when you check the program.
Names That Must Be Unique
The following names must be unique. An error is detected during the program check if they are not.
• Global variable names in the same CPU Unit
• Variable names in the same POU
• Section names in the same POU
• Member names in the same union or structure
• Enumerators in the same enumeration
• Local variable names and global variable names
• POU names and data type names
• Data type names and variable names
• Enumerators of an enumeration and enumerators of another enumeration
• Enumerators and variable names
6-60
NJ-series CPU Unit Software User’s Manual (W501)
6 Programming
6-4
Constants (Literals)
This section describes constants in detail.
6-4-1
Constants
The value of a variable changes depending on the data that is assigned to that variable. The value of a
constant never changes. Unlike variables, constants are not stored in memory. You can use constants
in the algorithm of a POU without the need to declare them. In the NJ-series Controllers, constants
have a data type in the same way as variables,
6-4-2
Types of Constants
6-4 Constants (Literals)
The following types of constants can be used with NJ-series Controllers.
• Bits
• Numbers
• Bit strings
• Times
• Text strings
The following tables show how to express different variables in an NJ-series Controller.
6
Bits
Example
Remarks
TRUE or FALSE
TRUE is equivalent to BOOL#1.
{data_type}#{numeric_value]
BOOL#1 or BOOL#0
FALSE is equivalent to BOOL#0.
Precautions for Correct Use
You cannot express a BOOL value as 0 or 1. A compiling error will occur.
Example:
Wrong: BOOL_variable:=1;
Correct: BOOL_variable:=TRUE; or BOOL_variable:=BOOL#1;
Numbers
z Integers
Notation
Example
Remarks
{data_type}#{base}#{numeric_value]
INT#10#−1
• Data types: SINT, USINT, INT, UINT, DINT, UDINT,
LINT, or ULINT
• Base: 2, 8, 10, or 16
{data_type}#{numeric_value]
INT#−1
This is interpreted as decimal data.
Note You cannot omit {data_type}# and just enter {base}#{numeric_value]. Any variables that are entered in that
form for instruction parameters result in errors.
Example: You cannot enter only #16#1A.
You cannot enter just {numeric_value]. Any variables that are entered in that form for instruction parameters
result in errors.
Example: You cannot enter only −1.
NJ-series CPU Unit Software User’s Manual (W501)
6-61
6-4-1 Constants
Notation
TRUE or FALSE
6 Programming
z Real Data
Notation
Example
Remarks
{data_type}#{base}#{numeric_value]
LREAL#10#−3.14
Data types: REAL or LREAL
{data_type}#{numeric_value]
LREAL#−3.14
This is interpreted as decimal data.
{numeric_value}
−3.14
If {data_type} is omitted, the value is interpreted
as LREAL decimal data.
Base: 10
Note Express real-number variables as REALnumeric_value.
Example:
Correct: REAL_variable:= REAL#3.14
Wrong: REAL_variable:=3.14;
Bit Strings
z Bit String Data
Notation
{data_type}#{base}#{numeric_value]
Example
WORD#16#0064
Remarks
• Data types: BYTE, WORD, DWORD, or LWORD
• Base: 2, 8, or 16
Note Express bit string data as bit_string_data_type#base#numeric_value.
Example:
Correct: bit_string_variable:=WORD#16#3
Wrong: bit_string_variable:=3
Precautions for Correct Use
• You cannot compare the sizes of bit string data types (BYTE, WORD, DWORD, and LWORD).
You must convert variables of these types to an integer data type with a data conversion
instruction (e.g., WORD_TO_UNIT) before you can compare the values.
Example:
BCD_data : WORD
IF WORD_BCD_TO _UNIT(BCD_data)> UINT#1234 THEN
• You cannot perform logic processing on integer data types (SINT, INT, DINT, LINT, USINT,
UINT, UDINT, and ULINT). You must convert variables of these types to a bit string data type
with a data conversion instruction (e.g., INT_TO_WORD) before you can perform logic operations.
Example:
a : INT
IF INT_TO_WORD(a) AND WORD#16#0001 THEN (*When a is odd*)
6-62
NJ-series CPU Unit Software User’s Manual (W501)
6 Programming
Time-related Data
z Durations
Notation
Example
TIME#{day}d{hour}h{mi
nutes}m{seconds}s{milliseconds}ms
TIME#61m5s
T#{day}d{hour}h{minutes}m{seconds}s{milliseconds}ms
T#61m5s
Remarks
• You can also include decimal points such as in “T#12d3.5h”.
• You can also include numerical values that are greater than the
valid range of times. For example, T#-61m5s expresses the same
time as T#-1h1m5s.
• The numerical value is interpreted as a decimal number. If any
number that is not a decimal number is used, a compiling error
will occur.
• You can specify the order of the time any way you want. For
example, “TIME#1h_2d” is a valid expression.
As long as there is at least one of the following: {day}, {hour},
{minutes}, {seconds}, {milliseconds}, no compiling error will
occur.
Notation
DATE#{year}-{month}{day}
Remarks
• You can add one or more zeroes to the beginning of the year,
month, and day. For example, D#2010-1-10 expresses the same
date as D#2010-01-10.
• A compiling error will occur if you specify any numerical value
that overflows the valid dates. For example, D#2010-01-35 will
cause an error.
• The numerical value is interpreted as a decimal number. If any
number that is not a decimal number is used, a compiling error
will occur.
D#2010-1-10
z Times of Day
Notation
Example
Remarks
TIME_OF_DAY#{hour}:{ TIME_OF_DAY# • You can add one or more zeroes to the beginning of the hour,
minutes}:{seconds}
23:59:59.99999
minute, and second. For example, D#23:1:1: expresses the same
9999
date as D#23:01:01.
• A compiling error will occur if you specify any numerical value that
overflows valid times. For example, D#24:00:00 will cause an
error.
• The numerical value is interpreted as a decimal number. If any
number that is not a decimal number is used, a compiling error
will occur.
TOD#{hour}:{minutes}:{seconds}
TOD#23:59:59.9
99999999
z Dates and Times
Notation
Example
Remarks
DATE_AND_TIME#{ye
ar}-{month}{day}:{hour}:{minutes}:{seconds}
DATE_AND_TI
This is the same as the date data and time data types.
ME#2010-1010-23:59:59.123
DT#{year}-{month}{day}:{hour}:{minutes}:{seconds}
DT#2010-10-1023:59:59.123
NJ-series CPU Unit Software User’s Manual (W501)
6-63
6
6-4-2 Types of Constants
D#{year}-{month}-{day}
Example
DATE#2010-110
6-4 Constants (Literals)
z Dates
6 Programming
Text Strings
z Text String Data
Notation
‘String’
Example
‘This is a string’
Remarks
• Enclose the string in single-byte single quotation marks
(‘).
• If you want to insert tabs, line break codes, or other
special characters, you can use a dollar sign ($) as an
escape character before them. (Refer to the following
table.)
• You can also specify a string with 0 characters.
• As in the following example, a compiling error will occur
if you specify any strings that span across multiple
lines.
strVar := 'ABC
DEF'
Escape Character List
Escape character
Name
Meaning
$$
Single-byte dollar sign
Single-byte dollar sign ($: character code 0x24)
$'
Single-byte single quotation mark
Single-byte single quotation mark (‘: character code 0x27)
$L or $l
Line feed
Moves the cursor to the next line.
$N or $n
Vertical tab
Moves the cursor to the next line.
LF control character (line feed: character code 0x0A)
NL control character (vertical tab: character code 0x0B)
$P or $p
Form feed
Moves the cursor to the next page.
FF control character (form feed: character code 0x0C)
$R or $r
Carriage return
Moves the cursor to the start of the line.
CR control character (carriage return: character code
0x0D)
$T or $t
Horizontal tab
Indicates a tab.
$"
Single-byte double quotation mark
Outputs a single-byte double quotation mark (character
code 0x22).
$(two-digit hexadecimal number)
Direct character code
specification
Specify the character code as two-digit hexadecimal in
parentheses. Character codes are two-digit hexadecimal
numbers that range from 00 to FF.
Tab character (character code 0x09)
For example, “$L” is the same as “$0A”. UTF-8 character
codes cannot be expressed in a single byte. But, for example, the character code for the Japanese character ‘ ’ is
0xE38182 which can be represented as ‘$E3$81$82’.
6-64
NJ-series CPU Unit Software User’s Manual (W501)
6 Programming
6-5
Programming Languages
This section describes the programming languages in detail. Refer to the Sysmac Studio Version 1
Operation Manual (Cat. No. W504) for details on entering programs with the Sysmac Studio.
6-5-1
Programming Languages
The languages used to express the algorithms in a POU (program, function, or function block) are
called the programming languages. There are two different programming languages that you can use
for an NJ-series Controller: ladder diagram language (LD) and ST (structured text) language.
6-5-2
Ladder Diagram Language
General Structure of the Ladder Diagram Language
A ladder diagram consists of left and right bus bars, connecting lines, ladder diagram structure elements (e.g., inputs and outputs), functions, and function blocks.*
* Only Jump instructions and Label instructions are expressed with symbols that indicate the jumps and labels.
Input
Function or function block
Output
Connecting line
Left bus bar
Right bus bar
Rungs
Logic blocks
z Bus Bars
The vertical lines on the left and right sides of a ladder diagram are called the bus bars. These bus
bars always have a status of either TRUE or FALSE. If you think of the ladder diagram as an electrical circuit, these states represent the flow of current through the circuit. When a POU that is written
as a ladder diagram is executed, the value of the left bus bar changes to TRUE. As a result, all
inputs and other configuration elements connected to the left bus bar also become TRUE. Execution
progresses as elements to the right are also changed to TRUE based on the operation of these configuration elements. This cascade of the TRUE state is called the “power flow.” The left bus bar is the
source of this power flow.
NJ-series CPU Unit Software User’s Manual (W501)
6-65
6
6-5-1 Programming Languages
Algorithms are made of multiple rungs connected together. A rung is a connection of all configuration
elements between the left bus bar and the right bus bar. A program rung consists of logic blocks that
begin with an LD/LD NOT instruction that indicates a logical start.
6-5 Programming Languages
The ladder diagram language (LD) is a graphical programming language that is written in a form that
appears similar to electrical circuits. Each object for processing, including functions and function blocks,
is represented as a diagram. Those objects are connected together with lines to build the algorithm.
Algorithms that are written in the ladder diagram language are called ladder diagrams.
6 Programming
z Connecting line
The straight horizontal lines that connect the bus bar and the configuration elements are called connecting lines. Connecting lines can be either TRUE or FALSE and can transfer the power flow from
the left to the right.
z Inputs
Inputs are placed along the connecting line to receive the power flow and operate accordingly. There
are several different types of inputs and, depending on their specifications, they will either transfer
the power flow from the left to the right or prevent the power flow from passing through. When an
input transfers the power flow to the right, the connecting line to the right of the input will become
TRUE. If the power flow is inhibited, the connecting line to the right of the input will remain FLASE.
For detailed specifications on inputs, refer to the NJ-series Instructions Reference Manual (Cat. No.
W502).
z Output
Outputs are placed along the connecting line to receive the power flow and operate accordingly. An
output writes the TRUE or FALSE value to a variable. There are different types of outputs. For
detailed specifications on outputs, refer to the NJ-series Instructions Reference Manual (Cat. No.
W502).
z Functions and Function Blocks
Functions and function blocks are placed along the connecting line to receive the power flow and
operate accordingly. For detailed instruction specifications, refer to the NJ-series Instructions Reference Manual (Cat. No. W502).
Order of Execution for Ladder Diagrams
Inputs, outputs, functions, and function blocks are executed when they receive the power flow. The
order of execution for a ladder diagram is from top to bottom. Elements at the same level are executed
from left to right.
Ladder Diagram Completion
A ladder diagram is executed in order from top to bottom. When the execution reaches the very bottom,
the process is completed. However, the process will also end if an END or RETURN instruction is
encountered at any point during the process. No processes after those instructions are executed.
Controlling Execution of Ladder Diagrams
Ladder diagrams are generally executed from top to bottom, but you can use execution control instructions to change the execution order. In the following example, when the value of program input a
changes to TRUE, execution will move to the point labeled ‘ExceptionProcessing.’
Input a
Label: ExceptionProcessing
6-66
Input b
Input c
Label: ExceptionProcessing
Input d
Input e
NJ-series CPU Unit Software User’s Manual (W501)
6 Programming
Connecting Functions and Function Blocks in a Ladder Diagram
z Connection Configurations
You use the following two types of connections for functions or function blocks.
1) Power Flow Input and Output
In a ladder diagram, the line that connects an input variable of a function or function block and the
left bus bar indicates a BOOL input and the line that connects an output variable to the right bus bar
indicates a BOOL output.
Example:
Inputs are connected in the power flow that connects to the left bus bar. Outputs are connected in
the power flow that connects to the right bus bar.
y2
FB
x2
6-5 Programming Languages
x1
IN1
OUT1
IN2
OUT2
y2
2) Parameter Inputs and Parameter Outputs
In a ladder diagram, parameter inputs and outputs are specified when the input and output variables
of a function or function block are not connected to the left and right bus bars.
y2
FB
x2
6-5-2 Ladder Diagram Language
x1
IN1
OUT1
IN2
OUT2
y2
As shown below, you can specify either variables or constants for input and output parameters.
Function/function block variables
Input parameters
Output parameters
Input variables
You can specify variables or constants.
---
Output variables
---
You can specify only variables.
In-out variables
You can specify only variables.
You can specify only variables.
z Number of BOOL Variables
At least one BOOL variable each is required for the input and the output (such as EN and ENO) of a
function or function block.
Example:
BOOL variable
BOOL variable
MyFB
(BOOL)
IN
(INT)
Val_In
NJ-series CPU Unit Software User’s Manual (W501)
6
(BOOL)
Q
6-67
6 Programming
z Connections Based on the BOOL Variable Positions
The top BOOL variables are connected to the left and right bus bars. In other words, they become
the power flow input and power flow output.
Top BOOL
variable
Power flow
MyFB
(BOOL)
IN
(INT)
Val_In
(INT)
Val_Out
(BOOL)
Q
Top BOOL variable
Power flow
There is only one power flow input and one power flow output for each function or function block. All
other BOOL variables that are not at the top are for parameter inputs and parameter outputs.
MyFB
BOOL variable
that is not at the
top
a
(BOOL)
IN1
(INT)
Val_In
(BOOL)
IN2
(INT)
Val_Out
(BOOL)
Q1
(BOOL)
Q2
BOOL variable that is not
at the top
b
Parameter output
Parameter input
You cannot connect multiple BOOL variables to the left bus bar or the right bus bar as shown below.
RS
(BOOL)
Set
(BOOL)
NG
(BOOL)
Q1
Reset1
MyFB
(BOOL)
IN
(INT)
Val_In
(INT)
Val_Out
(BOOL)
Q1
(BOOL)
Q2
NG
You do not have to connect an OUT instruction to the right bus bar. You can connect the function or
function block directly.
MyFB
(BOOL)
IN
(INT)
Val_In
OK
(BOOL)
Q
A LD instruction is not necessarily required. You can also connect directly to the left bus bar.
OK
MyFB
(BOOL)
IN
(INT)
Val_In
6-68
(BOOL)
Q
NJ-series CPU Unit Software User’s Manual (W501)
6 Programming
z Cascade Connections
Cascade connections in which the output of a function or function block is connected to the input of
another function or function block are allowed only for power flow outputs and inputs.
Example:
CIPRead
GO
(BOOL)
Execute
(BOOL)
Handle
(BOOL)
SrcDat
(BOOL)
Size
(BOOL)
DscDut
CIPRead
(BOOL)
Execute
(BOOL)
Handle
(BOOL)
SrcDat
(BOOL)
Size
(BOOL)
DscDut
(BOOL)
Done
(BOOL)
Busy
(BOOL)
Error
(BOOL)
ErrorID
(BOOL)
ErrorIDEx
(BOOL)
RecvSize
6-5 Programming Languages
(BOOL)
Done
(BOOL)
Busy
(BOOL)
Error
(BOOL)
ErrorID
(BOOL)
ErrorIDEx
(BOOL)
RecvSize
MyFB
(BOOL)
IN
(INT)
Val_In
(INT)
Val_Out
(BOOL)
Q
(BOOL)
IN
(INT)
Val_In
MyFB
(INT)
Val_Out
(BOOL)
Q
You can branch the power flow output.
6
Example:
CIPRead
CIPRead
GO
(BOOL)
Execute
(BOOL)
Handle
(BOOL)
SrcDat
(BOOL)
Size
(BOOL)
DscDut
6-5-2 Ladder Diagram Language
OK
(BOOL)
Done
(BOOL)
Busy
(BOOL)
Error
(BOOL)
ErrorID
(BOOL)
ErrorIDEx
(BOOL)
RecvSize
(BOOL)
Execute
(BOOL)
Handle
(BOOL)
SrcDat
(BOOL)
Size
(BOOL)
DscDut
(BOOL)
Done
(BOOL)
Busy
(BOOL)
Error
(BOOL)
ErrorID
(BOOL)
ErrorIDEx
(BOOL)
RecvSize
CIPRead
(BOOL)
Execute
(BOOL)
Handle
(BOOL)
SrcDat
(BOOL)
Size
(BOOL)
DscDut
NJ-series CPU Unit Software User’s Manual (W501)
(BOOL)
Done
(BOOL)
Busy
(BOOL)
Error
(BOOL)
ErrorID
(BOOL)
ErrorIDEx
(BOOL)
RecvSize
6-69
6 Programming
Restriction
• You cannot create closed loops or intersect connecting lines.
Example:
FB1
FB2
EN
ENO
EN
ENO
IN1
OUT1
IN
OUT
IN2
OUT2
NG
No closed loops
z NOT Inputs
BOOL parameters can be inverted for inputs.
NOT input
FB
(BOOL)
(BOOL)
Q
IN
TRUE→FALSE
FALSE→TRUE
Inline ST
z Introduction
Inline ST is a ladder diagram programming element in which you can write ST language code in a
box called an inline ST box (a blank text input area) within a ladder diagram. This allows you to easily code numeric data processing and text string processing within ladder diagrams. The connecting
line to an inline ST box becomes its execution condition. The ST code inside of the box is executed
based on that connecting line. Refer to the following figure.
Inline ST
Execution Condition for Inline ST
Inline ST box
i1
i2
taiseki := 4.0 * 3.14 * round *round * round / 3.0;
Enter the ST language code here.
Inline ST is treated as a rung element in a ladder diagram. Therefore, unlike functions and function
blocks, they have no input, output, or in-out variables.
z Restrictions for Inline ST
You can write ST language code in inline ST boxes.
6-70
NJ-series CPU Unit Software User’s Manual (W501)
6 Programming
z Execution Conditions for Inline ST
The execution conditions for inline ST are shown in the following table.
Status
Operation
TRUE execution condition
Operation follows the execution condition. You can use the execution condition at any point in the power flow (e.g., you can connect the inline ST
directly to the left bus bar). To specify a change to TRUE or a change to
FALSE, specify it for an input in the execution condition.
FALSE execution condition
Nothing is done.
Resetting in a master control
region
Nothing is done.
z Scope of Variables in Inline ST
The scope of variables that you can access from inline ST is the same as the POU of the ladder diagram that contains the inline ST.
Item
Number of inline ST boxes per rung
6-5-3
Description
1
Structured Text Language
The ST (structured text) language is a high-level language code for industrial controls (mainly PLCs)
defined by the IEC 61131-3 standard. The standard control statements, operators, and functions make
the ST language ideal for mathematical processing that is difficult to write in ladder diagrams. The features of ST are described below.
• You can write programs like high-level languages such as C, and you can include comments to make
the program easy to read.
NJ-series CPU Unit Software User’s Manual (W501)
6-71
6
6-5-3 Structured Text Language
• Loop constructs and control constructs such as IF THEN ELSE are provided.
6-5 Programming Languages
z Restrictions for Inline ST
6 Programming
Structure of ST
ST code consists of one or more statements. One statement is the equivalent of one process. Statements are executed from top to bottom, one line at a time, until the process is completed. Statements
are made up of keywords and expressions. A keyword is a symbol or string that expresses assignment
or execution control. An expression is a code that calculates a value from variables, constants, function
return values, and/or a combination of those, along with various operators. A statement represents a
process that completes by itself. Expressions form a statement by using a combination of values and
keywords.
Example of an Assignment Statement:
Assignment
keyword
Variables Operators Constant Return value of function
Comment
A:=
B +
100
* ABC (10, 20) ; (*Assign A to B + 100 * ABC (10, 20)*)
Expression
Example of an IF Construct:
IF keyword
IF keyword
IF D = E + 100 * DEF(10,20)
THEN
Expression
G := H ;
(*TRUE if D and E+100*DEF(10,20) are equal, otherwise FALSE*)
Statement IF keyword
END_IF ;
ST Language Expressions
z Statement Separators
• Statements must end with a single-byte semicolon (;). Statements are not considered complete
with only a carriage return at the end. This allows you to write long statements across multiple
lines.
• One statement must end with one single-byte semicolon (;). In the following example, the IF construct contains a single assignment statement. Each statement must be ended with a single-byte
semicolon (;).
IF A=B THEN
Assignment
C := D;
statement
END_IF
IF construct
z Comment
• You can write comments in your program to make the code easier to understand.
• Statements written as comments are not executed.
6-72
NJ-series CPU Unit Software User’s Manual (W501)
6 Programming
• The two methods to insert comments are described below.
Comment notation
Enclose the comment in single-byte parenthesis and
asterisks, for example,
“(*This is a comment*)”.
Examples
(* Commenting out multiple lines
IF ErrCode = 3 THEN
Value := 1000;
Remarks
This type of comment can span over
multiple lines. Comments cannot be
nested.
END_IF;
down to here. *)
Begin the comment with two
forward slashes (//) and end
it with a carriage return.
// Comment
// A := SIN(X)^2;
You can comment out only single
lines.
z Spaces, Carriage Returns, and Tabs
• Always enter a token separator, such as a space, carriage return, or tab, between operators/keywords and variables.
Example:
The square boxes indicate where you must insert a token separator, such as a space,
carriage return, or tab.
IF ■ A>0 ■ THEN ■ X:=10;
ELSE ■
X:=0;
6-5 Programming Languages
• You can place any number of spaces, carriage returns, and tabs in your code at any location. This
allows you to add spaces or tabs before statements and carriage returns between operators/keywords and expressions in order to make your code easier to read.
END_IF;
6
z Lowercase/Uppercase, Single-byte/double-byte Characters
• Operators, keywords, and variable names are not case sensitive.
z Variables and Prohibited Characters
Refer to 6-3-12 Restrictions on Variable Names and Other Program-related Names for restrictions
on variable names.
z Text Strings
Refer to 6-3-12 Restrictions on Variable Names and Other Program-related Names for restrictions
on text strings.
NJ-series CPU Unit Software User’s Manual (W501)
6-73
6-5-3 Structured Text Language
• Operators, keywords, and variable names must always be in single-byte characters. A syntax
error will occur if you input double-byte characters.
6 Programming
ST Keywords and Operators
z Statement Keywords
Keyword
:=
Meaning
Example
Assignment
d := 10;
Calling functions and
function blocks
FBname(para1 := 10, para2 := 20);
RETURN
Return
IF
If
Refer to Function Block Calls on page 6-94.
IF d < e THEN f := 1;
ELSIF d = e THEN f :=2;
ELSE f := 3;
END_IF;
CASE
Case
CASE f OF
1: g :=11;
2: g :=12;
ELSE g :=0;
END_CASE;
FOR
For
FOR i = 100 TO 1 BY -1 DO
Val[ i ] := i;
END_FOR;
WHILE
While
WHILE Val < MaxVal DO
Val := Val + 1;
END_WHILE;
REPEAT
Repeat
REPEAT
Val := Val + 1;
UNTIL( Val > 4 )
END_REPEAT;
EXIT
Exit the loop.
FOR i := 1 TO 100 DO
FOR j := 1 TO 10 DO
IF Val[ i, j ]>100 THEN EXIT;
END_IF;
END_FOR;
END_FOR;
;
Empty statement
Val[ i ] := i
; (* Empty statement *)
WHILE(Var <>0) DO
; (* Empty statement *)
END_WHILE;
(* Text *)
Comments
(* Commenting out multiple lines
IF MyFun (ErrorCode) = 3
THEN ReturnValue := GetDetail();
END_IF;
down to here. *)
//Text
Comment
A := SIN( X ) ^ 2 + COS ( Y ) ^2 + 10;
// A := SIN( X ) ^ 2 + COS ( Y ) ^2 + 5;
6-74
NJ-series CPU Unit Software User’s Manual (W501)
6 Programming
z Operators
Operation
Parentheses
Operator
()
Priority
1: Highest
11: Lowest
Notation example and evaluated value
(1+2)*(3+4)
1
Value: 21
Function/function
block call
Exponent
**
CONCAT('ABC','DEFG')
2
1**2
3
Value: 1
NOT
NOT
NOT TRUE
4
Value: FALSE
Multiplication
*
100*200
5
Value: 20,000
/
6-5 Programming Languages
Division
100/200
Value: 0.5
Remainder
MOD
10 MOD 7
Value: 3
−17 MOD 6
Value: −5
−17 MOD (−6)
Value: −5
6
17 MOD 6
6-5-3 Structured Text Language
Value: 5
17 MOD (−6)
Value: 5
Addition
+
100+200
6
Value: 300
Subtraction
−
100-200
Comparison
<, >, <=, >=
100<200
Value: −100
7
If the comparison result is TRUE, the value is set
to TRUE. Otherwise, the value is set to FALSE. In
the above example, 100 is less than 200, so the
value is TRUE.
Matches
=
100=200
8
If the two values match, the value is set to TRUE.
Otherwise, the value is set to FALSE. In the above
example, 100 does not equal 200, so the value is
FALSE.
Does not match
<>
100<>200
If the two values do not match, the value is set to
TRUE. Otherwise, the value is set to FALSE. In
the above example, 100 does not equal 200, so
the value is TRUE.
NJ-series CPU Unit Software User’s Manual (W501)
6-75
6 Programming
Operation
Logical AND
Operator
AND,&
Priority
1: Highest
11: Lowest
Notation example and evaluated value
Applies 1-bit AND logic to all bits.
9
The results of 1-bit AND logic are as follows:
0 AND 0 = 0
0 AND 1 = 0
1 AND 0 = 0
1 AND 1 = 1
0101 AND 1100
Value: 0100
Logical exclusive OR
XOR
Applies 1-bit exclusive OR logic to all bits.
10
The results of 1-bit exclusive OR logic are as follows:
0 XOR 0 = 0
0 XOR 1 = 1
1 XOR 0 = 1
1 XOR 1 = 0
0101 XOR 1100
Value: 1001
Logical OR
OR
Applies 1-bit OR logic to all bits.
11
The results of 1-bit OR logic are as follows:
0 OR 0 = 0
0 OR 1 = 1
1 OR 0 = 1
1 OR 1 = 1
0101 OR 1100
Value: 1101
If operators with different priorities are mixed, the operators with the highest
priorities are executed first.
Example: X:=(1+2)−3*4; In this case, X is assigned a value of −9.
Calculations are performed based on the data types. For example, the result of calculations with INT
data will be INT data. If the expression A/B is calculated with INT variables A=3 and B=2, the result
would not be 1.5 because all values after the decimal point are truncated. Thus, in this case the
expression (A/B)*2 would evaluate to 2 instead of 3. Use it with caution.
6-76
NJ-series CPU Unit Software User’s Manual (W501)
6 Programming
z Data Types for Operator Operands
If all the operands for an operator have the same data type, any data type given as “Supported” in
the following table can be set as operands. However, if an operand with a different data type is set
for the operator, an implicit cast is required. Refer to Implicit Casts, following the table, for details on
implicit casting.
Assignment
operator
Argument setting
operator
Numeric
operators
:=
=>
+
−
*
/
Data type
:=
Modulodivision
operator
Power
operator
Comparison
operators
**
<
<=
=>
>
MOD
Equality
operators
Logic
operators
Positive/negative
signs
=
<>
NOT
AND
&
OR
XOR
+
−
OK
OK
---
---
---
---
OK
OK
---
Bit string
OK
OK
---
---
---
---
OK
OK
---
Integer
OK
OK
OK
OK
OK
OK
OK
---
OK
Real number
OK
OK
OK
---
OK
OK
OK
---
OK
Duration
OK
OK
---
---
---
---
---
---
OK
Date
OK
OK
---
---
---
---
---
---
---
Time of
day
OK
OK
---
---
---
---
---
---
---
Date and
time
OK
OK
---
---
---
---
---
---
---
OK
OK
---
---
---
---*
---*
---
---
Enumeration
OK
OK
---
---
---
---
OK
---
---
Structure
parent
OK
OK
---
---
---
---
---
---
---
Array parent
OK
OK
---
---
---
---
---
---
---
6
6-5-3 Structured Text Language
Text string
6-5 Programming Languages
Boolean
OK: Possible
---: A compiling error will occur.
* Do not use operators to compare text string variables. Use instructions (such as EQascii) instead.
z Implicit Casts
If the data types of the operands do not match, as shown below, the data types are converted automatically according to the implicit cast rules. If the implicit cast rules are not satisfied, a compiling
error occurs.
(1) When the data types of the operands in the expression on the right side of the
assignment statement are not the same
(2) When the data types of the operands on the right and left sides of the assignment
statement are not the same
Example: Assignment Statement Where the Right Side is an Arithmetic Expression
A: = B + C - D
(2)
(1)
(3) When the data types of the operands in statement are not the same
Example: Integer Expression in a Statement
CASE A+B OF
INT#1:
def:=INT#10
NJ-series CPU Unit Software User’s Manual (W501)
(3)
6-77
6 Programming
Casting Rules When the Right-hand Side of an Assignment Statement Is an
Arithmetic Expression
• For the right-hand operand, you can use any combination of the data types that are supported for
the operator operand.
• Of the operands on the right side, the operand with the highest rank is considered the data type of
the entire side. (Refer to the Data Type Ranking Table given below for the data type ranks.)
• If both an unsigned integer and a signed integer with the same ranks exist on the right side, the
data type of the right side is considered to be unsigned.
Data Type Ranking Table:
The higher the rank, the larger the range (absolute values and precision) of numerical values that
the data type can express.
Rank
Data type
1
USINT, SINT, and BYTE
2
UINT, INT, and WORD
3
REAL
4
DINT, UDINT, and DWORD
5
LREAL
6
LINT, ULINT, and LWORD
Casting Rules When You Assign the Right-hand Value to the Left-hand Side
In the following chart, a cast is performed if an arrow connects the data type of the source to the
data type of the assignment destination. Any combination that is not connected will cause a compiling error.
USINT
UINT
UDINT
ULINT
SINT
INT
DINT
LINT
REAL
LREAL
When you assign the value, the sign and absolute value of the number do not change.
When you assign the value, the sign and absolute value of the number may change.
Example: intVar := -1; (* intVar := 16#FFFF *)
uintVar := 1;
uintVar := intVar;
(* uintVar:= 16#FFFF, or −1 was
assigned but the result is 65535 *)
Even if the arrow does not connect directly to a data type, you can still perform assignments for the
data types. For example, SINT->USINT->UINT->UDINT->ULINT are all connected, so you can write
an assignment such as ULINT:=SINT.
6-78
NJ-series CPU Unit Software User’s Manual (W501)
6 Programming
Casting Rules in Expressions in Statements
The implicit cast rules for right-hand arithmetic expressions in assignment statements and for
assigning the value of the right-hand side to the left-hand side also apply to expressions in statements.
Example:
CASE (A+B+C) OF
Result1:
to
ResultN:
to
END_CASE;
ST Language Statements
Overview:
This statement assigns the right side (i.e., the value of the expression) to the left side (i.e., the variable).
Reserved Words:
:=
Combination of a colon (:) and an equals sign (=)
6-5 Programming Languages
z Assignment
6
Statement Structure:
<variable>:=<variable>;
<variable>:=<constant>;
Application:
Use this statement to assign a value to a variable. For example, use it to set initial values or to store
the results of a calculation.
Description:
This statement assigns (or stores) the <expression_value> to the <variable>.
Example:
Example 1: The following statement assigns the result of the expression X+1 to variable A.
A:=X+1;
Example 2: The following statement assigns the value of variable B to variable A.
A:=B;
Example 3: The following statement assigns a value of 10 to variable A.
A:=10;
Precautions:
• Either the source data type must match the destination data type, or the combination of data types
must allow implicit casting. Otherwise, a compiling error will occur.
NJ-series CPU Unit Software User’s Manual (W501)
6-79
6-5-3 Structured Text Language
<variable>:=<expression>;
6 Programming
• If the value that is assigned is STRING data, make the size of the destination STRING variable
larger than that of the source string. Otherwise, an error will occur.
• For STRING variables, assignment is allowed if the size of left-hand variable is greater than the
size of the text string stored in right-hand variable.
Example:
Assignment is allowed in the following case.
• Variable Table:
Variable
name
Var1
Var2
Data type
STRING
STRING
Size
10
20
• User Program:
Var2 :='ABC';
Var1 := Var2;
You cannot make assignments to union variables. You must make the assignments to individual
members of the unions.
z RETURN
Overview:
The following actions occur depending on where the ST statement is used.
ST
The ST program is ended during operation and the next program is executed.
ST in a Function Inside a Function Block Instance
The function or function block is ended during operation and the next instruction after the calling
instruction is executed.
Inline ST
The POU that contains inline ST with a RETURN statement is ended.
Reserved Words:
RETURN
Statement Structure:
RETURN;
Application:
Use this statement to force the current program, function, or function block to end.
z IF with One Condition
Overview:
The construct executes the specified statement when a condition is met. If the condition is not met,
another statement is executed. The following expressions are used to specify whether the condition
is met.
TRUE: The condition is met.
FALSE: The condition is not met.
6-80
NJ-series CPU Unit Software User’s Manual (W501)
6 Programming
Reserved Words:
IF, THEN, (ELSE), END_IF
Note You can omit ELSE.
Construct Structure:
IF <condition_expression> THEN
<statement_1>;
ELSE
<statement_2>;
END_IF;
Process Flow Diagram:
Application:
6-5 Programming Languages
Use this construct to perform one of two processes depending on evaluation of a condition (condition expression).
6
Condition
expression
FALSE
TRUE
Statement 1
Statement 2
If <condition_expression> is TRUE, <statement_1> is executed.
If <condition_expression> is FALSE, <statement_2> is executed.
Precautions:
• IF must always be used together with END_IF.
• Write a statement that evaluates to TRUE or FALSE (for example IF A>10) or a BOOL variable (for
example IF A) for the condition expression.
• You can write <statement_1> and <statement_2> on multiple lines. Separate statements with a
semicolon (;).
Example: Another IF Statement before <statement_1>
IF <condition_expression_1> THEN
IF <condition_expression_2> THEN
<statement_1>;
ELSE
<statement_2>;
END_IF;
END_IF;
NJ-series CPU Unit Software User’s Manual (W501)
6-81
6-5-3 Structured Text Language
Description:
6 Programming
Process Flow Diagram:
FALSE
Condition
expression 1
TRUE
FALSE
Condition
expression 2
TRUE
Statement 1
Statement 2
ELSE corresponds to the previous THEN statement, as shown above.
• You can execute more than one statement for both <statement_1> and <statement_2>. Separate
statements with a semicolon (;).
• You can omit the ELSE statement.
<condition_expression> is FALSE.
If
it
is
omitted,
nothing
is
executed
when
Process Flow Diagram:
Condition
FALSE
TRUE
Statement
Example:
Example 1:
A value of 10 is assigned to variable X when the statement A > 0 is TRUE. A value
of 0 is assigned to variable X when the statement A > 0 is FALSE.
IF A>0 THEN
X:=10;
ELSE
X:=0;
END_IF;
Example 2:
A value of 10 is assigned to variable X and a value of 20 is assigned to variable Y
when the statements A > 0 and B > 1 are both TRUE. A value of 0 is assigned to
variable X and variable Y when the statements A > 0 and B > 1 are both FALSE.
IF A>0 AND B>1 THEN
X:=10;Y:=20;
ELSE
X:=0;Y:=0;
END_IF;
Example 3:
A value of 10 is assigned to variable X when the BOOL variable A is TRUE. A value
of 0 is assigned to variable X when variable A is FALSE.
IF A THEN X:=10;
ELSE X:=0;
END_IF;
6-82
NJ-series CPU Unit Software User’s Manual (W501)
6 Programming
z IF with Multiple Conditions
Overview:
The construct executes the specified statement when a condition is met. If a condition is not met but
another condition is met, another statement is executed. If neither condition is met, another statement is executed.
The following expressions are used to specify whether the condition is met.
TRUE: The condition is met.
FALSE: The condition is not met.
Reserved Words:
IF, THEN, ELSIF, (ELSE), END_IF
Note You can omit ELSE.
6-5 Programming Languages
Construct Structure:
IF <condition_expression_1> THEN <statement_1>;
ELSIF <condition_expression_2> THEN <statement_2>;
ELSIF <condition_expression_3> THEN <statement_3>;
·
·
·
ELSIF <condition_expression_n> THEN <statement_n>;
ELSE<statement_m>;
END_IF;
6
Process Flow Diagram:
TRUE
Statement 1
6-5-3 Structured Text Language
Condition
expression 1
FALSE
Condition
expression 2
TRUE
Statement 2
FALSE
Condition
expression 3
FALSE
TRUE
Statement 3
Statement m
NJ-series CPU Unit Software User’s Manual (W501)
6-83
6 Programming
Application:
Use this construct to perform a process depending on evaluation of multiple conditions (condition
expressions).
Description:
If <condition_expression_1> is TRUE, <statement_1> is executed.
If <condition_expression_1> is FALSE and <condition_expression_2> is TRUE, then
<statement_2> is executed.
If <condition_expression_2> is FALSE and <condition_expression_3> is TRUE, then
<statement_3> is executed.
·
·
·
If <condition_expression_n> is TRUE, <statement_n> is executed.
If none of the conditions is TRUE, <statement_m> is executed.
Precautions:
• IF must always be used together with END_IF.
• Write statements that can be TRUE or FALSE for the condition expressions. Example: IF(A>10)
You can also specify BOOL variables (including functions that return a BOOL value) for the condition expressions instead of an actual expression. In that case, when the variable is TRUE, the
evaluated result is TRUE and when the variable is FALSE, evaluated result is FALSE.
• You can write any of the statements on multiple lines. Separate statements with a semicolon (;).
• You can omit the ELSE statement. If it is omitted, and none of the conditions produces a match,
nothing is done.
Example:
A value of 10 is assigned to variable X when the statement A > 0 is TRUE.
A value of 1 is assigned to variable X when the statement A > 0 is FALSE and statement B = 1 is
TRUE.
A value of 2 is assigned to variable X when the statement A > 0 is FALSE and statement B = 2 is
TRUE.
If none of the conditions is TRUE, a value of 0 is assigned to the variable X.
IF A>0 THEN X:=10;
ELSIF B=1 THEN X:=1;
ELSIF B=2 THEN X:=2;
ELSE X:=0;
END_IF;
6-84
NJ-series CPU Unit Software User’s Manual (W501)
6 Programming
z CASE
Overview:
This construct executes a statement that corresponds to an integer set value that matches the value
of an integer expression.
Reserved Words:
CASE
Construct Structure:
CASE <integer_expression> OF
<integer_expression_value_1>:<statement_1>;
<integer_expression_value_2>:<statement_2>;
6-5 Programming Languages
·
·
·
<integer_expression_value_n>:<statement_n>;
ELSE<statement_m>;
END_CASE;
Process Flow Diagram:
Equal to
value 1?
Yes
6
No
6-5-3 Structured Text Language
Equal to
value 2?
Yes
No
Equal to
value n?
Yes
No
Statement m
Statement n
NJ-series CPU Unit Software User’s Manual (W501)
Statement 2
Statement 1
6-85
6 Programming
Application:
Use this construct to perform different actions based on the value of an integer.
Description:
If <integer_expression> matches <integer_expression_value_n>, <statement_n> is executed.
If <integer_expression> does not match any of the integer values, <statement_m> is executed.
Precautions:
• CASE must always be used together with END_CASE.
• Use one of the following for the <integer_expression>:
• An integer or enumeration variable (example: abc)
• An integer expression (example abc+def)
• A function that returns an integer value (example: xyz())
• You can write any of the statements on multiple lines. Separate statements with a semicolon (;).
• To specify OR logic of multiple integers for <integer_expression_value_n>, separate the values
with commas. To specify a continuous range of integers, separate the start integer and the end
integer with two periods (..).
Example 1:
You can specify a condition for a specific integer value, or the same condition for
multiple integer values.
CASE A OF
1: X:=1;
2: X:=2;
3: X:=3;
ELSE
X:=0;
END_CASE;
CASE A OF
1: X:=1;
2,5: X:=2;
6..10: X:=3;
11,12,15..20: X:=4;
ELSE
X:=0;
END_CASE;
Example 2:
A value of 1 is assigned to variable X when variable A is 1.
A value of 2 is assigned to variable X when variable A is 2.
A value of 3 is assigned to variable X when variable A is 3.
If none of the values is matched, a value of 0 is assigned to
the variable X.
A value of 1 is assigned to variable X when variable A is 1.
A value of 2 is assigned to variable X when variable A is 2 or 5.
A value of 3 is assigned to variable X when variable A is between 6 and 10.
A value of 4 is assigned to variable X when variable A is 11, 12,
or between 15 and 20.
If none of the values is matched, a value of 0 is assigned to the
variable X.
You can give an integer variable, integer expression, integer function return value,
enumeration variable, or enumeration function return value for the
<integer_expression>. An example is shown below.
• Example for an Integer Enumeration Variable
CASE ColorVar OF
RED:
X := 0;
BLUE:
X := 1;
ELSE
X := 2;
END_CASE;
6-86
NJ-series CPU Unit Software User’s Manual (W501)
6 Programming
• Example for an Integer Expression
CASE (a1 + a2) OF
0:
X := 0;
1:
X := 1;
ELSE
X := 2;
END_CASE;
• Example of an Integer Enumeration Function Return Value
Branches depending on the return value of FUN( ).
6-5 Programming Languages
CASE FUN( ) OF
0:
X := 10;
1:
X := 11;
ELSE
X := 12;
END_CASE;
Data Types That You Can Use in CASE Constructs
Classification
Basic data types
Data type specifications
Data type
Integers
Boolean, bit string, real, duration, date, time
of day, date and time, or text string data
Arrays
Array specifications
Elements
Derivative data types
Members
Unions
Unions
Enumerations
Members
Not supported.
Supported for integers and enumerations only.
Not supported.
Supported for integers and enumerations only.
Not supported.
Supported for integers and enumerations only.
Supported.
z FOR
Overview:
This construct repeatedly executes the same statements until a variable (called the FOR variable)
changes from one value to another value.
The following expressions are used to specify whether the condition is met.
TRUE: The condition is met.
FALSE: The condition is not met.
Reserved Words:
FOR, TO, (BY), DO, END_FOR
Note You can omit BY.
Construct Structure:
FOR <FOR_variable>:= <initial_value> TO <end_value> BY <increment/decrement> DO
<statement>;
END_FOR;
NJ-series CPU Unit Software User’s Manual (W501)
6-87
6
6-5-3 Structured Text Language
Structures
Structures
<integer_expression>
Supported.
Not supported.
6 Programming
Process Flow Diagram:
FOR variable = Initial value
TRUE
FOR variable >
end value?
Repeated
FALSE
Statement
FOR variable +
Increment/decrement value
End
Application:
Use this construct when you know in advance how many times you want to repeat a process.
This type of repeat construct is particularly effective to specify each element of an array variable
based on the value of a FOR variable.
Description:
A decision is made based on the evaluation of <initial_value>, <end_value>, and <increment/decrement>.
When <FOR_variable> is <initial_value>, <statement> is executed.
After execution, the value of <increment/decrement> is added to <FOR_variable> and <statement>
is executed again if <FOR_variable> is less than the value of the <end_value>.
After execution, the value of <increment/decrement> is added to <FOR_variable> and <statement>
is executed again if <FOR_variable> is less than the value of the <end_value>.
This process is repeated.
The loop ends when <FOR_variable> > <end_value>.
If <increment/decrement> is negative, the directions of the comparison symbols in the above statements are reversed.
Precautions:
• If the FOR variable is signed, <increment/decrement> can be a negative number.
• FOR must always be used together with END_FOR.
• You cannot use addition or other arithmetic expressions in the <end_value> and <increment/decrement>.
• The FOR variable becomes the end value plus increment/decrement after execution of the process is completed for the end value. This ends the FOR construct.
Example: When the FOR construct is completed in the following ST statements, the value of i is
101.
FOR i:=0 TO 100 DO
X[i]:=0;
END_FOR;
// Here, i is 101.
a:=FALSE;
END_IF;
6-88
NJ-series CPU Unit Software User’s Manual (W501)
6 Programming
• Do not write code that directly modifies the FOR variable inside the FOR construct. Unintended
operation may result.
Example:
FOR i:=0 TO 100 BY 1 DO
X[i]:=0;
i:=i+INT#5;
END_FOR;
• You can write any of the statements on multiple lines. Separate statements with a semicolon (;).
• You can omit BY<increment/decrement>. If it is omitted, the statement is executed with an increment value of 1.
• You can specify any expression that returns an integer (SINT, INT, DINT, LINT, USINT, UINT,
UDINT, or ULINT) variable or integer value for the <initial_value>,<end_value>, and <increment/decrement>. You can also specify a function that returns an integer value.
Example 1:
FOR n := 0 TO 50 BY 5 DO
SP[n] := 100;
END_FOR;
Example 2:
The total of elements DATA[1] through DATA[50] of array variable elements DATA[n]
is calculated and the result is assigned to the variable SUM.
IF a THEN
FOR n := 0 TO 50 BY 1 DO
DATA[n]:= 1 ;
END_FOR;
6
a:=FALSE;
END_IF;
The maximum and minimum values of elements DATA[1] through DATA[50] of array
variable elements DATA[n] are found. The maximum value is assigned to the MAX
variable, and the minimum value is to the MIN variable. The value of DATA[n] is from
0 to 1,000.
MAX :=0;
MIN :=1000;
FOR n :=1 TO 50 BY 1 DO
IF DATA[n] > MAX THEN
MAX :=DATA[n];
END_IF;
IF DATA[n] < MAX THEN
MIN :=DATA[n];
END_IF;
END_FOR;
• If the total execution time of the statements in the FOR construct from when the FOR variable is
incremented/decremented from the initial value until it reaches the end value exceeds the task
period, a Task Period Exceeded Error occurs.
• When the FOR Variable Cannot Logically Reach the End Value
Example:
NJ-series CPU Unit Software User’s Manual (W501)
6-89
6-5-3 Structured Text Language
FOR n := 0 TO 50 BY 1 DO
SUM:= SUM + DATA[n] ;
END_FOR;
Example 3:
6-5 Programming Languages
A value of 100 is assigned to array variable elements SP[n]. The FOR variable is
variable n, the initial value is 0, the end value is 50, and the increment is 5.
6 Programming
FOR i := 0 TO 100 BY 1 DO
intArray[i] := i;
i := INT#50;
END_FOR;
An infinite loop occurs and results in
a Task Period Exceeded Error.
Example:
FOR i := 0 TO 100 BY 0 DO
;
END_FOR;
An infinite loop occurs and results
in a Task Period Exceeded Error.
• When an Overflow or Underflow Occurs Because the FOR Variable Exceeds the End Value
Example:
FOR i := 0 TO 254 BY 2 DO
INTArray[i] := i;
END_FOR;
Data Types That You Can Use in FOR Constructs
Classification
Basic data types
Data type
Boolean, bit string, real, duration, date, time
of day, date and time, or text string data
Integers
Arrays
Array specifications
Elements
<initial_value>, <end_value>,
and <increment/decrement>*
Not supported.
Supported.
Not supported.
Data type specificaSupported for integers and enutions
merations only.
Structures
Not supported.
Structures
Supported for integers and enuMembers
merations only.
Derivative data types
Unions
Not supported.
Unions
Supported for integers and enuMembers
merations only.
Enumerations
Supported.
* You must use the same data type for the <FOR_variable>, <end_value> and <increment/decrement>. Otherwise,
an error occurs when the program is built on the Sysmac Studio.
z WHILE
Overview:
This construct repeatedly executes the specified statements as long as a condition expression is
TRUE.
Reserved Words:
WHILE, DO, END_WHILE
Construct Structure:
WHILE <condition_expression> DO
<statement>;
END_WHILE;
6-90
NJ-series CPU Unit Software User’s Manual (W501)
6 Programming
Process Flow Diagram:
Repeated
Condition
expression
FALSE
TRUE
Statement
End
Application:
Description:
The <condition_expression> is evaluated before <statement> is executed.
If <condition_expression> is TRUE, <statement> is executed. Then the <condition_expression> is
evaluated again. This process is repeated.
If the <condition_expression> is FALSE,
<condition_expression> is no longer evaluated.
<statement>
is
not
executed
and
the
• WHILE must always be used together with END_WHILE.
• If the <condition_expression> is FALSE before <statement> is executed, the WHILE construct is
exited and <statement> is not executed.
• You can write <statement_1> and <statement_2> on multiple lines. Separate statements with a
semicolon (;).
• You can execute more than one statement for <statement>. Separate statements with a semicolon (;).
• You can also specify a BOOL variable (including functions that return a BOOL value) for the condition expressions instead of an actual expression.
Example:
Example 1: The first multiple of 7 that exceeds 1,000 is calculated and assigned to variable A.
A := 0;
WHILE A <= 1000 DO
A := A+INT#7;
END_WHILE;
Example 2:
The value of variable X is doubled if X is less than 3,000 and the value is assigned
to array variable element DATA[1]. Next, the value of X is doubled again and the
value is assigned to the array variable element DATA[2]. This process is repeated.
NJ-series CPU Unit Software User’s Manual (W501)
6-91
6
6-5-3 Structured Text Language
Precautions:
6-5 Programming Languages
Use this type of repeat construct when you do not know how many times to repeat a process (i.e.,
when you do not know how many times based on the condition) and you want to repeat a process
for as long as a certain condition is met. You can also use this type of repeat construct to execute a
process only when a condition expression is TRUE (pre-evaluation repeat construct).
6 Programming
n := 1;
X := 1;
WHILE X < 3000 DO
X:= X*INT#10#2;
DATA[n]:= X;
n := n+INT#1;
END_WHILE;
• If you do not write correct condition expressions, the program execution time increases and may
cause a Task Period Exceeded Error.
Example:
boolVar := TRUE;
WHILE boolVar DO
intVar := intVar + INT#1;
END_WHILE;
z REPEAT
The following expressions are used to specify whether the condition is met.
TRUE: The condition is met.
FALSE: The condition is not met.
Overview:
This construct repeatedly executes one or more statements until a condition expression is TRUE.
Reserved Words:
REPEAT, UNTIL, END_ REPEAT
Construct Structure:
REPEAT
<statement>;
UNTIL <condition_expression>
END_REPEAT;
Process Flow Diagram:
Statement
Repeated
Condition
expression
FALSE
TRUE
End
Application:
Use this type of repeat construct when you do not know how many times to repeat a process (i.e.,
when you do not know how many times based on the condition) and you want to repeat a process
for as long as a certain condition is met after processing. Use this type of repeat construct to determine whether to repeat execution based on the result of the execution of a process (post-evaluation
repeat construct).
6-92
NJ-series CPU Unit Software User’s Manual (W501)
6 Programming
Description:
First, <statement> is executed unconditionally. Then the <condition_expression> is evaluated.
If <condition_expression> is FALSE, <statement> is executed.
If <condition_expression> is TRUE, <statement> is not executed and the REPEAT construct is
exited.
Precautions:
• REPEAT must always be used together with END_REPEAT.
• Even if the <condition_expression> is TRUE before <statement> is executed, <statement> is executed.
In other words, <statement> is always executed at least one time.
• <statement> can contain multiple lines of code for the statement. Separate statements with a
semicolon (;).
Example:
Example 1: Numbers from 1 to 10 are added and the values are assigned to the variable TOTAL.
A := 1;
TOTAL := 0;
REPEAT
TOTAL := TOTAL + A;
A := A+INT#1;
UNTIL A>10
END_REPEAT;
6
Example:
intVar := INT#1;
REPEAT
intVar := intVar + INT#1;
UNTIL intVar = INT#0
END_REPEAT;
z EXIT
Overview:
Use this statement only inside a repeat construct (FOR construct, WHILE construct, or REPEAT
construct) to exit the repeat construct.
Use this statement inside an IF construct to exit from the repeat construct when a condition is met.
Reserved Words:
EXIT
6-93
6-5-3 Structured Text Language
• If you do not write correct condition expressions, the program execution time increases and may
cause a Task Period Exceeded Error.
NJ-series CPU Unit Software User’s Manual (W501)
6-5 Programming Languages
• You can also specify a BOOL variable (including functions that return a BOOL value) for the condition expressions instead of an actual expression.
6 Programming
Construct Structure (e.g., in an IF Construct):
FOR (WHILE, REPEAT) <statement>
·
·
·
IF <condition_expression> THEN EXIT;
END_IF;
·
·
·
END_FOR (WHILE, REPEAT);
Application:
Use EXIT to end a repeating process before the end condition is met.
Description (e.g., in an IF Construct):
If the <condition_expression> is TRUE, the repeat construct (FOR construct, WHILE construct, or
REPEAT construct) is ended and all code inside the repeat construct after the EXIT statement is
ignored.
Note 1 You can also specify a BOOL variable instead of an expression for the condition expressions.
2 Even if the <condition_expression> is TRUE before <statement> is executed, <statement> is executed.
Example:
Variable n is repeatedly incremented by 1 from 1 to 50 while the value of n is added to array variable elements DATA[n]. However, if DATA[n] exceeds 100, the repeat construct is exited.
IF A THEN
DATA[3] :=98;
FOR n := 1; TO 50 BY 1 DO
DATA[n] := DATA[n] + n;
IF DATA[n] > 100 THEN EXIT;
END_IF;
END_FOR;
A :=FALSE;
END_IF;
z Function Block Calls
Overview:
This statement calls a function block.
Reserved Words: None
Statement Structure:
Give the argument specifications (to pass the values of the specified variables to the input variables
of the called function block) and the return value specification (to specify the variable that will receive
the value of the output variable of the called function block) in parenthesis after the instance name of
the function block. There are two methods of writing this statement, as shown in (1) and (2) below.
We recommend method 1 for program readability.
6-94
NJ-series CPU Unit Software User’s Manual (W501)
6 Programming
Notation Method 1:
Give both the variable names of the called function block and the parameter names of the calling
POU.
ABC(A:=x1, B:=x2, C=>y1);
ABC: Function block instance name
A and B: Input or in-out variable names of called function block
x1 and x2: Input or in-out parameter of calling POU (can be a constant)
C: Output variable of called function block
y1: Output parameter of calling POU
• Ladder Diagram Expression
ABC
x1
y1
MyFB
A
B
• You can give the arguments and return values in any order.
• You can omit the input variable names and input parameter names. If you omit these names, the
values assigned to the input variables for the previous call are assigned to the input variables
again. If this is the first time that the function block is called, the input variables are set to their initial values.
• You can omit the output variables and output parameters. If they are omitted, the value of the output variable is not assigned to anything.
Notation Method 2:
Omit the variable names of the called function block and give the parameter names of the calling
POU.
• Ladder Diagram Expression
ABC
y1
MyFB
A
x2
C
B
• The order of parameters is based on the function block definition. The order is the same as the
local variable definition for the function block, from top to bottom.
Application:
This statement calls a function block.
NJ-series CPU Unit Software User’s Manual (W501)
6
6-5-3 Structured Text Language
ABC(x1, x2, y1);
ABC: Function block instance name
A and B: Omitted. (Input or in-out variable of called function block)
x1 and x2: Input or in-out parameter of calling POU (can be a constant)
C: Omitted. (Output variable of called function block or constant)
y1: Omitted. (Output parameter of calling POU)
x1
6-5 Programming Languages
x2
C
6-95
6 Programming
Example
• Programming
Notation 1
ChangeFixToFloat(Execute:=Exe,Data32_1:=FixPointData1, Data32_2:=FixPointData2,
NoOfDigit_1:=FixPointPos1,
NoOfDigit_2:=FixPointPos2,OK=>Done,Double_1=>RealData1,
Double_2=>RealData2);
Notation 2
ChangeFixToFloat(Exe, FixPointData1, FixPointData2, FixPointPos1, FixPointPos2,
Done, RealData1, RealData2);
• Ladder Diagram Expression
ChangeFixToFloat
Exe
Done
ConvData32ToDouble
Execute
OK
FixPointData1
Data32_1
Double_1
RealData1
FixPointData2
Data32_2
Double_2
RealData2
FixPointPos1
NoOfDigit_1
FixPointPos2
NoOfDigit_2
• Function Block Definition
Function block name: ConvData32ToDouble
Function Block Variables
I/O
Input variables
Output variables
Variable name
Execute
Data32_1
Data32_2
NoOfDigit_1
NoOfDigit_2
OK
Double_1
Double_2
Data type
BOOL
DINT
DINT
INT
INT
BOOL
LREAL
LREAL
• Program Variables
6-96
Variable name
ChangeFixToFloat
Data type
ConvData32ToDouble
Exe
FixPointData1
BOOL
DINT
FixPointPos1
INT
FixPointData2
DINT
FixPointPos2
INT
Done
RealData1
RealData2
BOOL
LREAL
LREAL
Comments
Convert from fixed-point to
floating-point.
Execution trigger
Decimal point position specification data 1
Number of digits below decimal point 1
Decimal point position specification data 2
Number of digits below decimal point 2
Normal end
Floating-point data 1
Floating-point data 2
NJ-series CPU Unit Software User’s Manual (W501)
6 Programming
Omitting Parameters
When you call a function block, you can omit parameters that are not required. The following table
shows when you can omit parameters.
POU type
FB
Variables for
the called
POU
Given (notation
method 1)
Given (notation
method 2)
Notation pattern
Parameters included
instance(x:=a,y:=b,z:=c);
instance(x:=a,y:=b);
instance(y:=b);
instance(x:=);
instance(a,b,c);
instance();
instance(a);
instance(a, , );
instance(a,b);
Omission
OK
--OK
--6-5 Programming Languages
All parameters given
More than one parameter given
One parameter given
No parameters given
All parameters given
All parameters not given
Only the first parameter given
One parameter given
More than one parameter given
Examples
OK: Possible (initial used), ---: Compiling error.
z Function Calls
Overview:
This statement calls a function.
Reserved Words: None
Statement Structure:
6
Notation Method 1:
IF (x0=TRUE) THEN
y1 := MyFUN(A:=x1, B:=x2, C=>y2);
END_IF;
• Ladder Diagram Expression
MyFUN
x0
EN
x1
x2
ENO
y1
A
B
C
y2
MyFUN: Function name
x0: Specifies whether to call the function.
A and B: Input variable names of the called function
x1 and x2: Input parameters of the called function
C: Output variable name of the called function
y1: Storage location for the return value from the called function
y2: Output parameters of the called function
• You can give the arguments in any order.
NJ-series CPU Unit Software User’s Manual (W501)
6-97
6-5-3 Structured Text Language
Give the output parameter to which the return value is assigned on the left side of the assignment
keyword (:=). On the right side, give the argument specifications (to pass the values of the specified
variables to the input variables of the called function) inside the parenthesis after the function name.
There are two methods of writing this statement, as shown in (1) and (2) below.
We recommend method (1) for program readability.
6 Programming
• You can omit the input variable names and input parameter names. If they are omitted, the input
variables are assigned their initial values.
• You can omit EN as well. If it is omitted, EN is assigned a value of TRUE.
Notation Method 2:
IF (x0=TRUE) THEN
y1 := MyFUN(x1, x2, y2);
END_IF;
• Ladder Diagram Expression
MyFUN
x0
EN
x1
x2
ENO
y1
A
B
C
y2
MyFUN: Function name
x0: Specifies whether to call the function.
A and B: Input variable names of the called function
x1 and x2: Input parameters of the called function
C: Output variable name of the called function
y1: Storage location for the return value from the called function
y2: Output parameters of the called function
• The order of parameters is based on the function definition. The order is the same as the local
variable definition for the function, from top to bottom.
Example:
• Programming
Notation 1
ConvData32ToDouble(Data32_1:=FixPointData1,Data32_2:=FixPointData2,
NoOfDigit_1:=FixPointPos1, NoOfDigit_2:=FixPointPos2,
Double_1=>RealData1, Double_2=>RealData2);
Notation 2
ConvData32ToDouble(FixPointData1, FixPointData2, FixPointPos1, FixPointPos2,
RealData1, RealData2);
• Ladder Diagram Expression
P_On
ConvData32ToDouble
EN
6-98
FixPointData1
Data32_1
Double_1
RealData1
FixPointData2
Data32_2
Double_2
RealData2
FixPointPos1
NoOfDigit_1
FixPointPos2
NoOfDigit_2
NJ-series CPU Unit Software User’s Manual (W501)
6 Programming
• Function Definition
Function name: ConvData32ToDouble
Function Variables
I/O
Input variables
Output variables
Return value
Variable name
Execute
Data32_1
Data32_2
NoOfDigit_1
NoOfDigit_2
Double_1
Double_2
---
Data type
BOOL
DINT
DINT
INT
INT
LREAL
LREAL
BOOL
• Program Variables
Data type
ConvData32ToDouble
Exe
FixPointData1
BOOL
DINT
FixPointPos1
INT
FixPointData2
DINT
FixPointPos2
INT
Done
RealData
RealData
BOOL
LREAL
LREAL
Comment
Convert from fixed-point to
floating-point.
Execution trigger
Decimal point position specification data 1
Number of digits below decimal point 1
Decimal point position specification data 2
Number of digits below decimal point 2
Normal end
Floating-point data 1
Floating-point data 2
6-5 Programming Languages
Variable name
ChangeFixToFloat
6
This statement calls a function.
Omitting Parameters
When you call a function, you can omit parameters that are not required. The following table shows
when you can omit parameters.
POU type
FUN
Variables for
the called
POU
Given (notation
method 1)
Given (notation
method 2)
Notation pattern
Parameters included
All parameters given
More than one parameter given
One parameter given
No parameters given
All parameters given
No parameters given
Only the first parameter given
One parameter given
More than one parameter given
Example
FUN(x:=a,y:=b,z:=c);
FUN(x:=a,y:=b);
FUN(y:=b);
FUN(x:=);
FUN(a,b,c)
FUN();
FUN(a);
FUN(a, , );
FUN(a,b);
Omission
OK
--OK
---
OK: Possible (initial used), ---: Compiling error.
NJ-series CPU Unit Software User’s Manual (W501)
6-99
6-5-3 Structured Text Language
Application:
6 Programming
Differences between ST and Ladder Diagrams
The differences between ST and ladder diagrams are described below.
Item
Input differentiation
Ladder diagram
z Change to TRUE
• Method 1
start
ST (including inline ST)
z Change to TRUE
• Method 1
R_TRIG_instance (Clk:=start, Q=>do);
do
----|↑|-----------
* R_TRIG_instance is an instance of the
R_TRIG instruction.
• Method 2
R_TRIG_instance
R_TRIG
Clk
start
Q
do
• Method 3
Up
do
In
start
z Change to TRUE
z Change to TRUE
• Method 1
• Method 1
start
F_TRIG_instance (Clk:=start, Q=>do);
do
----|↓|-----------
* F_TRIG_instance is an instance of the
F_TRIG instruction.
• Method 2
F_TRIG_instance
F_TRIG
start
Clk
Q
do
• Method 3
Down
start
Instruction
differentiation
In
do
z Change to TRUE
start
z Change to TRUE
@Inst
There is no equivalent in ST. You must create it
in logic.
Example:
• Method 1
R_TRIG_instance (Clk:=start, Q=>do);
IF (do = TRUE) THEN Inst();
END_IF;
• Method 2
IF (start = TRUE) THEN
IF (pre_start = FALSE) THEN Inst();
END_IF;
END_IF;
pre-start:=start;// Update previous value.
6-100
NJ-series CPU Unit Software User’s Manual (W501)
6 Programming
Item
Instructions
that last
multiple
task periods
Ladder diagram
With the TON instruction, multiple cycles are
required from the start of instruction execution
to the end and the instruction is reset when the
power flow is FALSE. Therefore, you need to
declare only one instance to both execute the
instruction and reset it.
TON_instance
start
Q
PT
ET
Add a circle to indicate NOT at the intersection
of the BOOL argument and the function/function
block.
Add a NOT operator to the argument.
* You can add NOT operators to any BOOL
variable, not just arguments.
Func
emergency
EN
6-5 Programming Languages
Function/function block
argument
NOT specifications
TON
In
ST (including inline ST)
You must declare two instances, one for
execution and one to reset, as shown below.
IF (start = TRUE) THEN
TON_instance(In:=TRUE, omitted);
// Start timer.
ELSE
TON_instance(In:=FALSE, omitted);
// Reset timer.
END_IF;
IF (NOT emergency) THEN
ENO
Func();
END_IF;
Multi-stage
connections
start
IF(start=TRUE) THEN
Func1
EN ENO
Func2( in := Func1());
tmp
tmp
Func2
EN ENO
in
You can connect only other Out instructions
after an Out instruction.
6
You cannot continue the ladder diagram after
inline ST.
NG
// Inline ST
str :=‘ABC’;
Program
divisions
You can create sections.
NJ-series CPU Unit Software User’s Manual (W501)
You cannot create sections.
6-101
6-5-3 Structured Text Language
Post-connecting ladder
instructions
END_IF;
6 Programming
6-6
Instructions
This section describes the instructions pre-defined by the NJ-series system.
For details on these instructions, refer to the NJ-series Instructions Reference Manual (Cat. No. W502)
and NJ-series Motion Control Instructions Reference Manual (Cat. No. W508).
6-6-1
Instructions
Instructions are the smallest unit of the processing elements that are provided by OMRON for use in
POU algorithms. Instructions are classified as shown below.
Ladder diagram structure elements (inputs and outputs)
FB instructions
Instructions
FUN instructions
ST language statements
Programs, user-defined functions, and user-defined function blocks consist of these instructions.
6-6-2
Basic Understanding of Instructions
The fundamental specifications of the instructions follow the specifications of functions and function
blocks.
This section describes specifications that are unique to instructions.
Ladder Diagram Structure Elements (Inputs and Outputs)
z Locations
Instructions for ladder diagram inputs and outputs have certain positions where they can be placed,
as shown below.
Classification
Input
Logical start
instructions
Locations
Connected directly to the left bus bar
or is at the beginning of an instruction
block.
Intermediate
instructions
Between a logical start and the output
instruction.
Output instructions
6-102
Diagram
Connected directly to the right bus
bar.
NJ-series CPU Unit Software User’s Manual (W501)
6 Programming
z Instruction Options
Some ladder diagram instructions for inputs also detect changes to TRUE or changes to FALSE if
you add an upward arrow or downward arrow to them.
Change to
TRUE (↑)
The instruction reads input status, makes
comparisons, tests bits, or performs other
types of processing every task period
and outputs the power flow when result
changes from FALSE to TRUE.
Variable A
Variable A
Output
1 task period
1 task period
Time Chart
Change to
FALSE (↓)
The output power flow changes to FALSE
in the next task period (after it is TRUE
for one task period).
The instruction reads input status or performs other types of processing every
task period and outputs the power flow
when result changes from TRUE to
FALSE. The output power flow changes
to FALSE in the next task period (after it
is TRUE for one task period).
Variable A
Variable A
Output
1 task period
6-6 Instructions
1 task period
Time Chart
Function Block Instructions
z Execution Conditions
The operation of the execution condition for an FB instruction depends on the instruction.
6
A specific input variable for the execution condition is defined for each instruction.
Execute specifies a change to TRUE or a change to FALSE in the execution condition.
Enable causes the instruction to be executed each task period according to the current
execution condition.
Function block instructions are unconditionally executed for as long as the POU that called them is
executed.
z Instruction Options
Instruction options cannot be specified.
NJ-series CPU Unit Software User’s Manual (W501)
6-103
6-6-2 Basic Understanding of Instructions
Examples:
6 Programming
FUN Instructions
z Execution Conditions
All FUN instructions have EN inputs as execution conditions. The FUN instruction is executed each
task period as long as EN is TRUE.
z Instruction Options
In a ladder diagram, you can add the following instruction options to specify a change to TRUE or a
change to FALSE as the execution condition for that instruction. ST statements do not have options.
Instruction Options
Differentiation
Change to
option
TRUE
Symbol
@
This option creates an upwardly differentiated instruction.
The instruction is executed only once when EN
changes to TRUE.
To add an instruction option, add one of the option symbols listed in the table above before the
instruction.
Example:
@ MAX
EN
ENO
In1
Out
In2
Information That Applies to Both FB Instructions and FUN
Instructions
z Condition Flags
System-defined variables that are assigned values that represent the result of instruction processing
are called Condition Flags. The only Condition Flag for an NJ-series Controller is the Carry Flag
(P_CY).
The Carry Flag serves the following purposes.
• It shows whether the result of processing an instruction exceeds the range that can be expressed
by the data type of the output variable.
• It shows whether an overflow occurred in a bit string data or bit shift instruction. For details, refer
to the NJ-series Instructions Reference Manual (Cat. No. W502).
6-104
NJ-series CPU Unit Software User’s Manual (W501)
6 Programming
6-6-3
Operation for Instruction Errors
Instruction Errors
An instruction error indicates that instruction execution was not possible due to a problem that was
found when input parameters and other values were checked by the CPU Unit before instruction execution.
Operation When an Instruction Error Occurs
• For instructions with ENO, ENO changes to FALSE (however, it is also FALSE when the instruction is
not executed).
• For FB instructions that are processed across multiple task periods, the Error output variable
changes to TRUE and an error code that gives the cause of the error is output to ErrorID.
In both of these cases, the P_PRGER (Instruction Error Flag) system-defined variable changes to
TRUE to indicate that an instruction error occurred in that program.
The following section describes the operations that are performed when an error occurs.
Operation for Instruction Errors
As a result of that check, one of the following actions is taken.
z Ladder Diagrams
Type
Output variable
ENO
P_PRGER
Updating output
parameters
ENO
User-created
functions and
function blocks
Updating output
parameters
Changes to TRUE.
Retained (nothing is done).
Power flow output: Value is
updated according to the internal
algorithm.
BOOL parameter output: Value is
updated according to the internal
algorithm.
Non-BOOL parameter output:
Value is updated according to the
internal algorithm.
Use ENO in the same way as for
standard instructions.
Power flow output: Value is
updated according to the internal
algorithm.
BOOL parameter output: Value is
updated according to the internal
algorithm.
Non-BOOL parameter output:
Value is updated according to the
internal algorithm.
Error operation
Changes to FALSE.
Changes to TRUE.
Power flow output: FALSE
BOOL parameter outputs:
Retained
Non-BOOL parameter outputs: Retained
Same as at the left.
Power flow output: FALSE
BOOL parameter outputs:
Retained
Non-BOOL parameter outputs: Retained
z ST
Type
ST
Output variable
ENO
P_PRGER
NJ-series CPU Unit Software User’s Manual (W501)
Normal operation
Changes to TRUE.
Retained (nothing is done).
Error operation
Changes to FALSE.
TRUE
6-105
6
6-6-3 Operation for Instruction Errors
Instruction
Normal operation
6-6 Instructions
When the CPU Unit executes an instruction, it checks the input parameter values and other information.
6 Programming
Operation When a Syntax Error Occurs in a POU Written in ST
z Errors in Assignment Statements
When an error occurs in an assignment statement written in ST, that line is not executed.
5 a = b / (c + d) + e ∗ f + ABS(g);
6 x := 1;
For example, if a division by zero error occurs
in (b/(c+d)) on line 5, execution of line 5 is
cancelled (the value of a is not changed) and
line 6 is executed.
This operation is the same as when the output ENO of a user-created function is FALSE.
5 a = User-created_function_block (b) + c;
6 x := 1;
When the ENO output from the user-created
function is FALSE, execution of line 5 is
cancelled (the value of a is not changed) and
line 6 is executed.
z Errors in IF Constructs
If a syntax error occurs in ST, perform error processing for the syntax error.
When the value of (c+d), below, is zero, the lines between the IF and END_IF are not executed.
POU"AA"
5
6
7
8
9
10
:
IF a = b / (c + d) THEN
x := 1;
ELSE
x := 2;
END_IF;
y := 10;
:
IF P_PRGER = TRUE THEN
x:= initial_value; (*Processing when an error occurs*)
y:= initial_value;
END_IF;
The user must include a safety
processing for possible errors.
z Syntax Errors in ST
The following syntax errors can occur in ST.
• Exceeding the number of elements in an array.
• No parameter set for in-out variable.
• STRING assignment: When the text string size (bytes) of the left side is less than the text string
length (bytes) of the right side
• Division by zero (excluding floating-point number calculations)
* When the value of a floating-point number is nonnumeric, the result of the calculation will also be nonnumeric.
This is not considered an error.
z Operation for Structure Errors
The P_PRGER Flag changes TRUE and the following occurs.
Syntax
Assignment
statement
6-106
Error location
Operation
The line is not executed.
NJ-series CPU Unit Software User’s Manual (W501)
6 Programming
Syntax
Error location
IF condition
expression
CASE condition
expression
FOR condition
expression
WHILE condition
expression
REPEAT condition expression
Control constructs
Operation
No statements between IF and END_IF are executed.
No statements between CASE and END_CASE are executed.
No statements between FOR and END_FOR are executed.
No statements between WHILE and END_WHILE are executed.
No statements between REPEAT and END_REPEAT are executed.
Instruction Error Flag
When an instruction error occurs in a ladder algorithm or when a syntax/function error occurs in an ST
algorithm, the P_PRGER (Instruction Error Flag) system-defined variable changes to TRUE. The
P_PRGER Flag is a local variable (i.e., internal variable) for the program. This flag changes to TRUE
when an instruction error occurs in the program, and remains TRUE during the next task period.
P_PRGER
Data
type
Meaning
Function
Instruction Error Flag
This flag changes to and
remains TRUE when an
instruction error occurs. After
this flag changes to TRUE, it
stays TRUE until the program
changes it back to FALSE.
BOOL
Range of values
TRUE or FALSE
Initial value
FALSE
Read
/writ
e
Read
/write
Example:
Programs
P_PRGER
User-created
initial process
R
User-created normal
process #1
User-created algorithm
(instructions)
P_PRGER
User-created normal
process #2
Error processing
for normal
process #1
If the flag is ON, you
know that the
instruction error has
to be inside this
range.
Example: Initial values
set for variables
The P_PRGER Flag also changes to TRUE when an instruction error occurs inside a user-created
function block that is used by the program.
Example:
Program
P_PRGER : OFF
Inside function block definition
User-defined
function block
P_PRGER : OFF
Instruction error
P_PRGER : ON
P_PRGER : ON
NJ-series CPU Unit Software User’s Manual (W501)
6-107
6
6-6-3 Operation for Instruction Errors
The user can write the P_PRGER Flag. You can temporarily set the value of this flag to FALSE through
a user operation to determine if the error occurs within a specific range, for example. After this flag
changes to TRUE, it remains TRUE until the operating mode is changed or the flag is overwritten by a
program.
6-6 Instructions
Variable
name
6 Programming
6-7
Programming Precautions
This section describes precautions for developing a user program.
6-7-1
Array Specifications for Input Variables, Output Variables, In-Out
Variables
Some instructions handle array variables.
Example:
Data Type Table
Variable name
data
Data type
ARRAY[0..4] OF INT
SetBlock
INT#0
data[0]
UINT#5
6-7-2
ENO
EN
In
AryOut
Out
data[0]
Size
Structure Variables for Input Variables, Output Variables, In-Out
Variables
Some instructions have structure variables for input, output, or in-out variables.
Example:
SerialRcv_instance
SerialRcv
Operating
InPort
UINT#13
Execute
Port
Size
DstDat
Done
Busy
Error
ErrorID
RecvDat[0]
RecvDat[0]
ErrorIDEx
RcvSize
6-108
RecvSize
NJ-series CPU Unit Software User’s Manual (W501)
6 Programming
In this case, you must create a structure variable for the input, output, and in-out parameters, then use
the MOVE instruction to set the values.
Example:
Variable Table
Variable name Data type
InPort
_sPORT
Execution
condition
Inline ST: Sets values in the Inport structure variable.
1 InPort.UnitNo
2 InPort.PhysicPortNo
:=_CBU_No00;
:=USINT#2;
// Serial Communications Unit with unit number 0
// Serial port 2
SerialRcv_instance
SerialRcv
UINT#13
Done
Busy
Error
ErrorID
Execute
Port
Size
DstDat
RecvDat[0]
RecvDat[0]
ErrorIDEx
RcvSize
6-7-3
6-7 Programming Precautions
InPort
RecvSize
Master Control
Introduction
Master control is used to make output FALSE for all processing between the MC (Master Control Start)
instruction and the MCR (Master Control End) instruction. Master control is useful to control the execution conditions of a relatively long series of instructions.
6
Refer to information on the MC and MCR instructions in the NJ-series Instructions Reference Manual
(Cat. No. W502) for details.
6-7-3 Master Control
Master Control Programming Languages
You can use master control in ladder diagrams.
You cannot use master control with ST. You also cannot use master control for inline ST inside a ladder
diagram.
Example:
Inside a Master Control Region:
Ladder diagram algorithm
The ladder diagram is reset by the master
control.
For example, the output variables from OUT
instructions change to FALSE.
Inline ST
Nothing is done.
Ladder diagram algorithm
The ladder diagram is reset by the master
control.
For example, the output variables from OUT
instructions change to FALSE.
Programs
User-defined
function block
Operation of Instructions That Are Reset in a Master Control Region
Refer to information on the MC and MCR instructions in the NJ-series Instructions Reference Manual
(Cat. No. W502) for the operation of other instructions in the master control region when master control
is reset.
NJ-series CPU Unit Software User’s Manual (W501)
6-109
6 Programming
6-110
NJ-series CPU Unit Software User’s Manual (W501)
Simulation, Transferring Projects to the
Physical CPU Unit, and Operation
This section describes simulation of Controller operation and how to use the results of
simulation.
7-1 Simulation . . . . . . . . . . . . . . . . . . . . . . . . . . . . . . . . . . . . . . . . . . . . . . . . . . . . 7-2
7-1-1
7-1-2
7-1-3
7-1-4
7-1-5
7-1-6
7-1-7
Differences between the Simulator and the Physical CPU Unit . . . . . . . . . . . .
Simulation Programs . . . . . . . . . . . . . . . . . . . . . . . . . . . . . . . . . . . . . . . . . . . .
Executing a Simulation . . . . . . . . . . . . . . . . . . . . . . . . . . . . . . . . . . . . . . . . . .
Sysmac Studio Online Operations . . . . . . . . . . . . . . . . . . . . . . . . . . . . . . . . . .
Simulation Debugging . . . . . . . . . . . . . . . . . . . . . . . . . . . . . . . . . . . . . . . . . . .
Estimation of Execution Times . . . . . . . . . . . . . . . . . . . . . . . . . . . . . . . . . . . .
Servo Drive Signal Processing Emulation . . . . . . . . . . . . . . . . . . . . . . . . . . . .
7-3
7-3
7-4
7-4
7-5
7-6
7-6
7-2 Transferring the Project to the CPU Unit and Test Run . . . . . . . . . . . . . . . 7-7
7-2-1
7-2-2
7-2-3
Transferring the Project . . . . . . . . . . . . . . . . . . . . . . . . . . . . . . . . . . . . . . . . . . 7-7
Checking I/O Wiring . . . . . . . . . . . . . . . . . . . . . . . . . . . . . . . . . . . . . . . . . . . . . 7-7
MC Test Run . . . . . . . . . . . . . . . . . . . . . . . . . . . . . . . . . . . . . . . . . . . . . . . . . . 7-7
7-3 Starting Operation . . . . . . . . . . . . . . . . . . . . . . . . . . . . . . . . . . . . . . . . . . . . . 7-8
NJ-series CPU Unit Software User’s Manual (W501)
7-1
7
7 Simulation, Transferring Projects to the Physical CPU Unit, and Operation
7-1
Simulation
This section describes simulation of the NJ-series Controller in the Sysmac Studio. Refer to the Sysmac Studio Version 1 Operation Manual (Cat. No. W504) for details.
The shaded steps in the overall procedure that is shown below are related to the simulation.
Step 1. Software Design
Step 1-1 Designing I/O and Processing
Step 1-2 Designing Tasks
Step 1-3 Designing Programs
Step 2. Software Setups and Programming
Step 2-1 Slave and Unit Configurations
Step 2-2 Controller Setup
Step 2-3 Programming
Step 2-4 Offline Debugging
Step 3. Mounting and Setting Hardware
Step 4. Wiring
Step 5. Confirming Operation and Starting Actual System
Operation
Refer to 1-3 Overall Operating Procedure for the NJ-series Controller for details.
You can simulate the following operations of the NJ-series Controller on the Sysmac Studio.
• Simulation Program
• Executing simulations (Simulations use a virtual controller that has the same functions as the physical CPU Unit.)
• Debugging
• Simulation Monitor
• Estimation of Execution Times
• Servo Drive Signal Processing Emulation
7-2
NJ-series CPU Unit Software User’s Manual (W501)
7 Simulation, Transferring Projects to the Physical CPU Unit, and Operation
7-1-1
Differences between the Simulator and the Physical CPU Unit
The differences between the functions of the Simulator and the physical CPU Unit are given below
according to the divisions of test functions.
Item
Simulator
Algorithm verification
• Data monitoring
• 3D motion monitoring
• Debugging
Simulation provides more functions,
such as step execution.
Checking task execution times
• Task execution time monitoring
You can display both the execution time and the actual processing time.
You can see only the execution time.
Checking wiring
Not supported.
• Forced refreshing
• Changing the values of variables
Verification of connections with
other Controllers and host applications
Not supported.
• Data links
Sysmac Studio online operations
The functions are the same.
Normal operation
Operation for errors
Physical CPU Unit
• Monitoring present values of variables
• Operating status displays
• Data tracing
Simulation Programs
A simulation program is a program or a program section of a ladder diagram that you can execute only
on the Simulator. Simulation programs are treated as normal programs by the Simulator. Assign them
to a task to execute them.
Program
7-1 Simulation
7-1-2
7
Sections
7-1-1 Differences between the Simulator and the Physical CPU Unit
NJ-series CPU Unit Software User’s Manual (W501)
7-3
7 Simulation, Transferring Projects to the Physical CPU Unit, and Operation
7-1-3
Executing a Simulation
Starting and Stopping Simulation
Select Simulation Pane from the View Menu on the Sysmac Studio to open the Simulation Pane. Click
the RUN Button to transfer the program and execute the simulation. When the simulation starts, the
Editor and other Sysmac Studio panes are the same as when connected to the physical CPU Unit.
Executes a simulation.
0.1
1.0
Execution x0.7
speed:
Click the Stop Button in the Simulation Pane to stop the simulation.
Executing a Partial Simulation
You can select what to simulate in the Multiview Explorer to execute a specific task, a specific section,
or a program.
Setting the Simulation Speed
Drag the Simulation Speed Slider in the Simulation Pane. You can change the simulation speed from
0.1x to 1x. You can change the speed during a simulation.
7-1-4
Sysmac Studio Online Operations
The Simulator provides the same online operations as those supported when the Sysmac Studio is
connected to a physical NJ-series Controller.
• Monitoring the present value of variables
• Changing the present value of variables
• Forced-refreshing variables
• Operating status displays
• Data tracing
7-4
NJ-series CPU Unit Software User’s Manual (W501)
7 Simulation, Transferring Projects to the Physical CPU Unit, and Operation
7-1-5
Simulation Debugging
You can use simulation debugging to stop the operation of the Simulator or to execute a program one
step at a time to check the validity of the program logic.
z Step Execution
This function stops execution after only one step is executed. You can use step execution for ladder
diagrams, ST, and inline ST.
z Continuous Step Execution
This function continually performs step execution at a specified interval.
z Step-In Execution
This function performs step execution into a function block.
z Step-out Execution
z One-period Execution
This function executes the current task for one period. Execution pauses at the beginning of the program in the next period.
7
z Breakpoints
z Pausing
This function pauses operation of the Simulator.
z Conditional Breaks
This function stops the execution of the program at a breakpoint when the specified stopping condition is met. You can combine multiple conditions with OR logic as the condition.
z Cycling Power
This function simulates turning the power OFF and ON (resetting).
7-5
7-1-5 Simulation Debugging
This function is used to specify a location in the program and pause the Simulator at that location
during execution.
NJ-series CPU Unit Software User’s Manual (W501)
7-1 Simulation
This function performs step execution from a function block to the next instruction.
7 Simulation, Transferring Projects to the Physical CPU Unit, and Operation
7-1-6
Estimation of Execution Times
This function adds the program execution time, refreshing time, and other required times to display estimated processing time for each task based on the times computed during simulations.
Task Execution Time Monitor Display
The display is the same as when connected to a physical CPU Unit. Only the task execution time is displayed when you are connected to a physical CPU Unit.
Graphs displayed.
Period (Right of this point indicates that
the period was exceeded.)
Task name
Task Settings
Reset Button
7-1-7
Servo Drive Signal Processing Emulation
You can emulate the signal processing of the Servo Drive, and move the Servo axes in the Simulator
with actual axis settings. This provides virtual outputs of the Servo status and other signals (e.g., waiting for in-position state signal and Servo ON signal) to perform a simulation without changing the program.
7-6
NJ-series CPU Unit Software User’s Manual (W501)
7 Simulation, Transferring Projects to the Physical CPU Unit, and Operation
7-2
Transferring the Project to the CPU
Unit and Test Run
This section describes how to use the Sysmac Studio to transfer the user program to the physical CPU
Unit and perform an MC Test Run.
Transferring the Project
Use the Sysmac Studio to transfer the project to the physical Controller.
1
Go online with the Controller, and then select Synchronization from the Controller Menu.
The data on the computer and the data in the physical Controller are compared automatically.
2
Click the Transfer to Controller Button.
Note Use the Synchronization Menu of the Sysmac Studio to upload and download data.
7-2-2
Checking I/O Wiring
You can check the wiring by using forced refreshing of real I/O from the I/O Map or Watch Tab Page.
7-2-3
MC Test Run
MC Test Run is used mainly to perform the following operations from the Sysmac Studio without a user
program.
7-2 Transferring the Project to the CPU Unit and Test Run
7-2-1
7
• Checking wiring: You can monitor Servo Drive connector I/O signals and Servo Drive status.
• Checking the operation and direction of the motor: You can turn ON the Servo and jog axes.
• Checking homing: You can check the homing operation.
Connect online to the CPU Unit from the Sysmac Studio and perform the MC Test Run on the MC Test
Run Tab Page. Refer to the NJ-series CPU Unit Motion Control User’s Manual (Cat. No. W507) for
details.
Use the following procedure.
1
2
After you complete the necessary wiring, connect the Sysmac Studio online to the CPU Unit.
Create axes, assign the axes, and set the following axis parameters.
Axis parameter settings required for MC Test Run operation:
Unit of Display, Command Pulse Count Per Motor Rotation, Work Travel Distance Per Motor
Rotation, Maximum Velocity, Maximum Jog Velocity, Maximum Acceleration Rate, Maximum
Deceleration Rate, Software Limit Function Selection, Software Limits, and Count Mode
3
Open the MC Test Run Tab Page and perform the following.
Example:
• Monitor and check wiring.
• Jogging to check the direction of the motor
• Check travel distances for relative positioning (electronic gear settings).
• Confirming the homing operation
NJ-series CPU Unit Software User’s Manual (W501)
7-7
7-2-1 Transferring the Project
• Checking electronic gear settings: You can perform relative positioning, and check and change travel
distances.
7 Simulation, Transferring Projects to the Physical CPU Unit, and Operation
7-3
Starting Operation
This section describes how to use the Sysmac Studio to operate the NJ-series Controller.
Use the Sysmac Studio to start operation of the CPU Unit.
7-8
NJ-series CPU Unit Software User’s Manual (W501)
CPU Unit Status
This section describes CPU Unit status.
8-1 Overview of CPU Unit Status . . . . . . . . . . . . . . . . . . . . . . . . . . . . . . . . . . . . 8-2
8-2 State Changes . . . . . . . . . . . . . . . . . . . . . . . . . . . . . . . . . . . . . . . . . . . . . . . . 8-3
8-2-1
8-2-2
8-2-3
8-2-4
When Power Is Turned ON . . . . . . . . . . . . . . . . . . . . . . . . . . . . . . . . . . . . . . .
Operating Mode Changes . . . . . . . . . . . . . . . . . . . . . . . . . . . . . . . . . . . . . . . .
When Downloading Data from the Sysmac Studio to CPU Unit . . . . . . . . . . .
Status for Controller Errors . . . . . . . . . . . . . . . . . . . . . . . . . . . . . . . . . . . . . . .
8-3
8-3
8-6
8-7
8
NJ-series CPU Unit Software User’s Manual (W501)
8-1
8 CPU Unit Status
8-1
Overview of CPU Unit Status
This section provides an overview of the states of an NJ-series CPU Unit.
An NJ-series CPU Unit can be in any of three states: startup state, ready state, or error state. The CPU
Unit changes between these states for the following events.
• When power is turned ON
• When operating mode changes
• When downloading data from the Sysmac Studio to CPU Unit
• When Controller error occurs
Power turned ON
Startup state
When power is turned ON
Ready state
Operating mode
When downloading data
from the Sysmac Studio
to CPU Unit
When Controller error occurs
PROGRAM
mode
Error state
Controller error reset.
When operating mode
changes
RUN mode
8-2
NJ-series CPU Unit Software User’s Manual (W501)
8 CPU Unit Status
8-2
State Changes
This section describes the changes in states that can occur for an NJ-series CPU Unit.
8-2-1
When Power Is Turned ON
Status until Ready State
The CPU Unit is ready to operate 10 to 20 seconds after the power supply to the Controller is turned
ON. All outputs from Basic Output Units are OFF during this time. External communications are not performed and the RUN indicator flashes. (This is called the startup state.)
Status after Ready State
z Operating Modes
When the CPU Unit enters the ready state, it will change to the operating mode that you specify in
the Controller Configurations and Setup (Startup Mode setting in the Basic Settings in Configurations and Setup − Controller Setup − Operation Settings). You can set the operating mode at
startup to RUN mode or PROGRAM mode. Refer to 8-2-2 Operating Mode Changes for information
on the operating modes.
8-2 State Changes
Power supply
Ready state
Operating mode
(Startup state)
RUN indicator
OFF
8
RUN mode: Lit.
PROGRAM mode: Not lit.
(Refer to Output Bit Status
for CJ-series Basic Output
Units.)
z Status of Output Bits for EtherCAT Slaves
The status of slave outputs before the start of EtherCAT communications depends on settings in the
slaves. After EtherCAT communications start, the slaves output the values of the device variables.
The values of device variables in RUN mode depend on the results of user program execution.
These values then determine the output values of slaves.
8-2-2
Operating Mode Changes
You can start and stop the execution of the user program when the CPU Unit is in Ready State.
You change the operating mode to start and stop user program execution.
Operating Modes
There are two operating modes: RUN mode and PROGRAM mode.
NJ-series CPU Unit Software User’s Manual (W501)
8-3
8-2-1 When Power Is Turned ON
Outputs from Basic
Output Units
Flashing.
RUN or
PROGRAM mode
8 CPU Unit Status
z RUN Mode
The user program is executed in RUN mode. The default setting of the operating mode at startup is
RUN mode.
z PROGRAM Mode
The user program is not executed in PROGRAM mode. Use this mode to transfer the project (with
the user program) and check I/O wiring.
Operating Modes and Functions
Function
RUN mode
Program execution
Yes
I/O refreshing of CJ-series Units and EtherCAT
slaves
Yes
Synchronizing from the Sysmac Studio
Not supported.
Online editing
Supported.
Forced refreshing
Supported.
Changing the values of variables and values in
memory used for CJ-series Units from the Sysmac Studio
Supported.
Changing the values of variables and values in
memory used for CJ-series Units from an HMI.
Supported.
Communications
Supported.
PROGRAM mode
None
Supported.
Operating Mode at Startup
You can set the operating mode that is used at startup in the Controller Setup under the Configurations
and Setup on the Sysmac Studio, as shown below.
Access point
Operation Settings, Operation
Settings Tab,
Basic Settings
Setting
group
Operation
Settings
Setting
Startup
Mode
Description
Sets the CPU
Unit’s operating mode at
startup.
Set values
RUN or
PROGRAM
mode
Default
Update
timing
RUN mode When
downloaded to
CPU Unit
Changes
in RUN
mode
Not
allowed.
Operation for Operating Mode Changes
z Changes in Values of Variables
When the operating mode changes between RUN and PROGRAM mode, the values of variables
and the status of errors are affected as given in the following table.
Mode change
RUN to PROGRAM
PROGRAM to RUN
8-4
Values of user-defined variables
Variables without Retain attribute
• If initial values are set, the variables
change to the initial values.
• If initial values are not set, the variables change to 0.
Variables with Retain attribute
No change
(The values before the operating mode
changed are retained.)
NJ-series CPU Unit Software User’s Manual (W501)
8 CPU Unit Status
Precautions for Safe Use
Always confirm the safety of the controlled system before you change the operating mode or the
setting of the Startup Mode.
z Status of Output Bits for EtherCAT Slaves
The output data sent from the EtherCAT Master Function Module is used regardless of the operating
mode of the CPU Unit.
z Servo Drive Status
If the operating mode changes from RUN to PROGRAM mode during a motion control operation, the
axes will decelerate to a stop at the maximum deceleration rate.
Checking the Operating Mode
You can check the operating mode on the front-panel indicators, from the Sysmac Studio, or from system-defined variables.
z Checking Operating Mode on Indicators on Front of CPU Unit
The RUN indicator on the front of the CPU Unit indicates the operating mode as described below.
RUN indicator on CPU Unit
Operating modes
During startup
Flashing.
RUN mode
In ready status
Not lit.
8-2 State Changes
PROGRAM mode
Lit green.
z Checking the Operating Mode from the Sysmac Studio
You can check the operating mode from the Controller Status Pane of the Sysmac Studio.
Controller Status Pane
8
8-2-2 Operating Mode Changes
Additional Information
Use the RUN output on the Power Supply Unit to externally output a signal in RUN mode.
Changing the Operating Mode
z Changing the Operating Mode
You can change the operating mode from the Sysmac Studio.
Changing the Operating Mode at Startup
When the power supply to the Controller is turned ON, the CPU Unit enters RUN mode by default.
Change the setting of the Startup mode in the Basic Settings to PROGRAM mode in Configurations and Setup − Controller Setup − Operation Settings on the Sysmac Studio.
NJ-series CPU Unit Software User’s Manual (W501)
8-5
8 CPU Unit Status
Changing the Operating Mode from the Sysmac Studio
Use the following procedure.
• Select Mode - Run from the Controller Menu.
8-2-3
When Downloading Data from the Sysmac Studio to CPU Unit
The operation that occurs when you download the project data from the Sysmac Studio to the CPU Unit
is described below.
Operation during Downloads
z Status of Output Bits for EtherCAT Slaves
The output status is controlled by the settings in the EtherCAT slave.
z Output Bit Status for CJ-series Basic Output Units
When you change from RUN mode to PROGRAM mode, the memory used for CJ-series Units is initialized to all zeros (16#0000). I/O refreshing is performed with those values.
Operation after Downloads
z Status of Output Bits for EtherCAT Slaves
The EtherCAT slaves perform initial processing after the download is completed. In the same way as
for the download process, the operation of the slaves during this time depends on the settings in the
EtherCAT slaves. Guidelines for the time required for initial processing after the download are given
in the following table.
Number of slaves
8-6
Time for initial processing after a download (guideline)
1
3.8 s
48
11 s
192
45 s
NJ-series CPU Unit Software User’s Manual (W501)
8 CPU Unit Status
The status is as follows after initial processing:
Settings at user program transfer
When variable values are initialized or not initialized
Device variables in CPU Unit
Status of outputs from EtherCAT slaves
Initial value of variable set to
TRUE
Output is turned ON.
Initial value of variable set to
FALSE
Output is turned OFF.
Variable for which no initial
value is set
Output is turned OFF.
z Output Bit Status for CJ-series Basic Output Units
Settings at user program transfer
When variable values are initialized or not initialized
8-2-4
Status of outputs from CJseries Basic Output Units
Device variables in CPU Unit
Initial value of variable set to
TRUE
Output is turned ON.
Initial value of variable set to
FALSE
Output is turned OFF.
Variable for which no initial value
is set
Output before the download is
retained.
Status for Controller Errors
An error that is defined by the NJ-series system is called a Controller error. The following tables give the
operation of function modules and the CPU Unit itself when a Controller error occurs.
8-2 State Changes
Function Module Operation for Controller Errors in RUN Mode
The following table lists function module operations when a Controller error occurs in RUN mode.
Error type
Operation
Minor fault level Controller
error
The function module where the error occurred does not stop.
Partial fault level Controller
error
The function module where the error occurred stops.
Major fault level Controller
error
All function modules stop.
8
8-2-4 Status for Controller Errors
Refer to 12-1-3 Non-fatal error in CPU Unit for details on Controller errors.
NJ-series CPU Unit Software User’s Manual (W501)
8-7
8 CPU Unit Status
8-8
NJ-series CPU Unit Software User’s Manual (W501)
CPU Unit Functions
This section describes the functionality provided by the CPU Unit.
9-1 Data Management, Clock, and Operating Functions . . . . . . . . . . . . . . . . . 9-3
9-1-1
9-1-2
9-1-3
Clearing All Memory . . . . . . . . . . . . . . . . . . . . . . . . . . . . . . . . . . . . . . . . . . . . 9-3
Clock . . . . . . . . . . . . . . . . . . . . . . . . . . . . . . . . . . . . . . . . . . . . . . . . . . . . . . . . 9-3
RUN Output . . . . . . . . . . . . . . . . . . . . . . . . . . . . . . . . . . . . . . . . . . . . . . . . . . . 9-6
9-2 Management Functions for CJ-series Units . . . . . . . . . . . . . . . . . . . . . . . . 9-7
9-2-1
9-2-2
Basic I/O Units . . . . . . . . . . . . . . . . . . . . . . . . . . . . . . . . . . . . . . . . . . . . . . . . . 9-7
Special Units . . . . . . . . . . . . . . . . . . . . . . . . . . . . . . . . . . . . . . . . . . . . . . . . . . 9-8
9-3 SD Memory Card Operations . . . . . . . . . . . . . . . . . . . . . . . . . . . . . . . . . . . 9-10
9-3-1
9-3-2
9-3-3
9-3-4
9-3-5
9-3-6
9-3-7
9-3-8
9-3-9
SD Memory Card Operations . . . . . . . . . . . . . . . . . . . . . . . . . . . . . . . . . . . .
Specifications of Supported SD Memory Cards, Folders, and Files . . . . . . .
SD Memory Card Operation Instructions . . . . . . . . . . . . . . . . . . . . . . . . . . . .
FTP Server . . . . . . . . . . . . . . . . . . . . . . . . . . . . . . . . . . . . . . . . . . . . . . . . . .
File Operations from the Sysmac Studio . . . . . . . . . . . . . . . . . . . . . . . . . . . .
SD Memory Card Life Expiration Detection . . . . . . . . . . . . . . . . . . . . . . . . . .
List of System-defined Variables Related to SD Memory Cards . . . . . . . . . .
SD Memory Card Self-diagnostic Functions . . . . . . . . . . . . . . . . . . . . . . . . .
Exclusive Control of Access to the SD Memory Card . . . . . . . . . . . . . . . . . .
9-10
9-11
9-12
9-12
9-13
9-13
9-13
9-14
9-15
9-4 Security . . . . . . . . . . . . . . . . . . . . . . . . . . . . . . . . . . . . . . . . . . . . . . . . . . . . . 9-17
9-4-1
9-4-2
9-4-3
9-4-4
Verification of Operation Authority . . . . . . . . . . . . . . . . . . . . . . . . . . . . . . . . .
CPU Unit Names and Serial IDs . . . . . . . . . . . . . . . . . . . . . . . . . . . . . . . . . .
Protection . . . . . . . . . . . . . . . . . . . . . . . . . . . . . . . . . . . . . . . . . . . . . . . . . . . .
CPU Unit Operation Restrictions for the User Program Execution ID . . . . . .
9-17
9-19
9-21
9-25
9-5 Debugging . . . . . . . . . . . . . . . . . . . . . . . . . . . . . . . . . . . . . . . . . . . . . . . . . . 9-28
9-5-1
9-5-2
9-5-3
9-5-4
Forced Refreshing . . . . . . . . . . . . . . . . . . . . . . . . . . . . . . . . . . . . . . . . . . . . .
Changing Present Values . . . . . . . . . . . . . . . . . . . . . . . . . . . . . . . . . . . . . . .
Online Editing . . . . . . . . . . . . . . . . . . . . . . . . . . . . . . . . . . . . . . . . . . . . . . . .
Data Tracing . . . . . . . . . . . . . . . . . . . . . . . . . . . . . . . . . . . . . . . . . . . . . . . . . .
9-28
9-32
9-34
9-35
9-6 Event Logs . . . . . . . . . . . . . . . . . . . . . . . . . . . . . . . . . . . . . . . . . . . . . . . . . . 9-43
9-6-1
9-6-2
9-6-3
9-6-4
Introduction . . . . . . . . . . . . . . . . . . . . . . . . . . . . . . . . . . . . . . . . . . . . . . . . . .
Detailed Information on Event Logs . . . . . . . . . . . . . . . . . . . . . . . . . . . . . . . .
Controller Events (Controller Errors and Information) . . . . . . . . . . . . . . . . . .
User-defined Events (User-defined Errors and Information) . . . . . . . . . . . . .
NJ-series CPU Unit Software User’s Manual (W501)
9-43
9-44
9-49
9-50
9-1
9
9 CPU Unit Functions
9-7 Using the Sysmac Studio to Back Up and Restore Data . . . . . . . . . . . . . . 9-57
9-7-1
9-2
Backing Up and Restoring the Present Values of Battery-backup Memory . . 9-57
NJ-series CPU Unit Software User’s Manual (W501)
9 CPU Unit Functions
9-1
Data Management, Clock, and
Operating Functions
This section describes the data management, clock, and operating functions.
9-1-1
Clearing All Memory
You can initialize the user program, Controller Configurations and Setup, and variables in the CPU Unit
to the defaults from the Sysmac Studio. This is called the Clear All Memory operation.
Precautions for Correct Use
• The Clear All Memory operation can be performed only in PROGRAM mode.
• You cannot execute the Clear All Memory operation when write protection is set in the security
functions.
After you clear the memory, the CPU Unit operates in the same way as immediately after you create the
system configuration with the CPU Unit in the factory default condition.
The absolute encoder home offset is not cleared.
z Operations from the Sysmac Studio
Connect the Sysmac Studio to the CPU Unit online, and select Clear All Memory from the Controller Menu.
9-1-2
Clock
Introduction
A clock (RTC) is built into the CPU Unit. The clock data from this clock is used for timestamps in the
event logs and for the time and date of files that are created on the SD Memory Card.
The following functions are supported.
• Reading/writing the clock with instructions
• Reading the clock from system-defined variables (Writing is not possible.)
• Correcting the clock from an NTP Server
NJ-series CPU Unit Software User’s Manual (W501)
9
9-1-1 Clearing All Memory
• Reading/writing the clock from the Sysmac Studio
9-1 Data Management, Clock, and Operating Functions
• Do not turn OFF the power supply to the Controller during the Clear All Memory operation.
9-3
9 CPU Unit Functions
• Reading/writing the clock from the Sysmac Studio
• Reading/writing the clock with instructions
• Correcting the clock from an NTP server
CPU Unit
Clock data
• Event logs
• Time and date of files that are
created on SD Memory Card
Battery backup
Battery
CJ1W-BAT01
Precautions for Correct Use
The clock data is retained by the Battery when the power is turned OFF. The clock data is not
correct when the power is turned ON. You can reset the clock data from an NTP server over an
EtherNet/IP network after the power is turned ON.
z Clock Data Range
The range of the clock is 1970-01-01 to 2106-02-06 (January 1, 1970 to February 6, 2106).
z Setting the Time Zone and the Local Time
You must set the time zone and local time for use outside of Japan. You can set the time zone from
the Sysmac Studio in the Controller Clock Dialog Box. You can still use the CPU Unit’s internal clock
even if you do not set the time zone. Clock data that is read by the CPU Unit from an external device
and the clock data that is set are the local time based on the time zone.
Additional Information
When a Battery is not mounted or when the Battery voltage is low, the time zone setting is
retained, but the clock data is not retained and will not be correct.
Setting the Clock Data
Use one of the following methods.
z Changing Clock Data from the Sysmac Studio
You can use the Sysmac Studio to synchronize the clock data of the built-in clock with the clock on
the computer.
z Changing Clock Data with Instructions
You can use the SetTime instruction to set the clock data.
z Changing the Clock Data from an NTP Server
You can use an NTP server on EtherNet/IP to set the clock data.
9-4
NJ-series CPU Unit Software User’s Manual (W501)
9 CPU Unit Functions
Correcting the Clock from an NTP Server
z Application
In a network system, the clock data must be shared by the entire system. NTP is supported to
enable easy time synchronization.
z Specifications
An NTP client is provided.
Refer to the NJ-series Built-in EtherNet/IP User’s Manual (Cat. No. W506) for details.
Reading the Clock Data
If the clock data is incorrect, the incorrect value is read.
z Reading the Clock Data from Instructions
z Reading the Clock from System-defined Variables (Writing Is Not Possible)
You can use the following system-defined variable to read the clock data.
_CurrentTime (System Time)
z Sysmac Studio Procedure
You can select Controller Clock from the Controller Menu of the Sysmac Studio to display the clock
data.
Logging
When you change the clock data, an event is recorded in the event log. However, nothing is recorded in
the event log if the time is corrected for the NTP.
9-1 Data Management, Clock, and Operating Functions
You can use the GetTime instruction to read the clock data from the user program.
Related System-defined Variables
Variable name
_CurrentTime
Meaning
System Time
Data type
This variable contains the CPU Unit’s inter- DATE_AND_TIME
nal clock data.
R/W
9
R
9-1-2 Clock
NJ-series CPU Unit Software User’s Manual (W501)
Description
9-5
9 CPU Unit Functions
9-1-3
RUN Output
Introduction
The RUN output on the NJ-P@3001 Power Supply Unit is ON while the CPU Unit is operating.
Power Supply Unit
NJ-P@3001
CPU Unit
RUN
output
The RUN output operates as shown in the following table.
Status
Operation
During RUN mode
ON
Startup state
(until RUN mode is entered according to the Startup Mode setting).
OFF
During PROGRAM mode
When a major fault level Controller error occurs
The ratings of the RUN output on an NJ-P@3001 Power Supply Unit are as follows:
Item
Contact form
Description
SPST-NO
2 A at 250 VAC for resistive load
Switching capacity
0.5 A at 120 VAC for inductive load
2 A at 24 VDC for resistive load
Application
You can use the RUN output for the following purposes:
• Obtain a signal to notify the host that the CPU Unit is functioning normally and is currently operating.
• Synchronize the completion of startup of more than one CPU Unit
• Release interlocks when the CPU Unit starts operation.
Precautions for Safe Use
It takes up to approximately 10 to 20 s to enter RUN mode after the power is turned ON. During
that time, outputs will be OFF and external communications are not performed. Use the RUN
output on the Power Supply Unit, for example, to implement fail-safe circuits so that external
devices do not operate incorrectly.
9-6
NJ-series CPU Unit Software User’s Manual (W501)
9 CPU Unit Functions
9-2
Management Functions for CJ-series
Units
This section describes the management functions used for Units in the Controller.
9-2-1
Basic I/O Units
Introduction
You can increase the input response time to reduce chattering and the effects of external noise. You
can decrease the input response time to enable detection of shorter input pulses. Do not set the ON
response time or OFF response time to less than the refresh time.
Pulses shorter than the input
response time are not detected.
Input bit
Input response time
Input response time
Setting Methods
From the Multiview Explorer of the Sysmac Studio, double-click CPU/Expansion Racks under Configurations and Setup. Then select the input response times in the Unit information for the Basic I/O
Units.
9-2 Management Functions for CJ-series Units
Input from a
proximity sensor
or other device
9
9-2-1 Basic I/O Units
You must do either of the following to enable the settings.
• Cycle the power supply to the Controller.
• Reset the Controller (the entire CPU Unit) from the Sysmac Studio.
NJ-series CPU Unit Software User’s Manual (W501)
9-7
9 CPU Unit Functions
Related System-defined Variables
The set values for the input response times of the Basic Input Units are output to the following systemdefined variable.
9-2-2
Variable name
Meaning
Description
_CJB_InRespTm
Basic Input Unit Input Response
Times
Contains the response times of
the Basic I/O Units in 0.1-ms
increments.
Data type
ARRAY[0..3,
0..9]OF UINT
Special Units
Restarting Special Units
You can restart a Special Unit (Special I/O Unit or CPU Bus Unit) to enable values that are set for it. If
you restart a Special Unit, you do not have to cycle the power supply to the Controller. Execute the following ResetUnit (Restart Unit) instruction to restart Special Units.
Instruction
name
Restart Unit
Instruction
ResetUnit
Description
Restarts the CPU Bus Unit or Special I/O Unit.
ResetUnit
a
b
Execute
Done
UnitNo
Busy
The ResetUnit instruction restarts a Special Unit
across multiple task periods when execution condition
a changes to TRUE. If the restart ends normally, the
output variable Done (normal end) changes to TRUE
and variable b therefore changes to TRUE.
Error
ErrorID
If Special Unit settings are changed in any of the following ways, you must restart the Special Unit or
cycle the power supply to the Controller.
• Editing from the Special Unit Setting Pane of the Sysmac Studio
• Editing from the I/O Map or Watch Tab Page
• Setting the user program
z Related System-defined Variables
Variable
name
9-8
Meaning
Description
Data type
_CJB_CBU00
InitSta
to
_CJB_CBU15
InitSta
CPU Bus Unit
Initializing
Flags
The corresponding variable is TRUE during initialization of the
CPU Bus Unit. The corresponding variable changes to FALSE
when the initialization is completed. The numbers in the variables indicate the unit numbers of the applicable Units.
BOOL
_CJB_SIO00I
nitSta
to
_CJB_SIO95I
nitSta
Special I/O
Unit Initializing Flags
The corresponding variable is TRUE during initialization of the
Special I/O Unit. The corresponding variable changes to FALSE
when the initialization is completed. The numbers in the variables indicate the unit numbers of the applicable Units.
BOOL
NJ-series CPU Unit Software User’s Manual (W501)
9 CPU Unit Functions
Variable
name
Meaning
Description
Data type
_CJB_CBU00
Restart
to
_CJB_CBU15
Restart
CPU Bus Unit
Restart Bits
The CPU Bus Unit is restarted when the corresponding variable
changes to TRUE. (It is changed to FALSE by the system after
the CPU Bus Unit is restarted.) The numbers in the variables
indicate the unit numbers of the applicable Units. If you change
the Restart Bit to TRUE with an instruction, the restart process
begins from refresh processing in the next task period after the
instruction is executed.
BOOL
_CJB_SIO00
Restart
to
_CJB_SIO95
Restart
Special I/O
Unit Restart
Bits
The Special I/O Unit is restarted when the corresponding variable changes to TRUE. (It is changed to FALSE by the system
after the Special I/O Unit is restarted.) The numbers in the variable names indicate the unit numbers of the applicable Units. If
you change the Restart Bit to TRUE with an instruction, the
restart process begins from refresh processing in the next task
period.
BOOL
9-2 Management Functions for CJ-series Units
9
9-2-2 Special Units
NJ-series CPU Unit Software User’s Manual (W501)
9-9
9 CPU Unit Functions
9-3
SD Memory Card Operations
This section describes the functions that you can use for SD Memory Cards.
9-3-1
SD Memory Card Operations
The NJ-series CPU Unit supports the following functions for SD Memory Cards.
Sysmac Studio
CPU Unit
Creating/reading files
from Sysmac Studio
Memory Card operation
instructions
SD Memory Card
FTP server
Function
SD Memory Card operation
instructions
FTP server
File operations from the Sysmac
Studio
SD Memory Card life expiration
detection
9-10
Introduction
You can access SD Memory Cards from instructions in the user program.
You can use FTP commands from an FTP client on the Intranet to read and
write large files in the SD Memory Card through EtherNet/IP.
You can perform file operations from the Sysmac Studio for the SD Memory Card inserted in the CPU Unit.
You can perform file operations for Controller files in the SD Memory Card
and save standard document files on the computer.
Notification of the expiration of the life of the SD Memory Card is provided
in a system-defined variable and event log.
NJ-series CPU Unit Software User’s Manual (W501)
9 CPU Unit Functions
9-3-2
Specifications of Supported SD Memory Cards, Folders, and
Files
SD Memory Card Specifications
You can use any SD or SDHC Memory Card, but operation has been verified only for the following
OMRON SD Memory Card. Normal operation may not be possible with any other SD Memory Cards.
Item
Description
Model number
HMC-SD291
Capacity
2 GB
Number of overwrites
100,000
Formatting
FAT16
Write protection
You can write-protect the SD Memory Card with a hardware switch on the Card.
The system-defined variable _Card1Err (SD Memory Card Error Flag) changes to TRUE (observation
level) in the following cases.
• When there is a format error
If an error occurs, the SD PWR indicator on the front of the CPU Unit goes out, and accessing the SD
Memory Card will not be possible.
Folder and File Specifications
Object
named by
user
Usable characters
Volume label
0 to 9, A to Z, and a to z, as
well as % - _ @ ! ‘ ( ) ~= # & +
^ [ ] { } , . ; and single-byte
kana*1
Directory
name
0 to 9, A to Z, and a to z, as
well as $ % ’ - _ @ ! ‘ ( ) ~= #
& + ^ [ ] { } , . ; and single-byte
kana
File name
Reserved
words
Case sensitivity
Not supported.*2
Case
insensitive
Maximum
size (without
NULL)
11 bytes
65 bytes
65 bytes
9
*1 You cannot begin volume label names with a space.
*2 Even if the computer supports multibyte characters (e.g., for Japanese), you cannot use them in the CPU Unit.
z Subdirectory Levels
You can create up to 5 levels (example: f1/f2/f3/f4/f5/abc.txt)
z Number of Files in the Root Directory
511 max.
NJ-series CPU Unit Software User’s Manual (W501)
9-11
9-3-2 Specifications of Supported SD Memory Cards,
Folders, and Files
CON, PRN,
AUX,
CLOCK$,
NUL, COM0,
COM1,
COM2,
COM3,
COM4,
COM5,
COM6,
COM7,
COM8,
COM9, LPT0,
LPT1, LPT2,
LPT3, LPT4,
LPT5, LPT6,
LPT7, LPT8,
LPT9
Multibyte
character
compatibility
9-3 SD Memory Card Operations
z Character Restrictions
9 CPU Unit Functions
9-3-3
SD Memory Card Operation Instructions
You can perform various operations on the SD Memory Card by using the following instructions.
Instruction name
Description
FileReadVar
The FileReadVar instruction reads the contents of a binary file on the
SD Memory Card and writes it to the specified variable. You can
specify array and structure variables.
Write Variable to
File
FileWriteVar
The FileWriteVar instruction writes the value of a specified variable to
a binary file in the SD Memory Card. You can specify array and structure variables. If the directory specified for the file name does not
exist, it is created.
Open File
FileOpen
The FileOpen instruction opens the specified file.
Close File
FileClose
The FileClose instruction closes the specified file.
Seek File
FileSeek
The FileSeek instruction sets a file position indicator in the specified
file.
Read File
FileRead
The FileRead instruction reads the data from the specified file.
Write File
FileWrite
The FileWrite instruction writes data to the specified file.
Get Text String
FileGets
The FileGets instruction reads a text string of one line from the specified file.
Put Text String
FilePuts
The FilePuts instruction writes a text string of one line to the specified
file.
Delete File
FileRemove
The FileRemove instruction deletes the specified file from the SD
Memory Card.
Change File
Name
FileRename
The FileRename instruction changes the name of the specified file or
directory.
Copy File
FileCopy
The FileCopy instruction copies the specified file to a different file.
Create Directory
DirCreate
The DirCreate instruction creates a directory in the SD Memory Card.
Delete Directory
DirRemove
The DirRemove instruction deletes a directory from the SD Memory
Card.
Read Variable
from File
9-3-4
Instruction
FTP Server
You can read and write files on the SD Memory Card via EtherNet/IP by sending FTP commands to the
built-in EtherNet/IP port from an FTP client.
Refer to the NJ-series CPU Unit Built-in EtherNet/IP User’s Manual (Cat. No. W506) for details.
CPU Unit
FTP Client
FTP
commands
SD Memory Card
Built-in EtherNet/IP port: FTP server
EtherNet/IP
File transfers
9-12
NJ-series CPU Unit Software User’s Manual (W501)
9 CPU Unit Functions
9-3-5
File Operations from the Sysmac Studio
You can perform file operations from the Sysmac Studio for the SD Memory Card inserted in the CPU
Unit. In addition to Controller files, you can also store document files or other files on the SD Memory
Card.
9-3-6
SD Memory Card Life Expiration Detection
You can determine the remaining life of the SD Memory Card before the Card becomes physically deteriorated.
You can determine the remaining life of the SD Memory Card with the following functions.
• System-defined variable _Card1Deteriorated (SD Memory Card Life Warning Flag)
• SD Memory Card Life Exceeded (Observation) record in the event log
The life of the SD Memory Card is checked when the power is turned ON and periodically while the SD
Memory Card is inserted.
When the end of the life of the SD Memory Card is detected, save the data on the SD Memory Card
and replace the SD Memory Card.
9-3-7
List of System-defined Variables Related to SD Memory Cards
The following system-defined variables show the status of the SD Memory Card.
_Card1Ready
Meaning
SD Memory
Card Ready
Flag
Description
TRUE when the SD Memory Card is recognized. It is FALSE when
an SD Memory Card is not recognized.
Data
type
BOOL
TRUE: The Card can be used.
FALSE: The Card cannot be used.
_Card1Protect
_Card1Err
SD Memory
Card Write
Protected
Flag
TRUE when the SD Memory Card is write-protected.
SD Memory
Card Error
Flag
TRUE when an unusable SD Memory Card is inserted or a format
error occurs.
BOOL
TRUE: Write protected.
FALSE: Not write protected.
9-3 SD Memory Card Operations
Variable name
BOOL
9
TRUE: There is an error
FALSE: There is no error
SD Memory
Card Access
Flag*1
TRUE during SD Memory Card access.
BOOL
TRUE: Card is being accessed.
FALSE: Card is not being accessed.
BOOL
_Card1Deterior SD Memory
ated
Card Life
Warning Flag
TRUE when the end of the life of the SD Memory Card is detected.
_Card1PowerF
ail
TRUE when the power supply to the Controller was interrupted dur- BOOL
ing access to the SD Memory Card.
SD Memory
Card Power
Interruption
Flag*2
TRUE: The end of the life of the Card is detected.
FALSE: The end of the life of the Card was not detected.
TRUE: Power was interrupted during SD Memory Card access.
FALSE: Operation is normal.
*1 Precaution When Using SD Memory Card Access Flag (_Card1Access)
The SD Memory Card Access Flag is intended for use in notifying external devices. The status of access to the
SD Memory Card is not updated in realtime. Because of this, do not use the flag in the user program. Because
the status of access to the SD Memory Card is not shown in realtime, it may cause unexpected Controller
operation if you use it in the user program.
NJ-series CPU Unit Software User’s Manual (W501)
9-13
9-3-5 File Operations from the Sysmac Studio
_Card1Access
9 CPU Unit Functions
*2 Precautions When Using the SD Memory Card Power Interruption Flag ( _Card1PowerFail)
If the SD Memory Card Power Interruption Flag is TRUE, check to see if the correct file is in the SD Memory
Card and to see if the SD Memory Card operates properly. If the correct file is missing or the SD Memory Card
does not operate properly, download the correct file to the SD Memory Card again. Cycle the power supply to
the Controller or reset the Controller, and then see if the SD Memory Card operates properly. When you are
finished, change SD Memory Card Power Interruption Flag to FALSE. (_Card1PowerFail does not change to
FALSE automatically.)
Additional Information
SD Memory Card Recognition and Unmounting Timing Chart
SD Memory Card inserted.
Card recognized.
Recognition reset
Recognition
System processing
Power supply stopped with power switch.
_Card1Ready
_Card1Err
_Card1Access
SD PWR indicator
SD BUSY indicator
9-3-8
Lit.
Not lit.
Not lit.
Flashing.
Not lit.
Lit.
Not lit.
Not lit.
SD Memory Card Self-diagnostic Functions
You can perform self-diagnosis on the inserted SD Memory Card when the power supply is turned ON.
You can select whether to perform self-diagnosis when the power is turned ON in the Operation Settings of the Controller Setup under the Configurations and Setup from the Sysmac Studio as shown
below.
• File system check
• Check equivalent to CHKDSK
• Restoration attempt when check fails
Access
point
Setting
group
Operation
Settings,
Operation
Settings
Tab, Basic
Settings
SD Memory Card
Settings
Setting
Memory
Card
Diagnosis
at Startup
(See
note.)
Description
Sets whether to execute self-diagnosis (file system check
and restoration) on the inserted SD Memory Card when
the power is turned ON.
Set values
Do not
check.
Check.
Note Self-diagnosis is not executed if write protection is set on the SD Memory Card itself.
9-14
NJ-series CPU Unit Software User’s Manual (W501)
9 CPU Unit Functions
z Results of Self-diagnosis
Indicators
Case
Self-diagnosis in
progress
RUN
Flashing.
SD PWR
SD BUSY
Error type
Correction
Remarks
Not lit.
Lit.
---
---
---
1. When self-diag- --nosis found no
problems
Lit.
Not lit.
Normal
None
---
2. The format of
the SD Memory
Card is not correct.
---
Not lit.
Not lit.
Observation
Use the Sysmac
Studio to format
the SD Memory
Card.
---
3. An error was
detected during
the file system
check and the
file system was
automatically
restored.
---
Not lit.
Flashes
during
restore
operation.
Observation
Use file operations
in the Sysmac Studio or insert the SD
Memory Card into
the computer to
check whether any
files were deleted
by the restore
operation.
If a corrupted file
is detected,
an attempt
is made to
restore the
file.
4. The SD Memory Card failed.
---
Observation
Replace the SD
Memory Card.
---
Not lit after
restore
operation is
completed.
Not lit.
Not lit.
Precautions for Correct Use
Precautions for Safe Use
If the recovery function is activated at startup, time is required to enter RUN mode. During that
time, outputs will be OFF and external communications are not performed. Use the RUN output
on the Power Supply Unit, for example, to implement fail-safe circuits so that external devices do
not operate incorrectly.
Exclusive Control of Access to the SD Memory Card
Access to files on the SD Memory Card is possible with the following methods.
• FTP server
• SD Memory Card operation instructions
• File operations from the Sysmac Studio
However, exclusive control is required when you access the same file on the SD Memory Card from different sources. This is to prevent reading or writing a file while it is being written, or writing a file while it
is being read.
Exclusive Control of Access to a File on the SD Memory Card
The CPU Unit automatically performs exclusive control only for the following combinations of instructions.
NJ-series CPU Unit Software User’s Manual (W501)
9-15
9
9-3-9 Exclusive Control of Access to the SD Memory Card
9-3-9
9-3 SD Memory Card Operations
Never interrupt the power supply to the Controller during SD Memory Card access. That includes
when SD Memory Card self-diagnosis at startup is enabled. An attempt is made by the SD Memory Card restoration function to restore any corrupted files. If the restore fails, these files may be
deleted automatically at startup.
9 CPU Unit Functions
For the other combinations shown below, perform exclusive control by using file operation instructions (Change File Name, Copy File, etc.) or communications commands.
Access already
underway
Later access
Instructions
Read
Read
Instructions
FTP
Write
9-16
Write
Perform exclusive control.
Perform exclusive control.
Write
Communications commands
Read
Exclusive control is performed auto- (Exclusive conmatically, and an error occurs for
trol is not
the instruction that is executed later. required.)
Read
(Exclusive control is not
required.)
Perform exclusive control.
Write
Perform exclusive control.
(Exclusive control is not
required.)
NJ-series CPU Unit Software User’s Manual (W501)
9 CPU Unit Functions
9-4
Security
This section describes security functions.
The NJ-series Controller provides the following security functions.
• Verification of operation authority
• CPU Unit names and serial IDs
• Protection
• Restriction of user program operation with user program execution IDs
9-4-1
Verification of Operation Authority
Introduction
Online operations are restricted by operation rights to prevent damage to equipment or injuries that may
be caused by operating mistakes. Examples are shown below.
• I/O Monitor: Writing, forced refreshing, etc.
• Controller operations: Changing the operating mode, online editing, MC Test Run, etc.
You can register passwords for operation authority for each CPU Unit in the Sysmac Studio. If a correct
password is entered when an online connection is made to a Controller, the online operations for the
operation authority category for the password that was entered will be allowed.
The Administrator sets a password for each operation authority. Users are notified of the operation
authority name and password according to their skills.
Operation
Select Security − Setting of Operation Authority from the Controller Menu on the Sysmac Studio.
Settings are made in the following dialog box.
1
9
Select the Enable the verification of operation authority Check Box and double-click Administrator in the Operation authority Column.
NJ-series CPU Unit Software User’s Manual (W501)
9-17
9-4-1 Verification of Operation Authority
2
Select Security − Setting of Operation Authority from the Controller Menu.
The Setting of Operation Authority Dialog Box is displayed.
9-4 Security
z Enabling Operation Authority Authentication
9 CPU Unit Functions
3
4
Enter the Administrator’s password in the New password Box. Enter the same password in the
confirmation box, and click the OK Button.
Set the Maintainer’s password in the same way.
The user can perform operations only if the correct password is entered.
Setting
Description
Enable the verification of
operation authority
Select this check box to enable verification of operation authority. Set a
password for each operation authority level.
Operation Lock
When the operation lock is enabled, operation is locked if you do not perform any actions for the specified period of time when the Sysmac Studio
is online. To reset the lock, enter the password in the Verification of Operation Authority Dialog Box that is displayed. This prevents an operator with
different authority from mistakenly performing operations. The operation
lock is intended to prevent misuse by operators of different operation
authority levels. Execution of internal Sysmac Studio operations, such as
monitoring and transfer processes, is still possible even when operation is
locked.
z Going Online
1
2
Go online. The Verification Dialog Box is displayed.
Select the operation authority, enter the password, and click the OK Button. The following warning is displayed if the password does not match. Click the OK Button, and then try to go online
again.
Specifications
z Types of Operation Authorities
You can use the following two operation authorities on the Sysmac Studio.
English name
Administrator
Maintainer
z Examples of Online Operations for Operation Rights
Examples of the online operations that are allowed for each operation authority are given below.
Refer to the Sysmac Studio Version 1 Operation Manual (Cat. No. W504) for details.
OK: Operation possible, VR: Verification required for each operation, NP: Operation not possible
Status monitor (example)
Monitoring errors for troubleshooting
I/O monitor operations (examples)
I/O monitor: Reading
9-18
Administrator
OK
Administrator
OK
Maintainer
OK
Maintainer
OK
NJ-series CPU Unit Software User’s Manual (W501)
9 CPU Unit Functions
Status monitor (example)
Administrator
Maintainer
I/O monitor: Writing
OK
OK
Controlling BOOL variables (SET/RESET)
OK
OK
Forced refreshing
OK
OK
Controller operations (examples)
Administrator
Maintainer
RUN mode/PROGRAM mode
OK
VR
Online editing
OK
VR
Resetting the Controller
OK
NP
Resetting errors (troubleshooting)
OK
OK
Starting or restarting an MC Test Run
OK
VR
User program execution IDs for Controllers
OK
NP
CPU Unit write protection
OK
OK
z Password Specifications
Item
9-4-2
Description
Valid number of characters
8 to 32
Applicable characters
Single-byte alphanumeric characters (case sensitive)
CPU Unit Names and Serial IDs
Introduction
Sysmac Studio
CPU Unit
name: A
CPU Unit
9
CPU Unit
CPU Unit
name: B
A check is performed
to see if the CPU Unit
name matches for
online connections.
In addition to the CPU Unit name, it is also possible to use serial ID identification based on the CPU
Unit production information (optional).
NJ-series CPU Unit Software User’s Manual (W501)
9-19
9-4-2 CPU Unit Names and Serial IDs
CPU Unit
name: A
9-4 Security
Register a CPU Unit name in the CPU Unit. When going online to a CPU Unit from the Sysmac Studio,
the CPU Unit name in the project is compared to the name of the CPU Unit being connected to. This
helps prevent incorrect connections to the CPU Unit from the Sysmac Studio. It is particularly effective
for operations performed over an EtherNet/IP network.
9 CPU Unit Functions
Setting Methods
1
Set the CPU Unit name when you create a project on the Sysmac Studio.
The CPU Unit name is displayed as shown below.
To change the name, right-click the Controller icon and select Rename.
2
3
When you first connect to the CPU Unit online, the Sysmac Studio prompts you to store the
CPU Unit name in the CPU Unit.
After that, when you connect to the CPU Unit online, the Sysmac Studio refers to the CPU Unit
name in the project and the CPU Unit name of the CPU Unit you connect to. A warning dialog
box is shown if they do not match, and you are asked whether to continue to connect.
Additional Information
You can name EtherNet/IP ports in the Network Configurator.
Serial IDs (Optional Function)
When the Sysmac Studio first connects online, you can obtain the serial ID from the CPU Unit’s production information and store it in the project. After that, when the Sysmac Studio connects online, both the
CPU Unit name and the serial ID are compared. This enables stricter verification of the CPU Unit.
Sysmac Studio
1. When you connect online, the serial ID is
CPU Unit name: A
obtained from the CPU Unit.
Serial ID
CPU Unit
CPU Unit
CPU Unit name:
A
CPU Unit name:
B
Serial ID
Serial ID
2. A check is performed to
see if the CPU Unit name
and serial ID match for
online connections.
9-20
NJ-series CPU Unit Software User’s Manual (W501)
9 CPU Unit Functions
The following dialog box is displayed on the Sysmac Studio when the CPU
Unit name and the serial ID are compared.
9-4-3
Protection
Introduction
This function disables the ability to write data to CPU Units and SD Memory Cards to protect user program assets and prevent misuse. The NJ-series Controller provides the following protection functions.
z Protection for Online Operations from the Sysmac Studio
Target data in the CPU Unit
Protection
User program transfers with no restoration information
Description
Prevents reading data in the CPU Unit
from the Sysmac Studio. This protects
the user program and other data.
Cam
tables
Configurations
and Setup
Possible
Possible
---
Possible
Possible
Possible
z Protection for Offline Operations from the Sysmac Studio
Protection
NJ-series CPU Unit Software User’s Manual (W501)
9
Protection
Project file
9-4-3 Protection
Protection of all project
files
Description
Codes the project file by using a password when
the project is exported (when an .smc file is created).
9-4 Security
Prevents writing data to the CPU Unit
CPU Unit write-protecfrom the Sysmac Studio. Use this function
tion to prevent incorrect operation.
User program
9-21
9 CPU Unit Functions
Protection for Online Operations from the Sysmac Studio
z User Program Transfers with No Restoration Information
Normally, when you transfer the user program from the Sysmac Studio to the CPU Unit, information
is transferred to restore it. This function does not transfer information for restoration to prohibit reading the user program.
User Program Transfer with No Restoration Information
Normal Transfer
Sysmac Studio
Sysmac Studio
CPU Unit
CPU Unit
User program
(for execution)
User program
(for execution)
User program
(restoration
information)
Readable
Normally, both
are transferred.
User program
(restoration
information)
Restoration information
is not transferred.
Not readable
This function is used to prevent theft of user program data when on-site maintenance of the user
program is not required. In the Sysmac Studio, select the Do not transfer program source Check Box
and click the Transfer to Controller Button when you transfer the user program to the CPU Unit.
z CPU Unit Write-protection
The following two types of protection are supported.
1) Controller Write Protection at Startup
This setting automatically enables write protection when you turn ON the power supply to the Controller.
Sysmac Studio
CPU Unit
CPU Unit
At startup
Write Protection
Write protection
Writing is not
possible.
Set whether to automatically enable write protection when the power supply is turned ON in the
Controller Setup under the Configurations and Setup of the Sysmac Studio.
Access point
Operation Settings,
Operation Settings
Tab, Basic Settings
9-22
Setting group
Security Settings
Setting
Description
Write Protection at
Startup
Sets whether to
enable write protection.
Set values
Do not use.
Use.
NJ-series CPU Unit Software User’s Manual (W501)
9 CPU Unit Functions
2) Setting and Removing Write Protection from the Sysmac Studio
In the Sysmac Studio, go online and select Security − Write Protect Setting Switch from the Controller Menu to toggle write protection.
Sysmac Studio
CPU Unit
You can turn write
protection ON and
OFF.
None
When power is turned ON
Write protection
set?
Not
enabled.
Enabled
Writing disabled.
Changed from the
Sysmac Studio.
Writing enabled.
9-4 Security
9
9-4-3 Protection
NJ-series CPU Unit Software User’s Manual (W501)
9-23
9 CPU Unit Functions
z Write-protected Items
The data and write operations in 1) and 2), above, to which write protection applies are given below.
Target data/write operation
Name
Variables
Operation commands
Download
Restoring
9-24
Write protection
CPU Unit name
Protected
Built-in EtherNet/IP names
---
I/O monitoring
---
Controlling BOOL variables (SET/RESET)
---
Forced refreshing
---
Changing the operating mode
---
Online editing
Protected
Clearing all memory
Protected
Resetting errors for troubleshooting
---
Clearing event logs (for troubleshooting)
Protected
Clock operations
---
MC Test Run
---
Resetting the Controller
---
User program execution IDs for Controllers
Protected
Memory Card operations
---
Resetting
---
User program, global variable table, date type
tables, POUs, and task settings
Protected
Unit Configuration
Protected
Setting data in the CJ-series Units
CPU Bus Unit Setups (e.g., CONTROLLER LINK
data link tables) and allocated DM Area words
---
EtherCAT Configuration and Setup
Protected
Settings in the EtherCAT slaves
---
Controller Setup (including routing tables)
Protected
Axis Setup
Protected
Cam table settings
Protected
Memory Card operations
---
Data Trace Settings
Protected
Event Settings
Protected
Restoring from computer (from computer to CPU
Unit)
Protected
NJ-series CPU Unit Software User’s Manual (W501)
9 CPU Unit Functions
9-4-4
CPU Unit Operation Restrictions for the User Program Execution
ID
Introduction
You can set a specific ID (called a user program execution ID) in the CPU Unit in advance. If you do, you
can execute only a user program with the same ID.
Sysmac Studio
A user program execution ID
is registered in the CPU Unit.
CPU Unit
User program execution ID
Download
User program
User program
The CPU Unit can
execute the user
program only when
these two match.
User program
execution ID assigned
to user program.
User program execution ID
User program execution ID
You can therefore prevent different CPU Units (hardware) from executing a user program.
In contrast to the protection function, you can still display and edit the user program even if a user program execution ID is set.
9-4 Security
Operating Procedure
1
2
Always backup the project files before you assign a user program execution ID.
9
Assign the user program execution ID to the user program offline from the Sysmac Studio.
After you assign a user program execution ID to a user program, you cannot change or delete
the ID. To use a different ID, read the project file without an ID that was backed up in step 1,
above, and assign another user program execution ID. To delete the ID, use the project file without an ID that was backed up in step 1, above.
NJ-series CPU Unit Software User’s Manual (W501)
9-25
9-4-4 CPU Unit Operation Restrictions for the User Program
Execution ID
Precautions for Correct Use
9 CPU Unit Functions
3
Connect the Sysmac Studio online and register the user program execution ID that was set in
step 2 in the CPU Unit.
The registration of the user program execution ID in the CPU Unit is recorded in the event log. At
this time, the user program execution ID in the CPU Unit is overwritten even if it is already registered.
4
Transfer the user program with the same user program execution ID to the CPU Unit.
If the user program execution ID in the user program does not match the user program execution ID in the CPU Unit or if one of them does not have an ID, an ID Verification Error (major fault
level Controller error) occurs when you attempt to change to RUN mode and the CPU Unit will
not operate.
Precautions for Correct Use
After you assign a user program execution ID to the CPU Unit, you cannot read or delete the ID.
To delete the ID from the CPU Unit, perform the Clear All Memory operation on the CPU Unit.
z Operation When an ID Verification Error Occurs
When the User Program Execution ID in the CPU Unit Is Incorrect or Not
Registered:
Connect online to the CPU Unit from the Sysmac Studio and perform the following steps.
1
2
Overwrite or register the correct user program execution ID in the CPU Unit.
Cycle the power supply to the Controller, or reset the CPU Unit from the Sysmac Studio.
When the User Program Execution ID Is Not Assigned to the User Program or
Is Incorrect
1
2
3
Read the backed up project file from the Sysmac Studio, and assign the correct user program
execution ID.
Connect the Sysmac Studio to the CPU Unit online and transfer the user program.
Cycle the power supply to the Controller, or reset the Controller from the Sysmac Studio.
z Other Situations
To Delete the User Program Execution ID Assigned to the User Program:
Read the backed up project file in the Sysmac Studio.
To Delete the User Program Execution ID from the CPU Unit:
Connect the Sysmac Studio to the CPU Unit online and perform the Clear All Memory operation.
To Check the User Program Execution ID Assigned to the User Program:
For security, the user program execution ID that is assigned to the user program cannot be checked
from the Sysmac Studio. Read the backed up project file in the Sysmac Studio and set the user program execution ID again.
9-26
NJ-series CPU Unit Software User’s Manual (W501)
9 CPU Unit Functions
To Check the User Program Execution ID in the CPU Unit:
For security, the user program execution ID that is set in the CPU Unit cannot be checked from the
Sysmac Studio. Perform the Clear All Memory operation and register the correct user program execution ID.
Specifications
z User Program Execution ID Verification Specifications
Timing of Verification
At startup, the CPU Unit compares the user program execution ID that is registered in the CPU Unit
with the user program execution ID that is assigned to the user program.
Verification Conditions
The conditions for verifications are given in the following table.
“A” and “B” indicate the IDs.
User program execution
ID that is registered in
the CPU Unit
User program execution
ID that is assigned to the
user program
A
A
None
None
None
A
A
None
A
B
Error
Operation
None
Possible
ID Verification Error
Not supported.
Operation When the IDs Do Not Match
z User Program Execution ID Character Specifications
Usable characters
0 to 9, A to Z, and a to z
Case sensitivity
Case sensitive
Maximum size (without
NULL)
9-4 Security
When the IDs do not match, an ID Verification Error (major fault level Controller error) occurs, and
the CPU Unit does not operate. However, to reset the error you must cycle the power supply to the
Controller or reset the Controller from the Sysmac Studio.
9
8 to 32 characters
9-4-4 CPU Unit Operation Restrictions for the User Program
Execution ID
NJ-series CPU Unit Software User’s Manual (W501)
9-27
9 CPU Unit Functions
9-5
Debugging
This section describes debugging.
The NJ-series Controller provides the following debugging operations.
• Forced refreshing
• Changing present values
• Online editing
• Data tracing
9-5-1
Forced Refreshing
Description
Forced refreshing allows the user to refresh external inputs and outputs with user-specified values from
the Sysmac Studio to debug the system. Forced refreshing is executed not for the specified device variables, but for the I/O ports that are assigned to the device variables. The state that is specified with
forced refreshing is retained until forced refreshing is cleared from the Sysmac Studio. (Refer to Holding/Clearing Forced Refreshing on page 9-31 for information how forced refreshing is retained or
cleared according to changes in CPU Unit status. All forced refreshing is cleared when a fatal error
occurs, when a Clear All Memory operation is performed, when the operating mode is changed, when
power is interrupted, or when the project is downloaded.
Inputs
The I/O port and device variable change to the status that is specified with forced refreshing regardless of the status of the external input.
Sysmac Studio
CPU Unit
(1) I/O port changed to
TRUE with forced
refreshing.
I/O port
Device variable
FALSE
TRUE
TRUE
(2) I/O port and device variable change to TRUE.
9-28
NJ-series CPU Unit Software User’s Manual (W501)
9 CPU Unit Functions
Outputs
The I/O port and the output to the external device change to the status that is specified with forced
refreshing. In the user program, the status of the device variable that is assigned to the I/O port will
not necessarily be the status that was specified with forced refreshing. It will change with the results
of user program execution.
Sysmac Studio
CPU Unit
(1) Output changed to
TRUE with forced
refreshing.
I/O port
Device variable
FALSE
TRUE
TRUE
(2) The I/O port and the output to the external
device change to TRUE. The device variable
changes with the result of user program
execution.
Applicable Areas
You can execute forced refreshing for the following I/O ports and memory used for CJ-series Units.
• I/O ports for EtherCAT slaves
• I/O ports for CJ-series Basic I/O Units
• I/O ports for CJ-series Special Units
If you execute forced refreshing from the Ladder Editor or the Watch Tab Page, the status of the I/O port
or memory element for a CJ-series Unit will change via the variable.
9-5 Debugging
• I/O bits for DeviceNet slaves that is specified for an AT specification from a variable
Number of Simultaneous I/O for Forced Refreshing
9
The number of variables that you can refresh with forced refreshing is listed below.
• CJ-series Units: 64 points total
The number of external I/O points are given for the above limits. For example, if more than one variable
is assigned the same external I/O point as the AT specifications, it is counted as only one point.
Application
z Inputs
• To apply a simulated input signal to debug the user program
• To create a status that would occur only when a failure occurs (e.g., two exclusive bits turning ON or
OFF at the same time)
z Outputs
• To turn outputs ON and OFF to check wiring
NJ-series CPU Unit Software User’s Manual (W501)
9-29
9-5-1 Forced Refreshing
• EtherCAT slaves: 64 points total
9 CPU Unit Functions
• To intentionally turn OFF an output you do not want to operate regardless of results of user program
execution
Operating Procedure
Operations can be performed from the following panes.
• Program Panes (Ladder diagram language)
• I/O Map
• Watch Tab Page
z Procedure for Forced Refreshing from Ladder Editor
1
2
Select Monitor from the Controller Menu. The monitor turns ON.
Double-click the ladder program, ladder function, or ladder function block under Programming
in the Multiview Explorer.
The rungs are displayed on the Ladder Editor in monitor status.
3
4
Right-click the input or output and select Forced Refreshing − TRUE. The input or output is
forced to TRUE. Right-click the input or output and select Forced Refreshing − FALSE. The
input or output is forced to FALSE.
The input or output in the Ladder Editor changes to TRUE or FALSE and the execution condition
changes accordingly.
A mark that indicates that the input or output has forced status is displayed as shown below.
Ladder diagram
The TRUE or FALSE mark for forced status indicates the status that was specified for forced
refreshing. It does not indicate the current value of the input or output.
Forced status mark
Operation
TRUE specified with forced refreshing
FALSE specified with forced refreshing
Additional Information
If there are other variables that are assigned the same memory address as one that is specified
as the AT specification of a variable for which forced refreshing is specified, the forced status
mark is displayed for all of the variables with that AT specification.
Affect of Operating Modes and Power Interruptions
z Operating Modes for Forced Refreshing
You can execute forced refreshing in either PROGRAM mode or RUN mode. Forced refreshing is
not possible while there is a major fault level Controller error.
9-30
NJ-series CPU Unit Software User’s Manual (W501)
9 CPU Unit Functions
z Status of Forced Refreshing during Operating Mode Changes or Power
Interruptions
By default, the forced refreshing is cleared when the operating mode changes between RUN mode
and PROGRAM mode and when the power is interrupted.
Holding/Clearing Forced Refreshing
Forced refreshing is retained and cleared according to changes in the status of the CPU Unit as shown
below.
Change in status
Forced refreshing status
When power is turned ON
Cleared
When operating
mode changes
Cleared
RUN to PROGRAM mode
PROGRAM to RUN mode
After downloading
Cleared
When a major fault level Controller error occurs
Cleared
During online editing
Retained
Programming Precautions for Forced Refreshing
The status of variables for which forced refreshing is specified are overwritten by instruction in the user
program. Therefore, the status that is specified for forced refreshing is not maintained in the user program. (This point differs from forced-setting/resetting with CJ-series PLCs.)
However, refreshing to external devices uses the values that were specified for forced refreshing, and
not the status of the variables in the user program. Therefore, care is required when using forced values
in the user program.
Example: When a Is Refreshed to TRUE with Forced Refreshing
TRUE for forced refreshing, but
FALSE in the user program.
a
x
OFF
9-5 Debugging
When FALSE
• a is FALSE in the program.
• When the output is refreshed, information from forced
refreshing is reflected and the external output of a is
TRUE.
9
External output
of a: TRUE
When FALSE
TRUE for forced refreshing, but
FALSE in the user program.
x
OFF
a
OFF
a
OFF
• a is FALSE in the program. Because of this, b is FALSE.
• When the output is refreshed, information from forced
refreshing is reflected and the external output of a is
TRUE.
b
OFF
a is FALSE in the program.
External output
of a: TRUE
As a result, b is FALSE.
NJ-series CPU Unit Software User’s Manual (W501)
9-31
9-5-1 Forced Refreshing
When There Is Another Input that is Controlled by the Forced Input
9 CPU Unit Functions
Precautions for Safe Use
• Confirm that no adverse effect will occur in the system before you use forced refreshing.
• Forced refreshing ignores the results of user program execution and refreshes I/O with the
specified values. If forced refreshing is used for inputs for which I/O refreshing is not supported, the inputs will first take the specified values, but they will then be overwritten by the
user program.
Depending on the difference in the forced status, the control system may operate unexpectedly.
9-5-2
Changing Present Values
Description
You can change the present values of variables that are used in the user program and settings and you
can change program inputs and outputs to TRUE or FALSE. This allows you to check the operation of
the user program and settings.
Sysmac Studio
CPU Unit
You can change the
values of variables
as required.
Precautions for Safe Use
Always confirm the safety of the system before you change the present value of a variable.
Application
z Changing Program Inputs and Outputs to TRUE or FALSE
You can change the value of any BOOL variable to TRUE or FALSE. The specified value is then
overwritten by the execution results of the user program. If the operating mode is changed or the
power supply is cycled, the initial value is restored. You can control BOOL variables in the Ladder
Editor, Watch Tab Page, or I/O Map.
z Changing the Values of Other Variables
You can change the present values of user-defined variables, system-defined variables, and device
variables as required. You can do this on a Watch Tab Page.
Precautions for Safe Use
Always confirm the safety of the system before you change the present value of a variable.
9-32
NJ-series CPU Unit Software User’s Manual (W501)
9 CPU Unit Functions
Operating Procedure
Operations can be performed from the following panes.
• Program panes (ladder diagrams)
• I/O Map
• Watch Tab Page
Procedure in the Ladder Diagram Editor
1
2
Select Monitor from the Controller Menu. The monitor turns ON.
Double-click the ladder program, ladder function, or ladder function block under Programming
in the Multiview Explorer.
The rungs are displayed on the Ladder Editor in monitor status.
3
Select the variable, input, or output to change and do one of the following:
• Controlling BOOL Variables (SET/RESET)
Right-click and select SET/RESET − SET or SET/RESET − RESET.
Procedure in the Watch Pane
1
2
Select Watch Tab Page from the View Menu to display a Watch Tab Page. The rungs are displayed on the Ladder Editor in monitor status.
Select the variable, input, or output in the Watch Tab Page and do one of the following:
• Controlling BOOL Variables (SET/RESET)
Select TRUE or FALSE in the Modify Column.
Additional Information
If the status of a BOOL variable that is used in a ladder diagram is changed, the execution status
in the Ladder Editor changes accordingly.
9-5 Debugging
• Changing Other Variables
Click the cell in the Modify Column on the Watch Tab Page, enter a value that is compatible
with the variable type given in the Data Format Column, and then press Enter Key. The format
for entering a value in the Modify Column depends on the data type that is given in the Data
Format Column.
9
Procedure in the I/O Map
2
Double-click I/O Map under Configurations and Setup on the Multiview Explorer. The I/O Map
is displayed.
Select the I/O port to change the present value in the I/O Map and do one of the following:
• Right-click and select SET/RESET − SET or SET/RESET − RESET.
• Enter a value in the Value Column in the I/O Map.
Additional Information
If the value is entered in the wrong format, an error occurs. The illegal values are highlighted in
red and an error icon is displayed. Place the mouse over the error icon to view the error details.
NJ-series CPU Unit Software User’s Manual (W501)
9-33
9-5-2 Changing Present Values
1
9 CPU Unit Functions
Precautions on Changing the Status of Outputs Assigned to
External Devices by Changing Present Values
Observe the following precautions when you change the status of an output that is assigned to an I/O
port of a CJ-series Basic Output Unit or EtherCAT output slave by changing a present value.
z Changing Present Values in the I/O Map in RUN Mode
Any value of an I/O port that is changed in the I/O Map is then overwritten by the execution results of
the user program. The value that was specified by changing the present value is not output to the
external device. To change the value of an I/O port and output that value to an external device, use
forced refreshing.
z Changing Present Values in a Watch Tab Page in PROGRAM Mode
The value that was specified in a Watch Tab Page by changing the present value of a device variable* that is defined as an external or local variable is not output to the external device. To output a
specified value to an external device, do one of the following:
• Use forced refreshing.
• Change the present value in a Watch Tab Page of a device variable* that is defined as a global
variable.
* The devices variables must be assigned to an I/O port of a CJ-series Basic Output Unit or EtherCAT output
slave. This also applies to a global variable with an AT specification to an output bit that is assigned to a CJseries Basic Output Unit.
z Precaution When Directly Writing to I/O Memory Addresses Assigned to
Output Bits for CJ-series Basic Output Units
Any value that is written to an I/O memory address that corresponds to an output bit that is assigned
to a CJ-series Basic Output Unit through a tag data link will be overwritten by the execution results of
the user program. The value that is written directly to the I/O memory address from the tag data link
will therefore not be output to the external device.
9-5-3
Online Editing
Introduction
The online editing function is used to add to or change part of a program in the CPU Unit directly from
the Sysmac Studio.
You can select any of the following to perform online editing.
• POUs (programs, functions, and function blocks)
For a ladder diagram program, select a section.
• Global variables
Application
To change a user program without stopping the operation of the CPU Unit.
Sysmac Studio Operations
z Performing Online Editing
1
9-34
Select the item to edit online.
NJ-series CPU Unit Software User’s Manual (W501)
9 CPU Unit Functions
2
3
4
5
6
Select Online Edit from the Project Menu.
Make the required changes.
Select Online Edit − Transfer from the Project Menu.
Check the results.
The user program will begin operation after online editing.
Caution
Execute online editing only after confirming that no adverse effects will occur
if the I/O timing is disrupted. If you perform online editing, the task execution
time may exceed the task period, I/O may not be refreshed with external
devices, input signals may not be read, and output timing may be changed.
Precautions for Correct Use
If the power supply to the Controller is interrupted when online edits are being saved,* a major
fault level Controller error (User Program/Controller Configurations and Setup Transfer Error,
Non-volatile Memory Restored or Formatted) occurs. If this error occurs, download the user program again.
* Online edits are saved from when you click the Yes Button in the confirmation dialog box until you leave
the Online Editing Pane."
Restrictions to Online Editing
The differentiation status of differentiated instructions in a program that is edited online is initialized.
Precautions for Correct Use
When online editing changes are applied, the execution times of the affected tasks are extended.
Set the task period appropriately so that you do not cause a Task Period Exceeded error due to
online editing.
Data Tracing
You can use data tracing to sample variables without any additional programming. You can read and
check the data from the Sysmac Studio, and save the data to a file. This is used to start up, operate,
and maintain devices.
The two tracing methods are described below.
z Triggered Tracing
Trigger conditions are set to record data before and after an event. Sampling stops automatically
when the maximum number of sampled variables is reached.
• You can check the flow of the program based on the status of changes in the present values of
variables.
• You can use the data to investigate the cause of unexpected changes in the present values of
variables.
NJ-series CPU Unit Software User’s Manual (W501)
9-35
9
9-5-4 Data Tracing
9-5-4
9-5 Debugging
z Internal Status of Differentiated Instructions
9 CPU Unit Functions
Sysmac Studio
NJ-series CPU Unit
Data to trace
Sampling
Sampled data
Uploaded once.
When the maximum number of sampled
variables is reached, the trace stops
and the trace data is sent to the
Sysmac Studio and displayed.
z Continuous Tracing
Sampling without a trigger is continuously performed. Sample data is transferred to the Sysmac Studio as it is collected and saved to a file. The Sysmac Studio also continues to read the trace data.
When the display buffer is full, the data is automatically saved to a CSV file. You can use this to store
trace results data for a long tracing period in multiple CSV files.
Sysmac Studio
NJ-series CPU Unit
Data to trace
Sampling
Sampled data
Continues.
9-36
NJ-series CPU Unit Software User’s Manual (W501)
9 CPU Unit Functions
Data Tracing Specifications
Item
Triggered tracing
Set a trigger condition to start sampling. Data from
before and after the condition is met is saved.
Continuous tracing
Sample data is transferred to a computer as it is collected and saved to a file.
Period of specified task
Specify a task. The period of that task is set as the sampling period.
Specified fixed interval
The time you enter is set as the sampling period. However, the time you enter is rounded off to an integer multiple of the primary periodic task.
Trace Type settings
Setting of timing of
sampling
Description
When the trace sampling instruction is executed
With this method, sampling is performed whenever the
TraceSamp instruction is executed in the user program.
Maximum number of
targets
192 variables max.
Setting sampled data
Basic data types except for text strings
Data types
Arrays (specify the element), structures (specify the
member), and unions (specify the member)
Sampled data
10,000 samples per variable
Setting trigger positions
The trigger position is set in respect to the overall trace
time or quantity.
Condition data types
Basic data types except for times, durations, dates, and
text strings
Arrays (specify the element), structures (specify the
member), and unions (specify the member)
BOOL: TRUE or FALSE
Condition expression
Note Combinations of multiple condition expressions are
not permitted.
Starting a trace
Sampling is performed when the TraceTrig instruction is
executed.
Evaluation timing
When sampling is executed
Starting tracing at start
of operation
You can set tracing to start automatically when operation
is started.
Maximum data storage
period
You can set the maximum amount of time to save continuous trace data.
Maximum data storage
size
You can set the maximum total size of all files saved during continuous tracing.
Data items per file
You can set the number of data items to save in each file
during a continuous trace.
File save location
You can specify the location to create files to save data
during a continuous trace.
File name prefix
You can specify a prefix to automatically add to the
beginning of the file names.
Operation when limit is
reached
You can specify the operation to perform when the storage time period or size limit is reached. (For example,
stopping tracing or deleting the oldest file and continuing.)
NJ-series CPU Unit Software User’s Manual (W501)
9
9-37
9-5-4 Data Tracing
Setting continuous
tracing
Trace Trigger ON
instruction
9-5 Debugging
Setting triggers
Non-BOOL: Equals (=), Greater than (>), Greater than or
equal (≥), Less Than (<), Less than or equal (≤), Not
equal (≠)
9 CPU Unit Functions
Item
Displaying trace results
Exporting trace data
Description
Graph display
You can display a graph where the X axis represents
time and the Y axis represents the value of the variable.
You can display both BOOL variables and other variables
on the same graph.
Table display
You can display the maximum value, minimum value,
average value, and value at the specified time for each
variable in a table.
3D Motion Trace Display Mode
You can position a virtual composition model in 3D space
and display the composition motion based on the command positions and actual positions of the motion axes.
Exporting to CSV files
You can save the trace results and all settings other than
the trace number to a CSV file.
Importing trace data
You can read the saved CSV format trace results and
display it on top of the current graph.
Saving
You can save the trace results in the project along with
the trace settings.
Printing
You can print graphs The Sysmac Studio’s printing functionality is used.
Data Trace Operation
Processing for data traces (sampling and trigger detection) are performed in System Common Processing 1, between I/O refreshing and user program execution.
Example: If sampling is specified in the primary periodic task, data tracing is executed in System Common Processing 1, as shown in the following diagram.
User program
execution
System
common
processing 2
I/O
refreshing
Motion
control
Primary period
System
common
processing 1
User program
execution
System
common
processing 2
I/O
refreshing
Motion
control
Primary periodic
task
System
common
processing 1
Primary period
Display examples for data trace operations and execution results is given below for sampling in a specified task period.
Additional Information
I/O refreshing, user program execution, and motion control processing are all executed in the
same task period. For data tracing, user program execution and motion control processing for
the current task period and I/O refreshing for the next task period are displayed at the same time.
The timing charts in the NJ-series Motion Control Instructions Reference Manual (Cat. No.
W508) are based on the task periods, so the display are not the same as those for data tracing.
Example 1:
In this example, the SysRun variable is changed to TRUE in the user program when the Sensor1 variable (assigned to the sensor input signal) changes to TRUE.
The data trace operations and display of the execution results are given below.
1. In data trace processing in System Common Processing 1, TRUE is obtained for Sensor1.
2. SysRun is changed to TRUE in the user program.
3. In data trace processing in System Common Processing 1 in the next primary period, TRUE is
obtained for SysRun.
9-38
NJ-series CPU Unit Software User’s Manual (W501)
9 CPU Unit Functions
Therefore, in the data trace display, SysRun is shown as TRUE one task period after Sensor1.
Data Trace Display
TRUE
Sensor1
TRUE
Delayed.
SysRun
1 task period
Additional Information
If the values of variables change during user program execution, the changes in the values and
changes for output processing for I/O refreshing are changed in the same task period.
Example 2:
When the Button2 variable (assigned to an input signal from a pushbutton) changes to TRUE during
velocity control, the user program in this example decelerates axis 0 (MC_Axis000) to a stop.
The data trace operations and display of the execution results are given below.
1. In data trace processing in System Common Processing 1, TRUE is obtained for Button2.
3. In data trace processing in System Common Processing 1 in the next primary period, TRUE is
obtained for STP_BSY and the status of the motion variable is obtained.
4. STP_ACT is changed to TRUE in the user program.
5. In data trace processing in System Common Processing 1 in the next primary period, TRUE is
obtained for STP_ACT.
NJ-series CPU Unit Software User’s Manual (W501)
9-39
9
9-5-4 Data Tracing
The command value in the MC Function Module starts changing (B in the following diagram) when
STP_BSY changes to TRUE in the user program and the Motion Control Function Module starts to perform deceleration processing. The command value changes stepwise in synchronization with the primary periodic task. The data trace, however, interpolates the values to connect the values for the
previous and current periods. Therefore, the display shows that the command value for the Command
Velocity motion control variable (MC_Axis000.Cmd.Vel) changes one period early, i.e., when Button2
changes to TRUE (A in the following figure). The display also shows that STP_BSY changes to TRUE
one period after deceleration starts and then STP_ACT changes to TRUE after another period.
9-5 Debugging
2. STP_BSY is changed to TRUE in the user program and the Motion Control Function Module performs deceleration processing.
9 CPU Unit Functions
Button2
STP_D
STP_BSY
STP_ACT
Dotted lines: Command value in MC Function Module
MC_Axis000.Cmd.Vel
Task period
A B
Additional Information
For function blocks that contain motion control instructions, the values of input parameters are
passed to the input variables when execution of the function block starts, and the values of the
output variables are passed to the output parameters when execution of the function block ends.
(Refer to Variable Designations for Function Blocks on page 6-11.) On the data trace displays,
input parameters and input variable, and output parameters and output variables, change in the
same task period.
Related System-defined Variables
Variable name
Member
Meaning
Description
Data type
_PLC_TraceSta[0..3]
.IsStart
Trace Busy Flag
TRUE when a trace starts.
BOOL
.IsComplete
Trace Completed
Flag
TRUE when a trace is completed.
BOOL
Changes to FALSE when the next trace starts.
.IsTrigger
Trace Trigger Mon- TRUE when the trigger condition is met.
BOOL
itor Flag
Changes to FALSE when the next trace starts.
.ParamErr
Trace Parameter
Error Flag
Changes to TRUE when a trace starts if there
is an error in the trace settings. FALSE when
the settings are normal.
BOOL
You cannot use these system-defined variables in the user program. Use the GetTraceSta instruction to
read the status of data trace from the user program.
9-40
NJ-series CPU Unit Software User’s Manual (W501)
9 CPU Unit Functions
Overview of Data Trace Procedure
Use the following procedure to execute a data trace.
1
2
Start the Sysmac Studio and create a project.
Right-click Data Trace Settings under Configurations and Setup in the Multiview Explorer
and select Add − Data Trace from the menu.
Data Trace is added to the Multiview Explorer.
3
Double-click Data Trace.
The Data Trace Tab Page is displayed in the Edit Pane.
9-5 Debugging
9
9-5-4 Data Tracing
• Set the trace type, sampling interval, variables to sample, trigger settings (for trigger tracing),
and other data trace parameters.
4
Go online and click the Execute Trace Button. The graph is drawn as soon as sampling starts if
displaying the graph while tracing is enabled.
NJ-series CPU Unit Software User’s Manual (W501)
9-41
9 CPU Unit Functions
z Display Examples
Example 1: When Only the Leftmost Toggle Button Is ON
The data trace graph is displayed. The vertical axis represents the value of the variable. The horizontal axis represents time.
Example 2: When Only the Rightmost Toggle Button Is ON
The 3D motion trace display appears.
9-42
NJ-series CPU Unit Software User’s Manual (W501)
9 CPU Unit Functions
9-6
Event Logs
This section describes the event logs.
9-6-1
Introduction
The event logs contain records of events,* such as errors, status changes, and user-defined events,
that occurred in the NJ-series Controller.
You can check the current
Controller events and the event
log of past events.
NJ-series CPU Unit
Event
sources
PLC Function
Module
Motion Control
Function Module
CJ-series
Units
EtherCAT Master
Function Module
EtherNet/IP
Function Module
Errors in
Special Units
Sysmac Studio
User program
Or
Create User-defined
Error (SetAlarm)
instruction
Event logs
Create User-defined
Information (SetInfo)
instruction
NS-series PT
Battery backup
EtherCAT
slave
* Here, events are unscheduled events that occur on the Controller, such as errors. “Event” refers to an error or
non-error information for which the user must be notified for the Controller or for a user definition. There are two
types and four classifications of events.
• Controller events
Controller errors
Controller information
• User-defined events
User-defined errors
User-defined Information
9
9-6-1 Introduction
Features
Event logs have the following features.
• In addition to error records, various records are recorded for events such as the time the power supply is turned ON or OFF, and the time when operation is started.
• You can check these records based on the time. You can therefore use them to isolate the causes of
errors when problems occur.
Types of Events
Events are classified as shown below.
NJ-series CPU Unit Software User’s Manual (W501)
9-6 Event Logs
You can check the current
Controller events and the event
log of past events.
9-43
9 CPU Unit Functions
z System-defined Events (Controller Events)
The Controller automatically detects these events. Controller events include events for the function
modules in the CPU Unit, CJ-series Units, and EtherCAT slaves. The different types of systemdefined events are as follows:
• Controller errors
• Controller information
z User-defined Events
These are events that occur in applications that the user developed. You can execute instructions to
create the following types of events.
• User-defined errors
• User-defined information
You can read the event logs from the Sysmac Studio or from an NJ-series-compatible NS-series PT.
9-6-2
Detailed Information on Event Logs
Event Sources
This information identifies where an event occurred in the Controller. The event sources are given
below for Controller events and user-defined events.
z Sources of Controller Events
Controller events occur in the function modules in the CPU Unit.
For some function modules, there is more detailed information about the event source. This information is called the detailed event source.
The following are Controller events.
Unit/Slave
CPU Unit
Event source
Source details
PLC Function Module
Bus master
Motion Control Function Module
Common, axis, or axes group
EtherCAT Master Function Module
Communications port or master
EtherNet/IP Function Module
Communications port, CIP, FTP,
NTP, or SNMP
CJ-series Units
Errors in the memory words allocated to a Special Unit*
EtherCAT slaves
Individual EtherCAT slaves
* The source details information does not show information from the error histories from within CJ-series CPU
Special Units or EtherCAT slaves. Read the error histories from the appropriate Support Software.
z Sources of User-defined Events
User-defined events occur in the PLC Function Module.
9-44
NJ-series CPU Unit Software User’s Manual (W501)
9 CPU Unit Functions
Category
This information displays the category of event log. It is used to access error logs from the Sysmac Studio or an HMI.
Event type
Controller events
User-defined events
Event log category
Description
System log
The Controller automatically detects
and records these events. CJ-series
Unit errors are also included.
Access log
This is a record of events that have
affect Controller operation due to
user actions.
User event log
This is a log of events that are
defined by the user.
Number of Records
Each event log can contain the following number of records. If the number of events exceeds the number of records permitted, the CPU Unit overwrites the oldest events.
Event type
Controller events
User-defined events
Event log category
Maximum number of records
System log
1,024 events
Access log
1,024 events
User event log
1,024 events
Retaining Events during Power Interruptions
The NJ-series CPU Unit uses a Battery to retain the event logs when the power is interrupted.
9-6 Event Logs
Precautions for Correct Use
The event logs are retained by Battery. They are not retained when there is no Battery.
Periodically export event logs as required.
9
Event Codes
Event Levels
Each event has an event level that indicates its level. The event level depends on the type of event. Levels are defined separately for Controller events and user-defined events.
NJ-series CPU Unit Software User’s Manual (W501)
9-45
9-6-2 Detailed Information on Event Logs
Event codes are assigned to Controller events by the system in advance according to the type of event.
Event codes are assigned to user-defined events by the user. Controller event codes are 8-digit hexadecimal values. You can use the Get Error Status instruction to read the error codes of current errors.
You can assign a decimal number from 1 to 60,000 as the event code for a user-defined event.
9 CPU Unit Functions
z Controller Events
Controller events are classified into five levels according to the degree of the effect that the events
have on control, as shown in the following table.
No.
1
Level
High
Classification
Controller errors
Major fault level
2
Partial fault level
3
Minor fault level
4
Observation level
5
Low
Controller information
Information level
Errors with a higher level have a greater affect on the functions that the NJ-series System provides,
and it is more important to recover from them. When an event in one of these levels occurs, the Sysmac Studio or NJ-series-compatible NS-series PT will display the error.
z User-defined Events
User-defined events are classified into the following levels. These levels are defined by the NJ-series
System. The event levels are defined for user-defined events.
No.
1
High
Type
User fault Level 1
2
User fault Level 2
3
User fault Level 3
4
User fault Level 4
5
User fault Level 5
6
User fault Level 6
7
User fault Level 7
8
User fault Level 8
9
9-46
Level
Low
User Information
Meaning
These event levels indicate a user-defined error in an
application. The user executes the SetAlarm (Create
User-defined Error) instruction to create the event.
These event levels indicate user-defined information
in an application. The user executes the SetInfo
(Create User-defined Information) instruction to create the event.
NJ-series CPU Unit Software User’s Manual (W501)
9 CPU Unit Functions
Displaying Event Logs
The Sysmac Studio or an NJ-series-compatible NS-series PT displays two event logs: the Controller
event log and the user-defined event log. You can also display the error logs that are recorded in the
CJ-series Units and EtherCAT slaves.
z Event Log List Display
9-6 Event Logs
z Event Log Details Display
If you want to display detailed information about an event in the list, select the desired event.
Level
Source
Information PLC
Information PLC
Warning
MC
Error
PLC
Information PLC
Information PLC
Information
MC
Information PLC
Event
Power ON
Power OFF
Non-fatal error, axis stop error
Fatal error, program error
Operating mode, RUN
Program changed
Configuration changed.
Operating mode, PROGRAM
05/6/1 10:33:05
05/6/1 10:32:03
Information
Information
Operating mode, RUN
Power ON
Time of occurrence
PLC
PLC
Time of occurrence
Level
Event Sources
Event Name
Description
9
Refer to attached information 1 for the task number.
Refer to attached information 2 for the program line.
Cause
@@@ could be the cause of this error.
Correction
Check the program and correct any errors.
Attached information 1
Attached information 2
NJ-series CPU Unit Software User’s Manual (W501)
2005/7/1 22:21:45
Fatal error
PLC Function Module
Program error (2062)
A program error occurred.
An error occurred in the following location.
126
8032
9-47
9-6-2 Detailed Information on Event Logs
07/3/2 9:00:12
07/3/1 21:40:12
06/2/2 12:15:13
05/7/1 22:21:45
06/2/3 12:00:00
05/7/1 19:11:42
05/7/1 19:12:15
05/7/1 19:11:42
9 CPU Unit Functions
Clearing Event Logs
z Clearing Event Logs from the Sysmac Studio or an HMI
You can clear the event logs from the Sysmac Studio or from an NJ-series-compatible NS-series PT.
You can clear the Controller event log and user-defined event log separately.
Precautions for Correct Use
If you need to delete event log in the CPU Unit from the Sysmac Studio or HMI, make sure you
do not need any of the event information before you delete the event log. You may have overlooked some important information and observation level Controller events or user-defined
events. Always check for these before you delete an event log.
z Clearing Event Logs with the Clear All Memory Operation
When you perform the Clear All Memory operation for an NJ-series CPU Unit from the Sysmac Studio, you can select whether to clear the event logs.
Exporting Event Logs
You can use the Sysmac Studio or an NJ-series-compatible NS-series PT to export the displayed event
log to a CSV file.
CPU Unit
090811 A8000001
090811 A8000002
090810 A80080F1
090808 A8008171
…
…
…
…
XXX.CSV
Sysmac Studio (Event Log Viewer)
Time of occurrence
Level
Information
Warning
Information
Source
Time of occurrence, Error level, Source,
Event, Attached information
Event
Exporting
09/08/11, Information, PLC, , Power ON,
09/08/11, Information, PLC, , Power OFF,
09/08/10, Error, PLC, Memory error, Checksum
09/08/08, Information, PLC, Program change, Task
A
Information
Information
9-48
NJ-series CPU Unit Software User’s Manual (W501)
9 CPU Unit Functions
9-6-3
Controller Events (Controller Errors and Information)
Introduction
Controller errors and information are defined by the NJ-series System. These events occur when the
NJ-series System detects an error or information factor.
z Controller Errors
These are system-defined errors. “Controller error” is a collective term for major fault level, partial
fault level, minor fault level, and observation level Controller events. Errors in the function modules of
the CPU Unit, CJ-series Units, and EtherCAT slaves are detected. When one of these events
occurs, a Controller error is recorded in the event log. To check the status of a Controller error on the
user program, you execute the Get Error Status instruction to access the status of the Error Status
variable, which is a system-defined variable. Controller errors are not reset when the operating
mode changes. Refer to the NJ-series Troubleshooting Manual (Cat. No. W503) for details on Controller Errors.
z Controller Information
Controller information is system-defined notification information. This information does not indicate
errors. It represents information level Controller events. Examples include events other than errors,
such as turning the power ON and OFF, starting and stopping operation, connecting the Sysmac
Studio online, and downloading user programs.
Function Modules
PLC Function
Module
Event logs
9-6 Event Logs
Motion Control
Function Module
An error or information occurs.
EtherCAT
Master Function
Module
Controller events
9
EtherNet/IP
Function Module
9-6-3 Controller Events (Controller Errors and Information)
System-defined variables
Errors in Special
Units
Error status
Detected Controller errors
Errors in EtherCAT
slaves
NJ-series CPU Unit Software User’s Manual (W501)
9-49
9 CPU Unit Functions
9-6-4
User-defined Events (User-defined Errors and Information)
Introduction
These errors and information are defined by the user. You can use instructions to create them.
z User-defined Errors
These errors are defined by the user. Use the Create User-defined Error (SetAlarm) instruction to
create user-defined errors. When this instruction is executed, a user-defined error is recorded in the
event log.
The corresponding system-defined variable changes to TRUE. User-defined errors are not reset
when the operating mode changes.
z User-defined Information
User-defined information is user-defined notification information. This information does not indicate
errors. Use the Create User-defined Information (SetInfo) instruction to create user-defined information. When this instruction is executed, user-defined information is recorded in the event log.
Event Setting Tables
Event code
Detailed information
100
Level
User fault level1
Instruction
Event logs
Program
SetAlarm
An event occurs.
User-defined events
System-defined Variables
User-defined error status
9-50
NJ-series CPU Unit Software User’s Manual (W501)
9 CPU Unit Functions
Application Procedures
Use the following procedures.
z User-defined Errors
1. Register a user-defined error in the Event Setting Table.
2. Execute the Create User-defined Error (SetAlarm) instruction.
(Specify an event code that is defined in the Event Setting Table.)
3. A user-defined error occurs.
4. The corresponding system-defined variable _AlarmFlag (User-defined Error
Status) changes to TRUE. Execute any process for that condition.
5. Check the user-defined error in the event log with the Sysmac Studio, an
instruction, or an HMI.
z User-defined information
9-6 Event Logs
1. Register user-defined information in the Event Setting Table.
2. Execute the Create User-defined Information (SetInfo) instruction.
9
NJ-series CPU Unit Software User’s Manual (W501)
9-6-4 User-defined Events (User-defined Errors and
Information)
3. Check the record in the event log.
9-51
9 CPU Unit Functions
Setting the Event Setting Table
To create a user-defined error or user-defined information, register the user-defined error or userdefined information in the Event Setting Table in the Sysmac Studio in advance. The user events that
you set here can be displayed on the Sysmac Studio or NJ-series-compatible NS-series PT with the
same information. You can register up to 5,120 events in the Event Setting Table.
Event Setting Table Tab Page
Event Setting Table
Event code
10001
Title
Level
Group
Details
User fault Level3 Control A (001)
Failure X
Details
Description
Failure X occurred.
Correction
Perform safety checks and handle the problem
according to the cause code.
Programming Example
Failure
Detection condition
SetAlarm
EN
102
Code
Var1
Info1
Var2
Info2
ENO
The following items are set in the Event Setting Table.
9-52
NJ-series CPU Unit Software User’s Manual (W501)
9 CPU Unit Functions
z Contents of the Event Setting Table
Item
Event Code
Description
Values
You can specify a number to identify the
event according to the event level.
User-defined error: 1 to 40,000
Event Name
You can include a title for the event.
128 characters max.
Event Level
You can specify the level of the event.
The level is indicated with a number.
The lower the number is, the higher the
level is.
User-defined error: User fault levels: 1 to
8
You can specify a group name to represent the location or type of the event.
You can use user-defined groupings for
the events.
32 characters max.
You can include a message that
describes the event. The user can enter
any text string. The message is used
when the event is displayed on the Sysmac Studio or an HMI.
1,024 characters max.
Refer to the additional information that is
given below on displaying user messages on an NJ-series-compatible NSseries PT when a major fault level Controller error occurs for more details.
128 characters max.
Group
Details
Error details that are
displayed on the HMI
when a major fault level
Controller error occurs
User-defined information: 40,001 to
60,000
User-defined information: User information
There are no restrictions on the characters that can be used. Case sensitive.
Reserved words: None
There are no restrictions on the characters that can be used. Case sensitive.
Reserved words: None
There are no restrictions on the characters that can be used.
Case sensitive. Reserved words: None
Additional Information
You can set up to nine different languages for the same event code for different regions and
users. On the Sysmac Studio, you can import an Event Setting Table from an Excel file via the
clipboard.
Displaying User Messages on an NJ-series-compatible NS-series PT When a Major Fault
Level Controller Error Occurs:
NJ-series CPU Unit Software User’s Manual (W501)
9-53
9
9-6-4 User-defined Events (User-defined Errors and
Information)
When a major fault level Controller error occurs, the user program execution stops. The NJseries Controllers can display user messages on an NJ-series-compatible NS-series PT when a
major fault level Controller error occurs. You can set the display messages under the list of userdefined events in the Event Setting Table on the Sysmac Studio.
9-6 Event Logs
Additional Information
9 CPU Unit Functions
z Event Levels and Event Codes
Event classification
User-defined
errors
Event level category*
Level
High
User fault Level1
Range of corresponding event
code
1 to 5000
User fault Level2
5001 to 10000
User fault Level3
10001 to 15000
User fault Level4
15001 to 20000
User fault Level5
20001 to 25000
User fault Level6
25001 to 30000
User fault Level7
30001 to 35000
User fault Level8
35001 to 40000
User Information
40001 to 60000
Description
Select from eight levels.
Low
User-defined
Information
Lowest
The event type is user-defined
information.
* User-defined error levels are separate from Controller error levels.
Precautions for Correct Use
If you update the Event Setting Table and transfer it to the CPU Unit, the event logs for userdefined events still contain old information. This can result in inconsistencies with the new Event
Setting Table. Program operations with caution.
Related Instructions
Use the following instructions to create and reset user-defined errors and to create user-defined information. Up to 32 events per level can occur simultaneously, for a total of 256 possible simultaneous
events.
Instruction name
9-54
Instruction
Description
Create User-defined
Error
SetAlarm
The SetAlarm instruction creates a user-defined error.
Reset User-defined
Error
ResetAlarm
The ResetAlarm instruction resets a user-defined error.
Create User-defined
Information
SetInfo
The SetInfo instruction records the specified user-defined information in the event log.
NJ-series CPU Unit Software User’s Manual (W501)
9 CPU Unit Functions
Checking for User-defined Errors:
You can use the Get User-defined Error Status (GetAlarm) instruction to obtain the status of the current user-defined errors (user-defined error levels 1 to 8) and the highest priority event code.
Example:
Event Setting Table
10001
Failure X
Details
Level
Group
User fault Level3
Control A (001)
Title
Event code
Details
Description
Failure X occurred.
Correction
Perform safety checks and handle the problem
according to the cause code.
Actual Programming
Detection condition
Error
GetAlarm
EN
Level
Code
Additional Information
You can use user-defined errors to add a message on possible corrections or other information
when a Controller error occurs. Use instructions such as the GetPLCError instruction to obtain
information about the error status or event code when a Controller error occurs. You can then
use the information to trigger a user-defined error.
Example 1
Battery is dead.
Apply power for at least five minutes before changing the
Battery.
Install a new Battery within five minutes of turning OFF the
power supply.
9
When a partial fault level Controller error occurs, the event error level is obtained (highest level
status: 2) and the following message is displayed.
A device failed. Call the following number for support.
Repair Contact
Hours: 8:00 AM to 9:00 PM
TEL: xxx-xxxx-xxxx
9-55
9-6-4 User-defined Events (User-defined Errors and
Information)
Example 2
NJ-series CPU Unit Software User’s Manual (W501)
9-6 Event Logs
When a Low Battery Voltage error occurs, the event code (16#000B0000) is obtained and the following message is displayed.
9 CPU Unit Functions
System-defined Variables Related to User-defined Errors
Variable
name
_AlarmFlag
Meaning
Description
User-defined
Error Status
The bit corresponding to the event level is TRUE while there
is a user-defined error. Bits 00 to 07 correspond to user
fault levels 1 to 8.
Data
type
WORD
R/W
R
Records in Event Log
An event is recorded in the event log when you create user-defined information or a user-defined error,
or when you use the ResetAlarm instruction to reset an error. When this happens, the time, event code,
event level, and attached information 1 and 2 are recorded in the user-defined event log in the event
logs.
Reset User-defined Errors
User-defined errors are cleared when the power supply to the NJ-series Controller is turned ON. You
can also clear errors with the Sysmac Studio, the Reset User-defined Error instruction (ResetAlarm)
and an HMI.
9-56
NJ-series CPU Unit Software User’s Manual (W501)
9 CPU Unit Functions
9-7
Using the Sysmac Studio to Back Up
and Restore Data
This section describes how to use the Sysmac Studio to back up data. You can back up the present values of the battery-backup memory from the Sysmac Studio.
9-7-1
Backing Up and Restoring the Present Values of Battery-backup
Memory
Introduction
• Present values of variables with a Retain attribute
• Present values in the DM, EM, and Holding Areas of memory used for CJ-series Units
• Absolute Encoder Home Offset Data
Sysmac Studio
Select Backup Variables and Memory from the
Tools Menu.
XML file
CPU Unit
Restoring
Present values
of batterybackup memory
Backup
Backup and Restore Targets:
Present values of retained variables
Present values in the DM, EM, and Holding Areas of memory used for CJ-series Units.
Absolute Encoder Home Offset Data
9
Place the Sysmac Studio online with the CPU Unit, and select either Backup Variables and Memory −
Backup or Backup Variables and Memory − Restore from the Tools Menu. Refer to the Sysmac Studio Version 1 Operation Manual (Cat. No. W504) for details.
z Backup Procedure
Select Backup Variables and Memory − Backup from the Tools Menu of the Sysmac Studio.
NJ-series CPU Unit Software User’s Manual (W501)
9-57
9-7-1 Backing Up and Restoring the Present Values of
Battery-backup Memory
Sysmac Studio Procedure
1
9-7 Using the Sysmac Studio to Back Up and Restore Data
You can back up the present values of the battery-backup memory in the CPU Unit to an XML file on
your computer or restore the battery-backup memory from a previously saved backup file. This applies
to the following data.
9 CPU Unit Functions
The Backup Dialog Box is displayed.
2
9-58
Click the View File Selection Dialog Button. The File Selection Dialog Box is displayed. Specify the file path name and file name.
NJ-series CPU Unit Software User’s Manual (W501)
9 CPU Unit Functions
3
Select the check boxes for the memory to back up, and then click the Execute Button. The data
is backed up.
When the backup is completed, the results are displayed in the Execution Results Text Display
Area.
Additional Information
z Restoring Data
Restore Procedure
1
Select Backup Variables and Memory − Restore from the Tools Menu of the Sysmac Studio.
The Restore Dialog Box is displayed.
9-7 Using the Sysmac Studio to Back Up and Restore Data
To back up the data, the contents of the NJ-series Controller and the project must match. If it
does not match, stop the backup and synchronize the data to make it match.
9
9-7-1 Backing Up and Restoring the Present Values of
Battery-backup Memory
NJ-series CPU Unit Software User’s Manual (W501)
9-59
9 CPU Unit Functions
2
3
Click the View File Selection Dialog Button. The File Selection Dialog Box is displayed. Specify the file path.
Select the check boxes for the memory to restore, and then click the Execute Button. The data
is restored.
When the restore operation is completed normally, the results are displayed in the Execution
Results Text Display Area. A dialog box for restarting the NJ-series Controller is displayed to
reflect the results of the restored data.
If the restore operation fails, the number of items that were not restored is shown in the Failed
Item List Text Box. Click the Display Button. The names of the data that were not restored are
displayed in the Failed Item List.
9-60
NJ-series CPU Unit Software User’s Manual (W501)
9 CPU Unit Functions
Additional Information
To restore the backup, the contents of the NJ-series Controller and the project must match. If it
does not match, stop the restore process and synchronize the data to make it match.
If you replace the Controller, you must restore the absolute encoder home offset as well.
When you replace a Servo Drive, you must redefine home in the Controller.
9-7 Using the Sysmac Studio to Back Up and Restore Data
9
9-7-1 Backing Up and Restoring the Present Values of
Battery-backup Memory
NJ-series CPU Unit Software User’s Manual (W501)
9-61
9 CPU Unit Functions
9-62
NJ-series CPU Unit Software User’s Manual (W501)
10
Communications Setup
This section describes how to go online with the CPU Unit and how to connect to other
devices.
10-1 Communications System Overview . . . . . . . . . . . . . . . . . . . . . . . . . . . . . . 10-2
10-1-1
Introduction . . . . . . . . . . . . . . . . . . . . . . . . . . . . . . . . . . . . . . . . . . . . . . . . . . 10-3
10-2 Connection Configuration for Sysmac Studio . . . . . . . . . . . . . . . . . . . . . 10-4
10-2-1
10-2-2
Configurations That Allow Online Connections . . . . . . . . . . . . . . . . . . . . . . . 10-4
Configurations That Do Not Allow Online Connections . . . . . . . . . . . . . . . . . 10-6
10-3 Connection Configurations between Controllers, and between Controllers
and Slaves . . . . . . . . . . . . . . . . . . . . . . . . . . . . . . . . . . . . . . . . . . . . . . . . . . 10-7
10-3-1
10-3-2
Connection Configurations between Controllers . . . . . . . . . . . . . . . . . . . . . . 10-7
Connection Configuration between Controllers and Slaves . . . . . . . . . . . . . 10-10
10-4 Connection Configurations with HMIs and Devices with Serial
Communications . . . . . . . . . . . . . . . . . . . . . . . . . . . . . . . . . . . . . . . . . . . . 10-11
10-4-1
10-4-2
Connections to HMIs . . . . . . . . . . . . . . . . . . . . . . . . . . . . . . . . . . . . . . . . . . 10-11
Connections to Devices with Serial Communications . . . . . . . . . . . . . . . . . 10-11
NJ-series CPU Unit Software User’s Manual (W501)
10-1
10 Communications Setup
10-1 Communications System Overview
This section gives an overview of the communications systems that are supported by NJ-series Controllers.
The shaded steps in the overall procedure that is shown below are related to the communications systems.
Step 1. Software Design
Step 1-1 Designing I/O and Processing
Step 1-2 Designing Tasks
Step 1-3 Designing Programs
Step 2. Software Setups and Programming
Step 2-1 Slave and Unit Configurations
Step 2-2 Controller Setup
Step 2-3 Programming
Step 2-4 Offline Debugging
Step 3. Mounting and Setting Hardware
Step 4. Wiring
Step 5. Confirming Operation and Starting Actual System
Operation
Refer to 1-3 Overall Operating Procedure for the NJ-series Controller for details.
10-2
NJ-series CPU Unit Software User’s Manual (W501)
10 Communications Setup
10-1 Communications System Overview
10-1-1 Introduction
You can use the NJ-series System to build the communications system shown below.
HMI
NJ-series Controller
NJ-series Controller
Sysmac Studio
EtherNet/IP
NTP server
BOOTP server
DNS server
EtherNet/IP
10
10-1-1 Introduction
Sysmac Studio
Example: Serial Communications Unit
NJ-series Controller
Power Supply Unit
General-purpose
device with serial
communications
CPU Unit
USB
Serial
Built-in EtherNet/IP port
Example: DeviceNet Unit
Built-in
EtherCAT
port
DeviceNet
EtherCAT
General-purpose slaves
Servo Drives
Connection
Sysmac Studio connection
Connections between Controllers
Connections between Controllers
and slaves
Connection method
Use USB or the built-in EtherNet/IP
port.
Connections with NJ-series Control- Use the built-in EtherNet/IP port.
ler or CJ2 CPU Unit
Connections to CS/CJ-series PLCs
Mount a Controller Link Unit and
use Controller Link.
Connections to Servo Drives and
general-purpose slaves
Use the built-in EtherCAT port.
I/O controls
Mount a DeviceNet Master Unit and
use DeviceNet.
Connections to HMIs
Use the built-in EtherNet/IP port.
Connections for serial communications
Mount a Serial Communications
Unit.
Connections to servers
Use the built-in EtherNet/IP port.
NJ-series CPU Unit Software User’s Manual (W501)
Connections to BOOTP servers,
DNS servers, or NTP servers
10-3
10 Communications Setup
10-2 Connection Configuration for
Sysmac Studio
This section describes the configurations for connecting the Sysmac Studio to an NJ-series Controller.
10-2-1 Configurations That Allow Online Connections
You can connect online from the Sysmac Studio to the peripheral USB port or built-in EtherNet/IP port
of the NJ-series CPU Unit.
z Connecting with USB
Sysmac Studio
USB
A direct connection is made from the computer that runs Sysmac Studio. You do not need to specify
the connection device.
10-4
NJ-series CPU Unit Software User’s Manual (W501)
10 Communications Setup
10-2 Connection Configuration for Sysmac Studio
z Connecting with EtherNet/IP
1:1 Connection
1:N Connections
Sysmac Studio
Sysmac Studio
EtherNet/IP
EtherNet/IP
Directly specify the IP address of the remote device or select the
remote device from the node list.
z Connecting to EtherNet/IP through USB
Sysmac Studio
USB
EtherNet/IP
Directly specify the IP address of the remote device or select the remote device from the node list.
NJ-series CPU Unit Software User’s Manual (W501)
10-5
10-2-1 Configurations That Allow Online Connections
• A direct connection is made from the computer that runs Sysmac Studio. You do not
need to specify the IP address or connection device.
• You can make the connection either with or
without a switching hub.
• You can use either a cross cable or a
straight cable.
10
10 Communications Setup
10-2-2 Configurations That Do Not Allow Online Connections
z Routing through CS/CJ-series EtherNet/IP Units/Ports
You cannot connect to an NJ-series Controller by routing through a CS/CJ-series Ethernet/IP Unit or
port (CS1W-EIP2, CJ1W-EIP21, CJ2 CPU Unit built-in EtherNet/IP port, or CJ2M CPU Unit built-in
EtherNet/IP port).
Sysmac Studio
USB
EtherNet/IP
CJ2 CPU Unit built-in EtherNet/IP port or EtherNet/IP Units
z Routing through Networks Other Than EtherNet/IP, Such as DeviceNet
You cannot route through any networks other than EtherNet/IP networks. (For example, routing is
not possible for Controller Link networks and DeviceNet networks.)
Sysmac Studio
USB
DeviceNet network
DeviceNet Unit
10-6
NJ-series CPU Unit Software User’s Manual (W501)
10 Communications Setup
This section shows the connection configurations that are used between Controllers and between Controllers and slaves.
EtherNet/IP
Refer to the NJ-series CPU Unit Built-in EtherNet/IP Port User’s Manual (Cat. No. W506) for details.
z Tag Data Links
You can create tag data links between NJ-series CPU Units on an EtherNet/IP network.
EtherNet/IP
z Message communications
You can send CIP messages from the user program.
EtherNet/IP
CIP communications
instruction
z Sending Mail
You can send e-mails to specified email addresses when the specified conditions are met.
Sysmac Studio
Sending Mail
EtherNet/IP
NJ-series CPU Unit Software User’s Manual (W501)
10-7
10
10-3-1 Connection Configurations between Controllers
10-3-1 Connection Configurations between Controllers
10-3 Connection Configurations between
Controllers, and between Controllers and Slaves
10-3 Connection Configurations between
Controllers, and between Controllers
and Slaves
10 Communications Setup
z Sending and Receiving Files
You can send and receive files on the SD Memory Card that is inserted in the NJ-series CPU Unit
from an FTP client application.
FTP client application
Sending and Receiving Files
EtherNet/IP
SD Memory Card
z Socket Services
You can directly use TCP or UDP from the user program to send and receive any data with remote
nodes between a host computer and the Controller, or between Controllers.
Communications
EtherNet/IP
Socket service
instruction
z Updating Clock Information
You can obtain clock information from an NTP server to update the built-in clock.
NTP server
Clock information
EtherNet/IP
NTP client
10-8
NJ-series CPU Unit Software User’s Manual (W501)
10 Communications Setup
You can use the DNS client or set up your Hosts so that you can specify the IP address of the NTP
server or SNMP manager or the target destination of a socket instruction or CIP communications
instruction with a host name instead of an IP address.
Example: Setting Host Names on the DNS Server
10-3 Connection Configurations between
Controllers, and between Controllers and Slaves
z Specifying Host Names
DNS server
10
IP address
EtherNet/IP
Host name
z Obtaining an IP Address When the Power is Turned ON
You can obtain an IP address for the built-in EtherNet/IP port from the BOOTP server when the
power supply is turned ON.
BOOTP server
IP address
EtherNet/IP
BOOTP commands
BOOTP client
z Specifying an SNMP Agent
Built-in EtherNet/IP port internal status information is provided to network management software
that uses an SNMP manager.
SNMP manager
Administration
information
EtherNet/IP
SNMP messages
SNMP agent
NJ-series CPU Unit Software User’s Manual (W501)
10-9
10-3-1 Connection Configurations between Controllers
DNS client
10 Communications Setup
10-3-2 Connection Configuration between Controllers and Slaves
EtherCAT
High-speed, high-precision communications are possible with Servo Drives and general-purpose
slaves. Refer to the NJ-series CPU Unit Built-in EtherCAT Port User’s Manual (Cat. No. W505) for
details.
EtherCAT
General-purpose slave
Servo Drives
10-10
NJ-series CPU Unit Software User’s Manual (W501)
10 Communications Setup
10-4 Connection Configurations with HMIs and
Devices with Serial Communications
10-4 Connection Configurations with
HMIs and Devices with Serial
Communications
This section shows the connection configurations used to connect HMIs and devices with serial communications to the NJ-series Controller.
z EtherNet/IP
You can use the built-in EtherNet/IP port to connect to an HMI. Refer to the NJ-series CPU Unit
Built-in EtherNet/IP Port User’s Manual (Cat. No. W506) for details.
HMI
EtherNet/IP
z Serial Communications
You can use a Serial Communications Unit to connect to an HMI. Refer to the CJ-series Serial Communications Units Operation Manual for NJ-series CPU Unit (Cat. No. W494) for details.
High-speed Serial Communications Unit
HMI
RS-232C or
RS-422A/485
10-4-2 Connections to Devices with Serial Communications
You can use a Serial Communications Unit to connect to an HMI. Refer to the CJ-series Serial Communications Units Operation Manual for NJ-series CPU Unit (Cat. No. W494) for details.
High-speed Serial Communications Unit.
Device with
serial communications
RS-232C or
RS-422A/485
NJ-series CPU Unit Software User’s Manual (W501)
10-11
10-4-1 Connections to HMIs
10-4-1 Connections to HMIs
10
10 Communications Setup
10-12
NJ-series CPU Unit Software User’s Manual (W501)
Example of Actual Application
Procedures
11
This section describes the procedures that are used to actually operate an NJ-series
Controller.
11-1 Example Application . . . . . . . . . . . . . . . . . . . . . . . . . . . . . . . . . . . . . . . . . . 11-2
11-1-1
11-1-2
System Configuration . . . . . . . . . . . . . . . . . . . . . . . . . . . . . . . . . . . . . . . . . . 11-2
Operation . . . . . . . . . . . . . . . . . . . . . . . . . . . . . . . . . . . . . . . . . . . . . . . . . . . . 11-3
11-2 Overview of the Example Procedure . . . . . . . . . . . . . . . . . . . . . . . . . . . . . 11-4
11-2-1
11-2-2
11-2-3
11-2-4
11-2-5
11-2-6
Wiring and Settings . . . . . . . . . . . . . . . . . . . . . . . . . . . . . . . . . . . . . . . . . . . . 11-4
Software Design . . . . . . . . . . . . . . . . . . . . . . . . . . . . . . . . . . . . . . . . . . . . . . 11-4
Software Settings from the Sysmac Studio . . . . . . . . . . . . . . . . . . . . . . . . . . 11-5
Programming with the Sysmac Studio . . . . . . . . . . . . . . . . . . . . . . . . . . . . . . 11-8
Simulation with the Sysmac Studio . . . . . . . . . . . . . . . . . . . . . . . . . . . . . . . . 11-9
Checking Operation and Actual Operation . . . . . . . . . . . . . . . . . . . . . . . . . 11-10
NJ-series CPU Unit Software User’s Manual (W501)
11-1
11 Example of Actual Application Procedures
11-1 Example Application
This section describes an example application for an NJ-series Controller.
11-1-1 System Configuration
Unit name
Qty
Connected device
Power Supply Unit
---
---
---
CPU Unit
---
1
---
CJ-series Basic I/O Units
---
2
---
CJ-series Analog Input
Unit
---
1
Displacement Sensor
EtherCAT slaves
Servo Drives (G5 EtherCAT)
2
---
I/O Terminal
1
---
Sysmac Studio
NJ-series Controller
Analog Input Unit
Basic I/O Units
Power Supply Unit
CPU Unit
USB
Displacement Sensor
Built-in EtherCAT port
EtherCAT
G5 EtherCAT
Positive limit input
Negative limit input
Immediate stop input
Home signal
External latch signal, etc.
11-2
General-purpose slaves
Servo Drives
Servo Drives
NJ-series CPU Unit Software User’s Manual (W501)
11 Example of Actual Application Procedures
11-1-2 Operation
11-1 Example Application
Interrupt feeding starts when the sensor signal changes to ON during velocity control.
Velocity
Velocity control
Interrupt feeding
11
11-1-2 Operation
Sensor turns ON.
Time
The vertical position changes based on the analog input from the Displacement Sensor.
NJ-series CPU Unit Software User’s Manual (W501)
11-3
11 Example of Actual Application Procedures
11-2 Overview of the Example Procedure
This section describes examples of the actual operating procedures for an NJ-series Controller.
11-2-1 Wiring and Settings
Wire the Controller and make the hardware settings.
11-2-2 Software Design
Design the I/O, tasks, POUs, and variables.
I/O Design
• Design the relationship between the external I/O and the unit configuration.
• Determine the intervals at which to refresh external I/O.
Task and POU Design
Consider the following:
• What task configuration is required
• Which programs to assign to which tasks
• Which Units to assign to which tasks
• What processing to place in programs and what processing to place in function blocks and functions
Variable Design
Consider the following:
• The separation of variables into those that you use in more than one POU (global variables) and variables that you use in only specific POUs (local variables)
• Defining the variable names for the device variables that you use to access slaves and Units
• Defining the attributes of variables, such as the Name and Retain attributes
• Designing the data types of variables
11-4
NJ-series CPU Unit Software User’s Manual (W501)
11 Example of Actual Application Procedures
On the Sysmac Studio, you set the Unit and slave configurations, register global variables and device
variables, create axes (axis variables), and set the Controller Setup and Special Unit Setup.
Start the Sysmac Studio.
Create a project in Sysmac Studio.
11-2 Overview of the Example Procedure
11-2-3 Software Settings from the Sysmac Studio
11
11-2-3 Software Settings from the Sysmac Studio
Create the Unit Configuration.
1
2
3
Double-click CPU/Expansion Racks under Configurations and Setup.
Create the Unit configuration by dragging Units.
Select each Unit and make the required settings.
NJ-series CPU Unit Software User’s Manual (W501)
11-5
11 Example of Actual Application Procedures
Create the EtherCAT Slave Configuration.
1
2
3
4
Double-click EtherCAT under Configurations and Setup.
Create the slave configuration by dragging slaves.
Select the master and set the master parameters.
Select each slave and set the slave parameters.
Additional Information
At this point, you can use forced resetting from the I/O Map to check the wiring.
11-6
NJ-series CPU Unit Software User’s Manual (W501)
11 Example of Actual Application Procedures
11-2 Overview of the Example Procedure
Register the Global Variables and Device Variables.
z Registering Global Variables
1
2
Double-click Global Variables under Programming − Data.
Register the global variables in the global variable table.
z Registering Device Variables
1
2
Double-click I/O Map under Configurations and Setup.
In the I/O Map, assign the variables to the I/O ports. (The I/O ports are created automatically
from the Unit and slave configurations.)
By default, device variables are registered in the global variable table. If necessary, you can
change the variable type from a global variable to a local variable (internal variable) for a POU.
Create Axes (Axis Variables)
1
2
Right-click Axis Settings under Configurations and Setups − Motion Control Setup and
select Add − Axis Settings from the menu.
Assign Servo Drives to the axes (axis variables) that you created in the EtherCAT configuration.
• Set the Axis Use parameter to Used Axis.
• Set the Axis Type parameter to Servo Axis.
• Set the Input Device parameter to the Servo Driver that you registered in the slave configuration.
Set the other parameters, such as the Unit Conversion Settings and Operation Settings.
NJ-series CPU Unit Software User’s Manual (W501)
11-7
11-2-3 Software Settings from the Sysmac Studio
You can automatically create device variable names with the Sysmac Studio. To do so, rightclick an I/O port and select Create Device Variables from the menu.
11
11 Example of Actual Application Procedures
Set the Controller Setup and the Special Unit Setup.
z Initial Settings for the PLC Function Module:
The Controller Setup includes the Startup Mode and other parameters.
z Initial Settings for Special Units:
Unit Configuration and Setup: Set the initial settings of the Analog Input Unit.
11-2-4 Programming with the Sysmac Studio
On the Sysmac Studio, create the programs, set the tasks, and build the project.
Write the Programs.
1
2
3
4
Right-click Programs under Programming − POU and select Add − Ladder or Add − ST from
the menu.
Double-click Section@ under the program that you registered.
Register the local variables for each program.
Enter the programs.
Create a program with the following instructions.
• Homing: MC_Home instruction
• Velocity control: MC_MoveVelocity instruction
• Interrupt feeding: MC_MoveFeed instruction
• Positioning: MC_Move instruction
5
As required, right-click Functions or Function Blocks under Programming − POU and select
Add − Ladder or Add − ST from the menu.
Double-click the function or function block that you registered. Register local variables for each
function and function block. Create the algorithms.
Note For a ladder diagram, press the R Key and create the following rungs.
11-8
NJ-series CPU Unit Software User’s Manual (W501)
11 Example of Actual Application Procedures
Double-click Task Setup under Configurations and Setup.
• In the Task Setup, set the task period and execution condition for the primary periodic task from the
pulldown list.
• In the I/O Control Task Setting, select the task name to which to assign each Unit and slave.
• Use the Program Assignments to assign the programs to the primary periodic task or the priority-16
periodic task.
Build the Project.
11
Select Build from the Project Menu.
Simulation is used to perform desktop debugging. Check the task execution times and the real processing times of tasks. Review the task design as required.
Starting the Simulator and Connecting to It
Select Execute from the Simulation Menu. The Simulator (i.e., the virtual Controller) starts. An online
connection is created automatically.
Checking the Task Execution Time on the Simulator
Double-click Task Settings under Configurations and Setup. Check to see if the task execution times
in the Task Execution Time Monitor exceed the task periods.
If necessary, review the task configuration, program assignments, and task periods.
Saving the Project
Select Save As from the File Menu.
11-9
11-2-5 Simulation with the Sysmac Studio
11-2-5 Simulation with the Sysmac Studio
NJ-series CPU Unit Software User’s Manual (W501)
11-2 Overview of the Example Procedure
Set Up the Tasks.
11 Example of Actual Application Procedures
11-2-6 Checking Operation and Actual Operation
Go online with the Controller, download the project, check the wiring and perform test operation before
you start actual operation.
Going Online
1
2
3
4
Turn ON the power supply to NJ-series Controller.
Connect the computer and the CPU Unit with a USB cable.
Select Communications Setup from the Controller Menu. Select the connection method for the
connection configuration in the Connection Type Field.
Select Online from the Controller Menu.
Downloading the Project with the Synchronize Menu
Select Synchronize from the Controller Menu and download the project to the Controller.
Note Use the Synchronize Menu of the Sysmac Studio to upload and download the project.
Checking Wiring
Check the wiring by performing forced-refreshing with user-specified values from the I/O Map or Ladder
Editor.
MC Test Run
1
2
3
4
11-10
Open the MC Test Run Dialog Box.
Change the CPU Unit to PROGRAM mode.
Monitor input signals on the display to check the wiring.
Jog the axis from the display.
NJ-series CPU Unit Software User’s Manual (W501)
11 Example of Actual Application Procedures
11-2 Overview of the Example Procedure
Manual Operation
Change the CPU Unit to RUN mode.
• Turning the Servo ON and OFF: Execute the MC_Power motion control instruction.
• Jogging: Execute the MC_MoveJog motion control instruction.
Homing
Homing: Execute the MC_Home instruction.
11
Actual Operation
NJ-series CPU Unit Software User’s Manual (W501)
11-11
11-2-6 Checking Operation and Actual Operation
Select Operation Mode − RUN Mode from the Controller Menu. If an error occurs, investigate the
cause and edit the user program.
11 Example of Actual Application Procedures
11-12
NJ-series CPU Unit Software User’s Manual (W501)
Troubleshooting
12
This section describes the event codes, error confirmation methods, and corrections for
errors that can occur.
12-1 Operation after an Error . . . . . . . . . . . . . . . . . . . . . . . . . . . . . . . . . . . . . . . 12-2
12-1-1
12-1-2
12-1-3
Overview of NJ-series Status . . . . . . . . . . . . . . . . . . . . . . . . . . . . . . . . . . . . 12-2
Fatal Errors in the CPU Unit . . . . . . . . . . . . . . . . . . . . . . . . . . . . . . . . . . . . . 12-3
Non-fatal error in CPU Unit . . . . . . . . . . . . . . . . . . . . . . . . . . . . . . . . . . . . . . 12-4
12-2 Troubleshooting . . . . . . . . . . . . . . . . . . . . . . . . . . . . . . . . . . . . . . . . . . . . . 12-11
12-2-1
12-2-2
12-2-3
12-2-4
12-2-5
Checking to See If the CPU Unit Is Operating . . . . . . . . . . . . . . . . . . . . . . .
Troubleshooting Flowchart for Non-fatal Errors . . . . . . . . . . . . . . . . . . . . . .
Error Table . . . . . . . . . . . . . . . . . . . . . . . . . . . . . . . . . . . . . . . . . . . . . . . . . .
Error Descriptions . . . . . . . . . . . . . . . . . . . . . . . . . . . . . . . . . . . . . . . . . . . .
Troubleshooting Errors That Are Not in the CPU Unit . . . . . . . . . . . . . . . . .
NJ-series CPU Unit Software User’s Manual (W501)
12-11
12-12
12-12
12-17
12-36
12-1
12 Troubleshooting
12-1 Operation after an Error
This section describes the error status of the NJ-series Controller and the operation that occurs after an
error is detected. Refer to 12-2 Troubleshooting for details on corrections for specific errors. Refer to the
NJ-series Troubleshooting Manual (Cat. No. W503) for all of the errors that may occur in an NJ-series
Controller.
12-1-1 Overview of NJ-series Status
You can check the operating status of the CPU Unit with the PWR, RUN, and ERROR indicators on the
front panels of the Power Supply Unit and CPU Unit.
Power Supply Unit
CPU Unit
PWR
indicator
RUN
indicator
ERROR
indicator
The following table shows the status of front-panel indicators, the status of user program execution, and
the ability to connect communications to the Sysmac Studio or NS-series PTs during startup, during
normal operation, and when errors occur.
Front-panel indicators
CPU Unit operating status
Fatal error in
CPU Unit
Non-fatal error
in CPU Unit
RUN (green)
Communications
with Sysmac Studio or NS-series
PT
Lit
Flashing
(1-s intervals)
Not lit
Stopped.
Not possible.
Lit
Lit
Not lit
Continues.
Possible.
PROGRAM mode
Lit
Not lit
Not lit
Stopped.
Power Supply
Error*1
Not lit
Not lit
Not lit
Stopped.
CPU Unit Reset*1
Lit
Not lit
Not lit
Stopped.
Incorrect Power
Supply Unit Connected*1
Lit
Flashing
(3-s intervals)
Lit
Stopped.
CPU Unit Watchdog Timer Error*1
Lit
Not lit
Lit
Stopped.
Major fault*2
Lit
Not lit
Lit
Stopped.
Lit
Lit
Flashing
(1-s intervals)
Continues.*3
Lit
Lit
Flashing
(1-s intervals)
Continues.
Lit
Lit
Not lit
Continues.
Startup
Normal operation
PWR
(green)
User program execuERROR (red) tion status
RUN mode
Partial fault*2
Minor fault*2
Observation*2
Not possible.
Possible. (Communications can be
connected from an
NS-series PT if EtherNet/IP is operating normally.)
*1 Refer to 12-1-2 Fatal Errors in the CPU Unit for information on individual errors.
*2 Refer to 12-1-3 Non-fatal error in CPU Unit for information on individual errors.
*3 The function module where the error occurred stops.
12-2
NJ-series CPU Unit Software User’s Manual (W501)
12 Troubleshooting
12-1-2 Fatal Errors in the CPU Unit
Types of Fatal Errors
z Power Supply Error
Power is not supplied, the voltage is outside of the allowed range, or the Power Supply Unit is faulty.
z CPU Unit Reset
The CPU Unit stopped operation because of a hardware error. Other than hardware failures, this
error also occurs at the following times.
12-1 Operation after an Error
Some errors are fatal and prevent the CPU Unit from operating. This section describes the errors that
cause the operation of the CPU Unit to stop. The Sysmac Studio and NS-series PTs cannot connect
communications if a fatal error occurs.
12
• The power supply to an Expansion Rack is OFF.
• The IN and OUT connectors are reversed.
• The connectors are not mated properly.
• There is more than one I/O Control Unit on the CPU Rack or there is an I/O Control Unit on an
Expansion Rack.
z Incorrect Power Supply Unit Connected
There is a CJ-series Power Supply Unit connected to the CPU Rack. The operation of the Controller
is stopped.
z CPU Unit Watchdog Timer Error
This error occurs in the CPU Unit. This error occurs when the watchdog timer times out because of
a hardware failure or when temporary data corruption causes the CPU Unit to hang.
Checking for Fatal Errors
You can identify fatal errors based on the status of the PWR indicator on the Power Supply Unit and the
RUN and ERROR indicators on the CPU Unit, as well as by the ability to connect communications to
the Sysmac Studio.
Indicator
PWR (green)
RUN (green)
ERROR (red)
Communications
with Sysmac Studio
Not lit
Not lit
Not lit
Lit
Not lit
Not lit
Lit
Flashing (3-s intervals) Lit
Incorrect Power Supply Unit Connected
Lit
Not lit
CPU Unit Watchdog
Timer Error
Lit
Not possible.*
CPU Unit operating
status
Power Supply Error
CPU Unit Reset
* Power Supply Errors and Incorrect Power Supply Unit Connected errors can be differentiated with the indicators. There is
no need to check communications with the Sysmac Studio.
NJ-series CPU Unit Software User’s Manual (W501)
12-3
12-1-2 Fatal Errors in the CPU Unit
• The I/O Connecting Cable is incorrectly installed.
12 Troubleshooting
12-1-3 Non-fatal error in CPU Unit
Event Levels
Non-fatal errors that occur are managed as Controller events in the NJ-series Controller. Controller
events are classified into levels according to the degree of the effect that the events have on control.
When an event occurs, the Sysmac Studio or PT will display the level. Refer to the NJ-series Troubleshooting Manual (Cat. No. W503) for details on Controller events.
• Major Fault Level
These errors prevent control operations for the entire Controller. If a major fault level error is detected,
user program execution is stopped immediately and the loads for all slaves (including remote I/O) are
turned OFF. With EtherCAT slaves and some CJ-series Special Units, you can set the slave settings
or Unit settings to select whether outputs will go OFF or retain their previous status. You cannot reset
major fault level errors from the user program, the Sysmac Studio, or an NS-series PT. To recover
from a major fault level error, remove the cause of the error, and either cycle the power supply to the
Controller or reset the Controller from the Sysmac Studio.
• Partial Fault Level
These errors prevent control operations in a certain function module in the Controller. The NJ-series
CPU Unit continues to execute the user program even after a partial fault level error occurs. You can
include error processing in the user program to safely stop any devices in operation. After you
remove the cause of the error, execute one of the following to return to normal status.
• Reset the error from the user program, the Sysmac Studio, or an NS-series PT.
• Cycle the power supply.
• Reset the Controller from the Sysmac Studio.
• Minor Fault Level
These errors prevent part of the control operations in a certain function module in the Controller. The
troubleshooting for minor fault level errors is the same as the processing for partial fault level errors.
• Observations
These errors do not affect the control operations of the Controller. Observations serve as warnings to
the user so that the error does not develop into an error at a higher level.
• Information
Events that are classified as information do not indicate errors.
12-4
NJ-series CPU Unit Software User’s Manual (W501)
12 Troubleshooting
Operation for Each Level
The operation that is performed when an error occurs depends on the error level of the Controller
event.
Item
Major fault level
Partial fault
level
Minor fault level
Observation
Information
These errors
prevent all of the
control in a function module
other than PLC
Function Module.
Errors that prevent a portion of
control in one of
the function
modules.
Errors that do
Information level
not affect control. events are not
errors, but information provided
to the user in the
event log.
• I/O Bus Check
Error (PLC
Function Module)
• Motion Control Period
Exceeded
(Motion Control Function
Module)
• Communications Controller Error
(EtherCAT
Master Function Module)
• Positive Limit
Input Detected
(Motion Control Function
Module)
• Analog Input
Disconnection
Detected (CJseries Unit)
• Low Battery
Voltage (PLC
Function Module)
• Packet Discarded Due to
Full Receive
Buffer (EtherNet/IP Function Module)
• Power ON
• Power Interrupted
• Memory All
Clear
PWR
(green)
Lit.
Lit.
Lit.
Lit.
Lit.
RUN
(green)
Not lit.
Lit.
Lit.
Lit.
Lit.
ERROR
(red)
Lit.
Flashes at 1-s
intervals.
Flashes at 1-s
intervals.
Not lit.
Not lit.
Event examples (Only a
few examples are provided here.
Refer to the NJ-series
Troubleshooting Manual
(Cat. No. W503) for a
complete list of errors.)
NJ-series CPU Unit Software User’s Manual (W501)
12-5
12
12-1-3 Non-fatal error in CPU Unit
These errors are
serious errors
that prevent control operations
for the entire
Controller.
Definition
Frontpanel indicators*1
Controller information
Controller errors
12-1 Operation after an Error
Event level
12 Troubleshooting
Event level
Item
Operation
of NJseries CPU
Unit
Controller information
Controller errors
Major fault level
Partial fault
level
Minor fault level
Observation
Information
RUN output on
Power
Supply
Unit
OFF
ON
ON
ON
ON
User program execution
status
Stops.
Continues.*2
Continues.
Continues.
Continues.
No
No
No
No
Not possible.
Depends on the
nature of the
error.
Depends on the
nature of the
error.
---
---
Recorded.
(Some errors are
not recorded.)
Recorded.
Recorded.
Recorded.
Recorded.
Refer to the I/O
Operation for a
Major Fault Level
Controller Error
on page 12-7.
• Errors in
EtherCAT
Master Function Module:
Depends on
settings in the
slave.
• Errors in other
function modules: Depends
on user program.
Depends on the
user program.
Depends on the
user program.
Depends on the
user program.
Outputs
Yes
turned OFF
Error reset
Event logs
Outputs from EtherCAT
slaves and Basic Output Units
Sysmac Studio display
(while online)
Error messages are automatically displayed. You can
display detailed information in the Troubleshooting Dialog Box.
These items are not displayed on
the error display.
*1 If multiple Controller errors have occurred, the indicators show the error with the highest error level.
*2 Operation stops in the function module (Motion Control Function Module, EtherCAT Master Function Module, or EtherNet/IP Function Module) in which the error occurred.
12-6
NJ-series CPU Unit Software User’s Manual (W501)
12 Troubleshooting
Operation in the Function Module Where an Error Event Occurred
Event level
Function module
Operation stops.
Motion Control Function Module
EtherCAT Master Function Module
Partial fault level
Observation
---
Operation continues.
All axes stop. (The
stop method
depends on the
error.)
• The affected axis/axes
group stops. (The stop
method depends on
the settings.)
• The motion control
instructions that are
related to axis operation are not executed.
• Axis operation continues.
• The motion control
instructions that are
not related to axis
operation are not executed.
EtherCAT communications stop.
EtherCAT communications stop or continue
depending on the fail-soft
operation settings.
EtherCAT communications continue.
Part of the EtherNet/IP
communications stop. (It
is possible to connect
communications when
the Sysmac Studio or
NS-series PT communications connection is not
the cause of the error.)
EtherNet/IP communications continue.
12
I/O Operation for a Major Fault Level Controller Error
• The following table gives the operation for the following errors.
• Unsupported Unit Detected
• I/O Bus Check Error
• End Cover Missing
• Incorrect Unit/Expansion Rack Connection
• Duplicate Unit Number
• Too Many I/O Points
• I/O Setting Check Error
Unit
CPU Unit operation
Unit or slave operation
EtherCAT slave
The slave is placed in the SafeOperational state.
Depends on the slave settings.*
CJ-series Basic I/O Unit
Refreshing is stopped.
• All outputs are turned OFF.
• All inputs are turned OFF.
CJ-series Special Unit
Refreshing is stopped.
Depends on the Unit operating
specifications (the ERH indicator
lights).
Servo Drive
Updating the command values is
stopped.
All axes stop immediately.
* Settings and setting methods depend on the slave. Refer to the manual for the slave. For a Servo Drive, operation depends on the setting of object 605E hex (Fault Reaction Option Code).
• The following table gives the operation for all other errors.
NJ-series CPU Unit Software User’s Manual (W501)
12-7
12-1-3 Non-fatal error in CPU Unit
EtherNet/IP communications stop. (The
Sysmac Studio and
NS-series PT cannot
connect communications.)
EtherNet/IP Function
Module
Minor fault level
12-1 Operation after an Error
PLC Function Module
Major fault level
12 Troubleshooting
Unit
CPU Unit operation
Unit or slave operation
EtherCAT slave
The slave is placed in the SafeOperational state.
Depends on the slave settings.*
CJ-series Basic I/O Unit
• All outputs are turned OFF.
• Input refreshing continues.
• All outputs are turned OFF.
• External inputs are refreshed.
CJ-series Special Unit
Refreshing continues.
Depends on the Unit operating
specifications.
Servo Drive
Updating the command values is
stopped.
All axes stop immediately.
* Settings and setting methods depend on the slave. Refer to the manual for the slave. For a Servo Drive, operation depends on the setting of object 605E hex (Fault Reaction Option Code).
Checking for Non-fatal Errors
Use the following methods to check for non-fatal errors.
Checking method
What you can check
Checking the indicators
You can use the indicators to confirm the Controller error level, the error status
of the EtherCAT Master Function Module, and the error status of the EtherNet/IP Function Module.
Checking with the troubleshooting function of Sysmac
Studio
You can check for current Controller errors, a log of past Controller errors, error
sources, error causes, and corrections.
Checking with the Troubleshooter of an NS-series PT
You can check for current Controller errors, a log of past Controller errors, error
sources, error causes, and corrections.
Checking with instructions that
read function module error status
You can check the highest-level status and highest-level event code in the current Controller errors.
Checking with system-defined
variables
You can check the current Controller error status for each function module.
This section describes the above checking methods.
Checking the Indicators
z Checking the Level of a Controller Error
You can use the PWR indicator on the Power Supply Unit and the RUN and ERROR indicators on
the CPU Unit to determine the event level for an error. The following table shows the relationship
between the Controller’s indicators and the event level.
Indicator
PWR (green)
RUN (green)
ERROR (red)
Event level
Lit
Not lit
Lit
Lit
Lit
Flashing (1-s intervals) Partial fault level
Major fault level
Minor fault level
Lit
12-8
Lit
Not lit
Observation
NJ-series CPU Unit Software User’s Manual (W501)
12 Troubleshooting
z Checking Errors in the EtherCAT Master Function Module and EtherNet/IP
Function Module
Indicator
EtherCAT NET ERR
Indicated status
EtherCAT Master Function Module Status
• Lit: An error for which normal status cannot be recovered through user
actions (i.e., errors for which you must replace the CPU Unit or contact your
OMRON representative) has occurred.
• Flashing: An error for which normal status can be recovered through user
actions has occurred.
• Not lit: There is no minor fault level or higher-level error.
EtherNet/IP NET ERR
EtherNet/IP Function Module Status
Checking with the Troubleshooting Function of Sysmac Studio
When an error occurs, you can connect the Sysmac Studio online to the Controller to check current
Controller errors and the log of past Controller errors.
z Current Errors
Open the Sysmac Studio’s Controller Error Tab Page to check the current error’s level, source,
source details, event name, event code, cause, and correction. Errors are not displayed for observations.
z Log of Past Errors
Open the Sysmac Studio’s Controller Log Tab Page to check the time of occurrence, level, source,
source details, event name, event code, details, attached information 1 to 4, and corrections for past
errors.
Refer to the NJ-Series Sysmac Studio Version 1 Operation Manual (Cat. No. W504) for details on
troubleshooting with the Sysmac Studio.
Checking with the Troubleshooter of an NS-series PT
If you can connect communications between an NS-series PT and the Controller when an error occurs,
you can check for current Controller errors and the log of past Controller errors.
z Current Errors
Open the Controller Error Tab Page on the NS-series PT’s Troubleshooter to check the current
error’s event name, event code, level, source, source details, details, and attached information 1 to
4. Observations are not displayed as errors.
NJ-series CPU Unit Software User’s Manual (W501)
12-9
12
12-1-3 Non-fatal error in CPU Unit
• Lit: An error for which normal status cannot be recovered through user
actions (i.e., errors for which you must replace the CPU Unit or contact your
OMRON representative) has occurred.
• Flashing: An error for which normal status can be recovered through user
actions has occurred.
• Not lit: There is no minor fault level or higher-level error.
12-1 Operation after an Error
For the EtherCAT Master Function Module and EtherNet/IP Function Module, use the EtherCAT and
EtherNet/IP NET ERR indicators to determine whether a minor fault level error or higher-level error
has occurred. The indicator lets you check the status given in the following table.
12 Troubleshooting
z Log of Past Errors
Open the Controller Event Log Tab Page on the NS-series PT’s Troubleshooter to check the time of
occurrence, level, source, event name, event code, details, and attached information 1 to 4 for past
errors.
Refer to the NS-series Programmable Terminals Programming Manual (Cat. No. V073) for details on
the NS-series PT’s Troubleshooter.
Checking with Instructions That Read Function Module Error Status
Instructions are provided that allow you to read the error status of each function module from the user
program. These instructions get the status and the event code of the error with the highest level.
Applicable function module
PLC Function Module
Motion Control Function Module
Instruction name
Instruction
Get PLC Controller Error Status
GetPLCError
Get I/O Bus Error Status
GetCJBError
Get Motion Control Error Status
GetMCError
EtherCAT Function Module
Get EtherCAT Error Status
GetECError
EtherNet/IP Function Module
Get EtherNet/IP Error Status
GetEIPError
For details on the instructions that get error status, refer to the NJ-series Instructions Reference Manual
(Cat. No. W502).
Checking with System-defined Variables
You can check the error status variables in the system-defined variables to determine the status of
errors in a Controller. You can read the error status variables from an external device by using communications. Refer to A-3 System-defined Variables for the system-defined variables.
12-10
NJ-series CPU Unit Software User’s Manual (W501)
12 Troubleshooting
12-2 Troubleshooting
This section provides basic error identification and troubleshooting flowcharts. Use them when an error
occurs in the NJ-series Controller. This section also describes the software errors that are related to the
PLC Function Module and corrections for those errors.
When an error occurs in the NJ-series Controller, use the following flowchart to determine whether the
error is a fatal error or a non-fatal error.
A fatal error occurred in the CPU Unit.
Refer to the NJ-series Troubleshooting Manual (Cat. No. W503) for the
correction.
Error occurs.
Not lit.
Power Supply Error
PWR indicator (green)?
Lit.
Not lit.
ERROR indicator (red)?
Not possible.
Communications
connection from Sysmac
Studio?
Lit.
CPU Unit Reset
Possible.
Flashing.
RUN indicator (green)?
Incorrect Power Supply Unit
Connected
Not lit.
Communications
connection from Sysmac
Studio?
Not possible.
CPU Unit Watchdog
Timer Error
Possible.
A
A non-fatal error occurred. Refer to 12-2-2
Troubleshooting Flowchart for Non-fatal Errors.
NJ-series CPU Unit Software User’s Manual (W501)
12-11
12
12-2-1 Checking to See If the CPU Unit Is Operating
Whenever possible, set the Sysmac Studio’s communications connection in the flowchart to a direct
USB connection. If you use Ethernet, there are many reasons that prevent a communications connection for the Sysmac Studio, so time is required to determine if a fatal or non-fatal error has occurred. If a
communications connection from the Sysmac Studio is not possible, perform the troubleshooting procedure that is provided in the NJ-series Troubleshooting Manual (Cat. No. W503) before you assume that
the error is a fatal error.
12-2 Troubleshooting
12-2-1 Checking to See If the CPU Unit Is Operating
12 Troubleshooting
12-2-2 Troubleshooting Flowchart for Non-fatal Errors
For a non-fatal error, use the Sysmac Studio or an NS-series PT to troubleshoot the error with the following flowchart. You can use the indicators to check the following:
• Level
• Whether the error is in the EtherNet/IP Function Module or the EtherCAT Master Function Module
• If the source of the error is the EtherNet/IP Function Module or the EtherCAT Master Function Module, whether you can restore normal status yourself
A
Non-fatal error in CPU Unit
To immediately check the
specific error
To check error status with the indicators
Lit.
Flashing.
ERROR indicator (red)?
Not lit.
Partial fault level
or minor fault level
Check all of the following branches that correspond to the
status of the EtherNet/IP NET ERR and EtherCAT NET
ERR indicators.
EtherNet/IP NET ERR indicator is lit or flashing.
Both indicators are not lit.
EtherCAT NET ERR indicator is
lit or flashing.
EtherNet/IP NET ERR
indicator (red)?
Flashing.
Lit.
Major fault
level
Observation
Error in the
EtherNet/IP Function
Module for which you
cannot restore normal
status by yourself.
EtherCAT NET ERR
indicator (red)?
Flashing.
Lit.
Error in the
EtherNet/IP Function
Module for which
you can restore
normal status by
yourself.
Error in the
EtherCAT Master
Function Module for
which you cannot
restore normal
status by yourself.
Error in the
EtherCAT Master
Function Module
for which you can
restore normal
status by yourself.
Error in PLC
Function Module or
MC Function
Module
Refer to the NJ-series Troubleshooting Manual (Cat. No. W503) for the procedures to check
for errors and corrections with the Sysmac Studio or an NS-series PT.
12-2-3 Error Table
The errors (i.e., events) that can occur in the PLC Function Module are given on the following pages.
Event levels are given as following in the tables:
Maj: Major fault level
Par: Partial fault level
Min: Minor fault level
Obs: Observation
Info: Information
Refer to the NJ-series Troubleshooting Manual (Cat. No. W503) for all NJ-series event codes.
12-12
NJ-series CPU Unit Software User’s Manual (W501)
12 Troubleshooting
Errors Related to Tasks
Event name
Meaning
Assumed cause
60020000 hex
Task Execution Timeout
Task execution
exceeded the timeout detection time.
• The timeout detection time setting is too short.
Level
Maj
Prt
Min
Obs
Info
Reference
√
page 12-18
√
page 12-19
12-2 Troubleshooting
Event code
• The task period setting is too
short.
• A user program is too large.
• The number of times that processing is repeated is larger
than expected.
• The priority of the periodic task
is incorrect.
60030000 hex
60010000 hex
• The task period setting is too
short.
Insufficient
System Service Time
Error
The specified system service execution time could not
be obtained.
• There is no unused time available for task execution.
Task Period
Exceeded
Task execution was
not completed during the set task
period for the primary periodic task
or a periodic task.
• The task period setting is too
short.
12
• The priority of the periodic task
is incorrect.
• There are too many Units and
slaves that perform I/O refresh
in the task period.
√
page 12-19
• The system service execution
interval is too short or the system service execution time ratio
is too long in the system service execution time settings.
√
page 12-20
• A user program is too large.
• The number of times that processing is repeated is larger
than expected.
• The priority of the periodic task
is incorrect.
60050000 hex
Task Period
Exceeded
Task execution was
not completed during the set task
period for the primary periodic task
or fixed periodic
task.
NJ-series CPU Unit Software User’s Manual (W501)
• The task period setting is too
short.
√
page 12-21
• A user program is too large.
• The number of times that processing is repeated is larger
than expected.
• The priority of the periodic task
is incorrect.
12-13
12-2-3 Error Table
60040000 hex
Two consecutive
I/O refresh failures
occurred during the
primary periodic
task or periodic task
period.
I/O Refreshing Timeout
Error
12 Troubleshooting
Errors Related to Controller Operation
Event code
Event name
10200000 hex
User Program/Controller
Configurations and
Setup Transfer Error
Meaning
The user program
or Controller Configurations and
Setup were not
transferred correctly.
Level
Assumed cause
Maj
• The user program or Controller
Configurations and Setup are
not correct because the power
supply to the Controller was
interrupted or communications
with the Sysmac Studio were
disconnected during a download of the user program or the
Controller Configurations and
Setup.
Prt
Min
Obs
Info
Reference
√
page 12-22
√
page 12-23
• The user program or Controller
Configurations and Setup are
not correct because the power
supply to the Controller was
interrupted during online editing.
• The user program or Controller
Configurations and Setup are
not correct because the power
supply to the Controller was
interrupted during a Clear All
Memory operation.
• Non-volatile memory failed.
10210000 hex
Illegal User
Program
Execution ID
The user program
execution IDs set in
the user program
and in the CPU Unit
do not match.
• The user program execution
IDs set in the user program and
in the CPU Unit do not match.
• A user program execution ID is
set in the CPU Unit but not in
the user program.
10240000 hex
Illegal User
Program
The user program
is not correct.
• There are more than 8 nesting
levels for functions or function
blocks.
√
page 12-23
10250000 hex
Illegal User
Program/Controller
Configurations and
Setup
The user program
or Controller Configurations and
Setup is corrupted.
• Illegal data was transferred for
the user program or Controller
Configurations and Setup.
√
page 12-24
40160000 hex
Safe Mode
The Controller
started in Safe
Mode.
• The power supply was turned
ON to the Controller when Safe
Mode was set on the DIP switch
on the CPU Unit.
√
page 12-24
10230000 hex
Event Log
Restoration
Error
Restoring the event
log failed.
• A low battery voltage prevented
retention of memory during a
power interruption.
√
page 12-25
10260000 hex
Trace Setting
Transfer Failure
The power supply
was interrupted
while transferring
the trace settings.
• The power supply was interrupted while transferring the
trace settings.
√
page 12-25
90010000 hex
Clock
Changed
The clock time was
changed.
• The clock time was changed.
√
page 12-25
90020000 hex
Time Zone
Changed
The time zone was
changed.
• The time zone was changed.
√
page 12-26
90080000 hex
Variable
Changed to
TRUE with
Forced
Refreshing
Changing a variable
to TRUE with forced
refreshing was
specified.
• Changing a variable to TRUE
with forced refreshing was
specified by the user.
√
page 12-26
12-14
• Non-volatile memory is deteriorating or has failed.
NJ-series CPU Unit Software User’s Manual (W501)
12 Troubleshooting
Event code
Event name
Meaning
Assumed cause
Level
Maj
Prt
Min
Obs
Info
Reference
Changing a variable
to FALSE with
forced refreshing
was specified.
• Changing a variable to FALSE
with forced refreshing was
specified by the user.
√
page 12-26
900A0000 hex
All Forced
Refreshing
Cleared
Clearing all forced
refreshing values
was specified.
• Clearing all forced refreshing
values was specified by the
user.
√
page 12-27
900B0000 hex
Memory All
Cleared
All of memory was
cleared.
• A user with Administrator rights
cleared all of the memory.
√
page 12-27
900C0000 hex
Event Log
Cleared
The event log was
cleared.
• The event log was cleared by
the user.
√
page 12-27
90110000 hex
Power
Turned ON
The power supply
was turned ON.
• The power supply was turned
ON.
√
page 12-28
90120000 hex
Power Interrupted
The power supply
was interrupted.
• The power supply was interrupted.
√
page 12-28
90130000 hex
Operation
Started
Operation was
started.
• A command to start operation
was received.
√
page 12-28
90140000 hex
Operation
Stopped
Operation was
stopped.
• A command to stop operation
was received.
√
page 12-29
90150000 hex
Reset Executed
A reset was executed.
• A reset command was
received.
√
page 12-29
90160000 hex
User Program Execution ID Write
The user program
execution ID was
set or changed in
the CPU Unit.
• A user with Administrator rights
changed the user program execution ID that is set in the CPU
Unit.
√
page 12-29
90180000 hex
All Controller
Errors
Cleared
All current errors
were cleared.
• The user cleared all current
errors.
√
page 12-30
90190000 hex
Forced
Refreshing
Cleared
Clearing a forced
refreshing value
was specified.
• Clearing a forced refreshing
value was specified by the user.
√
page 12-30
Errors Related to FINS Communications
Event code
Event name
Meaning
Assumed cause
Level
Maj
Prt
Min
Obs
Info
Reference
14010000 hex
CPU Bus
Unit Setup
Area Error
An error was
detected in the
memory check of
the Setup Area for
CPU Bus Units.
• The power supply to the Controller was interrupted or communications with the Sysmac
Studio were disconnected while
downloading the CPU Bus Unit
Settings.
√
page 12-31
34100000 hex
IP Address
Table Setting
Error
The IP address
table settings are
incorrect.
• The IP address conversion
method is set to the combined
method or the IP address table
method, but the IP address
table settings are incorrect.
√
page 12-31
34110000 hex
Unknown
Destination
Node
The send destination node is not
known.
• The send destination node was
not found when a FINS message was sent.
√
page 12-32
34130000 hex
FINS/TCP
Connection
Table Setting
Error
The FINS/TCP connection table is
incorrect.
• The power supply to the Controller was interrupted or communications with the Sysmac
Studio were disconnected while
downloading the FINS/TCP
connection table.
√
page 12-32
NJ-series CPU Unit Software User’s Manual (W501)
12-15
12
12-2-3 Error Table
Variable
Changed to
FALSE with
Forced
Refreshing
12-2 Troubleshooting
90090000 hex
12 Troubleshooting
Event code
80100000 hex
Event name
Packet Discarded
Level
Meaning
Assumed cause
One or more packets were discarded.
• A FINS response addressed to
the CPU Unit was received.
Maj
Prt
Min
Obs
Info
Reference
√
page 12-33
√
page 12-34
√
page 12-35
• The send designation Unit for
the FINS response does not
exist.
80110000 hex
Packet Discarded
One or more packets were discarded.
• An attempt was made to send a
FINS response with over 2002
bytes.
• An attempt was made to route a
FINS response with over 2002
bytes.
• Packet was received with a No
Such Unit routing error.
• Packet was received with a
Routing Error routing error.
• Packet was received with a No
Routing Table routing
error.Packet was received with
a No Routing Table routing
error.
• Packet was received with an
Event Area Size Over Limit
routing error.
• There is insufficient space in
the internal buffer.
• FINS message routing failed
because the communications
load is too high.
80120000 hex
Packet Discarded
One or more packets were discarded.
• A FINS response was received
in which DNA was the local network but DA1 was not the local
node.
• A FINS command or response
was received in which the hub
network address specification
DNA was greater than or equal
to 80 hex.
• There is insufficient space in
the internal buffer.
• A FINS command that does not
have the minimum command
length was received.
• A FINS command that
exceeded the maximum command length was received.
• Sending packets failed.
• FINS message routing failed
because the communications
load was too high.
12-16
NJ-series CPU Unit Software User’s Manual (W501)
12 Troubleshooting
12-2-4 Error Descriptions
This section describes the information that is given for individual errors.
Controller Error Descriptions
Gives the name of the error.
Meaning
Gives a short description of the error.
Event code
Gives the code of the error.
Source
Gives the source of the error.
Source details
Gives details on
the source of the
error.
Detection
timing
Tells when the
error is detected.
Error attributes
Level
Tells the level of
influence on control.*1
Recovery
Gives the recovery method.*2
Log category
Tells which log
the error is saved
in.*3
Effects
User program
Tells what will happen to execution of
the user program.*4
Operation
Provides special information on the operation that results
from the error.
Indicators
Gives the status of the built-in EtherNet/IP port and built-in EtherCAT port indicators. Indicator status is given only for
errors in the EtherCAT Master Function Module and the EtherNet/IP Function Module.
System-defined
variables
Variable
Cause and correction
Assumed cause
Attached
information
This is the attached information that is displayed by the Sysmac Studio or an NS-series PT.
Precautions/
Remarks
Provides precautions, restrictions, and supplemental information.
Data type
Name
Lists the variable names, data types, and meanings for system-defined variables that provide direct error notification,
that are directly affected by the error, or that contain settings that cause the error.
Correction
Prevention
Lists the possible causes, corrections, and preventive measures for the error.
*1 One of the following:
Major fault: Major fault level
Partial fault: Partial fault level
Minor fault: Minor fault level
Observation
Information
*2 One of the following:
Automatic recovery: Normal status is restored automatically when the cause of the error is removed.
Error reset: Normal status is restored when the error is reset after the cause of the error is removed.
Cycle the power supply: Normal status is restored when the power supply to the Controller is turned OFF and then back
ON after the cause of the error is removed.
Controller reset: Normal status is restored when the Controller is reset after the cause of the error is removed.
Depends on cause: The recovery method depends on the cause of the error.
*3 One of the following:
System: System event log
Access: Access event log
*4 One of the following:
Continues: Execution of the user program will continue.
Stops: Execution of the user program stops.
Starts: Execution of the user program starts.
NJ-series CPU Unit Software User’s Manual (W501)
12-17
12
12-2-4 Error Descriptions
Event name
12-2 Troubleshooting
The items that are used to describe individual errors (events) are described in the following copy of an
error table.
12 Troubleshooting
Errors Related to Tasks
Event name
Task Execution Timeout
Event code
60020000 hex
Meaning
Task execution exceeded the timeout detection time.
Source
PLC Function Module
Source details
None
Detection
timing
Continuously
Error attributes
Level
Major fault
Recovery
Cycle the power
supply or reset
the Controller.
Log category
System
Effects
User program
Stops.
Operation
All outputs are stopped.
System-defined
variables
Variable
Cause and
correction
Data type
Name
_<Task_name>_Exceeded
BOOL
Task Period Exceeded Flag
_<Task_name>_ExceedCount
UDINT
Task Period Exceeded Count
_<Task_name>_LastExecTime
TIME
Last Task Execution Time
_<Task_name>_MaxExecTime
TIME
Maximum Task Execution Time
Assumed cause
Correction
Prevention
The timeout detection time setting is
too short.
Increase the timeout detection time.
Design the tasks considering the corrections that are given on the left.
The task period setting is too short.
Increase the task period.
A user program is too large.
Separate the processes into different
tasks, for example move processes
that need a short execution period to
a periodic task with a lower priority.
The number of times that processing
is repeated is larger than expected.
If there is a program with an
extremely high number of repetitions,
correct the program to achieve the
correct number of repetitions. Set a
trap in the user program that monitors
the number of times a process is executed to check the number of repetitions.
The priority of the periodic task is
incorrect.
Increase the priority of the periodic
task.
Attached
information
Attached Information 1: Name of task where error occurred
Precautions/
Remarks
None
12-18
NJ-series CPU Unit Software User’s Manual (W501)
12 Troubleshooting
Event name
I/O Refreshing Timeout Error
Event code
60030000 hex
Two consecutive I/O refresh failures occurred during the primary periodic task or periodic task period.
Source
PLC Function Module
Source details
None
Detection
timing
Continuously
Error attributes
Level
Major fault
Recovery
Cycle the power
supply or reset
the Controller.
Log category
System
Effects
User program
Stops.
Operation
All outputs are stopped.
System-defined
variables
Variable
Cause and
correction
Data type
Name
_<Task_name>_Exceeded
BOOL
Task Period Exceeded Flag
_<Task_name>_ExceedCount
UDINT
Task Period Exceeded Count
12-2 Troubleshooting
Meaning
TIME
Last Task Execution Time
_<Task_name>_MaxExecTime
TIME
Maximum Task Execution Time
Assumed cause
Correction
Prevention
The task period setting is too short.
Check the task execution time and
change the task period to an appropriate value.
Design the tasks considering the corrections that are given on the left.
The priority of the periodic task is
incorrect.
Increase the priority of the periodic
task.
There are too many Units and slaves
that perform I/O refresh in the task
period.
Move the I/O refresh processes to
other tasks, for example move I/O
refresh processes within the task to
other tasks.
Attached
information
Attached Information 1: Name of task where error occurred
Precautions/
Remarks
None
Event name
Insufficient System Service Time Error
Meaning
The specified system service execution time could not be obtained.
Source
PLC Function Module
Source details
None
Detection
timing
Continuously
Error attributes
Level
Major fault
Recovery
Cycle the power
supply or reset
the Controller.
Log category
System
Effects
User program
Stops.
Operation
All outputs are stopped.
System-defined
variables
Variable
Data type
Name
_<Task_name>_Exceeded
BOOL
Task Period Exceeded Flag
_<Task_name>_ExceedCount
UDINT
Task Period Exceeded Count
_<Task_name>_LastExecTime
TIME
Last Task Execution Time
Cause and
correction
Event code
60040000 hex
_<Task_name>_MaxExecTime
TIME
Maximum Task Execution Time
Assumed cause
Correction
Prevention
There is no unused time available for
task execution.
Check the time that is available for
task execution and increase the task
period to ensure that there is sufficient task execution time.
Set the system service time according to the corrections that are given
on the left.
The system service execution interval
is too short or the system service execution time ratio is too long in the system service execution time settings.
Check the effect on the processes
executed by the system services with
this operation and increase the system service execution interval or
reduce the system service execution
time ratio.
Attached
information
None
Precautions/
Remarks
None
NJ-series CPU Unit Software User’s Manual (W501)
12
12-2-4 Error Descriptions
_<Task_name>_LastExecTime
12-19
12 Troubleshooting
Event name
Task Period Exceeded
Event code
60010000 hex
Meaning
Task execution was not completed during the set task period for the primary periodic task or a periodic task.
Source
PLC Function Module
Source details
None
Detection
timing
Continuously
Error attributes
Level
Minor fault
Recovery
Error reset
Log category
System
Effects
User program
Continues.
Operation
If the task execution does not finish within the set task
period, the I/O refresh operation will be as follows:
• CJ-series Units: No I/O refresh is executed.
When task execution is completed, I/O refreshing for the
next period is executed.
• EtherCAT slaves: The same values are output as for the
previous output refresh.
If the task execution does not finish within the set task
period, overall control of the equipment may become
impossible.
System-defined
variables
Cause and
correction
Variable
Data type
Name
_<Task_name>_Exceeded
BOOL
Task Period Exceeded Flag
_<Task_name>_ExceedCount
UDINT
Task Period Exceeded Count
_<Task_name>_LastExecTime
TIME
Last Task Execution Time
_<Task_name>_MaxExecTime
TIME
Maximum Task Execution Time
Assumed cause
Correction
Prevention
The task period setting is too short.
Check the task execution time and
change the task period to an appropriate value.
Design the tasks considering the corrections that are given on the left.
A user program is too large.
Separate the processes into different
tasks, for example move processes
that need a short execution period to
a periodic task with a lower priority.
The number of times that processing
is repeated is larger than expected.
If there is a program with an
extremely high number of repetitions,
correct the program to achieve the
correct number of repetitions. Set a
trap in the user program that monitors
the number of times a process is executed to check the number of repetitions.
The priority of the periodic task is
incorrect.
Increase the priority of the periodic
task.
Attached
information
Attached Information 1: Name of task where error occurred
Precautions/
Remarks
You can change the level of the error to an observation in the task settings.
12-20
NJ-series CPU Unit Software User’s Manual (W501)
12 Troubleshooting
Task Period Exceeded
Event code
60050000 hex
Meaning
Task execution was not completed during the set task period for the primary periodic task or fixed periodic task.
Source
PLC Function Module
Source details
None
Detection
timing
Continuously
Error attributes
Level
Observation
Recovery
---
Log category
System
Effects
User program
Continues.
Operation
If the task execution does not finish within the set task
period, the I/O refresh operation will be as follows:
• CJ-series Units: No I/O refresh is executed.
When task execution is completed, I/O refreshing for the
next period is executed.
• EtherCAT slaves: The same values are output as for the
previous output refresh.
If the task execution does not finish within the set task
period, overall control of the equipment may become
impossible.
System-defined
variables
Data type
Name
_<Task_name>_Exceeded
BOOL
Task Period Exceeded Flag
_<Task_name>_ExceedCount
UDINT
Task Period Exceeded Count
_<Task_name>_LastExecTime
TIME
Last Task Execution Time
12
_<Task_name>_MaxExecTime
TIME
Maximum Task Execution Time
Assumed cause
Correction
Prevention
The task period setting is too short.
Check the task execution time and
change the task period to an appropriate value.
Design the tasks considering the corrections that are given on the left.
A user program is too large.
Separate the processes into different
tasks, for example move processes
that does not need a short execution
period to a periodic task with a lower
priority.
The number of times that processing
is repeated is larger than expected.
If there is a program with an
extremely high number of repetitions,
correct the program to achieve the
correct number of repetitions. Set a
trap in the user program that monitors
the number of times a process is executed to check the number of repetitions.
The priority of the periodic task is
incorrect.
Increase the priority of the periodic
task.
Attached
information
Attached Information 1: Name of task where error occurred
Precautions/
Remarks
This error can occur if you change the level of the error to an observation in the task settings.
NJ-series CPU Unit Software User’s Manual (W501)
12-21
12-2-4 Error Descriptions
Cause and
correction
Variable
12-2 Troubleshooting
Event name
12 Troubleshooting
Errors Related to Controller Operation
Event name
User Program/Controller Configurations and Setup Transfer Error
Meaning
The user program or Controller Configurations and Setup were not transferred correctly.
Source
PLC Function Module
Motion Control Function Module
EtherCAT Master Function Module
EtherNet/IP Function Module
Source details
None
Detection
timing
At power ON or
Controller reset
Error attributes
Level
Major fault
Recovery
Cycle the power
supply or reset
the Controller.
Log category
System
Effects
User program
Stops.
Operation
All outputs are stopped.
System-defined
variables
Variable
Data type
Name
None
---
---
Cause and
correction
Assumed cause
Correction
Prevention
The user program or Controller Configurations and Setup are not correct
because the power supply to the Controller was interrupted or communications with the Sysmac Studio were
disconnected during a download of
the user program or the Controller
Configurations and Setup.
Clear all of memory and then download the project from the Sysmac Studio. If attached information is
registered, cycle the power supply to
the Controller and then implement the
above correction.
Do not turn OFF the power supply to
the Controller or disconnect communications with the Sysmac Studio during a download of the user program or
the Controller Configurations and
Setup.
10200000 hex
The user program or Controller Configurations and Setup are not correct
because the power supply to the Controller was interrupted during online
editing.
Do not interrupt the power supply to
the Controller during online editing.
The user program or Controller Configurations and Setup are not correct
because the power supply to the Controller was interrupted during a Clear
All Memory operation.
Do not interrupt the power supply to
the Controller during a Clear All Memory operation.
Non-volatile memory failed.
Attached
information
Event code
If the error persists even after you
make the above correction, replace
the CPU Unit.
None
Attached Information 1: Cause Details
None: Power was interrupted or communications were disconnected during a download or power was interrupted during online editing.
Downloading/Predownloading: For other causes, the timing of error occurrence (during download or during download
preparations) is given.
Precautions/
Remarks
12-22
None
NJ-series CPU Unit Software User’s Manual (W501)
12 Troubleshooting
Event name
Illegal User Program Execution ID
Event code
10210000 hex
PLC Function Module
Source details
None
Detection
timing
At user program
download, power
ON, or Controller
reset
Error attributes
Level
Major fault
Recovery
Cycle the power
supply or reset
the Controller.
Log category
System
Effects
User program
Stops.
Operation
All outputs are stopped.
System-defined
variables
Variable
Data type
Name
None
---
---
Cause and
correction
Assumed cause
Correction
Prevention
The user program execution IDs set in
the user program and in the CPU Unit
do not match.
Set the same user program execution
ID in the user program and CPU Unit.
A user program execution ID is set in
the CPU Unit but not in the user program.
If user program execution ID is not set
in the user program, clear the user
program execution ID set in the CPU
Unit by clearing all memory in the
CPU Unit.
Set the same user program execution
ID in the user program and CPU Unit.
Keep a record of the user program
execution IDs set in the user program
and in the CPU Unit. They are not displayed.
Attached
information
None
Precautions/
Remarks
None
Event name
Illegal User Program
Meaning
The user program is not correct.
Source
PLC Function Module
Error attributes
Level
Effects
User program
System-defined
variables
Variable
Data type
Name
None
---
---
Cause and
correction
Assumed cause
Correction
Prevention
There are more than 8 nesting levels
for functions or function blocks.
Find the location in the user program
with more than 8 nesting levels for
functions or function blocks and
reduce the number of nesting levels to
8 or fewer. Then, download the user
program again.
Write the user program so that there
is never more than 8 nesting levels for
functions or function blocks. Use the
program check on the Sysmac Studio
to confirm that there are not more
than 8 nesting levels.
Attached
information
None
Precautions/
Remarks
None
Event code
10240000 hex
Source details
None
Detection
timing
At download,
power ON, or
Controller reset
Major fault
Recovery
Cycle the power
supply or reset
the Controller.
Log category
System
Stops.
Operation
All outputs are stopped.
NJ-series CPU Unit Software User’s Manual (W501)
12
12-2-4 Error Descriptions
The user program execution IDs set in the user program and in the CPU Unit do not match.
Source
12-2 Troubleshooting
Meaning
12-23
12 Troubleshooting
Event name
Illegal User Program/Controller Configurations and Setup
Event code
10250000 hex
Meaning
The user program or Controller Configurations and Setup is corrupted.
Source
PLC Function Module
Source details
None
Detection
timing
At download,
power ON, or
Controller reset
Error attributes
Level
Major fault
Recovery
Cycle the power
supply or reset
the Controller.
Log category
System
Effects
User program
Stops.
Operation
All outputs are stopped.
System-defined
variables
Variable
Data type
Name
None
---
---
Cause and
correction
Assumed cause
Correction
Prevention
Illegal data was transferred for the
user program or Controller Configurations and Setup.
Download the user program or Controller Configurations and Setup
again. Or clear all of memory. If this
error persists, replace the CPU Unit.
None
Non-volatile memory is deteriorating
or has failed.
Attached
information
None
Precautions/
Remarks
None
Event name
Safe Mode
Meaning
The Controller started in Safe Mode.
Source
PLC Function Module
Error attributes
Level
Effects
User program
System-defined
variables
Variable
Data type
Name
None
---
---
Cause and
correction
Assumed cause
Correction
Prevention
The power supply was turned ON to
the Controller when Safe Mode was
set on the DIP switch on the CPU
Unit.
---
---
Attached
information
None
Precautions/
Remarks
If the Controller starts in Safe Mode, the user program is not executed even if the startup mode is set to RUN mode.
12-24
Event code
40160000 hex
Source details
None
Detection
timing
At power ON or
Controller reset
Major fault
Recovery
Cycle the power
supply or reset
the Controller.
Log category
System
Stops.
Operation
All outputs are stopped.
NJ-series CPU Unit Software User’s Manual (W501)
12 Troubleshooting
Event Log Restoration Error
Event code
10230000 hex
Meaning
Restoring the event log failed.
Source
PLC Function Module
Source details
None
Detection
timing
At power ON or
Controller reset
Error attributes
Level
Observation
Recovery
---
Log category
System
Effects
User program
Starts.
Operation
Not affected. However, the past event log cannot be
checked.
System-defined
variables
Variable
Data type
Name
None
---
---
Cause and
correction
Assumed cause
Correction
Prevention
Attached
information
Attached information 1: Error Details (0: Failure to restore all categories of logs, 1: Failure to restore system event log,
2: Failure to restore access event log, 100: Failure to restore user-defined event log)
Precautions/
Remarks
None
A low battery voltage prevented reten- Replace the Battery.
tion of memory during a power interruption.
Replace the battery periodically.
12-2 Troubleshooting
Event name
12
Trace Setting Transfer Failure
Meaning
The power supply was interrupted while transferring the trace settings.
Event code
10260000 hex
Source
PLC Function Module
Source details
None
Detection
timing
At power ON or
Controller reset
Error attributes
Level
Observation
Recovery
Cycle the power
supply or reset
the Controller.
Log category
System
Effects
User program
Continues.
Operation
Not affected.
System-defined
variables
Variable
Data type
Name
None
---
---
Cause and
correction
Assumed cause
Correction
Prevention
The power supply was interrupted
while transferring the trace settings.
Transfer the trace settings again.
Do not interrupt the power supply
while transferring the trace settings.
Attached
information
None
Precautions/
Remarks
All trace settings are initialized when this error occurs.
Event name
Clock Changed
Meaning
The clock time was changed.
Event code
90010000 hex
Source
PLC Function Module
Source details
None
Detection
timing
Commands from
user
Error attributes
Level
Effects
User program
Information
Recovery
---
Log category
Access
Continues.
Operation
Not affected.
System-defined
variables
Variable
Data type
Name
_CurrentTime
DATE_AND_TIME
System Time
Cause and
correction
Assumed cause
Correction
Prevention
The clock time was changed.
---
---
Attached
information
Attached information 1: Time before change
Precautions/
Remarks
Clock changes by the Set Time instruction (SetTime) are not recorded in the event log.
The time stamp for this event will be for the time after the change.
NJ-series CPU Unit Software User’s Manual (W501)
12-25
12-2-4 Error Descriptions
Event name
12 Troubleshooting
Event name
Time Zone Changed
Event code
90020000 hex
Meaning
The time zone was changed.
Source
PLC Function Module
Source details
None
Detection
timing
When downloading
Error attributes
Level
Information
Recovery
---
Log category
Access
Effects
User program
Continues.
Operation
Not affected.
System-defined
variables
Variable
_CurrentTime
DATE_AND_TIME
System Time
Cause and
correction
Assumed cause
Correction
Prevention
The time zone was changed.
---
---
Attached
information
None
Precautions/
Remarks
None
Event name
Variable Changed to TRUE with Forced Refreshing
Data type
Name
Event code
90080000 hex
Meaning
Changing a variable to TRUE with forced refreshing was specified.
Source
PLC Function Module
Source details
None
Detection
timing
Commands from
user
Error attributes
Level
Information
Recovery
---
Log category
Access
Effects
User program
Continues.
Operation
Operation is performed according to the forced refreshing
values.
System-defined
variables
Variable
Data type
Name
None
---
---
Cause and
correction
Assumed cause
Correction
Prevention
Changing a variable to TRUE with
forced refreshing was specified by the
user.
---
---
Attached
information
None
Precautions/
Remarks
None
Event name
Variable Changed to FALSE with Forced Refreshing
Event code
90090000 hex
Meaning
Changing a variable to FALSE with forced refreshing was specified.
Source
PLC Function Module
Source details
None
Detection
timing
Commands from
user
Error attributes
Level
Information
Recovery
---
Log category
Access
Effects
User program
Continues.
Operation
Operation is performed according to the forced refreshing
values.
System-defined
variables
Variable
Data type
Name
None
---
---
Cause and
correction
Assumed cause
Correction
Prevention
Changing a variable to FALSE with
forced refreshing was specified by the
user.
---
---
Attached
information
None
Precautions/
Remarks
None
12-26
NJ-series CPU Unit Software User’s Manual (W501)
12 Troubleshooting
Event name
All Forced Refreshing Cleared
Event code
900A0000 hex
Clearing all forced refreshing values was specified.
Source
PLC Function Module
Source details
None
Detection
timing
Commands from
user
Error attributes
Level
Information
Recovery
---
Log category
Access
Effects
User program
Continues.
Operation
Forced refreshing values are all cleared and operation is
performed according to the user program.
System-defined
variables
Variable
Data type
Name
None
---
---
Cause and
correction
Assumed cause
Correction
Prevention
Clearing all forced refreshing values
was specified by the user.
---
---
Attached
information
None
Precautions/
Remarks
None
Event name
Memory All Cleared
12-2 Troubleshooting
Meaning
12
900B0000 hex
Meaning
All of memory was cleared.
Source
PLC Function Module
Source details
None
Detection
timing
Commands from
user
Error attributes
Level
Information
Recovery
---
Log category
Access
Effects
User program
---
Operation
Operation returns to the factory state.
System-defined
variables
Variable
Data type
Name
None
---
---
Cause and
correction
Assumed cause
Correction
Prevention
A user with Administrator rights
cleared all of the memory.
---
---
Attached
information
None
Precautions/
Remarks
None
Event name
Event Log Cleared
Meaning
The event log was cleared.
Source
PLC Function Module
Error attributes
Level
Effects
User program
System-defined
variables
Variable
Data type
Name
None
---
---
Cause and
correction
Assumed cause
Correction
Prevention
The event log was cleared by the
user.
---
---
Attached
information
Attached information 1: Cleared events
Precautions/
Remarks
None
Event code
900C0000 hex
Source details
None
Detection
timing
Commands from
user
Information
Recovery
---
Log category
Access
Continues.
Operation
Not affected.
NJ-series CPU Unit Software User’s Manual (W501)
0:
1:
2:
100:
All log categories were cleared
The system event log was cleared.
The access event log was cleared.
The user-defined event log was cleared.
12-27
12-2-4 Error Descriptions
Event code
12 Troubleshooting
Event name
Power Turned ON
Event code
90110000 hex
Meaning
The power supply was turned ON.
Source
PLC Function Module
Source details
None
Detection
timing
At power ON
Error attributes
Level
Information
Recovery
---
Log category
System
Effects
User program
----
Operation
Operation starts.
System-defined
variables
Variable
None
---
---
Cause and
correction
Assumed cause
Correction
Prevention
The power supply was turned ON.
---
---
Attached
information
None
Precautions/
Remarks
None
Event name
Power Interrupted
Data type
Name
Event code
90120000 hex
Meaning
The power supply was interrupted.
Source
PLC Function Module
Source details
None
Detection
timing
At power interruption
Error attributes
Level
Information
Recovery
---
Log category
System
Effects
User program
Stops.
Operation
All operations stops.
System-defined
variables
Variable
None
---
---
Cause and
correction
Assumed cause
Correction
Prevention
The power supply was interrupted.
---
---
Attached
information
None
Precautions/
Remarks
None
Event name
Operation Started
Meaning
Operation was started.
Source
PLC Function Module
Error attributes
Level
Effects
User program
System-defined
variables
Variable
Data type
Name
None
---
---
Cause and
correction
Assumed cause
Correction
Prevention
A command to start operation was
received.
---
---
Attached
information
None
Precautions/
Remarks
None
12-28
Data type
Name
Event code
90130000 hex
Source details
None
Detection
timing
When changing
to RUN mode
Information
Recovery
---
Log category
System
Starts.
Operation
User program execution starts.
NJ-series CPU Unit Software User’s Manual (W501)
12 Troubleshooting
Event name
Operation Stopped
Event code
90140000 hex
Operation was stopped.
Source
PLC Function Module
Source details
None
Detection
timing
When changing
to PROGRAM
mode
Error attributes
Level
Information
Recovery
---
Log category
System
Effects
User program
Stops.
Operation
User program execution stops.
System-defined
variables
Variable
Data type
Name
None
---
---
Cause and
correction
Assumed cause
Correction
Prevention
A command to stop operation was
received.
---
---
Attached
information
None
Precautions/
Remarks
None
Event name
Reset Executed
Meaning
A reset was executed.
Source
PLC Function Module
Error attributes
Level
Effects
User program
System-defined
variables
Variable
Cause and
correction
A reset command was received.
Attached
information
None
Precautions/
Remarks
None
12-2 Troubleshooting
Meaning
12
90150000 hex
Source details
None
Detection
timing
Commands from
user
Information
Recovery
---
Log category
Access
---
Operation
Operation is started after a reset is executed.
Data type
Name
None
---
---
Assumed cause
Correction
Prevention
---
---
Event name
User Program Execution ID Write
Meaning
The user program execution ID was set or changed in the CPU Unit.
Source
PLC Function Module
Source details
None
Detection
timing
When downloading
Error attributes
Level
Information
Recovery
---
Log category
Access
Effects
User program
Continues.
Operation
Not affected.
System-defined
variables
Variable
Data type
Name
None
---
---
Cause and
correction
Assumed cause
Correction
Prevention
A user with Administrator rights
changed the user program execution
ID that is set in the CPU Unit.
---
---
Attached
information
None
Precautions/
Remarks
None
NJ-series CPU Unit Software User’s Manual (W501)
Event code
90160000 hex
12-29
12-2-4 Error Descriptions
Event code
12 Troubleshooting
Event name
All Controller Errors Cleared
Event code
90180000 hex
Meaning
All current errors were cleared.
Source
PLC Function Module
Source details
None
Detection
timing
Commands from
user
Error attributes
Level
Information
Recovery
---
Log category
Access
Effects
User program
Continues.
Operation
Clearing all errors for which the causes have been
removed.
System-defined
variables
Variable
Data type
Name
None
---
---
Cause and
correction
Assumed cause
Correction
Prevention
The user cleared all current errors.
---
---
Attached
information
None
Precautions/
Remarks
None
Event name
Forced Refreshing Cleared
Meaning
Clearing a forced refreshing value was specified.
Source
PLC Function Module
Error attributes
Level
Effects
User program
System-defined
variables
Variable
None
---
---
Cause and
correction
Assumed cause
Correction
Prevention
Clearing a forced refreshing value
was specified by the user.
---
---
Attached
information
None
Precautions/
Remarks
None
12-30
Event code
90190000 hex
Source details
None
Detection
timing
Commands from
user
Information
Recovery
---
Log category
Access
Continues.
Operation
Forced refreshing values are cleared and operation is performed according to the user program.
Data type
Name
NJ-series CPU Unit Software User’s Manual (W501)
12 Troubleshooting
Errors Related to FINS Communications
Event name
CPU Bus Unit Setup Area Error
Event code
14010000 hex
An error was detected in the memory check of the Setup Area for CPU Bus Units.
Source
PLC Function Module
Source details
None
Detection
timing
At power ON, at
Controller reset,
or when writing
CPU Bus Unit
Setup Area
Error attributes
Level
Minor fault
Recovery
Error reset or
cycling power
supply
Log category
System
Effects
User program
Continues.
Operation
The CPU Bus Unit may stop.
System-defined
variables
Variable
Data type
Name
None
---
---
Cause and
correction
Assumed cause
Correction
Prevention
The power supply to the Controller
was interrupted or communications
with the Sysmac Studio were disconnected while downloading the CPU
Bus Unit Settings.
Clear all memory or download the
CPU Bus Unit Settings. If this error
persists, replace the CPU Unit.
Do not interrupt the power supply to
the Controller or disconnect communications with the Sysmac Studio
while downloading the CPU Bus Unit
Settings.
Attached
information
None
Precautions/
Remarks
None
Event name
IP Address Table Setting Error
Meaning
The IP address table settings are incorrect.
Source
PLC Function Module
Error attributes
Level
Effects
User program
System-defined
variables
Variable
Data type
Name
None
---
---
Cause and
correction
Assumed cause
Correction
Prevention
The IP address conversion method is
set to the combined method or the IP
address table method, but the IP
address table settings are incorrect.
Correct the IP address table settings.
Set the IP address table correctly.
Attached
information
None
Precautions/
Remarks
None
12
34100000 hex
Source details
None
Detection
timing
At power ON,
Controller reset,
or restart of builtin Ethernet port
Minor fault
Recovery
Error reset
Log category
System
Continues.
Operation
FINS/UDP communications will not operate.
12-31
12-2-4 Error Descriptions
Event code
NJ-series CPU Unit Software User’s Manual (W501)
12-2 Troubleshooting
Meaning
12 Troubleshooting
Event name
Unknown Destination Node
Event code
34110000 hex
Meaning
The send destination node is not known.
Source
PLC Function Module
Source details
None
Detection
timing
At FINS message
reception
Error attributes
Level
Minor fault
Recovery
Error reset
Log category
System
Effects
User program
Continues.
Operation
Not affected. Packets are discarded.
System-defined
variables
Variable
None
---
---
Cause and
correction
Assumed cause
Correction
Prevention
The send destination node was not
found when a FINS message was
sent.
Correct the setting of the send destination node for FINS/UDP communications.
Set the send destination node for
FINS/UDP communications correctly.
Attached
information
None
Precautions/
Remarks
None
Event name
FINS/TCP Connection Table Setting Error
Meaning
The FINS/TCP connection table is incorrect.
Source
PLC Function Module
Error attributes
Level
Effects
User program
System-defined
variables
Variable
Data type
Name
None
---
---
Cause and
correction
Assumed cause
Correction
Prevention
The power supply to the Controller
was interrupted or communications
with the Sysmac Studio were disconnected while downloading the
FINS/TCP connection table.
Download the FINS/TCP connection
table again.
Do not interrupt the power supply to
the Controller or disconnect communications with the Sysmac Studio
while downloading the FINS/TCP
connection table.
Attached
information
None
Precautions/
Remarks
None
12-32
Data type
Name
Event code
34130000 hex
Source details
None
Detection
timing
At power ON,
Controller reset,
or restart of builtin Ethernet port
Minor fault
Recovery
Error reset
Log category
System
Continues.
Operation
FINS/UDP communications will not operate.
NJ-series CPU Unit Software User’s Manual (W501)
12 Troubleshooting
Event name
Packet Discarded
Event code
80100000 hex
One or more packets were discarded.
Source
PLC Function Module
Source details
None
Detection
timing
At FINS message
reception
Error attributes
Level
Observation
Recovery
---
Log category
System
Effects
User program
Continues.
Operation
Not affected.
System-defined
variables
Variable
Data type
Name
None
---
---
Cause and
correction
Assumed cause
Correction
Prevention
A FINS response addressed to the
CPU Unit was received.
Correct the contents of the FINS message at the source.
Set the FINS messages correctly.
The send designation Unit for the
FINS response does not exist.
Attached
information
Attached information 1: Cause of packet discard (01 hex: FINS response addressed to CPU Unit received, 02 hex:
Response send failed)
Precautions/
Remarks
None
12-2 Troubleshooting
Meaning
12
12-2-4 Error Descriptions
NJ-series CPU Unit Software User’s Manual (W501)
12-33
12 Troubleshooting
Event name
Packet Discarded
Event code
80110000 hex
Meaning
One or more packets were discarded.
Source
PLC Function Module
Source details
None
Detection
timing
At FINS message
reception
Error attributes
Level
Observation
Recovery
---
Log category
System
Effects
User program
Continues.
Operation
Not affected.
System-defined
variables
Variable
None
---
---
Cause and
correction
Assumed cause
Correction
Prevention
1. An attempt was made to send a
FINS response with over 2002
bytes.
Do not send a FINS response with
over 2002 bytes.
Set the FINS message at the source
correctly.
Data type
Name
2. An attempt was made to route a
FINS response with over 2002
bytes.
3. Packet was received with a No
Such Unit routing error.
Check the FINS message at the
source and correct the unit number in
the response frame or a command
frame that does not require a
response.
4. Packet was received with a Routing Error routing error.
Check the FINS message at the
source and correct the unit number in
the response frame or a command
frame that does not require a
response to a unit number that is in
the routing table.
5. Packet was received with a No
Routing Table routing error.
Check the FINS message at the
source, and correct the routing table
to include the network address of the
source network.
6. Packet was received with an
Event Area Size Over Limit routing error.
Check the FINS message at the
source and correct the event area
size in the response frame or a command frame that does not require a
response so that it does not exceed
the limit.
7. There is insufficient space in the
internal buffer.
Reduce the frequency of sending
FINS messages at the source.
Keep the frequency of sending FINS
messages as low as possible.
8. FINS message routing failed
because the communications
load is too high.
Attached
information
Attached information 1: Cause of discarding packets
1: 01 hex, 2: 02 hex, 3: 03 hex, 4: 04 hex, 5: 05 hex, 6: 06 hex, 7: 07 hex, 8: 08 hex
The numbers refer to the numbers of the above causes.
Precautions/
Remarks
12-34
None
NJ-series CPU Unit Software User’s Manual (W501)
12 Troubleshooting
Event name
Packet Discarded
Event code
80120000 hex
PLC Function Module
Source details
None
Detection
timing
At FINS message
reception
Error attributes
Level
Observation
Recovery
---
Log category
System
Effects
User program
Continues.
Operation
Not affected.
System-defined
variables
Variable
Data type
Name
None
---
---
Cause and
correction
Assumed cause
Correction
Prevention
1. A FINS response was received in
which DNA was the local network
but DA1 was not the local node.
Correct the IP address table settings.
Make sure that the IP address table
settings are correct.
2. A FINS command or response
was received in which the hub
network address specification
DNA was greater than or equal to
80 hex.
Correct the FINS message at the
source so that the hub network
address specification DNA is not
greater than or equal to 80 hex.
Check the FINS message at the
source to be sure that the hub network address specification DNA is not
greater than or equal to 80 hex.
3. There is insufficient space in the
internal buffer.
Reduce the frequency of sending
FINS messages at the source.
Keep the frequency of sending FINS
messages as low as possible.
4. A FINS command that does not
have the minimum command
length was received.
Correct the FINS command at the
source so that it has at least the minimum command length.
Set the FINS commands at the
sources so that they have at least the
minimum command length.
5. A FINS command that exceeded
the maximum command length
was received.
Correct the FINS command at the
source so that it does not exceed the
maximum command length.
Set the FINS commands at the
sources so that they do not exceed
the maximum command length.
6. Sending packets failed.
If the destination node is not in the
network, add it to the network.
Confirm that the destination node is in
the network.
7. FINS message routing failed
because the communications
load was too high.
Reduce the frequency of sending
FINS messages at the sources.
Keep the frequency of sending FINS
messages as low as possible.
Attached
information
Attached information 1: Cause of discarding packets
1: 01 hex, 2: 02 hex, 3: 03 hex, 4: 04 hex, 5: 05 hex, 6: 06 hex, 7: 07 hex
The numbers refer to the numbers of the above causes.
Precautions/
Remarks
None
NJ-series CPU Unit Software User’s Manual (W501)
12-35
12
12-2-4 Error Descriptions
One or more packets were discarded.
Source
12-2 Troubleshooting
Meaning
12 Troubleshooting
12-2-5 Troubleshooting Errors That Are Not in the CPU Unit
Security Errors
No.
Problem
Correction
1
Forgot the Administrator password.
You cannot access the Administrator’s password. Always
record the Administrator password so that you do not forget it.
2
Cannot release the operation lock with
the Sysmac Studio.
Log in with verification authority that is equal to or higher
than the verification rights when you connected online.
3
Operation was locked when verifying
operation authority on the Sysmac
Studio.
If the password for verification of operation authority is
entered incorrectly five time in row, operation is locked for
10 minutes. Wait until the operation lock is released.
4
An online connection was made with
the operation authority that is required
for operation, but operation authority
verification was requested for a specific operation.
Verification of operation authority is required every time
for the following functions to prevent hazards to equipment and people.
5
Cannot release the operation lock with
the Sysmac Studio after the operator
left the Sysmac Studio unattended.
You can release the operation lock with an operation
authority that is equal to or higher than the operator. The
required operation authority will be that of an operator
(the operation authority that was verified when going
online with the Sysmac Studio).
6
Some of the user program data cannot
be read for certain operations.
The source data was not downloaded along with the user
program. You will be able to read the data if you download
the user program normally.
• Monitoring
Variables
• Operation Commands
SET/RESET, forced refreshing,
online editing, data tracing, MC Trial
Run, and setting the user program
execution ID in the CPU Unit
• Synchronizing, Uploading, Verification, and Backup
POU algorithms
7
Writing to the CPU Unit is not possible
for some operations.
• Operating mode change by a Maintainer
• Online editing by a Maintainer
The CPU Unit is write protected. Release the write protection.
• Names
CPU Unit name
• Operation Commands
Online editing, Memory All Clear,
event log clearing, and setting the
user program execution ID in the
CPU Unit
• Synchronizing and Downloading
User program, CPU/Expansion
Rack Configuration and Setup,
EtherCAT Settings, Controller
Setup, Axis Settings, Cam Table
Settings, Data Trace Settings, Userdefined Event Setup, restoring
12-36
NJ-series CPU Unit Software User’s Manual (W501)
12 Troubleshooting
No.
Problem
Correction
I do not know how to change the user
program execution ID.
The user program execution ID cannot be changed or
deleted after it is set.
9
I forgot the user program execution ID
assigned to user program.
There is no way to access the user program execution ID
that is set. Always record the user program execution ID
so that you do not forget it.
10
I forgot the user program execution ID
that is registered in the CPU Unit.
This is no way to access the user program execution ID
that is set. Set the user program execution ID again. You
can also clear the user program execution ID if you execute the Memory All Clear operation.
12-2 Troubleshooting
8
12
12-2-5 Troubleshooting Errors That Are Not in the CPU Unit
NJ-series CPU Unit Software User’s Manual (W501)
12-37
12 Troubleshooting
12-38
NJ-series CPU Unit Software User’s Manual (W501)
pp
Appendices
A-1 Specifications . . . . . . . . . . . . . . . . . . . . . . . . . . . . . . . . . . . . . . . . . . . . . . . . . A-3
A-1-1
A-1-2
A-1-3
General Specifications . . . . . . . . . . . . . . . . . . . . . . . . . . . . . . . . . . . . . . . . . . . A-3
Performance Specifications . . . . . . . . . . . . . . . . . . . . . . . . . . . . . . . . . . . . . . . A-4
Function Specifications . . . . . . . . . . . . . . . . . . . . . . . . . . . . . . . . . . . . . . . . . . A-8
A-2 Calculating Guidelines for Task Execution Times . . . . . . . . . . . . . . . . . . A-16
A-2-1
A-2-2
Calculating the Average Task Execution Times . . . . . . . . . . . . . . . . . . . . . . . A-16
Example of Calculating the Average Task Execution Time and Setting the Task
Period . . . . . . . . . . . . . . . . . . . . . . . . . . . . . . . . . . . . . . . . . . . . . . . . . . . . . . A-24
A-3 System-defined Variables . . . . . . . . . . . . . . . . . . . . . . . . . . . . . . . . . . . . . . A-26
A-3-1
A-3-2
A-3-3
A-3-4
A-3-5
A-3-6
A-3-7
System-defined Variables for the Overall NJ-series Controller (No Category)
PLC Function Module, Category Name: _PLC . . . . . . . . . . . . . . . . . . . . . . .
PLC Function Module, Category Name: _CJB . . . . . . . . . . . . . . . . . . . . . . .
Motion Control Function Module, Category Name: _MC . . . . . . . . . . . . . . . .
EtherCAT Master Function Module, Category Name: _EC . . . . . . . . . . . . . .
EtherNet/IP Function Module, Category Name: _EIP . . . . . . . . . . . . . . . . . .
Meanings of Error Status Bits . . . . . . . . . . . . . . . . . . . . . . . . . . . . . . . . . . . .
A-26
A-30
A-31
A-33
A-34
A-38
A-45
A-4 Specifications for Individual System-defined Variables . . . . . . . . . . . . . . A-47
A-4-1
A-4-2
A-4-3
A-4-4
A-4-5
A-4-6
System-defined Variables for the Overall NJ-series Controller (No Category)
PLC Function Module, Category Name: _PLC . . . . . . . . . . . . . . . . . . . . . . .
PLC Function Module, Category Name: _CJB . . . . . . . . . . . . . . . . . . . . . . .
Motion Control Function Module, Category Name: _MC . . . . . . . . . . . . . . . .
EtherCAT Master Function Module, Category Name: _EC . . . . . . . . . . . . . .
EtherNet/IP Function Module, Category Name: _EIP . . . . . . . . . . . . . . . . . .
A-47
A-54
A-55
A-59
A-61
A-68
A-5 CPU Unit Data Retention and Other Attributes . . . . . . . . . . . . . . . . . . . . . A-76
A-6 Contents of Memory Used for CJ-series Units . . . . . . . . . . . . . . . . . . . . . A-80
A-6-1
A-6-2
A-6-3
A-6-4
A-6-5
CIO Area . . . . . . . . . . . . . . . . . . . . . . . . . . . . . . . . . . . . . . . . . . . . . . . . . . . .
Auxiliary Area . . . . . . . . . . . . . . . . . . . . . . . . . . . . . . . . . . . . . . . . . . . . . . . . .
Holding Area . . . . . . . . . . . . . . . . . . . . . . . . . . . . . . . . . . . . . . . . . . . . . . . . .
DM Area . . . . . . . . . . . . . . . . . . . . . . . . . . . . . . . . . . . . . . . . . . . . . . . . . . . . .
EM Area . . . . . . . . . . . . . . . . . . . . . . . . . . . . . . . . . . . . . . . . . . . . . . . . . . . . .
NJ-series CPU Unit Software User’s Manual (W501)
A-80
A-82
A-83
A-83
A-84
A-1
App
The appendices provide the CPU Unit specifications, task execution times, systemdefined variable lists, data attribute lists, CJ-series Unit memory information, CJ-series
Unit memory allocation methods, and data type conversion information.
Appendices
A-7 Variable Memory Allocation Methods . . . . . . . . . . . . . . . . . . . . . . . . . . . . .A-85
A-7-1
A-7-2
A-2
Variable Memory Allocation Rules . . . . . . . . . . . . . . . . . . . . . . . . . . . . . . . . .A-85
Important Case Examples . . . . . . . . . . . . . . . . . . . . . . . . . . . . . . . . . . . . . . . .A-88
NJ-series CPU Unit Software User’s Manual (W501)
Appendices
A-1
Specifications
This section gives the specifications of the NJ-series Controllers.
A-1-1
General Specifications
Item
NJ501-1300
NJ501-1400
Mounted in a panel
Grounding method
Ground to less than 100 Ω.
Dimensions
90 mm × 90 mm × 90 mm
NJ501-1500
5 VDC 1.90 A (including SD Memory Card and End Cover)
Operating
environment
Ambient operating temperature
0 to 55°C
Ambient operating humidity
10% to 90% (with no condensation)
Atmosphere
Must be free from corrosive gases.
Ambient storage temperature
−20 to 75°C (excluding battery)
Altitude
2,000 m max.
Pollution degree
2 or less: Conforms to JIS B3502 and IEC 61131-2.
Noise immunity
2 kV on power supply line (Conforms to IEC 61000-4-4.)
Overvoltage category
Category II: Conforms to JIS B3502 and IEC 61131-2.
EMC immunity level
Zone B
Vibration resistance
Conforms to JIS C60068-2-6.
5 to 8.4 Hz with 3.5-mm amplitude, 8.4 to 150 Hz, Acceleration of 9.8 m/s2, 100 min in X, Y, and Z directions (10 sweeps
of 10 min each = 100 min total)
Shock resistance
Conforms to JIS C60068-2-27.
147 m/s2, 3 times in X, Y, and Z directions (100 m/s2 for Relay
Output Units)
Battery
Life
5 years at 25°C
Model
CJ1W-BAT01
Applicable standards
NJ-series CPU Unit Software User’s Manual (W501)
Conforms to cULus, EC Directives, NK, and LR.
A-3
A-1-1 General Specifications
550 g (including the End Cover)
Current consumption
App
Weight
A-1 Specifications
Enclosure
Appendices
A-1-2
Performance Specifications
Item
Program capacity
Memory
capacity
for
variables
Programming
Memory
for
CJ-series
Units (Can
be
specified
with AT
specifications for
vari-
Variables with Retain attribute
(Does not include Holding, DM,
and EM Area memory for
CJ-series Units.)
NJ501-1300
NJ501-1400
NJ501-1500
20 MB (execution objects and variable tables (including variable
names))
2 MB
Variables without Retain attribute 4 MB
(Does not include CIO and Work
Area memory for CJ-series Units.)
CIO Area
6,144 words (CIO 0 to CIO 6143)
Work Area
512 words (W0 to W511)
Holding Area
1,536 words (H0 to H1535)
DM Area
32,768 words (D0 to D32767)
32,768 words × 25 banks (E0_00000 to E18_32767)
EM Area
ables.)*1
Unit configuration
Maximum number of connectable Units
Maximum per CPU Rack or Expansion Rack: 10 Units
Entire Controller: 40 Units
Number of Expansion Racks
3 max.
I/O capacity
2,560 points max. plus EtherCAT slave I/O capacity
Power Supply to CPU Rack and Expansion
Racks
NJ-P@3001 Power Supply Unit
Recommended Servo Drives
OMRON G5-series Servo Drives with Built-in EtherCAT Communications
Recommended unit version: Version 2.1 or later
Recommended encoder input terminals
OMRON GX-series GX-EC0211/EC0241 EtherCAT Remote I/O Terminals
Recommended unit version: Version 1.1 or later
Control method
Control commands using EtherCAT communications
Position control (Cyclic Synchronous Position Control Mode)
Control modes
Velocity control (Cyclic Synchronous Velocity Control Mode)
Torque control (Cyclic Synchronous Torque Control Mode)
Motion
control
Number of
controlled
axes
Maximum number of controlled
axes
16 axes
32 axes
64 axes
Single-axis control
16 axes max.
32 axes max.
64 axes max.
Linear interpolation control
4 axes max. per axes group
Circular interpolation control
2 axes per axes group
Number of axes groups
32 axes groups max.
Unit of Display
Pulses, millimeters, micrometers, nanometers, inches, or degrees
Electronic gear ratio
Command pulses per motor rotation/Work travel distance per motor
rotation
Positions that can be managed
Command positions and actual positions
Negative, positive, or 0 long real data (LREAL) (command units*)
A-4
Position command values
*
Velocity command values
Negative, positive, or 0 long real data (LREAL) (command units/s)
Positions can be set within a 40-bit signed integer range when converted to pulses.
NJ-series CPU Unit Software User’s Manual (W501)
Appendices
Item
Motion
control
NJ501-1400
NJ501-1500
Positive or 0 long real data (LREAL) (command units/s2)
Jerk command values
Positive or 0 long real data (LREAL) (command units/s3)
Override factors
0.00% or 0.01% to 500.00%
Axis types
Servo axes, virtual servo axes, encoder axes, and virtual encoder axes
Motion control period
Same as process data communications cycle of EtherCAT communications
Cams
65,535 points max. per cam table
1,048,560 points max. for all cam tables
640 tables max.
Supported services
Sysmac Studio connection
Physical layer
USB 2.0-compliant B-type connector
Transmission distance
5 m max.
Communications protocol
TCP/IP, UDP/IP, and BOOTP client
Supported services
Sysmac Studio connection, tag data link, CIP message communications, socket service, FTP server, automatic clock adjustment (NTP client), SNMP agent, and DNS client
Physical layer
10Base-T or 100Base-TX
Media access method
CSMA/CD
Modulation
Baseband
Topology
Star
Baud rate
100 Mbps (100Base-TX)
Transmission media
Shielded, twisted-pair cable (STP): Category 5, 5e or higher
Transmission distance
100 m max. (distance between hub and node)
Number of cascade connections
There are no restrictions if a switching hub is used.
NJ-series CPU Unit Software User’s Manual (W501)
A-1-2 Performance Specifications
Number of cam tables
App
Built-in
EtherNet/IP port
Number of cam data points
A-1 Specifications
Peripheral
USB port
Communications
NJ501-1300
Acceleration command values and deceleration
command values
A-5
Appendices
Item
NJ501-1300
CIP service: Tag data links
(cyclic communications)
Number of
connections
NJ501-1400
NJ501-1500
--32
10 to 10,000 ms in 1.0-ms increments
Built-in
EtherNet/IP port
Communications
Packet interval
Can be set for each connection. (Data will be refreshed at the set interval, regardless of the number of nodes.)
Permissible
communications
band
1,000 pps*2 including heartbeat
Number of tag sets
32
Tag types
Network variables (CIO, Work, Holding, DM, and EM Areas)
Number of tags per
connection
(i.e., per tag set)
8 (Seven tags if Controller status is included in the tag set.)
Maximum link data
size per node
(total size for all
tags)
19,200 bytes
Maximum data size
per connection
600 bytes (Note: Data concurrency is maintained within each connection.)
Number of
registrable tag sets
32 (1 connection = 1 tag set)
Maximum tag set
size
600 bytes (Two bytes are used if Controller status is included in the tag
set.)
Changing tag data
link parameters
when Controller is in
RUN mode
Supported.*3
Multi-cast packet
Supported.
filter*4
CIP message service: Explicit
messages
---
Class 3 (number of
connections)
32 (clients plus server)
UCMM
(non-connection
type)
Number of clients that can communicate at one time: 32 max.
Number of servers that can communicate at one time: 32 max.
Supported.
CIP routing
Built-in
EtherCAT
port
A-6
Units through which CIP routing is supported: CS1W-EIP21, CJ1WEIP21, CJ2H-CPU@@-EIP, and CJ2M-CPU3@
Communications standard
IEC 61158, Type 12
EtherCAT master specifications
Class B (Feature Pack Motion Control compliant)
Communications protocol
Special protocol for EtherCAT
Supported services
CoE (PDO communications and SDO communications)
Synchronized communications
DC (distributed clock)
Physical layer
100Base-TX
Modulation
Baseband
Baud rate
100 Mbps (100Base-TX)
Duplex mode
Automatic
Topology
Line, daisy chain, and branching
Transmission media
Twisted-pair cable of category 5 or higher (double-shielded straight
cable with aluminum tape and braiding)
NJ-series CPU Unit Software User’s Manual (W501)
Appendices
Item
NJ501-1300
NJ501-1400
Transmission distance
Distance between nodes: 100 m max.
Maximum number of slaves
192
NJ501-1500
Inputs: 5,736 bytes
Maximum process data size
Communications
Built-in
EtherCAT
port
Outputs: 5,736 bytes
However, the maximum number of process data frames is 4.
Maximum process data size per
slave
Inputs: 1,434 bytes
Communications cycle
500, 1,000, 2,000, or 4,000 µs
Minimum communications cycle
500 µs
Maximum communications cycle
4,000 µs
Sync jitter
1 µs max.
Outputs: 1,434 bytes
A-1 Specifications
At ambient temperature of 55°C: −3.5 to +0.5 min error per month
Internal clock
At ambient temperature of 25°C: −1.5 to +1.5 min error per month
At ambient temperature of 0°C: −3 to +1 min error per month
*1 Timers, counters, index registers, data registers, and Task Flags cannot be specified.
*3 However, if port parameters are changed, the relevant EtherNet/IP port is restarted.
Communications for the nodes that were communicating with that port will time out, and then they will be automatically
restored.
NJ-series CPU Unit Software User’s Manual (W501)
A-7
A-1-2 Performance Specifications
*4 An IGMP client is mounted for the EtherNet/IP port. If a switching hub that supports IGMP snooping is used, filtering of
unnecessary multicast packets is performed.
App
*2 Means packets per second, i.e., the number of communications packets that can be sent or received in one second.
Appendices
A-1-3
Function Specifications
Item
NJ501
I/O refresh and the user program are executed in units that are called
tasks. Tasks are used to specify execution conditions and execution
priority. Tasks are executed periodically as described below.
• Primary periodic task: This task has the highest priority. It is
always executed in the specified period. There is only one primary periodic task.
Function
• Periodic tasks: Periodic tasks are executed during the unused
time between executions of the primary periodic task. There can
be three periodic tasks.
System Service Monitoring Settings
Tasks
The execution interval and the percentage of the total user program
execution time are monitored for the system services (processes that
are executed by the CPU Unit separate from task execution).
EtherCAT Slaves:
Axes assigned to Servo Drives and encoder input slaves:
Assigned to the primary periodic task.
Setup
I/O refresh settings
Other Slaves: Assigned as required to the primary periodic task or
a periodic task.
CJ-series Units:
I/O refreshing is set as required for each Unit in the primary periodic task or a periodic task.
POUs that are assigned to tasks.
POUs
(program
organization units)
Programming
languages
Programs
There are no restrictions to the number of definitions. (There are
capacity restrictions.)
Function blocks
POUs that are used to create objects with specific conditions.
Functions
POUs that are used to create an object that determine unique outputs
for the inputs, such as for data processing.
Ladder diagrams (see note) and structured text (ST)
Types
Note Inline ST is supported. (Inline ST is ST that is written as an element in a ladder diagram.)
External access of variables
Programming
Variables
Initial values
Network variables (This is set as an attribute of the variable.)
Variables
without Retain
attribute
Initial values are set when the user program is transferred.
Variables with
Retain attribute
Whether to set initial values can be selected when the user program is
transferred.
An array groups data with the same attributes so that it can be handled
as a single unit of data.
Function
Array
attribute
A-8
Number of dimensions: 3 max.
Maximum number of elements: 65,535
Array variables
Array
specifications
for FB
instances
Supported. (Execution of multiple instances is possible with one
instance by using a variable to indirectly specify an array element number.)
NJ-series CPU Unit Software User’s Manual (W501)
Appendices
Item
NJ501
BOOL,
BYTE, WORD, DWORD, LWORD,
INT, SINT, DINT, LINT
Basic data types
UINT, USINT, UDINT, ULINT,
REAL, LREAL,
TIME (durations), DATE, TIME_OF_DAY, DATE_AND_TIME, and
STRING (text strings)
Derivative data types
Structures, unions, and enumerations
A derivative data type that groups together data with different data
types.
Function
Programming
Nesting levels: 8 max.
Member data
types
Data types
Function
A derivative data type that enables access to the same data with different data types.
App
Member data
types
BOOL, BYTE, WORD, DWORD, or LWORD
Function
A derivative data type that uses text strings called enumerators to
express variable values.
Array
specifications
An array is a group of elements with the same data type. You specify
the number (subscript) of the element from the first element to specify
the element. You can specify arrays for both basic data types and
derivative data types.
Range
specifications
You can specify a range for a data type in advance. The data type can
take only values that are in the specified range. You can specify a
range for any integer basic data type.
Program checks
NJ-series CPU Unit Software User’s Manual (W501)
Programming is checked offline with the Sysmac Studio and when
instructions are executed.
A-9
A-1-3 Function Specifications
Data type
attributes
Basic data types, structures, enumerations, unions, or array variables
Number of members: 4 max.
Unions
Enumerations
Number of members: 2,048 max.
A-1 Specifications
Structures
Appendices
Item
Single-axis
position
control
Single-axis
velocity control
Single-axis
torque control
Motion
control
functions*
Single
axes
Single-axis
synchronized
control
Single-axis
manual
operation
A-10
NJ501
Absolute
positioning
Positioning is performed for a target position that is specified with an
absolute value.
Relative
positioning
Positioning is performed for a specified travel distance from the command current position.
Interrupt
feeding
Positioning is performed for a specified travel distance from the position where an interrupt input was received from an external input.
Velocity
control
Velocity control is performed in Position Control Mode.
Cyclic
synchronous
velocity
control
A velocity command is output each control period in Velocity Control
Mode.
Torque control
The torque of the motor is controlled.
Starting cam
operation
A cam motion is performed using the specified cam table.
Ending cam
operation
The cam motion for the axis that is specified with the input parameter
is ended.
Starting gear
operation
A gear motion with the specified gear ratio is performed between a
master axis and slave axis.
Positioning
gear operation
A gear motion with the specified gear ratio and sync position is performed between a master axis and slave axis.
Ending gear
operation
The specified gear motion or positioning gear motion is ended.
Synchronous
positioning
Positioning is performed in sync with a specified master axis.
Master axis
phase shift
The phase of a master axis in synchronized control is shifted.
Combining
axes
The command positions of two axes are added or subtracted and the
result is output as the command position.
Powering the
Servo
The Servo in the Servo Drive is turned ON to enable axis motion.
Jogging
An axis is jogged at a specified target velocity.
NJ-series CPU Unit Software User’s Manual (W501)
Appendices
Item
NJ501
Resetting axis
errors
Axes
groups
Auxiliary
functions for
multi-axes
coordinated
control
Common
items
Cams
Parameters
High-speed
homing
Positioning is performed for an absolute target position of 0 to return to
home.
Stopping
An axis is decelerated to a stop at the specified rate.
Immediately
stopping
An axis is stopped immediately.
Setting
override
factors
The target velocity of an axis can be changed.
Changing the
current
position
The command current position or actual current position of an axis can
be changed to any position.
Enabling
external
latches
The position of an axis is recorded when a trigger occurs.
Disabling
external
latches
The current latch is disabled.
Zone
monitoring
You can monitor the command position or actual position of an axis to
see when it is within a specified range (zone).
Monitoring
axis following
error
You can monitor whether the difference between the command positions or actual positions of two specified axes exceeds a threshold
value.
Resetting the
following error
The error between the command current position and actual current
position is set to 0.
Torque limit
The torque control function of the Servo Drive can be enabled or disabled and the torque limits can be set to control the output torque.
Absolute
linear
interpolation
Linear interpolation is performed to a specified absolute position.
Relative linear
interpolation
Linear interpolation is performed to a specified relative position.
Circular 2D
interpolation
Circular interpolation is performed for two axes.
Resetting axes
group errors
Axes group errors and axis errors are cleared.
Enabling axes
groups
Motion of an axes group is enabled.
Disabling axes
groups
Motion of an axes group is disabled.
Stopping axes
groups
All axes in interpolated motion are decelerated to a stop.
Immediately
stopping axes
groups
All axes in interpolated motion are stopped immediately.
Setting axes
group override
factors
The blended target velocity is changed during interpolated motion.
Setting cam
table
properties
The end point index of the cam table that is specified in the input
parameter is changed.
Saving cam
tables
The cam table that is specified with the input parameter is saved in
non-volatile memory in the CPU Unit.
Writing MC
settings
Some of the axis parameters or axes group parameters are overwritten
temporarily.
NJ-series CPU Unit Software User’s Manual (W501)
A-11
A-1-3 Function Specifications
Multi-axes
coordinated
control
A motor is operated and the limit signals, home proximity signal, and
home signal are used to define home.
App
Motion
control
functions*
Homing
A-1 Specifications
Single
axes
Auxiliary
functions for
single-axis
control
Axes errors are cleared.
Appendices
Item
Count modes
Unit conversions
You can set the display unit for each axis according to the machine.
Acceleration/
deceleration
control
Motion
control
functions*
Auxiliary
functions
NJ501
You can select either Linear Mode (finite length) or Rotary Mode (infinite length).
Automatic
acceleration/
deceleration
control
Jerk is set for the acceleration/deceleration curve for an axis motion or
axes group motion.
Changing the
acceleration
and
deceleration
rates
You can change the acceleration or deceleration rate even during
acceleration or deceleration.
In-position check
You can set an in-position range and in-position check time to confirm
when positioning is completed.
Stop method
You can set the stop method to the immediate stop input signal or limit
input signal.
Re-execution of motion control
instructions
You can change the input variables for a motion control instruction during execution and execute the instruction again to change the target
values during operation.
Multi-execution of motion control
instructions (Buffer Mode)
You can specify when to start execution and how to connect the velocities between operations when another motion control instruction is
executed during operation.
Continuous axes group motions
(Transition Mode)
You can specify the Transition Mode for multi-execution of instructions
for axes group operation.
Monitoring
functions
Software limits
Software limits are set for each axis.
Following error
The error between the command current value and the actual current
value is monitored for each axis.
Velocity,
acceleration
rate,
deceleration
rate, torque,
interpolation
velocity,
interpolation
acceleration
rate, and
interpolation
deceleration
rate
Absolute encoder support
You can set warning values for each axis and each axes group.
You can use an OMRON G5-series Servomotor with an Absolute
Encoder to eliminate the need to perform homing at startup.
The following Servo Drive input signals are used.
External interface signals
A-12
Home signal, home proximity signal, positive limit signal, negative
limit signal, immediate stop signal, and interrupt input signal
NJ-series CPU Unit Software User’s Manual (W501)
Appendices
Item
NJ501
Use one of the following procedures.
• Creating the Unit configuration offline with Sysmac Studio
I/O allocations
• Creating the Unit configuration online by reading the actual Unit configuration with the Sysmac Studio
Number of Units
CJ-series
Units
Unit (I/O)
management
Basic I/O Units
Chattering and
noise countermeasures
Input response times are set.
Load short-circuit protection
and I/O
disconnection
detection
Alarm information for Basic I/O Units is read.
Special Unit
Setup
Special Units can be set up with Unit settings from the Sysmac Studio
or by setting device variables.
Number of slaves
EtherCAT
slaves
Basic I/O
192
A port for communications with various kinds of Support Software running on a personal computer.
Peripheral USB port
CIP communications service
Communications
EtherCAT
port
Tag data links
Programless cyclic data exchange is performed with the devices on
the EtherNet/IP network.
Message communications
CIP commands are sent to or received from the devices on the EtherNet/IP network.
Socket
services
Data is sent to and received from any node on Ethernet using the UDP
or TCP protocol. Socket communications instructions are used.
FTP server
Files can be read from or written to the SD Memory Card in the CPU
Unit from computers at other Ethernet nodes.
Automatic
clock
adjustment
Clock information is read from the NTP server at the specified time or
at a specified interval after the power supply to the CPU Unit is turned
ON. The internal clock time in the CPU Unit is updated with the read
time.
SNMP agent
Built-in EtherNet/IP port internal status information is provided to network management software that uses an SNMP manager.
Process data communications
Control information is exchanged in cyclic communications between
the EtherCAT master and slaves.
SDO communications
Control information is exchanged in noncyclic event communications
between the EtherCAT master and slaves.
The following application protocol is supported.
CoE (CANopen over EtherCAT)
Network scanning
Information is read from connected slave devices and the slave configuration is automatically generated.
DC (distributed clock)
Time is synchronized by sharing the EtherCAT system time among all
EtherCAT devices (including the master). To implement the distributed
clock, propagation delay compensation, drift compensation, and offset
compensation are performed.
The following instructions are supported.
Communications instructions
Operation
management
RUN output contacts
CIP communications instructions, SDO message instructions, noprotocol communications instructions, and protocol macro instructions
The output on the NJ-P@3001 Power Supply Unit turns ON in RUN
mode.
The following events are recorded.
System
management
functions
Log management
• Events for the operation of the NJ-series system itself
Event logs
• Communications events
• Security events
• Events for the operation of user-designed device applications
NJ-series CPU Unit Software User’s Manual (W501)
A-13
A-1-3 Function Specifications
EtherNet/IP port
Input response times are set.
App
Chattering and
noise countermeasures
A-1 Specifications
Special Units
40
Appendices
Item
NJ501
Programs, function blocks, functions, and global variables can be
changed online.
Online editing
The user can force specific variables to TRUE or FALSE.
Forced refreshing
Device variables for CJ-series Units and variables with AT specifications: 64 variables max.
Device variables for EtherCAT slaves: 64 variables max.
MC Test Run
Motor operation and wiring can be checked from the Sysmac Studio.
Synchronizing
The project file in the Sysmac Studio and the data in the CPU Unit can
be made the same when online.
The specified variables are sampled and stored in trace memory when
the specified conditions are met. No programming is required.
Data tracing
Maximum number of records: 10,000 records
Maximum number of sampled variables 192 variables
Debugging
Timing of sampling
Sampling is performed for the specified task period, at the specified
time, or when a sampling instruction is executed.
Starting tracing
When specified from the Sysmac Studio or automatically at startup
Triggered traces
Trigger conditions are set to record data before and after an event.
When BOOL variable changes to TRUE or FALSE
Trigger conditions
Comparison of non-BOOL variable with a constant
Comparison Method: Equals (=), Greater than (>), Greater than or
equals (≥), Less Than (<), Less than or equals (≤), Not equal (≠)
Delay
Continuous tracing
Trigger position setting: A slider is used to set the percentage of sampling before and after the trigger condition is met. (Example:
20%/80%)
Data tracing is executed continuously and the trace data is collected by
the Sysmac Studio.
The operation of the CPU Unit is emulated in the Sysmac Studio.
The following can be emulated: user program execution (including partial emulation), debugging (including step execution and breakpoints),
monitoring, tracing, estimating execution times, and Servo Drive signals.
Simulation
(Emulation is possible on the Simulator that is included with the Sysmac Studio integrated software package.)
Connections to
HMIs
Maintenance
Sysmac
Studio
connection
ID information
Built-in EtherNet/IP port
Connected port
Connected port
Peripheral USB port or built-in EtherNet/IP port
Remote programming and
monitoring
Connection is possible through the peripheral USB port to other nodes
that are connected to the built-in EtherNet/IP port.
Production information
Individual identifiers, lot numbers, and other information is accessed
from the Sysmac Studio.
• Major faults: Internal bus check errors, main memory check errors,
etc.
Controller errors
• Minor faults: Battery-backed-up memory check errors, clock oscillation stopped, etc.
Self-diagnosis
Reliability
functions
User-defined errors
User-defined errors are registered in advance and then generated by
executing an instruction.
Error registration, error resetting, error information registration
User-defined error messages
Power
supply
management
A-14
• Partial faults: Motion control period exceeded, slave initialization
error, etc.
User-defined error messages can be specified in up to nine languages,
including Japanese and English.
AC power supply: 30 to 45 ms
Power OFF detection time
DC power supply: 22 to 25 ms
NJ-series CPU Unit Software User’s Manual (W501)
Appendices
Item
NJ501
CPU Unit names and serial IDs
Security
Protecting
software
assets and
preventing
operating
mistakes
Protection
User program transfers with no
restoration information
Prevents reading data in the CPU
Unit from the Sysmac Studio.
CPU Unit write-protection
Prevents writing data to the CPU
Unit from the Sysmac Studio.
Protection for
offline
operations
from the
Sysmac Studio
Protection of all project files
The project file is coded by using
a password when the project is
exported (when an .smc file is
created).
Verification of operation
authority
Online operations are restricted by operation rights to prevent damage
to equipment or injuries that may be caused by operating mistakes.
Hardware identification
(user program execution ID)
The user program cannot be executed without entering a user program
execution ID from the Sysmac Studio for the specific hardware (CPU
Unit).
SD Memory Card (2 GB max.)
You can access SD Memory Cards from instructions in the user program.
FTP server
You can use FTP commands from an FTP client on an intranet to read
and write large files in the SD Memory Card through EtherNet/IP.
File operations from the Sysmac
Studio
You can perform file operations for Controller files in the SD Memory
Card and read/write general-purpose document files on the computer.
SD Memory Card life expiration
detection
Notification of the expiration of the life of the SD Memory Card is provided in a system-defined variable and event log.
* When connected to an OMRON G5-series Servo Drive with built-in EtherCAT communications
Note You can use FINS message communications with NJ-series Controllers. However, not all memory areas in the NJ-series
CPU Unit can be accessed. If you require this functionality, e.g., to connect to existing systems, consult with your
OMRON representative.
NJ-series CPU Unit Software User’s Manual (W501)
A-15
A-1-3 Function Specifications
SD Memory Card operation
instructions
App
Application
A-1 Specifications
Protection for
online
operations
from the
Sysmac Studio
Storage type
SD Memory
Card
functions
When going online to a CPU Unit from the Sysmac Studio, the CPU
Unit name in the project is compared to the name of the CPU Unit
being connected to.
Appendices
A-2
Calculating Guidelines for Task
Execution Times
This section describes how to calculate guidelines for average task execution times on paper.
You must use the physical Controller to check the maximum values of task execution times. For details,
refer to 5-3 Task Design Example and I/O Response Times.
Precautions for Safe Use
The execution times in the physical Controller depends on the logic operations that are performed in the user program, the presence of communications commands and data links, on
whether data tracing is performed, and on other factors.
Before starting actual operation, you must test performance under all foreseeable conditions on
the actual system and make sure that the task periods are not exceeded and that suitable communications performance is achieved.
A-2-1
Calculating the Average Task Execution Times
The task execution time is the total of the following processing times.
Task execution time =
I/O refresh processing time + User program execution time + Motion control processing time
+ Common processing time
The following processing is performed.
Processing
Processing contents
Primary
periodic
task
Priority-16
periodic
task
Priority-17
and priority-18 periodic tasks
I/O refresh processing
I/O is refreshed for CJ-series Units
(Basic I/O Units, Special I/O Units, and
CPU Bus Units) and EtherCAT slaves.
Performed.
Performed.
Not performed.
User program execution
• Programs assigned to tasks are executed in the order that they are
assigned.
Performed.
Performed.
Performed.
Motion control processing
• Motion control commands from the
user program are executed.
• Motion control outputs are processed.
Performed.
Not performed.
Not performed.
System com- • Variable refresh processing (if there
mon proare accessing tasks) is performed.
cessing 1
• Motion input processing
• Data trace processing
Performed.
Performed.
Performed.
System com- • Variable refresh processing (if there
mon proare refreshing tasks) is performed.
cessing 2
• Variable access processing external to
the Controller to ensure concurrency
with task execution
Performed.
Performed.
Performed.
System over- Other system common processing
head time
Performed.
Performed.
Performed.
Common
processing
time
Guidelines are provided below for calculating the various processing times.
A-16
NJ-series CPU Unit Software User’s Manual (W501)
Appendices
The I/O refresh processing time is the total of the following times.
I/O refresh processing time =
(A) I/O refresh overhead time +
(B) Larger of the EtherCAT slave processing time and the CJ-series Unit processing time.
z (A) I/O Refresh Overhead Time
As shown by the following table, if there are EtherCAT slaves, the I/O refresh overhead time is 60 µs
regardless of whether there are CJ-series Units. If there are only CJ-series Units, the I/O refresh
overhead time is 30 µs.
EtherCAT slaves
Present
I/O refresh overhead time
CJ-series Units
None
60 µs
Present
60 µs
App
30 µs
None
EtherCAT Slave Processing Time
(I/O refresh time for each EtherCAT slave × Number of slaves) − 70 µs
However, if the above value is negative, use 0 µs.
CJ-series Unit Processing Time
(I/O refresh time for each CJ-series Unit × Number of Units) − 230 µs
However, if the above value is negative, use 0 µs.
If more than one of the following CJ-series Units is used, add 230 µs to the above value regardless
of the number of Units.
• CJ1W-PH41U Analog Input Unit with Universal Inputs
• CJ1W-AD04U Analog Input Unit with Universal Inputs
• CJ1W-PDC15 Analog Input Unit with Universal Inputs
• CJ1W-V680C11 ID Sensor Unit
• CJ1W-V680C12 ID Sensor Unit
I/O Refresh Times for Typical EtherCAT Slaves and Units
z EtherCAT slaves
The following refresh times are for the default PDO mapping parameters.
Model
I/O refresh time per slave [µs]
Input slave (16 points)
GX-ID1611
1.5
Output slave (32 points)
GX-OD1611
1.5
Analog Input Slave
GX-AD0471
2.5
Analog Output Slave
GX-DA0271
2
Encoder Input Slave
GX-EC
5
Servomotor
R88D-@@
6
Expansion Unit
XWT@@@
1.5
NJ-series CPU Unit Software User’s Manual (W501)
A-17
A-2-1 Calculating the Average Task Execution Times
z (B) Larger of the EtherCAT Slave Processing Time and the CJ-series Unit
Processing Time
Slave name
A-2 Calculating Guidelines for Task Execution Times
I/O Refresh Processing Time
Appendices
z CJ-series Units
Basic I/O Units
I/O refresh time per Unit [µs]
Unit name
Model
On Expansion Rack
On CPU Rack
8/16-point DC Input Units
CJ1W-ID201/211/212
1
1.5
32-point DC Input Units
CJ1W-ID231/232/233
2
3
64-point DC Input Units
CJ1W-ID261/262
4
6
8/16-point AC Input Units
CJ1W-IA201/111
1
1.5
16-point Quick-response Input
Unit
CJ1W-IDP01
1
1.5
8/16-point Transistor Output
Units
CJ1W-OD201/202/203/204//211/212/213
1
1.5
32-point Transistor Output
Units
CJ1W-OD231/232/233/234
2
3
64-point Transistor Output
Units
CJ1W-OD261/262/263
4
6
Relay Contact Output Units
CJ1W-OC201/OC211
1
1.5
Triac Output Unit
CJ1W-OA201
1
1.5
24-VDC Input/Transistor Output Units (16 inputs/16 outputs)
CJ1W-MD231/232/233
1
1.5
24-VDC Input/Transistor Output Units (32 inputs/32 outputs)
CJ1W-MD261/263
2
3
TTL Input/Output Units (16
inputs/16 outputs)
CJ1W-MD563
4
6
B7A Interface Unit
CJ1W-B7A04
4
6
CJ1W-B7A14
4
6
CJ1W-B7A22
4
6
Special I/O Units
I/O refresh time per Unit [µs]
Unit name
Analog Input Units
Model
CJ1W-AD041-V1/081-V1
On CPU Rack
On Expansion Rack
24
36
CJ1W-AD042
A-18
Analog Output Units
CJ1W-DA021/041/08V
24
36
Analog I/O Unit
CJ1W-MAD42
24
36
High-speed Counter Unit
CJ1W-CT021
54
81
Temperature Control Units
CJ1W-TC@@@
114
171
Analog Input Unit with Universal Inputs
CJ1W-PH41U
80 (When
using expansion allocation
area: 180)
120 (When
using expansion allocation
area: 270)
ID Sensor Units
CJ1W-V680C11
76
114
CJ1W-V680C12
86
129
NJ-series CPU Unit Software User’s Manual (W501)
Appendices
CPU Bus Units
Serial Communications Units
Model
On Expansion Rack
3.8
CJ1W-SCU32
Add up to the
following maximum time
when a protocol macro is
executed:
Add up to the
following maximum time
when a protocol macro is
executed:
0.1 × Number
of refresh
words
0.15 × Number of refresh
words
2.5 + 0.1 ×
Number of
allocated
words
3.8 + 0.17 ×
Number of
allocated
words
The number of
allocated
words is the
total number of
words allocated to all the
slaves.
The number of
allocated
words is the
total number of
words allocated to all the
slaves.
CJ1W-DRM21
User Program Execution Time
The user program execution time depends on the specific instructions multiplied by the numbers of
instructions used.
As a guideline, instructions are divided into three groups and the number of instructions in each group
is used for measurements and estimates.
• Standard instructions
• Arithmetic instructions for LREAL data
• Trigonometric instructions for LREAL data
z Simple Estimate
For the number of instructions in each group, read the execution time for each group from the following graphs and calculate the total.
• Execution time for standard instructions
• Execution time for arithmetic instructions for LREAL data
• Execution time for trigonometric instructions for LREAL data
This will allow you to estimate the execution time of the user program.
The instruction execution times are different for ladder diagrams and structured text.
NJ-series CPU Unit Software User’s Manual (W501)
A-19
A-2-1 Calculating the Average Task Execution Times
2.5
App
CJ1W-SCU42
CJ1W-SCU22
DeviceNet Unit
On CPU Rack
A-2 Calculating Guidelines for Task Execution Times
I/O refresh time per Unit [µs]
Unit name
Appendices
Ladder Diagrams
Find the execution times from the following graphs and calculate the total.
• Execution Time for Standard Instructions
2000
1800
Execution time (µs)
1600
1400
1200
1000
800
600
400
200
0
0
10000
20000
30000
40000
50000
60000
70000
80000
90000 100000
Total number of instructions
• Execution Times for Arithmetic and Trigonometric Instructions for LREAL Data
2000
1800
Execution time (µs)
1600
1400
1200
1000
800
600
400
200
0
0
100
200
300
400
500
600
700
800
900
1000
Total number of instructions
Trigonometric instructions for LREAL data
A-20
Arithmetic instructions for LREAL data
NJ-series CPU Unit Software User’s Manual (W501)
Appendices
Structured Text
A-2 Calculating Guidelines for Task Execution Times
Find the execution times from the following graphs and calculate the total.
• Execution Time for Standard Instructions
2000
1800
Execution time (µs)
1600
1400
1200
1000
800
600
400
200
0
0
5000
15000
20000
25000
30000
35000
40000
Total number of instructions
App
• Execution Times for Arithmetic and Trigonometric Instructions for LREAL Data
2000
1800
A-2-1 Calculating the Average Task Execution Times
Execution time (µs)
1600
1400
1200
1000
800
600
400
200
0
0
100
200
300
400
500
600
700
800
900
1000
Total number of instructions
Trigonometric instructions for LREAL data
NJ-series CPU Unit Software User’s Manual (W501)
Arithmetic instructions for LREAL data
A-21
Appendices
z Instruction Configuration for Each Group
Instruction Configuration for Standard Instructions
Ladder Diagrams
Types of instructions
Instructions
Percent of
instructions
Percent of execution time in
instruction
group
Ladder diagram instructions
LD, AND, OUT, SET, and RESET
81.0%
40.2%
Comparison instructions
EQ and LT
4.1%
8.3%
Timer and counter instructions
Timer, TON/TOF, and CTU/CTD
1.6%
7.3%
Math instructions
+, -, *, /, ADD, SUB, MUL, and DIV
2.4%
6.5%
BCD conversion instructions and
data conversion instructions
INT_TO_DINT and
WORD_BCD_TO_UINT
0.2%
1.2%
Bit string processing instructions
AND and OR
6.2%
13.0%
Data movement instructions
MOVE
4.6%
23.5%
100.0%
100.0%
Total
Structured Text
Types of instructions
Instructions
Percent of
instructions
Percent of execution time in
instruction
group
ST constructs
IF ELSEIF END_IF
75.4%
41.6%
Comparison instructions
EQ and LT
5.2%
8.7%
Timer and counter instructions
Timer, TON/TOF, and CTU/CTD
2.1%
18.8%
Math instructions
+, -, *, and /
3.1%
10.2%
BCD conversion instructions and
data conversion instructions
INT_TO_DINT and
WORD_BCD_TO_UINT
0.2%
1.6%
Bit string processing instructions
AND and OR
8.0%
11.7%
Data movement instructions
:=
5.9%
7.3%
100.0%
100.0%
Total
Configuration of Arithmetic Instructions for LREAL Data
Instructions
Addition instructions for LREAL data
Percent of instructions
20.0%
Subtraction instructions for LREAL data
20.0%
Multiplication instructions for LREAL data
30.0%
Division instructions for LREAL data
30.0%
Total
100.0%
Configuration of Trigonometric Instructions for LREAL Data
Instructions
Sin of LREAL data
16.7%
Cos of LREAL data
16.7%
Tan of LREAL data
Sin
A-22
Percent of instructions
−1
of LREAL data
16.7%
16.7%
NJ-series CPU Unit Software User’s Manual (W501)
Appendices
Instructions
Percent of instructions
of LREAL data
16.7%
Tan−1 of LREAL data
16.7%
Total
100.0%
Motion Control Processing
The motion control processing time depends on the number of servo axes and virtual servo axes that
are used. For the number of servo and virtual servo axes, read the motion control processing time from
the following graph.
600
400
300
App
Execution time (µs)
500
A-2 Calculating Guidelines for Task Execution Times
Cos−1
200
0
0
4
8
12
16
20
24
28
32
36
40
44
48
52
56
60
64
Total number of instructions
Common Processing Time
The total time for system overhead, system common processing 1, and system common processing 2
is as follows: The common processing time depends on the type of task.
Type of task
Common processing time
Primary periodic task
Always 265 µs
Periodic task
10 µs
NJ-series CPU Unit Software User’s Manual (W501)
A-23
A-2-1 Calculating the Average Task Execution Times
100
Appendices
A-2-2
Example of Calculating the Average Task Execution Time and
Setting the Task Period
Calculating the Average Task Execution Time
First we find the average task execution time for the following conditions. The task is the primary periodic task.
Item
Slaves/Units that are
used
User program
Motion control processing
Conditions
EtherCAT slaves
• GX-ID1611 Input Slave: 1
• GX-OD1611 Output Slave: 1
• R88D-@@ Servomotors: 4
CJ-series Units (on CPU
Rack)
•
•
•
•
•
Language
Ladder diagrams
Standard instruction configuration
Number of instructions: 5,000
Arithmetic instructions for
LREAL data
Number of instructions: 200
Trigonometric instructions
for LREAL data
Number of instructions: 100
Number of axes
4
CJ1W-ID211 DC Input Unit: 1
CJ1W-OD211 Transistor Output Unit: 1
CJ1W-AD042 Analog Input Unit: 1
CJ1W-DA021 Analog Output Unit: 1
CJ1W-SCU42 Serial Communications Unit: 1
(Protocol macros are not used.)
z I/O Refresh Time
• I/O Refresh Overhead Time:
60 µs
• EtherCAT slave processing time:
1.5 + 1.5 + (6 × 4) µs − 70 µs = 27 µs − 70 µs = −43 µs
Therefore, 0 µs is used.
• CJ-series Unit processing time:
1 + 1 + 24 + 24 + 2.5 − 230 µs = 52.5 − 230 µs = −177.5 µs
Therefore, 0 µs is used.
Therefore, the I/O refresh time is 60 µs + 0 µs = 60 µs
z User Program Execution Time
The graphs show the following values.
• Standard instruction configuration: 5,000 instructions = 100 µs
• Arithmetic instructions for LREAL data: 200 instructions = 175 µs
• Trigonometric instructions for LREAL data: 100 instructions = 220 µs
The total is 495 µs.
z Motion Control Processing
The graphs show 25 µs for four axes.
A-24
NJ-series CPU Unit Software User’s Manual (W501)
Appendices
z Common Processing Time
Therefore,
Average value of the task execution time is 60 + 495 + 25 + 265 = 845 µs
Setting the Task Period
The task period is set based on the average value of the task execution time.
Average task execution time 845 µs ≤ Task execution time × 0.9
A task period of 1 ms satisfies the above formula.
The execution times in the physical Controller depends on the operations that are performed in the user
program, the presence of communications commands and data links, on whether data tracing is perform, and on other factors. Use the physical Controller and verify performance with the Task Execution
Time Monitor.
A-2 Calculating Guidelines for Task Execution Times
This is the primary periodic task, so the common processing time is 265 µs.
App
A-2-2 Example of Calculating the Average Task Execution Time and Setting the Task Period
NJ-series CPU Unit Software User’s Manual (W501)
A-25
Appendices
A-3
System-defined Variables
System-defined variables are assigned specific functions by the system. They are registered in the global variable table, or the local variable table for each POU, in advance.
These variables cannot be changed. Some of the variables start with an underbar and some start with
”P_”.
Some of the system-defined variables are read-only and some are read/write.
You read and write the variables with the user program, with communications from external devices,
with the Sysmac Studio, or with an NS-series PT.
Basically, system-defined variables are classified according to the function modules. The variables start
with the following category names.
Function module
Category name
System-defined variables for the overall
NJ-series Controller
None
PLC Function Module
_PLC
_CJB
Motion Control Function Module
_MC
EtherCAT Master Function Module
_EC
EtherNet/IP Function Module
_EIP
The variables are described in the tables of this appendix as shown below.
Variable name
This is the systemdefined variable
name. The prefix
gives the category
name.
A-3-1
Meaning
This is the meaning of the variable.
Function
Data type
The function of the variable is described.
The data
type of the
variable is
given.
Range of
values
The range of
values that the
variable can
take is given.
Reference
The page of
the individual
systemdefined variable specifications table
is given.
System-defined Variables for the Overall NJ-series Controller
(No Category)
z Functional Classification: Clock
Variable name
_CurrentTime
A-26
Meaning
System Time
Function
Data type
Contains the CPU Unit’s internal clock data.
DATE_
AND_
TIME
Range of
values
DT#1970-0101-00:00:00 to
DT#2106-0206-23:59:59
Reference
page A-47
NJ-series CPU Unit Software User’s Manual (W501)
Appendices
z Functional Classification: Tasks
Variable name
_TaskName_
Active
Meaning
Task Active Flag
Function
TRUE during task execution.
Data type
Range of values
Reference
TRUE or
FALSE
page A-47
TIME
Depends on
data type.
page A-48
TIME
Depends on
data type.
page A-48
TIME
Depends on
data type.
page A-48
UDINT
Depends on
data type.
page A-48
BOOL
TRUE or
FALSE
page A-49
UDINT
Depends on
data type.
page A-49
FALSE when task execution is not in
progress.
Note You cannot use this system-defined
variable in the user program. It is used
only to access task status for data tracing from the Sysmac Studio.
_TaskName_
LastExecTime
Last Task
Execution Time
Contains the task execution time the last time
the task was executed (unit: 0.1 µs).
Note You cannot use this system-defined
variable in the user program. It is used
only to access task status for data tracing from the Sysmac Studio.
_TaskName_
MaxExecTime
Maximum Task
Execution Time
Contains the maximum value of the task execution time (unit: 0.1 µs).
Minimum Task
Execution Time
Contains the minimum value of the task execution time (unit: 0.1 µs).
Note You cannot use this system-defined
variable in the user program. It is used
only to access task status for data tracing from the Sysmac Studio.
_TaskName_
ExecCount
Task Execution
Count
Contains the number of executions of the
task.
If 4294967295 is exceeded, the value returns
to 0 and counting is continued.
Note You cannot use this system-defined
variable in the user program. It is used
only to access task status for data tracing from the Sysmac Studio.
_TaskName_
Exceeded
Task Exceeded
Flag
TRUE if the task period was exceeded.
FALSE if task execution was completed within
the task period.
Note You cannot use this system-defined
variable in the user program. It is used
only to access task status for data tracing from the Sysmac Studio.
_TaskName_
ExceedCount
Task Period
Exceeded Count
Contains the number of times that the period
was exceeded.
If the present value exceeds the maximum
value of the data type, the present value
returns to 0 and the count is continued.
If 4294967295 is exceeded, the value returns
to 0 and counting is continued.
Note You cannot use this system-defined
variable in the user program. It is used
only to access task status for data tracing from the Sysmac Studio.
NJ-series CPU Unit Software User’s Manual (W501)
A-27
A-3-1 System-defined Variables for the Overall NJ-series Controller (No Category)
_TaskName_
MinExecTime
App
Note You cannot use this system-defined
variable in the user program. It is used
only to access task status for data tracing from the Sysmac Studio.
A-3 System-defined Variables
BOOL
Appendices
z Functional Classification: Errors
Variable name
_ErrSta
Meaning
Controller Error
Status
Function
Data type
TRUE if there is a Controller error.
Range of values
Reference
WORD
16#0000 to
16#C0F0
page A-49
WORD
16#0000 to
16#00FF
page A-50
FALSE if there is no Controller error.
Note Do not use this variable in the user program. There may be a delay in updating
it and concurrency problems in relation
to the error status of the function module. Use this variable only to access
status through communications from an
external device. Refer to information on
the meanings of the error status bits at
the end of this appendix for details.
_AlarmFlag
User-defined
Error Status
The bit corresponding to the event level is
TRUE while there is a user-defined error. Bits
00 to 07 correspond to user fault levels 1 to 8.
This variable contains 0000 hex when there is
no user-defined error.
z Functional Classification: SD Memory Card
Variable name
_Card1Ready
Meaning
SD Memory Card
Ready Flag
Function
Data type
TRUE when the SD Memory Card is recognized.
Range of values
Reference
BOOL
TRUE or
FALSE
page A-50
BOOL
TRUE or
FALSE
page A-50
BOOL
TRUE or
FALSE
page A-50
BOOL
TRUE or
FALSE
page A-51
BOOL
TRUE or
FALSE
page A-51
BOOL
TRUE or
FALSE
page A-51
FALSE when the SD Memory Card is not recognized.
TRUE: The Card can be used.
FALSE: The Card cannot be used.
_Card1Protect
SD Memory Card
Write
Protected Flag
TRUE when the SD Memory Card is writeprotected with the LOCK switch.
TRUE: Write protected.
FALSE: Not write protected.
_Card1Err
SD Memory Card
Error Flag
TRUE when an unusable SD Memory Card is
inserted or a format error occurs.
TRUE: There is an error
FALSE: There is no error
_Card1Access
SD Memory Card
Access Flag
TRUE during SD Memory Card access.
TRUE: Card is being accessed.
FALSE: Card is not being accessed.
The system updates the flag every 100 ms.
Because of this, access to the SD Memory
Card is shown by this flag with a delay of up to
100 ms. We therefore do not recommend the
use of this variable in the user program.
_Card1Deteriorated
SD Memory Card
Life
Warning Flag
TRUE when the life of the SD Memory Card is
exceeded.
TRUE: The life of the Card has been
exceeded.
FALSE: The Card can still be used.
_Card1PowerFail
SD Memory Card
Power Interruption Flag
TRUE when the power supply to the CPU Unit
was interrupted during access to the SD
Memory Card.
TRUE: Power was interrupted during SD
Memory Card access.
FALSE: Normal
A-28
NJ-series CPU Unit Software User’s Manual (W501)
Appendices
z Functional Classification: Power Supply
Variable name
_PowerOnHour
Meaning
Total Power ON
Time
Function
Contains the total time that the power has
been ON.
Data type
Range of
values
Reference
UDINT
0 to
4294967295
page A-51
UDINT
0 to
4294967295
page A-52
BOOL
TRUE or
FALSE
page A-52
Contains the total time that the CPU Unit has
been ON in 1-hour increments.
The value is not updated after it reaches
4294967295.
This variable is not initialized at startup.
_PowerOnCount
Power
Interruption
Count
Contains the number of times that the power
supply has been interrupted. The value is
incremented by 1 each time the power supply
is interrupted after the first time that the power
was turned ON.
To reset this value, overwrite the current value
with 0.
App
The value is not updated after it reaches
4294967295.
This variable is not initialized at startup.
_RetainFail
TRUE at the following time (failure of retention
during power interruptions).
• When an error is detected in the batterybackup memory check at startup.
FALSE at the following times (no failure of
retention during power interruptions).
• When no error is detected in the batterybackup memory check at startup.
• When the user program is downloaded.
• When the Clear All Memory operation is
performed.
Note When the encoder home offset data is
not retained, the status is given in the
error status of the axis variable, and not
in this flag.
z Functional Classification: Programming
Variable name
Meaning
Function
Data type
Range of
values
Reference
P_On
Always TRUE
Flag
This flag is always TRUE.
BOOL
TRUE
page A-52
P_Off
Always FALSE
Flag
This flag is always FALSE.
BOOL
FALSE
page A-52
P_CY
Carry Flag
This flag is updated by some instructions.
BOOL
TRUE or
FALSE
page A-52
P_First_RunMode
First RUN Period
Flag
TRUE for one task period when PROGRAM
mode changes to RUN mode.
BOOL
TRUE or
FALSE
page A-53
BOOL
TRUE or
FALSE
page A-53
Use this flag to perform initial processing
when the CPU Unit begins operation.
P_PRGER
Instruction Error
Flag
This flag changes to and remains TRUE when
an instruction error occurs. It remains TRUE
until changed to FALSE from the user program.
NJ-series CPU Unit Software User’s Manual (W501)
A-29
A-3-1 System-defined Variables for the Overall NJ-series Controller (No Category)
Retention
Failure Flag
A-3 System-defined Variables
To reset this value, overwrite the current value
with 0.
Appendices
z Functional Classification: Communications
Variable name
Function
_Port_numUsingPort
Number of Used
Ports
Gives the number of internal logical ports that
are currently used. You can use this variable
when you debug the user program.
USINT
0 to 32
page A-53
_Port_isAvailable
Network Communications Instruction Enabled Flag
Indicates whether there is an available internal logical port.
BOOL
FALSE or
TRUE
page A-53
FINS/TCP Connection Status
Gives the FINS/TCP connection status.
WORD
16#0000 to
16#FFFF
page A-53
_FINSTCPConnSta
A-3-2
Data type
Range of
values
Meaning
Reference
TRUE when an internal logical port is available. Otherwise FALSE.
PLC Function Module, Category Name: _PLC
z Functional Classification: Debugging
Variable name
Member
Meaning
Function
Data type
_PLC_TraceSta[0..3]
.IsStart
_sTRACE_
STA
Trace Busy Flag
TRUE when a trace starts.
.IsTrigger
Trace
Completed Flag
TRUE when a trace is completed.
Trace Trigger
Monitor Flag
TRUE when the trigger condition is met.
Reference
page A-54
BOOL
TRUE or
FALSE
page A-54
BOOL
TRUE or
FALSE
page A-54
BOOL
TRUE or
FALSE
page A-54
BOOL
TRUE or
FALSE
page A-55
Note You cannot use this system-defined
variable in the user program. It is used
only to monitor the status of data tracing from the Sysmac Studio.
.IsComplete
Range of
values
Note You cannot use this system-defined
variable in the user program. It is used
only to monitor the status of data tracing from the Sysmac Studio.
FALSE when the next trace starts.
Note You cannot use this system-defined
variable in the user program. It is used
only to monitor the status of data tracing from the Sysmac Studio.
.ParamErr
Trace
Parameter Error
Flag
TRUE when a trace starts, but there is an
error in the trace settings.
FALSE when the settings are normal.
Note You cannot use this system-defined
variable in the user program. It is used
only to monitor the status of data tracing from the Sysmac Studio.
z Functional Classification: Errors
Variable name
_PLC_ErrSta
Meaning
PLC Function
Module Error Status
Function
Data type
TRUE when there is a Controller error that
involves the PLC Function Module.
WORD
Range of
values
16#0000 to
16#00F0
Reference
page A-55
FALSE when there is no Controller error that
involves the PLC Function Module.
Refer to information on the meanings of the
error status bits at the end of this appendix for
details.
A-30
NJ-series CPU Unit Software User’s Manual (W501)
Appendices
A-3-3
PLC Function Module, Category Name: _CJB
z Functional Classification: I/O Bus Status
Meaning
_CJB_MaxRackNo
Largest Rack
Number
Contains the largest rack number of the
Expansion Racks that are detected by the
Controller.
UINT
Largest Slot
Number
Contains one higher than the largest slot
number with a CJ-series Unit on each of the
Racks that are detected by the Controller.
ARRAY
[0..3]
OF UINT
_CJB_MaxSlotNo
Function
Data type
Range of
values
0 to 3
Reference
page A-55
0: Only CPU
Rack.
0 to 10
page A-55
0: No CJseries Unit
mounted.
z Functional Classification: I/O Bus Errors
Variable name
_CJB_UnitErrSta
_CJB_InRespTm
I/O Bus Error
Status
Gives the I/O bus error status.
I/O Bus Master
Error Status
Gives the I/O bus master error status.
I/O Bus Unit Error
Status
Gives the error status of the I/O Bus Unit.
Basic Input Unit
Input Response
Times
Contains the response times of the Basic
Input Units.
Data type
16#0000 to
16#C0F0
page A-56
WORD
16#0000 to
16#00F0
page A-56
ARRAY
[0..3, 0..9]
OF WORD
16#0000 to
16#80F0
page A-56
ARRAY
[0..3, 0..9]
OF UNIT
0 to 320
page A-56
Note Do not use this variable in the user program. There may be a delay in updating
it. Use this variable only to access status through communications from an
external device. Refer to information on
the meanings of the error status bits at
the end of this appendix for details.
NJ-series CPU Unit Software User’s Manual (W501)
Reference
WORD
Note Do not use this variable in the user program. There may be a delay in updating
it. Use this variable only to access status through communications from an
external device. Refer to information on
the meanings of the error status bits at
the end of this appendix for details.
Note Do not use this variable in the user program. There may be a delay in updating
it. Use this variable only to access status through communications from an
external device. Refer to information on
the meanings of the error status bits at
the end of this appendix for details.
Range of
values
A-31
A-3-3 PLC Function Module, Category Name: _CJB
_CJB_MstrErrSta
Function
App
_CJB_ErrSta
Meaning
A-3 System-defined Variables
Variable name
Appendices
z Functional Classification: Auxiliary Area Bits for CJ-series Units
Variable name
_CJB_IOUnitInfo
Meaning
Basic I/O Unit
Information
Function
Data type
Shows the status of the Basic I/O Unit alarm
output (load short-circuit protection).
TRUE: Load short-circuit
FALSE: No load short-circuit
_CJB_CBU00InitSta
to
CPU Bus Unit Initializing Flags
The corresponding variable is TRUE during
initialization of the CPU Bus Unit.
Range of
values
Reference
ARRAY
[0..3, 0..9,
0..7] OF
BOOL
TRUE or
FALSE
page A-57
BOOL
TRUE or
FALSE
page A-57
BOOL
TRUE or
FALSE
page A-57
BOOL
TRUE or
FALSE
page A-58
BOOL
TRUE or
FALSE
page A-58
BOOL
TRUE or
FALSE
page A-59
BOOL
TRUE or
FALSE
page A-59
The corresponding variable changes to
FALSE when the initialization is completed.
_CJB_CBU15InitSta
The numbers in the variables indicate the unit
numbers of the applicable Units.
_CJB_SIO00InitSta
to
Special I/O Unit
Initializing Flags
The corresponding variable is TRUE during
initialization of the Special I/O Unit.
The corresponding variable changes to
FALSE when the initialization is completed.
_CJB_SIO95InitSta
The numbers in the variables indicate the unit
numbers of the applicable Units.
_CJB_CBU00Restart
to
CPU Bus Unit
Restart Bits
_CJB_CBU15Restart
The CPU Bus Unit is restarted when the corresponding variable changes to TRUE. (It is
changed to FALSE by the system after the
CPU Bus Unit is restarted.)
The numbers in the variables indicate the unit
numbers of the applicable Units.
If you change the Restart Flag to TRUE with
an instruction, the restart process begins from
refresh processing in the next task period.
_CJB_SIO00Restart
to
Special I/O Unit
Restart Bits
_CJB_SIO95Restart
The Special I/O Unit is restarted when the
corresponding variable changes to TRUE. (It
is changed to FALSE by the system after the
Special I/O Unit is restarted.)
The numbers in the variables indicate the unit
numbers of the applicable Units.
If you change the Restart Flag to TRUE with
an instruction, the restart process begins from
refresh processing in the next task period.
_CJB_SCU00P1ChgSta
to
_CJB_SCU00P2ChgSta
_CJB_SCU15P1ChgSta
to
_CJB_SCU15P2ChgSta
A-32
Serial Communications Unit 0,
Port 1/2 Settings
Changing Flags
Serial Communications Units 1 to
15, Port 1/2 Settings Changing
Flags
TRUE when the parameters of the specified
port are being changed. TRUE when the
Change Serial Communications Parameter
(SerialSetup) instruction is being executed.
FALSE after the parameters are changed.
It is also possible for the user to indicate a
change in serial port settings by turning ON
the corresponding flag through the execution
of an instruction or a user operation.
NJ-series CPU Unit Software User’s Manual (W501)
Appendices
A-3-4
Motion Control Function Module, Category Name: _MC
z Functional Classification: Motion Control Functions
Variable name
_MC_ErrSta
Function
Motion Control
Function Module
Error Status
Shows the status of errors that are detected in
the Motion Control Function Module.
Range of
values
Data type
Reference
16#0000 to
16#40F0
page A-59
WORD
16#0000 to
16#00F0
page A-59
Shows the error status for each axis. The status of up to 64 axes is shown.
You can use this variable directly in the user
program. Refer to information on the meanings of the error status bits at the end of this
appendix for details.
ARRAY
[0..63]
16#0000 to
16#00F0
page A-60
Shows the error status for each axes group.
The error status for up to 32 axes groups is
shown.
You can use this variable directly in the user
program. Refer to information on the meanings of the error status bits at the end of this
appendix for details.
ARRAY
[0..31]
16#0000 to
16#00F0
page A-60
Shows the status that is common to the
Motion Control Function Module.
_sCOMMO
N_REF
---
page A-60
Used to specify axes groups and shows multi- _sGROUP_
REF
axes coordinated control status, and multiaxes coordinated control settings for motion
control instructions.
---
page A-60
---
page A-61
You can use this variable directly in the user
program.
Refer to information on the meanings of the
error status bits at the end of this appendix for
details.
_MC_ComErrSta
Common Error
Status
Shows the status of errors that are detected in
common processing for motion control.
You can use this variable directly in the user
program.
Refer to information on the meanings of the
error status bits at the end of this appendix for
details.
_MC_AX_ErrSta
_MC_COM
Axes Group Error
Status
Common
Variable
OF WORD
OF WORD
Refer to the NJ-series Motion Control Instructions Reference Manual (Cat. No. W508) for
details on structure members.
_MC_GRP[32]
Axes Group Variables
Normally, you use an Axes Group Variable
with a different name.
When you create an axes group on the System Studio, a user-defined axes group variable with a different name is created.
Refer to the NJ-series Motion Control Instructions Reference Manual (Cat. No. W508) for
details on structure members.
_MC_AX[64]
Axis Variables
Used to specify axes and shows single-axis
control status, and single-axis control settings
for motion control instructions.
_sAXIS_
REF
When you create an axis on the System Studio, a user-defined axis variable with a different name is created.
Normally, you use an Axis Variable with a different name.
Refer to the NJ-series Motion Control Instructions Reference Manual (Cat. No. W508) for
details on structure members.
NJ-series CPU Unit Software User’s Manual (W501)
A-33
A-3-4 Motion Control Function Module, Category Name: _MC
_MC_GRP_ErrSta
Axis Error
Status
App
WORD
A-3 System-defined Variables
Meaning
Appendices
A-3-5
EtherCAT Master Function Module, Category Name: _EC
z Functional Classification: EtherCAT Communications Errors
Variable name
_EC_ErrSta
Meaning
Built-in
EtherCAT Error
Function
Data type
This system-defined variable provides the collective status of errors in the EtherCAT Master
Function Module.
Range of
values
Reference
WORD
16#0000 to
16#00F0
page A-61
WORD
16#0000 to
16#00F0
page A-61
WORD
16#0000 to
16#00F0
page A-61
WORD
16#0000 to
16#00F0
page A-62
Refer to information on the meanings of the
error status bits at the end of this appendix for
details.
_EC_PortErr
Communications
Port Error
This system-defined variable provides the collective status of errors in the communications
ports for the EtherCAT master.
Refer to information on the meanings of the
error status bits at the end of this appendix for
details.
_EC_MstrErr
Master Error
This system-defined variable provides the collective status of EtherCAT master errors and
slave errors detected by the EtherCAT master.
Refer to information on the meanings of the
error status bits at the end of this appendix for
details.
_EC_SlavErr
Slave Error
This system-defined variable provides the collective status of all the error status for EtherCAT slaves.
Refer to information on the meanings of the
error status bits at the end of this appendix for
details.
_EC_SlavErrTbl
Slave Error Table
This system-defined variable gives the error
status for each EtherCAT slave. The error status is given for each slave in the actual system
configuration. This variable array indicates
slaves in which there are errors. Status is provided for each EtherCAT slave node address
(1 to 192). Refer to information on the meanings of the error status bits at the end of this
appendix for details.
ARRAY
[1..192]
OF WORD
16#0000 to
16#00F0
page A-62
_EC_MacAdrErr
MAC Address
Error
TRUE if there is an illegal MAC address.
BOOL
TRUE or
FALSE
page A-62
_EC_LanHwErr
Communications
Controller Error
TRUE if there is a communications controller
hardware error.
BOOL
TRUE or
FALSE
page A-62
_EC_LinkOffErr
Link OFF Error
TRUE if the communications controller link is
not established.
BOOL
TRUE or
FALSE
page A-62
_EC_NetCfgErr
Network
Configuration
Information Error
TRUE if there is illegal network configuration
information.
BOOL
TRUE or
FALSE
page A-63
_EC_NetCfgCmpErr
Network
Configuration
Verification Error
TRUE if the network configuration information
does not match the actual network configuration.
BOOL
TRUE or
FALSE
page A-63
_EC_NetTopologyErr
Network
Configuration
Error
TRUE if there is a network configuration error
(too many devices connected or ring connection).
BOOL
TRUE or
FALSE
page A-63
_EC_PDCommErr
Process Data
Communications
Error
TRUE if there is an unexpected slave disconnection or connection or if a slave WDT error
is detected during process data communications.
BOOL
TRUE or
FALSE
page A-63
_EC_PDTimeoutErr
Process Data
Reception
Timeout
TRUE if a timeout occurs while receiving process data.
BOOL
TRUE or
FALSE
page A-63
A-34
NJ-series CPU Unit Software User’s Manual (W501)
Appendices
Variable name
Meaning
Function
Data type
Range of
values
Reference
TRUE if there is a process data transmission
error (cannot send within the process data
communications cycle or transmission jitter is
over the limit).
BOOL
TRUE or
FALSE
page A-63
_EC_SlavAdrDupErr
Slave Node
Address
Duplicated Error
TRUE if the same node address is set for
more than one slave.
BOOL
TRUE or
FALSE
page A-64
_EC_SlavInitErr
Slave
Initialization Error
TRUE if there is an error in an initialization
command addressed to a slave.
BOOL
TRUE or
FALSE
page A-64
_EC_SlavAppErr
Slave
Application Error
TRUE if there is an error in the slave’s application status register.
BOOL
TRUE or
FALSE
page A-64
_EC_MsgErr
EtherCAT
Message Error
TRUE when a message is sent to a slave that
does not support messages or when there is
an error in the format of the response to a
message that was sent to a slave.
BOOL
TRUE or
FALSE
page A-64
_EC_SlavEmergErr
Emergency Message Detected
TRUE if the master detects an emergency
message that was sent by a slave.
BOOL
TRUE or
FALSE
page A-64
_EC_CommErrTbl
Communications
Error Slave Table
Slaves are given in the table in the order of
slave node addresses. The corresponding
slave element is TRUE if the master detected
an error for the slave.
ARRAY
[1..192]
OF BOOL
TRUE or
FALSE
page A-65
App
Process Data
Transmission
Error
A-3 System-defined Variables
_EC_PDSendErr
A-3-5 EtherCAT Master Function Module, Category Name: _EC
NJ-series CPU Unit Software User’s Manual (W501)
A-35
Appendices
Additional Information
Typical Relationships for the Built-in EtherCAT Error Flags
Variable
Name
_EC_ErrSta
Meaning
Built-in
EtherCAT
Error
Variable
Name
_EC_PortErr
_EC_MstrErr
_EC_SlavErr
Meaning
Communications
Port Error
Master
Error
Slave
Error
Variable Name
Meaning
_EC_MacAdrErr
MAC Address Error
_EC_LanHwErr
Communications
Controller Error
_EC_LinkOffErr
Link OFF Error
_EC_NetCfgErr
Network Configuration Information Error
_EC_NetCfgCmpErr
Network Configuration Verification Error
_EC_NetTopologyErr
Network Configuration Error
_EC_PDCommErr
Process Data Communications Error
_EC_PDTimeoutErr
Process Data Reception Timeout
_EC_PDSendErr
Process Data Transmission Error
_EC_SlavAdrDupErr
Slave Node Address
Duplicated Error
_EC_SlavInitErr
Slave Initialization
Error
_EC_SlavAppErr
Slave Application
Error
_EC_CommErrTbl
Communications
Error Slave Table
_EC_MsgErr
EtherCAT Message
Error
_EC_SlavEmergErr
Emergency Message
Detected
_EC_SlavErrTbl
Slave Error Table
Event level
Partial fault
level
Minor fault
level
Observation
Defined by
the slave.
Note The values of all system-defined variables that are related to errors in EtherCAT communications do not
change until the cause of the error is removed and then the error in the Controller is reset with the troubleshooting functions of the Sysmac Studio or the ResetECError instruction.
A-36
NJ-series CPU Unit Software User’s Manual (W501)
Appendices
z Functional Classification: EtherCAT Communications Status
Variable name
Data type
Range of
values
Function
Reference
_EC_RegSlavTbl
Registered Slave
Table
This table indicates the slaves that are registered in the network configuration information.
Slaves are given in the table in the order of
slave node addresses. The element for a
slave is TRUE if the corresponding slave is
registered.
ARRAY
[1..192]
OF BOOL
TRUE or
FALSE
page A-65
_EC_EntrySlavTbl
Network
Connected Slave
Table
This table indicates which slaves are connected to the network. Slaves are given in the
table in the order of slave node addresses.
The element for a slave is TRUE if the corresponding slave has entered the network.
ARRAY
[1..192]
OF BOOL
TRUE or
FALSE
page A-65
_EC_MBXSlavTbl
Message Communications
Enabled Slave
Table
This table indicates the slaves that can perform message communications. Slaves are
given in the table in the order of slave node
addresses.
ARRAY
[1..192]
OF BOOL
TRUE or
FALSE
page A-65
ARRAY
[1..192]
OF BOOL
TRUE or
FALSE
page A-66
ARRAY
[1..192]
OF BOOL
TRUE or
FALSE
page A-66
ARRAY
[1..192]
OF BOOL
TRUE or
FALSE
page A-66
App
The element for a slave is TRUE if message
communications are enabled for it (pre-operational, safe-operation, or operational state).
Process Data
Communicating
Slave Table
This table indicates the slaves that are performing process data communications. Slaves
are given in the table in the order of slave
node addresses.
The element for a slave is TRUE if process
data of the corresponding slave is enabled
(operational) for both slave inputs and outputs.
Note Use this variable to confirm that the
data for the relevant slave is valid
before controlling an EtherCAT slave.
_EC_DisconnSlavTbl
Disconnected
Slave Table
Slaves are given in the table in the order of
slave node addresses.
The element for a slave is TRUE if the corresponding slave was disconnected.
_EC_DisableSlavTbl
Disabled Slave
Table
Slaves are given in the table in the order of
slave node addresses.
The element for a slave is TRUE if the corresponding slave is disabled.
_EC_PDActive
Process Data
Communications
Status
TRUE when process data communications
are performed with all slaves.
BOOL
TRUE or
FALSE
page A-66
_EC_PktMonStop
Packet
Monitoring
Stopped
TRUE when packet monitoring is stopped.
BOOL
TRUE or
FALSE
page A-67
_EC_LinkStatus
Link Status
TRUE if the communications controller link
status is Link ON.
BOOL
TRUE or
FALSE
page A-67
_EC_PktSaving
Saving Packet
Data File
Shows whether a packet data file is being
saved.
BOOL
TRUE or
FALSE
page A-67
BOOL
TRUE or
FALSE
page A-67
TRUE: Packet data file being saved.
FALSE: Packet data file not being saved.
_EC_InDataInvalid
Input Data Invalid
TRUE when process data communications
are not normal and the input data is not valid.
Note All system-defined variables that are related to the status of EtherCAT communications give the current status.
NJ-series CPU Unit Software User’s Manual (W501)
A-37
A-3-5 EtherCAT Master Function Module, Category Name: _EC
Note Use this variable to confirm that message communications are possible for
the relevant slave before you execute
message communications with an
EtherCAT slave.
_EC_PDSlavTbl
A-3 System-defined Variables
Meaning
Appendices
A-3-6
EtherNet/IP Function Module, Category Name: _EIP
z Functional Classification: EtherNet/IP Communications Errors
Variable name
_EIP_ErrSta
Meaning
Function
Data type
Built-in
EtherNet/IP Error
This is the error status variable for the built-in
EtherNet/IP port.
Range of
values
Reference
WORD
16#0000 to
16#00F0
page A-68
WORD
16#0000 to
16#00F0
page A-68
It represents the following error flags.
• _EIP_PortErr (Communications Port Error)
• _EIP_CipErr (CIP Communications Error)
• _EIP_TcpAppErr (TCP Application Communications Error)
Note Refer to information on the meanings of
the error status bits at the end of this
appendix for details.
_EIP_PortErr
Communications
Port Error
This is the error status variable for the communications port.
It represents the following error flags.
• _EIP_MacAdrErr (MAC Address Error)
• _EIP_LanHwErr (Communications Controller Error)
• _EIP_EtnCfgErr (Basic Ethernet Setting
Error)
• _EIP_IPAdrCfgErr (TCP/IP Basic Setting
Error)
• _EIP_IPAdrDupErr (IP Address Duplication
Error)
• _EIP_BootpErr (BOOTP Server Error)
• _EIP_IPRTblErr (TCP/IP Advanced Setting
Error)
Note If a Link OFF or Built-in EtherNet/IP
Processing Error occurs, it is recorded
in the event log and then the corresponding bit turns ON. Refer to information on the meanings of the error
status bits at the end of this appendix
for details.
A-38
NJ-series CPU Unit Software User’s Manual (W501)
Appendices
Variable name
_EIP_CipErr
Meaning
CIP Communications Error
Function
This is the error status variable for CIP communications.
Data type
Range of
values
Reference
WORD
16#0000 to
16#00F0
page A-69
WORD
16#0000 to
16#00F0
page A-69
BOOL
TRUE or
FALSE
page A-69
BOOL
TRUE or
FALSE
page A-69
BOOL
TRUE or
FALSE
page A-70
BOOL
TRUE or
FALSE
page A-70
BOOL
TRUE or
FALSE
page A-70
BOOL
TRUE or
FALSE
page A-70
It represents the following error flags.
• _EIP_IdentityErr (Identity Error)
• _EIP_TDLinkCfgErr (Tag Data Link Setting
Error)
A-3 System-defined Variables
• _EIP_TDLinkOpnErr (Tag Data Link Connection Failed)
• _EIP_TDLinkErr (Tag Data Link Communications Error)
• _EIP_TagAdrErr (Tag Name Resolution
Error)
• _EIP_MultiSwONErr (Multiple Switches ON
Error)
_EIP_TcpAppErr
This is the error status variable for TCP application communications.
It represents the following error flags.
• _EIP_TopAppCfgErr (TCP/IP Setting Error)
• _EIP_NTPSrvErr (NTP Server Connection
Error)
• _EIP_DNSSrvErr (DNS Server Connection
Error)
Note Refer to information on the meanings of
the error status bits at the end of this
appendix for details.
_EIP_MacAdrErr
MAC Address
Error
Indicates that an error occurred when the
MAC address was read at startup.
TRUE: Error
FALSE: Normal
_EIP_LanHwErr
_EIP_EtnCfgErr
Communications
Controller Error
TRUE: The communications controller failed.
Basic Ethernet
Setting Error
TRUE: The Ethernet communications speed
setting (Speed/Duplex) is incorrect. Or, a read
operation failed.
FALSE: Normal
FALSE: Normal
_EIP_IPAdrCfgErr
TCP/IP Basic
Setting Error
TRUE:
• There is an illegal IP address setting.
• A read operation failed.
• The IP address obtained from the BOOTP
server is inconsistent.
• The DNS settings are not correct.
FALSE: Normal
_EIP_IPAdrDupErr
IP Address Duplication Error
TRUE: The same IP address is assigned to
more than one node.
_EIP_BootpErr
BOOTP Server
Error
TRUE: There was a failure to connect to the
BOOTP server (timeout).
FALSE: Other than the above.
FALSE: The BOOTP is not enabled, or
BOOTP is enabled and an IP address was
normally obtained from the BOOTP server.
NJ-series CPU Unit Software User’s Manual (W501)
A-39
A-3-6 EtherNet/IP Function Module, Category Name: _EIP
TCP
Application Communications Error
App
Note If a Tag Resolution Error occurs, it is
recorded in the event log and this variable changes to TRUE. Refer to information on the meanings of the error
status bits at the end of this appendix
for details.
Appendices
Variable name
_EIP_IPRTblErr
Meaning
TCP/IP
Advanced
Setting Error
Function
Data type
TRUE: There is an error in one of the following settings. Or, a read operation failed.
Range of
values
Reference
BOOL
TRUE or
FALSE
page A-70
BOOL
TRUE or
FALSE
page A-71
BOOL
TRUE or
FALSE
page A-71
BOOL
TRUE or
FALSE
page A-71
BOOL
TRUE or
FALSE
page A-71
BOOL
TRUE or
FALSE
page A-71
BOOL
TRUE or
FALSE
page A-72
BOOL
TRUE or
FALSE
page A-72
BOOL
TRUE or
FALSE
page A-72
BOOL
TRUE or
FALSE
page A-72
• IP router table settings
• Hosts settings
FALSE: Normal
_EIP_IdentityErr
Identity Error
TRUE: The identity information (which you
cannot overwrite) is not correct. Or, a read
operation failed.
FALSE: Normal
_EIP_TDLinkCfgErr
Tag Data Link
Setting Error
_EIP_TDLinkOpnErr
Tag Data Link
Connection
Failed
TRUE: The tag data link settings are incorrect. Or, a read operation failed.
FALSE: Normal
TRUE: The connection was not established
because the remote node information in the
tag data link parameters was different from
the actual node information.
Note This variable does not change to TRUE
if there is no remote node when the
power is turned ON.
FALSE: Other than the above.
_EIP_TDLinkErr
_EIP_TagAdrErr
Tag Data Link
Communications
Error
TRUE: A timeout occurred in a tag data link
connection.
Tag Name
Resolution Error
TRUE: Tag resolution failed (i.e., the address
could not be identified from the tag name).
The following causes are possible.
FALSE: Other than the above.
• The size of the network-published variable
does not agree with the tag setting.
• The I/O direction that is set in the tag data
link settings does not agree with the I/O
direction of the variable in the CPU Unit.
• There is no network-published variable in
the CPU Unit that corresponds to the tag
setting.
FALSE: Other than the above.
_EIP_MultiSwONErr
Multiple Switches
ON Error
_EIP_TcpAppCfgErr
TCP/IP Setting
Error
_EIP_NTPSrvErr
NTP Server Connection Error
TRUE: More than one data link start/stop
switch changed to TRUE at the same time.
FALSE: Other than the above.
TRUE: At least one of the set values for a
TCP/IP application (FTP, NTP, SNMP) is
incorrect. Or, a read operation failed.
FALSE: Normal
TRUE: The NTP client failed to connect to the
server (timeout).
FALSE: NTP is not set or the connection was
successful.
_EIP_DNSSrvErr
DNS Server Connection Error
TRUE: The DNS client failed to connect to the
server (timeout).
FALSE: DNS is not enabled. Or, DNS is
enabled and the connection was successful.
A-40
NJ-series CPU Unit Software User’s Manual (W501)
Appendices
Additional Information
Typical Relationships for the Built-in EtherNet/IP Error Flags
Variable
name
_EIP_ErrSta
Meaning
_EIP_PortErr
NJ-series CPU Unit Software User’s Manual (W501)
CIP Communications
Error
TCP Application Communications
Error
Meaning
_EIP_MacAdrErr
MAC Address Error
_EIP_LanHwErr
Communications
Controller Error
_EIP_EtnCfgErr
Basic Ethernet Setting Error
_EIP_IPAdrCfgErr
TCP/IP Basic Setting Error
_EIP_IPAdrDupErr
IP Address Duplication Error
Event
level
Partial
fault level
_EIP_BootpErr
BOOTP Server Error
_EIP_IPRTblErr
TCP/IP Advanced
Setting Error
Minor fault
level
_EIP_IdentityErr
Identity Error
_EIP_TDLinkCfgErr
Tag Data Link Setting Error
Minor fault
level
_EIP_TDLinkOpnErr
Tag Data Link Connection Failed
_EIP_TDLinkErr
Tag Data Link Communications Error
_EIP_TagAdrErr
Tag Name Resolution Error
_EIP_MultiSwONErr
Multiple Switches
ON Error
Observation
_EIP_TcpAppCfgErr
TCP/IP Setting Error
_EIP_NTPSrvErr
NTP Server Connection Error
Minor fault
level
_EIP_DNSSrvErr
DNS Server Connection Error
A-41
A-3-6 EtherNet/IP Function Module, Category Name: _EIP
_EIP_TcpAp
pErr
Communications Port
Error
Variable name
App
_EIP_CipErr
Meaning
A-3 System-defined Variables
Built-in
EtherNet/IP
Error
Variable
name
Appendices
Additional Information
Relationships between the Target Node Information Tables
Registered Target Node Information
(_EIP_RegTarget
Sta)
TRUE
FALSE
A-42
Registered Target
Node Information
Valid only when
_EIP_RegTargetSta is
TRUE
Normal Target Node
Information
Valid only when
_EIP_EstbTargetSta
is TRUE
Registered Target
Node Information
Valid only when
_EIP_RegTargetSta is
TRUE
Normal Target Node
Information
(_EIP_EstbTargetSta)
Target PLC Error
Information
(_EIP_EIP_TargetPLC
Err)
Target Node Error
Information
(_EIP_TargetNodeErr)
TRUE
FALSE
FALSE
A connection with
the target node was
established normally and there is
no error in the target PLC.
TRUE
TRUE
A connection with
the target node was
established but
there is an error in
the target PLC.
FALSE
Disabled
TRUE
A connection with
the target node was
not established normally.
Disabled
Disabled
Disabled
The information is
not valid because
the target node is
not registered.
Description
NJ-series CPU Unit Software User’s Manual (W501)
Appendices
z Functional Classification: EtherNet/IP Communications Status
Variable name
_EIP_EtnOnlineSta
Meaning
Online
Function
TRUE: The built-in EtherNet/IP port’s communications can be used. (The link is ON
and IP address is defined. Also, there are
no errors.)
Data type
Range of
values
Reference
TRUE or
FALSE
page A-72
BOOL
TRUE or
FALSE
page A-73
BOOL
TRUE or
FALSE
page A-73
ARRAY
[0..255] OF
BOOL
TRUE or
FALSE
page A-73
ARRAY
[0..255] OF
BOOL
TRUE or
FALSE
page A-73
ARRAY
[0..255] OF
BOOL
TRUE or
FALSE
page A-73
FALSE: The built-in EtherNet/IP port’s communications is disabled due to an error in
initial processing or restart processing.
_EIP_TDLinkRunSta
_EIP_TDLinkAllRunSta
_EIP_RegTargetSta [255]
Tag Data Link
Communications
Status
TRUE: At least one connection is in normal
operation.
All Tag Data Link
Communications
Status
TRUE: Tag data links are communicating in
all connections as the originator.
Registered
Target Node
Information
This variable gives a list of nodes for which
built-in EtherNet/IP connections are registered.
This variable is valid only when the built-in
EtherNet/IP port is the originator.
FALSE: Other than the above.
FALSE: An error occurred in at least one
connection.
App
Array[x] is FALSE: The connection to the
node with a target node ID of x is not registered.
Normal Target
Node
Information
This variable gives a list of nodes that have
normally established built-in EtherNet/IP
connections.
Array[x] is TRUE: The connection to the
node with a target node ID of x was established normally.
Array[x] is FALSE: The connection to the
node with a target node ID of x was not
established, or an error occurred.
_EIP_TargetPLCModeSta
[255]
Target PLC Operating Mode
This variable shows the operating status of
the target node Controllers that are connected with the built-in EtherNet/IP port as
the originator.
The array elements are valid only when the
corresponding Normal Target Node Information is TRUE. If the corresponding Normal Target Node Information is FALSE, the
Target Node Controller Operating Information indicates the previous operating status.
Array[x] is TRUE: This is the operating state
of the target Controller with a node address
of x.
Array[x] is FALSE: Other than the above.
NJ-series CPU Unit Software User’s Manual (W501)
A-43
A-3-6 EtherNet/IP Function Module, Category Name: _EIP
Array[x] is TRUE: The connection to the
node with a target node ID of x is registered.
_EIP_EstbTargetSta [255]
A-3 System-defined Variables
BOOL
Appendices
Variable name
_EIP_TargetPLCErr [255]
Range of
values
Meaning
Function
Data type
Reference
Target PLC Error
Information
This variable shows the error status (logical
OR of fatal and non-fatal errors) of the target node Controllers that are connected
with the built-in EtherNet/IP ports as the
originator. The array elements are valid only
when the corresponding Normal Target
Node Information is TRUE. The immediately preceding value is retained if this variable is FALSE.
ARRAY
[0..255] OF
BOOL
TRUE or
FALSE
page A-74
ARRAY
[0..255] OF
BOOL
TRUE or
FALSE
page A-74
Array[x] is TRUE: A fatal or non-fatal error
occurred in the target Controller with a target node ID of x.
Array[x] is FALSE: Other than the above.
_EIP_TargetNodeErr [255]
Target Node
Error
Information
This variable indicates that the connection
for the Registered Target Node Information
was not established or that an error
occurred in the target Controller. The array
elements are valid only when the Registered Target Node Information is TRUE.
Array[x] is TRUE: A connection was not normally established with the target node for a
target node ID of x (the Registered Target
Node Information is TRUE and the Normal
Target Node Information is FALSE), or a
connection was established with the target
node but an error occurred in the target
Controller.
Array[x] is FALSE: The target node is not
registered for a target node ID of x (the
Registered Target Node Information is
FALSE), or a connection was normally
established with the target node (the Registered Target Node Information is TRUE and
the Normal Target Node Information is
TRUE).
An error occurred in the target Controller
(the Target PLC Error Information is
TRUE.).
_EIP_NTPResult
NTP Operation
Information
Use the GetNTPStatus instruction to read
the NTP operation information from the user
program. Direct access is not possible.
_sNTP_
RESULT
page A-74
.ExecTime
NTP Last
Operation Time
Gives the last time that NTP processing
ended normally. The time that was obtained
from the NTP server is stored when the
time is obtained normally. The time is not
stored if it is not obtained from the NTP
server normally.
DATE_
AND_
TIME
Depends
on data
type.
page A-74
BOOL
TRUE or
FALSE
page A-75
Note Do not use this variable in the user
program. There may be a delay in
updating it. Use this variable only to
access status through communications from an external device.
.ExecNormal
NTP Operation
Result
TRUE: Indicates an NTP normal end.
FALSE: Indicates that NTP operation ended
in an error or has not been executed even
once.
Note Do not use this variable in the user
program. There may be a delay in
updating it. Use this variable only to
access status through communications from an external device.
A-44
NJ-series CPU Unit Software User’s Manual (W501)
Appendices
z Functional Classification: EtherNet/IP Communications Switches
Variable name
Meaning
Function
Data type
Range of
values
Reference
Tag Data Link
Communications
Start Switch
This is the start switch for data links.
BOOL
TRUE or
FALSE
page A-75
_EIP_TDLinkStopCmd
Tag Data Link
Communications
Stop Switch
This is the stop switch for data links.
BOOL
TRUE or
FALSE
page A-75
A-3-7
A-3 System-defined Variables
_EIP_TDLinkStartCmd
Meanings of Error Status Bits
The meanings of the individual bits in the following error status are the same.
• _ErrSta (Controller Error Status)
• _PLC_ErrSta (PLC Function Module Error Status)
• _CJB_ErrSta (I/O Bus Error Status)
• _CJB_MstrErrSta (I/O Bus Master Error Status)
App
• _CJB_UnitErrSta (I/O Bus Unit Error Status)
• _MC_ErrSta (Motion Control Function Module Error Status)
A-3-7 Meanings of Error Status Bits
• _MC_ComErrSta (MC Common Error Status)
• _MC_AX_ErrSta (Axis Error Status)
• _MC_GRP_ErrSta (Axes Group Error Status)
• _EC_ErrSta (Built-in EtherCAT Error)
• _EC_PortErr (Communications Port Error)
• _EC_MstrErr (Master Error)
• _EC_SlavErr (Slave Error)
• _EC_SlavErrTbl (Slave Error Table)
• _EIP_ErrSta (Built-in EtherNet/IP Error)
• _EIP_PortErr (Communications Port Error)
• _EIP_CipErr (CIP Communications Error)
• _EIP_TcpAppErr (TCP Application Communications Error)
The meaning of the bits are shown in the following table.
However, do not use the following variables in the user program:_ErrSta (Controller Error Status),
_CJB_ErrSta (I/O Bus Error Status), _CJB_MstrErrSta (I/O Bus Master Error Status), and
_CJB_UnitErrSta (I/O Bus Master Unit Status). There may be a delay in updating them and concurrency problems in relation to the error status of the function module.
Use these variables only to access status through communications from an external device.
15
Bit:
14
13
12
11
10
9
8
7
6
5
4
3
2
1
0
WORD
Bit
15
Meaning
Master-detected error: This bit indicates whether the master detected a Controller error in the Unit/slave for the
error status of the Controller error.
TRUE: The master detected a Controller error.
FALSE: The master has not detected a Controller error.
(Valid for _CJB_U_ErrSta and _EC_SlvErrTbl.)
14
Collective slave error status: This bit indicates if a Controller error was detected for levels (e.g., a Unit, slave,
axis, or axes group) that are lower than the event source (i.e., for a function module).
TRUE: A Controller error has occurred at a lower level.
FALSE: A Controller error has not occurred at a lower level.
(Valid for _CJB_ErrSta, _MC_ErrSta, and _EC_ErrSta.)
8 to 13
Not used.
NJ-series CPU Unit Software User’s Manual (W501)
A-45
Appendices
Bit
7
Meaning
This bit indicates whether a major fault level Controller error has occurred.
TRUE: A major fault level Controller error has occurred.
FALSE: A major fault level Controller error has not occurred.
6
This bit indicates whether a partial fault level Controller error has occurred.
TRUE: A partial fault level Controller error has occurred.
FALSE: A partial fault level Controller error has not occurred.
5
This bit indicates whether a minor fault level Controller error has occurred.
TRUE: A minor fault level Controller error has occurred.
FALSE: A minor fault level Controller error has not occurred.
4
This bit indicates whether an observation level Controller error has occurred.
TRUE: An observation level Controller error has occurred.
FALSE: An observation level Controller error has not occurred.
0 to 3
A-46
Not used.
NJ-series CPU Unit Software User’s Manual (W501)
Appendices
Specifications for Individual Systemdefined Variables
The specifications for each system-defined variable are given as described below.
Members
The member names are given for
structure variables.
Meaning
This is the meaning of the variable.
Global/local
Global: Global variable, Local: Local
variable
Function
The function of the variable is described.
Data type
The data type of the variable is given.
Range of values
The range of values that the variable can take is given.
R/W access
R: Read only,
RW: Read/write
Retained
The Retain
attribute of the
variable is given.
Network Publish
The Network Publish attribute of the
variable is given.
Usage in user program
Whether you
can use the variable directly in
the user program is specified.
Related instructions
The instructions that are related to the variable are given.
A-4-1
If you cannot use the variable directly in the user program, the instructions
that access the variable are given.
System-defined Variables for the Overall NJ-series Controller
(No Category)
z Functional Classification: Clock
Variable name
_CurrentTime
Meaning
System Time
Function
This variable contains the CPU Unit’s internal clock data.
Data type
DATE_AND_TIME
R/W access
R
Retained
Not retained.
Usage in user program
Possible.
Related instructions
Clock instructions
Global/local
Global
Range of values
DT#1970-01-01-00:00:00 to
DT#2106-02-06-23:59:59
Network Publish
Published.
Global/local
Global
z Functional Classification: Tasks
Variable name
_TaskName_Active
Meaning
Task Active Flag
Function
TRUE during task execution.
FALSE when task execution is not in progress.
Note You cannot use this system-defined variable in the user program. It is used only to access task status for
data tracing from the Sysmac Studio.
Data type
BOOL
R/W access
R
Retained
Not retained.
Usage in user program
Not possible.
Related instructions
ActEventTask
Range of values
TRUE or FALSE
Network Publish
Not published.
You can access this variable from the user program only with the following
instruction.
• Task_IsActive
NJ-series CPU Unit Software User’s Manual (W501)
A-47
A-4-1 System-defined Variables for the Overall NJ-series Controller (No Category)
This is the system-defined variable name. The prefix
gives the category name.
App
Variable name
A-4 Specifications for Individual System-defined Variables
A-4
Appendices
Variable name
_TaskName_LastExecTime
Meaning
Last Task Execution Time
Function
Contains the task execution time the last time the task was executed (unit: 0.1 µs).
Global/local
Global
Note You cannot use this system-defined variable in the user program. It is used only to access task status for
data tracing from the Sysmac Studio.
Data type
TIME
Range of values
Depends on data type.
R/W access
R
Retained
Not retained.
Usage in user program
Not possible.
Related instructions
You can access this variable from the user program only with the following
instruction.
Network Publish
Not published.
• GetMyTaskStatus
Variable name
_TaskName_MaxExecTime
Meaning
Maximum Task Execution Time
Function
Contains the maximum value of the task execution time (unit: 0.1 µs).
Global/local
Global
Note You cannot use this system-defined variable in the user program. It is used only to access task status for
data tracing from the Sysmac Studio.
Data type
TIME
Range of values
Depends on data type.
Network Publish
Not published.
R/W access
R
Retained
Not retained.
Usage in user program
Not supported.
Related instructions
You can access this variable from the user program only with the following
instruction.
• GetMyTaskStatus
Variable name
_TaskName_MinExecTime
Meaning
Minimum Task Execution Time
Function
Contains the minimum value of the task execution time (unit: 0.1 µs).
Global/local
Global
Note You cannot use this system-defined variable in the user program. It is used only to access task status for
data tracing from the Sysmac Studio.
Data type
TIME
R/W access
R
Retained
Not retained.
Range of values
Depends on data type.
Network Publish
Not published.
Usage in user program
Not possible.
Related instructions
You can access this variable from the user program only with the following
instruction.
• GetMyTaskStatus
Variable name
_TaskName_ExecCount
Meaning
Task Execution Count
Function
Global/local
Global
Contains the number of executions of the task.
If 4294967295 is exceeded, the value returns to 0 and counting is continued.
Note You cannot use these system-defined variables in the user program. It is used only to access task status for
data tracing from the Sysmac Studio.
Data type
UDINT
Range of values
Depends on data type.
R/W access
R
Retained
Not retained.
Usage in user program
Not possible.
Related instructions
You can access this variable from the user program only with the following
instruction.
Network Publish
Not published.
• GetMyTaskStatus
A-48
NJ-series CPU Unit Software User’s Manual (W501)
Appendices
_TaskName_Exceeded
Meaning
Task Exceeded Flag
Function
TRUE if the task period was exceeded.
Global/local
Global
FALSE if task execution was completed within the task period.
Note You cannot use this system-defined variable in the user program. It is used only to access task status for
data tracing from the Sysmac Studio.
Data type
BOOL
Range of values
TRUE or FALSE
Network Publish
Not published.
R/W access
R
Retained
Not retained.
Usage in user program
Not possible.
Related instructions
You can access this variable from the user program only with the following
instruction.
• GetMyTaskStatus
Variable name
_TaskName_ExceedCount
Meaning
Task Period Exceeded Count
Function
Global/local
Global
Contains the number of times that the period was exceeded.
If the present value exceeds the maximum value of the data type, the present value returns to 0 and the count is
continued.
Note You cannot use this system-defined variable in the user program. It is used only to access task status for
data tracing from the Sysmac Studio.
UDINT
R/W access
R
Retained
Not retained.
Range of values
Depends on data type.
Network Publish
Not published.
Usage in user program
Not possible.
Related instructions
You can access this variable from the user program only with the following
instruction.
• GetMyTaskStatus
z Functional Classification: Errors
Variable name
_ErrSta
Meaning
Controller Error Status
Function
Global/local
Global
TRUE if there is a Controller error.
FALSE if there is no Controller error.
Note Do not use this variable in the user program. There may be a delay in updating it and concurrency problems in relation to the status of the function module. Use this variable only to access status through communications from an external device. Refer to A-3-7 Meanings of Error Status Bits for the meanings of the
error status bits.
Data type
WORD
R/W access
R
Retained
Not retained.
Usage in user program
Not possible.
Related instructions
• ResetPLCError
Range of values
16#0000 to 16#C0F0
Network Publish
Published.
• ResetCJBError
• ResetECError
• ResetMCError
• MC_Reset
• MC_GroupReset
You can access this variable from the user program only with the following
instructions.
• GetPLCError
• GetCJBError
• GetECError
• GetMCError
• GetEIPError
NJ-series CPU Unit Software User’s Manual (W501)
A-49
A-4-1 System-defined Variables for the Overall NJ-series Controller (No Category)
Data type
App
If 4294967295 is exceeded, the value returns to 0 and counting is continued.
A-4 Specifications for Individual System-defined Variables
Variable name
Appendices
Variable name
_AlarmFlag
Meaning
User-defined Error Status
Function
The bit corresponding to the event level is TRUE while there is a user-defined error.
Global/local
Global
Bits 00 to 07 correspond to user fault levels 1 to 8.
This variable contains 0000 hex when there is no user-defined error.
Data type
WORD
R/W access
R
Retained
Not retained.
Usage in user program
Possible.
Related instructions
• SetAlarm
Range of values
16#0000 to 16#00FF
Network Publish
Published.
• ResetAlarm
• GetAlarm
z Functional Classification: SD Memory Card
Variable name
_Card1Ready
Meaning
SD Memory Card Ready Flag
Function
TRUE when the SD Memory Card is recognized.
Global/local
Global
FALSE when an SD Memory Card is not recognized.
TRUE: The Card can be used.
FALSE: The Card cannot be used.
Data type
BOOL
R/W access
R
Retained
Retained.
Usage in user program
Possible.
Related instructions
---
Variable name
_Card1Protect
Meaning
SD Memory Card Write Protected Flag
Function
Range of values
TRUE or FALSE
Network Publish
Published.
Global/local
Global
TRUE when the SD Memory Card is write-protected with the LOCK switch.
TRUE: Write protected.
FALSE: Not write protected.
Data type
BOOL
R/W access
R
Retained
Retained.
Range of values
TRUE or FALSE
Network Publish
Published.
Usage in user program
Possible.
Related instructions
---
Variable name
_Card1Err
Meaning
SD Memory Card Error Flag
Function
TRUE when an unusable SD Memory Card is inserted or a format error occurs.
Global/local
Global
TRUE: There is an error
FALSE: There is no error
Data type
BOOL
R/W access
R
Retained
Retained.
Usage in user program
Possible.
Related instructions
---
A-50
Range of values
TRUE or FALSE
Network Publish
Published.
NJ-series CPU Unit Software User’s Manual (W501)
Appendices
_Card1Access
Meaning
SD Memory Card Access Flag
Function
TRUE during SD Memory Card access.
Global/local
Global
TRUE: Card is being accessed.
FALSE: Card is not being accessed.
The system updates the flag every 100 ms. Because of this, access to the SD Memory Card is shown by this flag
with a delay of up to 100 ms. We therefore do not recommend the use of this variable in the user program.
Data type
BOOL
R/W access
R
Retained
Retained.
Usage in user program
Possible.
Related instructions
---
Variable name
_Card1Deteriorated
Meaning
SD Memory Card Life Warning Flag
Function
Range of values
TRUE or FALSE
Network Publish
Published.
Global/local
Global
TRUE when the life of the SD Memory Card is exceeded.
If this variable changed to TRUE, replace the SD Memory Card.
A-4 Specifications for Individual System-defined Variables
Variable name
Read/write operation may fail if the SD Memory Card is not replaced.
App
TRUE: The life of the Card has been exceeded.
FALSE: The Card can still be used.
Data type
BOOL
TRUE or FALSE
Network Publish
Published.
Global/local
Global
R/W access
R
Retained
Retained.
Usage in user program
Possible.
Related instructions
---
Variable name
_Card1PowerFail
Meaning
SD Memory Card Power Interruption Flag
Function
TRUE when the power supply to the CPU Unit was interrupted during access to the SD Memory Card.
A-4-1 System-defined Variables for the Overall NJ-series Controller (No Category)
Range of values
TRUE: Power was interrupted during SD Memory Card access.
FALSE: Normal.
Data type
BOOL
R/W access
RW
Retained
Retained.
Usage in user program
Possible.
Related instructions
---
Range of values
TRUE or FALSE
Network Publish
Published.
Global/local
Global
z Functional Classification: Power Supply
Variable name
_PowerOnHour
Meaning
Total Power ON Time
Function
Contains the total time that the power has been ON.
Contains the total time that the CPU Unit has been ON in 1-hour increments.
To reset this value, overwrite the current value with 0.
The value is not updated after it reaches 4294967295.
This variable is not initialized at startup.
Data type
UDINT
R/W access
RW
Retained
Retained.
Usage in user program
Possible.
Related instructions
---
NJ-series CPU Unit Software User’s Manual (W501)
Range of values
0 to 4294967295
Network Publish
Published.
A-51
Appendices
Variable name
_PowerOnCount
Meaning
Power Interruption Count
Function
Contains the number of times that the power supply has been interrupted.
Global/local
Global
The value is incremented by 1 each time the power supply is interrupted after the first time that the power was
turned ON.
To reset this value, overwrite the current value with 0.
The value is not updated after it reaches 4294967295.
This variable is not initialized at startup.
Data type
UDINT
Range of values
0 to 4294967295
R/W access
R/W
Retained
Retained.
Usage in user program
Possible.
Related instructions
---
Network Publish
Published.
Variable name
_RetainFail
Meaning
Retention Failure Flag
Function
TRUE at the following times (failure of retention during power interruptions).
Global/local
Global
• When an error is detected in the battery-backup memory check at startup.
FALSE at the following times (no failure of retention during power interruptions).
• When no error is detected in the battery-backup memory check at startup.
• When the user program is downloaded.
• When the Clear All Memory operation is performed.
Note When the encoder home offset data is not retained, the status is given in the error status of the axis variable, and not in this flag.
Data type
BOOL
R/W access
R
Retained
Not retained.
Usage in user program
Possible.
Related instructions
---
Range of values
TRUE or FALSE
Network Publish
Not published.
Global/local
Global
Range of values
TRUE
Network Publish
Not published.
Global/local
Global
z Functional Classification: Programming
Variable name
P_On
Meaning
Always TRUE Flag
Function
This flag is always TRUE.
Data type
BOOL
R/W access
R
Retained
Not retained.
Usage in user program
Possible.
Related instructions
---
Variable name
P_Off
Meaning
Always FALSE Flag
Function
This flag is always FALSE.
Data type
BOOL
R/W access
R
Retained
Not retained.
Usage in user program
Possible.
Related instructions
---
Variable name
P_CY
Meaning
Carry Flag
Function
This flag is updated by some instructions.
Data type
BOOL
R/W access
R
Retained
Not retained.
Usage in user program
Possible.
Related instructions
---
A-52
Range of values
FALSE
Network Publish
Not published.
Global/local
Local
Range of values
TRUE or FALSE
Network Publish
Not published.
NJ-series CPU Unit Software User’s Manual (W501)
Appendices
P_First_RunMode
Meaning
First RUN Period Flag
Function
TRUE for one task period when PROGRAM mode changes to RUN mode.
Global/local
A-4 Specifications for Individual System-defined Variables
Variable name
Local
Use this flag to perform initial processing when the CPU Unit begins operation.
Data type
BOOL
R/W access
R
Retained
Not retained.
Usage in user program
Possible.
Related instructions
---
Range of values
TRUE or FALSE
Network Publish
Not published.
Global/local
Local
Variable name
P_PRGER
Meaning
Instruction Error Flag
Function
This flag changes to and remains TRUE when an instruction error occurs.
It remains TRUE until changed to FALSE from the user program.
BOOL
R/W access
RW
Retained
Not retained.
Usage in user program
Possible.
Related instructions
---
Range of values
TRUE or FALSE
Network Publish
Not published.
App
Data type
z Functional Classification: Communications
_Port_numUsingPort
Meaning
Number of Used Ports
Function
Gives the number of internal logical ports that are currently used.
Global/local
Global
You can use this variable when you debug the user program.
Data type
USINT
Range of values
0 to 32
Network Publish
Not published.
R/W access
R
Retained
Not retained.
Usage in user program
Possible.
Related instructions
Communications instructions (ExecPMCR, SerialSend, SerialRcv, Send,
Rcv, and SendCmd)
Variable name
_Port_isAvailable
Meaning
Network Communications Instruction Enabled Flag
Function
Indicates whether there is an available internal logical port.
Global/local
Global
TRUE when an internal logical port is available. Otherwise FALSE.
Data type
BOOL
R/W access
R
Retained
Not retained.
Usage in user program
Possible.
Related instructions
Communications instructions (ExecPMCR, SerialSend, SerialRcv, Send,
Rcv, and SendCmd)
Variable name
_FINSTCPConnSta
Meaning
FINS/TCP Connection Status
Function
Gives the FINS/TCP connection status.
Data type
WORD
R/W access
R
Retained
Not retained.
Usage in user program
Possible.
Related instructions
---
NJ-series CPU Unit Software User’s Manual (W501)
Range of values
TRUE or FALSE
Network Publish
Not published.
Global/local
Global
Range of values
16#0000 to 16#FFFF
Network Publish
Not published.
A-53
A-4-1 System-defined Variables for the Overall NJ-series Controller (No Category)
Variable name
Appendices
A-4-2
PLC Function Module, Category Name: _PLC
z Functional Classification: Debugging
Variable name
_PLC_TraceSta[0..3]
Members
.IsStart
Meaning
Trace Busy Flag
Global/local
Global
Function
TRUE when a trace starts.
Note You cannot use these system-defined variables in the user program. It is used only to monitor the status of
data tracing from the Sysmac Studio.
Data type
Structure: _sTRACE_STA, Members: BOOL
Range of values
TRUE or FALSE
R/W access
R
Retained
Retained.
Network Publish
Not published.
Usage in user program
Not possible.
Related instructions
• TraceTrig
• TraceSamp
You can access this variable from the user program only with the following
instruction.
• GetTraceStatus
Variable name
_PLC_TraceSta[0..3]
Members
.IsComplete
Meaning
Trace Completed Flag
Global/local
Global
Function
TRUE when a trace is completed.
Note You cannot use this system-defined variable in the user program. It is used only to monitor the status of
data tracing from the Sysmac Studio.
Data type
Structure: _sTRACE_STA, Members: BOOL
Range of values
TRUE or FALSE
R/W access
R
Retained
Retained.
Network Publish
Not published.
Usage in user program
Not possible.
Related instructions
• TraceTrig
• TraceSamp
You can access this variable from the user program only with the following
instruction.
• GetTraceStatus
Variable name
_PLC_TraceSta[0..3]
Members
.IsTrigger
Meaning
Trace Trigger Monitor Flag
Global/local
Global
Function
TRUE when the trigger condition is met.
FALSE when the next trace starts.
Note You cannot use these system-defined variables in the user program. It is used only to monitor the status of
data tracing from the Sysmac Studio.
Data type
Structure: _sTRACE_STA, Members: BOOL
Range of values
TRUE or FALSE
R/W access
R
Retained
Retained.
Network Publish
Not published.
Usage in user program
Not possible.
Related instructions
• TraceTrig
• TraceSamp
You can access this variable from the user program only with the following
instruction.
• GetTraceStatus
A-54
NJ-series CPU Unit Software User’s Manual (W501)
Appendices
_PLC_TraceSta[0..3]
Members
.ParamErr
Meaning
Trace Parameter Error Flag
Global/local
Global
Function
TRUE when a trace starts, but there is an error in the trace settings.
FALSE when the settings are normal.
Note You cannot use these system-defined variables in the user program. It is used only to monitor the status of
data tracing from the Sysmac Studio.
Data type
Structure: _sTRACE_STA, Members: BOOL
Range of values
TRUE or FALSE
R/W access
R
Retained
Retained.
Network Publish
Not published.
Usage in user program
Not possible.
Related instructions
You can access this variable from the user program only with the following
instruction.
• GetTraceStatus
z Functional Classification: Errors
Variable name
_PLC_ErrSta
Meaning
PLC Function Module Error Status
Function
TRUE when there is a Controller error that involves the PLC Function Module.
Global/local
Global
App
FALSE when there is no Controller error that involves the PLC Function Module.
Refer to A-3-7 Meanings of Error Status Bits for the meanings of the error status bits.
Data type
WORD
R
Retained
Not retained.
Usage in user program
Possible.
Related instructions
• GetPLCError
16#0000 to 16#00F0
Network Publish
Published.
A-4-3 PLC Function Module, Category Name: _CJB
R/W access
Range of values
You can use the following instruction to clear this variable.
• ResetPLCError
A-4-3
PLC Function Module, Category Name: _CJB
z Functional Classification: I/O Bus Status
Variable name
_CJB_MaxRackNo
Meaning
Largest Rack Number
Function
Contains the largest rack number of the Expansion Racks that are detected by the Controller.
Data type
UINT
R/W access
R
Retained
Not retained.
Usage in user program
Possible.
Related instructions
---
Global/local
Global
Range of values
0 to 3
Network Publish
Published.
Global/local
Global
0: Only CPU Rack.
Variable name
_CJB_MaxSlotNo
Meaning
Largest Slot Number
Function
Contains one higher than the largest slot number with a CJ-series Unit on each of the Racks that are detected by
the Controller.
Data type
ARRAY [0..3] OF UINT
Range of values
0 to 10
0: No CJ-series Unit mounted.
R/W access
R
Retained
Not retained.
Usage in user program
Possible.
Related instructions
---
NJ-series CPU Unit Software User’s Manual (W501)
Network Publish
A-4 Specifications for Individual System-defined Variables
Variable name
Published.
A-55
Appendices
z Functional Classification: I/O Bus Errors
Variable name
_CJB_ErrSta
Meaning
I/O Bus Error Status
Function
Gives the I/O bus error status.
Global/local
Global
Note Do not use this variable in the user program. There may be a delay in updating it and concurrency problems may occur. Use this variable only to access status through communications from an external device.
Refer to A-3-7 Meanings of Error Status Bits for the meanings of the error status bits.
Data type
WORD
Range of values
16#0000 to 16#00F0
R/W access
R
Retained
Not retained.
Usage in user program
Not possible.
Related instructions
You can access this variable from the user program only with the following
instruction.
Network Publish
Published.
• GetCJBError
You can use the following instruction to clear this variable.
• ResetCJBError
Variable name
_CJB_MstrErrSta
Meaning
I/O Bus Master Error Status
Function
Gives the I/O bus master error status.
Global/local
Global
Note Do not use this variable in the user program. There may be a delay in updating it and concurrency problems may occur. Use these variables only to access status through communications from an external
device. Refer to A-3-7 Meanings of Error Status Bits for the meanings of the error status bits.
Data type
WORD
R/W access
R
Retained
Not retained.
Range of values
16#0000 to 16#00F0
Network Publish
Published.
Usage in user program
Not possible.
Related instructions
You can access this variable from the user program only with the following
instruction.
• GetCJBError
You can use the following instruction to clear this variable.
• ResetCJBError
Variable name
_CJB_UnitErrSta
Meaning
I/O Bus Unit Error Status
Function
Gives the error status of the I/O Bus Unit.
Global/local
Global
Note Do not use this variable in the user program. There may be a delay in updating it and concurrency problems may occur. Use this variable only to access status through communications from an external device.
Refer to A-3-7 Meanings of Error Status Bits for the meanings of the error status bits.
Data type
ARRAY [0..3, 0..9] OF WORD
R/W access
R
Retained
Not retained.
Range of values
16#0000 to 16#80F0
Network Publish
Published.
Usage in user program
Not possible.
Related instructions
You can access this variable from the user program only with the following
instruction.
• GetCJBError
You can clear this variable with the following instruction.
• ResetCJBError
Variable name
_CJB_InRespTm
Meaning
Basic Input Unit Input Response Times
Function
Contains the response times of the Basic I/O Units.
Data type
ARRAY [0..3, 0..9] OF UINT
R/W access
R
Retained
Not retained.
Usage in user program
Possible.
Related instructions
---
A-56
Global/local
Global
Range of values
0 to 320
Network Publish
Published.
NJ-series CPU Unit Software User’s Manual (W501)
Appendices
A-4 Specifications for Individual System-defined Variables
z Functional Classification: Auxiliary Area Bits for CJ-series Units
Variable name
_CJB_IOUnitInfo
Meaning
Basic I/O Unit Information
Function
Shows the status of the Basic I/O Unit alarm output (load short-circuit protection).
Global/local
Global
TRUE: Load short-circuit
FALSE: No load short-circuit
Data type
ARRAY [0..3, 0..9, 0..7] OF BOOL
R/W access
R
Retained
Not retained.
Usage in user program
Possible.
Related instructions
---
Auxiliary
Area
addresses
Words
A50 to A69
Bits
A50.00 to A69.15
Variable name
Range of values
TRUE or FALSE
Network Publish
Not published.
Global/local
Global
_CJB_CBU00InitSta
to
CPU Bus Unit Initializing Flags
Function
App
_CJB_CBU15InitSta
Meaning
The corresponding variable is TRUE during initialization of the CPU Bus Unit.
The corresponding variable changes to FALSE when the initialization is completed.
A-4-3 PLC Function Module, Category Name: _CJB
The numbers in the variables indicate the unit numbers of the applicable Units.
Data type
BOOL
R/W access
R
Retained
Not retained.
Usage in user program
Possible.
Related instructions
• ResetUnit
Auxiliary
Area
addresses
Words
A302
Bits
A302.00 to A302.15
Variable name
Range of values
TRUE or FALSE
Network Publish
Published.
Global/local
Global
_CJB_SIO00InitSta
to
_CJB_SIO95InitSta
Meaning
Special I/O Unit Initializing Flags
Function
The corresponding variable is TRUE during initialization of the Special I/O Unit.
The corresponding variable changes to FALSE when the initialization is completed.
The numbers in the variables indicate the unit numbers of the applicable Units.
Data type
BOOL
R/W access
R
Retained
Not retained.
Usage in user program
Possible.
Related instructions
• ResetUnit
Auxiliary
Area
addresses
Words
A330 to A335
Bits
A330.00 to A335.15
NJ-series CPU Unit Software User’s Manual (W501)
Range of values
TRUE or FALSE
Network Publish
Published.
A-57
Appendices
Variable name
_CJB_CBU00Restart
to
_CJB_CBU15Restart
Meaning
CPU Bus Unit Restart Bits
Global/local
Global
Function
The CPU Bus Unit is restarted when the corresponding variable changes to TRUE. (It is changed to FALSE by the
system after the CPU Bus Unit is restarted.)
The numbers in the variables indicate the unit numbers of the applicable Units.
If you change the Restart Flag to TRUE with an instruction, the restart process begins from refresh processing in
the next task period.
Data type
BOOL
R/W access
RW
Retained
Not retained.
Usage in user program
Possible.
Related instructions
• ResetUnit
Auxiliary
Area
addresses
Words
A501
Bits
A501.00 to A501.15
Variable name
Range of values
TRUE or FALSE
Network Publish
Published.
Global/local
Global
_CJB_SIO00Restart
to
_CJB_SIO95Restart
Meaning
Special I/O Unit Restart Bits
Function
The Special I/O Unit is restarted when the corresponding variable changes to TRUE. (It is changed to FALSE by
the system after the CPU Bus Unit is restarted.)
The numbers in the variables indicate the unit numbers of the applicable Units.
If you change the Restart Flag to TRUE with an instruction, the restart process begins from refresh processing in
the next task period.
Data type
BOOL
R/W access
RW
Retained
Not retained.
Usage in user program
Possible.
Related instructions
• ResetUnit
Auxiliary
Area
addresses
Words
A502 to A507
Bits
A502.00 to A507.15
A-58
Range of values
TRUE or FALSE
Network Publish
Published.
NJ-series CPU Unit Software User’s Manual (W501)
Appendices
_CJB_SCU00P1ChgSta
_CJB_SCU00P2ChgSta
to
_CJB_SCU15P1ChgSta
_CJB_SCU15P2ChgSta
Meaning
Serial Communications Unit 0, Port 1/2 Settings
Changing Flags
Global/local
Global
···
Serial Communications Units 1 to 15, Port 1/2 Settings
Changing Flags
Function
TRUE when the parameters of the specified port are being changed. TRUE when the Change Serial Communications Parameter (SerialSetup) instruction is being executed.
FALSE after the parameters are changed.
It is also possible for the user to indicate a change in serial port settings by turning ON the corresponding flag
through the execution of an instruction or a user operation.
BOOL
R/W access
RW
Retained
Not retained.
Usage in user program
Possible.
Related instructions
• SerialSetUp
Auxiliary
Area
addresses
Ports on Serial Communications Unit with unit numbers 1 to 15: A621 to A635
Words
TRUE or FALSE
Network Publish
Published.
Port on Serial Communications Unit with unit number 0: A620
A-4-4 Motion Control Function Module, Category Name: _MC
Bits
Range of values
App
Data type
Port on Serial Communications Unit with unit number 0: A620.01 to A620.02
Ports on Serial Communications Unit with unit numbers 1 to 15: A621.01 to A635.02
A-4-4
Motion Control Function Module, Category Name: _MC
z Functional Classification: Motion Control Functions
Variable name
_MC_ErrSta
Meaning
Motion Control Function Module Error Status
Function
Global/local
Global
Shows the status of errors that are detected in the Motion Control Function Module.
You can use this variable directly in the user program.
Refer to A-3-7 Meanings of Error Status Bits for the meanings of the error status bits.
Data type
WORD
R/W access
R
Retained
Not retained.
Usage in user program
Possible.
Related instructions
• GetMCError
Range of values
16#0000 to 16#40F0
Network Publish
Published.
Global/local
Global
• ResetMCError
• MC_Reset
• MC_GroupReset
Variable name
_MC_ComErrSta
Meaning
Common Error Status
Function
Shows the status of errors that are detected in common processing for motion control.
You can use this variable directly in the user program.
Refer to A-3-7 Meanings of Error Status Bits for the meanings of the error status bits.
Data type
WORD
R/W access
R
Retained
Not retained.
Usage in user program
Possible.
Related instructions
• GetMCError
NJ-series CPU Unit Software User’s Manual (W501)
A-4 Specifications for Individual System-defined Variables
Variable name
Range of values
16#0000 to 16#00F0
Network Publish
Published.
• ResetMCError
A-59
Appendices
Variable name
_MC_AX_ErrSta
Meaning
Axis Error Status
Function
Shows the error status for each axis.
Global/local
Global
The status of up to 64 axes is given.
You can use this variable directly in the user program.
Refer to A-3-7 Meanings of Error Status Bits for the meanings of the error status bits.
Data type
ARRAY [0..63] OF WORD
R/W access
R
Retained
Not retained.
Usage in user program
Possible.
Related instructions
• GetMCError
Range of values
16#0000 to 16#00F0
Network Publish
Published.
Global/local
Global
• ResetMCError
• MC_Reset
Variable name
_MC_GRP_ErrSta
Meaning
Axes Group Error Status
Function
Shows the error status for each axes group.
The error status for up to 32 axes groups is shown.
You can use this variable directly in the user program.
Refer to A-3-7 Meanings of Error Status Bits for the meanings of the error status bits.
Data type
ARRAY [0..31] OF WORD
R/W access
R
Retained
Not retained.
Usage in user program
Possible.
Related instructions
• GetMCError
Range of values
16#0000 to 16#00F0
Network Publish
Published.
Global/local
Global
• ResetMCError
• MC_GroupReset
Variable name
_MC_COM
Meaning
Common Variable
Function
Shows the status that is common to the Motion Control Function Module.
Refer to the NJ-series Motion Control Instructions Reference Manual (Cat. No. W508) for details on structure
members.
Data type
_sCOMMON_REF
R/W access
R
Retained
Not retained.
Range of values
---
Network Publish
Published.
Usage in user program
Possible.
Related instructions
---
Variable name
_MC_GRP[32]
Meaning
Axes Group Variables
Global/local
Global
Function
Used to specify axes groups and shows multi-axes coordinated control status, and multi-axes coordinated control
settings for motion control instructions.
When you create an axes group on the System Studio, a user-defined axes group variable with a different name is
created.
Normally, you use an Axes Group Variable with a different name.
Refer to the NJ-series Motion Control Instructions Reference Manual (Cat. No. W508) for details on structure
members.
Data type
_sGROUP_REF
R/W access
R
Retained
Not retained.
Usage in user program
Possible.
Related instructions
---
A-60
Range of values
---
Network Publish
Published.
NJ-series CPU Unit Software User’s Manual (W501)
Appendices
_MC_AX[64]
Meaning
Axis Variables
Function
Used to specify axes and shows single-axis control status, and single-axis control settings for motion control
instructions.
Global/local
Global
When you create an axis on the System Studio, a user-defined axis variable with a different name is created.
Normally, you use an Axis Variable with a different name.
Refer to the NJ-series Motion Control Instructions Reference Manual (Cat. No. W508) for details on structure
members.
Data type
_sAXIS_REF
R/W access
R
Retained
Not retained.
Usage in user program
Possible.
Related instructions
---
A-4-5
Range of values
---
Network Publish
Published.
EtherCAT Master Function Module, Category Name: _EC
z Functional Classification: EtherCAT Communications Errors
App
Variable name
_EC_ErrSta
Meaning
Built-in EtherCAT Error
Function
This system-defined variable provides the collective status of errors in the EtherCAT Master Function Module.
Global/local
Global
WORD
R/W access
R
Retained
Not retained.
Range of values
16#0000 to 16#00F0
Network Publish
Published.
Usage in user program
Possible.
Related instructions
Get EtherCAT Error Status
• GetECError
Reset EtherCAT Controller Error
• ResetECError
Variable name
_EC_PortErr
Meaning
Communications Port Error
Function
This system-defined variable provides the collective status of errors in the communications ports for the EtherCAT
master.
Global/local
Global
Refer to A-3-7 Meanings of Error Status Bits for the meanings of the error status bits.
Data type
WORD
Range of values
16#0000 to 16#00F0
Network Publish
Published.
R/W access
R
Retained
Not retained.
Usage in user program
Possible.
Related instructions
Get EtherCAT Error Status
• GetECError
Reset EtherCAT Controller Error
• ResetECError
Variable name
_EC_MstrErr
Meaning
Master Error
Function
This system-defined variable provides the collective status of EtherCAT master errors and slave errors detected
by the EtherCAT master.
Global/local
Global
Refer to A-3-7 Meanings of Error Status Bits for the meanings of the error status bits.
Data type
WORD
R/W access
R
Retained
Not retained.
Range of values
16#0000 to 16#00F0
Network Publish
Published.
Usage in user program
Possible.
Related instructions
Get EtherCAT Error Status
• GetECError
Reset EtherCAT Controller Error
• ResetECError
NJ-series CPU Unit Software User’s Manual (W501)
A-61
A-4-5 EtherCAT Master Function Module, Category Name: _EC
Refer to A-3-7 Meanings of Error Status Bits for the meanings of the error status bits.
Data type
A-4 Specifications for Individual System-defined Variables
Variable name
Appendices
Variable name
_EC_SlavErr
Meaning
Slave Error
Function
This system-defined variable provides the collective status of all the error status for EtherCAT slaves.
Global/local
Global
Refer to A-3-7 Meanings of Error Status Bits for the meanings of the error status bits.
Data type
WORD
R/W access
R
Retained
Not retained.
Range of values
16#0000 to 16#00F0
Network Publish
Published.
Usage in user program
Possible.
Related instructions
Get EtherCAT Error Status
• GetECError
Reset EtherCAT Controller Error
• ResetECError
Variable name
_EC_SlavErrTbl
Meaning
Slave Error Table
Function
This system-defined variable gives the error status for each EtherCAT slave.
Global/local
Global
The error status is given for each slave in the actual system configuration.
This variable array indicates slaves in which there are errors. Status is provided for each EtherCAT slave node
address (1 to 192).
Refer to A-3-7 Meanings of Error Status Bits for the meanings of the error status bits.
Data type
Array [1..192] OF WORD
R/W access
R
Retained
Not retained.
Range of values
16#0000 to 16#00F0
Network Publish
Published.
Usage in user program
Possible.
Related instructions
Get EtherCAT Error Status
• GetECError
Reset EtherCAT Controller Error
• ResetECError
Variable name
_EC_MacAdrErr
Meaning
MAC Address Error
Function
TRUE if there is an illegal MAC address.
Data type
BOOL
R/W access
R
Retained
Not retained.
Usage in user program
Possible.
Related instructions
Reset EtherCAT Controller Error
Variable name
Global/local
Range of values
TRUE or FALSE
Network Publish
Published.
• ResetECError
_EC_LanHwErr
Meaning
Communications Controller Error
Function
TRUE if there is a communications controller hardware error.
Data type
BOOL
R/W access
R
Retained
Not retained.
Usage in user program
Possible.
Related instructions
Reset EtherCAT Controller Error
Variable name
_EC_LinkOffErr
Meaning
Link OFF Error
Global/local
Global
Range of values
TRUE or FALSE
Network Publish
Published.
• ResetECError
Global/local
Function
TRUE if the communications controller link is not established.
Data type
BOOL
Global
Range of values
TRUE or FALSE
Network Publish
Published.
R/W access
R
Retained
Not retained.
Usage in user program
Possible.
Related instructions
Reset EtherCAT Controller Error
A-62
Global
• ResetECError
NJ-series CPU Unit Software User’s Manual (W501)
Appendices
_EC_NetCfgErr
Meaning
Network Configuration Information Error
Function
TRUE if there is illegal network configuration information.
Data type
BOOL
R/W access
R
Retained
Not retained.
Usage in user program
Possible.
Related instructions
Reset EtherCAT Controller Error
Global/local
Global
Range of values
TRUE or FALSE
Network Publish
Published.
• ResetECError
Variable name
_EC_NetCfgCmpErr
Meaning
Network Configuration Verification Error
Function
TRUE if the network configuration information does not match the actual network configuration.
Data type
BOOL
R/W access
R
Retained
Not retained.
Usage in user program
Possible.
Related instructions
Reset EtherCAT Controller Error
_EC_NetTopologyErr
Meaning
Network Configuration Error
Global/local
Global
Range of values
TRUE or FALSE
Network Publish
Published.
• ResetECError
Global/local
Global
TRUE if there is a network configuration error (too many devices connected or ring connection).
Data type
BOOL
Range of values
TRUE or FALSE
Network Publish
Published.
R
Retained
Not retained.
Usage in user program
Possible.
Related instructions
Reset EtherCAT Controller Error
• ResetECError
Variable name
_EC_PDCommErr
Meaning
Process Data Communications Error
Function
TRUE if there is an unexpected slave disconnection or connection or if a slave WDT error is detected during process data communications.
Data type
BOOL
R/W access
R
Retained
Not retained.
Usage in user program
Possible.
Related instructions
Reset EtherCAT Controller Error
Global/local
Global
Range of values
TRUE or FALSE
Network Publish
Published.
• ResetECError
Variable name
_EC_PDTimeoutErr
Meaning
Process Data Reception Timeout Error
Function
TRUE if a timeout occurs while receiving process data.
Data type
BOOL
Global/local
Global
Range of values
TRUE or FALSE
Network Publish
Published.
R/W access
R
Retained
Not retained.
Usage in user program
Possible.
Related instructions
Reset EtherCAT Controller Error
• ResetECError
Variable name
_EC_PDSendErr
Meaning
Process Data Transmission Error
Function
TRUE if there is a process data transmission error (cannot send within the process data communications period
or transmission jitter is over the limit).
Data type
BOOL
R/W access
R
Retained
Not retained.
Usage in user program
Possible.
Related instructions
Reset EtherCAT Controller Error
NJ-series CPU Unit Software User’s Manual (W501)
Global/local
Global
Range of values
TRUE or FALSE
Network Publish
Published.
• ResetECError
A-63
A-4-5 EtherCAT Master Function Module, Category Name: _EC
Function
R/W access
App
Variable name
A-4 Specifications for Individual System-defined Variables
Variable name
Appendices
Variable name
_EC_SlavAdrDupErr
Meaning
Slave Node Address Duplicated Error
Function
TRUE if the same node address is set for more than one slave.
Global/local
Data type
BOOL
R/W access
R
Retained
Not retained.
Usage in user program
Possible.
Related instructions
Reset EtherCAT Controller Error
Range of values
TRUE or FALSE
Network Publish
Published.
• ResetECError
Variable name
_EC_SlavInitErr
Meaning
Slave Initialization Error
Function
TRUE if there is an error in an initialization command addressed to a slave.
Data type
BOOL
R/W access
R
Retained
Not retained.
Usage in user program
Possible.
Related instructions
Reset EtherCAT Controller Error
Variable name
_EC_SlavAppErr
Meaning
Slave Application Error
Global
Global/local
Global
Range of values
TRUE or FALSE
Network Publish
Published.
• ResetECError
Global/local
Function
TRUE if there is an error in the slave’s application status register.
Data type
BOOL
Global
Range of values
TRUE or FALSE
Network Publish
Published.
R/W access
R
Retained
Not retained.
Usage in user program
Possible.
Related instructions
Reset EtherCAT Controller Error
• ResetECError
Variable name
_EC_MsgErr
Meaning
EtherCAT Message Error
Function
TRUE when a message is sent to a slave that does not support messages or when there is an error in the format
of the response to a message that was sent to a slave.
Data type
BOOL
R/W access
R
Retained
Not retained.
Usage in user program
Possible.
Related instructions
CoE messages (Read CoE SDO)
Global/local
Global
Range of values
TRUE or FALSE
Network Publish
Published.
• EC_CoESDORead
CoE messages (Write CoE SDO)
• EC_CoESDOWrite
Variable name
_EC_SlavEmergErr
Meaning
Emergency Message Detected
Function
TRUE if the master detects an emergency message that was sent by a slave.
Data type
BOOL
R/W access
R
Retained
Not retained.
Usage in user program
Possible.
Related instructions
Reset EtherCAT Controller Error
A-64
Global/local
Global
Range of values
TRUE or FALSE
Network Publish
Published.
• ResetECError
NJ-series CPU Unit Software User’s Manual (W501)
Appendices
_EC_CommErrTbl
Meaning
Communications Error Slave Table
Function
Slaves are given in the table in the order of slave node addresses.
Global/local
Global
The corresponding slave element is TRUE if the master detected an error for the slave.
Data type
Array [1..192] OF BOOL
R/W access
R
Retained
Not retained.
Range of values
TRUE or FALSE
Network Publish
Published.
Usage in user program
Possible.
Related instructions
Reset EtherCAT Controller Error
• ResetECError
Note The values of all system-defined variables that are related to errors in EtherCAT communications do not change until the
cause of the error is removed and then the error in the Controller is reset with the troubleshooting functions of the Sysmac Studio or the ResetECError instruction.
z Functional Classification: EtherCAT Communications Status
Variable name
_EC_RegSlavTbl
Meaning
Registered Slave Table
Global
This table indicates the slaves that are registered in the network configuration information.
App
Function
Global/local
Slaves are given in the table in the order of slave node addresses.
The element for a slave is TRUE if the corresponding slave is registered.
Array [1..192] OF BOOL
R/W access
R
Retained
Not retained.
Usage in user program
Possible.
Related instructions
---
Variable name
_EC_EntrySlavTbl
Meaning
Network Connected Slave Table
Function
Range of values
TRUE or FALSE
Network Publish
Published.
Global/local
Global
A-4-5 EtherCAT Master Function Module, Category Name: _EC
Data type
This table indicates which slaves are connected to the network.
Slaves are given in the table in the order of slave node addresses.
The element for a slave is TRUE if the corresponding slave has entered the network.
Data type
Array [1..192] OF BOOL
R/W access
R
Retained
Not retained.
Usage in user program
Possible.
Related instructions
---
Variable name
_EC_MBXSlavTbl
Meaning
Message Communications Enabled Slave Table
Function
Range of values
TRUE or FALSE
Network Publish
Published.
Global/local
Global
This table indicates the slaves that can perform message communications.
Slaves are given in the table in the order of slave node addresses.
The element for a slave is TRUE if message communications are enabled for it (pre-operational, safe-operation,
or operational state).
Note Use this variable to confirm that message communications are possible for the relevant slave before you
execute message communications with an EtherCAT slave.
Data type
Array [1..192] OF BOOL
R/W access
R
Retained
Not retained.
Range of values
TRUE or FALSE
Network Publish
Published.
Usage in user program
Possible.
Related instructions
Disconnect EtherCAT Slave
• EC_DisconnectSlave
Connect EtherCAT Slave
• EC_ConnectSlave
NJ-series CPU Unit Software User’s Manual (W501)
A-4 Specifications for Individual System-defined Variables
Variable name
A-65
Appendices
Variable name
_EC_PDSlavTbl
Meaning
Process Data Communicating Slave Table
Function
This is a table that indicates the slaves that are performing process data communications.
Global/local
Global
Slaves are given in the table in the order of slave node addresses.
The element for a slave is TRUE if process data of the corresponding slave is enabled (operational) for both slave
inputs and outputs.
Note Use this variable to confirm that the data for the relevant slave is valid before controlling an EtherCAT slave.
Data type
Array [1..192] OF BOOL
R/W access
R
Retained
Not retained.
Range of values
TRUE or FALSE
Network Publish
Published.
Usage in user program
Possible.
Related instructions
Disconnect EtherCAT Slave
• EC_DisconnectSlave
Connect EtherCAT Slave
• EC_ConnectSlave
Variable name
_EC_DisconnSlavTbl
Meaning
Disconnected Slave Table
Function
Global/local
Global
Slaves are given in the table in the order of slave node addresses.
The element for a slave is TRUE if the corresponding slave was disconnected.
Data type
Array [1..192] OF BOOL
Range of values
TRUE or FALSE
Network Publish
Published.
R/W access
R
Retained
Not retained.
Usage in user program
Possible.
Related instructions
Disconnect EtherCAT Slave
• EC_DisconnectSlave
Connect EtherCAT Slave
• EC_ConnectSlave
Variable name
_EC_DisableSlavTbl
Meaning
Disabled Slave Table
Function
Global/local
Global
Slaves are given in the table in the order of slave node addresses.
The element for a slave is TRUE if the corresponding slave is disabled.
Data type
Array [1..192] OF BOOL
Range of values
TRUE or FALSE
Network Publish
Published.
Global/local
Global
R/W access
R
Retained
Not retained.
Usage in user program
Possible.
Related instructions
---
Variable name
_EC_PDActive
Meaning
Process Data Communications Status
Function
TRUE when process data communications are performed with all slaves.
Data type
BOOL
R/W access
R
Retained
Not retained.
Usage in user program
Possible.
Related instructions
Disconnect EtherCAT Slave
Range of values
TRUE or FALSE
Network Publish
Published.
• EC_DisconnectSlave
Connect EtherCAT Slave
• EC_ConnectSlave
A-66
NJ-series CPU Unit Software User’s Manual (W501)
Appendices
_EC_PktMonStop
Meaning
Packet Monitoring Stopped
Function
TRUE when packet monitoring is stopped.
Data type
BOOL
R/W access
R
Retained
Not retained.
Usage in user program
Possible.
Related instructions
Stop Packet Monitor
Global/local
A-4 Specifications for Individual System-defined Variables
Variable name
Global
Range of values
TRUE or FALSE
Network Publish
Published.
• EC_StopMon
Start Packet Monitor
• EC_StartMon
Variable name
_EC_LinkStatus
Meaning
Link Status
Function
TRUE if the communications controller link status is Link ON.
Data type
BOOL
Global/local
R
Retained
Not retained.
Usage in user program
Possible.
Related instructions
---
Variable name
_EC_PktSaving
Meaning
Saving Packet Data File
Function
Shows whether a packet data file is being saved.
Range of values
TRUE or FALSE
Network Publish
Published.
Global/local
Global
Range of values
TRUE or FALSE
Network Publish
Published.
App
R/W access
Global
A-4-5 EtherCAT Master Function Module, Category Name: _EC
TRUE: Packet data file being saved.
FALSE: Packet data file not being saved.
Data type
BOOL
R/W access
R
Retained
Not retained.
Usage in user program
Possible.
Related instructions
Saving Packet Data File
• EC_SaveMon
Variable name
_EC_InDataInvalid
Meaning
Input Data Invalid
Function
TRUE when process data communications are not normal and the input data is not valid.
Data type
BOOL
R/W access
R
Retained
Not retained.
Usage in user program
Possible.
Related instructions
---
Global/local
Global
Range of values
TRUE or FALSE
Network Publish
Published.
Note All system-defined variables that are related to the status of EtherCAT communications give the current status.
NJ-series CPU Unit Software User’s Manual (W501)
A-67
Appendices
A-4-6
EtherNet/IP Function Module, Category Name: _EIP
z Functional Classification: EtherNet/IP Communications Errors
Variable name
_EIP_ErrSta
Meaning
Built-in EtherNet/IP Error
Function
This is the error status variable for the built-in EtherNet/IP port.
Global/local
Global
It represents the following error flags.
• _EIP_PortErr (Communications Port Error)
• _EIP_CipErr (CIP Communications Error)
• _EIP_TcpAppErr (TCP Application Communications Error)
Note Refer to A-3-7 Meanings of Error Status Bits for the meanings of the error status bits.
Data type
WORD
R/W access
R
Retained
Not retained.
Range of values
16#0000 to 16#00F0
Network Publish
Published.
Usage in user program
Possible.
Related instructions
You can access this variable from the user program with the following
instruction.
• GetEIPError
Variable name
_EIP_PortErr
Meaning
Communications Port Error
Function
This is the error status variable for the communications port.
Global/local
Global
It represents the following error flags.
• _EIP_MacAdrErr (MAC Address Error)
• _EIP_LanHwErr (Communications Controller Error)
• _EIP_EtnCfgErr (Basic Ethernet Setting Error)
• _EIP_IPAdrCfgErr (TCP/IP Basic Setting Error)
• _EIP_IPAdrDupErr (IP Address Duplication Error)
• _EIP_BootpErr (BOOTP Server Error)
• _EIP_IPRTblErr (TCP/IP Advanced Setting Error)
Note If a link OFF or Built-in EtherNet/IP Processing Error occurs, it is recorded in the event log and then corresponding bit turns ON. Refer to A-3-7 Meanings of Error Status Bits for the meanings of the error status
bits.
Data type
WORD
Range of values
16#0000 to 16#00F0
Network Publish
Published.
R/W access
R
Retained
Not retained.
Usage in user program
Possible.
Related instructions
You can access this variable from the user program with the following
instruction.
• GetEIPError
A-68
NJ-series CPU Unit Software User’s Manual (W501)
Appendices
_EIP_CipErr
Meaning
CIP Communications Error
Function
This is the error status variable for CIP communications.
Global/local
Global
It represents the following error flags.
• _EIP_IdentityErr (Identity Error)
• _EIP_TDLinkCfgErr (Tag Data Link Setting Error)
• _EIP_TDLinkOpnErr (Tag Data Link Connection Failed)
• _EIP_TDLinkErr (Tag Data Link Communications Error)
• _EIP_TagAdrErr (Tag Name Resolution Error)
• _EIP_MultiSwOnErr (Multiple Switches ON Error)
Note If a Tag Resolution Error occurs, it is recorded in the event log and this variable changes to TRUE. Refer to
A-3-7 Meanings of Error Status Bits for the meanings of the error status bits.
Data type
WORD
R/W access
R
Retained
Not retained.
Range of values
16#0000 to 16#00F0
Network Publish
Published.
Usage in user program
Possible.
Related instructions
You can access this variable from the user program with the following
instruction.
• GetEIPError
_EIP_TcpAppErr
Meaning
TCP Application Communications Error
Global
This is the error status variable for TCP application communications.
A-4-6 EtherNet/IP Function Module, Category Name: _EIP
Function
Global/local
App
Variable name
It represents the following error flags.
• _EIP_TcpAppCfgErr (TCP/IP Setting Error)
• _EIP_NTPSrvErr (NTP Server Connection Error)
• _EIP_DNSSrvErr (DNS Server Connection Error)
Note Refer to A-3-7 Meanings of Error Status Bits for the meanings of the error status bits.
Data type
WORD
R/W access
R
Retained
Not retained.
Range of values
16#0000 to 16#00F0
Network Publish
Published.
Usage in user program
Possible.
Related instructions
You can access this variable from the user program with the following
instruction.
• GetEIPError
Variable name
_EIP_MacAdrErr
Meaning
MAC Address Error
Function
Indicates that an error occurred when the MAC address was read at startup.
Global/local
Global
TRUE: Error
FALSE: Normal
Data type
BOOL
R/W access
R
Retained
Not retained.
Usage in user program
Possible.
Related instructions
---
Variable name
_EIP_LanHwErr
Meaning
Communications Controller Error
Function
TRUE: The communications controller failed.
Range of values
TRUE or FALSE
Network Publish
Published.
Global/local
Global
FALSE: Normal
Data type
BOOL
R/W access
R
Retained
Not retained.
Usage in user program
Possible.
Related instructions
---
NJ-series CPU Unit Software User’s Manual (W501)
Range of values
TRUE or FALSE
Network Publish
Published.
A-4 Specifications for Individual System-defined Variables
Variable name
A-69
Appendices
Variable name
_EIP_EtnCfgErr
Meaning
Basic Ethernet Setting Error
Function
TRUE: The Ethernet communications speed setting (Speed/Duplex) is incorrect. Or, a read operation failed.
Global/local
Global
FALSE: Normal
Data type
BOOL
R/W access
R
Retained
Not retained.
Usage in user program
Possible.
Related instructions
---
Variable name
_EIP_IPAdrCfgErr
Meaning
TCP/IP Basic Setting Error
Function
TRUE:
Range of values
TRUE or FALSE
Network Publish
Published.
Global/local
Global
• There is an illegal IP address setting.
• A read operation failed.
• The IP address obtained from the BOOTP server is inconsistent.
• The DNS settings are not correct.
FALSE: Normal
Data type
BOOL
R/W access
R
Retained
Not retained.
Usage in user program
Possible.
Related instructions
---
Variable name
_EIP_IPAdrDupErr
Meaning
IP Address Duplication Error
Function
Range of values
TRUE or FALSE
Network Publish
Published.
Global/local
Global
TRUE: The same IP address is assigned to more than one node.
FALSE: Other than the above.
Data type
BOOL
R/W access
R
Retained
Not retained.
Usage in user program
Possible.
Related instructions
---
Variable name
_EIP_BootpErr
Meaning
BOOTP Server Error
Function
Range of values
TRUE or FALSE
Network Publish
Published.
Global/local
Global
TRUE: There was a failure to connect to the BOOTP server (timeout).
FALSE: The BOOTP is not enabled, or BOOTP is enabled and an IP address was normally obtained from the
BOOTP server.
Data type
BOOL
R/W access
R
Retained
Not retained.
Range of values
TRUE or FALSE
Network Publish
Published.
Usage in user program
Possible.
Related instructions
---
Variable name
_EIP_IPRTblErr
Meaning
TCP/IP Advanced Setting Error
Global/local
Global
Function
TRUE: There is an error in one of the following settings. Or, a read operation failed.
• IP router table settings
• Hosts settings
FALSE: Normal.
Data type
BOOL
R/W access
R
Retained
Not retained.
Usage in user program
Possible.
Related instructions
---
A-70
Range of values
TRUE or FALSE
Network Publish
Published.
NJ-series CPU Unit Software User’s Manual (W501)
Appendices
_EIP_IdentityErr
Meaning
Identity Error
Function
TRUE: The identity information (which you cannot overwrite) is not correct. Or, a read operation failed.
Global/local
A-4 Specifications for Individual System-defined Variables
Variable name
Global
FALSE: Normal.
Data type
BOOL
R/W access
R
Retained
Not retained.
Usage in user program
Possible.
Related instructions
---
Range of values
TRUE or FALSE
Network Publish
Published.
Global/local
Global
Variable name
_EIP_TDLinkCfgErr
Meaning
Tag Data Link Setting Error
Function
TRUE: The tag data link settings are incorrect. Or, a read operation failed.
FALSE: Normal.
BOOL
R/W access
R
Retained
Not retained.
Range of values
TRUE or FALSE
Network Publish
Published.
Usage in user program
Possible.
Related instructions
---
Variable name
_EIP_TDLinkOpnErr
Meaning
Tag Data Link Connection Failed
Global/local
Global
Function
TRUE: The connection was not established because the remote node information in the tag data link parameters
was different from the actual node information.
App
Data type
FALSE: Other than the above.
Data type
BOOL
R/W access
R
Retained
Not retained.
Usage in user program
Possible.
Related instructions
---
Variable name
_EIP_TDLinkErr
Meaning
Tag Data Link Communications Error
Function
Range of values
TRUE or FALSE
Network Publish
Published.
Global/local
Global
TRUE: A timeout occurred in a tag data link connection.
FALSE: Other than the above.
Data type
BOOL
R/W access
R
Retained
Not retained.
Usage in user program
Possible.
Related instructions
---
Range of values
TRUE or FALSE
Network Publish
Published.
Global/local
Global
Variable name
_EIP_TagAdrErr
Meaning
Tag Name Resolution Error
Function
TRUE: Tag resolution failed (i.e., the address could not be identified from the tag name). The following causes are
possible.
• The size of the network-published variable does not agree with the tag setting.
• The I/O direction that is set in the tag data link settings does not agree with the I/O direction of the variable in the CPU Unit.
• There is no network-published variable in the CPU Unit that corresponds to the tag setting.
FALSE: Other than the above.
Data type
BOOL
R/W access
R
Retained
Not retained.
Usage in user program
Possible.
Related instructions
---
NJ-series CPU Unit Software User’s Manual (W501)
Range of values
TRUE or FALSE
Network Publish
Published.
A-71
A-4-6 EtherNet/IP Function Module, Category Name: _EIP
Note This variable does not change to TRUE if there is no remote node when the power is turned ON.
Appendices
Variable name
_EIP_MultiSwONErr
Meaning
Multiple Switches ON Error
Function
TRUE: More than one data link start/stop switch changed to TRUE at the same time.
Global/local
Global
FALSE: Other than the above.
Data type
BOOL
R/W access
R
Retained
Not retained.
Range of values
TRUE or FALSE
Network Publish
Published.
Usage in user program
Possible.
Related instructions
---
Variable name
_EIP_TcpAppCfgErr
Meaning
TCP/IP Setting Error
Global/local
Global
Function
TRUE: At least one of the set values for a TCP/IP application (FTP, NTP, SNMP) is incorrect. Or, a read operation
failed.
Data type
BOOL
FALSE: Normal.
R/W access
R
Retained
Not retained.
Usage in user program
Possible.
Related instructions
---
Variable name
_EIP_NTPSrvErr
Range of values
TRUE or FALSE
Network Publish
Published.
Global/local
Global
Meaning
NTP Server Connection Error
Function
TRUE: The NTP client failed to connect to the server (timeout).
FALSE: NTP is not set or the connection was successful.
Data type
BOOL
R/W access
R
Retained
Not retained.
Usage in user program
Possible.
Related instructions
---
Variable name
_EIP_DNSSrvErr
Meaning
DNS Server Connection Error
Function
Range of values
TRUE or FALSE
Network Publish
Published.
Global/local
Global
TRUE: The DNS client failed to connect to the server (timeout).
FALSE: DNS is not enabled. Or, DNS is enabled and the connection was successful.
Data type
BOOL
R/W access
R
Retained
Not retained.
Usage in user program
Possible.
Related instructions
---
Range of values
TRUE or FALSE
Network Publish
Published.
z Functional Classification: EtherNet/IP Communications Status
Variable name
_EIP_EtnOnlineSta
Meaning
Online
Function
TRUE: The built-in EtherNet/IP port’s communications can be used. (The link is ON and IP address is defined.
Also, there are no errors).
Global/local
Global
FALSE: The built-in EtherNet/IP port’s communications is disabled due to an error in initial processing or restart
processing.
Data type
BOOL
R/W access
R
Retained
Not retained.
Usage in user program
Possible.
Related instructions
---
A-72
Range of values
TRUE or FALSE
Network Publish
Published.
NJ-series CPU Unit Software User’s Manual (W501)
Appendices
_EIP_TDLinkRunSta
Meaning
Tag Data Link Communications Status
Function
TRUE: At least one connection is in normal operation.
Global/local
A-4 Specifications for Individual System-defined Variables
Variable name
Global
FALSE: Other than the above.
Data type
BOOL
R/W access
R
Retained
Not retained.
Usage in user program
Possible.
Related instructions
---
Variable name
_EIP_TDLinkAllRunSta
Meaning
All Tag Data Link Communications Status
Function
Range of values
TRUE or FALSE
Network Publish
Published.
Global/local
Global
TRUE: Tag data links are communicating in all connections as the originator.
FALSE: An error occurred in at least one connection.
BOOL
R/W access
R
Retained
Not retained.
Usage in user program
Possible.
Related instructions
---
_EIP_RegTargetSta [255]
Meaning
Registered Target Node Information
Function
TRUE or FALSE
Network Publish
Published.
Global/local
Global
A-4-6 EtherNet/IP Function Module, Category Name: _EIP
Variable name
Range of values
App
Data type
This variable gives a list of nodes for which built-in EtherNet/IP connections are registered.
This variable is valid only when the built-in EtherNet/IP port is the originator.
Array[x] is TRUE: The connection to the node with a target node ID of x is registered.
Array[x] is FALSE: The connection to the node with a target node ID of x is not registered.
Data type
ARRAY [0..255] OF BOOL
R/W access
R
Retained
Not retained.
Usage in user program
Possible.
Related instructions
---
Variable name
_EIP_EstbTargetSta [255]
Meaning
Normal Target Node Information
Function
Range of values
TRUE or FALSE
Network Publish
Published.
Global/local
Global
This variable gives a list of nodes that have normally established EtherNet/IP connections.
Array[x] is TRUE: The connection to the node with a target node ID of x was established normally.
Array[x] is FALSE: The connection to the node with a target node ID of x was not established, or an error
occurred.
Data type
ARRAY [0..255] OF BOOL
Range of values
TRUE or FALSE
Network Publish
Published.
Global/local
Global
R/W access
R
Retained
Not retained.
Usage in user program
Possible.
Related instructions
---
Variable name
_EIP_TargetPLCModeSta [255]
Meaning
Target PLC Operating Mode
Function
This variable shows the operating status of the target node Controllers that are connected with the built-in EtherNet/IP port as the originator.
The array elements are valid only when the corresponding Normal Target Node Information is TRUE.
If the corresponding Normal Target Node Information is FALSE, the Target Node Controller Operating Information
indicates the previous operating status.
Array[x] is TRUE: This is the operating state of the target Controller with a node address of x.
Array[x] is FALSE: Other than the above.
Data type
ARRAY [0..255] OF BOOL
R/W access
R
Retained
Not retained.
Usage in user program
Possible.
Related instructions
---
NJ-series CPU Unit Software User’s Manual (W501)
Range of values
TRUE or FALSE
Network Publish
Published.
A-73
Appendices
Variable name
_EIP_TargetPLCErr [255]
Meaning
Target PLC Error Information
Function
This variable shows the error status (logical OR of fatal and non-fatal errors) of the target node Controllers that
are connected with the built-in EtherNet/IP ports as the originator.
Global/local
Global
The array elements are valid only when the corresponding Normal Target Node Information is TRUE.
The immediately preceding value is retained if this variable is FALSE.
Array[x] is TRUE: A fatal or non-fatal error occurred in the target Controller with a target node ID of x.
Array[x] is FALSE: Other than the above.
Data type
ARRAY [0..255] OF BOOL
Range of values
TRUE or FALSE
Network Publish
Published.
Global/local
Global
R/W access
R
Retained
Not retained.
Usage in user program
Possible.
Related instructions
---
Variable name
_EIP_TargetNodeErr
Meaning
Target Node Error Information
Function
This variable indicates that the connection for the Registered Target Node Information was not established or that
an error occurred in the target Controller.
The array elements are valid only when the Registered Target Node Information is TRUE.
Array[x] is TRUE: A connection was not normally established with the target node for a target node ID of x (the
Registered Target Node Information is TRUE and the Normal Target Node Information is FALSE), or a connection
was established with the target node but an error occurred in the target Controller.
Array[x] is FALSE: The target node is not registered for a target node ID of x (the Registered Target Node Information is FALSE), or a connection was normally established with the target node (the Registered Target Node Information is TRUE and the Normal Target Node Information is TRUE). An error occurred in the target Controller (the
Target PLC Error Information is TRUE).
Data type
ARRAY [0..255] OF BOOL
Range of values
TRUE or FALSE
Network Publish
Published.
R/W access
R
Retained
Not retained.
Usage in user program
Possible.
Related instructions
---
Variable name
_EIP_NTPResult
Members
.ExecTime
Meaning
NTP Last Operation Time
Global/local
Global
Function
Gives the last time that NTP processing ended normally.
The time that was obtained from the NTP server is stored when the time is obtained normally.
The time is not stored if it is not obtained from the NTP server normally.
Note Do not use this variable in the user program. There may be a delay in updating it. Use this variable only to
access status through communications from an external device.
Data type
Structure: _sNTP_RESULT
Range of values
Depends on data type.
Network Publish
Published.
Members: DATE_AND_TIME
R/W access
R
Retained
Not retained.
Usage in user program
Not possible.
Related instructions
You can read the contents of this variable with the GetNTPStatus instruction.
A-74
NJ-series CPU Unit Software User’s Manual (W501)
Appendices
_EIP_NTPResult
Members
.ExecNormal
Meaning
NTP Operation Result
Global/local
Global
Function
This variable shows if the NTP operation ended normally.
TRUE: Indicates an NTP normal end.
FALSE: Indicates that NTP operation ended in an error or has not been executed even once.
Note Do not use this variable in the user program. There may be a delay in updating it. Use this variable only to
access status through communications from an external device.
Data type
BOOL
R/W access
R
Retained
Not retained.
Range of values
TRUE or FALSE
Network Publish
Published.
Usage in user program
Not possible
Related instructions
You can read the contents of this variable with the GetNTPStatus instruction.
z Functional Classification: EtherNet/IP Communications Switches
Meaning
Tag Data Link Communications Start Switch
Function
This is the start switch for data links.
Data type
BOOL
R/W access
RW
Retained
Not retained.
Usage in user program
Possible.
Related instructions
---
Variable name
_EIP_TDLinkStopCmd
Meaning
Tag Data Link Communications Stop Switch
Function
This is the stop switch for data links.
Data type
BOOL
R/W access
RW
Retained
Not retained.
Usage in user program
Possible.
Related instructions
---
NJ-series CPU Unit Software User’s Manual (W501)
Global/local
Global
Range of values
TRUE or FALSE
Network Publish
Published.
Global/local
Global
Range of values
TRUE or FALSE
Network Publish
Published.
A-4-6 EtherNet/IP Function Module, Category Name: _EIP
_EIP_TDLinkStartCmd
App
Variable name
A-4 Specifications for Individual System-defined Variables
Variable name
A-75
Appendices
A-5
CPU Unit Data Retention and Other
Attributes
The following table shows whether CPU Unit data is retained or cleared for the following: Power interruptions, startup, operating mode changes, major fault level Controller errors, and clearing memory.
Status changes
CPU Unit data
User program
Task
Setup
Variables
Retained
(with nonvolatile
memory).
Change
between
PROGRAM
mode and
RUN mode
When a
Major Fault
Level Controller
Error
occurs
Same as
before
power interruption.
Retained.
Retained.
Retained
(with nonvolatile
memory).
Same as
before
power interruption.
Retained.
Retained
(with nonvolatile
memory).
Same as
before
power interruption.
Retained
(with nonvolatile
memory).
Writing
when write
protection
is enabled
Retained.
Not supported.
Retained.
Retained.
Same as
before
power interruption.
Retained.
Retained.
Retained
(with nonvolatile
memory).
Same as
before
power interruption.
Retained.
Retained
(with nonvolatile
memory).
Same as
before
power interruption.
Retained.
CPU Unit
name
Built-in EtherNet/IP port
name
Retained
(with nonvolatile
memory).
Same as
before
power interruption.
Retained.
Device variable
User-defined
variables
User-defined
data types
Operating
modes
permitting
writing
Overwriting in RUN
mode
Synchronized data
Retained.
Task Settings
Data type
When
power is
turned ON
Not supported.
POUs and user program
execution ID in user program
Variable
tables
(but not
variable
values)
Data retention at
power
interruptions
Transferring data
with the
Sysmac
Studio
PROGRAM/
RUN mode
(online editing)
Supported.
Retained.
PROGRAM
mode
Not supported.
Not supported.
Retained.
PROGRAM
mode
Not supported.
Not supported.
Retained.
PROGRAM/
RUN mode
(online editing)
Supported.
Not supported.
Retained.
PROGRAM/
RUN mode
(online editing)
Supported.
Retained.
Not supported.
Retained.
PROGRAM/
RUN mode
Supported.
Retained.
Supported
Not
retained.
PROGRAM/
RUN mode
Supported.
Retained.
Online editing
Online editing
Online editing
Controller name
A-76
NJ-series CPU Unit Software User’s Manual (W501)
Appendices
Status changes
Retained
(with nonvolatile
memory).
Writing
when write
protection
is enabled
Operating
modes
permitting
writing
Overwriting in RUN
mode
When a
Major Fault
Level Controller
Error
occurs
Same as
before
power interruption.
Retained.
Retained.
Not supported.
Retained.
CPU Unit
name:
RUN/PROGRAM
mode,
Other settings: PROGRAM
mode
Not supported.
Retained
(with nonvolatile
memory).
Same as
before
power interruption.
Retained.
Retained.
Not supported.
Retained.
Write Protection and
other settings: PROGRAM
mode
Supported.
TCP/IP Settings, Built-in
EtherNet/IP
Port Link Settings, Service
Settings.
SNMP Settings, SNMP
Trap Settings,
NTP Settings,
FTP Settings,
and IP Router
Tables
Retained
(with nonvolatile
memory).
Same as
before
power interruption.
Retained.
Retained.
Not supported.
Retained.
PROGRAM
mode
Not supported.
Tag data link
settings for
built-in EtherNet/IP port
Retained
(with nonvolatile
memory).
Same as
before
power interruption.
Retained.
Retained.
Supported
Not
retained.
PROGRAM/
RUN
Not supported.
Node Address
Settings,
FINS/UDP Settings,
FINS/TCP Settings, FINS
Routing
Tables
Retained
(with nonvolatile
memory).
Same as
before
power interruption.
Retained.
Retained.
Not supported.
Retained.
PROGRAM
mode
Not supported.
Axis assignments, axis
parameter settings, axes
group parameter settings,
MC common parameter
settings
Retained
(with nonvolatile
memory).
Same as
before
power interruption.
Retained.
Retained.
Not supported.
Retained.
PROGRAM
mode
Not supported.
Retained
(with nonvolatile
memory).
Same as
before
power interruption.
Retained.
Retained.
Not supported.
Retained.
PROGRAM
mode
Not supported.
Operation Settings
Operation Settings
Error settings
Security
Settings
Protection
Settings at
Startup
Built-in
EtherNet/IP
Port Settings
FINS Settings
Cam Data
Synchronized data
Event
Setting
Table
Event
Setting
Table
User-defined
error messages
Retained
(with nonvolatile
memory).
Same as
before
power interruption.
Retained.
Retained.
Not supported.
Retained.
RUN/PROGRAM
mode
Not supported.
Bus configuration
CJ-series
bus configuration
Retained
(with nonvolatile
memory).
Same as
before
power interruption.
Retained.
Retained.
Not supported.
Retained.
I/O table
PROGRAM
mode
Not supported.
NJ-series CPU Unit Software User’s Manual (W501)
A-77
App
Change
between
PROGRAM
mode and
RUN mode
Controller Setup
Motion
Control
Setup
When
power is
turned ON
A-5 CPU Unit Data Retention and Other Attributes
CPU Unit data
Data retention at
power
interruptions
Transferring data
with the
Sysmac
Studio
Appendices
Status changes
CPU Unit data
Data retention at
power
interruptions
When
power is
turned ON
Change
between
PROGRAM
mode and
RUN mode
When a
Major Fault
Level Controller
Error
occurs
Writing
when write
protection
is enabled
Transferring data
with the
Sysmac
Studio
Operating
modes
permitting
writing
Overwriting in RUN
mode
Synchronized data
Data in CJseries Units,
such as protocol macros
Retained
(in CJseries
Units).
---
Retained.
Retained.
Supported.
Not
retained.
Depends
on the Unit.
Words allocated to CPU
Bus Units,
Example: Controller Link
Data Link
Tables.
Retained
(with nonvolatile
memory).
Same as
before
power interruption.
Retained.
Retained.
Supported.
Not
retained.
RUN/PROGRAM
mode
Supported.
Retained
(with Battery).
Same as
before
power interruption.
Retained.
Retained.
Supported
Retained.
RUN/PROGRAM
mode
Supported.
Retained
(with nonvolatile
memory).
Same as
before
power interruption.
Retained.
Retained.
Not supported.
Retained.
PROGRAM
mode
Not supported.
Retained
(with nonvolatile
memory).
Same as
before
power interruption.
Retained.
Retained.
Not supported.
Retained.
PROGRAM
mode
Not supported.
Retained
(by slaves).
---
Retained.
Retained.
Supported.
Retained.
RUN/PROGRAM
mode
Supported.
Retained
(with nonvolatile
memory).
Same as
before
power interruption.
Retained.
Retained.
Operation Authority Verification
Not supported.
Not
retained.
PROGRAM
mode
Not supported.
Retained
(with nonvolatile
memory).
Same as
before
power interruption.
Retained.
Retained.
User program execution ID in CPU Unit
Not supported.
Not
retained.
PROGRAM
mode
Not supported.
Not
retained.
Initial values
Initial values
Initial values
Supported.
Not
retained.
RUN/PROGRAM
mode
Supported.
Retained
(with Battery).
Initial values
Retained.
Retained.
Supported.
Not
retained.
RUN/PROGRAM
mode
Supported.
Not
retained.
16#0000
16#0000
16#0000
Supported.
Not
retained.
RUN/PROGRAM
mode
Supported.
Retained
(with Battery).
Same as
before
power interruption.
Retained.
Retained.
Supported.
Not
retained.
RUN/PROGRAM
mode
Supported.
Special
I/O Unit
Settings/CP
U Bus
Unit Settings
CJ-series
Unit Settings
Words allocated in DM
Area
EtherCAT Configuratio
n
EtherCAT Network
Configuration
Network configuration
information.
Master
EtherCAT Settings
EtherCAT Settings
Settings in
Slaves
Present
values of
variables
Contents
of memory used
for CJseries
Units
A-78
Values of
nonretained
variables
User-defined
variables
Values of
retained
variables
User-defined
variables
CIO/WR
HR/DM/EM
NJ-series CPU Unit Software User’s Manual (W501)
Appendices
Status changes
Event
logs
Internal
clock
Logs
System log
User event log
Change
between
PROGRAM
mode and
RUN mode
When a
Major Fault
Level Controller
Error
occurs
Writing
when write
protection
is enabled
Overwriting in RUN
mode
Retained.
Retained.
Supported.
Not
retained.
Retained
(with Battery).
With Battery:
Retained
(continued), Without Battery:
Not predictable (may
stop).
Retained
(continued).
Retained
(continued).
Supported.
Not
retained.
Retained
(with Battery).
Same as
before
power interruption.
Retained
(continued).
Retained
(continued).
Supported.
Not
retained.
Supported.
RUN/PROGRAM
mode
Supported.
Not supported.
A-79
App
Same as
before
power interruption.
NJ-series CPU Unit Software User’s Manual (W501)
Operating
modes
permitting
writing
Synchronized data
Retained
(with Battery).
Depends on the specifications of each systemdefined variable.
Absolute encoder home offset
When
power is
turned ON
A-5 CPU Unit Data Retention and Other Attributes
CPU Unit data
Data retention at
power
interruptions
Transferring data
with the
Sysmac
Studio
Appendices
A-6
Contents of Memory Used for CJseries Units
You can specify addresses in the memory used for CJ-series Units for AT specifications for variables.
Details on each area are provided below.
A-6-1
CIO Area
I/O Bits
z Description
The bits in this area are allocated to input and output terminals on CJ-series Basic I/O Units. The
number of words (16 bits each) that is required for each CJ-series Basic I/O Unit are allocated in
order based on the position where the Units are connected (from left to right starting from the Unit
that is closest to the CPU Unit). Data in this area is cleared when power is cycled or when the operating mode is changed between PROGRAM and RUN mode.
z Addresses
Addresses
Range
Word addresses
CIO 0 to CIO 159
Bit addresses
0.00 to 159.15
Additional Information
You can access this area on NJ-series CPU Units through device variables allocated to I/O ports.
We therefore recommend that you do not use AT specifications to access this area. You should
use AT specifications for the CIO Area only when you specify addresses for some of the Special
Units.
CPU Bus Unit Area
z Description
The bits in this area are allocated to control and status information for CJ-series CPU Bus Units.
Each Unit is allocated 25 words based on its unit number. Data in this area is cleared when power is
cycled or when the operating mode is changed between PROGRAM and RUN mode.
z Addresses
Addresses
Range
Word addresses
CIO 1500 to CIO 1899
Bit addresses
CIO 1500.00 to CIO 1899.15
Words per Unit
25 words
The words that are allocated are listed in the following table.
Word addresses
A-80
Unit Number
CIO 1500 to CIO 1524
0
CIO 1525 to CIO 1549
1
to
to
CIO 1875 to CIO 1899
F
NJ-series CPU Unit Software User’s Manual (W501)
Appendices
For details on how to use the allocated words, refer to the operation manual for the CJ-series CPU
Bus Unit.
You can access the CPU Bus Unit Area in NJ-series CPU Units through the device variables that
are allocated to I/O ports. We therefore recommend that you do not use AT specifications to
access this area. You should use AT specifications for the CIO Area only when you specify
addresses for some of the Special Units.
Special I/O Unit Area
z Description
z Addresses
Range
Word addresses
CIO 2000 to CIO 2959
(10 words × 96 unit
numbers)
Bit addresses
CIO 2000.00 to CIO 2959.15
Words per Unit
A-6-1 CIO Area
Addresses
10 words
The words that are allocated are listed in the following table.
Word addresses
Unit Number
CIO 2000 to CIO 2009
0
CIO 2010 to CIO 2019
1
to
to
CIO 2950 to CIO 2959
95
For details on how to use the allocated words, refer to the operation manual for the CJ-series Special I/O Unit.
Additional Information
You can access the Special I/O Unit Area in NJ-series CPU Units through the device variables
that are allocated to I/O ports. We therefore recommend that you do not use AT specifications to
access this area.
DeviceNet Area
z Description
The bits in this area are allocated to the slaves when the remote I/O master function of a DeviceNet
Unit is used (fixed allocations only). Data in this area is cleared when power is cycled or when the
operating mode is changed between PROGRAM and RUN mode.
NJ-series CPU Unit Software User’s Manual (W501)
App
The bits in this area are allocated to control and status information for CJ-series Special I/O Units.
Each Unit is allocated 10 words based on the unit number for up to a total of 96 Units (unit numbers
0 to 95). Data in this area is cleared when power is cycled or when the operating mode is changed
between PROGRAM and RUN mode.
A-6 Contents of Memory Used for CJ-series Units
Precautions for Correct Use
A-81
Appendices
z Addresses
Addresses
Range
Word addresses
CIO 3200 to CIO 3799
Bit addresses
CIO 3200.00 to CIO 3799.15
Words in this area are allocated to slaves for fixed allocations according to fixed allocation setting 1,
2, or 3 in the software switches in the CIO Area. Select one of these fixed areas.
Master to slave output area
Addresses
Slave to master input area
Fixed allocation area 1
CIO 3200 to CIO 3263
CIO 3300 to CIO 3363
Fixed allocation area 2
CIO 3400 to CIO 3463
CIO 3500 to CIO 3563
Fixed allocation area 3
CIO 3600 to CIO 3663
CIO 3700 to CIO 3763
You can allocate memory in the DeviceNet Area even if you use fixed allocations to use the remote
I/O slave function of a DeviceNet Unit.
Master to slave output area
Addresses
Slave to master input area
Fixed allocation area 1
CIO 3370
CIO 3270
Fixed allocation area 2
CIO 3570
CIO 3470
Fixed allocation area 3
CIO 3770
CIO 3670
Refer to the CS/CJ-series DeviceNet Unit Operation Manual (Cat. No. W380) for details.
CIO Area Work Areas
z Description
You use the bits in these areas only in programming. You cannot use them to input or output data
through external I/O terminals. If you need work bits, you should normally use bits in this area. Data
in this area is cleared when power is cycled or when the operating mode is changed between PROGRAM and RUN mode.
z Addresses
Addresses
Range
A-6-2
Word addresses
CIO 1300 to CIO 1499 and
CIO 3800 to CIO 6143
Bit addresses
CIO 1300.00 to CIO 1499.15 and
CIO 3800.00 to CIO 6143.15
Auxiliary Area
z Description
You use the bits in these areas only in programming. You cannot use them to input or output data
through external I/O terminals. If you need work bits, you should normally use bits in this area. Data
in this area is cleared when power is cycled or when the operating mode is changed between PROGRAM and RUN mode.
A-82
NJ-series CPU Unit Software User’s Manual (W501)
Appendices
z Addresses
Range
A-6-3
Word addresses
W000 to W511
Bit addresses
W000.00 to W511.15
Holding Area
z Description
You use the words and bits in this area only in programming. The status of the words and bits in this
area are retained during power interruptions or when the operating mode is changed between PROGRAM and RUN mode.
z Addresses
Addresses
Range
H0 to H511
Bit addresses
H0.00 to H511.15
App
A-6-4
Word addresses
DM Area
This is a general-purpose data area used to read and write 16-bit words. You can also add a bit
number to address specify bits. Data in this area is retained during power interruption or when the
operating mode is changed between PROGRAM and RUN mode.
z Addresses
Range
Word addresses
D0 to D32767
Bit addresses
D0.00 to D32767.15
DM Area Words for Special Units
z Description
The following words in the DM Area are allocated to initial settings for Special Units.
z Addresses
Addresses
Range
Type of CJ-series
Special Unit
Word addresses
Words per Unit
CJ-series Special I/O
Units
D20000 to D29599 (100 words
× 96 unit numbers)
100 words
CJ-series CPU Bus
Units
D30000 to D31599 (100 words
× 16 unit numbers)
100 words
The words that are allocated are listed in the following table.
CJ-series Special I/O Units
Word addresses
Unit Number
D20000 to D20099
0
D20100 to D20199
1
to
to
D29500 to D29599
95
NJ-series CPU Unit Software User’s Manual (W501)
A-83
A-6-3 Holding Area
z Description
Addresses
A-6 Contents of Memory Used for CJ-series Units
Addresses
Appendices
CJ-series CPU Bus Units
Word addresses
Unit Number
D30000 to D30099
0
D30100 to D30199
1
to
to
D31500 to D31599
F
For details on how to use the allocated words, refer to the operation manual for the Special Unit.
Additional Information
You can access the DM Area words that are allocated to Special Units in NJ-series CPU Units
through the device variables that are allocated to I/O ports. We therefore recommend that you do
not use AT specifications to access this area.
A-6-5
EM Area
z Description
This is a general-purpose data area used to read and write 16-bit words. You can also add a bit
number to address specify bits. Data in this area is retained during power interruption or when the
operating mode is changed between PROGRAM and RUN mode.
z Addresses
Addresses
Range
Word addresses
E0_0 to E18_32767
Bit addresses
E0_0.00 to E18_3276.15
Note The number of banks is given in hexadecimal.
A-84
NJ-series CPU Unit Software User’s Manual (W501)
Appendices
A-7
Variable Memory Allocation Methods
• When you access variables through CIP messages or EtherNet/IP tag data links between an NJseries CPU Unit and another CPU Unit.
• When you need to exchange structure variable data with ID Tags or any device other than the CPU
Unit.
A-7-1
Variable Memory Allocation Rules
Variables are stored at locations in memory that are multiples of the alignment values shown in the following table.
Data type
Size
16 bits
Alignment
App
BOOL
2 bytes
8 bits
1 byte
WORD, UINT, or INT
16 bits
2 bytes
DWORD, UDINT, or DINT
32 bits
4 bytes
LWORD, ULINT, or LINT
64 bits
8 bytes
REAL data
32 bits
4 bytes
LREAL data
64 bits
8 bytes
TIME, DATE, TIME_OF_DAY, DATE_AND_TIME
64 bits
8 bytes
STRING[N]
(N+1) × 8
bits
1 byte
Enumeration
32 bits
4 bytes
A-7-1 Variable Memory Allocation Rules
BYTE, USINT, or SINT
Basic Data Types
z Variables with One-Byte Alignments (e.g., BYTE)
These variables are stored in memory with a one-byte alignment.
Example:
Memory
Variable Table
Bytes
Variable A (bits 0 through 7)
Stored with a 1-byte
alignment.
Variable B (bits 8 through 15)
Name
Data type
A
BYTE
B
BYTE
z Variables with Two-Byte Alignments (e.g., BOOL and WORD)
These variables are stored in memory with a two-byte alignment.
Example:
Memory
Size is 1 bit.
Bytes
Variable A
Variable B
Variable Table
Name
Data type
First byte
A
BOOL
First byte + 1
B
BOOL
First byte + 2
Stored with a 2-byte
alignment.
First byte + 3
NJ-series CPU Unit Software User’s Manual (W501)
A-7 Variable Memory Allocation Methods
You must be aware of variable memory allocation methods when you need to match the memory locations of structure variable members with the memory locations in other devices. When you use structure variables to perform communications with other devices, you must align the data allocations.
A-85
Appendices
z Variables with Four-Byte Alignments (e.g., DWORD)
These variables are stored in memory with a four-byte alignment. The first byte is the first of four
bytes in memory. Therefore, if a variable with a two-byte alignment, such as WORD data, is inserted,
two bytes of unused memory will remain.
Example:
Memory
Variable Table
Bytes
Variable A
Name
Data type
First byte
A
DWORD
First byte + 1
B
WORD
C
DWORD
Stored with a 4-byte
alignment.
First byte + 2
First byte + 3
Variable B
First byte + 4
Stored with a 2-byte
alignment.
First byte + 5
First byte + 6
Not used.
First byte + 7
First byte + 8
Variable C
First byte + 9
Stored with a 4-byte
alignment.
First byte + 10
First byte + 11
z Variables with Eight-Byte Alignments (e.g., LWORD)
These variables are stored in memory with an eight-byte alignment. The first byte is the first of eight
bytes in memory. Therefore, if a variable with a two-byte alignment, such as WORD data, is inserted,
six bytes of unused memory will remain. If a variable with a four-byte alignment, such as DWORD
data, is inserted, four bytes of unused memory will remain.
Example:
Memory
Variable Table
Bytes
Variable A
Name
Data type
First byte
A
LWORD
First byte + 1
B
WORD
First byte + 2
C
LWORD
First byte + 3
Stored with a
8-byte alignment.
First byte + 4
First byte + 5
First byte + 6
First byte + 7
Variable B
First byte + 8
Stored with a
2-byte alignment.
First byte + 9
First byte + 10
First byte + 11
First byte + 12
First byte + 13
Not used.
First byte + 14
First byte + 15
Variable C
First byte + 16
First byte + 17
First byte + 18
First byte + 19
First byte + 20
Stored with a
8-byte alignment.
First byte + 21
First byte + 22
First byte + 23
A-86
NJ-series CPU Unit Software User’s Manual (W501)
Appendices
Array Variables
Array variables are stored in a continuous section of memory.
Example:
Size is 1 bit.
Variable A
Variable B
Variable C[1..5]
A-7 Variable Memory Allocation Methods
Memory
Bytes
Variable Table
Name
Data type
First byte
A
BOOL
First byte + 1
B
BOOL
First byte + 2
C
ARRAY [1..5] OF BOOL
First byte + 3
D
ARRAY [0..18] OF BOOL
First byte + 4
E
ARRAY [5..8] OF BOOL
First byte + 5
Stored with
a 2-byte
alignment.
Variable D[0..18] First byte + 6
First byte + 7
First byte + 8
First byte + 9
Variable E[5..8]
First byte + 10
First byte + 11
Variable Table
Name
Data type
Variable A
ARRAY[0..4] OF INT
Variable A[0]
Variable A[1]
Variable A[2]
Variable A[3]
Variable A[4]
Structures
A continuous section of memory is allocated based on the alignment value of the data type of the structure variable to store structure data.
Example:
Data Type Definitions
Memory
Bytes
Variable A.a
Name
First byte
Stored with a
4-byte
alignment.
First byte + 1
First byte + 2
First byte + 3
Variable A.b
Stored with a
2-byte
alignment.
First byte + 4
First byte + 5
First byte + 6
First byte + 7
Not used.
Data type
Structure A STRUCT
a
DINT
b
INT
c
DINT
Variable Table
Name
Data type
Variable A
Structure A
First byte + 8
Variable A.c
First byte + 9
First byte + 10
Stored with a
4-byte
alignment.
First byte + 11
NJ-series CPU Unit Software User’s Manual (W501)
A-87
A-7-1 Variable Memory Allocation Rules
Variable A
App
Memory
Stored with a 2-byte alignment.
Appendices
A-7-2
Important Case Examples
When you exchange structure variable data between an NJ-series CPU Unit and another device, you
must align the memory locations of the structure variable members with those of the other device. This
is not necessary when you exchange data between NJ-series CPU Units.
You need to be aware of the locations in memory of structure variable members in the following cases.
z Reading and Writing Variables through CIP Messages or EtherNet/IP Tag Data
Links between an NJ-series CPU Unit and Another CPU Unit
When the object for a tag data link includes a structure variable, make sure that the locations in
memory of the structure variable members matches between the NJ-series CPU Unit and an other
CPU Unit you need to exchange data with. For example, the differences in memory configuration for
structure variables between an NJ-series CPU Unit and a CJ-series CPU are shown below.
Data Type Definitions
Name
Data type
Structure Y
STRUCT
a
DINT
b
INT
c
DINT
Variable Table
Data type
Name
Data Type Definitions
NJ-series Structure Variable NJ_X
Bytes
First byte
a
First byte + 4
b
First byte + 6
Not used.
First byte + 8
c
Variable NJ_X Structure Y
Name
Data type
Structure Y
STRUCT
a
DINT
b
INT
c
DINT
Variable Table
Name
Data type
Variable CJ_X
Structure Y
CJ-series Structure Variable CJ_X
Bytes
First byte
a
First byte + 4
b
First byte + 6
c
In this case, align the CJ-series and NJ-series memory locations.
Solution: Insert members to adjust memory locations.
You must match both the memory locations and the data types. You need to create the alignment
members for alignment in both the CJ-series and NJ-series CPU Units.
Data Type Definitions
Name
Data type
Structure Y
STRUCT
a
DINT
b
INT
c
DINT
Variable Table
Name
Data type
Variable NJ_X
Structure Y
Data Type Definitions
NJ-series Structure Variable NJ_X
Bytes
First byte
a
First byte + 4
b
First byte + 6
Not used.
First byte + 8
c
Name
Data type
Structure Y
STRUCT
a
DINT
b
INT
c
DINT
Variable Table
Name
Data type
Variable CJ_X
Structure Y
CJ-series Structure Variable CJ_X
Bytes
First byte
a
First byte + 4
b
First byte + 6
c
Make the following changes to align the memory
configurations in the NJ-series and CJ-series CPU Units.
Data Type Definitions
Data Type Definitions
NJ-series Structure Variable NJ_X
Name
Data type
Structure Y
STRUCT
a
DINT
b
INT
b2
INT
First byte + 4
DINT
First byte + 6
First byte + 8
c
c
Variable Table
First byte
Data type
Structure Y
STRUCT
a
DINT
b
INT
b
b2
INT
First byte + 4
b
b2
c
DINT
First byte + 6
b2
First byte + 8
c
a
Variable Table
Name
Data type
Name
Data type
Variable NJ_X
Structure Y
Variable CJ_X
Structure Y
2. Add the dummy variable b2 that you created in the
CJ-series CPU Unit to the NJ-series CPU Unit as well.
A-88
CJ-series Structure Variable CJ_X
Name
Bytes
Bytes
First byte
a
1. Add a dummy member variable b2 that matches the
unused memory location on the NJ-series CPU Unit.
NJ-series CPU Unit Software User’s Manual (W501)
Appendices
z Exchanging Structure Variable Data with ID Tags or Any Other Device Outside
of the CPU Unit
Example: Two-byte + four-byte data
Data to Write to the ID Tag
Bytes
First byte
a
First byte + 2
b
Data Type Definitions
Name
Structure Y
a
b
Variable Table
Name
Variable X
Data type
STRUCT
INT
DINT
NJ-series Structure Variable X
Bytes
a
First byte
First byte + 2
b
First byte + 4
Data type
Structure Y
A-7 Variable Memory Allocation Methods
When you create data to write to a device outside of the CPU Unit in an NJ-series CPU Unit structure variable, the data is arranged as shown below. Therefore, before you write the data to the ID
Tag, you must arrange the data as shown below.
App
A-7-2 Important Case Examples
NJ-series CPU Unit Software User’s Manual (W501)
A-89
Appendices
In this case, use one of the following solutions.
Solution 1: Change the data format of the ID tag.
Solution 2: Use instructions to convert the data on the NJ-series CPU Unit before you write it to the
ID Tag.
NJ-series Structure Variable X
Bytes
First byte
First byte + 2
First byte + 4
BYTE Array Variable Z to Write to ID Tag
Bytes
First byte
Z[0]: Value of a
First byte + 2
Z[2]: Value of b
a
b
Written to ID Tag.
(@)ToAryByte
Structure variable X.a
EN
Transfer each member
to the byte array.
ENO
Out
In
_LOW_HIGH
Order
Array variable Z[0] AryOut
(@)ToAryByte
EN
Structure variable X.b
In
ENO
Out
_LOW_HIGH
Order
Array variable Z[2] AryOut
A-90
NJ-series CPU Unit Software User’s Manual (W501)
Index
I
NJ-series CPU Unit Software User’s Manual (W501)
Index-1
Index
Index
A
Accessing Task .............................................................. 4-7
accessing tasks ........................................................... 5-15
_TaskName_Active ...................................5-19, A-27, A-47
_AlarmFlag ........................................................ A-28, A-50
algorithms ........................................................... 6-10, 6-17
All Tag Data Link Communications Status ........ A-43, A-73
Always FALSE Flag ........................................... A-29, A-52
Always TRUE Flag ............................................ A-29, A-52
array specification ............................................... 6-33, 6-44
AT Specification ........................................................... 6-51
Axes Group Error Status ................................... A-33, A-60
Axes Group Variables ........................2-7, 3-18, A-33, A-60
Axis Error Status ............................................... A-33, A-60
Axis Variables ....................................2-7, 3-18, A-33, A-61
B
backup
data ........................................................................ 9-57
present values of battery-backup memory ............ 9-57
basic data types .......................................................... 6-31
Basic Ethernet Setting Error .............................. A-39, A-70
Basic I/O Unit Information ................................. A-32, A-57
Basic I/O Units ......................................................4-10, 9-7
Basic Input Unit Input Response Times ..... 9-8, A-31, A-56
basic settings ................................................................. 4-4
basic system configurations .......................................... 1-4
bit strings ..................................................................... 6-31
Boolean ....................................................................... 6-31
BOOTP Server Error ......................................... A-39, A-70
Built-in EtherCAT Error ...................................... A-34, A-61
Built-in EtherNet/IP Error ................................... A-38, A-68
bus bars ....................................................................... 6-65
C
cam data variables ........................................................ 2-6
_Card1Access ..........................................9-13, A-28, A-51
_Card1Deteriorated .................................. 9-13, A-28, A-51
_Card1Err .................................................9-13, A-28, A-50
_Card1PowerFail ......................................9-13, A-28, A-51
_Card1Protect ..........................................9-13, A-28, A-50
_Card1Ready ...........................................9-13, A-28, A-50
Carry Flag .................................................. 6-8, A-29, A-52
changing present values ............................................. 9-32
checking I/O wiring ........................................................ 7-7
CIP Communications Error ................................ A-39, A-69
_CJB_CBU00InitSta to
_CJB_CBU15InitSta ................................ 9-8, A-32, A-57
_CJB_CBU00Restart to
_CJB_CBU15Restart .............................. 9-9, A-32, A-58
_CJB_ErrSta ..................................................... A-31, A-56
Index-2
_CJB_InRespTm ........................................9-8, A-31, A-56
_CJB_IOUnitInfo ................................................ A-32, A-57
_CJB_MaxRackNo ............................................ A-31, A-55
_CJB_MaxSlotNo .............................................. A-31, A-55
_CJB_MstrErrSta .............................................. A-31, A-56
_CJB_SCU00P1ChgSta to
_CJB_SCU00P2ChgSta ...........................................A-32
_CJB_SCU00P1ChgSta,
_CJB_SCU00P2ChgSta to _CJB_SCU15P1ChgSta,
_CJB_SCU15P2ChgSta ...........................................A-59
_CJB_SCU15P1ChgSta to
_CJB_SCU15P2ChgSta ...........................................A-32
_CJB_SIO00InitSta to
_CJB_SIO95InitSta .................................9-8, A-32, A-57
_CJB_SIO00Restart to
_CJB_SIO95Restart ................................9-9, A-32, A-58
_CJB_UnitErrSta ............................................... A-31, A-56
CJ-series Unit configuration .......................................... 1-4
CJ-series Units
accessing Basic I/O Units ...................................... 2-10
accessing Special Units ......................................... 2-10
interfacing .............................................................. 2-10
Clearing All Memory ...................................................... 9-3
clock .............................................................................. 9-3
clock data ...................................................................... 9-4
Common Error Status ........................................ A-33, A-59
Common Variable .............................................. A-33, A-60
communications .......................................................... 10-3
Communications Controller Error ...A-34, A-39, A-62, A-69
Communications Error Slave Table ................... A-35, A-65
Communications Port Error ............A-34, A-38, A-61, A-68
Condition Flags ......................................................... 6-104
connecting lines ........................................................... 6-66
constants ..................................................................... 6-61
bit string data ......................................................... 6-62
bits ......................................................................... 6-61
integers .................................................................. 6-61
numbers ................................................................. 6-61
real data ................................................................. 6-62
text strings ............................................................. 6-64
time-related data .................................................... 6-63
control period and tasks .............................................. 2-13
Controller Error Status ....................................... A-28, A-49
Controller errors .......................................................... 9-49
Controller events ......................................................... 9-44
Controller information .................................................. 9-49
Controller Setup ............................................................ 4-4
CPU Bus Unit Initializing Flags ...................9-8, A-32, A-57
CPU Bus Unit Restart Bits .........................9-9, A-32, A-58
CPU Unit
data ........................................................................ 2-18
internal software configuration ................................. 2-2
name ...................................................................... 9-19
resetting ................................................................. 12-3
status ..................................................................... 2-17
NJ-series CPU Unit Software User’s Manual (W501)
Index
watchdog timer error ............................................. 12-3
_CurrentTime .................................................... A-26, A-47
D
data formats
bit strings ............................................................... 6-34
real numbers ......................................................... 6-34
text strings ............................................................. 6-34
data retention .............................................................. 2-18
data tracing ................................................................. 9-35
continuous tracing ................................................. 9-36
operation ............................................................... 9-38
specifications ......................................................... 9-37
triggered tracing .................................................... 9-35
data types ................................................................... 6-30
BOOL .................................................................... 6-31
BYTE ..................................................................... 6-31
converting .............................................................. 6-37
DATE ..................................................................... 6-32
DINT ...................................................................... 6-31
DWORD ................................................................. 6-31
INT ........................................................................ 6-31
LINT ...................................................................... 6-31
LREAL ................................................................... 6-32
LWORD ................................................................. 6-31
REAL ..................................................................... 6-32
SINT ...................................................................... 6-31
specifications ......................................................... 6-33
STRING ................................................................. 6-32
TIME ...................................................................... 6-32
TIME_OF_DAY ...................................................... 6-32
UDINT ................................................................... 6-31
UINT ...................................................................... 6-31
ULINT .................................................................... 6-31
USINT ................................................................... 6-31
WORD ................................................................... 6-31
date and time .............................................................. 6-32
dates ........................................................................... 6-32
derivative data types ................................................... 6-33
device variable name
creating automatically ........................................... 3-15
entering manually .................................................. 3-15
device variables ................................................... 2-5, 3-13
attributes ............................................................... 3-14
registering ............................................................. 3-15
Disabled Slave Table ......................................... A-37, A-66
Disconnected Slave Table ................................. A-37, A-66
DNS Server Connection Error ........................... A-40, A-72
downloading .................................................................. 8-6
durations ..................................................................... 6-32
E
_EC_CommErrTbl ............................................. A-35, A-65
_EC_DisableSlavTbl ......................................... A-37, A-66
_EC_DisconnSlavTbl ........................................ A-37, A-66
_EC_EntrySlavTbl ............................................. A-37, A-65
_EC_ErrSta ....................................................... A-34, A-61
NJ-series CPU Unit Software User’s Manual (W501)
_EC_InDataInvalid ............................................ A-37, A-67
_EC_LanHwErr ................................................. A-34, A-62
_EC_LinkOffErr ................................................. A-34, A-62
_EC_LinkStatus ................................................ A-37, A-67
_EC_MacAdrErr ................................................ A-34, A-62
_EC_MBXSlavTbl ............................................. A-37, A-65
_EC_MsgErr ..................................................... A-35, A-64
_EC_MstrErr ..................................................... A-34, A-61
_EC_NetCfgCmpErr ......................................... A-34, A-63
_EC_NetCfgErr ................................................. A-34, A-63
_EC_NetTopologyErr ........................................ A-34, A-63
_EC_PDActive .................................................. A-37, A-66
_EC_PDCommErr ............................................. A-34, A-63
_EC_PDSendErr ............................................... A-35, A-63
_EC_PDSlavTbl ................................................ A-37, A-66
_EC_PDTimeoutErr .......................................... A-34, A-63
_EC_PktMonStop ............................................. A-37, A-67
_EC_PktSaving ................................................. A-37, A-67
_EC_PortErr ...................................................... A-34, A-61
_EC_RegSlavTbl ............................................... A-37, A-65
_EC_SlavAdrDupErr ......................................... A-35, A-64
_EC_SlavAppErr ............................................... A-35, A-64
_EC_SlavEmergErr ........................................... A-35, A-64
_EC_SlavErr ..................................................... A-34, A-62
_EC_SlavErrTbl ................................................ A-34, A-62
_EC_SlavInitErr ................................................ A-35, A-64
_EIP_BootpErr .................................................. A-39, A-70
_EIP_CipErr ...................................................... A-39, A-69
_EIP_DNSSrvErr .............................................. A-40, A-72
_EIP_ErrSta ...................................................... A-38, A-68
_EIP_EstbTargetSta[255] .................................. A-43, A-73
_EIP_EtnCfgErr ................................................ A-39, A-70
_EIP_EtnOnlineSta ........................................... A-43, A-72
_EIP_IdentityErr ................................................ A-40, A-71
_EIP_IPAdrCfgErr ............................................. A-39, A-70
_EIP_IPAdrDupErr ............................................ A-39, A-70
_EIP_IPRTblErr ................................................. A-40, A-70
_EIP_LanHwErr ................................................ A-39, A-69
_EIP_MacAdrErr ............................................... A-39, A-69
_EIP_MultiSwONErr ......................................... A-40, A-72
_EIP_NTPResult ......................................A-44, A-74, A-75
_EIP_NTPResult.ExecNormal .................................... A-44
_EIP_NTPResult.ExecTime ........................................ A-44
_EIP_NTPSrvErr ............................................... A-40, A-72
_EIP_PortErr ..................................................... A-38, A-68
_EIP_RegTargetSta[255] .................................. A-43, A-73
_EIP_TagAdrErr ................................................ A-40, A-71
_EIP_TargetNodeErr ................................................... A-74
_EIP_TargetNodeErr[255] ........................................... A-44
_EIP_TargetPLCErr[255] .................................. A-44, A-74
_EIP_TargetPLCModeSta[255] ......................... A-43, A-73
_EIP_TcpAppCfgErr ......................................... A-40, A-72
_EIP_TcpAppErr ............................................... A-39, A-69
_EIP_TDLinkAllRunSta ..................................... A-43, A-73
_EIP_TDLinkCfgErr .......................................... A-40, A-71
_EIP_TDLinkErr ................................................ A-40, A-71
_EIP_TDLinkOpnErr ......................................... A-40, A-71
_EIP_TDLinkRunSta ......................................... A-43, A-73
_EIP_TDLinkStartCmd ..................................... A-45, A-75
Index-3
I
Index
_EIP_TDLinkStopCmd ...................................... A-45, A-75
Emergency Message Detected ......................... A-35, A-64
EN ...................................................................... 6-12, 6-20
ENO .................................................................... 6-12, 6-20
enumerations ............................................................... 6-43
errors
checking for non-fatal errors .................................. 12-8
indicators ............................................................... 12-8
instructions that read error status ........................ 12-10
system-defined variables ..................................... 12-10
table ..................................................................... 12-12
troubleshooting with NS-series PT ........................ 12-9
troubleshooting with Sysmac Studio ...................... 12-9
_ErrSta .............................................................. A-28, A-49
EtherCAT Master Function Module
initial settings ......................................................... 4-15
EtherCAT Message Error .................................. A-35, A-64
EtherCAT network configuration .................................... 1-4
EtherCAT slave configuration ........................................ 3-5
EtherCAT Slaves
interfacing ................................................................ 2-8
EtherNet/IP Function Module
initial settings ......................................................... 4-16
event codes ................................................................. 9-45
event levels ......................................................... 9-45, 12-4
event log categories .................................................... 9-45
event logs .................................................................... 9-43
Event Setting Table ...................................................... 9-52
event sources .............................................................. 9-44
_TaskName_ExceedCount .......................5-20, A-27, A-49
_TaskName_Exceeded ............................5-20, A-27, A-49
_TaskName_ExecCount ...........................5-20, A-27, A-48
execution times
estimating ................................................................ 7-6
external variables ............................................... 6-12, 6-20
F
fatal errors ................................................................... 12-3
FINS/TCP Connection Status ............................ A-30, A-53
_FINSTCPConnSta ........................................... A-30, A-53
First RUN Period Flag ................................ 6-8, A-29, A-53
forced refreshing ......................................................... 9-28
FTP server ................................................................... 9-12
FUN instructions ........................................................ 6-104
function block instructions ......................................... 6-103
function blocks
accessing variables from outside
the function block ................................................ 6-16
array specifications for instances ........................... 6-14
calling from ST ....................................................... 6-10
creating .................................................................... 6-8
definitions and instances ....................................... 6-13
details ...................................................................... 6-8
execution conditions .............................................. 6-15
instances ............................................................... 6-13
instruction names .................................................... 6-9
names ...................................................................... 6-9
parameters ............................................................. 6-10
Index-4
structure ................................................................... 6-9
using or omitting EN and ENO ............................... 6-22
variable designations ............................................. 6-11
function modules ....................................................2-2, 2-3
EtherCAT Master Function Module .......................... 2-2
EtherNet/IP Function Module ................................... 2-2
Motion Control Function Module .............................. 2-2
PLC Function Module .............................................. 2-2
functions
details .................................................................... 6-17
expressing in ST .................................................... 6-18
instruction names .................................................. 6-17
names .................................................................... 6-17
operation for parameter errors ............................... 6-23
operation when parameters are omitted ................ 6-23
parameters ............................................................. 6-18
structure ................................................................. 6-17
variable designations ............................................. 6-19
G
global variables ............................................................ 6-29
I
I/O Bus Error Status .......................................... A-31, A-56
I/O Bus Master Error Status .............................. A-31, A-56
I/O Bus Unit Error Status ................................... A-31, A-56
I/O Control Task Settings ............................................... 4-6
I/O ports ...................................................................... 3-11
names .................................................................... 3-12
I/O refresh operation ................................................... 5-12
I/O Refreshing Timeout Error ...................................... 5-22
Identity Error ...................................................... A-40, A-71
implicit casts ................................................................ 6-77
inline ST ...................................................................... 6-70
in-out variables ...................................................6-11, 6-19
Input Data Invalid ............................................... A-37, A-67
input variables ....................................................6-11, 6-19
inputs
program inputs ....................................................... 6-66
instance name ............................................................... 6-9
instance names ........................................................... 6-17
Instruction Error Flag .......................6-8, 6-107, A-29, A-53
instruction errors .............................................6-105, 6-107
instruction options ..................................................... 6-103
instructions ................................................................ 6-102
GetMyTaskStatus ................................................... 5-19
Lock ....................................................................... 5-19
ResetUnit ................................................................. 9-8
Task_IsActive ......................................................... 5-19
Unlock .................................................................... 5-19
Insufficient System Service Time Error ....................... 5-23
integers ........................................................................ 6-31
internal variables ................................................6-12, 6-19
IP Address Duplication Error ............................. A-39, A-70
NJ-series CPU Unit Software User’s Manual (W501)
Index
L
ladder diagram language ............................................ 6-65
ladder diagrams
completion ............................................................. 6-66
connecting functions and function blocks .............. 6-67
controlling execution .............................................. 6-66
order of execution .................................................. 6-66
Largest Rack Number ....................................... A-31, A-55
Largest Slot Number ......................................... A-31, A-55
Last Task Execution Time ........................ 5-19, A-27, A-48
_TaskName_LastExecTime ..................... 5-19, A-27, A-48
Link OFF Error .................................................. A-34, A-62
Link Status ........................................................ A-37, A-67
literals .......................................................................... 6-61
local variable tables ............................................ 6-10, 6-18
local Variables ............................................................. 6-28
M
MAC Address Error ........................ A-34, A-39, A-62, A-69
master control ........................................................... 6-109
Master Error ...................................................... A-34, A-61
_TaskName_MaxExecTime ..................... 5-19, A-27, A-48
Maximum Task Execution Time ............... 5-19, A-27, A-48
MC Common Variable ................................................... 2-7
MC Test Run ................................................................. 7-7
_MC_AX[64] ...................................................... A-33, A-61
_MC_AX_ErrSta ............................................... A-33, A-60
_MC_COM ........................................................ A-33, A-60
_MC_ComErrSta ............................................... A-33, A-59
_MC_ErrSta ...................................................... A-33, A-59
_MC_GRP[32] ................................................... A-33, A-60
_MC_GRP_ErrSta ............................................ A-33, A-60
Message Communications Enabled Slave Table ........ A-65
_TaskName_MinExecTime ...................... 5-19, A-27, A-48
Minimum Task Execution Time ................ 5-19, A-27, A-48
Motion Control Function Module
initial settings ......................................................... 4-13
Motion Control Function Module Error Status ... A-33, A-59
Motion Control Period Exceeded Error ....................... 5-21
motion control system ................................................. 2-15
Multiple Switches ON Error ............................... A-40, A-72
N
names
restrictions ............................................................. 6-60
nesting
levels ..................................................................... 6-26
Network Communications Instruction
Enabled Flag .................................................. A-30, A-53
Network Configuration Error ............................. A-34, A-63
Network Configuration Information Error .......... A-34, A-63
Network Configuration Verification Error ........... A-34, A-63
network configurations .................................................. 1-5
Network Connected Slave Table ....................... A-37, A-65
non-fatal errors ............................................................ 12-4
Normal Target Node Information ....................... A-43, A-73
NJ-series CPU Unit Software User’s Manual (W501)
NTP Last Operation Time ................................. A-44, A-74
NTP Operation Information ......................................... A-44
NTP Operation Result ....................................... A-44, A-75
NTP Server Connection Error ........................... A-40, A-72
Number of Task Executions ........................................ 5-20
Number of Used Ports ...................................... A-30, A-53
O
Online ................................................................ A-43, A-72
online editing ............................................................... 9-34
operating mode ........................................................... 2-17
checking .................................................................. 8-5
operation when changing operating mode .............. 8-4
Operating Mode at Startup ............................................ 8-4
operating modes ........................................................... 8-3
operation authority ...................................................... 9-17
Operation Settings ........................................................ 4-4
Operation Settings Tab Page ........................................ 4-4
output variables .................................................. 6-11, 6-19
outputs
program outputs .................................................... 6-66
P
I
Packet Monitoring Stopped ............................... A-37, A-67
P_CY ........................................................................... A-29
Period/Execution Condition ........................................... 4-6
periodic tasks .............................................................. 5-10
parameters ............................................................ 5-14
periodic tasks that control I/O ................................ 5-10
periodic tasks that do not control I/O ..................... 5-10
P_First_RunMode ............................................. A-29, A-53
PLC Function Module
initial settings ........................................................... 4-4
PLC Function Module Error Status ................... A-30, A-55
_PLC_ErrSta ..................................................... A-30, A-55
_PLC_TraceSta[0..3] ......................................... A-54, A-55
_PLC_TraceSta[0..3].IsComplete .......................9-40, A-30
_PLC_TraceSta[0..3].IsStart ..............................9-40, A-30
_PLC_TraceSta[0..3].IsTrigger ...........................9-40, A-30
_PLC_TraceSta[0..3].ParamErr ..........................9-40, A-30
P_Off ................................................................. A-29, A-52
P_On ................................................................. A-29, A-52
_Port_isAvailable ............................................... A-30, A-53
_Port_numUsingPort ......................................... A-30, A-53
POUs
function blocks ......................................................... 6-6
functions .................................................................. 6-6
programs ................................................................. 6-6
restrictions ............................................................. 6-24
POUs (program organization units) .............................. 6-5
Power Interruption Count .................................. A-29, A-52
power ON
states ....................................................................... 8-3
Power Supply Unit
incorrect model ...................................................... 12-3
_PowerOnCount ................................................ A-29, A-52
_PowerOnHour ................................................. A-29, A-51
Index-5
Index
P_PRGER ......................................................... A-29, A-53
primary periodic task ..................................................... 5-8
parameters ............................................................. 5-13
Process Data Communicating Slave Table ....... A-37, A-66
Process Data Communications Error ................ A-34, A-63
Process Data Communications Status .............. A-37, A-66
Process Data Reception Timeout ................................A-34
Process Data Reception Timeout Error .......................A-63
Process Data Transmission Error ...................... A-35, A-63
Program Assignment Settings ....................................... 4-7
Program Execution Order .............................................. 4-7
PROGRAM mode .................................................2-17, 8-4
programming languages .............................................. 6-65
programs ....................................................................... 6-7
execution conditions ................................................ 6-8
protection ..................................................................... 9-21
CPU Unit write-protection ...................................... 9-22
user program transfers with no restoration information
9-22
R
range specification ............................................. 6-33, 6-48
Ready State ................................................................... 8-3
real numbers ............................................................... 6-32
refreshing task settings ............................................... 5-18
refreshing tasks ........................................................... 5-15
Registered Slave Table ...................................... A-37, A-65
Registered Target Node Information ................. A-43, A-73
restore
data ........................................................................ 9-57
present values of battery-backup memory ............ 9-57
_RetainFail ........................................................ A-29, A-52
Retention Failure Flag ....................................... A-29, A-52
return values ....................................................... 6-20, 6-21
RUN mode ............................................................ 2-17, 8-4
RUN output .................................................................... 9-6
S
Saving Packet Data File .................................... A-37, A-67
SD Memory Card
exclusive control of access .................................... 9-15
self-diagnosis ......................................................... 9-14
SD Memory Card Access Flag ................. 9-13, A-28, A-51
SD Memory Card Error Flag ............................. 9-13, A-50
SD Memory Card Life Warning Flag ........9-13, A-28, A-51
SD Memory Card Power Interruption Flag 9-13, A-28, A-51
SD Memory Card Ready Flag ..................9-13, A-28, A-50
SD Memory Card Setting .............................................. 4-4
SD Memory Card Write Protected Flag ....9-13, A-28, A-50
SD Memory Cards
file operations from the Sysmac Studio ................. 9-13
life expiration detection .......................................... 9-13
operation instructions ............................................ 9-12
operations .............................................................. 9-10
specifications ......................................................... 9-11
Security Setting ............................................................. 4-5
semi-user-defined variables .................................2-5, 6-27
Index-6
sequence control and motion control .......................... 2-14
sequence control system ............................................. 2-14
Serial Communications Unit 0, Port 1/2 Settings Changing
Flags ............................................................... A-32, A-59
Serial Communications Units 1 to 15, Port 1/2 Settings
Changing Flags .............................................. A-32, A-59
serial IDs ............................................................9-19, 9-20
Servo Drives
signal processing emulation .................................... 7-6
Settings for All Units ...................................................... 4-9
Settings for Exclusive Control of
Variables in Tasks ..............................................4-7, 5-15
simulation
debugging ................................................................ 7-5
partial simulation ...................................................... 7-4
speed ....................................................................... 7-4
starting and stopping ............................................... 7-4
simulation programs ...................................................... 7-3
Simulator and physical CPU Unit .................................. 7-3
Slave Application Error ...................................... A-35, A-64
Slave Error ......................................................... A-34, A-62
Slave Error Table ............................................... A-34, A-62
Slave Initialization Error ..................................... A-35, A-64
Slave Node Address Duplicated Error ............... A-35, A-64
Special I/O Unit Initializing Flags ................9-8, A-32, A-57
Special I/O Unit Restart Bits .......................9-9, A-32, A-58
Special Units ..........................................................4-9, 9-8
initial settings ......................................................... 4-11
specifications ................................................................. 1-6
general .....................................................................A-3
performance .............................................................A-4
ST language ................................................................ 6-71
assignment ............................................................ 6-79
CASE ..................................................................... 6-85
EXIT ....................................................................... 6-93
expressions ............................................................ 6-72
FOR ....................................................................... 6-87
function block calls ................................................. 6-94
function calls .......................................................... 6-97
IF with multiple conditions ...................................... 6-83
IF with one condition .............................................. 6-80
operators ................................................................ 6-75
REPEAT ................................................................. 6-92
RETURN ................................................................ 6-80
statement keywords ............................................... 6-74
structure ................................................................. 6-72
syntax errors ........................................................ 6-106
WHILE ................................................................... 6-90
structures ..................................................................... 6-38
Support Software ........................................................... 1-5
System Service Monitoring Settings ....................4-5, 5-27
system services ........................................................... 5-11
monitoring settings ................................................ 5-12
System Time ..................................................... A-26, A-47
system-defined events ................................................. 9-44
system-defined variables ......................................2-7, 6-27
Auxiliary Area bits for CJ-series Units ......... A-32, A-57
clock ............................................................. A-26, A-47
communications ........................................... A-30, A-53
NJ-series CPU Unit Software User’s Manual (W501)
Index
debugging .................................................... A-30, A-54
errors ........................................ A-28, A-30, A-49, A-55
EtherCAT communications errors ................ A-34, A-61
EtherCAT communications status ............... A-37, A-65
EtherNet/IP communications errors ............ A-38, A-68
EtherNet/IP communications status ............ A-43, A-72
EtherNet/IP communications switches ........ A-45, A-75
I/O bus errors .............................................. A-31, A-56
I/O bus status .............................................. A-31, A-55
meanings of error status bits ................................. A-45
motion control functions .............................. A-33, A-59
power supply ............................................... A-29, A-51
programming ............................................... A-29, A-52
SD Memory Cards ....................................... A-28, A-50
tasks ............................................................ A-27, A-47
system-defined variables for motion control .................. 2-7
T
Tag Data Link Communications Error ............... A-40, A-71
Tag Data Link Communications Start Switch .... A-45, A-75
Tag Data Link Communications Status ............. A-43, A-73
Tag Data Link Communications Stop Switch .............. A-75
Tag Data Link Connection Failed ...................... A-40, A-71
Tag Data Link Setting Error ............................... A-40, A-71
Tag Name Resolution Error ............................... A-40, A-71
Target Node Error Information .......................... A-44, A-74
Target PLC Error Information ............................ A-44, A-74
Target PLC Operating Mode ............................. A-43, A-73
Task Active Flag ....................................... 5-19, A-27, A-47
task design
example ................................................................. 5-26
Task Exceeded Flag .......................................... A-27, A-49
task exclusive control instructions ............................... 5-16
Task Execution Count ....................................... A-27, A-48
task execution status
monitoring ............................................................. 5-23
Task Execution Status Monitor ...................................... 4-8
Task Execution Time Monitor ............................... 4-8, 5-24
Task Execution Timeout Error ..................................... 5-22
Task Execution Timeout Time ....................................... 4-6
task execution times .................................................... 5-26
Task Name ............................................................. 4-5, 4-7
Task Period Exceeded Count ................... 5-20, A-27, A-49
Task Period Exceeded Error ....................................... 5-21
Task Period Exceeded Error Detection ......................... 4-6
Task Period Exceeded Flag ........................................ 5-20
Task Settings ................................................................. 4-5
Task Type ...................................................................... 4-5
tasks .............................................................................. 2-3
assigning tasks to programs .................................. 5-13
monitoring task execution status and task
execution times ................................................... 5-23
operating mode ....................................................... 5-8
order of program execution ................................... 5-13
outline ...................................................................... 5-5
overall operation ...................................................... 5-7
POUs that you can assign to tasks ....................... 5-13
processing of tasks and system services ................ 5-8
NJ-series CPU Unit Software User’s Manual (W501)
specifications ........................................................... 5-6
synchronizing variable access with task execution 5-18
task execution order ................................................ 5-8
task execution priority .............................................. 5-6
TCP Application Communications Error ........... A-39, A-69
TCP/IP Advanced Setting Error ........................ A-40, A-70
TCP/IP Basic Setting Error ............................... A-39, A-70
TCP/IP Setting Error ......................................... A-40, A-72
text strings ................................................................... 6-32
time of day ................................................................... 6-32
Total Power ON Time ........................................ A-29, A-51
Trace Busy Flag ....................................... 9-40, A-30, A-54
Trace Completed Flag .............................. 9-40, A-30, A-54
Trace Parameter Error Flag ...................... 9-40, A-30, A-55
Trace Trigger Monitor Flag ....................... 9-40, A-30, A-54
transferring
projects .................................................................... 7-7
troubleshooting ......................................................... 12-11
U
unions ......................................................................... 6-41
Unit configuration .......................................................... 3-7
Unit Configuration and Unit Setup ................................ 4-9
Unit Information ............................................................. 4-9
Update Variable ............................................................ 4-7
user program execution IDs ........................................ 9-25
User-defined Error Status ................................. A-28, A-50
user-defined errors ...................................................... 9-50
user-defined events ..................................................... 9-44
user-defined information ............................................. 9-50
user-defined variables .......................................... 2-5, 6-27
V
Variable Access Time ................................................... 4-6
variable access time ratio ............................................ 5-19
variable attributes
AT Specification ..................................................... 6-51
Constant ................................................................ 6-55
Edge ...................................................................... 6-57
Initial Value ............................................................ 6-53
Network Publish .................................................... 6-56
Retain .................................................................... 6-53
Variable Name ....................................................... 6-50
variable names ............................................................ 6-50
restrictions ............................................................. 6-60
variable values
ensuring concurrency ............................................ 5-15
variables
attributes ................................................................ 6-29
outline .................................................................... 6-27
types ...................................................................... 6-27
variables and I/O assignments ...................................... 2-8
verification of operation authority ................................ 9-17
Index-7
I
Index
Index-8
NJ-series CPU Unit Software User’s Manual (W501)
OMRON Corporation
Industrial Automation Company
Authorized Distributor:
Tokyo, JAPAN
Contact: www.ia.omron.com
Regional Headquarters
OMRON EUROPE B.V.
Wegalaan 67-69-2132 JD Hoofddorp
The Netherlands
Tel: (31)2356-81-300/Fax: (31)2356-81-388
OMRON ELECTRONICS LLC
One Commerce Drive Schaumburg,
IL 60173-5302 U.S.A.
Tel: (1) 847-843-7900/Fax: (1) 847-843-7787
OMRON ASIA PACIFIC PTE. LTD.
No. 438A Alexandra Road # 05-05/08 (Lobby 2),
Alexandra Technopark,
Singapore 119967
Tel: (65) 6835-3011/Fax: (65) 6835-2711
OMRON (CHINA) CO., LTD.
Room 2211, Bank of China Tower,
200 Yin Cheng Zhong Road,
PuDong New Area, Shanghai, 200120, China
Tel: (86) 21-5037-2222/Fax: (86) 21-5037-2200
© OMRON Corporation 2011 All Rights Reserved.
In the interest of product improvement,
specifications are subject to change without notice.
Cat. No. W501-E1-01
0711