1
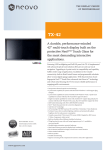
www.neo-laser.com
The neoV1064
Application Manual
•Nail Fungus
•Warts
2
DHF-001-R-023 neoV1064 Application Manual
European Authorized Representative:
MEDNET GmbH Borkstr 10,
48163 Munster, GERMANY
1023
CON T E N T
INHALT
Lasers Safety . . . . . . . . . . . . . . . . . . . . . . . . . . . . . . . 4
Device Overview . . . . . . . . . . . . . . . . . . . . . . . . . . . . 7
Optical Handpieces . . . . . . . . . . . . . . . . . . . . . . . . . . . 9
Nail Fungus . . . . . . . . . . . . . . . . . . . . . . . . . . . . . . . 11
Warts . . . . . . . . . . . . . . . . . . . . . . . . . . . . . . . . . . .15
© 2014 neoLaser. Alle Rechte vorbehalten.
Namen anderer hier genannter Firmen und Produkte sind Marken ihrer jeweiligen Rechtsinhaber. Jede Nutzung des Materials,
einschließlich der Vervielfältigung im Ganzen oder in Teilen, bedarf schriftlicher Genehmigung von neoLaser.
Es wurden alle Anstrengungen unternommen, um sicherzustellen, dass die in diesem Handbuch aufgeführten Informationen korrekt und
auf dem neusten Stand sind. neoLaser übernimmt jedoch keine Gewähr für die Richtigkeit des Inhalts dieses Handbuchs und haftet nicht
für persönlichen Schäden oder Verletzungen, die direkt oder indirekt verursacht werden, allein durch die Nutzung dieses Dokuments. Im
Zweifelsfall wenden Sie sich bitte vor Benutzung dieses Geräts an neoLaser.
Mai 2014
ENGLISCH
© 2014 neoLaser - all rights reserved.
Names other here named carrier companies or products are trademarks theirs respective holder of rights. Any use of the
material, including reproduction in whole or in part, requires permission in writing from neoLaser.
While every endeavour has been taken by the authors to ensure the information in this document is accurate and up to date.
neoLaser shall not be liable for any personal damage or injury caused directly or indirectly, by solely using this document.
In case of any doubt, please contact neoLaser before using the device.
May 2014
© neoLaser 2014
3
LASERS SAFETY
THERAPY INDICATIONS
1. This manual covers various podiatry applications approved for use with the neoV
laser; manual is designed to assist both
the “beginner” and “experienced” users.
2. Clinical information detailed in this manual is intended to be used by a healthcare
professional who posses relevant medical
background, as well basic knowledge with
medical lasers.
3. It is strongly advisable to refer to appropriate literature relevant to the intended
use. If no such literature is available,
please contact your local neoLaser representative for support.
4. Laser parameters values are usually
detailed with min /max values. These
parameters were developed based on the
extensive use of the device by healthcare
professionals.
5. The user should always utilize his/her experience and knowledge, as well as clinical best practice, taking into consideration
relevant patient information. Neither the
author nor the manufacturer will be liable
for a treatment failure caused by misuse
of the device.
MANAGING UNWANTED EFFECTS
Since safety goggles must be worn throughout the procedure, the operator must be aware
that his/her vision is temporarily altered (color shades appear differently, contrast may be
dimmed, etc.) - this can lead to visual misjudgment. It is than recommended from time to
time to turn off the laser, remove the goggles
and inspect the treated area without goggles.
In case of any eye injury due to disregard of the eye protection by safety goggles,
an ophthalmologist hast to be consulted.
Laser radiation can cause immediate and unwanted tissue damage, therefore it is highly advisable
to have within reach measures for burn control (such as: ice or cooling pads, topical products, special dressings for burns, etc.).
Laser radiation can cause unwanted hemostasis and coagulation damages. The
extent strongly depends on the exposure
time to the laser’s radiation.
Coagulated tissue is not harmful
and normally will not cause issues.
In case of overheating of temperature-sensitive areas, applying immediate
cooling should be done and treatment
should be stopped and reevaluated.
LASER RADIATION & TEMPERATURE EFFECT
TEMPERATURE
EFFECT
> 40° C
Enzyme induction, membrane
disaggregation, edema
45° – 65° C
Tissue damage, irreversibility
depends on irradiation time
> 65° C
Coagulation
> 100° C
Dehydration
> 150° C
Carbonisation
Discomfort from the heating which is generated by the laser may occur. To avoid this,
the user should follow the application parameter guidelines. If possible, cooling can
reduce patient discomfort during and after treatment.
4
Warning label fiber exit
(Console top)
Warning label WARNING LABELS
laser radiation
(Cover stand top)
The
neoV
an intense, highly
Manual FOXlaser produces
Warning label
directional
beam of laser
light.radiation
If directed, reflected,
July
2014
(Cover stand
or focused upon an object,
lasertop)
light will be
L A SER S SA F ET Y
Warning label fiber exit
(Console top)
damage. Moreover, this beam of light can be
hazardous to the eye even when the laser light
is reflected from a different surface.
partially absorbed, raising the temperature of
The energy generated by the neoV1064 laser is
Manual
FOXthe interior of the object,
WARNING
LABELS
the surface
and/or
in the infrared portion of the electromagnetic
July 2014
Warning label fiber exit
potentially causing an alteration or deformaspectrum.
(Console top)
tion
of
the
material
and
can
also
cause
tissue
Warning label
laser radiation
WARNING LABELS
(Cover stand top)
Warning label fiber exit
(Console top)
Warning label
laser radiation
(Cover stand top)
Warning label
laser radiation
(Cover stand top)
Warning label
laser radiation
(Cover stand top)
Warning/Hazard labels found on the NeoV Laser device
Infrared lasers are particularly hazardous,
since the body’s protective “blink reflex” response is triggered only by visible light. In this
sense, people exposed to high power laser emitting invisible 1064 nm radiation, may not feel
pain or notice immediate damage to their eyesight. A pop or click noise emanating from the
eyeball may be the only indication that retinal
damage has occurred i.e. the retina was heated
to over 100 °C resulting in localized explosive
boiling accompanied by the immediate creation
of a permanent blind spot.
File: User-Manual_Fox_III_EN
How the laser perform in a specific application
File: User-Manual_Fox_III_EN
is based on laser radiation
and tissue interaction, as the laser radiation may be absorbed,
scattered or reflected by the treated area. Air
has very little effect on the laser radiation so
interaction between air and the laser radiation
can be neglected. Reflection do plays a major
File:
User-Manual_Fox_III_EN
role
with metal, glass and other reflecting surfaces, but not so much when it comes to human
tissue.
When emitting
laser radiation on human tissue,
File: User-Manual_Fox_III_EN
reflection is minimal but not zero! Although
© neoLaser 2014
Warning label
Lasers
areradiation
categorized and classified into 4
laser
(Cover
stand top)
classes,
ranging
from Class 1 to Class 4. The
neoV is a Class 4 laser, which is the highest and
Warning
most dangerous
class label
of laser. By definition, a
laser radiation
class 4 laser can
burn
thetop)
skin, or cause devas(Cover
stand
tating and permanent eye damage as a result of
direct, diffuse or indirect beam viewing. These
lasers may ignite combustible materials, and
thus may represent a fire risk. These hazards
may also apply to indirect or non-specular reflections of the beam, even from apparently
matte surfaces—meaning that great care must
be taken to control the beam path and to protect
the eyes of any person within the laser use area.
24
laser radiation may be scattered on a tissue‘s
24
surface, it does not influence much the overall
energy absorption. Absorption is mainly derived by the laser radiation physical properties
(wavelength). Absorption defines how much of
the laser radiation is converted into heat, which
causes the desired clinical effects (coagulation
24
/ vaporisation).
24
5
L A SER S SA F ET Y
BASIC LASER SAFETY INSTRUCTIONS
To avoid any injuries it is important
to follow the laser safety instructions:
• Operating personnel – the neoV laser
system can be operated by authorized
personnel only.
• Laser Safety Goggles – Laser safety goggles are crucial for the safety of all persons
in the laser use area. Make absolutely sure
that before turning the laser to READY
mode (Yellow indicator on user screen and
Yellow light on diagonal stripe on top of
laser), every person in the area that may
be impacted by laser radiation is wearing
laser safety goggles. Make sure that the
goggles are suitable for eye protection from
the neoV laser radiation (see User Manual
for further information). This includes all
persons in the laser treatment area or laser
room, including patient, physician, nurse,
general staff and anyone in the vicinity of
the treatment area.
• Training - all users of the neoV laser
system have to be trained by neoLaser
authorized personnel or by your trained
authorized dealer.
• Laser Warning Symbols – laser Warning Symbols must be clearly placed in all
areas where the laser system is used.
• Laser Operating Area – the laser
operating area should be clearly marked
and sealed while laser is in operation. All
personnel should be aware when the laser
is operating and should not enter the Laser
Operating Area without adequate safety
protections while the laser is in use.
6
• System Check – before use, verify that
the system and all its components work
as intended. If the system does not come
up, you may try to isolate the problem, as
explained in the neoV User Manual. If problem persists, contact your local authorized
dealer for technical support. If any of the
components are deemed malfunctioning
– do not use the system, and contact your
local dealer.
• Fiber Delivery - the fiber spot, which
is illustrated by the aiming beam should
always be round and well defined no scattering should occur.
• Defined Application – do not use the
laser for any application other than its
defined application, as stated in this application manual. The laser must be used only
for the defined application; never illuminate/irradiate any other material or tissue
besides the intended use.
• Reflected laser radiation - reflected
laser radiation can cause the same harm
as direct application, therefore you should
make sure to avoid irradiating reflecting
materials.
• Standby Mode – the neoV laser should be
in Standby mode whenever the laser is not
in use, e.g. during operation breaks or at
the end of the surgery/procedure.
MANUAL neoV
DEVICE
OVERVIEW
August 2013
i. Housing Front
The front panel of the device consists of the following controls and keys:
Laser Status light: Green (standby), Yellow
(ready), Red (firing), Flashing Red (error)
Fiber Port
Emergency
Button
Touch Screen for setting control
Cooling inflow
Standby/Ready button
ii. neoV Fiber Port
The neoV
has a fiber port at the head of the device, intended to incorporate the patented
RearLaser
Panel/Sockets
click plug for a wide range of hand pieces and applicators. To protect the fiber port neoLaser
inserted the protective cap.
The silver port allows connection of a full range of fiber accessories, from 300 microns and up,
as the mating element is part of the fiber.
ATTENTION!
Fibers are not delivered with the laser and should be purchased separately.
On/Off
Button
Power
supply
Foot
Pedal
Door
interlock
© neoLaser 2014
28
neoLaser
flash drive
Do not connect
unauthorized
USB sticks into
the unit, use
only neoLaser
supplied sticks.
7
Language
Alarm Volume (5%-100%)
Aiming Beam Frequency
(0-6Hz)
Ready Yellow Brightness
(5%-100%)
Ready to Standby
(2min-inf)
Alarm Tone (10%-100%)
Volume (5%-100%)
Aiming Beam Brightness
(1-100%)
The settings screen is accessible from the main menu by pressing the Settings Icon on the top
right hand corner of the screen. Once entering the settings screen, all user settings will be easily
accessible, each one having its own up/down control button, as can be seen by the image
below.
Screen Brightness (5100%)
OV ERV IEW
Go back to
Home page
Go back button
MANUAL neoV
August 2013
MANUAL neoV
August 2013
i. Display / Main Menu
Humidity
Reset Settings
System Info
i. Display / Main Menu
Temperature
Remember
Surgeon Settings
Edit
Password
Advanced
Settings
Screen Brightness - Allows altering the brightness of the display screen to match the OR
environment. Changes will impact the display immediately
Pulse Length
Volume - Enables alteration of overall volume of noise generating functions of the unit (such as
feedback sound when pressing an icon).
Power Up/Down
Control Panel
Aiming Beam Brightness - Allows adjusting the brightness of the green Interval
aiming beamLength
from 1%
to 100% of the applicable power.
Pulse Length
Pulse/Energy
40
Display
Interval Length
Power Up/Down
Control Panel
Up/Down
Pulse/Energy
Buttons
Display
Up/Down
Buttons
Power Display / Control
Standby / Ready Button
The iconsThe
and
display
parameters
of the
Main
image
above.
icons
and display
parameters
of the
MainMenu
Menuare
are provided
provided in in
thethe
image
above.
The The
power of
setting
of the laser
is Power
provided
in the
of the
the screen.
This
corresponds
power setting
the laser
is provided
in
the
center
of
screen,
andnumber
corresponds
Display
/ center
Control
Standby
/ Ready
Button to to
peak power output from the fiber distal end to the tissue, and given in fractions of Watts. On
the peakthe
power
output from the fiber distal end to the tissue in Watts. On the right hand side you
the right hand side you may read (1) the Pulse Interval which dictates the length of each pulse
may readThe
the
Pulse
Interval
dictates
the
length
of each
pulse,
orLength,
CW
for
Continuous
in(1)
theicons
pulse
train,
or CW
forwhich
Continuous
transmission;
(2) the
Interval
which
and
display
parameters
of theWave
Main
Menu
are provided
in
the image
above.
The
the Interval
the following
will
be
SP in case
ofpulses,
a Single
power
setting
of Length,
the time
laseruntil
is
provided
in the pulse
center
oftime
thetransmitted,
screen.
Thisor
number
corresponds
toor SP in
Wave; (2)dictates
the Interval
which
dictates
the off
between
consecutive
Pulse
transmission;
(3)
the
Energy
Display
which
can
be
toggled
to
show
4
different
parameters
the peak power output from the fiber distal end to the tissue, and given in fractions of Watts. On
case of a the
Single
Pulse
transmission;
(3) the Energy Display which can be toggled to show 4 differof
dosage
as described
below.
right hand
side you may
read (1) the Pulse Interval which dictates the length of each pulse
ent parameters
of dosage.
in the pulse
train, or CW for Continuous Wave transmission; (2) the Interval Length, which
On the top
you may
see
the
Program
selected,
as well asorHome,
and
Settings
dictates
theline
Interval
time
until
thecurrent
following
pulseselected,
will
be transmitted,
SP in Save
case
of
aand
Single
On the top
line
you
may
see
the
current
Program
as
well as Home,
Save
Settings
icons. transmission; (3) the Energy Display which can be toggled to show 4 different parameters
Pulse
icons. On
line
you
may
Surgeon
selected,
theStatus
Laser
Statuson
indicator
on the
Onthe
thebottom
bottom
line
you
may
seesee
the the
Surgeon
selected,
and theand
Laser
indicator
the
of
dosage
as described
below.
bottom
right corner
hand corner
showing
whetherthe
the laser
laser is
or in
mode.
bottom right
hand
showing
whether
isininStandby
Standby
orReady
in Ready
mode.
On the top line you may see the current Program selected, as well as Home, Save and Settings
icons.
Changing
Parameters
On the
bottom line you may see the Surgeon selected, and the Laser Status indicator on the
right
corner
showing
whether
theas
laser
in Standby
or inand
Ready
mode. Length on the
You maybottom
change
thehand
Peak
Power
setting
as well
theisPulse
Length
Interval
main menu by (1) clicking on the parameter to activate its control and (2) clinking on the corresponding arrows to change it. When clicking the parameter it will be highlighted in Green to
36
indicate it may be now changed.
36
8
You may change the Peak Power setting as well as the Pulse Length and Interval Length on the
main menu by (1) clicking on the parameter to activate its control and (2) clinking on the
OPTICAL HANDPIECES
corresponding arrows to change it. When clicking the parameter it will be highlighted in Green to
indicate it may be now changed.
Saving Parameters
2. Saving Parameters
After changing
parameters,
the the
changes
may
bebestored
theprogram
program
name
by clicking
the
After changing
parameters,
changes
may
stored under
under the
name
by clicking
the
icontop
on the
top hand
right hand
Save iconSave
on the
right
side.side.
You may notice that once saved the Save icon will become inactive until a change is made. Once a
parameter
changed,
theonce
Savesaved
icon the
willSave
again
to allow
saving
the new
parameters.
Youismay
notice that
iconactivate
will become
inactive
until aof
change
is made.
Once a parameter is changed, the Save icon will again activate to allow saving of the new
parameters.
3. Power
The main Peak Power may be changed by clicking on it to activate its control and then by using
the arrows and bars on the left hand side to change the setting. The power control is activated
when marked in green. Once activated you may change the power setting by either (1) pressing
OPTICAL
HANDPIECES
the arrow keys up or down to increase or decrease the power in 0.1W steps or (2) pressing the
bar indicator
of power
on the
left Green
directly and
for immediate
andused
largerfor
changes
in power.
The optical
hand pieces
(Blue,
Red,
Silver) are
focusing/
parallelization the
laser beam for different applications. They work only with the double sided fiber connector
OF-WFST400-D.
4. Pulse Length Adjustment
The Pulse Length may be changed by clicking on it to activate its control and then by using the
arrows on the bottom right hand side to change the setting. The Pulse Length control is
activated when marked in green. Once activated you may change the setting by pressing the
arrow keys up or down to increase or decrease the Pulse Length between the activated settings
in a cyclical manner.
The activated settings can be determined by pressing down on the Pulse Length area for more
than 2 seconds. The Pulse Length Activation screen will show up as described below.
HP-FOC1, HP-FOC2, HP-FOC3
HP-NF
37
OPTICAL HANDPIECES - SPOT SIZE Ø
Handpiece
with OF-WFST400-D [400µm]
Blue
Ø 0.5 mm
Red
Ø 1.0 mm
Green
Ø 2.0 mm
Silver
Ø 3.0 mm
OF-WFST400-D [400 µm]
User has wide selection of hand pieces to achieve the proper spot size and power density on the
target tissue from 0.5 to 3mm
© neoLaser 2014
9
NAIL FUNGUS
NAI L
FU NGUS
Nail fungus (onychomycosis) is the most common nail
disease, impacting 6-8% of
the adult population. In the
past, nail fungus was treated by medication, but this
requires months of intake, it
is expensive and has severe
risk of liver damage. Using
the neoV laser allows for
effective treatment with no
medication.
10
NA IL F U NGUS
The neoV1064 produces a high intensity laser beam at 1064nm (near infrared) which goes through
the nail, penetrates the nail plate, heats up the nail bed and destroys the fungus (pathogens) with
minimal pain. The heat affects the
pathogens by warming the cells, destroying the cell walls and thus killing
the affected cells. The neoV radiation
does not have any effect on the nail
itself, the cuticle or the surrounding
skin. At the end of the process, the
nail fungus is eradicated and there is
visible increase in nail clearness.
CONTRA INDICATION
This treatment is not indicated for:
MANUAL
neoVMANUAL neoV
• Patients suffering from neuropathy, (including diabetics
with neuropathy)
August 2013 August 2013
• Patients with inflamed tissue around the fungus / treatment area
• Patients with hyperkeratosis infection
the Applicator
d. Inserting d.
theInserting
Applicator
When power
the preselected
power
and with
pulses
withparameters,
the treatmentthe
parameters,
preselected
and pulses
comply
thecomply
treatment
applicatorthe applicator
can the
beSETUP
plugged
into the laser aperture.
gged into
laser aperture.
neoV1064
system
should
besocket
equipped
a dual
connector
fiber
GentlyThe
push
the applicator
plug
into the
untilwith
it firmly
"clicks"
into place.
In (400
case micron
it does OFh the applicator
plug into the
socket
until ithand
firmlypiece
"clicks"
into place.
case itdepending
does
WFST400-D)
and
focusing
orIn
HP-NF
on physician prefenot click
in correctly, try
toatwist
the plug inside
the(HP-FOC2,
socket.
correctly, try to twist the plug inside the socket.
rence). Laser should be operated and fiber and hand piece connected according to User Manual
instructions (see DHF-001-R-003 neoV User Manual).
If the plug has not properly clicked into place, the device will not change into READY mode, and
theproperly
neoV laser
will not
has not
clicked
intowork.
place, the device will not change into READY mode, and
ser will not work.
Please pay attention to a clearly perceptible “click” when inserting the plug! You may need to
twist
thea plug
a bit
while its partially
in orderthe
to be
able
to fully
into place.
attention
to
clearly
perceptible
“click” inserted
when inserting
plug!
You
mayclick
needit to
© neoLaser
2014
ug a bit while its partially inserted in order to be able to fully click it into place.
11
NA IL F U NGUS
TREATMENT PARAMETERS
The duration of the treatment depends on the size of the nails, the number of nails to be treated,
the laser settings, the speed of the movement, and the tolerance of the specific patient to pain.
• Apply laser dosage to all nails, as to ensure optimal results and avoid reinfection due to untreated nails.
• Scan each treated nail at least twice in each treatment session.
• Scan the laser beam continuously over the nail to ensure uniform deposition of energy on
the entire nail surface as well as nail edge and surrounding tissue. Move over the nail both in
horizontal and vertical movements.
• Pass over the complete nail, including the nail plate,
nail wall and eponychium.
• If using HP-NF, the laser beam should be kept at a
distance of ~1cm from the nail, and with a spot size
of ~3mm. If using HP-FOC2, the metal distance
setting prongs should be in contact with the nail
ensuring spot size of 1mm on the nail
• If using a Continuous Scan Mode (high pulse rate of
30 pulses per second) – use HP-FOC2 and scan the
nail in a uniform speed continuously. Do not stop in
one spot. Keep motion at >2mm/sec.
• In using a Discrete Scan Mode, (low pulse rate of 2
pulses per second) – use HP-NF and move at least
half a spot size between consecutive pulses.
Below are the settings recommended for both techniques. The user should choose his preferred
technique based on his experience as well as patient preference.
LASER SETTINGS FOR USERS USING CONTINUOUS SCAN MODE
Nail Size
Power (W)
Pulse ON (ms)
Pulse OFF (ms)
Total Energy [J]
Time [Sec]
Small Toe
10
20
10
150-250
20-35
Middle Toe
10
20
10
300-500
45-75
Big Toe
10
20
10
600-800
90-120
LASER SETTINGS FOR USERS USING DISCRETE SCAN MODE
Nail Size
Power (W)
Pulse ON (ms)
Pulse OFF (ms)
Total Energy [J]
Time [Sec]
Small Toe
10
200
300
150-250
20-35
Middle Toe
10
200
300
300-500
45-75
Big Toe
10
200
300
600-800
90-120
12
“NeoV Laser“ is Trademark of NeoLaser
NA IL F U NGUS
The patient will feel a heating sensation. If this sensation gets too discomforting, cease treatment
for 5-10 secs. If the patient suffers from constant discomfort, turn down the power from 10W to
8W or lower.
If the patient has dark skin, it is recommended to consider taking down power as patient skin
absorption may be higher due to pigments and therefore result in increased pain sensation.
Post treatment heating sensation will cease after 1-2hours.
When applying energy, you can choose to view the accumulated energy delivered to the patient, or
the accumulated number of pulses delivered (on main screen below the Pulse On and Pulse Off interval times; see User Manual). In either case, it is highly recommended to record and document
the dosage applied in each session. Choosing the
Accumulated Energy setting will allow you to view
the total dosage applied in Joules.
Please note - all personnel, including the patient,
have to wear eye protection goggles; this may lead to
decreased vision regarding contrast and color by the
personnel and surgeon. In case of any eye injury due
to disregard of the eye protection by safety goggles,
immediate medical attention should be sought.
POST TREATMENT CARE
• Disinfect the hand piece by wiping it after each treatment with a special alcohol-containing
disinfectant solution. Hand pieces should not be used on consecutive patients without disinfecting them first.
• The neoV laser treatment should not have side effects, when applied correctly. However, the
heat generated by the laser radiation may cause patient discomfort. Post treatment, use cooling to reduce patient discomfort. Please note – discomfort may increase if laser treatment is
not applied correctly. All treatments should therefore follow the above application parameters
and guidelines.
• In severe cases, laser heating can cause burning of the tissue, depending on the amount of
energy that is applied to the nail. This may result in burn wounds, which in extreme situations
can cause necrosis. In case of overheating of temperature-sensitive areas, cool the area and
use other forms of burn treatment.
© neoLaser 2014
13
NA IL F U NGUS
AVOIDING REINFECTION
Several key steps are recommended to reduce chance of reinfection and increase probability of
successful long term outcome. These should be communicated to the patients and may include:
• Exchange regular shoes into new shoes
• Place shoes in the freezer overnight to kill any remaining fungal infection
• Use clean socks on daily basis
• Wash socks only at temperatures of >60° C to kill any remaining fungal infection
• Use antifungal powder in your socks/shoes on daily basis, or use of antifungal cream
• Wear absorbent socks (no synthetic material)
• After showering, dry the feet especially between the toes
• Wear well ventilated shoes
• If you run frequently, spray or powder on daily basis with fungicide
The patient should be followed up and examined 4-6 weeks after the last laser treatment to evaluate progress of clear nails. In any case of concern regarding outcome an additional laser session,
identical in nature to the sessions described above should be considered. Final outcome and
increase in clear nails can be viewed within 9-12 months of first treatment.
14
WARTS
WA RTS
© neoLaser 2014
15
WA RTS
BACKGROUND
Warts are benign (not cancerous) skin growths that appear when a virus infects the top layer of the
skin. Viruses that cause warts are called human papillomavirus (HPV). You are more likely to get
one of these viruses if you cut or damage your skin in some way.
Wart viruses are contagious.
Warts can spread by contact with the wart or something that touched the wart.
Warts that develop on the foot are commonly referred to as plantar warts.
Plantar warts have these traits:
• Grow most often on the soles (plantar surface) of the feet
• Can grow in clusters (mosaic warts)
• Often are flat or grow inward (walking creates pressure, which causes the warts to grow
inward)
• Can hurt, feels like you have pebbles in your shoe
• Can have black dots
Source: American Academy of Dermatology
PREREQUISITE
• Review User Manual for all safety and system operation topics prior to using the unit
• Ensure all users wear safety goggles per
requirements of User Manual and that
treatment room is properly marked and
protected
16
• Setup laser system, fiber, and hand piece
per User Manual requirements (see also
page 12 above for Nail Fungus setup)
• This application is applicable to neoV1064
(Part Number LSV1064-20) lasers only
with up to 20Watts of power
WA RTS
PATIENT/SETUP
• Document the treatment area prior to
treatment for clinical reference
• Topical and/or local anesthetic may be
used to increase patient comfort
• Debridement of the area for improved laser
transmission is recommended; use disinfected instruments
• Gel is not to be used
• Smoke evacuation and laser plume masks
highly recommended
TREATMENT
Settings should be
• 1mm spot size red focusing hand piece
Treat the entire wart area
• Make sure pulses overlap slightly
• For skin types I-IV:
16 Watts, 200-300 msec Pulse On,
300 msec Pulse Off,
total Fluence: 200-240 J/cm2
• Cover the wart area and a 1mm margin
around the wart
• For skin types V-VI:
12 Watts, 150-250 msec Pulse On,
300 msec Pulse Off,
total Fluence: 120-150 J/cm2
• Endpoint: Dusky, ashen or blanched appearance to the wart with a halo or round red
circle around the edge
POST TREATMENT
• Immediate cooling of the area with frozen
gel pack may help patient comfort. Burn
sensation may be felt up to 12 hours post
treatment
• If blistering occurs, wound healing treatment should be implemented, including
potential topical antibiotic or soothing
ointment
• Warts will usually present a black or crusty
appearance within 24 hours, a blood blister
© neoLaser 2014
may form within 7-10 days, then crusting
and sloughing off within 2 weeks
• The area should be kept clean, patient
should use new shoes and socks and wash
the area thoroughly
• More than one treatment may be necessary
if wart persists.
Treatments should be performed 3-4 weeks
apart
17
1064
Distributor:
The Product in this Brochure
is Not For Sale in the US
neoLaser • Ha‘Eshel St. 7, 3088900, Caesarea, Israel • POB 3203
[email protected] • office +972 4 677 9919 • fax +972 4 859 1505