1
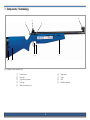
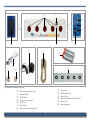
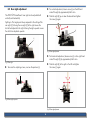
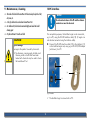
User Manual
LaserPower II Series Models
Issue 01/2013
Contents
1 Components / Terminology................................. 3
9 Maintenance / cleaning..................................... 17
2 Introduction............................................................. 5
10PC interface........................................................... 17
3 Key to Symbols....................................................... 5
11Technical data...................................................... 18
3.1 General instructions.................................................6
3.2 Safety instructions....................................................6
12Troubleshooting................................................... 19
4 Legal.......................................................................... 7
13Disposal.................................................................. 19
5 Intended use........................................................... 7
14Miscellaneous....................................................... 20
6 Liability..................................................................... 8
15Guarantee. ............................................................ 20
7 Inserting / replacing the batteries.................. 8
7.1 LaserPower II rifle.....................................................8
7.2 Biathlon target and main unit..................................10
7.3 Remote control.......................................................13
8 Shooting. ................................................................ 14
8.1
8.2
8.3
8.4
8.5
Engaging the safety on the LaserPower II rifle...........14
Releasing the safety on the LaserPower II rifle...........15
Target reducer.......................................................15
Laser alignment.....................................................15
Rear sight adjustment.............................................16
2
1 Components / Terminology
[1]
[4]
[2]
[3]
[7]
[9]
[6]
[5]
[8]
Fig. 1 Overall view of the LaserPower II rifle
[1]
[2]
[3]
[4]
[5]
Loading button
Rear sight
Trigger safety (if present)
Front sight
Battery compartment cover
[6]
[7]
[8]
[9]
3
Trigger guard
Trigger
Stock
Buttplate (adjustable)
[10]
[11]
[12]
[13]
[12]
[15]
[22]
[19]
[14]
[18]
[16]
[21]
[20]
[17]
[20]
Fig. 2 Overall view of LaserPower II accessories
[10]
[11]
[12]
[13]
[14]
[15]
[16]
[17]
[18]
[19]
[20]
[21]
[22]
Biathlon target / target zone (5 pcs.)
Information display
RS-485 interface
Power unit connection socket
On/Off switch
Infrared receiver
Batteries for the biathlon target (2x AA)
4
Target reducer
RS-485 interface cable
Power unit (6 volt)
Batteries for the remote control (2x CR 2016)
Remote control
Battery compartment
2 Introduction
3 Key to Symbols
Thank you for choosing an ANSCHÜTZ product.
Many spectacular sporting successes have been achieved
by marksmen, olympians and shooters in world and European
championships using ANSCHÜTZ sporting rifles. ANSCHÜTZ
hunting and sporting rifles are highly reputed as a result of their
well-engineered design, workmanship and outstanding shooting
performance. Quality and precision are a part of our tradition,
and have grown as a result of our experience since 1856.
In this handbook, the following symbols are used for particularly
important information:
XX is the symbol for an instruction
99 shows the desired result
yy is the symbol for a list item
$$ identifies a safety instruction
Note!
We wish you much pleasure and sporting success
with your new ANSCHÜTZ product.
An instruction indicating a particular course of .
action.
Your ANSCHÜTZ team.
Caution!
Indicates a hazardous situation that can lead to .
minor physical injury or material damage.
Warning!
Indicates a hazardous situation that can lead to .
serious physical injury or death.
5
3.1 General instructions
3.2 Safety instructions
Although the ANSCHÜTZ LaserPower II Set is a safe item of
sporting equipment, it can nevertheless present risks as a result of
incorrect use or failure to comply with the operating instructions.
Storage and use therefore require particular care. The following
safety and warning instructions must be observed without
exception!
Caution!
Misoperation!
Incorrect handling and failure to comply
with the operating instructions.
hh Observe the operating instructions.
Note!
The user's handbook must be read carefully .
before using the LaserPower II Set.
Caution!
Material damage and minor physical injury!
$$ The LaserPower II Set must not be exposed to rain, snow or other moisture.
Unauthorised opening of the LaserPower II Set.
hh The LaserPower II Set may only be opened
by qualified specialists.
$$ The LaserPower II Set may only be used at temperatures between +70 °C and 0 °C.
$$ It should only be used with dry hands.
The LaserPower II Set must be protected from:
yy
yy
yy
yy
yy
yy
high temperatures,
extreme temperature fluctuations,
direct sunlight,
excessive dust,
excessive cigarette smoke and
mechanical vibration or shocks.
$$ In the event of malfunctions or the appearance of smoke or smells, $
the LaserPower II Set must be checked by a qualified specialist.
$$ No foreign objects must be allowed to get into the LaserPower II Set.
$$ Servicing work may only be carried out by qualified specialists.
$$ Only original LaserPower II power units may be used with the LaserPower II Set.
Third-part products or even power units from previous LaserPower models will $
damage the target unit.
6
4 Legal
Caution!
Note!
Material damage and minor physical injury!
Foreign objects in the LaserPower II Set.
hh Protect the LaserPower II Set from entry
of foreign objects and liquids (eg. when
changing the batteries).
The applicable firearms legislation, regulations .
and provisions of the respective territory and .
also the safety rules of the hunting and sporting
organisations must be observed.
5 Intended use
$$ The batteries must be removed if the LaserPower II Set is not to be used $
for long periods.
The ANSCHÜTZ LaserPower II Set is designed exclusively for
shooting at the biathlon target. The hits are displayed by means
of a light signal on the biathlon target and are reset by remote
control. The 5-panel biathlon target is designed to detect and
register a Class 1 laser pulse. This is intended to be done at a
distance of 10 metres. The current diameters of the targets are in
line with the regulations for the summer biathlon that are in force
at present (as of June 2004).
$$ When transporting the LaserPower II Set from a cold areas to a warm area, $
it is necessary to wait for approximately one hour before switching it on.
Note!
Although the LaserPower II rifle is not a firearm as
defined by firearms legislation, care must be taken
that the barrel is always held in a safe direction .
and is never pointed at people.
7
6 Liability
7 Inserting / replacing the batteries
ANSCHÜTZ will accept no liability or claims for compensation
for damage of any kind arising from:
yy
yy
yy
yy
yy
yy
yy
yy
7.1 LaserPower II rifle
failure to comply with the instructions in this user's handbook,
improper treatment or repair,
use of non-original ANSCHÜTZ parts,
incorrect handling or care,
negligence,
removal of the sealing paint,
unauthorised tampering or
transport damage.
XX Unscrew the battery compartment cover [5] (on the underside
of the stock).
[5]
Caution!
Fig.3 Battery compartment cover opened
Altering or tampering with the LaserPower II Set or
its components is forbidden and may breach the
terms of the guarantee. Alterations of this kind can
have an adverse effect on the safe use of the product
and lead to accidents that endanger life and limb. .
In such cases the guarantee is automatically void.
XX Insert the batteries (2 x AAA), observing the correct polarity.
Fig.4 Inserting the batteries
8
XX Screw the battery compartment cover [5] on to the underside
of the stock.
Note!
Only batteries of the same brand and the same .
type may be used together.
The batteries must always be replaced at the same
time (do not fit old and new batteries together).
[5]
Fig.5 Battery compartment cover closed
Note!
Batteries are hazardous waste and do not belong .
in household refuse. The national regulations for .
the disposal of used batteries must be observed.
Note!
If the LaserPower II rifle is not to be used for long
periods, the batteries must be removed to prevent
damage due to leakage or corrosion.
Note!
The life of the batteries in the LaserPower II rifle
depends on the frequency of use. With frequent use,
it is entirely possible for the batteries to be drained
within 1-2 days.
9
7.2 Biathlon target
XX Insert the batteries (2 x AA), observing the correct polarity.
XX Remove the battery compartment cover [22].
Note!
To open the battery compartment, a small screwdriver or a fingernail must be hooked into the small
slot [v] on the outer edge of the cover, the tab [w]
pushed carefully (without applying force) in the
direction of the long slot [x] (see direction of arrow)
and the battery compartment cover lifted out.
Fig.7 Inserting the batteries
XX Refit the battey compartment cover [22].
[22]
[22]
[w]
[x]
[x]
[v]
Fig.8 Battery compartment cover closed
Fig.6 Battery compartment cover
10
Mains unit
The biathlon target can also be
powered from the mains if desired.
The battery circuit is interrupted
(switched off) when the power unit
is connected. Therefore it is not
necessary to remove the batteries
when using mains power.
Note!
If the biathlon target is not to be used for long .
periods, the batteries must be removed to prevent
damage due to leakage or corrosion.
Note!
The life of the batteries in the biathlon target .
depends on the frequency of use. With frequent use,
it is entirely possible for the batteries to be drained
within 1-2 days. A low battery charge condition
in the biathlon target is indicated by a "LO" in the
display.
Caution!
The mains unit supplied is intended exclusively
for the LaserPower biathlon target. Do not use it
for other units.
For operating at mains voltage you must only
use the genuine ANSCHÜTZ mains unit
(voltage 6 Volt)!
Please also observe the country-specific
stipulations in this matter!
Note!
Only batteries of the same brand and the same .
type may be used together.
The batteries must always be replaced at the same
time (do not fit old and new batteies together).
Intended use of the mains unit:
Unilateral modification and/or changing the mains unit is not permitted
for safety and certification reasons (CE).
Any other use than that described is not permitted and can lead to
damaging the product or short circuits, fires or electrocution.
Note!
Batteries are hazardous waste and do not belong .
in the household refuse. Used batteries must be .
disposed of in the used battery container.
11
• Pull the mains unit from the plug socket if the unit is not being used
for an extended period.
• In the event of a malfunction, separate the unit from the plug socket.
• In order to separate the unit completely from the mains, separate the
mains unit from the plug socket or the adapter from the unit.
• Mains units are not intended for use on humans or animals.
• Use under adverse conditions (e.g. moisture, too high humidity, dust,
flammable gases, vapours or solvents) is not permitted.
• Take the unit out of service if:
– there are visible indications of damage,
– it stops functioning perfectly,
– it has been stored under unfavourable conditions or
– it has been exposed to severe loading during transport.
• Also observe the additional safety instructions in each chapter of this
operating instruction manual.
NOTE!
The warranty/guarantee will become invalid for
damage caused by non-observance of this operating instruction manual! We accept no liability
for consequential losses! We accept no liability
for material damage or personal injury caused
by improper handling or non-observance of the
safety instructions. In these cases, the warranty/
guarantee becomes invalid.
Safety instructions:
To maintain the technically perfect condition of the unit and to guarantee safe operation, you must always observe the safety instructions and
warnings.
• Ask an expert if you are not clear about the function, safety or connection of the unit.
• Store away from access by children!
• Keep small parts etc. away from children and pets.
• In commercial buildings, comply with the accident prevention stipulations for electrical equipment and devices of the relevant professional association.
• The hands, shoes and clothes and the floor and mains unit must
remain dry during use.
• Do not connect the mains unit if you have brought it from a cold
room into a hot room. The condensation produced can destroy the
unit. The unit must be allowed to warm up to room temperature before switching it on.
• The mains unit warms up in use. Ensure adequate ventilation.
• Do not leave the mains unit and connected unit unsupervised during
operation.
Maintenance and cleaning of the mains unit:
The mains unit does not need any maintenance. Never dismantle the
unit because otherwise the CE approval and the warranty/guarantee
becomes invalid. In order to prevent damage, it should only be repaired by an expert or a specialist workshop.
Clean the mains unit only with a soft non-fraying cloth. Do not use
any cleaning agents. Dust can be removed with a soft paintbrush or a
vacuum cleaner.
Disposal of the mains unit:
Worn out and defective units must be taken to
public collection points for electrical waste.
12
7.3 Remote control NOTE!
You can use a remote control to operate more
than one target unit at the same time, since .
the remote control and target unit are not
made to match each other in each case.
XX Remove the CR 2016 button cells [20] from the remote
control unit [21] (see arrow).
Two CR 2016 button cells [20] are required for the remote
control unit.
[20]
[21]
[20]
Fig.11 Battery compartment open
XX Replace the batteries (the "+" terminals must face upwards).
XX Close the battery compartment cover again.
Fig.9 Button cells
XX Open the battery compartment cover (on the rear side of the
remote controller) with a suitable tool.
Fig.12 Battery compartment cover closed
Fig.10 Opening the battery compartment
99 The battery compartment is now open.
13
8 Shooting
The hits display is reset using the remote control [21].
XX Point the remote control [21] at the biathlon target and
press the button.
XX Switch the biathlon target on (On/Off switch [14] to "I").
99 The biathlon target is reset when all the lights go out.
8.1 Engaging the safety on the LaserPower II rifle
The trigger safety at the side [3] (where present) can be operated
when the rifle is cocked. The safety is engaged when the safety
catch is in the rear position (direction of arrow).
[14]
[2]
Fig. 13 Switching on the biathlon target
XX Press the loading button [1] on the LaserPower II rifle,
aim and pull the trigger [7].
Fig.15 Trigger safety
[1]
[7]
Fig.14 Loading and shooting
99 Hits are displayed by a green light signal on the biathlon
target.
14
8.2 Releasing the safety on the LaserPower II rifle
8.4 Laser alignment
The safety on the LaserPower II rifle is released when the safety
catch (where present) is in the forward position (direction of
arrow).
The laser is factory set to a range of 10 metres.
For varying distances, the use of a rear sight from the ANSCHÜTZ
range of accessories is recommended. The alignment is then
carried out using the rear sight adjustment.
[2]
Fig.16 Trigger safety
8.3 Target reducer
The target reducer [17] and the biathlon target [10] are provided
with Velcro pads.
XX To fasten the target reducer [17] to the biathlon target [10],
press the reducer [17] on to the target [10] using light pressure (the attachment points on the two components must be
facing each other).
99 The target reducer can be quickly attached and removed as
required.
15
8.5 Rear sight adjustment
XX For vertical adjustment, loosen screw [a] on the left hand
side of the sight by approximately half a turn.
The ANSCHÜTZ LaserPower II rear sight can be adjusted both
vertically and horizontally.
XX Slide the sight [b] up or down the dovetail and tighten
the screw [a] again.
Sighting in: The target point always responds to the setting of the
rear sight [2]. Moving the rear sight [2] to the right causes the
shot to be displaced to the right. Moving the sight upwards causes
the shot to be displaced upwards.
[b]
[a]
[3]
Fig.19 Rear sight adjustment
XX For horizontal adjustment, loosen screw [c] on the right hand
side of the sight [b] by approximately half a turn.
Fig.17 Rear sight
XX Slide the sight [b] to the right or the left and tighten
the screw [c] again.
XX To access the adjusting screws, unscrew the aperture [x].
[x]
[b]
[c]
Fig.18 Removing the aperture
Fig.20 Rear sight adjustment
16
9 Maintenance / cleaning
10PC interface
$$ The inside of the barrel of the LaserPower II rifle must always be kept free of dirt,
dust, snow, etc.
Note!
The relevant instructions of the PC and the software
manufacturers must be observed.
$$ A soft, dry cloth must be used to clean the LaserPower II Set.
$$ For stubborn dirt, the cloth can be moistened slightly and soaked with a mild $
cleaning agent.
$$ Dry the LaserPower II Set with a soft cloth.
For competition purposes, the biathlon target can be connected,
eg. to a PC, using the RS-485 interface cable [18]. (2 targets can
also be interconnected using the interface cable).
XX Connect the RS-485 interface cable [18] to the interface [12]
on the biathlon target and, using eg. an RS-485/USB adapter
(not shown), to a PC.
Caution!
Physical damage!
Damage to the product caused by chemicals.
hh No abrasives, scouring pads, alcohol, paint
thinners, petrol or cloths that have been
treated with chemicals may be used to clean
the LaserPower II Set.
[12]
[18]
[12]
Fig.21 Interface
99 The biathlon target is connected to a PC.
17
11Technical data
Note!
Weight........................................................... approx. 2.2 kg
ANSCHÜTZ does not itself market any software, .
nor does it offer any software support.
Overall length of LaserPower II rifle............................... 95 cm
System length.............................................................. 66 cm
Laser classification....................................... Class 1 (≤ 1mW)
Batteries for LaserPower II rifle................................... 2 x AAA
Note!
Batteries for remote control.............. 2 x CR 2016 lithium cells
Up to 99 biathlon targets can be interconnected .
over the RS-485 interface [12] and evaluated .
using appropriate software (competition mode). .
The targets are automatically configured with .
a unique consecutive target number, which is .
indicated in the information display [11].
.
It is also possible to supply power to several .
biathlon targets via the RS-485 cable [18] when .
only one power unit [19] is available. In this case,
however, a maximum of only 6 targets can be .
supplied with power from the power unit [19].
Batteries for biathlon target......................................... 2 x AA
Biathlon target interface............................................. RS-485
Biathlon target operating time (LED on)......... approx. 24 hours
Biathlon target operating time (LED off)....... approx. 150 hours
LaserPower II rifle operating time.......................approx.1 year
Remote control operating time..........................approx.1 year
18
12Troubleshooting
13Disposal
Before disposal, the LaserPower II Set must first be broken down
into its component materials.
Fault diagnosis on the LaserPower II Set
Fault
Possible cause
Remedy
Batteries too low
Laser actuator defective
Replace batteries
Send for repair
Laser not exactly on target
Laser not aligned correctly
Send for alignment
Trigger does not release
Trigger not cocked
Trigger safety engaged
Cock the LaserPower
Release trigger safety
Rifle:
No laser spot
Biathlon target:
Laser hits but target does not Target not switched on
light up
Switch on target
"LO" (Low battery) appears in
display
Batteries are flat
Replace batteries
When operating with plug-in
power unit
Connect power
Target does not respond with "LO" (Low battery) appears in
every shot
display
Batteries are flat
Original plug-in power unit
being used?
Replace plug-in power unit
Replace batteries
Use original plug-in power
unit
Important: When operating with a plug-in power unit, only use the unit supplied with the
set [19], as otherwise damage to the biathlon target can occur!
Remote control:
Range too short
Batteries low
Replace batteries
Does not even function close in Send both remote control and
biathlon target for repair
19
14Miscellaneous
15 Guarantee
Additional information is available on the Internet at
www.anschuetz-sport.com.
<<< WARRANT Y >>>
1. Material: This product has been released for sale after the product itself, its materials and individual components have been
subjected to strict inspection, or the rifle has demonstrated its durability and function during test shooting. J.G. ANSCHÜTZ
GmbH & Co. KG offers a full guarantee covering material and manufacturing faults (excluding broken stocks and springs)
for a period of two years, provided that the fault can be shown to have been present at the time of handover of the product.
No warranty claims will be accepted by J.G. ANSCHÜTZ GmbH & Co. KG for faults that are the result of improper use or
unauthorised repairs. The item will either be repaired or replaced at our discretion. Claims for compensation - put forward
for any legal reason whatsoever – are excluded.
ANSCHÜTZ provides news on this product and other products
in the ANSCHÜTZ Newsletter, which you can sign up to for free
on the Internet.
2. Shooting Performance: The purchaser undertakes to inform J.G. ANSCHÜTZ GmbH & Co. KG in writing of any
faults detected in shooting performance within one month of purchase with the submission of their own shooting record.
J.G. ANSCHÜTZ GmbH & Co. KG reserves the right to transfer the rifle to an independent agency for inspection (DEVA
or a national ballistics office). Should such an agency confirm excellent shooting performance, J.G. ANSCHÜTZ GmbH
& Co. KG is entitled to charge the purchaser the costs of the rifle inspection. The accepted warranties do not apply to rifle
damage resulting from mechanical effects and improper use or care by the purchaser. The warranty is excluded if the rifle
has been repaired or modified by unauthorised persons. Likewise, the warranty is cancelled when using reloaded ammunition
or ammunition which is not CIP approved.
In the event of a warranty/damage claim please enclose this card,
completed and signed by your dealer, with the product.
J.G. ANSCHÜTZ GmbH & Co. KG · Jagd- und Sportwaffenfabrik
Postfach 1128 · D-89001 Ulm/Germany · www.anschuetz-sport.com
SERIAL-NO.:
DATE:
THIS ITEM WAS BOUGHT FROM: (Stamp and signature of dealer)
www.anschuetz-sport.com
20