1
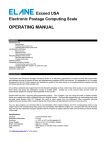
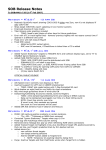
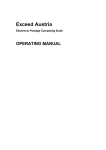
Exceed i 5kg/0.5g
Intelligent Precision Electronic Scale
Max=5000g, d=0.5g
USER MANUAL
CONTENTS
INTRODUCTION
Specifications
Preparing the Scale for Use
Keyboard Layout
Operating the Exceed Weighing Scale
KEYBOARD FUNCTIONS
BASIC FUNCTIONS
PROGRAMMABLE FUNCTIONS
SOFTWARE UPDATES
INTRODUCTION
The Exceed i Intelligent Precision Electronic Scale is a state-of-the-art weighing instrument which
encompasses intelligent features of a weighing scale that anyone can think of. It is not only a simple
weighing scale but it can do batch weighing, item counting and other important weight calculations. The
Exceed i Intelligent Precision Electronic Scale is also equipped with ten (10) optional programmable
functions which cannot be found on any other scales. These functions maximize scale use and allow
scale users to benefit the most out of their Exceed i scale.
The succeeding sections give more details on these features and functions of the Exceed i scale.
Specifications:
Capacity
Graduation / Resolution
Min startup weight detection
Accuracy
Power consumption
Tare
Weight of Scale
Dimensions
Display
Platform Size
Power Supply
Auto off
: 5000g
: 0.5g step
: 1.5g
: ± 0.1% of reading ±1 digit
: Approx. 0.40 watts
: Unlimited (up to scale’s maximum capacity)
: 1100g
: 20cm X 24.5cm X 7cm
: Liquid crystal display with back light
: Fold up 19 cm x 12 cm platform
: Mains via 12 Volts Main Adapter or 6 AA batteries (not supplied)
: Shuts down after 5 min of non use in battery (programmable autooff duration)
Visit http://www.elane.net/exceedpc/exceedi/exceedi.htm for the more details.
PREPARING THE SCALE FOR USE
(i) Fit the weighing platform to the body of the scale via the location points, making sure that the platform
opens toward the front (keyboard) end of the scale. Refer to the diagram below.
Fitting the Weighing Platform to the Scale
(ii) Plug the mains adapter supplied with the scale into the mains and connect the adapter's output plug
to the input socket at the rear of the scale.
(iii) Place the scale on a firm level surface, switch on the mains supply and press on the scale the
"ON/OFF" key.
(iv) The display shows “0.0 gm (zero grams)” and the scale is now ready to use.
OPERATING THE EXCEED i SCALE
The Exceed i Scale offers a straight-forward keyboard layout and corresponding display on the scale.
Weight display is available in six (6) units of weight and can be set by pressing the key of the desired unit.
It has six (6) basic functions labeled with F1-F6 on the keyboard, which can be used immediately. The
other ten (10) programmable functions require the use of Exceed i PC Program to activate and use each
function. There are also keys that allow users to enable scale features (like backlight on or off) or set
values (like setting of auto-off duration). The display and prompts on the scale will guide them on how to
use these features and functions.
DISPLAY LAYOUT
Data Input and Output
Display
Receive Data Symbol
Battery Low Symbol
Function Symbol Display/
Memory Usage Display
Send Data Symbol/
Data Log Symbol
Tare Symbol
Memory Location Display/
Batch Weighing Symbols
Display Hold Symbol/
Count Process Symbol
Weight Display /
Count Display (for
Diff Count Function)
Output & Function Symbols
KEYBOARD LAYOUT
BASIC FUNCTIONS
The following section gives details on the 6 basic functions of Exceed i. Press the corresponding key to
activate a function (except for DIFF COUNT function which can only be activated after COUNT function).
F1 BATCH
Batch function allows scale to batch weigh items. This is important when there is a need to pack
items according to a programmed standard set of weight range. It indicates whether the item they are
packing is below the standard weight, within the standard weight, or above the standard weight.
The result of batch weighing is indicated by the following display:
The current weight on the scale is within LOW range (greater than or equal to minimum
low range AND less than or equal to maximum low range).
LOW
SET
HIGH
The current weight on the scale is within SET or EXACT range (greater than or equal to
minimum set range AND less than or equal to maximum set range).
The current weight on the scale is within HIGH range (greater than or equal to minimum
high range AND less than or equal to maximum high range).
If there is no arrow pointing to LOW, SET, or HIGH on the scale’s LCD, the weight on the
scale is not within the range of low, set, or high range.
To program a set of weight range, do the following:
1. Press SET key.
2. Enter weight for the following (confirm each entry by pressing SET key):
! Minimum Low Range – this is the lowest weight classified in the low range
! Maximum Low Range – this is the highest weight classified in the low range
! Minimum Set Range – this is the lowest weight classified in the set or exact range
! Maximum Set Range – this is the highest weight classified in the set or exact range
! Minimum High Range – this is the lowest weight classified in the high range
! Maximum High Range – this is the highest weight classified in the high range
3. If the weight entered is not valid for the range, “Error” will be displayed and requires another
input value for that range again. To cancel the entire operation, press CE key (no values for
batch weighing will be programmed).
4. After completing entries for each range, batch weighing of items can now be done (results will
be indicated on the LCD) or this set of weight range can be saved for later use.
Example 1: To program the following weights for low, set, and high range:
Low Range: 98.5 – 99.5 grams
Set Range: 100.0 – 101.5 grams
High Range: 102.0 – 103.0 grams
1. Press SET key. The decimal point is displayed and will be adjusted accordingly.
2. Press 0-0-9-8-5 for minimum low range then press SET key.
3. Press 0-0-9-9-5 for maximum low range then press SET key.
4. Press 0-1-0-0-0 for minimum set range then press SET key.
5. Press 0-1-0-1-5 for maximum set range then press SET key.
6. Press 0-1-0-2-0 for minimum high range then press SET key.
7. Press 0-1-0-3-0 for maximum high range then press SET key.
8. Place the item for batch weighing on the scale’s platform. Results will be shown on the
scale’s LCD.
***In cases where there is only one value for each range of low, set, or high (example: low range =
99.0 grams; set range = 100.0 grams; high range = 101.0 grams), the same value must be entered in
the minimum and maximum range.
To save the current set of weight range entered, do the following:
1. Press MS key.
2. A cursor on the lower right of the scale’s LCD will blink and a number from 0 to 9 can be
pressed. The number entered refers to the memory location where that set of weight range
will be saved and use this to retrieve the range and use it for batch weighing again. Previous
set of weight range stored in this memory location will be overwritten.
3. Press SET key to confirm entry and save the current set of weight range or CE key to cancel
this operation (no set of weight range will be saved).
Example 2: To save the current set of weight range that was just entered in memory location 0:
1. Press MS key.
2. Press 0 key and then SET key. The current set of weight range is now saved in memory
location 0.
To retrieve a set of weight range to be used for batch weighing, do the following:
1. Press MR key.
2. A cursor on the lower right of the scale’s LCD will blink and a number from 0 to 9 can be
pressed.. The number entered refers to the memory location where that set of weight range
was saved.
3. Press SET key to confirm entry and retrieve the set of weight range for batch weighing.
Example 3: To retrieve the stored set of weight range from memory location 0:
1. Press MR key.
2. Press 0 key and then SET key. The stored set of weight range is retrieved and can now be
used for batch weighing.
To erase a set of weight range stored in a specific memory location, do the following:
1. Press MR key.
2. A cursor on the lower right of the scale’s LCD will blink and a number from 0 to 9 can be
pressed. The number entered refers to the memory location where the set of weight for
erasing is saved.
3. Press CE key twice and the memory location display will be cleared. The set of weight range
stored in the selected memory location is now erased.
Example 4: To erase the stored set of weight range in memory location 0:
1. Press MR key.
2. Press 0 key and then press CE key twice. The stored set of weight range is erased.
To display current weights for LOW, SET, or HIGH range:
Press 1/LOW key to show minimum low range.
98.5
L
Press 1/LOW key again to show maximum low range.
99.5
L
Press 2/SET key to show minimum set range.
100.0
S
Press 2/SET key again to show maximum set range.
101.5
S
Press 3/HIGH key to show minimum high range.
102.0
H
Press 3/HIGH key again to show maximum high range.
103.0
H
F2 COUNT
Count function allows scale to count items from the scale’s platform. This is important to count items
like coins or nails or other things of almost identical type (in terms of weight, shape, and size). First,
make a sampling of the items for counting. After the scale calculates weight from the samples, items
can be added on the platform and the scale will start counting them. The current count value can be
saved to a specific memory location or can be added to or subtracted from a value stored in a specific
memory location.
To activate counting, make a sampling of your items by doing the following:
1. Press SET key.
2. Enter the number of items for sampling (minimum of 5 items). Then press SET key.
3. Put the items on the scale’s platform. The display M starts to blink while the weight on the
scale is not yet stable. Once the weight becomes stable, the display stops blinking and scale
freezes for 5 seconds while it calculates unit weight of the items.
4. If M display is cleared, items can now be added to the platform and the scale will start
counting them.
5. The count of items displayed can be saved in a specific memory location or can be added to
or subtracted from a value stored in a specific memory location.
Example 1: To activate counting and make a sampling for 15 items:
-----.
F2
Press SET key.
0.0
.
00015 F2
Press 0-0-0-1-5 keys. The press SET key to confirm entry.
0.0
.
15 F2
M
Put the 15 items on the platform. Wait for the M to blink and display steadily.
100.0
.
15 F2
After the M display is cleared, user may start adding items for counting.
100.0
To save the current count to a specific memory location, do the following:
1. Press MS key.
2. A cursor on the lower right of the scale’s LCD will blink and a number from 0 to 9 can be
pressed. The number entered refers to the memory location where current count will be
saved and this can be used to retrieve the value for later use. Previous value stored in this
memory location will be overwritten.
3. Press SET key to confirm entry and save the current count or CE key to cancel this operation
(the current count will not be saved).
Example 2: To save the current count value to memory location 0, do the following:
1. Press MS key.
2. Press 0 key then SET key. The current count value is now saved in the selected memory
location.
To add the current count to the value stored in a specific memory location, do the following:
1. Press M+ key.
2. A cursor on the lower right of the scale’s LCD will blink and a number from 0 to 9 can be
pressed. The number entered refers to the memory location where current count will be
added and where the result of the addition will be saved. Previous value stored in this
memory location will be overwritten.
3. Press SET key to confirm entry and save the result or CE key to cancel this operation (the
current count will not be added to the count value stored in selected memory location).
Example 3: To add the current count value to memory location 0, do the following:
1. Press M+ key.
2. Press 0 key then SET key. The current count value is now added and saved in the selected
memory location.
Example: If current count value is 15 and memory location 0 contains count value of 15, the
result would be 30 which will be saved in memory location 0.
To subtract the current count from the value stored in a specific memory location, do the
following:
1. Press M- key.
2. A cursor on the lower right of the scale’s LCD will blink and a number from 0 to 9 can be
pressed. The number entered refers to the memory location where current count will be
subtracted from and where the result of the subtraction will be saved. Previous value stored
in this memory location will be overwritten.
3. Press SET key to confirm entry and save the result or CE key to cancel this operation (the
current count will not be subtracted from the count value stored in selected memory location).
Example 4: To subtract the current count value from memory location 0, do the following:
1. Press M- key.
2. Press 0 key then SET key. The current count value is now subtracted and saved in the
selected memory location.
Example 1: If current count value is 15 and memory location 0 contains count value of 30,
the result would be 15 which will be saved in memory location 0.
Example 2: If current count value is 15 and memory location 0 contains count value of 10,
the result would be -5 which will be saved in memory location 0.
To display the count value stored in a specific memory location, do the following:
1. Press MR key.
2. A cursor on the lower right of the scale’s LCD will blink and then press a number from 0 to 9
where to retrieve the stored count value.
3. Press SET key to confirm entry and display the stored count value.
Example 5: To display the count value stored in memory location 0, do the following:
1. Press MR key.
2. Press 0 key then SET key. The count value is stored in the selected memory location will be
displayed.
F3 WEIGHT FACTOR
Weight Factor function allows scale to multiply the current weight reading by a certain factor. This is
important to increase or decrease weight reading by a given factor. Weight factor can be from 0.001
up to 2.000. After input of valid weight factor, the calculated weight reading will be displayed. The
current weight factor entered can also be saved to a specific memory location for later reference.
To change the current weight reading by a certain factor, do the following:
1. Press SET key.
2. Enter the weight factor to multiply with the current weight.
3. Press SET key to confirm entry. The current weight multiplied by the factor provided will be
shown in the weight display.
Example 1: To change the current weight reading by a factor of 1.200, do the following:
-.--- F3
Press SET key. The decimal point is displayed and will be adjusted accordingly.
12.5
.
1.200 F3
15.0
Press 1-2-0-0 keys. The press SET key to confirm entry. The calculated value
will be shown on the weight display (current weight x weight factor).
To save the current weight factor to a specific memory location, do the following:
1. Press MS key.
2. A cursor on the lower right of the scale’s LCD will blink and a number from 0 to 9 can be
pressed. The number you entered refers to the memory location where current weight factor
will be saved and you can use this to retrieve the value for later use. Previous value stored in
this memory location will be overwritten.
3. Press SET key to confirm entry and save the weight factor or CE key to cancel this operation
(weight factor will not be saved).
Example 2: To save the current weight factor to memory location 0, do the following:
1. Press MS key.
2. Press 0 key then SET key. The current weight factor is now saved in the selected memory
location.
To retrieve a weight factor stored in a specific memory location, do the following:
1. Press MR key.
2. A cursor on the lower right of the scale’s LCD will blink and a number from 0 to 9 can be
pressed. The number you entered refers to the memory location where that set weight factor
was saved.
3. Press SET key to confirm entry and retrieve the weight factor from that memory location.
Weight reading is calculated according to this weight factor and will be displayed on the
scale.
Example 3: To retrieve weight factor saved in memory location 0:
1. Press MR key.
2. Press 0 key and then SET key. The stored weight factor is retrieved and is used to compute
weight reading.
F4 % WEIGHT
% Weight function calculates the percentage of the current weight on the platform with regards to an
entered target weight. This percentage is calculated and displayed as the weight on the scale’s
platform changes. This is important to determine the proportion of the weight on your scale with
regards to your predefined target weight.
To calculate percentage of current and target weight, do the following:
1. Press SET key.
2. Enter the target weight to calculate the percentage against the current weight.
3. Press SET key to confirm entry. The percentage which is equal to (current weight/target
weight) X 100 is shown on the upper part of the LCD.
Example 1: To calculate percentage of current (12.5 grams) and target weight (15.0 grams), do the
following:
----.- F4
Press SET key. The decimal point is displayed and will be adjusted accordingly.
12.5
.
0015.0 F4
Press 0-0-1-5-0 keys.
12.5
.
85.33 F4
12.5
The press SET key to confirm entry. The calculated percentage will be shown on
the upper part of the LCD.
F5 DIFF COUNT
Diff Count function allows scale to count the number of items that are being removed from or being
added to the scale (shows the change in count of the items on the platform). It displays both the
current count of items on the platform and the count of items being removed or being added. This is
important to know the number of items that are being removed or added on the scale. Count function
must be prior to Diff Count function.
To count items that are being removed or being added to the scale, do the following:
1. After counting process (see F2 Count function above), press DIFF COUNT key.
2. Start removing or adding items on the scale’s platform. The default time out is 3 seconds to
get stable weight from the platform. This means that after removing items, the scale waits for
3 seconds of no weight change and interprets this as change in count of items.
3. Scale displays the current count on the lower portion of the LCD and the change in count on
the upper portion of the LCD. A negative sign on the upper LCD indicates that items are
being removed from the platform. If there is no negative sign display, it indicates that items
are being added to the platform.
Example 1: To count items that are being removed from or being added to the scale after counting
process (in Example 1 of Count function), do the following:
1. Count items on the platform first. Refer to Example 1 of Count function. Press DIFF COUNT
key.
2. Remove 3 items from the platform. Scale shows -3 on the upper part of LCD while 12 on the
lower part of the display. The upper display goes back to 0 after 3 seconds of stable weight.
3. Put back the 3 items that you removed. Scale now shows 3 on the upper part of LCD while
15 on the lower part of the display. The upper display goes back to 0 after 3 seconds of
stable weight.
F6 DIFF WEIGHT
Diff Weight function allows scale to calculate and show the weight that is being removed from or
being added to the scale (shows the change in weight of the items on the platform). It displays both
the current weight of items on the platform and the weight of items being removed or being added.
This is important if you need to know the weight of items that you are removing or adding on the
scale.
To show the weight of items being removed from or being added to the scale, do the following:
1. Start removing or adding items on the scale’s platform. The default time out is 3 seconds to
get stable weight from the platform. This means that after removing items, the scale waits for
3 seconds of no weight change and interprets this as change in count of items.
2. Scale displays the current count on the lower portion of the LCD and the change in count on
the upper portion of the LCD. A negative sign on the upper LCD indicates that items are
being removed from the platform.
Example 1: To count items that are being removed or being added to the scale after counting
process (in Example 1 of Count function), do the following:
1. Count items on the platform first. Refer to Example 1 of Count function. Press DIFF COUNT
key.
2. Remove 3 items from the platform. Scale shows -3 on the upper part of LCD while 12 on the
lower part of the display. The upper display goes back to 0 after 3 seconds of stable weight.
3. Put back the 3 items that you removed. Scale now shows 3 on the upper part of LCD while
15 on the lower part of the display. The upper display goes back to 0 after 3 seconds of
stable weight.
MISCELLANEOUS FUNCTIONS
These functions are related to data format, input, and display on the scale.
TARE
This is used to tare the current weight on the scale (weight is set to 0). This is helpful when there
is need to weigh items that must be placed in a container. First, put the container in the platform,
press TARE key, and put the items on the container. The weight shown on the scale is the weight
of the item only.
USER CAL
This is used to perform user calibration of your scale. In cases where the scale loses its accuracy
due to dropping or putting items that are too heavy for the scale, recalibration is required. Refer to
later section on how to perform user calibration of the Exceed i Scale.
DISPLAY HOLD
This is used to freeze the current weight display on the scale. After 5 seconds of no weight
change (weight becomes stable), it locks the display for 20 seconds. This is helpful when there is
need to weigh items that are too big and blocks the scale’s display.
MR (Memory Recall)
This is used in functions where data can be saved or stored in memory (like Batch and Count
functions). It is used to retrieve data saved in a given memory location (0 to 9). It is also used to
erase data currently stored in a selected memory location (0 to 9). Refer to previous sections on
how to perform these processes.
MS (Memory Store)
This is used in functions where data can be saved or stored in memory (like Batch and Count
functions). It is used to save data in a selected memory location (0 to 9). Refer to previous
sections on how to perform this process.
M+ (Memory Add)
This is used in functions where data can be saved or stored in memory (like Batch and Count
functions). It is used to add current count value to the stored value in a selected memory location
(0 to 9). Refer to previous sections on how to perform this process.
M- (Memory Minus)
This is used in functions where data can be saved or stored in memory (like Batch and Count
functions). It is used to subtract current count value from the stored value in a selected memory
location (0 to 9). Refer to previous sections on how to perform this process.
LOW
When in Batch function, it toggles display of minimum and maximum low range.
SET
When in Batch function, it toggles display of minimum and maximum set or exact range.
HIGH
When in Batch function, it toggles display of minimum and maximum high range.
SET FROM DISPLAY
This is used when function requires input of values and the value that to input is same as the
weight display (example input of target weight or count).
0/DURATION/INTERVAL/CLR DISPLAY
When in Data Log function, it toggles display of time duration or time interval of current data
logging. Time duration display tells how long the data log has been going on while time interval
display tells the current time interval of data log.
This key is also used to clear displays of current weight range for low, set, and high in batch
weighing and count displays during memory recall (MR).
CE/ESC
This is used to exit from the 6 basic functions and go back to normal weighing mode of the scale.
It also acts as a backspace (clear previous input) when entering required values. When in MR key
and after input of memory location, pressing this key twice will erase the contents of the selected
memory location. It is also used to stop or disable data logging.
DATA SEND
This is used to manually send weight data to a computer program or device (if designed and
programmed to communicate with the scale).
SEND FORMAT
This is used to set format of weight data sending to a computer program or to a device. It can be
set to manual or automatic sending of data. Refer to succeeding section on how to send data to a
computer program and how to format data sending.
SCALE SETTING FUNCTIONS
These functions are related to settings of the scale. Settings are saved and will still take effect the next
time the scale is turned on.
GRAM
This function changes the weight display to gram units.
LB. OZ.
This function changes the weight display to lb/oz (pounds and ounces) units.
TROY LB. OZ.
This function changes the weight display to troy lb/oz (troy pounds and ounces) units.
KG
This function changes the weight display to kilogram units.
LB
This function changes the weight display to lb (pounds) units.
TROY LB
This function changes the weight display to troy lb (troy pounds) units.
ZERO TRACKING ON/OFF
This function turns on or off zero tracking feature of the Exceed i Scale. Refer to later section on
the explanation of zero tracking function.
BACKLIGHT ON/OFF
This function turns on or off scale back lighting.
KEY BEEP ON/OFF
This function turns on or off key beep of the scale.
AUTO-OFF DURATION
This function sets the auto-off duration of the scale when it is in battery mode. Input is in h:mm:ss
(0-00-00) format. The default auto-off duration is 3 minutes.
ON/OFF
This will turn on or off the scale.
USER CALIBRATION OF THE EXCEED i SCALE
In case the scale loses its accuracy due to dropping or putting heavy objects which are beyond the
scale’s limit, user calibration can be done on the scale. A 2-kg weight is needed for the calibration.
To perform user calibration of the scale:
1. Press USER CAL key. Remove any weight on the scale’s platform.
2. Display becomes “CAL 0”.
3. Wait for the display to become “CAL 1” and then place the 2-kg weight on the scale’s platform.
Scale will start calibrating.
4. When the display on the upper part of the LCD is cleared, this signals that calibration is finished
and was successful. The scale can be used again.
***Note: In cases where you cannot calibrate the scale using user calibration, remote scale calibration
maybe required to fix the scale. This is one of the 10 programmable functions of the Exceed i Scale and
can only be used after unlocking it.
USING COMPUTER PROGRAM TO CONNECT TO SCALE
The Exceed i Scale is also designed to send and received data from other serial devices (like computers).
Download and install the sample program that demonstrates this function.
To send data to the computer program:
1. Run the sample program. Press DATA SEND key to send data to this program (sent data is
displayed accordingly).
2. Default format to send data is manual sending. This sends data only once after pressing DATA
SEND key. To change the format to automatic sending (data will be sent every time interval
specified), press SEND FORMAT key and enter the time interval for automatic data sending.
Press SET key to confirm entry. Press DATA SEND key to start sending data every time interval.
To stop sending data to the program, press DATA SEND key again.
3. To switch to manual sending format, press SEND FORMAT key. No input value is required for
this function. Press DATA SEND key to manually send data to the program.
EXCEED i PC PROGRAM
This is the application program that comes with the Exceed i Scale. It is a multi-function and integrated
software that allows user to:
! Update scale with its latest software that includes software enhancements (FREE of charge)
! Unlock the other 10 optional programmable functions so that they can be used
! Interact user’s computer with the scale using the other application programs that are packaged
with it (like postal calculator and coin counter)
! Read data saved on the external cartridge (optional scale component) after data logging
User can get this application program for FREE!
Register Exceed i Scale on the web. To do this, visit: www.elane.net/exceedpc/exceedi/registration.htm
Download and install it in your computer NOW!
Download this from: www.elaneinternational.com/Exceedi/NewExceedi_PCProgram.msi
PROGRAMMABLE FUNCTIONS
The Exceed i Scale is equipped with ten (10) optional programmable functions. These are more powerful,
versatile, and complicated functions of the scale. To use a certain function, user needs to purchase an
unlock code. Use this to enable that function on the Exceed i Scale.
To purchase unlock code for a certain function, visit: www.elane.net/exceedpc/exceedi/unlockcode.htm.
The following summarizes these 10 programmable functions:
P1 WEIGHT DATA
This programmable function displays current weight from the scale’s platform. Scale must be in
normal weighing mode or in DIFF WEIGHT mode when using this function.
P2 BATCH DATA
This programmable function displays current weight from the scale’s platform and the result of batch
weighing (LOW, SET, or HIGH). Scale must be in BATCH mode when using this function.
P3 COUNT DATA
This programmable function displays current count of items on the scale’s platform. Scale must be in
COUNT or DIFF COUNT mode when using this function.
P4 FACTOR DATA
This programmable function displays factored weight reading. Scale must be in FACTOR DATA
mode when using this function.
P5 DATA LOG
This programmable function allows user to read logged data from the external memory cartridge of
the Exceed i Scale. The external memory cartridge of the scale is an optional component and this can
be used to store or save weight values during data logging. Please refer to Data Logging section of
this manual to know more about this function.
P6 COIN COUNTER
This programmable function allows the scale to be connected to a coin counter application program
which is a part of the Exceed i PC Program. The coin counter application program allows user to
count coins and display the total monetary value of these coins. Available coin counters are for:
Australia, UK, USA, Canada, and Europe coins (contact us if you want a customized coin counter
for other countries). Each of these coin counter programs must be unlocked first before they can be
used in the Exceed i PC Program.
P7 POSTAL CALCULATOR
This programmable function allows the scale to be connected to a postal calculator program which is
a part of the Exceed i PC Program. The postal calculator program calculates postal fees of different
postal services for different countries. It can be connected to the Exceed i scale to calculate the
actual postal fee of the item on the platform or manually input the weight of your item. Available postal
calculators are for: Australia, UK, and USA (contact us if you want a customized postal calculator for
other countries). Each of these postal calculator programs must be unlocked first before they can be
used in the Exceed i PC Program.
P8 REMOTE CALIBRATION
This programmable function allows user to perform remote scale calibration of his Exceed i scale. In
cases where there is need to adjust scale’s calibration due to change in demographic location or
abnormalities of the surroundings, use this to adjust calibration settings of the scale.
P9 REMOTE SCALE
This programmable function allows the scale to be connected to an external weighing platform.
Exceed i scale can have an external weighing platform with separate load cell and it usually can
accommodate heavier weights (up to 30 kg).
P10 USER PROGRAM
This programmable function is intended for a customized application program that users may want for
their Exceed i scale.
DATA LOGGING FUNCTION
Data logging function is one of the programmable functions of the Exceed i Scale. This feature allows
user to log or record current weight on the scale’s platform. Weight data will be saved in the external
memory cartridge attached to the scale. This is an optional component of the scale and available only
upon purchase of the cartridge. This feature needs to be unlocked in the Exceed i PC Program.
Data logging is important when there is a need to monitor and record the weight of an object for some
time within a given time interval. It can also be used for scientific experiments that require recording of
weight within a precise time.
The data logging feature can record weights within a minimum time interval of 0.1 second to a maximum
of 1000.0 seconds. This assures that even a weight change of the object within 0.1 second will be
recorded. It also has a PAUSE function that allows pausing of data logging and resuming it afterwards.
The external memory cartridge has a maximum size of 128 KB which can be used to record
approximately 65,500 (max) weight data. This is enough to record weight data for (approx):
! 1 hour and 50 minutes within a time interval of 0.1 second or
! 18 hours and 11 minutes within a time interval of 1 second
! 7 days, 15 hours, and 19 minutes within a time interval of 10 seconds
! 76 days, 9 hours, and 20 minutes within a time interval of 100 seconds
! 2 years, 33 days, 21 hours, and 20 minutes within a time interval of 1000 seconds
Data logged on the external memory cartridge can be retrieved and further use for analysis or data
export. The Exceed i PC Program can be used to read the external memory cartridge and save the data
in it as a TEXT file or as a CSV (comma separated values) file.
To use data logging on the Exceed i scale, make sure that this function is already unlocked in the Exceed
i PC Program. Upon purchase of the external memory cartridge, user will receive an unlock code that can
be used to enable the function. After this, data logging can be started by doing the following:
1. Press DATA LOG key.
2. Enter the time interval of data logging (0.1 – 1000 seconds). The decimal point is displayed and
will be adjusted accordingly. Press SET key to confirm entry.
3. Data log starts and records current weight on the scale’s platform within the time interval
specified. An arrow is lighted on the display every time interval.
4. To pause data logging, press DATA LOG key. P is lighted on the lower right corner of the scale.
5. To resume data logging, press DATA LOG key again. P display is cleared and data logging
resumes.
6. To view the current data log duration (how long data log has been going on), press 0 key. The
display toggles with data log interval.
7. To permanently stop data logging, press CE key. Data logging cannot be resumed in this case.
8. Data logged can now be converted to TEXT or CSV file using Exceed i PC Program.
Warning: Starting another data log session will erase previously recorded data in the external memory
cartridge. Make sure that current data on the cartridge are exported to TEXT or CSV files first before
starting another data log.
Example: To start data logging using a time interval of 0.1 seconds:
1. Press DATA LOG key.
2. Press 0-0-0-0-1 keys in succession. The decimal point is shown and is adjusted accordingly.
3. Press SET key to confirm entry.
4. Scale starts recording weight values to the external memory cartridge within the specified time
interval.
5. Use Exceed i PC Program to read recorded weights from the external memory cartridge.
SCALE SOFTWARE UPDATES
If there are software enhancements for Exceed i Scale, it is very easy to update it with the latest. The
Exceed i PC Program also includes a tool to update the software of the Exceed i Scale via Internet. To
update Exceed i Scale with its latest software, please do the following:
1. Download and install Exceed i Scale PC Program (refer to previous section on how to download
and install this application program). Close all other opened applications or windows.
2. Run Exceed i Scale PC Program. From the options, click Update Software button. Make sure that
Exceed i Scale is registered first to proceed with the free software update (refer to previous
section on where to register Exceed i Scale).
3. Exceed i Scale PC Program will download a file and after this, proceed now with the software
update. Wait for the entire update process to finish. After this, a confirmation will appear that your
Exceed i Scale’s software was successfully updated. If there are errors during the update,
Exceed i Scale PC Program will tell it so.
For further help regarding Exceed i Scale, please visit: http://www.elane.net/exceedpc/exceedi/FAQ.htm.
If there are problems with the software update, please send email to: [email protected].