1
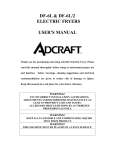
User Manual Electric Countertop Fryers Models: F100, F102 08/2014 Please read and keep these instructions. Indoor use only. www.AvantcoEquipment.com1 User Manual WARNINGS This equipment must be operated by trained cooks or professionals. • Do not touch any hot surfaces. • Do not immerse unit, cord or plug in liquid at any time. • Unplug cord from outlet when not in use and before cleaning. • It is recommended that the fryer not be moved when it contains hot oil or any other hot liquid. • Do not use this unit for other than intended use. • Do not use outdoors. • Always cook on a firm, dry and level surface. • High temperature will cause scalding. Do not stand over fryer when operating and do not touch any part of machine while in operation, other than handle of basket and power controls. • Do not use unit with a damaged cord or plug, in the event the appliance malfunctions, or has been damaged in any manner. • Keep children and animals away from fryer. • Do not modify unit. 2www.AvantcoEquipment.com User Manual Thank you for purchasing and using Avantco's Electric Fryer. Please read this manual thoroughly before using to understand proper use and function. Safety warnings, cleaning suggestions and electrical recommendations are given to reduce the risk of damage or injury. Warning! Any Incorrect Installation, Alterations, Adjustments And/or Improper Maintenance Can Lead To Property Loss And Injury. All Repairs Should Be Done By Authorized Professionals Only. KEEP ALL FLAMMABLE AND COMBUSTABLE LIQUIDS AWAY FROM PRODUCT. THIS MACHINE MUST BE PLACED ON A LEVEL SURFACE. A. Parts of the Fryer Parts of the Fryer 1. Power-on indicator DF series 1-tank electric fryer DF series 2-tank electric fryer 2. Heater-on indicator 3. Temperature regulator 4. Electrical circuit enclosure 5. Heater element 6. Power cable 7. Rubber feet 8. Outer case 9. Frying basket 10. Oil tank 11. Heater element cover Features of the Fryer 1. Power-on indicator 1. T he F series electric fryer is offered in2. 2 different models. One is a 1-tank fryer; another is a 2-tank fryer. The 2-tank Heater-on indicator fryer can fry two different kinds of foods at the same time. 3. Temperature regulator 2. O il temperature is regulated by the temperature regulator and includes a yellow (hot light) which cycles on and off to indicate when desired temperature has reached.circuit enclosure 4.been Electrical 3. The automatic shut off feature will cut power when the oil has reached maximum allowable temperature. (446°F) 5. Heater element 4. A n automatic micro-switch is located at the bottom of the electrical enclosure. This will cut power from the electrical unit if the enclosure is removed without the power cable. 6.unplugging Power cable 5. The stainless steel tank has a removable oil insert with 7. Rubber feetcalibration marks for oil levels. 6. Heating coils are protected by a stainless panel base at the bottom of the unit. 8. Outer case 9. Frying basket www.AvantcoEquipment.com3 10. Oil tank User Manual Basic Information of F Series Fryers Name Deep Fryer Single 6 Liter Deep Fryer Double 6 Liter (x2) Model F100 F102 Voltage 120V 50/60Hz 120V 50/60Hz Power 1750W 2 x 1750W Number of oil tanks 1 2 Size of oil tanks 9 1/2" x 12" x 6" 9 1/2" x 12" x 6" Volume 1.5 Gallon 1.5 Gallon (x2) Number of frying baskets 1 2 Size of frying baskets 7 1/4" x 8 1/4" x 4 1/2" 7 1/4" x 8 1/4" x 4 1/2" Cooking temperature range 120°F - 370°F 120°F - 370°F Temperature safety cut-off 446°F Overall Dimensions 10 1/2" x 17" x 11 1/2" 446°F THE MAXIMUM QUANTITY OF FOOD TO BE PLACE 21 1/2" x 17" x 11 1/2" FRYER SHOULD NOT EXCEED AMOUNT SHO The Maximum Quantity Of Food To Be Placed In The Fryer Should Not Exceed 1.98 lbs/pot Notes About Food: DF-6L/6L-2 1.98 lbs/pot NOTES ABOUT FOOD: VOLUME OF FOOD SHOULD BE LIMITED TO AVOID OIL OVERFLOW FOODS THAT DO NOT ABSORB OIL EASILY SHOULD BE LIMITED T OVERFLOWING • Foods that do not absorb oil easily should be limited to avoid overflowing. PLACE LARGE FOODS INTO THE FRYER CAREFULLY TO PREVENT OVERFLOW AND SPATTER • Volume of food should be limited to avoid oil overflowing. • Place large foods into the fryer carefully to prevent oil overflow and spatter. Circuit Diagram D. Circuit Diagram S1 -Micro-switch SA-Overheat switch EH-Heater element HL 1-Power-on indicator HL 2-Heater-on cycling indicator SB- Temperature regulator E: Ground connection S1 -Micro-switch Note: The circuits of the two fryers are identical. The difference is that the two tank fryer has two SA-Overheat switch separate electrical unit boxes and receptacles. EH-Heater element HL 1-Power-on indicator HL 2-Heater-on cycling indicator 4www.AvantcoEquipment.com SB- Temperature regulator User Manual Instructions for Fryer Usage 1. P lease make sure the power supply you are using is adequate for continual fryer use and voltage is adequate. The use of a surge protector or circuit breaker is advisable. 2. F ill oil receptacle with vegetable oil to between the minimum and maximum levels, allowing for food volume. 3. M ake sure the temperature regulator knob is in the “OFF” position before you plug the machine into an outlet. Once you plug the machine in, a green “Power Light” will come on. Then, rotate the temperature regulator knob clockwise to the desired temperature indicated by the pointer. When the desired temperature has been reached, the yellow "Hot Light" will turn off and cycle, and the temperature controller will maintain the temperature automatically. 4. L ift food basket up and away from machine to load food, and carefully place loaded basket into machine to avoid splash. Gently shake off excess oil from food when removing from tank after frying. 5. T he enclosed frying basket is intended to hold small foods such as French fries and onion rings. Large food can be placed directly into the basket or oil tank. Cleaning and Maintenance 1. A fter fryer usage, turn power controller counterclockwise to the “OFF” position Remove plug from power supply. Wait for oil to cool down before removing tank from outer case. The procedure is as follows: A. Remove protective panel bottom with large fork or tongs. Do not stick hand into oil. B. Gently lift up electrical box unit from back of machine. Place in a safe dry place. 2. T he micro-switch on the bottom of the electrical box unit will automatically cut off power in case electric plug is not removed from power supply. 3. Lift oil tank out of outer case and carefully dispose of oil, removing any sludge. 4. Gently wash oil tank with soap and water, dry it thoroughly, and place it back into machine. 5. Always use fresh vegetable oil at every use. Never use old oil. 6. Cover the fryer tank with the night cover after the oil has cooled and the unit is not in use. Tough on grease. Tough on carbon. Tempest deep fat fryer cleaner offers thorough elimination of encrusted grease and grime. www.AvantcoEquipment.com5 User Manual Troubleshooting Problem Causes Solution Indicator light will not turn on and unit will not heat. Plug not properly inserted. Reinsert plug. Micro-switch not closed. Adjust the limit distance of mircro-switch. Electric heater tubes is not properly connected. Tighten both sides of electric heater. Heater is defective. Change electric heating tube. Power indicator is on but the desired temperature is not reached. Temperature controller is burned out. Change temperature. Temperature control is normal but indicator is not on. Indicator light is burned out. Change indicator. Temperature indicator is on, but heater tube is not hot. Temperature limiter has tripped. Reset over heating protecting button by hand on bottom of electrical box. Temperature can not be controlled. Temperature limiter is out of order. Change temperature limiter. Heating indicator is not on, the temperature is not increasing. Troubles listed are for reference. If any fault occurs, please discontinue use. Do not attempt to repair yourself. This will void the warranty. Transportation and Storage During transportation, the machine should be careful handled by using the handles at the sides of the unit. The packaged machine should not be stored in the open. It should be put in a ventilated warehouse without corrosive atmosphere and placed right side up. Daily Check Before Using • Make sure machine is on level surface. • Check to see if power cord is frayed or damaged. During Use • Check control panel for damage. • Check for any electrical smells. • Check for any strange sounds coming out of machine • Watch for oil spattering. 6www.AvantcoEquipment.com User Manual I. Parts diagrams I. Parts diagrams Parts Diagrams DF series 1-tank electric fryer DF series 1-tank electric fryer F100 1-Tank Electric Fryer DF series 2-tank electric fryer DF series 2-tank electric fryer F1102 2-Tank Electric Fryer 1 Power indicator (Green ) 2. Heating indicator (Yellow) 1 Power indicator (Green ) 3. Back cover screw 2. Heating indicator (Yellow) Rear 1. 4. Power indicator (Green ) 3. Back cover cover screw 5. Electrical enclosure Rear cover 2. 4.Heating indicator (Yellow) 6. Over temperature limiter 5. Electrical enclosure 3. 7. Back cover screw connectorlimiter block 6. Ceramic Over temperature 4. 8. Rear cover Micro--switch 7. Ceramic connector block Temperature controller 5. 98.Electrical enclosure Micro--switch 10. Knob 6. 9Over temperature limiter Temperature controller 11. Power cable pigtail Knob connector block 7. 10. Ceramic 11. Power cable pigtail 8. Micro-switch Parts List 12. Power cable 13 screw 12.Ground Power cable 14. Outer case 13 Ground screw 15 Rubber feet 9. Temperature 14. Outercontroller case 16. Oil tank 10. Knob15 Rubber feet 17 Cover 16.cable Oil tank 11. Power pigtail 18. Electric 17 Cover heater 12. Power cable 19. screw 18. Connection Electric heater 20. Protective cover 13. Ground screw 19. Connection screw Heater cover 14. Outer21. case 20. Protective cover 22. Frying basket 21. Heater 15. Rubber feet cover 22. Frying basket 16. Oil tank 17. Cover 18. Electric heater 19. Connection screw 20. Protective cover 21. Heater cover 22. Frying basket www.AvantcoEquipment.com7 User Manual F100 Part List NO NAME SPECIFICATION AMOUNT NOTE 1 Power indicator 12 250V 1 Green, Merchant LH-580-N or Arcoelectric 0589 2 Heating indicator 12 250V 1 Yellow, Merchant LH-580-N or Arcoelectric 0589 3 Fix screw for back board M4×8 4 Pan Head 4 Rear cover Stainless S=0.8 1 5 Electric circuit enclosure Stainless S=0.8 1 6 Temperature limiter 446F/250V 1 7 Connector block, ceramic Insulated ceramic 250V/16A 1 8 Micro-switch KW-7-0/16A 1 SAIA-Burgess X3m502K2KA 9 Temperature controller 370F/250V 1 Linkco TY316 series or E.G.O. 10 Knob for temperature controller ABS Plastic 1 Chi Mei PA-757 11 Strain relief 15/ABS Plastic 1 Chi Mei PA-757 12 Power cable 14 A.W.G.-3 1 Ching Cheng plug orChau's Electrical with NEMA 5-15 plug 13 Ground screw M6×15/brass 1 With nut and washer 14 Lower enclosure Stainless S=0.8 1 15 Rubber feet 30×15/black 4 16 Oil pot Stainless steel 1 17 Cover of oil pot Stainless S=0.8 1 18 Electric heater 120V, 1750W 1 19 Nut for electric heating tube 45# steel M12 2 20 Protective cover Stainless S=0.8 1 21 Heater element cover Stainless S=0.8 1 22 Frying basket Stainless wire, net 1 E.G.O.56.11744.010 With level markings SJHI (Xiamen) or Tamman Electric (Handle can be folded) 8www.AvantcoEquipment.com User Manual F102 Part List NO NAME SPECIFICATION AMOUNT NOTE 1 Power indicator 12 250V 2 Green, Merchant LH-580-N or Arcoelectric 0589 2 Heating indicator 12 250V 2 Yellow, Merchant LH-580-N or Arcoelectric 0589 3 Fix screw for back board M4×8 8 Pan Head 4 Rear cover Stainless S=0.8 2 5 Electric circuit enclosure Stainless S=0.8 2 6 Temperature limiter 446F/250V 2 7 Connector block, ceramic Insulated ceramic 250V/16A 2 8 Micro-switch KW-7-0/16A 2 SAIA-Burgess X3m502K2KA 9 Temperature controller 370F/250V 2 Linkco TY316 series or E.G.O. 10 Knob for temperature controller ABS Plastic 2 Chi Mei PA-757 11 Strain relief 15/ABS Plastic 2 Chi Mei PA-757 12 Power cable 14 A.W.G.-3 2 Ching Cheng plug orChau's Electrical with NEMA 5-15 plug 13 Ground screw M6×15/brass 2 With nut and washer 14 Lower enclosure Stainless S=0.8 2 15 Rubber feet 30×15/black 8 16 Oil pot Stainless steel 2 17 Cover of oil pot Stainless S=0.8 2 18 Electric heater 120V, 1750W 2 19 Nut for electric heating tube 45# steel M12 4 20 Protective cover Stainless S=0.8 2 21 Heater element cover Stainless S=0.8 2 22 Frying basket Stainless wire, net 2 E.G.O.56.11744.010 With level markings SJHI (Xiamen) or Tamman Electric (Handle can be folded) www.AvantcoEquipment.com9