1
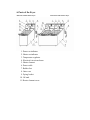
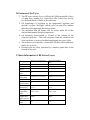
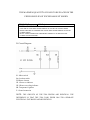
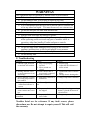
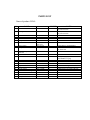
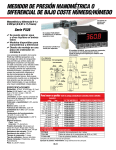
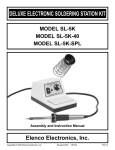
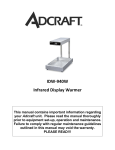
DF-6L & DF-6L/2
ELECTRIC FRYERS
USER’S MANUAL
Thank you for purchasing and using Adcraft’s Electric Fryer. Please
read this manual thoroughly before using to understand proper use
and function.
Safety warnings, cleaning suggestions and electrical
recommendations are given to reduce risk of damage or injury.
Keep this manual in a safe place for your future reference.
WARNING!
ANY INCORRECT INSTALLATION, ALTERATIONS,
ADJUSTMENTS AND/OR IMPROPER MAINTENANCE CAN
LEAD TO PROPERTY LOSS AND INJURY.
ALL REPAIRS SHOULD BE DONE BY AUTHORIZED
PROFESSIONALS ONLY.
WARNING!
KEEP ALL FLAMMABLE AND COMBUSTABLE LIQUIDS
AWAY FROM PRODUCT.
WARNING!
THIS MACHINE MUST BE PLACED ON A LEVEL SURFACE.
A. Parts of the Fryer
DF series 1-tank electric fryer
1. Power-on indicator
2. Heater-on indicator
3. Temperature regulator
4. Electrical circuit enclosure
5. Heater element
6. Power cable
7. Rubber feet
8. Outer case
9. Frying basket
10. Oil tank
11. Heater element cover
DF series 2-tank electric fryer
B. Features of the Fryer
1. The DF series electric fryer is offered in 2 different models. One is
a 1-tank fryer; another is a 2-tank fryer. The 2-tank fryer can fry
two different kinds of foods at the same time.
2. Oil temperature is regulated by the temperature regulator and
includes a yellow hot light which cycles on and off to indicate
when desired temperature has been reached.
3. The automatic shut off feature will cut power when the oil has
reached maximum allowable temperature.
4. An automatic micro-switch is located at the bottom of the
electrical enclosure. This will cut power from the electrical unit
if the enclosure is removed without unplugging the power cable.
5. The stainless steel tank has a removable oil insert with calibration
marks for oil levels.
6. Heating coils are safely protected by a stainless panel base at the
bottom of the unit.
C. Basic Information of DF Series Fryers
Name
Model
Voltage
Power
Number of oil
tanks
Size of oil
tanks (mm)
Volume
Number of
frying baskets
Size of frying
basket(mm)
Cooking
temperature
range
Temperature
Safety cut-off
Dimensions
(mm)
Deep Fryer Single 6 Liter
DF-6L
~ 120Vx50/60Hz
1750W
Deep Fryer Double 6
Liter
DF-6L/2
~ 120Vx50/60Hz
2×1750W
1
2
240x300x150 (9 1/2x12x6 in)
240x300x150 (9 1/2x12x6 in)
6 Liters (1 ½ gal)
2x6 Liters ( 1 ½ gal)
1
2
185x210x115 (7 1/4x 8 1/4x
4 ½ in )
185x210x115 (7-1/4 x8-1/4x
4 ½ in)
120 to 370oF
120 to 370oF
446oF
446oF
265x430x290(10 1/2x17x11 ½
in)
550x430x290 (21 ½ x17x 11
½ in)
THE MAXIMUM QUANTITY OF FOOD TO BE PLACED IN THE
FRYER SHOULD NOT EXCEED AMOUNT SHOWN
DF-6L/6L-2
1.98 lbs/pot
NOTES ABOUT FOOD:
VOLUME OF FOOD SHOULD BE LIMITED TO AVOID OIL OVERFLOWING
FOODS THAT DO NOT ABSORB OIL EASILY SHOULD BE LIMITED TO AVOID
OVERFLOWING
PLACE LARGE FOODS INTO THE FRYER CAREFULLY TO PREVENT OIL
OVERFLOW AND SPATTER
D. Circuit Diagram
S1 -Micro-switch
SA-Overheat switch
EH-Heater element
HL 1-Power-on indicator
HL 2-Heater-on cycling indicator
SB- Temperature regulator
E Ground connection
NOTE: THE CIRCUITS OF THE TWO FRYERS ARE IDENTICAL. THE
DIFFERENCE IS THAT THE TWO TANK FRYER HAS TWO SEPARATE
ELECTRICAL UNIT BOXES AND RECEPTICLES.
D. Instructions for Fryer Usage
1. Please make sure the power supply you are using is adequate for continual
fryer use and voltage is adequate. The use of a surge protector or circuit
breaker is advisable.
2. Fill oil receptacle with vegetable oil to between the minimum and maximum
levels, allowing for food volume.
3. Make sure the temperature regulator knob is in the off position before you
plug the machine into an outlet. Once you plug the machine in, a green
"Power Light" will come on. Then, rotate the temperature regulator knob
clockwise to the desired temperature indicated by the pointer. When the
desired temperature has been reached, the yellow "Hot Light" will turn off
and cycle, and the temperature controller will maintain the temperature
automatically.
4. Lift food basket up and away from machine to load food, and carefully place
loaded basket into machine to avoid splash. Gently shake off excess oil from
food when removing from tank after frying.
5. The cover of the pot is designed for warming food and preventing oil spatter
during cooking.
6. The enclosed frying basket is intended to hold small foods such as french fries
and onion rings. Large food can be placed directly into the basket or oil tank,
with protective cover in place.
7. After fryer usage, turn power controller counterclockwise to off position
Remove plug from power supply. Wait for oil to cool down before removing
tank from outer case. The procedure is as follows:
1. Remove protective panel bottom with large fork or tongs. Do not
stick hand into oil.
2. Gently lift up electrical box unit from back of machine. Place in a
safe dry place.
8. The micro-switch on the bottom of the electrical box unit will automatically
cut off power in case electric plug is not removed from power supply.
9. Lift oil tank out of outer case and carefully dispose of oil, removing any
sludge.
10. Gently wash oil tank with soap and water, dry it thoroughly and place it back
into machine.
11. Always use fresh vegetable oil at every use. Never use old oil.
WARNINGS
This equipment must be operated by trained cooks or professionals.
• Do not touch any hot surfaces.
• Do not immerse unit, cord or plug in liquid at any time.
• Unplug cord from outlet when not in use and before cleaning.
• It is recommended that the fryer not be moved when it contains hot
oil or any other hot liquid. If it must be moved, use extreme care.
• Do not use this unit for other than intended use.
• Do not use outdoors.
• Always cook on a firm, dry and level surface.
• High temperature will cause scalding. Do not stand over fryer
when operating and do not touch any part of machine while in
operation, other than handle of basket and power controls.
• Do not clean the product with a water jet .
• Do not use unit with a damaged cord or plug, in the event the
appliance malfunctions, or has been damaged in any manner.
• Keep children and animals away from fryer.
• Do not modify unit.
E. Troubleshooting
Problem
1. Indicator light wont turn
on and unit will not heat.
2. Heating indicator is not
on and temperature is not
increasing.
3. Power indicator is on but
the setting temperature is
not reached.
4. Temperature control is
normal but indicator is
not on.
5. After circuit heating
electric heater tube is not
hot.
6. Temperature can not be
controlled.
Causes
1. Plug is not properly
inserted
2. Micro-switch not
closed.
1. Electric heater tube is
not properly connected
2. Heater is defective
1. Temperature controller is
burned out.
Solution
1. Reinsert plug
2. Adjust the limit distance of
micro-switch
1. Indicator light is burned
out.
1. Change indicator.
1. Temperature limiter
has tripped.
1. Reset over heating protecting
button by hand on bottom of
electrical box.
1. Change temperature limiter.
1. Temperature limiter is
out of order.
1. Tighten both sides of electric
heater.
2. Change electric heating tube.
1. Change temperature controller.
Troubles listed are for reference. If any fault occurs, please
discontinue use. Do not attempt to repair yourself. This will void
the warranty.
F. Transportation and storage
During transportation, the machine should be careful handled by using
the handles at the sides of the unit. The packaged machine should not be
stored in the open. It should be put in a ventilated warehouse without
corrosive atmosphere and placed right side up.
G.Cleaning and maintenance
1. Always remove the power cord from power supply before you clean
the unit.
3. Use a dry towel to gently clean circuit coils and electrical enclosure.
Oil tank can be washed with a mild detergent and water. Outer surface
of unit can be wiped with a non abrasive cleaner.
H.Daily check
Before using
During Use
Make sure machine is on level surface
Check to see if power cord is frayed or
damaged.
Check control panel for damage.
Check for any electrical smells
Check for any strange sounds coming out
of machine
Watch for oil spattering.
I. Parts diagrams
DF series 1-tank electric fryer
DF series 2-tank electric fryer
1 Power indicator (Green )
2. Heating indicator (Yellow)
3. Back cover screw
4. Rear cover
5. Electrical enclosure
6. Over temperature limiter
7. Ceramic connector block
8. Micro--switch
9 Temperature controller
10. Knob
11. Power cable pigtail
12. Power cable
13 Ground screw
14. Outer case
15 Rubber feet
16. Oil tank
17 Cover
18. Electric heater
19. Connection screw
20. Protective cover
21. Heater cover
22. Frying basket
PARTS LIST
Name of product: DF-6L
NO
NAME
1
Power indicator
2
Heating indicator
3
4
5
6
7
Fix screw for back board
Rear cover
Electric circuit enclosure
Temperature limiter
Connector block, ceramic
8
9
Micro-switch
Temperature controller
10
11
12
Knob for temperature
controller
Strain relief
Power cable
13
14
15
16
17
18
19
20
21
22
Ground screw
Lower enclosure
Rubber feet
Oil pot
Cover of oil pot
Electric heater
Nut for electric heating tube
Protective cover
Heater element cover
Frying basket
SPECIFICATION
12 250V
12 250V
AMOUNT
1
1
M4×8
Stainless S=0.8
Stainless S=0.8
446F/250V
Insulated ceramic
250V/16A
KW-7-0/16A
370F/250V
4
1
1
1
1
ABS Plastic
1
15/ABS Plastic
14 A.W.G.-3
1
1
M6×15/brass
Stainless S=0.8
30×15/black
Stainless steel
Stainless S=0.8
120V, 1750W
45# steel M12
Stainless S=0.8
Stainless S=0.8
Stainless wire, net
1
1
4
1
1
1
2
1
1
1
1
1
NOTE
Green, Merchant LH-580-N or
Arcoelectric 0589
Yellow, Merchant LH-580-N or
Arcoelectric 0589
Pan head
E.G.O.56.11744.010
SAIA-Burgess X3m502K2KA
Linkco TY316 series or E.G.O.
55.13032.040
Chi Mei PA-757
Chi Mei PA-757
Ching Cheng plug orChau s Electrical
with NEMA 5-15 plug
With nut and washer
With level markings
SJHI (Xiamen) or Tamman Electric
(Handle can be folded)
PARTS LIST
Name of product: DF-6L/2
NO
NAME
1
Power indicator
2
Heating indicator
3
4
5
6
7
Fix screw for back board
Back board
Electric circuit enclosure
Temperature limiter
Connector block
8
9
Micro-switch
Temperature controller
10
11
12
Knob for temperature
controller
Strain Relief
Power cable
13
14
15
16
17
18
19
20
21
22
ground screw
Bottom
Rubber feet
Oil tank
Cover of oil pot
Electric heater
Nut for electric heater
Protective cover
Heater element cover
Frying basket
SPECIFICATION
12 250V
AMOUNT
2
12 250V/14A
2
M4×8
Stainless S=0.8
Stainless S=0.8
446F/250V
Insulated ceramic
250V/16A
KW-7-0/16A
370F/250V
8
2
2
2
2
ABS Plastic
2
15/ABS Plastic
14 A.W.G.-3
2
2
M6×15/brass
Stainless S=0.8
30×15/black
Stainless steel
Stainless S=0.8
1750 W/120V
45# steel M12
Stainless S=0.8
Stainless S=0.8
Stainless wire, net
2
1
4
2
2
2
4
2
2
2
2
2
NOTE
Green Merchant LH-580-N or
Arcoelectric 0589
Yellow Merchant LH-580-N or
Arcoelectric 0589
Pan head
E.G.O. 56.11744.010
SAIA-Burgess X3M502K2KA
E.G.O. 55.13032.040 or Lincko
TY316 Series
Chi Mei PA-757
Chi Mei PA-757
Ching Cheng or Chau s Electric
with NEMA 5-15 plug
With nut and washer
SJHI (Xiamen) or Tamman Electric
(Handle can be folded)
Admiral Craft Equipment Corporation Electrical Equipment One Year Warranty
Admiral Craft Equipment Corporation (Adcraft) warrants its equipment against defects in materials and
workmanship, subject to the following conditions:
This warranty applies to the original owner only, and is not assignable.
Adcraft Electrical Equipment is warranted for one year, effective from the date of purchase by the original owner.
A copy of the original receipt, or other proof of purchase is required to obtain warranty coverage.
Should any product fail to function in its intended manner under normal use within the limits defined in this
warranty, at Adcraft’s discretion, such product will be repaired, replaced with a refurbished unit, or replaced with
a new unit by Adcraft, after defective unit has been inspected and defect has been confirmed. Adcraft does not
assume any liability for extended delays in replacing any item beyond its control. This warranty does not apply to
rubber and non-metallic synthetic parts where usage, wear, or lack of preventative maintenance may create
abnormal replacement rates, and these parts are excluded from this limited warranty.
Adcraft will only be responsible for charges incurred or services performed by its Authorized Service Agencies.
The use of other than Adcraft Authorized Service Agencies will void this warranty and AdCraft will not be
responsible for such work or any charges associated with same.
This warranty covers products shipped into the 48 contiguous United States, Hawaii, metropolitan areas of Alaska
and Canada. Warranty coverage on products used outside the 48 contiguous United States, Hawaii, and
metropolitan areas of Alaska and Canada may vary. Contact Adcraft for details.
If equipment fails to operate in its intended manner, unit must be sent prepaid to Adcraft for inspection. Unit
should be sent to Adcraft utilizing the attached return label. All information required on return label must be
provided.
The following conditions are not covered by warranty:
*Equipment failure relating to improper installation, improper utility connection or supply, and problems
due to improper ventilation.
*Equipment that has not properly been maintained, damage from improper cleaning, and water damage to
controls.
*Equipment that has not been used in an appropriate manner, or has been subject to misuse, neglect,
abuse, accident, alteration, negligence, damage during transit, delivery or installation, fire, flood, riot, or
act of God.
*Equipment that has the model number or serial number removed or altered.
*Equipment on which security seal has been broken.
If the equipment has been changed, altered, modified or repaired without express written permission from
Adcraft, then the manufacturer shall not be liable for any damages to any person or to any property, which may
result from the use of this equipment thereafter.
This equipment is intended for commercial use only. Warranty is void if equipment is used in other than a
commercial application.
In the event your repair is not covered under the stated warranty provisions, parts are available by calling 1-800223-7750 Extension 262. Equipment not covered by repair should be picked up from our warehouse facility within
10 business days from notification date. Any and all arrangement and expense for the return of this merchandise
is your responsibility.
“THE FOREGOING WARRANTY IS IN LIEU OF ANY AND ALL OTHER WARRANTIES EXPRESSED OR IMPLIED
INCLUDING ANY IMPLIED WARRANTY OF MERCHANTABILITY OR FITNESS FOR PARTICULAR PURPOSES
AND CONSTITUTES THE ENTIRE LIABILITY OF ADCRAFT EQUIPMENT COMPANY. IN NO EVENT DOES THE
LIMITED WARRANTY EXTEND BEYOND THE TERMS STATED HEREIN.”
1
Please use the following label if merchandise is being returned to our facility for any
reason.
PLEASE REMEMBER TO ENCLOSE A COPY OF YOUR SALES RECEIPT
----------------------------------------------------Please cut here------------------------------------------------------------
Name: ___________________________________
Address: _________________________________
________________________________________
Phone: ___________________________________
Fax: ____________________________________
Email: ___________________________________
Admiral Craft Equipment Corp.
Attn: Warranty Services
940 South Oyster Bay Road
Hicksville, NY 11801
----------------------------------------------------Please cut here------------------------------------------------------------
2