1
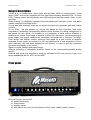
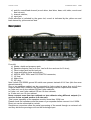
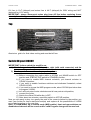
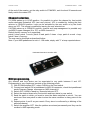
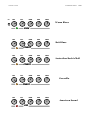
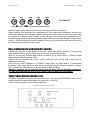
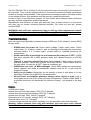
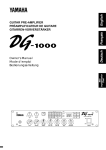
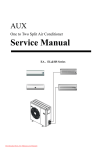
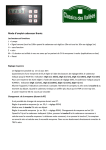
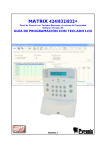
X100M User manual
X100MENG1.0 04/2006
Masotti Guitar Devices
X100M
User manual
1/13
X100M User manual
X100MENG1.0 04/2006
2/13
Welcome to Masotti Guitar Devices world and thank you for your choice.
Our challenge is to bring new ideas in guitar amplification, exploring
new techniques and adopting the "no compromise" philosophy.
IMPORTANT:
BEFORE SWITCH THE AMPLIFIER ON , READ CAREFULLY THE
IMPORTANT SAFETY NOTES AT PAGES 12-13
X100M User manual
X100MENG1.0 04/2006
3/13
Index
General description ..........................................................................................................................4
Front panel. ......................................................................................................................................4
Rear panel. .......................................................................................................................................5
Top ...................................................................................................................................................6
Switch ON your X100M !................................................................................................................6
Channel selection. ............................................................................................................................7
MIDI programming..........................................................................................................................7
MIDI pedalboard phantom power supply (optional). ......................................................................8
Startup sound setups. .......................................................................................................................8
Use, maintenance and periodic checks. .........................................................................................10
Tube replacement and bias set. ......................................................................................................10
Troubleshooting. ............................................................................................................................11
Fuses. .............................................................................................................................................11
Warranty.........................................................................................................................................12
Versions and customisations..........................................................................................................12
Important safety warnings..............................................................................................................12
Technical specifications.................................................................................................................13
Contacts..........................................................................................................................................13
X100MENG1.0 04/2006
X100M User manual
4/13
General description
X100M is a "no compromise" guitar head, with all tubes 100W of nominal power. It has
seven 12Ax7 and can be equipped with four final tubes choosing between E34L, 6L6 and
KT66. Preamp section derives directly from X3M and gives thre bas sounds: clean, crunch
and lead.
Clean channel is completely separated from the others and it has gain, treble, mid, bass,
master controls and a bright switch.
Crunch and lead channels share the eq section but they have separate gain and master
controls.
As for X3M, the two passive eq circuits are based on the innovative "total band
suppression" technology, developed by Masotti Guitar Devices for a deep management of
the sound. By this circuit, it's possible to cut completely a band without affecting or
modifying the others. Final stage is identical to Slave100, with same over-dimensioning of
power supply and output transformers, developed and produced in exclusive for MGD.
Final section has Master volume, presence and depth for a total control of amplifier
response. Power supply for heaters is in DC and stabilised for a total elimination of hum,
while particular care has been adopted for HV filtering, in order to give the maximum
dynamics and stability to the sound.
Signal is routed through gold-plated relays.
Channel switching is completely clickless thanks to the microcontroller-based muting
system.
Channel and serial loop selection is made by switches on the front (rear for loop), by a
stomp pedalboard (as our XCF) and via MIDI.
Front panel.
From left to right, we can find:
a) power check lamp;
b) mains switch;
c) standby switch;
d) brite switch and pots for clean channel (drive, bass, middle, treble, volume);
X100MENG1.0 04/2006
X100M User manual
5/13
e) pots for crunch/lead channel (crunch drive, lead drive, bass, mid, treble, crunch and
lead volume);
f) channel selector;
g) input jack.
Clean selection is indicated by the green led, crunch is indicated by the yellow one and
lead channel by yellow and red leds.
Rear panel.
From left:
a) Master, depth and presence pots;
b) Speakers outputs (two for 4 ohm, two for 8 ohm and one for 16 ohm);
c) Direct output jack and its level pot;
d) Loop send/return jacks and selector;
e) MIDI IN, MIDI TRHU and FOOTSWITCH connectos;
f) HV fuse;
g) Mains fuse;
h) IEC plug.
Note: before S/N 05006 ground lift switch was present instead of HV fuse (this fuse was
placed internally).
One or two speakers cabinet can be connected to 4 ohm output at same time or to 8 ohm
output at same time. However, the impedance matching must be respected as follows:
to 4 ohm out: one 4 ohm cabinet OR two 8 ohm cabinets;
to 8 ohm out: one 8 ohm cabinet OR two 16 ohm cabinets;
to 16 ohm out: one 16 ohm cabinet.
Never connect more than two cabinets or two cabinets using different outputs (i.e.
one in a 4 ohm out and another in 8 ohm out).
Total power capability of the speakers must be more than 150W rms
Please check the impedance and the power of your speaker before connect it to X100M.
Direct out can be connected to a mixer.
Send/return connectors allow the serial processing of the sound through an external mfx
and they divide the pre stage out from the final stage input.
X100MENG1.0 04/2006
X100M User manual
6/13
HV fuse is 1A-T (delayed) and mains fuse is 4A-T (delayed) for 230V wiring and 8A-T
(delayed) for 115V wiring.
IMPORTANT: always disconnect mains plug from AC line before replacing fuses;
use only fuses for type and dimensions as indicated on the panel.
Top
Aluminium grid is for final tubes cooling and must be left free.
Switch ON your X100M !
IMPORTANT: before switch the amplifier on:
1) Check the good conditions of the mains cable (with earth connector) and the
presence of a good earth connection in the line.
2) Check speaker connection adn proper imepdance.
a) Before connecting the mains cable to X100M, put MAINS switch to OFF
position and STBY/ACTIVE switch to STANDBY position.
b) If you want to enable MIDI channel selection, put channel selector to
CRUNCH position;
c) if you want to enable front/rear switches and dedicated footswitch, select
CRUCH-LEAD;
d) if you want to access the MIDI program mode, select CLEAN (see below how
to program X100M).
e) turn all front pots counter-clockwise and all rear pots at mid position;
f) connect the guitar;
g) Switch the mains ON while stby is OFF;
h) After about two minutes, move stby switch to ACTIVE position.
Now you are ready to play: turn gently the pots of the current channel to the position you
want (see further for some start-point setups) and explore all the possibilities of X100M
sound also by acting on the rear pots.
Note: if X100M wakes up in crunch mode (MIDI enable), front and rear switches are
disabled and channel will be crunch until a valid Program change will be received.
X100M User manual
X100MENG1.0 04/2006
7/13
At the end of the session, put the stby switch to STANDBY, wait for about 20 seconds and
finally switch the mains OFF.
Channel selection.
If X100M wakes up in LEAD position, it's possibile to select the channel by front switch
and/or dedicated footswitch XFC (see next picture). XFC is enabled by leaving the front
selector in CRUNCH position. Loop can be activated by the rear switch or by the fourth
stomp on XFC. This stomp is enabled by leaving the rear selectos low.
If X100M wakes up in CRUNCH position, channel and loop management is possible only
via MIDI Program changes (0 to 127) on MIDI channel #1.
Default factory memory is so organised:
patch 0 clean, patch 1 crunch, patch 2 lead, patch 3 clean + loop, patch 4 crunch + loop,
patch 5 lead + loop ecc.
The map can be modified as described further.
Note: if your MIDI pedalboard is set in 1-128 mode, simply add "1" at map reported above.
Dedicated footswitch controller XFC
MIDI programming.
Any channel and loop status can be associated to any patch between 0 and 127.
Programming is very simple and consists of the following points:
1) With X100M switched OFF, select CLEAN on the front switch.
2) Connect and switch ON a pedalboard to MIDI IN connector; check that pedalboard
sends Program Change messages on MIDI channel #1.
3) Switch ON X100M in stand-by; channels leds are OFF.
4) Select the desired channel by front switch and loop status by rear switch.
5) Send the patch in which you want to store the status selected in point 4. You can
send more than one patch in order to store the same condition in many points fo the
map.
6) Repeat points 4 and 5 as your needs. Every store is confirmed by a blinking of the
selected channel
7) Switch the amplifier OFF. Now the patches are stored permanently and they can be
recalled in MIDI operating mode.
X100M User manual
X100MENG1.0 04/2006
8/13
MIDI pedalboard phantom power supply (optional).
MIDI pedalboard can be supplied directly by X100M through a MIDI 5 or 7 poles cable. Its'
recommended to check the correct polarity of your pedalboard before connecting. This
function is a free of charge optional and it must be set on factory. Please, contact MGD
before delivery for correct wiring of the connector.
Startup sound setups.
X100M is a head engineered to give the widest flexibility of the sound. We developed
circuital solution completely different from usual, so a period of training ( specially on eq
knobs) is necessary to reach the best results. In this section we report some start-point
setups. Furthermore, we have developed two hardware setups, based on different final
tubes:
X100M Classic: four
selected E34L, a new interpretation of the british sound, with a
proud and aggressive soul, at the same time round and elegant. Dedicated to vintage
sound lovers.
X100M Modern:
4 X E34L or 4 X 6L6, two deeply different versions: strong and
heavy the first, round and elegant the second. For players who need a modern, versatile,
ultra-dynamic and ultra-defined amplifier.
A brief channel description
Clean: dedicated to clean sound, it's equipped with a brite switch to refresh high
frequencies. Drive and volume controls are inter-dependt and they can be set in order to
obtain different sounds: drive high and volume low for a "full and strong" sound, drive low
and volume high for "crystal brilliance" results. At high levels and with an external booster,
it's easy to have a very impressive crunch.
Crunch: channel for mean overdriven sounds, available in two versions: Crunch and
Boosted Crunch. Crunch starts from clean gradually dirty up to reach a rhythm rock sound
full and dynamic. Acting on the guitar volume, it's possible to have a wide variety of
degrees of crunch. Boosted crunch is similar to the former but is more useful for modern
sounds, both for rhythm and solo parts, with very high gain, dynamics and transparency.
Lead: modern high gain channel, great headroom with rich armonics, perfect for solo
parts. Very reactive to the pick, with a solid and fully controlled response to low
frequencies, it gives a "liquid" and sustained sound.
Here you have some basic setup:
brite
drive
bass
middle
treble
volume
Funky
CLEAN
X100M User manual
X100MENG1.0 04/2006
brite
drive
bass
middle
treble
9/13
volume
Warm Blues
CLEAN
drive
bass
middle
treble
volume
Brit Blues
CRUNCH
drive
bass
middle
treble
volume
Australian Rock’n’Roll
CRUNCH
drive
bass
middle
treble
volume
Guerrilla
CRUNCH
drive
bass
middle
treble
volume
American Sound
LEAD
X100M User manual
X100MENG1.0 04/2006
drive
bass
middle
treble
10/13
volume
Nu Metal
LEAD
Depth, presence and master controls are common to the three channels.
Depth controls the reactivity and consistence of low frequencies; presence controls the
width and freshness of mid-highs. Master controls the level at the input of final stage, after
pre section and effects loops. Thanks to this pot and to the final stage transparency, it's
possible to put under pressure the preamp stage also at low volume: despite of high output
power, X100M has been projected keeping in mind a very diffused needs, that is to have a
fully satisfying sound also at low levels.
Use, maintenance and periodic checks.
X100M use requires normal attention as in any other tube power amplifier. Top and rear
grids must be free for air circulation and correct cooling of internal parts.
Wait for at least two minutes after switch on before go in active mode, in order to allow
tube heaters reach the steady state.
Cabinet can be cleaned with a soft, cotton cloth wet with normal water. Avoid use of
aggressive solvents.
As for all the other amplifiers, if X100M is used often on stage and it is transported
frequently, with deep vibrations and shock, periodically check the tube insertion, screws
lock of frame and internal parts, bias and power supply voltages.
Warning: controls on the internal parts must be done only by qualified personnel.
For any doubt and before any service, please refer to MGD for information.
Tube replacement and bias set.
X100M is equipped by factory with selected tubes. The seven ECC83/12AX7 last a lot of
months and their replacement does not require any re-tuning.
Tube location is shown in the following drawing
All ECC83/12AX7 but the four final tubes
Crunch1
Lead
Clean1
Crunch2
Clean2/Recovery stage
Crunch3
Phase shifter
Final tubes: 4X E34L o 4X 6L6
X100MENG1.0 04/2006
X100M User manual
11/13
The four E34L/6L6 life is function of the use and of the mean volume and it can be about 6
to 24 months. They must be replaced all four in the same time and a selected, good brand
quartet is strongly recommended. Their replacement necessarily requires the setup of bias
on an internal trimmer; this operation must be done by a qualified technician.
In case of fault of one final tube, external HV fuse and/or some internal fuses could blow
and they must be replaced by qualified personnel.
Manufacturer and selection of tubes (pre and final) have a deep influence on the sound
and they can be chosen following personal attitudes. For more info and tips, please
conctact MGD.
WARNING: tube and fuses replacement, bias set and any other maintenance internal
to X100M must be done exclusively by MGD or qualified and skilled personnel at
least 30 minutes after mains disconnection from the IEC rear socket!
Troubleshooting.
Here we report some possibile problems during X100M use. Don't esitate to contact MGD
for any doubt.
X100M does not power on. Check mains voltage. Check mains cable. Check
mains fuses. If it is blown, replace it with an identical one following the instructions
indicated before. If it is blown again, contact MGD or qualified personnel for
maintenance.
At the switch ON, all leds blink for a moment and then they are lit OFF. X100M
has been switched ON in MIDI program mode with channel selector on CLEAN
position.
Channel is correctly selected but there is no sound.. Check cables and jacks
and their insertion. Check level of drive, tones and volume. Check master level on
the rear panel. If tones are all OFF, signal is completely cut
X100M does not react to MIDI messages. Check MIDI cables and connections.
Check channel and mode of pedalboard: channel must be #1, mode must be
Program Change.
Noisy pot at rotation. Absolutely do not attempt to clean it with spray or in any
other way! Please refer to MGD for pot replacement.
Sound is bad, the amplifier generates strange noise, hisses or pops. One or
more tubes are at end of life or they became microphonics. Please contact MGD or
a qualified technician for individuate the defective tube(s) and replace in the best
way.
Fuses.
X100M has 5 fuses:
Internal fuse for final tube heaters: 250V 10A T delayed;
Internal fuse for preamp tube heaters: 250V 2A T delayed;
Internal fuse for bias: 250V 100mA T delayed;
External fuse for HV (anodic voltage): 250V 1A T delayed;
External mains fuse: 4 A T delayed.
If mains voltage has fast and violent oscillation in a few seconds, mains fuse can blow.
Warning: replace external fuses only with identical type and specs ones. Internal
fuses must ne replaced only by qualified personnel!
X100MENG1.0 04/2006
X100M User manual
12/13
Warranty.
Warranty is lifetime for the hardware ( tubes not included) except these parts: connectos,
switches and pots. These parts have 24 months warranty from purchase date.
Preamp tubes have 6 months warranty from purchase date.
Final tubes have 3 months warranty from purchase date.
Warranty is not valid if the amplifier is opened by not qualified personnel or partially
modified.
Masotti Guitar Devices does not have any responsibility for damages to humans, animals
or things caused by a manumission or an improper use of the device different from the
description of this manual.
Versions and customisations
X100M is available in two main versions, Modern and Classic, different for sound but
identical for controls and general circuitry. It is possible to customise a lot of functions and
sound aspects (MIDI switched dual master, parallel loop etc.) , so you can contact us for
explain your needs. In this manual a special "Black crocodile" version is shown. It's
possible also customise cover as shown in the following pictures.
Standard cover and knobs for Classic version
Standard cover and knobs for Modern version
"Red crocodile" custom version
"Blu" version with MIDI customised mods
WARNING: don't replace final tubes with different type. If your X100M is delivered
with E34L, never replace them with 6L6 and vice-versa.
Important safety warnings
X100M is projected and engineered following international rules EN 60065, EN 55103-1
and EN55103-2 and it is compliant to European Community laws. CE mark indicates the
compliance.
X100MENG1.0 04/2006
X100M User manual
13/13
However, in order to avoid shock or hurt risks, you should follow carefully the instructions
indicated in this manual and in the following notes:
• Never open the case. Removal of rear grid or the frame from cabinet exposes the
operator to dangerous voltages and high temperature parts. Please refer to
qualified personnel to any maintenance operation.
• Never unscrew any screw from the device.
• Avoid use or storage in presence of rain, water sparks, high temperature and/or wet
atmosphere, water or chemical vapours, excessive dust or any other material which
can penetrate the case from air cooling apertures.
• Don't close air cooling grids on the top and on the rear. Leave free space on the top
and on the rear for free air circulation.
• After many hours of uninterrupted functioning , top air grid could become hot. Even
if temperature does not reach dangerous values, avoid to touch it.
• Don't enter any metal or isolated part inside air cooling grids.
• Never use X100M without rear protection grid.
• Use only proper jacks and plugs in the sockets of the amplifier.
• Don't espose X100M to excessive vibrations during the funcitoning.
• After a storage at very low temperature, if you will play in a wet/humid warm
ambient please wait for at least 30-40 minutes before switch the amplifier ON.
• Use only good mains cables and never cut protective earth connections.
• Check mains voltage indicated on the rear of the amplifier
• Disconnect the device from mains in case of use during thunderstorms.
• IF HV and/or mains fuses blow not related to extraordinary events as thunderstorms
or violent mains variations, don't attempt to replace more than once fuses and
contact qualified personnel.
• Dont' force pots and switches.
• Never replace internal fuse and refer to qualified personnel.
Technical specifications.
Power supply: 230V±10% 50Hz or 115V ±10% 50-60Hz, factory set
Max power consumption: 600VA
Input impedance: 1MΩ.
Output power: nominal 100W rms
Output impedance: 4-8-16 ohm
Tubes: seven ECC83/12AX7, four E34L/EL34 or four 6L6.
Ambiental conditions: 10-40°C, 30-90% humidity with no frost
Dimensions: 680(W)X280(D)X250(H) mm;
Weight: 24.5 kg
Contacts.
Masotti Guitar Devices Via C. Battisti 107– 01010 Farnese (VT) Italy.
URL: www.masottiamp.it
For info: e-mail [email protected]