1
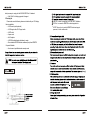
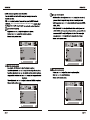
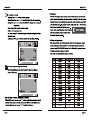
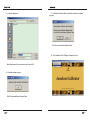
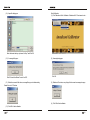
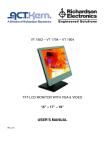
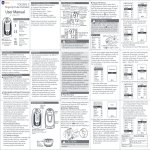
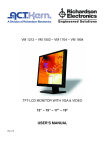
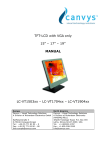
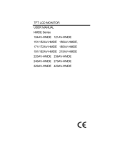
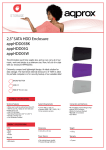
AMEDICOM MDA2121
21.6” DUAL-MODE 2MP11-bit
MEDICAL LCD DISPLAY
1
2
4
4
4
4
5
5
5
6
6
6
3.6. DICOM GSDF Calibration
3.7. DICOM mode setting
7
7
9
12
12
13
14
15
4.1. 21.6” dual-mode 2 MP 11-BIT mdeical LCD display specification
4.2. ARMSTEL Lux meter specification
4.3. ARMSTEL Amedicom Calibrator specification
4.4. Pin assignment of signal cable
16
16
18
18
18
20
EMC COMPLIANCE
IMPORTANT PRECAUTIONS
EMC COMPLIANCE
This device has been tested and found to comply with the standards for a class
B digital device, pursuant to Part 15 of FCC Rules. Those standards are designed
to provide reasonable protection against harmful interference in a residential
installation. This device generates and can radiate radio frequency energy and, if
not installed and used in accordance with the instructions, may cause harmful
interference to radio communications.
If this device does cause harmful interference to radio or television reception,
which can be determined by turning the device off and on, user is encouraged to
try to correct the interference by one or more of the following measures:
---Reorient or relocate the receiving antenna
---Increase the separation between the device and receiver
---Plug the device into a wall outlet different from that connected to the receiver.
---Consult the dealer or an experienced radio/TV technician for help.
CAUTION: any change or modification not expressly illustrated in this
manual may void the warranty.
NOTE: any unshielded cable is not allowed to
be used in the device!
page 1
IMPORTANT PRECAUTIONS
WARNINGS:
1. Before using this device, please read all the instructions in this manual carefully.
2. Please keep the manual carefully for future reference.
3. Unplug this device from the wall outlet before cleaning. Do not use liquid
cleaners or aerosol cleaners. Use a damp or wet cloth to clean. Please use LCD
screen detergent for cleaning if it is still dirty.
4. Do not use the parts not recommended by the manufacturer, otherwise it may
cause a hazard.
5. When unplugging the power cord of the monitor or adapter, please hold the plug
with your hand, do not pull the cord directly.
6. Do not place any object on the power cord. Do not trample it either.
7. Do not use the device near water sources, e.g. bathtub, basin, kitchen sink, or
washing machine. Do not place the device on a wet floor, or near a swimming
pool etc. Do not touch the screen with your fingers or other hard objects.
8. Slots and openings on the housing and its back or bottom are provided for
ventilation. To ensure reliable operation of the components and to protect them
from overheating, these openings must not be blocked or covered placing the
device on a bed, sofa, rug, or other similar surface. The device should never be
placed near or over a radiator or heater and should not be placed in a built-in
installation unless proper ventilation is provided.
9. Make sure that the device is at least 5cm distance from the wall or other objects
around when it is in use.
10. The power supply must respond to that stated on the rating plate. If you have
any query about the power supply, please refer to the dealer or local power
supply provider.
11. As a safeguard measure, the monitor or adapter is equipped with a power cord
with three-terminal plug, the third terminal is grounded. If the plug cannot be
inserted into the outlet, please contact an electrical technician for replacing the
original outlet while keeping the safeguard measure in effect.
12. Ensure that the power socket and cord in use are able to take the sum of the
rated currency of all the products.
13. Do not put the device at the place where user is subject to mal-operation.
page 2
1.1 General
Thank you for purchasing the latest ARMSTEL AMEDICOM model of dual
-mode LCD monitor, with advantages of high display performance and light
weight etc, meanwhile with the power saving and no-radiation features.
The latest ARMTEL dual-mode medical LCD will bring you comfortable, safe
and environmental-protection brand-new visual experience, with guaranteed
DICOM adjustable medical clinic medical display functions. The AMEDICOM has
the most advance ARMSTEL patented medical display solution (ARMSATT tech
-nology) (patent pending), to provide the clinic practitioners with the most conve
-nient LCD monitor solutions.
Your purchase and use of this product are highly appreciated!
1.2 Features
--- High performance intelligent frequency scanning, use active matrix
Thin film transistor liquid crystal display (TFT).
--- Micro Computer digital technology control, no radiation, no glare
--- Comply with VESA DPMS International Power Saving Regulation.
--- Support DDC 1/2B and Windows PNP Plug & Play.
--- Microprocessor based with OSD (On Screen Display) control, be able to
adjust the image to optimum.
--- Built-in hoisting hole complying with International Standard(VESA), which
is able to hang the display on the wall.
--- Single DICOM button push to select ARMSTEL patented ARSMATT® tec
-hnology based DICOM compliant clinic medical display function.
--- Any time user friendly DICOM calibration with the ARMSTEL lux meter
and calibration software via dedicated USB port on the display.
--- External Power Supply to extend the life of ARMSTEL dual-mode medical
LCD display.
--- Pivot 90 degree turn (landscape/portrait)
--- Swivel 180 degree
--- Extendable back support.
--- Build-in DICOM calibration to 11-bit grayscale (2048 grayscale luminance
levels) accuracy to comply with the DICOM GSDF Part 14 standard
--- 8-bit/10-bit/11-bit display grayscale bit support
1.3 Packing list
Please make sure the following items are included with your LCD display
before installation:
--- A LCD monitor (with pedestal)
--- A VGA signal cable, DVI-D signal cable
--- A UPS cable
--- A power cord
--- An AC adapter
--- A DICOM medical display calibration lux meter
--- Down loadable DICOM calibrator softaware (free) from ARMSTEL
Corporate Webside .
--- User's manual, qualification and warranty cards
USB Port : connect to computer for DICOM GSDF Calibration
5 IDC Port : to connect to ARMSTEL technical support tool *.
*
NOTE: This port is only used by ARMSTEL technical support
personnel , not for customer use .
orange
orange
USB Port
IDC port
DICOM Button
Push DICOM button to activate ARMSTEL’s patented Dicom technology for
medical display function. When LCD display is in DICOM mode. The LED light
remains flashing.
Push Dicom again to switch back to normal LCD display function.
The LED light turns purple
When DICOM mode is selected. All other OSD button functions are disabled ,
except power button. Note the default power up mode is normal LCD display mode.
DICOM
AUTO
MENU
orange
with >/< (the selection buttons on the front of case)
67.500
62 795
1366x768
79.976
1440x900
55.935
60.000
79.976
1680x1050
65.290
60.000
1600x1200
1920x1080
75.000
79.796
60.000
60.000
40W
red/orange
DICOM
1W
turn off
1W
purple
40W
3.6. DICOM GSDF Part 14 calibration
The ARMSTEL AMEDICOM medical display has the buil-in calibrated DICOM
GSDF compliant BARTEN curve for medical image display, with patented
(pending) ARMSATT technology embedded. To adjust the display from shifting
away from the DICOM characteristic display f unction, ARMSTEL provides a
dedicated tool for user to calibrate the display lookup table whenever needed.
The tools include a software and a lux meter coming with the LCD display.
ARMSTEL AMEDICOM Calibrator software provides a user control function
to calibrate the DICOM GSDF Barten curve on site to prevent the shifting. The
software allows user to calibrate at different levels of accuracies, i.e., using 2048,
1024, 512, or 256 grayscales (grayscale luminance levels) to interpolate the
Barten curve. Using 2048 grayscales takes approximately 40 minutes to restore
the default setting, whereas 1024 takes around 20 minutes. 512 grayscales
calibration takes about 10 minutes while 256 grayscales takes less than 5 minute
to complete the calibration.
Calibration steps are as follows:
1) Install ARMSTEL AMEDICOM Calibrator software by following the prompted
up instructions. The software supports Window 98/XP/Vista/Win7 OS;
2) Connect LCD display USB to the computer using the USB wire that comes
with the LCD display;
3) Connect ARMSTEL lux meter to the computer;
4) Fix the lux meter on the LCD screen by the suction cup on the lux meter.
5) Double click to run ARMSTEL AMEDICOM Calibrator software installed
above;
6) For Amedicom Calibrator software function , refer to section 4.3 for details .
Note,
user needs to the right luminance table and the corresponding Barten
table generated by the software to set the LCD display in the calibration.
3.7. DICOM mode setting
When LCD display is powered up, by default, the LCD working mode is set to
normal color LCD mode. All OSD operations are working for the color LCD display
setting.
User selects DICOM working mode by pushing the DICOM button once. When
LCD is set to work in DICOM mode, the LED of display will remain purple
status. All the corresponding DICOM viewers grayscale image display will trigger
ARMSTEL's ARMSATT technology to apply DICOM GSDF Part 14 required display
function for the medical image presentation. The color LCD OSD functions are
disabled and the Gamma display curve is set to default one for color image display.
Under the DICOM mode, the only functional button is power button, unless user
switch back to normal LCD display mode LED turn blue.
User can switch to normal color monitor working mode by pushing the DICOM
button again under the DICOM mode. (LED indicates flashing). Once the LCD is
switched back to normal color LCD mode, the full OSD functions are back to work.
4.1. 21.6” DUAL-MODE Medical LCD display specification
21.6
21.6
0.248x0.248mm
10:9
304mmx228mm
1920x1080
16,777
DICOM
100
570*210*470mm
N.W: 8KG , G.W: 10KG
15
16
Gradation Display
11-bit * (LUT)
Calibration (standard)
DICOM Part 14
Calibration Port
USB
Calibration tools
ARMSTEL lux Meter ,
ARMSTEL Amedicom Calibrator
In put Grayscale
resolution
8-bit/10-bit *
* Requires ARMSTEL Viewer Application
4.2 ARMSTEL lux meter specification
ARMSTEL lux meter is a dedicated luminance meter for medical LCD display
DICOM Part 14 calibration. The lux meter works with ARMSTEL AMEDICOM
Calibrator to measure up to 2048 grayscales that ARMSATT technology can
generate on a 8-bit color LCD display. Those 2048 grayscale luminance levels are
measured and transmitted to the computer via USB connection. ARMSTEL
AMEDICOM calibrator collects the data and calibrate the BARTEN curve based
on the grayscale luminance values sent from the lux meter and set the LCD display
with the correct DICOM GSDF characteristic display function via USB connection
from the computer to the LCD display USB port.
Sensor:Silicon photodiode
Optical Wavelength coverage:350~600nm
Measuring range:0~2000 Lux
Accuracy:±(3% Rdg +0.5 F.S)(while the ambient temperature is 23 ±5°C)
Resolution:0.01
Sampling rate:1 /s
Repeatability:±2%
USB:USB2.0
USB cable length:1.5M
4.3 ARMSTEL AMEDICOM calibrator specification
ARMSTEL AMEDICOM Calibrator is an ARMSTEL owned software package for
calibrating the DICOM GSDF Part 14 display characteristic function. The software
can provide user the control over the ARMSTEL AMEDICOM medical LCD display
calibration on site any time user needs.
The calibration software provides user different accuracy of calibration on site,
depending on interval between calibrations.
The following is the example demonstrating the use of ARMSTEL Amedicom
Calibrator software to calibrate ARMSEL Amedicom dual-functional medical LCD
display.
First of all, to go ARMSTEL’s corporate website to down load the Amedicom
Calibrator software by registering the customer information. After the down loading,
17
18
install the software on our preferred local file directory, and run the software.
After starting the software, user follows the following steps to calibrate the LCD.
(3.) Wait about 15 minutes, when complete a dialog pops:
(1.) Click: Calibration->Generate Grayscale Luminance->Generate Table with
512 Luminance Levels…
Click OK to save the grayscale file.
(4.) Click: Calibration ->Generate Barton Calibration Table->Generate Barton
Table with 512 Luminance level:
(2.) A warning dialog pops:
Click OK.
19
20
(5.) a open file dialog pops:
(7.) After Barten Calibration Table is generated successfully, a message
box pops:
Click OK to save the Braten Calibration Table
(8.) Click Calibration->Set LCD Display Characteristic Curve.
Select the grayscale file you just saved in step 3 and click OK.
(6.) A warning message box pops:
Click OK to generate Barten Calibration Table.
21
22
(9.) A open file dialog pops:
Quick Calibration:
(1.) Click Calibration->Quick Calibration->Calibrate with 512 Luminance levels…
Select the barten table you just saved in Step 7 and Click OK.
(10.) A message Box pops:
Click OK to write the Barten Curve to the LCD.
(11.) Wait a few seconds. After done, a message Box pops to indicate writing
Barten Curve to LCD is done
(2.) A warning dialog pops:
Click OK.
(3.) Wait about 15 minutes, every thing will be done and a message box pops
(4.) Click OK to finish calibration.
(12.) Click OK to finish calibration.
23
24
4. 4
4. 5
25
26
Contents of the Package
*
LCD Monitor
(Reference only, the real feature is depended on selected model)
Removing the Stand
Turn the connecting screw at the bottom of the stand to separate it.
Monitor
Base
*Accessory
Power Cord
DVI Cable
VGA Cable
User’s Manual
SUB Cable
Adaptor
I/O Ports Connection
Lex meter
AMEDICOM calibrator
Installation and Removal
USB
INSTALL
Turn the connecting screw at the bottom of the stand fully so that it is completely fixed.
SUB Cable
Lex meter