1
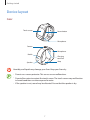
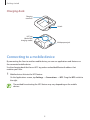
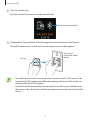
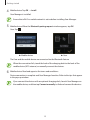
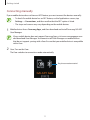
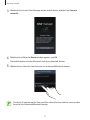
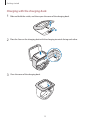
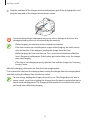
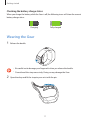
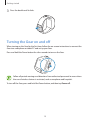
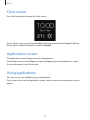
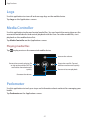
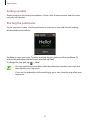
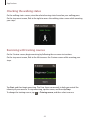
SM-V700
User Manual
www.samsung.com
About this manual
You can use this Gear as a companion device to some Samsung Android™ smartphones or
tablet PCs. This user manual is specially designed to explain applications and features that are
available when the Gear is connected to a mobile device.
• Please read this manual before using the Gear to ensure safe and proper use.
• Descriptions are based on the Gear’s default settings.
• Images and screenshots may differ in appearance from the actual product.
• Content may differ from the final product, or from software provided by service providers
or carriers, and is subject to change without prior notice. For the latest version of the
manual, refer to the Samsung website, www.samsung.com.
• Content (high quality content) that requires high CPU and RAM usage will affect the
overall performance of the Gear. Applications related to the content may not work
properly depending on the Gear’s specifications and the environment that it is used in.
• Available features and additional services may vary by Gear, software, or service provider.
• Applications and their functions may vary by country, region, or hardware specifications.
Samsung is not liable for performance issues caused by applications from any provider
other than Samsung.
• Samsung is not liable for performance issues or incompatibilities caused by edited
registry settings or modified operating system software. Attempting to customise the
operating system may cause the Gear or applications to work improperly.
• Software, sound sources, wallpapers, images, and other media provided with this Gear
are licensed for limited use. Extracting and using these materials for commercial or other
purposes is an infringement of copyright laws. Users are entirely responsible for illegal
use of media.
• Default applications that come with the Gear are subject to updates and may no longer
be supported without prior notice. If you have questions about an application provided
with the Gear, contact a Samsung Service Centre. For user-installed applications, contact
service providers.
• Modifying the Gear’s operating system or installing softwares from unofficial sources may
result in Gear malfunctions and data corruption or loss. These actions are violations of
your Samsung licence agreement and will void your warranty.
2
About this manual
Instructional icons
Warning: situations that could cause injury to yourself or others
Caution: situations that could cause damage to your device or other equipment
Note: notes, usage tips, or additional information
Copyright
Copyright © 2013 Samsung Electronics
This guide is protected under international copyright laws.
No part of this guide may be reproduced, distributed, translated, or transmitted in any form or
by any means, electronic or mechanical, including photocopying, recording, or storing in any
information storage and retrieval system, without the prior written permission of Samsung
Electronics.
Trademarks
• SAMSUNG and the SAMSUNG logo are registered trademarks of Samsung Electronics.
• Bluetooth® is a registered trademark of Bluetooth SIG, Inc. worldwide.
• All other trademarks and copyrights are the property of their respective owners.
3
Table of Contents
Getting started
Gear Manager
6 Package contents
7 Device layout
8 Connecting to a mobile device
14Button
14 Charging the battery
17 Wearing the Gear
18 Turning the Gear on and off
19 Locking and unlocking the Gear
19 Adjusting the brightness of the display
19 Adjusting the volume
20 Switching to silent mode
31
31
32
33
34
34
35
35
35
36
36
36
Basics
About Gear Manager
Configuring the Gear settings
Customising the Home screen
Managing applications
Finding the Gear
Using notifications
Activating the auto lock feature
Setting an application shortcut
Setting up emergency messages
Smart relay
Using a wake-up gesture
Viewing help information
Applications
21 Indicator icons
21 Using the touch screen
24Notifications
25 Home screen
26 Clock screen
26 Applications screen
26 Using applications
27 Returning to the previous screen
27 Securing the Gear
28Bluetooth
30 Using calling features
37Camera
39Gallery
40Contacts
40Dialler
40 Find my device
41Logs
41 Media Controller
41Pedometer
45 S Voice
45Stopwatch
46Timer
4
Table of Contents
46 Today’s Schedule
46 Voice Memo
47Weather
Settings
48 About Settings
48Clock
49Sound
49Volume
49Display
50Battery
50Bluetooth
50Motions
50 Privacy lock
50Language
51 Reset Gear
51 Gear info
Troubleshooting
5
Getting started
Package contents
Check the product box for the following items:
• Gear
• Charging dock
• Quick start guide
• The items supplied with the Gear and any available accessories may vary
depending on the region or service provider.
• The supplied items are designed only for this Gear and may not be compatible
with other devices.
• Appearances and specifications are subject to change without prior notice.
• You can purchase additional accessories from your local Samsung retailer. Make
sure they are compatible with the Gear before purchase.
• Other accessories may not be compatible with your Gear.
• Use only Samsung-approved accessories. Malfunctions caused by using
unapproved accessories are not covered by the warranty service.
• Availability of all accessories is subject to change depending entirely on
manufacturing companies. For more information about available accessories, refer
to the Samsung website.
6
Getting started
Device layout
Gear
Touch screen
Power button
Microphone
Camera
Microphone
Buckle
Charging
terminals
Strap
Speaker
Humidity and liquids may damage your Gear. Keep your Gear dry.
• Do not use a screen protector. This causes sensor malfunctions.
• Do not allow water to contact the touch screen. The touch screen may malfunction
in humid conditions or when exposed to water.
• If the speaker is wet, sound may be distorted. Ensure that the speaker is dry.
7
Getting started
Charging dock
Charging
terminals
Switch
NFC tag
(Back of the
charging cradle)
Multipurpose jack
Connecting to a mobile device
By connecting the Gear to another mobile device, you can use applications and features on
the connected mobile device.
Use the charging dock that has an NFC tag and an embedded Bluetooth address that
matches your Gear.
1 Mobile device: Activate the NFC feature.
On the Applications screen, tap Settings → Connections → NFC. Drag the NFC switch to
the right.
The method for activating the NFC feature may vary depending on the mobile
devices.
8
Getting started
2 Gear: Turn on the Gear.
The Gear switches to connection mode automatically.
Play the connection tutorial.
3 Charging dock: Touch the back of the charging dock to the back of the mobile device.
The mobile device emits a sound and a Gear Manager pop-up window appears.
NFC antenna
(Back of the mobile
device)
NFC tag
• The mobile device shown in the image above contains a built-in NFC antenna. The
location of the NFC antenna may differ depending on the device. Refer to the user
manual to locate the NFC antenna.
• Unlock the mobile device before connecting the Gear. If the cover is folded closed,
the screen is off, or the device is locked, you cannot connect the Gear to the mobile
device.
9
Getting started
4 Mobile device: Tap OK → Install.
Gear Manager is installed.
Ensure that a Wi-Fi or mobile network is active before installing Gear Manager.
5 Mobile device: When the Bluetooth pairing request window appears, tap OK.
Gear: Tap
.
▲ Gear
▲ Mobile device
The Gear and the mobile device are connected via the Bluetooth feature.
When the connection fails, touch the back of the charging dock to the back of the
mobile device (NFC antenna) or manually connect the devices.
6 Mobile device: Read and agree to the terms and conditions.
Device connection is complete and Gear Manager launches. Refer to the tips that appear
in the pop-up window.
If you connect the devices with an optional charging dock, launch Gear Manager on
the mobile device, and then tap Connect manually to find and connect the devices.
10
Getting started
Connecting manually
If your mobile device does not have an NFC feature you must connect the devices manually.
• To check if a mobile device has an NFC feature, on the Applications screen, tap
Settings → Connections, and then confirm that the NFC option is listed.
• The steps and screens may vary depending on the mobile devices.
1 Mobile device: Access Samsung Apps, and then download and install Samsung GALAXY
Gear Manager.
If your mobile device does not support Samsung Apps, visit www.samsungapps.com
and download Gear Manager. You cannot install Gear Manager on mobile devices
that do not support syncing with a Gear. Ensure that your mobile device is compatible
with a Gear.
2 Gear: Turn on the Gear.
The Gear switches to connection mode automatically.
Play the connection tutorial.
11
Getting started
3 Mobile device: Launch Gear Manager on the mobile device, and then tap Connect
manually.
4 Mobile device: When the Notice window appears, tap OK.
The mobile device activates Bluetooth and shows detected devices.
5 Mobile device: Select the Gear from the list of detected Bluetooth devices.
Check the ID number on the Gear, and then select the Gear with the same number
from the list of detected Bluetooth devices.
12
Getting started
6 Mobile device: When the Bluetooth pairing request window appears, tap OK.
Gear: Tap
.
▲ Gear
▲ Mobile device
The Gear and the mobile device are connected via the Bluetooth feature.
7 On the mobile device: Read and agree to the terms and conditions.
Device connection is complete and Gear Manager launches.
Connecting to another mobile device
You can connect the Gear to another mobile device. End the current connection and connect
to another mobile device.
1 Mobile device: Launch Gear Manager, tap the Gear name under Paired Gear →
Disconnect → OK.
The connection between the Gear and the mobile device will end.
2 Gear: On the Home screen, scroll to Apps, tap Apps → Settings → Reset Gear → Reset.
The Gear will reset and access connection mode.
3 Mobile device: On another mobile device, launch Gear Manager, and then connect the
mobile device to the Gear.
13
Getting started
Button
Button
Function
• Press and hold to turn the Gear on or off.
• Press and hold for 8-10 seconds to reset the Gear if it has fatal
errors or hang-ups, or freezes.
Power
• Press to return to the Clock screen.
• Press to lock the Gear on the Clock screen. The Gear goes into
lock mode when the touch screen turns off. Press again to
unlock the Gear.
Charging the battery
Use the charging dock to charge the battery before using it for the first time. A computer can
be also used to charge the Gear by connecting them via the USB cable.
Use only Samsung-approved chargers, batteries, and cables. Unapproved chargers or
cables can cause the battery to explode or damage the Gear.
• When the battery power is low, the battery icon appears empty.
• If the battery is completely discharged, the Gear cannot be turned on immediately
when the charger is connected. Allow a depleted battery to charge for a few
minutes before turning on the Gear.
14
Getting started
Charging with the charging dock
1 Slide and hold the switch, and then open the cover of the charging dock.
2
1
2 Place the Gear on the charging dock with the charging terminals facing each other.
3 Close the cover of the charging dock.
15
Getting started
4 Plug the small end of the charger into the multipurpose jack of the charging dock, and
plug the large end of the charger into an electric socket.
Connecting the charger improperly may cause serious damage to the Gear. Any
damage caused by misuse is not covered by the warranty.
• While charging, you cannot use voice recorder and camera.
• If the Gear receives an unstable power supply while charging, the touch screen
may not function. If this happens, unplug the charger from the Gear.
• While charging, the Gear may heat up. This is normal and should not affect the
Gear’s lifespan or performance. If the battery gets hotter than usual, the charger
may stop charging.
• If the Gear is not charging properly, take the Gear and the charger to a Samsung
Service Centre.
After fully charging, disconnect the Gear from the charging dock.
First remove the Gear from the charging dock, unplug the charger from the charging dock,
and then unplug the charger from the electric socket.
To save energy, unplug the charger when not in use. The charger does not have a
power switch, so you must unplug the charger from the electric socket when not in
use to avoid wasting power. The charger should remain close to the electric socket
and easily accessible while charging.
16
Getting started
Checking the battery charge status
When you charge the battery while the Gear is off, the following icons will show the current
battery charge status:
Charging
Fully charged
Wearing the Gear
1 Release the buckle.
• Be careful not to damage your fingernails when you release the buckle.
• Do not bend the strap excessively. Doing so may damage the Gear.
2 Open the clasp and fit the strap to your wrist with the pin.
17
Getting started
3 Press the buckle until it clicks.
Turning the Gear on and off
When turning on the Gear for the first time, follow the on-screen instructions to connect the
Gear to a smartphone or tablet PC and set up your Gear.
Press and hold the Power button for a few seconds to turn on the Gear.
Follow all posted warnings and directions from authorised personnel in areas where
the use of wireless devices is restricted, such as aeroplanes and hospitals.
To turn off the Gear, press and hold the Power button, and then tap Power off.
18
Getting started
Locking and unlocking the Gear
When not in use, lock the Gear to prevent unwanted operation. Pressing the Power button
on the Clock screen turns off the screen and puts the Gear into lock mode. The Gear
automatically gets locked if it is not used for a specified period.
Press the Power button to unlock the Gear.
Adjusting the brightness of the display
Use one of the following methods:
• Double-tap the screen with two fingers, and then tap
icon.
or
next to the brightness
• On the Home screen, scroll to Apps, tap Apps → Settings → Display → Brightness, and
then adjust the brightness.
When you use the Gear in bright conditions, such as under bright sunlight, you can
set the brightness of the display to the maximum. Press and hold the Power button,
and then tap Outdoor mo... When the screen remains off for 5 minutes, outdoor
mode will deactivate automatically.
Adjusting the volume
Use one of the following methods:
• Double-tap the screen with two fingers, and then tap
or
next to the volume icon.
• On the Home screen, scroll to Apps, tap Apps → Settings → Volume, and then select a
category to adjust the ringtone volume or sound volume.
Do not hold the Gear’s speaker close to your ears. Excessive exposure to loud sounds
can cause hearing damage.
19
Getting started
Switching to silent mode
Use one of the following methods:
• Press and hold the Power button, and then tap Sound or Vibrate.
• On the Home screen, scroll to Apps, tap Apps → Settings → Sound → Sound mode →
Vibrate or Mute.
20
Basics
Indicator icons
The following icons provide information about the status of the Gear. These icons appears
when you double-tap the screen with two fingers.
Icon
Meaning
Bluetooth feature activated
Another Bluetooth device connected
Battery power level
Using the touch screen
Use only fingers to use the touch screen.
• Do not allow the touch screen to come into contact with other electrical devices.
Electrostatic discharges can cause the touch screen to malfunction.
• To avoid damaging the touch screen, do not tap it with anything sharp or apply
excessive pressure to it with your fingertips.
• The Gear may not recognise touch inputs close to the edges of the screen, which
are outside of the touch input area.
• Leaving the touch screen idle for extended periods may result in afterimages
(screen burn-in) or ghosting. Turn off the touch screen when you do not use the
Gear.
21
Basics
Finger gestures
Tapping
To open an application, to select a menu item, or to press an on-screen button, tap it with a
finger.
Tapping and holding
Tap and hold the screen with two fingers to open the list of recent applications.
22
Basics
Double-tapping
• Double-tap on an image to zoom in a part. Double-tap again to return.
• Double-tap the screen with two fingers to access the brightness and volume control
panel and view indicator icons and the remaining battery life.
23
Basics
Flicking
Flick left or right on the Home screen or the Applications screen to see another panel.
Pinching
Spread two fingers apart on an image to zoom in a part. Pinch to zoom out.
Notifications
Once the Gear is connected to a mobile device and the mobile device is locked, you can
receive notifications of activities, such as missed calls or new messages on the Gear.
When you receive notifications, tap the screen to view the details.
Tap to make calls, reply with S Voice, or reply with text templates that you set in Gear
Manager.
To view missed notifications or the notification history, on the Home screen, scroll to
Notifications, and tap Notifications. Then, select a category → a notification to view the
details.
24
Basics
Home screen
The Home screen is the starting point to access all of the Gear’s features. It displays the clock,
widgets, shortcuts to applications, and others.
The Home screen can have multiple panels. To view other panels, scroll left or right.
Panels on the Home screen
Number
Application or feature
1 Camera
2 Clock
3 Dialler
4 Notifications
5 S Voice
6 Voice Memo
7 Gallery
8 Media Controller
9 Pedometer
10 Settings
11 Logs
12 Contacts
13 Apps
25
Basics
Clock screen
Press the Power button to open the Clock screen.
On the Clock screen, you can launch Dialler by flicking up and launch Camera by flicking
down. Tap the weather information to launch Weather.
Applications screen
The Applications screen displays icons for all applications.
On the Home screen, scroll to Apps, and then tap Apps to open the Applications screen.
To view other panels, scroll left or right.
Using applications
This Gear can run many different types of applications.
On the Home screen or the Applications screen, select a shortcut or an application icon to
open it.
26
Basics
Returning to the previous screen
While using applications or on the Applications screen, flick down from the top of the screen.
Securing the Gear
Prevent others from using or accessing personal data and information stored in the Gear by
using the pattern lock.
Setting a pattern
On the Applications screen, tap Settings → Privacy lock → Privacy lock → Pattern.
Draw a pattern by connecting four dots or more, and then draw the pattern again to verify it.
If you set a pattern lock, when the Gear disconnects from another mobile device, the pattern
lock activates automatically.
27
Basics
Unlocking the Gear
Turn on the screen by pressing the Power button, and enter the unlock code.
Or, connect to the mobile device again to unlock the Gear automatically.
Bluetooth
Bluetooth creates a direct wireless connection between two devices over short distances.
To activate Bluetooth, on the Applications screen, tap Settings → Bluetooth, and then tick
Bluetooth.
Notices for using Bluetooth
• To avoid problems when connecting your Gear to another mobile device, place the
devices close to each other.
• Ensure that there are no obstacles between your Gear and a connected mobile device,
including human bodies, walls, corners, or fences.
• Do not touch the Bluetooth antenna of a connected mobile device.
• Bluetooth uses the same frequency as some industrial, scientific, medical, and low power
products and interference may occur when making connections near these types of
products.
• Samsung is not responsible for the loss, interception, or misuse of data sent or received
via the Bluetooth feature.
• Always ensure that you share and receive data with devices that are trusted and properly
secured. If there are obstacles between the devices, the operating distance may be
reduced.
• Some devices, especially those that are not tested or approved by the Bluetooth SIG, may
be incompatible with your Gear.
• Do not use the Bluetooth feature for illegal purposes (for example, pirating copies of files
or illegally tapping communications for commercial purposes).
• Samsung is not responsible for the repercussion of illegal use of the Bluetooth feature.
28
Basics
Pairing with other Bluetooth devices
When the other Bluetooth device sends a request to pair with, accept the auto-generated
passkey on the Gear to confirm.
Sending files to a mobile device
You can send images, videos, voice memos, or pedometer records from the Gear to the
mobile device.
On the mobile device, launch Gear Manager, tap My Apps → Apps, and then tap
an application and configure settings.
next to
• To send images or videos, tap next to Camera → Auto transfer → Manual →
Transfer now. To set the Gear to send files to the mobile device automatically, tap Auto
transfer → Always.
• To send voice memos, tap next to Voice Memo → Auto transfer → None → Transfer
now. To set the Gear to send files to the mobile device automatically, tap Auto transfer
→ Always.
• To send pedometer records, tap next to Pedometer → Transfer now. To set the Gear
to send records to the mobile device automatically, tap Auto transfer interval, and then
select an option.
29
Basics
Using calling features
Making a call
On the Applications screen, tap Dialler, enter a number with the keypad, and then tap .
Or, tap Logs or Contacts, select a contact, and then tap
if necessary.
During a call
The following actions are available:
• : Adjust the volume by tapping
→
• /
or
.
: Disconnect your Gear and continue the call only on the mobile device.
• →
: Turn off the microphone so that the other party cannot hear you.
• →
: Open the keypad.
• →
: Switch to a Bluetooth headset if it is connected to the mobile device.
• : End the current call.
Answering a call
When a call comes in, drag
to the right.
If the call waiting service is active, another call can be made. When the second call is
answered, the first call is put on hold.
Rejecting a call
When a call comes in, drag
to the left.
30
Gear Manager
About Gear Manager
This application allows you to connect to a mobile device, customise your Gear settings and
applications, and use features of the connected mobile device.
From the connected mobile device, tap Gear Manager on the Applications screen.
Configuring the Gear settings
Access Gear information and update Gear software.
Tap the Gear name, and then use the following features:
• Rename: Set a name for the Gear.
• Disconnect: End the connection between the Gear and the mobile device.
• Connect new Gear: Connect the mobile device to another Gear.
• Software update: Update the Gear to the latest software.
31
Gear Manager
Customising the Home screen
Customise the settings to change the clock type, add frequently-used applications to the
Home screen, or reorganise applications on the Home screen.
Changing the clock type
Tap Clocks, and then select a clock under Available.
To select what information to show on the Clock screen, tap
Current selection.
next to the clock under
Customising shortcuts
Adding shortcuts
Tap My Apps → Favourites. Tap
, select applications, and then tap Done.
To change the applications to launch when you flick up or down on the Clock screen, tap
Application shortcuts.
You can add up to 14 shortcuts.
Rearranging shortcuts
Tap My Apps → Favourites. Tap , tap and hold
or down to another position, and then tap Done.
next to the application name, drag it up
Deleting shortcuts
Tap My Apps → Favourites. Tap
, select applications, and then tap Done.
32
Gear Manager
Managing applications
Viewing all applications
Tap My Apps → Apps. Scroll up or down to view all applications on the Gear.
Configuring applications settings
Tap My Apps → Apps. Tap
next to an application and configure settings.
Installing applications
Tap Samsung Apps. Browse applications and select an application to download.
To browse and download suggested applications, tap My Apps → Featured.
To install applications from sources other than Samsung Apps, tap Settings →
Unknown Sources.
Uninstalling applications
Tap My Apps → Apps. Tap
→
next to an application → OK.
Default applications that come with the Gear cannot be uninstalled.
33
Gear Manager
Finding the Gear
If you misplace the Gear, Gear Manager will help you find the Gear by making it emit sounds
and turn on the screen.
Tap Find my Gear → Start.
Using notifications
Stay up-to-date with a variety of events, such as missed calls or new messages, of the
connected mobile device.
Tap Notifications, and then drag the Notification switch to the right.
Activating notifications for features
You can select features and activate notifications by ticking the features.
To view more and activate more features, drag the More notifications switch to the right and
tick features.
Changing message notifications settings
You can set the Gear to display the text of a new message.
Tap Preview message.
Managing text templates
Create and manage text templates to reply to messages easily.
Tap Manage text templates.
To create a text template, tap
. To delete a text template, tap
34
.
Gear Manager
Activating the auto lock feature
Use this feature to set the mobile device to lock automatically when it is disconnected from
your Gear.
Tap Settings, and then drag the Auto lock switch to the right.
Tap Continue, draw a pattern by connecting four dots or more, and then draw the pattern
again to verify it.
When your Gear is not detected, the pattern lock activates automatically on the mobile
device. When your Gear is detected again, the pattern lock is deactivated.
Setting an application shortcut
You can launch an application quickly by pressing the Power button twice. First, set a shortcut
to a frequently-used application.
Tap Settings → Double pressing power key, and then select an application.
Setting up emergency messages
Set the Gear to send an emergency message that includes a photo and your current location
when you press the Power button 3 times.
Tap Settings → Safety assistance, and then drag the Safety assistance switch to the right.
Read the terms and conditions, and then tap OK to agree to them. Then, tap OK → Add
contact → an option, and then add the recipients for the message.
To edit the message that will be sent, tap Edit emergency message.
To set an interval for resending the message, tap Message interval.
To edit the recipients for the message, tap Emergency contacts.
35
Gear Manager
Smart relay
Use this feature to view new messages, events, and other information on the mobile device
when you receive notifications.
Before using this feature, make sure the motion feature of the mobile device is
activated.
Tap Settings → Smart relay, and then drag the Smart relay switch to the right.
When you receive a notification, pick up the connected mobile device while your Gear’s
screen is on. The mobile device shows the details. If the mobile device is locked, you must
enter the unlock code first.
Using a wake-up gesture
Set the Gear to recognise your gesture to wake up the Gear and show the clock or the last
page you accessed when the screen is turned off.
Tap Settings → Wake-up gesture, and then drag the Wake-up gesture switch to the right.
To select a screen to be shown when the screen turns on, tap Select screen show.
To wake up the Gear, raise the hand wearing the Gear and look at the screen for a few
seconds. The screen turns on and the screen you set appears.
Viewing help information
Use this feature to access help information for the Gear.
Tap Help.
36
Applications
Camera
Use this application to take photos or videos. The Gear can save up to 50 photos and 15
videos.
Use Gallery to view photos and videos taken with the Gear’s camera. (p. 39)
Tap Camera on the Applications screen.
• The camera automatically shuts off when unused.
• Make sure that the lens is clean. Otherwise, the Gear may not work properly in
some modes that require high resolutions.
• If your Gear saved 50 photos or 15 videos, you cannot take more photos or videos.
Access Gallery and delete files or transfer files to the connected mobile device.
After you transferred files to the mobile device and take more photos or videos,
your Gear will delete some files that are transferred to free some memory.
• While charging, you cannot use this application.
Camera etiquette
• Do not take photos or videos of other people without their permission.
• Do not take photos or videos where legally prohibited.
• Do not take photos or videos in places where you may violate other people’s privacy.
37
Applications
Taking photos
Taking a photo
Tap the screen to take a photo.
Switch between still and video
mode.
Change the camera settings.
Taking a photo with sound
Tap
→ Sound & shot → On.
Tap the screen to take a photo. The Gear records a few seconds of audio after taking a photo.
To stop recording, tap the screen again.
Taking videos
Taking a video
Tap
, and then tap the screen to take a video. To stop recording, tap the screen again.
The maximum recording time is 15 seconds.
After you record videos 3 times, the camera will shut off for optimal performance.
38
Applications
Configuring settings for Camera
Tap to configure settings for Camera. Not all of the following options are available in both
still camera and video camera modes.
• Focus mode: Select a focus mode. Auto is camera-controlled. Macro is for very close
objects.
This setting will not be saved when you turn off this camera.
• Photo size / Video size: Select a resolution. Use higher resolution for higher quality. But it
takes up more memory.
• Sound & shot: Use this to take a photo with sound.
This setting will not be saved when you turn off this camera.
• Signature: Set the Gear to add a signature to photos.
Gallery
Use this application to view images and videos.
Tap Gallery on the Applications screen.
Viewing images
Images are displayed by creation date.
Scroll left or right to view the next or previous image.
Zooming in and out
Use one of the following methods to zoom in an image:
• Double-tap anywhere to zoom in.
• Spread two fingers apart on any place to zoom in. Pinch to zoom out, or double-tap to
return.
39
Applications
Playing videos
Video files show the
icon on the preview. Select a video to watch it and tap
.
Deleting files
When viewing a file, tap
→ Delete.
Sharing files
When viewing a file, tap
→ Share to send it to others or share it via social network services.
Contacts
Use this application to view contacts on the connected mobile device.
Tap Contacts on the Applications screen.
You can make a call or send a message to a contact by scrolling left or right on a log entry.
Dialler
Use this application to open the dialling keypad and make a call.
Tap Dialler on the Applications screen.
Find my device
Use this application to find the connected mobile device.
Tap Find my device on the Applications screen.
Tap Start, the mobile device emits sounds, vibrates, and turns on the screen.
This application is available only when the devices are connected.
40
Applications
Logs
Use this application to view call and message logs on the mobile device.
Tap Logs on the Applications screen.
Media Controller
Use this application to play and control media files. You can launch the music player on the
connected mobile device and control playback with the Gear. For other media files, start
playback on the mobile device first.
Tap Media Controller on the Applications screen.
Playing media files
Tap
to play music on the connected mobile device.
Increase the volume.
Restart the currently-playing file
or skip to the previous file. Tap
and hold to move backwards
quickly.
Skip to the next file. Tap and
hold to move forwards quickly.
Pause and resume playback.
Decrease the volume.
Pedometer
Use this application to track your steps and information about workouts for managing your
health.
Tap Pedometer on the Applications screen.
41
Applications
Before You Start Exercising
This app can be used to monitor your exercise. While moderate physical activity, such as brisk
walking, is safe for most people, health experts suggest that you talk with your doctor before
you start an exercise program, particularly if you have any of the following conditions:
• Heart disease
• Asthma or lung disease
• Diabetes, or liver or kidney disease
• Arthritis
You should also check with your doctor if you have symptoms suggestive of heart, lung, or
other serious disease, such as:
• Pain or discomfort in your chest, neck, jaw, or arms during physical activity
• Dizziness or loss of consciousness
• Shortness of breath with mild exertion or at rest, or when lying down or going to bed
• Ankle swelling, especially at night
• A heart murmur or a rapid or pronounced heartbeat
• Muscle pain when walking upstairs or up a hill that goes away when you rest
Finally, the American College of Sports Medicine recommends that you see your doctor
before engaging in vigorous exercise if two or more of the following apply:
• You are a man older than age 45 or a woman older than age 55.
• You have a family history of heart disease before age 55.
• You smoke or quit smoking in the past six months.
• You have not exercise for three months or more.
• You are overweight or obese.
• You have high blood pressure or high cholesterol.
• You have impaired glucose tolerance, also call pre-diabetes.
When in Doubt - Check it Out
If you are unsure of your health status, have several health problems, or are pregnant, you
should speak with your doctor before starting a new exercise program. Working with your
doctor ahead of time is a good way to plan an exercise program that is right and safe for you.
Consider it the first step on your path to physical fitness.
42
Applications
Setting a profile
Read and agree to the terms and conditions. Select a unit of measurement, and then enter
your physical statistics.
Starting the pedometer
On the step count screen, start the pedometer to count your steps and view the walking
distance and burned calories.
Tap Start to count your steps. To pause counting, tap the screen, and then tap Pause. To
resume the pedometer, tap the screen, and then tap Start.
To change the step goal, tap
→ Goal.
• You may experience a brief delay while the pedometer monitors your steps and
then displays your step count.
• If you use the pedometer while travelling by car or train, vibration may affect your
step count.
43
Applications
Checking the walking status
On the walking status screen, view the calorie burning status based on your walking pace.
On the step count screen, flick to the right to access the walking status screen while counting
your steps.
Exercising with training courses
On the S trainer screen, begin exercising by following the on-screen instructions.
On the step count screen, flick to the left to access the S trainer screen while counting your
steps.
Tap Start, and then begin exercising. The Gear shows commands to help you control the
intensity of your exercise. To stop exercising, tap the screen, and then tap Stop.
To change the training course, tap
→ Training course, and then select a course.
44
Applications
S Voice
Use this application to command the Gear remotely by voice to dial a number, send a
message, and more.
Tap S Voice on the Applications screen. Alternatively, press the Power button twice.
• This application may not be available depending on the region or service provider.
• This application is not supported in some languages.
• You can change the application to launch when you press the Power button twice.
(p. 35)
Here are several examples of spoken commands:
• Open gallery
• Launch gallery
• Call Lulu mobile
• Check schedule
To view more examples, tap
.
Tips for better voice recognition
• Speak clearly.
• Speak in quiet places.
• Do not use offensive or slang words.
• Avoid speaking in dialectal accents.
The Gear may not recognise your commands or may perform unwanted commands
depending on your surroundings or how you speak.
Stopwatch
Use this application to measure the amount of elapsed time.
Tap Stopwatch on the Applications screen.
Tap Start to time an event. Tap Lap to record lap times.
Tap Reset to clear lap time records.
45
Applications
Timer
Use this application to use the Gear as a countdown timer.
Tap Timer on the Applications screen.
Set the duration, and then tap Start.
Tap Dismiss when the timer goes off.
Today’s Schedule
Use this application to view today’s events.
Tap Today’s Schedule on the Applications screen.
Voice Memo
Use this application to record voice memos.
Tap Voice Memo on the Applications screen.
While charging, you cannot use this application.
Recording voice memos
Tap to start recording. Speak into the microphone at the top left of the Gear. Tap
pause recording. Tap to finish recording.
to
Display the list of voice memos.
Remaining recording time
Start recording.
46
Applications
Playing voice memos
Select a voice memo to play. If spoken text is recorded and the text converting is finished,
appears next to the filename. The Gear shows the text on the screen during playback.
• : Start playback.
• : Adjust the volume by tapping
or
.
• : Pause playback.
• /
: Skip to the previous or next voice memo.
Weather
Use this application to view weather information for the locations that are set on the
connected mobile device.
Tap Weather on the Applications screen.
When you add other locations on the mobile device, you can view weather information for
them by scrolling left or right.
To view the weather information for this week, tap the screen.
47
Settings
About Settings
Use this application to configure the Gear and set application options.
Tap Settings on the Applications screen.
Clock
Access and alter the following settings to control how the Gear displays the time and date.
If the battery remains fully discharged, the time and date is reset.
• Clock type: Change the clock type.
• Date and time:
– – Auto sync: Automatically update the time and date when moving across time zones.
To use this feature, the Gear must be connected to a mobile device.
– – Set date: Set the current date manually.
– – Set time: Set the current time manually.
• Hourly alert: Set the Gear to emit sounds or vibrate every hour.
48
Settings
Sound
Change settings for various sounds on the Gear.
• Sound mode: Activate silent mode to make your Gear vibrate or mute all sounds, except
for media sounds.
• Touch sounds: Set the Gear to sound when selecting an application or option on the
touch screen.
• Ringtones: Select a ringtone to alert you to incoming calls.
• Notifications: Select a ringtone for events, such as incoming messages and missed calls.
• Vibration: Select the force of the vibration notification.
• Preferred arm: Select the arm on which you wear the Gear. The main microphone will
change depending on your selection.
Volume
Adjust the volume for various sounds on the Gear.
• Multimedia: Adjust the volume level for media sound.
• Ringtones: Adjust the volume level for call ringtones.
• Notifications: Adjust the volume level for notifications.
• System: Adjust the volume level for system sounds.
Display
Change the settings for the display.
• Brightness: Adjust the brightness for the display.
• Screen timeout: Set the length of time the Gear waits before turning off the display’s
backlight.
• Home bg colour: Set a colour for the Home screen.
• Font size: Change the font size.
• Battery per...: Set the Gear to display the remaining battery life when you double-tap the
screen with two fingers.
49
Settings
Battery
View the remaining battery life.
Bluetooth
• Bluetooth: Turn the Bluetooth wireless feature on or off.
• Visibility: Set the Gear to be visible to other Bluetooth devices.
Motions
• Smart relay: Set to view new messages and other information when you pick up your
connected mobile device after receiving notifications on your Gear.
• Wake-up gesture: Set the Gear to turn on the screen and show the screen you set when
you raise the hand wearing the Gear and look at the screen for a few seconds.
Privacy lock
• Privacy lock: Activate the screen lock feature.
• Help: Access help information about using the screen lock feature.
Language
Select a display language for all menus and applications. When your Gear is connected to a
mobile device, the display language on the mobile device is applied to your Gear. You cannot
change the language with your Gear.
50
Settings
Reset Gear
Reset settings to the factory default values and delete all data.
Gear info
Access Gear information.
51
Troubleshooting
Before contacting a Samsung Service Centre, please attempt the following solutions. Some
situations may not apply to your Gear.
Your Gear does not turn on
When the battery is completely discharged, your Gear will not turn on. Charge the battery
completely before turning on the Gear.
The touch screen responds slowly or improperly
• If you attach a protective cover or optional accessories to the touch screen, the touch
screen may not function properly.
• If you are wearing gloves, if your hands are not clean while touching the touch screen,
or if you tap the screen with sharp objects or your fingertips, the touch screen may
malfunction.
• The touch screen may malfunction in humid conditions or when exposed to water.
• Restart your Gear to clear any temporary software bugs.
• Ensure that your Gear software is upgraded to the latest version.
• If the touch screen is scratched or damaged, visit a Samsung Service Centre.
Your Gear freezes or has fatal errors
If your Gear freezes or hangs, you may need to close applications and turn on the Gear to
regain functionality. If your Gear is frozen and unresponsive, press and hold the Power button
for more than 8-10 seconds to reboot.
If this does not solve the problem, perform a factory data reset. On the Applications screen,
tap Settings → Reset Gear → Reset. Before performing the factory data reset, remember to
make back-up copies of all important data stored on the Gear.
If the problem is still not resolved, contact a Samsung Service Centre.
52
Troubleshooting
Another Bluetooth device cannot locate your Gear
• Ensure that the Bluetooth wireless feature is activated on your Gear.
• Reset your Gear and try again.
• Ensure that your Gear and the other Bluetooth device are within the maximum Bluetooth
range (10 m).
If the tips above do not solve the problem, contact a Samsung Service Centre.
A Bluetooth connection is not established or your Gear and the
mobile device are disconnected
• Ensure that the Bluetooth feature on both devices is activated.
• Ensure there are no obstacles, such as walls or electrical equipment, between the devices.
• Ensure that the latest version of the Gear Manager application is installed on the mobile
device.
• Use the devices within the maximum Bluetooth range (10 m). If there are obstacles
between the devices, the operating distance may be reduced.
• Restart both devices and launch the Gear Manager on the mobile device again.
Your Gear receives notifications at an interval different than the one
you set on the mobile device
Ensure that you set the Gear’s time and date to be updated automatically and the Gear is
connected to the mobile device.
Calls are not connected
• Ensure that your Gear is connected to a mobile device.
• Ensure that the connected mobile device has accessed the right cellular network.
• Ensure that you have not set call barring for the phone number you are dialling on the
connected mobile device.
• Ensure that you have not set call barring for the incoming phone number on the
connected mobile device.
53
Troubleshooting
Others cannot hear you speaking on a call
• Ensure that you are not covering the built-in microphone.
• Ensure that the microphone is close to your mouth.
Sound echoes during a call
Adjust the volume or move to another area.
Audio quality is poor
You may have connectivity problems due to issues with the mobile device’s network
connections.
The battery icon is empty
Your battery is low. Recharge the battery.
The battery does not charge properly (For Samsung-approved
chargers)
• Ensure that you place the Gear on the charging dock and connect the dock to the
charger properly.
• If the charging terminals are dirty, the battery may not charge properly or the Gear may
turn off. Wipe both gold-coloured contacts and try charging the battery again.
• The batteries in some devices are not user-replaceable. To have the battery replaced, visit
a Samsung Service Centre.
The battery depletes faster than when first purchased
• When you expose the Gear to very cold or very hot temperatures, the useful charge may
be reduced.
• Battery consumption increases when you use some applications.
• The battery is consumable and the useful charge will get shorter over time.
54
Troubleshooting
Your Gear is hot to the touch
When you use applications that require more power or use applications on your Gear for an
extended period of time, your Gear may feel hot to the touch. This is normal and should not
affect your Gear’s lifespan or performance.
Error messages appear when launching the camera
Your Gear must have sufficient available memory and battery power to operate the camera
application. If you receive error messages when launching the camera, try the following:
• Charge the battery.
• Free some memory by deleting files from your Gear.
• Restart the Gear. If you are still having trouble with the camera application after trying
these tips, contact a Samsung Service Centre.
Photo quality is poorer than the preview
• The quality of your photos may vary, depending on the surroundings and the
photography techniques you use.
• If you take photos in dark areas, at night, or indoors, image noise may occur or images
may be out of focus.
A connection is not established when you connect the Gear to a
computer
• Your Gear is not detected as a removable disk. You can send files only to the connected
mobile using the Bluetooth feature. (p. 29)
• Ensure that the USB cable you are using is compatible with your Gear.
• Ensure that you have the proper driver installed and updated on your computer.
• If you are a Windows XP user, ensure that you have Windows XP Service Pack 3 or higher
installed on your computer.
• Ensure that you have Samsung Kies installed on your computer.
55
Troubleshooting
Data stored on the Gear has been lost
Always make backup copies of all important data stored on the Gear. Otherwise, you cannot
restore data if it is corrupted or lost. Samsung is not responsible for the loss of data stored on
the Gear.
A small gap appears around the outside of the Gear case
• This gap is a necessary manufacturing feature and some minor rocking or vibration of
parts may occur.
• Over time, friction between parts may cause this gap to expand slightly.
56
Some content may differ from your Gear depending on the region, service provider, or
software version, and is subject to change without prior notice.
www.samsung.com
English (EU). 01/2014. Rev.1.3