1
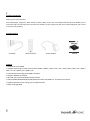
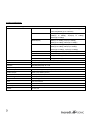
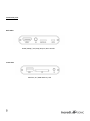
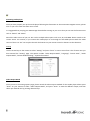
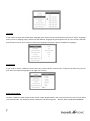
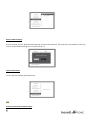
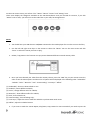
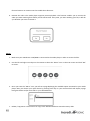
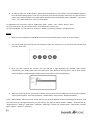
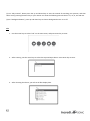
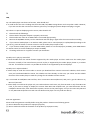
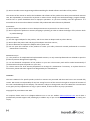
I
Product Introduction……………………………………………………………………………………………………………………………………..…2
Package contents……………………………………………………………………………………………………………………………………..2
Features……………………………………………………………………………………………………………………………………………………2
Product specifications………………………………………………………………………………………………………………………………3
Remote control guide……………………………………………………………………………………………………………………………….4
Connection ports………………………………………………………………………………………………………………………………………5
II
Activating media player……………………………………………………………………………………………………………………………………..6
Setting……………………………………………………………………………………………………………………………………………………….6
Video Output Mode……………………………………………………………………………………………………………………….…….……6
Language……………………………………………………………………………………………………………………………………………….....6
Audio Output Mode……………………………………………………………………………………………………………………………….….7
Restore Default Setting………………………………………………………………………………………………………………….……….….8
System information………………………………………………………………………………………………………………………………...…8
III
Getting started with the Media Player……………………………………………………………………………………………….…………….…8
Movies……………………………………………………………………………………………………………………………..…………………........9
Music…………………………………………………………………………………………………………………………………………………………10
Pictures……………………………………………………………………………………………………………………………………………………..11
Files………………………………………………………………………………………………………………………………………………………..…12
IV
FAQ…………………………………………………………………………………………………………………………………………………………….……13
I
Product Introduction
Thank you for your purchase.
This media player supports a wide variety of audio, video, music, text, and subtitle file formats that enables you to
view these files on your big-screen TV within the comfort of your living room. Our user manual will guide you on how
to use this unit properly.
Package content:
AV Cables
Remote Control
Power Adaptor
Manual
Features
• Full Real HD up to 1080P
• Playback wide range of video formats: RM / RMVB / MPEG / VOB / DAT / Divx / Xvid / MKV / MP4 / AVI / MOV /
MPG / TS / TP / M2TS / AVI / WMV / FLV
• H.264 decode technology with 1080p resolution
• Supports HDMI & AV outputs
• SRT, SMI, SSA, ASS and SUB+IDX subtitle formats
• AC3/DTS/MP3/WMA/WAV/OGG/AAC/APE/FLAC audio with HDMI 1.3, and Audio L/R outputs
• Playback Resume & time setting (set the playback time)
• Multi-Languages OSD
Product specifications
Audio & Video Decoding
Video
MPEG1
Audio
Picture
Subtitle
Hardware Specifications
Video Output
Audio Output
Hard Disk
Connecting interface
IR
Size
USB OTG
Memory Card
Power
AV ( PAL/NTSC) / HDMI ( 480P, 720P, 1080i, 1080P )
Audio L/R/ HDMI ( Stereo )
FAT / FAT32 / NTFS /ex FAT
HDMI / AV Output
Receive signals from Remote Control
73 x 73 x 15 mm
USB2.0 Host
SD / SDHC / MMC / microSD
DC 5V / 2A
DAT (up to 720*576), MPG (up to
720*576),MPEG (up to 720*576)
MPEG2
MPG(up to 1080p) MPEG(up to 1080p),
VOB(up to 1080p), TS/TP(up to 1080p),
M2TS(up to 1080p)
MPEG4(Xvid)
MKV(up to 1080p), AVI(up to 1080p),
MP4(up to 1080p), M2TS(up to 1080p)
H.264
MKV(up to 1080p), AVI(up to 1080p)
MP4(up to 1080p), MOV(up to 1080p)
M2TS(up to 1080p), TS/TP(up to 1080p)
WMV9/VC-1
M2TS(up to 1080p),WMV(up to 1080p)
Real Video
RM/RMVB(up to 720p)
MJPEG
AVI(up to 1080p)
FLV
FLV(up to 1080p)
MP3/WMA/WAV/OGG/AAC/APE/FLAC/RA/AC3/DTS
JPG/BMP/PNG/GIF
SRT/SMI/ASS/SSA/ idx +sub
Remote Control Guide
1.
2.
3.
4.
5.
6.
7.
8.
9.
10.
<POWER>: on/off key. When power is off, the system goes into standby Mode. To completely shut it off the power
cable has to be unplugged
<MUTE>: Press key for sound off, press again for sound on
11.
12.
13.
14.
15.
16.
17.
<Movie>, <Music>, <File>, <Photo>: Shortcut to movie, music, file, and photo
<Setup>: Shortcut to setting options.
<Repeat>: Select the playback mode
<Rotate>: Rotate the pictures
<Home>: Go back to the main menu
<Audio>: Select the sound track( for multi-track movie files)
<SUB-T>: Select the right subtitle when the movie has multi-subtitle
<OSD>: Press this key, the screen will display control menu when playing movies, music or
picture.
<Ratio>: Select screen ratios
<Stop>: Stop the current display
<GO-TO>: To set up playing time for playing the local video
<Ok>: Play & Enter key
<Play/Pause>: To play or pause present display
<Return>: Press this key to return back to previous menu.
<REW> <FWD>: Rewind or Forward
18.
19.
20.
21.
22.
23.
24.
<PREV><NEXT>:Previous or next.
<VOL-> <VOL+>: Adjust the volume
<Info>: press this key to see the information of the playing video, audio or photo
<Reset>: To reset the player
<AV>: Select AV output
<Zoom-><Zoom+>: Zoom in the picture or video
<HDMI>: Select high-definition output
Connection ports
Back View
HDMI (1080p) / AV (576p) Output, Micro SD Slot
Front View
USB host, SD / MMC Memory card
II
Activating media player
Once you have properly set up the media player following the illustration on the Connection Diagram section, please
turn on your TV to enter the main menu screen.
It is suggested that you plug your USB storage device before turning on your TV so that you can see the function icons
such as “Movie” and “Music”.
Switch the video source of your TV. Your TV has multiple video inputs such as TV, AV, and HDMI. Please switch to the
correct source. For instance, if you connect the media player to TV through the AV Cables please switch the video
source of the TV to “AV”. You may do that with the buttons on your remote control or buttons on the television.
Setting
Use the arrow keys on the remote to select “Setting” and press “Enter” to enter. You will see a list of items once you
have entered the “Setting” page. The options include “Video Output Mode”, “Language”, “Screen Saver”, “Audio
Output Mode”, “Restore Default Setting”, “System Information”
Video Output Mode
Once you are in the setting options page, please switch the video output standard for the media player. Please press
“Enter” on your remote to select “Video Output Mode”, and press “Enter” to view the different output, and then
select your desired one by pressing direction keys.
Language
If you need to change your media player language input, please use the up and down arrow keys to select “Language.”
Once you are in language input, please view the different languages by pressing Enter key on your remote, and then
press direction keys on your remote to select your language. The player supports 22 different languages.
Screen Saver
If you need to choose a different screen saver time, please choose “Screen Saver” and press the Enter key. You can
now select the required language on the right of the screen.
Audio Output Mode
To select a different audio output mode, choose “Audio Output Mode” and press the Enter key. You can now select
your desired mode. The output list will be switched in the following order: Normal, SPDIF LPCM, SPDIF RAWDATA
Restore Default Setting
You just need to choose “Restore Default Setting” and press the Enter key. There will be a text prompt to ask if you
want to restore default setting, you can choose yes or no.
System Information
You can see the software information here.
III
Getting started with the Media Player
On the main menu screen, you will see “File” “Music” “Movie” ”Picture” and ”Setting” icons
These icons display the categories available on the USB device/Smart Card you inserted for instance, if you click
“Movie” Icon to enter, you will access to the video files in your USB / SD storage device.
Movie
1. You should have your USB device or SD/MMC connected to the media player first in order to access the files;
2. Use the left and right arrow keys on the remote to select the “Movie” icon on the main screen and click
“Enter“ to select the movie you want to play;
3. Delete / Copy Movie: This function can copy movies between different external memory disks.
4. Once you have selected your video from the memory device, press the “OSD” key on your remote control in
order to see the video options and then a list of options will be displayed in the following order: “Subenable”
“Subtitle” “Color” “Rimcolor” “Size” “Text Encoding” “Time Sync” “Offset”
(1) “Subenable”, choose to show subtitle or not.
(2) “Subtitle”, choose different subtitle;
(3) “Color”, change different color for subtitle;
(4) “Rimcolor”, show different effect for subtitle;
(5) “Size”, show subtitle size;
(6) “Text Encoding”, show encoding style;
(7) “Time Sync”, Adjust the time to make the subtitle’s synchronization with movie.
(8) “Offset”, adjust the subtitle location
5. If you want to make the movie Repeat, Play/Pause, Stop, Rewind or Fast Forward all you need to press the
function buttons on remote control to enable these functions.
6. Resume the video: This media player supports resume playback. This function enables you to resume the
video you were watching from where you left off last time. Every time, you start watching your file, it will ask
you whether you want to resume it.
Music
1. Make sure your USB device or SD/MMC is connected to the media player in order to access the files.
2. Use the left and right arrow keys on the remote to select the “Music” icon on the main screen and click “OK”
to access.
3. Once you enter the “Music” icon, you will see a page displaying the available inputs connected to your media
player. Next you choose your input device by pressing Enter key on your remote which will display a page
listing the folders and/or music files in your selected device.
7. Delete / Copy Music: This function can copy music between different external memory disks.
8. In order to select the “Audio Options” please press the OSD key on your remote, it will immediately display a
list of all audio setting options. Then you just need to press the left and right arrows keys on your remote to
choose your preferred option. The audio options will be listed in the following order: “EQ Mode”, “Lyric Focus
Color”, “Lyric Unfocused Color” and “Lyric Play Mode”
(1) “EQ Mode” You can choose “normal” “DBB “POP” “Rock” “Classic” “Jazz” “Vocal” “Dance” “Soft” ;
(2) “Lyric Focus Color” & “Lyric Unfocus Color”, choose different color for lyric.
(3) “Lyric Play Mode”, you can choose “Line Roll” or “Kalaok”; by pressing “Repeat” to loop the music
Picture
1. Make sure your USB device or SD/MMC is connected to the media player in order to access the files.
2. Use the left and right arrow keys on the remote to select the “Picture” icon on the main menu screen and
press the “Enter” key.
3. Once you have entered the “Picture” icon you will see a page displaying the available input devices
connected to your media player. Next you choose your input device by pressing “Enter” key on your remote
which will display a page listing the folders and/or picture files in your selected device.
4. After you chose the picture, press Enter to display. You can then press the OSD key on your remote to display
a list of picture options. You have the options: “Switch Mode” “Play Interval” “Background Music”.
(1) For “Switch Mode”, Please press the up and down keys to view all different modes of switching your pictures, and
then select one by pressing the Enter key on your remote. The types of modes include: “Default” “Persian blinds H”
“Persian blind V” “Slide up” “Slide down” “Slide left” “Slide right” “Stretch up” “Stretch down” “Stretch left” “Stretch
right” “Mosaic” “Zoom in” “Zoom out”
(2) For “Play Interval”, Please press the up and down keys to view the interval of switching your pictures, and then
select one by pressing the Enter key on your remote. You have the following interval choices: 1s, 3s, 5s, 10s and 30s.
(3) For “Background Music”, press up and down keys to choose background music on or off.
File
1. Use the arrow keys to select “File” on the main menu, and press Enter key to enter.
2. After entering, use the arrow keys to select the required input device. Press Enter key to enter.
3. After choosing the device, you will see all files display here.
IV
FAQ
Q1: The media player unit does not function, what should i do?
A: It could be that the unit is loading data from the USB / SD/ MMC storage device and it may take a while. However,
if you are sure that the unit does not function, please try to unplug the power adapter and plug it in again.
Q2: There is no picture displaying on the screen, what should i do?
A: Please check the followings:
1. Please check if the power adaptor is properly connected;
2. Please make sure if the AV or HDMI cable is connected appropriately;
3. Remove the SD/MMC memory card or USB device and then plug in again after the unit turned on normally;
4. If you connect media player to TV with AV Cable, please set TV source(output) as TV/PAL/NTSC(according to the
type of TV), press AV button on remote control to set the media player output as AV;
5. If you connect media player to TV with HDMI Cable, please set TV source(output) as HDMI, press HDMI button
on remote control to set the media player output as HDMI;
6. If nothing still shows on TV, please connect your distributor.
Q3: Why can’t I play my movie file?
A: Please double check the movie formats supported by this media player and then make sure the media player
functions normally. If the movie format you wish to play is supported by this media player, please try to reboot
the unit. If it still does not work. It is possible the format is not supported by this media player.
Q4: Why can’t I adjust subtitle?
A: Please keep in mind that some video or movies you download from internet come with subtitles, which means
once you have downloaded the movie, the subtitles are there already. In that case, you cannot use the subtitle
functions of this media player to make any change for the subtitles of these movies.
Q5: I connected SD Card/Micro SD Card first, then I insert Micro SD Card/SD Card, Why can’t I get the video on my
Micro sd /SD Card ?
A: Please keep in mind that the player only can read one device each time, only from SD Card or only from Micro SD
Card, If you want to change to display the content from Micro SD Card/SD Card, you need disconnect the SD
Card/Micro SD Card first, then disconnect to power, connect to the power again, now you can insert only SD Card
or only Micro SD Card(insert one card one time because the player can only read one device).
End-user Agreement
Please read this agreement carefully before using the product. Please ensure following points:
(1). Do not dismantle the product for improper purposes;
(2). Do not read and refresh the firmware of the product by improper means;
(3). Do not conduct inverse engineering and disassembling for related software and codes of the product.
The content of the manual as well as the hardware and software of the product have been processed with intensive
care. No responsibility is assumed for any direct or indirect losses arising from hardware damage, program damage,
and file loss or system breakdown due to improper operations. As you have carefully read this agreement. It is
ensured that the terms and conditions have been fully understood and will be strictly followed.
Precautions:
(1). Do not expose the product to rain or damp environments to prevent fire or electric stock;
(2). Do not expose the product to moisture, dripping or splashing in order to reduce the danger of fire, electric shock
or product damage.
Safety Instructions
(1). Use the original adapter for the product, and do not share an adapter with any other devices;
(2). Do not place the power cord and plug of the adaptor near heat sources;
(3). Do not dismantle and repair the adapter and its power cord
(4). Do not open the enclosure of the product to ensure your safety. Please ask trained professionals to conduct
maintenance if necessary.
Maintenance Tips
(1) The product is of complicated and sophisticated structure, so only trained professionals are allowed to open the
product to prevent damage from happening;
(2) Do not dismantle components of the product on your own. The warranty mark will be invalid automatically if
you dismantle and repair the product on your own;
(3) Please contact our local warranty department to arrange for maintenance if necessary. To replace devices or
accessories, please select the original ones designated by the manufacturer.
WARNING
This User’s Manual is for specific product, and all its contents are processed with due care but are not ensured fully
correct. We assume no responsibility for any loss arising from use of this manual. The right to interpret all contents of
this User’s Guide belongs to the company. The manual is subject to change with notice. This Manual is not authorized
to any party and any reproduction or copy, in part or whole, of the manual in any way is permitted
Copyright © by Incredisonic USA 2015.
For inquiries Please email us at [email protected] or visit our website www.incredisonic.com we do have a
professionally trained support staff, standing by to address any of your concerns and will do the best to satisfy your
inquiry