1
WORLD WATCH™ HELP CONTENTS
Information in this document is subject to change without notice and does not represent a commitment
on the part of Express Technologies Corporation. The software, which includes information contained
in any databases, described in this document is furnished under a license agreement and may be used
or copied only in accordance with the terms of the license agreement. It is against the law to copy the
software except as specifically allowed in the license. No part of this manual may be reproduced or
transmitted in any form or by any means, electronic or mechanical, including photocopying and
recording, for any purpose, without the expressed written permission of Express Technologies
Corporation.
© 1992-2008 Express Technologies Corporation. All rights reserved.
World Watch™ and the World Watch™ Icon are trademarks of Express Technologies Corporation in
the United States and other countries. Microsoft®, MS® and MS-DOS® and Windows® are registered
trademarks of Microsoft® Corporation in the United States and other countries.
We wish to thank the following:
Myra Haryani
Preston Gates & Ellis
The United States Defense Mapping Agency
The various Government Offices & Embassy Officials
Microsoft® Word 2003 for Windows® was used in the production of this manual.
Printed in the United States of America.
Limited Warranty on Media and Manuals
If you discover physical defects in the media on which this software is distributed, or in the manuals distributed
with the World Watch™ software, Express Technologies Corporation will replace the media or the manuals at no
charge to you, provided you return the item to be replaced with proof of purchase to Express Technologies
Corporation during the 90-day period after you purchased the World Watch™ Software.
All implied warranties on the media and manual, including warranties of merchantability and fitness for a
particular purpose, are limited in duration to ninety (90) days from the original retail purchase of this product.
Even though Express Technologies Corporation has tested the software and reviewed the documentation, EXPRESS
TECHNOLOGIES CORPORATION MAKES NO WARRANTY OR REPRESENTATION, EITHER EXPRESSED OR
IMPLIED, WITH RESPECT TO THE SOFTWARE, ITS QUALITY, PERFORMANCE, MERCHANTABILITY, OR
FITNESS FOR A PARTICULAR PURPOSE. AS A RESULT, THIS SOFTWARE IS SOLD “AS IS,” AND YOU, THE
PURCHASER, ARE ASSUMING THE ENTIRE RISK AS TO ITS QUALITY AND PERFORMANCE.
Express Technologies License Agreement
IMPORTANT, PLEASE READ CAREFULLY: This Agreement is a legal agreement between the user (“you”), whether you
are an individual or an entity, and Express Technologies Corporation (“Express Technologies”) for the software accompanying
this Agreement (“SOFTWARE”). By opening the sealed disk package, you agree to be bound by the terms of this Agreement. If
you do not agree to the terms of this Agreement, you must promptly return the unopened disk package and the accompanying
items (including written materials and packaging) to Express Technologies or to the place you obtained them for a full refund.
LICENSE GRANT. Express Technologies Corporation grants to you a non-exclusive right to:
(a) Use one copy of the SOFTWARE on a single computer.
(b) Make one copy of the SOFTWARE for archival or backup purposes, or copy the SOFTWARE onto the hard drive of your
World Watch User’s Guide
computer and retain the original for archival or backup purposes. Certain rights are not granted under this Agreement, but
may be available under a separate agreement. For more information, please contact Express Technologies.
COPYRIGHT. The SOFTWARE is owned by Express Technologies Corporation or its suppliers, and is protected by United
States copyright laws and international treaty provisions. All rights not specifically granted herein are reserved by Express
Technologies Corporation. You must treat the SOFTWARE like any other copyrighted material (e.g., a book or musical
recording) except to the extent that this Agreement provides to the contrary. You may not copy the written materials
accompanying the SOFTWARE.
OTHER RESTRICTIONS. This Agreement is your proof of license to exercise the
rights granted herein and must be retained by you. You may not rent, transfer or lease the SOFTWARE. You may not reverse
engineer, decompile, or disassemble the SOFTWARE, except and only to the extent that such activity is permitted by applicable
law notwithstanding this limitation. You may not export or reexport, directly or indirectly, the SOFTWARE into any country
if such a transfer is prohibited by the United States Export Administration Act and implementing regulations.
DUAL MEDIA. If the SOFTWARE package contains either 3.5", or CD-ROM
disks, then these are provided only to facilitate use on a single computer. You may not use the additional set of disks on another
computer or network, or loan, rent, or transfer them to another user, except as otherwise provided in this Agreement.
BROADCAST PURPOSES. This License for World Watch for Microsoft Windows
is only to be used on One Machine and on One Monitor. This License of the software that you have purchased does not allow
the user to output World Watch onto additional monitors, or to be used as a Display Screen. It is strictly for personal use on
your computer. This software is not Licensed for any Public Broadcast Purposes. In order to display World Watch for
Broadcast to an audience of more than 6 (six) people, you will need to receive a Separate Broadcast License that may be obtained
through Express Technologies Corporation. Such areas considered as broadcast include, but are not limited to, the following
list… Video Walls, Projectors, Board Rooms, Train Stations, Lobbies, Business Centers, Airports, Convention Centers,
College/University Rooms.
LIMITED WARRANTY. Express Technologies Corporation warrants that, for a period of ninety (90) days from the date of
delivery (as evidenced by a copy of your receipt), the SOFTWARE and associated media will, under normal use, perform
substantially in accordance with the accompanying written materials. EXCEPT AS SET FORTH IN THE FOREGOING
LIMITED WARRANTY, EXPRESS TECHNOLOGIES PROVIDES THE SOFTWARE AND DOCUMENTATION “AS
IS” AND DISCLAIMS ALL OTHER WARRANTIES, EITHER EXPRESSED OR IMPLIED, INCLUDING BUT NOT
LIMITED TO IMPLIED WARRANTIES OF MERCHANTABILITY, FITNESS FOR A PARTICULAR PURPOSE, AND
NONINFRINGEMENT. Any implied warranty on the SOFTWARE not hereby disclaimed is limited to ninety (90) days from
the date of delivery. Some jurisdictions do not allow the exclusion or limitation on duration of an implied warranty, so the
above exclusion and limitation may not apply to you. This limited warranty gives you specific legal rights. You may have
others, which vary from jurisdiction to jurisdiction.
EXCLUSIVE REMEDY. Express Technologies' entire liability and your exclusive remedy shall be, at Express Technologies'
discretion, either (a) return of the price paid for the SOFTWARE or (b) repair or replacement of the SOFTWARE that does not
meet Express Technologies' Limited Warranty, provided the SOFTWARE is returned to Express Technologies with a copy of
your receipt. Express Technologies shall have no responsibility if failure of the SOFTWARE resulted from accident, abuse, or
misapplication, if the SOFTWARE has been altered in any way, or if the non-conformance arises out of the use of the
SOFTWARE in conjunction with software not supplied by Express Technologies. Any replacement SOFTWARE will be
warranted for the remainder of the original warranty period or thirty (30) days, whichever is longer.
LIMITATION OF DAMAGES. IN NO EVENT SHALL EXPRESS TECHNOLOGIES OR ITS SUPPLIERS BE LIABLE
FOR ANY INDIRECT, SPECIAL, INCIDENTAL, OR CONSEQUENTIAL DAMAGES WHATSOEVER (INCLUDING,
WITHOUT LIMITATION, DAMAGES FOR LOSS OF BUSINESS PROFITS, BUSINESS INTERRUPTION, LOSS OF
BUSINESS INFORMATION, OR ANY OTHER PECUNIARY LOSS) ARISING OUT OF THE USE OF OR INABILITY
TO USE THE SOFTWARE, EVEN IF EXPRESS TECHNOLOGIES HAS BEEN ADVISED OF THE POSSIBILITY OF
SUCH DAMAGES. BECAUSE SOME STATES DO NOT ALLOW THE EXCLUSION OR LIMITATION OF LIABILITY
FOR CONSEQUENTIAL OR INCIDENTAL DAMAGES, THE ABOVE LIMITATION MAY NOT APPLY TO YOU. IN
NO EVENT SHALL EXPRESS TECHNOLOGIES' LIABILITY HEREUNDER EXCEED THE AMOUNT PAID FOR
THE SOFTWARE.
Page 3
World Watch User’s Guide
GOVERNMENT RESTRICTED RIGHTS. For solicitations issued before December 1, 1995 by the United States of America,
its agencies and/or instrumentalities (the "Government"), other than the Department of Defense, the use, duplication or
disclosure of the SOFTWARE provided to the Government under this License shall be subject to the RESTRICTED RIGHTS
as set forth in subparagraphs (c)(1) and (2) of the Commercial Computer Software - Restricted Rights clause at 48 CFR ch.1
52.227-19. For solicitations issued before September 29, 1995 by the Department of Defense, the use, duplication or disclosure
of the SOFTWARE provided under this License shall be subject to the RESTRICTED RIGHTS as set forth in subparagraph
(c)(1)(ii) of the Rights in Technical Data and Computer Software clause at 48 CFR ch.2 252.227-7013. For solicitations issued
by the Government on or after December 1, 1995 and the Department of Defense on or after September 29, 1995, the only
rights provided in the SOFTWARE provided hereunder shall be those contained in this License.
MISCELLANEOUS. This Agreement is governed by the laws of the State of Nevada, United States of America. This
Agreement contains the complete agreement between the parties with respect to the subject matter hereof, and supersedes all
prior or contemporaneous agreements or understandings, whether oral or written. All questions concerning this Agreement
should be directed to: Express Technologies Corporation, 3753 Howard Hughes Parkway, Suite 500, Las Vegas, Nevada 89109,
USA; +1-800.654.9548 or +1.702.733.6230.
Some states do not allow the exclusion of limitation of implied warranties or liability or consequential damages, so the above
limitation or exclusion may not apply to you. This warranty gives you specific legal rights, and you may have other rights that
vary from state to state.
PROFESSIONAL AUDIENCES. This License for World Watch™ for Microsoft® Windows™ is only to be used on One
Machine and on One Monitor. This License of the software that you have purchased does not allow the user to output World
Watch™ onto additional monitors, or to be used as a Display Screen. It is strictly for personal use on your computer.
This software is not Licensed for any Public Broadcast Purposes. In order to display World Watch™ for Broadcast to an
audience of more than 6 (six) people, you will need to receive a Separate Broadcast License that may be obtained through
Express Technologies Corporation. Please call us to discuss this at 1.800.654.9548 (within the U.S.) or 1.920.337.1640 (outside
of the U.S.)
If the intention is to use World Watch™ in a Public area, please contact us for a Special License. Such areas considered as
public include Airports, Business Centers, Board Rooms, Video Walls, Train Stations, Convention Centers, and Lobbies. If
there is any question that your intention of use may require a separate license, please do not hesitate to contact us.
Express Technologies Corporation
3960 Howard Hughes Parkway, Suite 500
Las Vegas, Nevada 89109
1.800.654.9548 1.920.337.1640
Fax 1.800.654.9533 1.920.337.1643
World Watch™
Page 4
World Watch User’s Guide
World Watch Overview
The World Watch™ program allows you to see the time in over 500 cities and locations throughout the
world. These clocks account for the currently known daylight savings times of the cities. The large
world map displayed in the main window shows an earth with a light/dark pattern representing the
areas of the earth currently experiencing daylight and darkness. A number of different views of the
world are available. You can choose to view the entire world or one of a number of zoomed views.
World Watch™ allows you to add your own cities and locations, called “Custom Cities”, to the cities
pre-defined by the program. The program allows you to choose whether to display the international
dateline, landmass and international borders, latitude and longitude lines, clocks, and cities on the
map. The program is also usable as updating wallpaper when running minimized. The “No Titles”
feature allows you to use the entire window to view the map, without the title bar and menu bar.
Screen Saver
The World Watch™ Screen Saver is a separate program, which displays the World Watch™ map on
your screen after a period of inactivity. Windows® 9x/ME/NT/2000/XP/Vista can be set up to
automatically start a screen saver after a few minutes of inactivity on the keyboard or mouse. The
World Watch™ screen saver uses all the settings you choose while running World Watch™. For
example, choose Africa from the “Map Menu” and quit World Watch™. The next time the World
Watch™ Screen Saver becomes active, it will show the map of Africa. All other settings for colors, city
names, clocks, etc., from World Watch™ are also used in the World Watch™ Screen Saver. For
information on setting up the screen saver, see Set up Screen Saver. If the screen saver doesn't seem to
work, see Help! Questions and Answers, or call 800.654.9548.
Technical Information about World Watch™
The Seasons
The axis around which the earth rotates passes through the North and South Poles. This axis is tilted
about 23.5 degrees from the axis of revolution of the earth around the sun. It takes one year for the
earth to complete a revolution around the sun. To an observer on earth, the sun appears to move North
and South during the year because of the tilt between the rotation of the earth and the plane of
revolution of the earth about the sun. During the summer solstice, around June 21, the sun appears
directly overhead at about 23.5 degrees North latitude. This latitude line is called the Tropic of Cancer.
Similarly, during the winter solstice, around December 21, the sun appears directly overhead at 23.5
degrees South latitude, called the Tropic of Capricorn. The sun appears to be over the equator during
the Spring and Fall Equinox. World Watch™ changes the latitude of its "sun" every day to account for
the North and South movement of the sun. Solar days are slightly shorter during some parts of the
year than others due to the elliptical nature of the orbit of the earth around the sun. World Watch™
also takes this into account.
Daylight / Darkness Pattern
The border between daylight and darkness is shown at the point where the center of the sun is on the
horizon. Atmospheric refraction is not accounted for. Therefore, some portions of the darkness area
may be experiencing twilight or even a few minutes of daylight. The curve should be accurate to
within about 10 minutes of sunset. Accordingly, you should account for mountains and hills. This
information has been tested against the United States Government Almanac systems.
Page 5
World Watch User’s Guide
Daily Movement of the Sun
The earth spins at a speed, which causes the sun to appear to move through 15 degrees of longitude
every hour. Therefore, time zones are about 15 degrees apart. If the World Watch™ screen shows
darkness falling about 15 degrees East of your location, you know that you have about an hour of
daylight left.
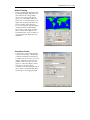
Global Satellite Image Cloud Cover
The Cloud Cover Map Image displays current cloud cover around the globe. Its accuracy allows the
user to know weather patterns in every part of the world. This Map Image does require a connection to
the Internet, whether dial-up or permanent. To access our Cloud Cover map please go to:
http://www.exptech.tv/InternetMap/cloudcover.jpg
Global Satellite Image Sea Surface Temperatures (SST)
The Water Temperature Map shows patterns of the El Nino Effect throughout the world. The Colors
on the Map change with the sea surface temperatures to bring the user accurate water temperatures.
This image is taken from the Internet and can be set to automatically update every 4 to 6 hours. This
download may be found at: http://www.exptech.tv/InternetMap/sst.jpg
Global Satellite Image Oceanic Wave Surfaces
The Wave Height map Image brings the user Current and Up-To -Date Wave Patterns of the Ocean
Seas. This Map Image allows the user to view the development of Wind patterns around the World.
This Map is another way that World Watch™ keeps you informed of the constantly changing world
around you. To access this updating Map Image, go to the following web page address:
http://www.exptech.tv/InternetMap/wave.jpg
Additional Live Maps
Additionally, we have two maps at the following:
http://www.exptech.tv/InternetMap/weather.jpg
http://www.exptech.tv/InternetMap/heat.jpg
Page 6
World Watch User’s Guide
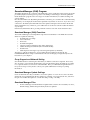
New Features in World Watch 9
World Watch 9 now comes with exciting new features! These features provide you with more
convenience and functionality. Get satellite and airline tracking right on your desktop PC. We’ve
even added speech recognition to make it even easier to use. Now with our Download Manager
Program you can be sure to get the latest updates for your World Watch application. Choose to
receive updates automatically or have Download Manager notify you before each update. Check out
other new features listed below.
Satellite Tracking
This feature allows you to view the satellite positioning, movement, and coverage area. Some available
satellites are Weather, Space Shuttle and Station, GPS, Amateur, Keplerian.
Airline Tracking
With Airline Tracking you can follow your flight path around the world. View the approximate
location of the flight as it reaches its destination. Just enter your flight departure and arrival times in
the corresponding city locations. You can also select the settings to show how it is to be displayed on
the map such as line thickness, color, font, and display name. It’s a great tool to keep track of a
person’s itinerary while the flight is in progress.
Speech Recognition
Utilize this feature to pinpoint a specific location on the map and its information by using speech. For
example, to view the city location and its information, simply say the word “London”. A microphone
connected to your PC is required to use this feature.
High Resolution Maps
World Watch 9 now provides you with high-resolution maps! Enjoy clear, detailed, highly pixilated
map images on your desktop PC.
Download Manager Program
Download Manager program is a vital application for World Watch Version 9 software users. This
application provides a link to the live information from our server. The Download Manager program
is very essential for World Watch to retrieve: Live Weather Data, Live Satellite Tracking, Live Maps;
all new features of World Watch Version 8.1.
City Weather
We now provide live-weather information in over 500 major cities around the world. View instantly
the current weather conditions and 5-day forecast. The weather icons can be displayed alongside the
cities’ location and time on your active map.
Zoom-to-Map Region
Zoom in to get a closer look of a specific region on your World Watch map. To use this feature, hold
down the shift key while you click and drag the mouse across the region you would like to enlarge.
Hold the shift key and click on the left mouse button to return to the original view.
Page 7
World Watch User’s Guide
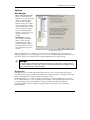
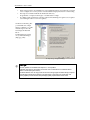
Set Up Instructions for Windows 9x/ME/NT/2000/XP/Vista
1.
2.
Insert the World Watch™ Disk into the CD-ROM drive
An auto-run dialog box should pop up
3.
4.
Click on “Install World Watch 9” and follow the on-screen instructions
Follow the on-screen instructions
Important Notes:
•
The serial key number must be correct before going on to the next step. It must be
entered in all CAPS. Make sure to distinguish between the number ZERO (0) and the
letter O.
•
Users are required to register their software before World Watch software can be
launched.
•
If Microsoft Direct X 9 or above is not yet installed, World Watch will notify you to
install it.
•
You must have an Internet connection in order to receive the live updates, such as
maps, weather, satellite, and news (optional).
Once you have completed the installations, you may find World Watch under the Start
Menu >> Programs >> Express Technologies >> World Watch
5.
Page 8
World Watch User’s Guide
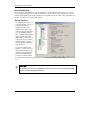
Download Manager (DLM) Program
The DLM is designed to be a vital part of World Watch version 9 and many other software programs
provided by Express Technologies Corporation. The DLM provides linkage to the latest updates for
the World Watch program such as live maps, live weather information, live satellite tracking, and
version updates.
How does the DLM work? By utilizing the Internet connectivity, we can deliver the content efficiently
and quickly. For example, the weather data is updated every minute on our server. If you have a live
connection to the Internet, the DLM will retrieve the updates and replace the new files in the World
Watch Install Directory. Therefore, you would be able to see the most current weather information
on your maps.
In the future, DLM will be able to provide premium content to users who need constant live data.
Download Manager (DLM) Functions
The Download Manager is an independent component of World Watch. The DLM allows World
Watch to update the following:
•
World Watch Live Maps
•
Active Label Data
•
News Data
•
World Watch Updates
•
City Data, used for Daylight Savings Times and changes
•
Satellite Tracking Data and TLE (Two Line Element files)
•
Weather Data
•
Other Express Technologies Corporation Program Updates (as installed)
The purpose of the PLAY button is to receive ONLY the latest updates for download. The
FASTFORWARD button will proceed with the download even though you might already have the
latest files on your computer.
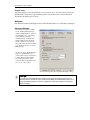
Proxy Support and Network Setting
Since DLM’s function is retrieving live information, an Internet connection is required. Those users,
who are using a corporate network that need to sign onto the Internet, must check their proxy setting.
Go to Options and choose Connection on the Menu Bar. Here you will find both requirements for a
Proxy Server setup. You may need to contact your system administrator for the proxy setting
information.
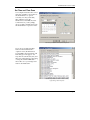
Download Manager Update Settings
Users can determine how they would like to receive the updates. You can choose to have automatic
downloads, to be prompted when the live updates are available, or never download. Also, users have
the option to schedule the updates at a certain time daily, weekly, or monthly.
Download Manager Files
•
Download Manager and World Watch 9 Update folders contain some executables, resources,
default settings, and data that periodically need to be updated.
Page 9
World Watch User’s Guide
•
•
•
•
Live Maps
This section of the Download Manager retrieves information for Internet maps, such as Cloud
Cover, Wave Height, Air Temperature, Sea Surface Temperature, and Weather from the
Internet. Once the files have been completely downloaded, they will automatically replace the
old files.
Weather Data Files
This section of the Download Manager retrieves information for Weather Data, such as the
current weather conditions and 5-day forecast. Once the files have been completely
downloaded, they will automatically replace the old files.
Satellite Data Files
This section of the Download Manager retrieves information for various satellites’ data. Once
the files have been completely downloaded, they will automatically replace the old files.
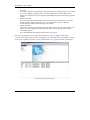
Current Running List
The Current Running List displays the files that are in progress.
If you have special questions or needs for the DLM, please contact us. Express Technologies
Corporation uses this program for many other applications. The DLM can be customized for a variety
of uses such as updating sales data or news and information over corporate networks and intranets.
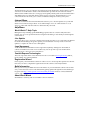
Download Manager Program Dialog Box
Page 10
World Watch User’s Guide
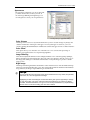
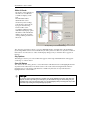
File Menu
Save Settings To File:
Allows the user to take all of their current World Watch™ settings and Save them into a Text file.
These files have the extension “x.wws”. Files can be saved for various users and uses, or utilized to
move your settings to another machine
Load Settings From File
This function allows the User to use the World Watch™ settings from “Save Settings to File” and
incorporate them into the World Watch™ folder.
Save Settings Now
This option allows you to save your settings without exiting the program. Saved settings are
automatically applied to the Screen Saver.
Exit
The “Exit” command allows you to end the World Watch™ program. Exiting World Watch™ saves
your settings, allowing these settings to be available for use by the World Watch™ Screen Saver.
View Menu
Title Bar
The “Title Bar” option is available on the “View Menu”. When checked, the map window appears
without a title bar and menu bar. This makes the entire window available for displaying the map and
clocks, and is especially useful if your World Watch™ window is small. You can also activate or
deactivate the “Title Bar” by pressing CTRL+T or double clicking anywhere on the map.
Status Bar
The Status Bar displays the mouse’s current position on the map. When checked, this option will
appear under the clock bar.
Always On Top
When this option is selected, the World Watch™ application will not be covered by any other opened
window. Many times this option, within a full screen view, confuses novice users because it
supersedes other programs and gives the illusion of a system lock up. Great care should be used with
this option.
Small Window
This option resizes the World Watch™ to 1.5%, 3%, 5%, 10%, or 25% of screen size and places it in one
of five preset locations or in any user’s selected location. Pressing CTRL-Z or DOUBLE CLICK on the
main screen activates this option. The Small Windows option provides an excellent opportunity to use
the Always On Top function described above.
Language
It displays the current language version of World Watch software.
Display Logo
A user can hide the World Watch logo bar on the top of the map by unchecking this function.
Page 11
World Watch User’s Guide
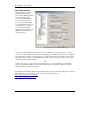
Tools Menu
Call Atomic Clock
This selection dials and aligns
your system time with the
Naval Observatory’s Atomic
Clock. The Atomic Clock is
located in Boulder, Colorado.
In most cases, this will be a
long-distance toll call. You
must have a modem installed
on your system to access this
feature. Consult your
Microsoft® Windows®
documentation for modem
configuration and settings.
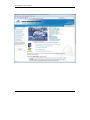
Atomic Clock Setup Dialog
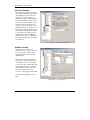
Time Coordinator
This window displays the
current and future times in up
to seven preselected cities.
This option is particularly
useful for planning meetings,
schedules, and conference
calls. Simply select your
required locations and spin the
time to determine the optimal
conferencing times.
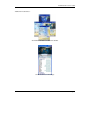
The Time Coordinator Dialog
Page 12
World Watch User’s Guide
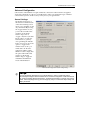
Find City Time
This feature is accessed by either the
“Tools Menu” or by right clicking on
the map. Type the name of the city
whose time you wish to check. The
World Watch™ will instantly show you
the local time for that location. This
option is for simple time lookups and
estimating time adjustments. This may
also be selected via a right-click on the
World Watch alarm icon in the Tool
Tray.
Find City Time Dialog
(available via right clicking on any World Watch™ map)
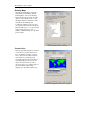
City Sun/Moon Time
This feature is accessed by either the
“Tools Menu” or by right clicking on
the map. Type the name of the city
whose sun/moon time you wish to
check. The World Watch will instantly
show you the sun rise/set and the
moon rise/set. It will also tell you the
Time Zone, Local Time, Date and the
Longitude and Latitude of the city.
City Sun/Moon Time Dialog
(available via right clicking on any World Watch map)
Page 13
World Watch User’s Guide
Distance and Time
This feature is accessed by either
the “Tools Menu” or by right
clicking on the map. Type the name
of the city you are traveling from
and then type the name of the city
to where you are traveling. The
World Watch will instantly show
you how many miles, kilometers or
nautical miles it is from one place
to the next. It will also tell you
about how long it will take. This
option is good for planning trips.
Distance and Time Dialog
(available via right clicking on any World Watch map)
Find City Weather
This feature can be accessed by
either the “Tools Menu” or by right
clicking on the map. Type the name
of the city whose temperature you
want to know. The World Watch
will instantly show you the local
temperature and sky conditions.
This option is good to see what the
temperature is like if you are
traveling to different cities.
Find City Weather Dialog
(available via right clicking on any World Watch map)
Page 14
World Watch User’s Guide
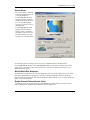
Screen Saver
The “Screen Saver” command
in the “Options Menu” directs
you to the Windows®
9x/NT/2000/ME/XP/Vista
Display Properties selections
automatically. From this point,
you can scroll through the
screen saver options section of
the Windows®
9x/NT/2000/ME/XP/Vista
desktop and select World
Watch™. Here you will have
the ability to select password
protection. Finally, you may
set the screen saver time delay.
Screen Saver Setup Dialog
An alternate method for setting your Screen Saver is to RIGHT CLICK on the Windows®
9x/NT/2000/ME/XP desktop. Select PROPERTIES from the pop-up menu. At this point you may
make any necessary changes. For more information on screen saver options, please refer to your
Windows® Users Guide.
World Watch as Wallpaper
World Watch™ may be utilized as a System Wallpaper with an automatic update rate. If you enable
this option, World Watch™ will display your map as a desktop wallpaper whenever the World
Watch™ window is minimized. The “Advanced Options” button will allow you to set the refresh rate
and location of the image file.
Enable Alarms/Chimes/Atomic Clock
A checkmark next to this menu item turns on the Multimedia Alarms, Chimes, and Atomic Clock
features. Without this check the three listed items become suppressed.
Page 15
World Watch User’s Guide
Multimedia Alarms
This function allows the user to set clock alarms. These alarms may be set to go off at the specified time
for the Current System Location or for any location contained within the World Watch™, i.e., 7 a.m.
New York, NY (Current System Location) or 7 a.m. in London, England, which is 2 a.m. in New York,
NY.
The Multimedia Alarms Setup Dialog
Notice that there is an Automatic timing feature in which you may select the amount of time that your
alarm is played until the alarm is automatically turned off. This is useful when reoccurring multimedia
could cause disruptions. The Alarm Settings dialog boxes below outline the methods to set these
Alarms
Chimes
The Chimes function uses a
sound file to ring out the hour,
quarter hour, half hour, and
three-quarter hour or any
combination thereof. In
addition, any .wav or .mid
files can be used for each
chime. Be careful when setting
these with Multimedia Alarms
for the exact same time.
The Alarms Chime Settings Dialog
Page 16
World Watch User’s Guide
Address Book
This allows users to add names, addresses, phone numbers, and other contact information. Click on
“Record” and choose “Add” to enter a new contact.
Location Manager Editor
The Location Manager allows the user to display data regarding any specific city through the addition
of basic text or a web page. A dot will then be visible on that specified location of the map. To view this
data, the user will need to place their cursor directly over the dot. Click the “New” button to begin
using this feature.
Maps Menu
The “Maps” menu includes commands that enable you to choose the portion of the world shown on
the World Watch™ map. The menu shows a dot to the left of the currently selected option. "World" is
considered a "World View." All other options are considered "Zoom Views" because the view is
"zoomed" to a particular part of the world. To select an option with the mouse, click left while it is
highlighted. With the keyboard, use ALT-V to open the menu, the ARROW KEYS to highlight your
selection, and ENTER to choose the selection you highlighted.
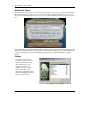
Media Panel
The Media Panel allows UpTo-Date and Important
Information / Images /
Movies to be constantly
displayed On Screen. The
possibilities here are endless –
Whether you want to display
entire Websites, Links to
Websites, List of Corporate
Offices and Contacts, etc., we
can set this up for you.
According to your needs, the
information can be updated on
a continual basis. This Media
Panel may be displayed on
either side of the World
Watch™ map.
The World Watch Internet Explorer Media Panel Dialog
The Media Panel allows for some drastic new and exciting features. Please send us your ideas for this
feature and the product will evolve accordingly. We plan to introduce features for calendars,
international holidays, and other pertinent information.
Page 17
World Watch User’s Guide
Effects
Rotating Maps
Rotating Maps may be
accessed by clicking
“Rotating Maps” under
the “Effects” Menu or by
clicking “Universal
Configuration,” “Rotating
Maps” under the Options
Menu and checking
“Enable Rotating Maps.”
This function gives the
user the option to revolve
between any or all of the
Maps within World
Watch. This includes the
World Maps, the
Continents, and the
Oceans. You may also
decide on the Interval in
which the maps should
rotate, ie. :15, :30, :45. This
feature allows the user to
view a number of different
Maps at a specified period
of time.
The World Watch Rotating Maps Dialog
Show Earth and Sun
This feature shows the earth’s rotation around the sun.
Show Earth and Moon
This feature shows the moon’s rotation around the earth.
Whole Day Animation
Watch the change of time throughout the day as the sun moves across the earth.
Whole Year Animation
View the change in seasons as the curve transforms its shape throughout the year.
Page 18
World Watch User’s Guide
Options
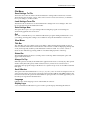
Map Manager
This is where the fun begins!
This box contains the most
applications to personalize and
change your maps to better
suit your needs. The Map
Manager allows you to adjust
each of your Maps to include
the information that you need.
You may create each of these
maps to include Individual
Settings or create any or all of
the maps with the same
settings.
IMPORTANT: To set the
Same Settings for Multiple
Maps, you may click the
desired Map name while
holding down the CTRL key.
The changes made will affect
all of the maps that you have
selected.
The Map Manager Dialog
While creating Maps, we would like you to be aware that some High Resolution images may not
display properly if you are not using high color or true color. The Map Manager has a button that you
may click to check your resolution. This tool may be helpful when choosing new maps.
Tool Tips:
The map manager options will be displayed accordingly to the map that is currently selected.
To make changes for a certain map, you have to select the options that are available for each
map by double clicking on the desired map.
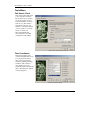
Background
In Background, choose Traditional World Watch Format for a two-color map OR Picture Image to
view high-resolution maps. Traditional World Watch format (the system colors) displays the World
Watch™ with individual colors for both the Land and the Oceans.
In the Map settings, you can click on “Browse for Map Image” to utilize the desired map. You may
choose “Internet Image” to view our updating live map images. These updating maps include Cloud
Cover (cloud.jpg), Sea Surface Temperature (sst.jpg), Air Temperature (heat.jpg), Weather
(weather.jpg) and Ocean Wave Height (wave.jpg), and they are updated every 4 to 6 minutes.
Important Notes:
Page 19
World Watch User’s Guide
•
•
•
Many of these pictures are intended to be used on High Resolution screens that are set at True
Color or High Color. You may click on “Check Windows Display Resolution” for this setting.
The maps are available inside the World Watch directory
Program Files >> Express Technologies >> World Watch >> Maps
Live Maps require an Internet Connection. The Download Manager Program is also required
to be running in order to receive live updates.
On the left of the Dialog Box
you will find a list of maps
that are available to you. This
includes maps such as the
following items detailed
below:
Traditional Image (system
color) and Picture Images
(bmp, jpg, other)
The Map Manager Background Dialog
Tool Tips:
The live updates are available under Options >> Live Updates
Individual maps may be saved with your favorite color combinations for Traditional World
Watch format (the system colors).
The World Watch™ can use any picture file as Picture Image (high resolution bitmap). Express
Technologies provides many images on its web pages or the users may create their own.
These graphics provide the most unique display quality representation of the world.
Page 20
World Watch User’s Guide
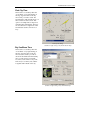
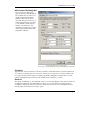
Projection
On the left of this Dialog Box
you can modify your map
projection by focusing the map
perspective to Current Sun
Position, Greenwich Mean
Time, or city name.
Map Manager Projection Dialog
Mercator View (Flat Map)
This option allows the map that you have created to be viewed as a Flat Map. This feature enables
the user to create the map as a World Map or as a Zoomed Map (focusing on a certain area of the
world). If you choose to use a Mercator Map, you are then given access to choose the location for the
Center of the Map. From here, you may decide if the center of the Map should be:
•
The Sun’s Perspective View (Choose the line of latitude)
If the “Sun’s Perspective” is chosen, the area of the world that you have chosen will
continually move throughout the day. The Center of the Map will always display that area of
the world that is experiencing daylight. (Default Lat. is top= 85N, bottom=83S)
•
Greenwich, England (zero degrees longitude)
If you choose the Traditional View of the Map, the Map will always display the area of the
world that you specify with the latitude and longitude lines. The sunlight and darkness bell
curve will continue to move with the time throughout the day. (Default Long. Is left=180W,
Right=180E; Default Lat. is top=85N, bottom= 83S)
•
City View (Pick the city from the Scroll Box)
This option allows the user to choose from any of the pre-defined cities in the Scroll Box to be
the center of the map. (Default Lat. is top= 85N, bottom=83S)
•
Custom View (Choose the lines of latitude and longitude)
User can specify the desired location by entering the exact latitude and longitude.
Page 21
World Watch User’s Guide
Round Globe View
This map option will enable the map to be displayed as a sphere. The Round Globes are also a great
choice, and an interesting way to view the world. If you choose this view, you will need to choose the
latitude and longitude points of the earth that you would like to be at the center of the globe. Microsoft
Direct X 9 or above is necessary for this option.
Display Features
Choosing Display allows you
to specify whether or not you
want the international
dateline, land mass and
international borders, cities
and clocks, the World Watch™
logo, the sunlight/darkness
line, or latitude and longitude
lines to appear on the map.
Additionally, you may choose
to show the mouse’s position
in the Status Bar. Select the
desired option by clicking the
appropriate box.
If you select “International
Dateline”, you may choose to
display either the date or day
of week on the left and right
sides of the dateline. Make
your choice in the "Dateline"
box at the top left of this dialog
box.
The Map Manager Display Features Dialog
Tool Tips:
To view ONLY the map and sunlight/darkness line, check the box next to “Suppress all display
features except the sunlight/darkness line”.
Page 22
World Watch User’s Guide
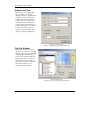
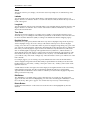
Appearance
The appearance setting lets you choose what font
you want and also the color that you want. It
also has image dithering and night image. You
can change those to meet your own preferences.
The Map Manager Appearance Dialog
Color Scheme
This drop-down scroll saves any named schemes that you have created. Change any item(s) and
click the SAVE button. A dialog box will appear. You may then type in a name for your color
scheme. Clicking the DELETE button will delete the scheme that appears in the “Scheme Title Bar.”
Color Offset
This option allows you to offset the color of the time curve. You can select the percentage of
darkness to be applied to the areas experiencing nighttime.
Image Dithering
This amount adjusts the darkness for the Sunlight/Darkness curve of the Image Maps (bitmaps,
JPEGs and other supported graphic files). This option does not attempt to alter the actual color of
the images, but rather gives a checkerboard effect that overlays the images to produce a darker
image section.
Night Image
This drop-down dialog determines the darkness of the shadowed areas of the World Watch maps.
This reprocesses the individual map colors. This is best utilized with the Traditional World Watch
maps, whereas, the images require Dithering as described next.
Tool Tips:
You can modify the colors and fonts of the various features such as city names, map borders,
clock faces, etc., all in the appearance settings.
Highlighting an item and clicking the “Customize” button gives you the opportunity to change
the color of that item. The “Font” option becomes active whenever you choose City Name,
Clock Bar, International Dateline, or Logo. You can use any installed font. Try experimenting
with the colors or fonts and creating your own color schemes.
Page 23
World Watch User’s Guide
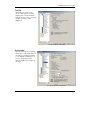
Cities & Clocks
The list box on the right shows
the names of over 500 cities
available for display on the
map.
The individual folders
subdivide the location
selections by Cities on Map,
Custom Cities, and locations
by regions from the Drop
Down List Box. Select
accordingly and then set the
individual City Display option
listed below. This includes the
ability to show the city name
on maps and the placement of
the Clock.
The Map Manager Cities and Clocks Dialog
The “Per-City” Options box allows you to place highlighted cities on World and/or Zoomed Maps.
(See the Map Menu section for more information). You may select more than one city name at a time in
the list boxes. You must choose “Cities" in the Display dialog box if you want the cities to appear on
the map.
City Options
This dialog box allows you to select which cities appear on the map and whether their clocks appear
on the map or on the clock bar.
Clear All Button
The “Cities & Clocks” dialog box has a “Clear All” button. This button removes the highlights from all
city names in the Cities list box. It is much easier to remove the selections using this button than to
manually remove each selection. This button is available only if at least one city name has been
highlighted in the “Cities List Box.”
Page 24
Tool Tips:
To copy the map’s specific settings to another map, simply highlight the item(s) and drag-anddrop into another map setting. For example, if you would like to copy the cities setting on your
Live Earth map onto your North Star map, you would highlight [Cities] and drag-and-drop to the
North Star map setting in the Map Manager properties.
World Watch User’s Guide
Add Custom City Dialog Box
The “Custom City” dialog box
appears when you click this button.
It is available only if you have not
already entered the maximum
number, which is 40, of custom
cities. The dialog box allows you to
enter information about a city that
you would like to add to the city
database ("Custom City"). Use
Appendix A to help locate a nearby
city for approximate latitude and
longitude coordinates.
The Custom City and New Location Dialog
NOTE: Please select the appropriate Settings for Daylight Savings Time here
City Name
Type the name of the city in this box. Be sure to include a comma between the city name and the state
or country. For example, type "Iowa City, Iowa" instead of "Iowa City Iowa." For cities outside of the
U.S., type City Name and Country, for example, type Manila, Philippines. World Watch™ uses the
comma to distinguish between the city name and the name of the state or country.
Show On
The option “World Map” or “Zoomed Map” allows you to select the display of the current custom city
on either the world map or the individual zoom maps. You can leave the boxes unchecked if you
would like to display the custom location later. All custom cities may be activated and deactivated
from the Cities & Clocks menu “Per-City” option.
Page 25
World Watch User’s Guide
Clock
This selection allows you to display a clock for the custom city and place it on either the map or the
clock bar.
Latitude
Type the latitude of the city in the latitude edit box. The latitude must be anywhere from 0 to 90
degrees. Then choose either the "North" or "South" radio button to indicate whether the city is North or
South of the equator.
Longitude
Type the longitude of the city in the longitude edit box. The longitude must be anywhere from 0 to 180
degrees. Then choose either the "East" or "West" radio button to indicate whether the city is East or
West of the Greenwich mean.
Time Zone
This drop-down list box displays over 30 time zones available. You should select the time zone in
which the city you are adding lies. The numbers in parenthesis are the numbers of hours the time zone
lies from Greenwich Mean Time (GMT) according to the United States Defense Mapping Agency.
Daylight Savings
This box allows you to specify whether and when a city observes daylight savings. If the city always
observes daylight savings, choose the "Always" radio button. If the city never observes daylight
savings, choose the "Never" radio button. If the city observes daylight savings during only a part of the
year, select the "As Shown Below" radio button. Then fill in the six drop-down list boxes to indicate the
time of the year when daylight savings is in effect. The left three boxes, labeled "From", indicate the
date on which daylight savings begin. The right three list boxes; labeled "To", indicate the date on
which daylight savings ends. Each row of three list boxes functions identically. The uppermost of the
three list boxes allows you to indicate a number, such as 1st, 2nd, ... last. The middle list box allows
you to indicate a day of the week or simply "day". The bottom list box allows you to indicate one of the
twelve months.
For example, suppose you are entering a city in the United States. Most cities in the United States
observe daylight savings time from the first Sunday in April until the last Sunday in October. In the
left three list boxes, select "First", "Sunday", and "April". Select "Last", "Sunday", and "October" in the
right three list boxes.
A small indicator in the lower right corner of the display clocks signifies that the location is currently
under daylight savings time. The dates at which these adjustments take place are listed in the
Appendix of the World Watch™ User's Guide. You define your Custom Cities daylight savings times
during each Custom City setup.
Edit Button
The “Edit Button” is available only if you have entered at least one custom city. All custom cities
appear at the end of the Cities list. Highlighting one of the cities and clicking the “Edit Button” causes
the “Custom City” dialog box to appear. You can then enter any necessary or desired changes.
Delete Button
Clicking the “Delete Button” on the Cities & Clocks menu removes the highlighted city from the
database.
Page 26
World Watch User’s Guide
Tool Tip
This dialog box allows you to
choose which options you want
displayed on your World Watch
maps. It also lets you choose which
weather options you want
displayed.
The Map Manager Tool Tip Dialog
Active Label
The active label shows everything
that is active on World Watch. You
can change everything to fit what
you would like on the maps. You
can also change the rotation
interval and the rotation styles of
the maps.
The Map Manager Active Label Dialog
Page 27
World Watch User’s Guide
Internet Downloads
This application of World
Watch™ allows the user to
receive News and Information
on a Scrolling Bar on the
bottom of the World Watch™
screen. In order to use this
service, the user must either
have a Permanent connection
to the Internet or a Dial-up
connection. Because this
application is connected to the
Internet, the information is
new and on time.
The Map Manager Internet Downloads Dialog
This Section of the Map Manager allows the user to enable the “News Ticker Support”. You may
choose to use the Default news Ticker Service. Depending on the address that you choose, a different
topic will be broadcasted as your News Ticker. You will notice that there are a wide variety of topics
here from sports to currency to international news. They will scroll along the bottom of your screen
and inform you throughout the day.
OR
You may also choose to “Use Custom News Ticker Service.” To use this feature you will need to
Browse for the Internet address, which will provide news from around the world. Some of these
Default addresses are listed to the right.
Dynamic Map Data displays Weather Temperature and Stock Quotes. This info will appear on the map
of the appropriate city locations. Some of our Browser sites for this Data are:
http://www.exptech.com/weather.txt
http://www.exptech.com/stocks.txt
Page 28
World Watch User’s Guide
Display Intervals
There are many features of World
Watch™ which change, flash, and
appear at different intervals. Well, as
you know, not everybody has the
same preferences, so we allow you to
change these intervals. Here we give
the option to:
The Map Manager Display Intervals Dialog
1.
2.
3.
4.
Choose the Refresh Rate for various World Watch™ maps (5 seconds to 5 minutes)
Choose the Refresh Rate for the World Watch™ Desktop Wallpaper Bitmap (15 seconds to 5
minutes)
Set the Rotation Speed for the Extra clocks on the clock Bar (off to 1 minute)
Select the Display Speed for the News Ticker (10 milliseconds to 50 milliseconds)
Clock Bar Order
This function allows you to rearrange
the order of the clocks. Highlight the
city and use the directional buttons to
move the city up or down in the
order. The default order on the Clock
Bar is alphabetical.
The Map Manager Clock Bar Order Dialog
Page 29
World Watch User’s Guide
Advanced Settings
This Dialog Box refers to settings for
the “Desktop Bitmap Image” and the
“Small Window” option of World
Watch™. If you are using, or are
planning on using a “Desktop Image”
for the World Watch™ Map, it does
need to be stored LOCALLY on your
hard drive. This is the function in
which you can choose where to save
this Bitmap Image. You will also have
the Option to Change the file name of
the Output for this Image. In order to
avoid and prevent cutting off any of
the Map when in Desktop Bitmap
Mode, you may choose to MOVE the
logo (in bottom right corner) and the
Local Time up.
The Map Manager Advanced Settings Dialog
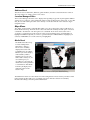
Satellite Tracking
With this feature you can view
satellite location, coverage area, and
movement such as weather, space
shuttle and station, GPS, amateur,
and Keplerian.
Mark “Show Satellite” checkbox to
view the various satellites and click
on TLE Files. Once you have made
your selection, the satellite name will
appear in the dialog box. Select the
desired satellite in the left box and
click on the right arrow key to
activate it. Click Apply and then OK.
The satellite should appear on your
map.
The Map Manager Satellite Dialog Box
Page 30
World Watch User’s Guide
Universal Configuration
Some features of World Watch™ require an Internet connection in order for them to be applied.
“Universal Configuration” is the area of World Watch™ where you designate the type of Internet
connection that you have. In this section you may choose your type between:
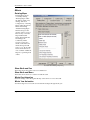
General Settings
The Double Click option of
this feature toward the bottom
of the General Settings screen
allows you to “Toggle” on and
off your Title Bar. By choosing
the “Toggle title bar on/off”,
you are able to Double Click
anywhere on the World
Watch™ map screen to
“Toggle” off (remove) the Title
Bar. In order to “Toggle” the
Title Bar back on, you may
once again bring the Title Bar
back to view. If you choose the
option to “Toggle small
window mode on/off”, you
will be able to do the same
application with the “Small
Window” feature. Simply click
the option and Double Click
anyplace on the World
Watch™ map, to Toggle On
and Off the Small Window
mode of World Watch™.
The Universal Configuration General Settings Dialog
Tool Tips:
You can use Speech Recognition for your World Watch. In order to enable this feature,
Microsoft Speech Engine must be installed. Go to Universal Configuration. Under the General
tab, check the “Enable Speech Recognition”. Select Speech setting to configure your speech
profile. After everything is set up, you can simply say “Tokyo” to center the map of Tokyo and
display the details.
Page 31
World Watch User’s Guide
Rotating Maps
Clicking “Rotating Maps” under the
Maps Menu, and checking “Enable
Rotating Maps” will access Rotating
Maps. This function gives the user the
option to rotate between any or all of
the Maps within World Watch™. This
includes the World Maps, the
Continents, and the Oceans. You may
also decide on the Interval in which the
Maps should rotate, i.e. :15, :30, :45. This
feature allows the user to view a
number of different Maps at a specified
period of time.
The World Watch Rotating Maps Dialog
Custom Lines
Many people find it helpful to visualize
one location to another, therefore we
have created the option for “Custom
Lines”. These lines could be useful in
such situations as planning a trip,
organizing import and export paths, or
for hobby airline pilots. You are also
able to name these lines, as well as
choose the type, color, and the shape of
the ends of the line that will be
displayed (i.e. dotted, bold, thin, etc.).
The Universal Configuration Custom Lines Setup Dialog
Page 32
World Watch User’s Guide
Airline Tracking
Track your flight path with this feature
by entering the flight’s departure and
arrival times in the corresponding
cities. You can also specify the line
type, its color, the display name and
font as well. To shape the path of your
flight, click and drag on the line in the
preview window of the dialog box.
You can reset the line shape by clicking
on the Reset button underneath the
preview map. Click Apply, and then
OK to view the drawn path on your
World Watch map. The icon will move
along the path as the flight reaches its
destination.
Airline Tracking Dialog Box in Universal Configurations
Countdown Clocks
Count down to an upcoming sporting
event, favorite holiday, or the first day
of summer with Express Technologies’
Countdown Clock. You may choose any
number of display clocks at one time,
and pick a new event when each one
expires. You have the ability to utilize
four clocks at one time. Set the
countdown clock by entering the title of
the clock, the event and the date that it
will take place. Click Apply, then OK.
The Universal Clocks Configuration Countdown Dialog
Page 33
World Watch User’s Guide
Screen saver
Select this option to view World Watch as your screen saver. You can choose to have the
World Watch map always appear during screen saver mode or for a certain amount of
time before the display goes to sleep.
Wallpaper
Check the box under the Wallpaper tab to enable World Watch as your desktop wallpaper.
Advanced Settings
This Dialog Box refers to settings
for the “Desktop Bitmap Image”
and the “Small Window” option of
World Watch™. If you are using,
or are planning on using a
“Desktop Image” for the World
Watch™ Map, it does need to be
stored LOCALLY on your hard
drive. This is the function in which
you can choose where to save this
Bitmap Image.
In order to use the World Watch™
map as a “Small Window” in a
corner of the screen, you will need
to adjust the size of the window.
Choose the percentages of the
screen size that accommodates you
(1%, 3%, 5%, 10%, or 25%).
The Universal Configuration Microsoft Windows® Wallpaper Dialog
Page 34
Tool Tips:
To activate the small window feature, make sure the “toggle small window mode on/off” is
selected under the General tab. Then double click anywhere on the World Watch map to turn
on the small window feature. To return to original size, double click anywhere on the World
Watch map again.
World Watch User’s Guide
Set Time and Time Zone
Your computer must have the correct
date, time, and time zone in order for
the World Watch™ to operate
accurately. You may set the date,
time, and time zone in the
Windows® 9x/NT/2000/XP/Vista
Control Panel or you may simply
choose Set Time and Time Zone from
the World Watch™ “Options” menu.
The Microsoft Windows Set Date/Time Properties
If you choose Set Time and Time
Zone from the World Watch™
“Options” menu, the Windows®
9x/NT/2000 Control Panel Date and
Time dialog box will appear. You
may enter the current date, time, and
time zone in this dialog box by typing
or using the SCROLL ARROWS.
Select OK to save your changes and
return to World Watch™.
The Microsoft Windows Set Time Zone and Day
Light Savings Time Properties
Page 35
World Watch User’s Guide
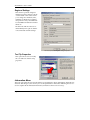
Regional Settings
This selection opens the “Regional
Settings Properties” dialog box in the
“Control Panel.” This section allows
you to change how numbers, times,
and dates are displayed according to
user preference. See your Windows®
9x/NT/2000 User Manual for further
directions.
The Time Tab will allow the user to
utilize Military Time options and the
various international time settings.
The Microsoft Windows Regional Settings Properties
Tool Tip Properties
This option allows users to modify
the color and font of their tool tip
properties.
Information Menu
This section provides the user such information as World Watch™ News and Updates. When the user
clicks into this dialog box, the user may choose the Update button. This button will bring the user to a
screen to Update the World Watch information (an Internet connection is necessary).
Page 36
World Watch User’s Guide
The Information box also provides the user with Tips about World Watch™, which explains a variety
of shortcuts to World Watch™ features. The Internet button provides the user with some website
addresses that will direct the user to such pages as Frequently Asked Questions about World Watch™
and additional services offered by Express Technologies Corporation. The final button is for our
contact information. We invite you to contact us with ideas and questions that you may have.
Internet Menu
This section contains all the online information that allows you to check for updates for your World
Watch version and our latest products. Access Online Help to view our online manuals. You can
always go online and order the software solutions that fit your needs.
Help Menu
World Watch™ Help Topic
Hitting the F1 key will bring up the HTML Help properties that also contains a fully interactive
tutorial. You can access specific information using the index listing or enter the keyword through the
search function.
Live Update
This option allows you to receive live updates. Please make sure that you are connected to the Internet
for the Download Manager Program to update your World Watch. You may need to wait for the
updates to complete in order to receive full updates.
Legal Agreement
Access the World Watch End User License Agreement anytime by clicking here. World Watch
software is intended to be used on one machine only. We also provide corporate and broadcast
licensing; please contact us for more information
Contact Express Technologies
This section provides all the contact information such as our website (www.exptech.com), address,
phone number, fax, and email address.
Registration Wizard
Please register your World Watch software in order to receive our latest product updates. For the first
time user, it is vital to complete the registration before the software can be fully installed.
Build Information
Here you can access your build and version information of your World Watch software. Please make
sure you have the latest version of World Watch by getting updates through the Download Manager
Program. Visit http://www.exptech.com/home/build_info.shtml to find out our latest build and
version of World Watch.
About World Watch
World Watch serial key and version number can be viewed here.
Page 37
World Watch User’s Guide
Page 38
World Watch User’s Guide
Additional Product Ideas…
World Watch for Microsoft Windows Mobile
World Watch Instant Messenger
Page 39
World Watch User’s Guide
BUSINESS OFFICE
EXPRESS TECHNOLOGIES CORPORATION
3960 HOWARD HUGHES PARKWAY, SUITE 500
LAS VEGAS, NEVADA 89109
UNITED STATES OF AMERICA
PHONE NUMBER: 1.702.733.6230
FAX NUMBER: 1.800.654.9533
ORDERS & INFORMATION
PHONE NUMBERS: 1.800.654.9548 1.920.337.1640
FAX NUMBERS: 1.800.654.9533 1.920.337.1643
INTERNET: http://www.exptech.com
E-MAIL: [email protected]
Network/Site Licenses and
Customization to the software is available.
Check with us about product updates & additional information available for the World Watch™.
Page 40