1
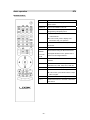
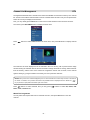
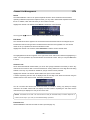
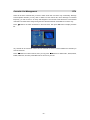
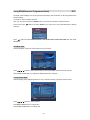
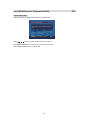
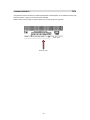
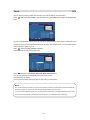
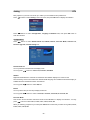
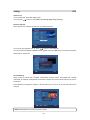
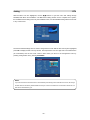
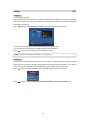
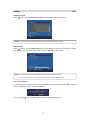
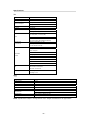
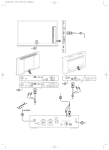
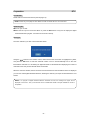
Preparation
DTV
Connection
Please refer to Antenna Connection (See the page 10).
NOTE: Please use good-quality RF cable. Make sure well connected with tuner to ensure effect.
Switching On
XTurn on your TV Set.
YSelect the DTV input in the Source Menu or press the DTV button at any time to display the digital
terrestrial television program. It needs a few seconds to startup.
Tuning In
The menu will ask if you want to start automatic search.
Using the
buttons on the remote control, make sure that the YES button is highlighted in yellow,
and press the OK button to start the automatic search. The TV will automatically tune to the UHF
transmission channels 21 to 68 looking for digital terrestrial TV broadcasts and displaying the names of
channels found. This process will take about five minutes.
When the search is finished, the first channel of the channel list and the information banner is displayed
you can now watch digital terrestrial television, selecting the channel you require as described in the next
section.
NOTE: If no program of digital terrestrial television broadcast is found, the message “No signal” will be
displayed on the screen. Then you should refer to the Troubleshooter Guide to analyse establish the cause of
the problem.
- 37 -
Basic operation
DTV
Change Channel
You can select the channel you desired in one of four ways - stepping using CH+ or CH- button, selection
by number, from the on-screen channel list, and using the electronic programme guide (EPG).
X Pressing the CH+ button will select the next channel. Pressing the CH- button will select the previous
channel.
Y You can also select the required channel using its channel list number. Channel numbers are entered
using the number buttons on the remote control handset and can be up to three digits long.
When you press a number button on the remote control, a small box appears in the top left of the
screen to show the entered number. After each digit is entered, the receiver will wait up to two seconds
for the next digit to be pressed until either three digits have been entered or you do not press a digit in
time. The channel corresponding to the entered number in the box will then be selected.
NOTE: If you enter a number which does not correspond to a stored channel, the next valid channel number
is selected instead. If you enter a number greater than the maximum one in the channel list, the TV will select
the last channel in the list.
Z You may change channel from Channel List menu, see page 41.
[ You may select the required channel from EPG, see page 44.
Information Banner
Whenever you change channel, using the CH+ and CH- buttons or the number buttons, will display the
channel picture along with an information banner at the bottom of the screen. This will remain on the
screen for approximately three seconds. The information banner can also be displayed at any time while
watching TV by pressing the DISPLAY button on the remote control. Pressing the DISPLAY button again
removes the banner.
The information banner gives a number of facts on the channel selected and the programmes on it. The
name of the channel is displayed, along with its channel list number and an indication of the strength of
the signal received on this tuning channel.
The channel name and the start and finish time of the programme currently showing on the selected
channel are given, and the current time.
- 38 -
Basic operation
DTV
Audio Control
You can altered the volume level of the sound from the⊿+ and⊿- buttons on the remote control handset.
Pressing either button a bar graph of the sound volume will be displays on the TV screen.
You can silence the sound from the receiver by pressing the MUTE button.
The sound remains mute until the MUTE button is pressed again.
You may set the audio language. (For details about language list see page 51)
Digital Teletext
Many digital terrestrial television channels not only broadcast pictures and sound for programmes but
also pages of information on the programmes, the weather, news and many other topics. This digital
teletext can be displayed by the TV.
Some channels are entirely given over to digital teletext and carry no normal TV programme at all. These
dedicated digital teletext channels will not give a quarter- screen image in the EPG or the Channel List
screen. When such a channel is selected, after a brief pause, they will usually display the opening page
information automatically.
Other channels have digital teletext pages broadcast alongside the television programme and often
include a reduced-size broadcast picture within digital teletext pages. These usually require the
TXT/MIX button to be pressed to activate the digital teletext pages.
In both cases, moving through the different pages of information is accomplished in a variety of ways,
dependent on the individual broadcasters, but including use of the W/ X/ S /T
and OK buttons to select
items from on- screen menus, you can press the coloured buttons on the remote control to jump directly
to particular pages.
You can exit any digital teletext channel by changing channel in any of the normal ways. You can leave
the digital teletext function of a combined digital teletext/programme channel, to return to normal
television viewing of that channel, by pressing the TXT/MIX button.
- 39 -
Basic operation
DTV
Remote Control
DTV
Press this button to shift DTV/TV mode.
DTV MENU
Press this button to display the DTV main
menu screen.
SUBTITLE
To turn the subtitles on and off.
GUIDE
Press this button to display the electronic
programme guide (EPG) menu.
DISPLAY
XPress this button to show or hide the infor
-mation banner.
YIn menu mode, press to display more
information help your operation.
MUTE
Press this button to mute audio, press again
to resume.
EXIT
Press this button to exit menu.
RED
GREEN
YELLOW
BLUE
TXT/MIX
These buttons using the EPG function and
the Digital Teletext function, please refer to
EPG menu and Digital Teletext .
Press this button to enter or exit teletext
function.
FAV
Press this button continuously to select
favourite List1, List2, List3, List4, List5, Off.
LIST
Press this button to display the channel list.
0-9NUMBER
X Press these buttons to change channel.
Y In DTV menu, press these buttons to input
letter or digital.
CH+/CH-
Press these buttons to change channel.
⊿+/⊿-
Press these buttons to increase or decrease
the volume.
- 40 -
Channel List Management
DTV
The digital terrestrial television channels found when first installed are stored in its memory as a channel
list. This list can be altered and amended to remove unwanted channels and to suit your own preferences.
There are two ways to display the channel list:
First, you may directly press LIST button on the remote control handset to enter Channel List menu.
The second, press DTV MENU button to display the main menu.
Press
buttons to select Channel List in the main menu, then press OK button to display channel
list.
The Channel List screen displays the list of channels in the TV's memory, with a quarter-screen image
window showing the selected channel, and can be used to change channels for viewing, delete channels
from the memory, edit the name of the channel as it appears in the list and on-screen, lock a channel
against viewing by younger members of the family, and set up favourite channels.
NOTE: Many of the menu screens displayed by the TV have reminders as to which keys do what, at the base of
the screen. In addition, many screens have further help available which is displayed when the "DISPLAY" (
i+
)
key is pressed, as prompted at the bottom right of the screen.
Press
buttons to select Channel, then you may press
buttons to select OK, Delete, Edit
Name, Lock, Favourite item.
Watch The Programme
You may select the required channel from Channel List menu, then press OK button to view the
channel.
- 41 -
Channel List Management
DTV
Delete
The initial installation of the TV can produce duplicate entries in the channel list from transmitters
operating at different frequencies in adjacent areas, you may wish to delete these duplicate entries from
the list. In addition, other channels which you do not want in the list.
Highlight the channel to be deleted, select Delete to delete the current channel.
You may press
buttons to select Yes to confirm delete or select No to cancel.
Edit Name
The channel names which appear in the channel list and the information banner are assigned by the
broadcasters and some longer names are abbreviated to become unrecognizable. You can edit the
names to suit your preferences with the Edit Name function.
Highlight the channel to be renamed, Select Edit Name to edit the current channel name.
The highlighted channel name appears on the right of the screen with the first character highlighted by a
cursor. You can input letters by numerical buttons on the remote control. Then you can press OK button
to save it.
Channel Lock
Some channels broadcast material which you do not want younger members of the family to watch. Any
channel can be 'locked' so that it cannot be selected for viewing without first a four-digit PIN code being
entered. In this way any channel not suitable for younger viewers can be protected.
Highlight the channel to be locked, select Lock to lock up the current channel.
A window requesting the PIN code is displayed and the four-digit code should be entered using the
number buttons on the remote control, followed by the OK button.
You can now leave the Channel List screen and return to normal TV viewing. Any attempt to change
channel to the locked channel will now display the same window requesting the PIN code and the
channel will only be displayed on entry of the correct code.
NOTE: The default PIN is 0000. This code should be reset (as described below) to another sequence of
numbers, known only to you, when you have finished setting up the DTV.
Favourite List
Select Favourite to enter the Favourite List menu (See the page 43).
- 42 -
Favourite List Management
DTV
There will be some channels that you tend to watch more often and some only occasionally. Although
some duplicate channels you may want to delete from the channel list, others although not watched
frequently, you will not want to do away with altogether. The favourite mode allows the most-watched
channels to accessed more easily, leaving the less-watched channels accessible but out of the way.
Press
buttons to select "Favourites" in the main menu, then press OK button to display favourite
list.
Any channel can be a favourite channel and the Channel List menu is used to label those channels you
want as favourites.
Press
buttons to select Channel, then you may press
buttons to select List 1, List 2, List 3,
List 4, List 5 item, and then press OK to add or remove any one list.
- 43 -
Using EPG(Electronic Programme Guide)
DTV
The EPG screen displays a list of the stored channels along with information on what programmes are
being broadcast.
You have two ways to display the EPG:
First, you may continuously press GUIDE button on the remote controller to enter EPG menu.
The second, press
buttons to select Guides in the main menu, then press OK button to display
submenu.
Press
buttons to select Now/Next EPG, List Schedule EPG, Timeline Schedule item, then press
OK button.
Now/Next EPG
This item displays current and next program for every channel.
Press W / X /S / T buttons to select desired channel, then press OK to watch the current channel.
Press Yellow or Blue button to display the detailed information schedule.
List Schedule EPG
This item display more detail program list for every channel, including of program name and time.
Press W / X /S / T buttons to select channel.
Press Red or Green button to change time.
Press Yellow or Blue button to change date.
- 44 -
Using EPG(Electronic Programme Guide)
Timeline Schedule
This item displays the detailed program list at a period of time.
Press W / X /S / T buttons to select desired channel or program.
Press Red or Green button to zoom in or zoom out the time range.
Press Yellow or Blue button to change date.
- 45 -
DTV
Common Interface
DTV
A single DVB Common Interface (CI) will be implemented to allow adoption of a Conditional Access (CA)
system by means of a plug-in CA module where available.
Please contact your local pay TV operator before you receive the pay TV programs.
Insert CI card
- 46 -
Timers
DTV
You can also set a timer to switch the receiver to any channel without your intervention.
Press
buttons to select Times in the main menu, then press OK button to display programme timer
menu.
Up to five separate timer events can be set and each is displayed in the Timer screen, showing the event
number, the channel to be selected, the start time, end time, date and the mode – no matter that event is
active (and will be acted on) or not.
Press
buttons to select Inactive or Active.
Press OK button to enter setting timer state.
Press
buttons to select Name, Start, End, Mode, Password item.
You can input letters by numerical buttons on the remote control.
Press OK button to confirm.
You may watch an other channel program on time when you set the time.
NOTE:
If an invalid number for the start or end times or the date is entered, the highest valid number is automatically
entered in its place. So, entering 28:30 as the time will automatically change to 23:30.
If you are watching digital terrestrial TV at the time the timer event starts, a message will flash onto the screen
announcing that the receiver is "Switching to timer channel" so you understand what is happening.
- 47 -
Setting
DTV
Many aspects of your DTV can be set up to reflect your circumstances and preferences.
Press
buttons to select Setting in the main menu, then press OK button to display the submenu.
Press
buttons to select Configuration, Language, Installation item, then press OK button to
enter the submenu.
Configuration
Press
buttons to select Default Guide list, Subtitle, Banner, Favourite Mode, Channel List,
Receiver Upgrade, Parental Setting item.
Default Guide list
You may alter the information banner display mode.
You may press
buttons to select List, Timeline, Now/Next.
Subtitle
Digital terrestrial television channels can broadcast with subtitles displayed on-screen for the
hard-of-hearing. This function selects the desired subtitle language and enables the automatic display of
subtitles whenever subtitle information is broadcast.
You may press
buttons to select Off, On.
Banner
You may set the time (in second) to display the banner.
You may press
buttons to select 1 second, 2 seconds, 4 seconds, 8 seconds, Off.
Favourite Mode
This function set the favourite channel list mode. Press OK button to display the submenu. You may
press
buttons to select List 1, List 2, List 3, List 4, List 5, Off.
When you watching programme you could press FAV button continuously to select among List 1, List 2,
List 3, List 4, List 5, Off.
- 48 -
Setting
DTV
Channel List
You may select the channel list display mode.
You may press
buttons to select Show all, TV only, Radio only, Text only.
Receiver Upgrade
Ensure that your DTV always has the most up to date information.
You may set Auto Upgrade on or off. Press
buttons to select Off, On.
You may set Manual Upgrade: highlight Manual Upgrade, then press OK button to start manual upgrade.
Please refer to window hint.
Parental Setting
Simply locking a channel will not deflect a determined would-be viewer. Re-installing the complete
channel list, for example, will bypass the channel lock. However, the menus can be locked out of use too,
prevent this.
Press OK button to display the submenu. Here the menu lock-out can be set and the PIN code can be
changed.
NOTE: Default password of parental control is "0000".
- 49 -
Setting
DTV
With the Menu Lock line highlighted, use the
buttons to cycle the menu lock setting through
Disabled, Main Menu and Installation. The Main Menu setting will lock out the complete menu system;
the Installation Menu setting locks only the Installation menu; and the Disabled setting allows free access
to any of the menus.
The same Parental Settings menu is used to change the PIN code. With the Set Lock Key line highlighted,
press OK to display the Set Lock Key window. This requests the new four-digit code to be entered twice
(for confirmation) and the new code comes in effect when you return to the Configuration menu by
pressing Configuration menu, pressing DTV MENU.
NOTE:
If you want the channel and menu locks to work efficiently and actually protect channels from access, do change
the PIN code from the factory default. Make sure that you choose a number that is not obvious to others but one
that can be remembered by you.
- 50 -
Setting
DTV
Language
You may set the language.
Digital terrestrial television channels can broadcast simultaneous soundtracks in more than one language.
This function selects which language soundtrack you will hear when switching to a channel broadcasting
with multiple soundtracks.
Press
buttons to select Preferred or Current, then press OK to enter the submenu.
You can select the preferred audio and subtitle language from the submenu.
You can select the current audio and subtitle language from the submenu.
Press
buttons to select language, then press OK to confirm.
NOTE: Languages may be different depending on each programme.
Installation
You may wish to re-install channel because you have moved to a different area with different broadcast
frequencies, and you wish to reinstate a channel previously deleted from the channel list, or you want to
watch new channels which have started broadcasting, please operate via to the follow step.
Press
buttons to select "Installation", then press OK button to display the submenu.
Press
buttons to select Automatic Search, Manual Search, First Time Installation item.
- 51 -
Setting
DTV
Automatic Search
Press
buttons to select Automatic Search, then press OK button to start search.
NOTE: You must perform First Time Installation step before selecting "Automatic Search".
Manual Search
Press
buttons to select Manual Search, and press OK button, the screen will display as follows.
Then input the channel number that you want, and press OK button to start search.
NOTE: You must perform First Time Installation step before selecting "Manual Search".
The new channels will cover the old ones after you finish the "Manual Search" step.
First Time Installation
To reset the receiver, highlight the First Time Installation line in the menu and press OK. A warning
screen is displayed in case of accidental operation.
You may press
buttons to select Yes to confirm or to select No to cancel.
- 52 -
Troubleshooting
Please read this user's manual before using the TV Set. If you have any troubles in using this TV set,
try to solve it by the suggestions mentioned below. If you cannot solve the problems after adopting
the corresponding suggestions, please contact the technical service center or dealer authorized by
us. For the sake of your safety, please do not open the cover and repair it by yourself or it may cause
further damage to the TV set, electric shock, or fire hazard.
No signal found
1.
Check antenna when antenna is disconnected, damage, and misaligned.
2.
Ensure the unit is inside the digital signal area.
There is no sound but picture is normal
1.
Ensure that the volume is turned down to the lowest.
2.
Check whether the TV set works in mute mode.
There is no picture or sound
1.
Ensure that the power cord has a good connection.
2.
Ensure that the power switch is on.
3.
The contrast and the brightness are adjusted properly.
4.
Make sure the current channel is not the encrypted one and no CA Card inserted.
Picture is black and white or colourless
1.
Adjust the colour setup.
2.
Check whether the broadcast system selection is correct.
Picture is blurred or there is snowflake or noise
1.
Adjust direction and position of the right antenna.
2.
The feedback cord of antenna is damaged or broken.
Sound and picture are interfered
1.
Check whether the TV set is very near to other electrical appliance. If so, remove it.
Picture is not stable and rolling in PC mode
1.
Check whether the display frequencies and bandwidth of computer or video source are fit for TV.
2.
Check the display setup of control panel in computer. If the setup is incorrect, change it by computer
programming tools.
Screen displays to check signal cords
1.
Check whether the signal cords are connected to PC or video source.
2.
Check whether PC or video source is in work.
Remote control is insensitive or does not work
1.
Check the batteries of the remote control and make sure that they are powerful and well conductive.
2.
Direct the remote control to the IR sensor of the TV.
3.
Check whether there are some obstacles between the remote control and IR sensor.
- 53 -
Screen Burn
A characteristic of Plasma and LCD TV Panels is that displaying the same image for a long time may
cause a permanent after-image to remain on the screen. This is called screen burn. Most pictures
shown on your TV will be constantly moving and fill the screen.
Examples of images that you need to watch out for are as follows (this is not an all-inclusive
list):
1. Black Bars: If black bars appear at the left/right or top/bottom of the screen it is recommended to
change the format so that the picture fills the entire screen.
2. TV Channel Logos: e.g. Shopping channel logos and pricing displays - especially if they are bright
and stationary. Moving or low-contrast graphics are less likely to cause ageing of the screen.
3. PIP and Multipip: Do not view for long periods of time using the PIP or Multipip functions.
4. Time Displays
5. Teletext: Do not view a stationary page for long periods of time.
6. TV/DVD Menus: e.g. Listings of DVD disk content.
7. Pause Mode: Do not leave the screen in pause mode for long periods of time, e.g. When watching
DVDs or videos.
NOTE: To prevent screen burn if viewing any of the above for long periods of time, reduce contrast and
brightness when viewing. Once burn-in occurs it will never disappear completely.
- 54 -
Maintenance
Care for your TV
Early malfunctions can be prevented. Careful and regular cleaning can extend the amount of time you will
have with your TV. Be sure to turn the power off and pull out the plug before you begin any cleaning.
Cleaning
We suggest that customer never use anything other than a clean, soft, dry cloth to clean the product.
Extended Absence
If you leave your TV unused for a long time (such as a vacation), it is a good idea to unplug the power
cord to protect against possible damage from lightning or power surges. If you use an antenna, you may
also need to disconnect it from the back of your TV before leaving.
- 55 -
Specifications
TV
MODEL
LOG37LW427
Input Voltage
220V~240V AC ,
Input Frequency
Power Consumption
Audio System
TV System
VGA
50/60 Hz
Standby: < 1W
Rating:200W
BG/DK/I /L/L'
PAL/SECAM
Sync.: H/V Separate, TTL, P. or N.
Video Signal:
0.7Vp-p, 75ohm
Audio in:
RCA JACK (L&R),0.5Vrms (-9dB)
Audio
Frequency Response: 80Hz-15KHz (at-3dB)
Earphone out:
Max.10mW Output (Φ3.5mmStereo Jack,32Ω)
Environmental
Operating Temperature: 5℃-40℃
Considerations
Operating Humidity:
10%-80% Relative Humidity
Colour range: 16.7M
Display resolution:
1920× 1080 pixel
Specification
of Panel
Pixel Pitch:0.426(H)×0.426(V)
Viewing angle:176º H / 176º V
Contrast ratio:
1200:1
Brightness: 550cd/m²
Response time:8 ms
Aspect Ratio: 16:9
Lamp Life: ≥ 60000
hours
Dimension(H×V×T)(mm):
Size
Without stand : 944*676*113
With stand: 944*728*340
Weight(Kg)
Gross Weight:32.5
Net Weight:26.5
DTV
MODEL
LOG37LW427
Channel Range
21~68
Input Level
-60~-20 dBm
Input Impedance
75 Ω
Channel Bandwidth
8M
Demodulator Mode
COFDM: 2K&8K
Interactive digital broadcast
Services: MHEG-5
Video Decoder
Video Decoder : MPEG-2 MP@ML
Resolving Power(Max): 720×576
Audio Decoder
Decompression: MPEG Layer I&II
Decompression
MPEG Layer I&II
NOTE: Specifications subject to change without notice. Weight and dimensions are approximate.
- 56 -
Visit Partmaster.co.uk today for the easiest way to buy electrical spares and
accessories.
With over 1 million spares and accessories in stock we can deliver direct to
your door the very next day.
Visit www.partmaster.co.uk
or call
0870 6001 338
(UK customers only)
Calls charged at National Rate.
This symbol on the product or in the instructions means that
your electrical and electronic equipment should be
disposed at the end of life separately from your household
waste.
There are separate collection systems for recycling in the
EU.
For more information, please contact the local authority or
your retailer where you purchased the product.