1
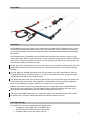
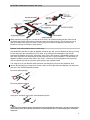
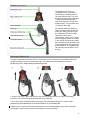
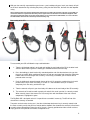
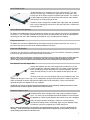
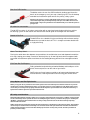
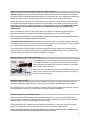
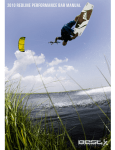
1
BEST KITEBOARDING
USER MANUAL
Thank you for purchasing a Best kite. Please read this manual carefully and in its entirety before using
your new Best kite.
WARNING
Kiteboarding/kitesurfing/snowkiting are extreme sports. They have numerous inherent risks and dangers,
and pose substantial risk of cuts, scrapes, bruises, broken bones, loss of limbs, loss of vision, paralysis,
and other serious, permanent and disabling injuries and death to the rider and others. Some of the
sources of these risks include but are not limited to:
•
•
•
•
•
•
•
•
Being lifted by the kite and then dropped or slammed into the ground, snow, trees, rocks,
buildings, piers, jetties and/or other structures or surfaces.
Being dropped or slammed into other people and/or property.
Contact with kite lines under tension, and/or watercraft.
Drowning.
Underwater conditions and/or objects such as sharp shells, broken glass, sand bars, shoals,
reefs, oyster beds, and/or concrete.
Contact with sea life such as sting rays, sharks, sea turtles, jelly fish, etc.
Weather conditions and/or changes in weather conditions such as increasing or decreasing wind,
waves, updrafts, lightning and/or water spouts.
Equipment performance. Kiteboarding is a new sport. Kiteboarding equipment and safety gear
are NOT 100% reliable. Safety designs and features are often new and unproven. Kites may
behave unfavorably and unpredictably. Lines can twist, tangle, or break, resulting in serious injury
and/or loss of control of the kite.
When using this product, you are responsible for your own safety and the safety of others around you.
Never use this product as a flying device. Never touch flying lines when the kite is in use.
RELEASE OF LIABILITY AND ASSUMPTION OF RISK
DO NOT USE THIS PRODUCT UNLESS YOU AGREE WITH THE
FOLLOWING TERMS AND CONDITIONS:
Before using this product, the purchaser/user has carefully reviewed, understood and agrees to comply
with the terms of this User Manual. Use of this product and any of its components involves certain
inherent risks, dangers and hazards, which can result in serious personal injury or death. The
purchaser/user of this product understands that the seller is not responsible for any damage to property
or injury caused by negligent operation of this product by the purchaser/user, and the purchaser/user
releases the seller from all such liability. In the event of your death or incapacity, this Agreement shall be
effective and binding upon your heirs, next of kin, executors, administrators, assigns and representatives.
The purchaser/user of this product expressly assumes the risk of any and all bodily injury, death and/or
liability which may result from the purchaser or user’s participation in kiteboarding. The purchaser/user
agrees to hold Ride Best, LLC harmless from any and all liability, and waive and release any and all
claims or potential claims against Ride Best, LLC and any of its respective agents, affiliates, subsidiaries,
employees, instructors, officers, directors, shareholders, suppliers and manufacturers in the event of any
such bodily injury or death which may result from the purchase and/or use of Ride Best LLC (d/b/a Best
Kiteboarding, LLC) products.
© 2008 RIDE BEST, LLC, d/b/a BEST KITEBOARDING, LLC
2
09 SLE BAR:
Introduction:
Best Kiteboarding would like to thank you for choosing the new 2009 SLE Bar. We guarantee this and all
of our products to be free from defects in materials and workmanship. All Best products are covered by
our Fair and Reasonable Timeframe warranty, which offers extended coverage beyond that provided by
other brands.
Best Kiteboarding has a dedicated, year-round R&D team comprised of our world-class technical staff
and pro-team riders. We never stop testing and we never stop improving our products. With our dedicated
R&D facilities in Australia and Brazil you can be sure that everything we make has been fully tested in the
most extreme locations the world has to offer.
To help you express your own riding style, you need a bar you can rig and ride exactly how you want. The
‘09 Best Bar provides the perfect mix of ease of use, advanced safety features, with maximum freeride
versatility.
Our new “Big-Black” molded chickenloop Quick Release provides easy one-handed release under any
line load. With only one internal moving part, it’s a cinch to reassemble in the water, giving you security
and confidence that adds to your riding enjoyment.
The ‘09 Best Bar comes with “Oh Shit Release” grab handles on all front and rear flying lines allowing you
to self land your kite on the beach safely regardless of wind direction. A multi-way bypass/handlepass
leash can be configured as a bypass, back line, or suicide leash to suit your needs.
Depower travel and bar reach are fully adjustable from just a single knot position, accommodating the
needs of riders of any body shape. Our dual-depower stopper takes the strain against the bar so you
don’t have to, reducing the load on your arms and increasing your comfort level.
With colour-coded 700lb rated flying lines, matching bar colors, and a high load-rated centerline swivel,
the ‘09 Best Bar is the perfect complement to either the Waroo or Nemesis HP kites.
09 SLE Bar: Package
Your 09 SLE Bar is delivered complete with the following items:
• Complete bar ready rigged with 22+3m 700lb line set.
• Velcro Donkey Dick attachment for the chickenloop.
• Handlepass/bypass leash with integral QR cuff.
3
09 SLE Bar: Performance features and set up
When unpacking and using your new bar for the first time, we recommend that you take some time to
familiarize yourself with the product and design features that make it unique. This will help you set up
your bar and kite correctly the first time, ensuring you gain the maximum potential from their highperformance design and multiple safety features.
Depower strap and handlepass/bypass safety leash:
Your 09 Best Bar provides 2 stages of depower control for your kite, you can depower the kite by pushing
the bar away from you and towards the Trim Strap, or by pulling on the red depower strap handle.
Adjustment of depower via the trim strap allows you to set the bar height at a comfortable position to suit
your riding style while still remaining full control of your kite even in gusty conditions. The total length of
depower available from bar travel and the trim strap is sufficient to reach the depower limit of your kite.
You can repower your kite at any time by pulling on the grey repower-handle.
The safety leash on your Best Bar works whenever you drop the bar or fire of the 'Big Black' quick
release. By activating your safety leash, the bar travels the full length of the dual depower line and places
your kite in the maximum depower position.
Bar at max power position
Bar at max-depower position
Safety leash activated, placing kite at max-depower position
Please note that the maximum depower achieved when using the Dual-depower safety leash is the same as when the bar is
pushed away from the rider completely. The function of the 'dual-depower' leash is to automatically bypass the depower
stopper ball.
4
Big Black quick release:
The 'Big Black' QR cuff is an
integrated release system that is
activated by pushing the external
cuff away from the rider. The cuff is
designed so that QR activation force
is completely independent of the
load on the front lines and the dual
depower ropes. The activation force
is factory set to be 8kg.
We strongly recommend that you
check the safe function of your QR
before you attach your kite to your
bar. Should the QR ever become
fouled with sand or other
contaminants, a quick rinse in water
will be enough to restore its function.
In the unlikely event that you should
ever damage any part of the QR cuff
we recommend that you replace the
part immediately, as a damaged QR
cuff could put you and others at risk
of injury.
Activating the Big Black QR:
The steps required to activate the QR are shown below. In this example we have omitted to attach the
handlepass/bypass leash to its attachment ring in the middle of the chickenloop for the sake of
photographic clarity. Always attach your leash before you ride.
1. Grip the cuff firmly in one hand and push the cuff up and away from the rest of the chickenloop
assembly. The cuff will click to let you know that it has released.
2. Once the cuff has cleared the internal assembly, the chickenloop holding pin is released and is
automatically pulled downwards by the load exerted on the chickenloop tube.
3. When the pin reaches the fully extended position, the chickenloop holding ring is released and the
chickenloop is able to slide free from the spreader bar, releasing the kite.
5
With your bar now fully separated from your harness, your handlepass/bypass leash (not shown) will pull
on the leash attachment ring activating the primary safety function of the kite, the front line dual-depower
safety.
Note to beginner riders: the front line dual depower safety does not provide 100% depower of the kite, it is provided as a
convenience feature for experienced riders who prefer to regain control of their kite in most situations. Beginner riders
may prefer to attach their leash, via the front of their harness, to one of the back line OSR handles, or to one of the front
line OSR handles rather than the chickenloop mounted leashing ring.
Reassembly of the QR:
To reassemble your QR cuff follow the steps outlined below.
1. Take the chickenloop tubing in one hand and holding the main body of the QR in the other hand,
slide the attachment ring over the holding pin and down towards the main body.
2. Press the holding pin back into the fully extended position and slide the attachment ring up into
the main assembly. When positioned correctly, the red rope and metal loop should be completely
hidden within the main body of the assembly. If incorrectly assembled, you will not be able to
proceed to the next step.
3. Push the holding pin upwards towards the top of the cuff. If correctly assembled, the pin should
position almost flush to the main body, as shown. It is not intended that the pin should be
completely flush. Do not try and force the pin.
4. Take the external cuff part in your hand and pull it down over the main body of the QR assembly.
5. The external cuff should seat with a gentle pull and will click to tell you that it is correctly seated.
When correctly closed, the external cuff sits exactly flush with the bottom of the main internal
components, highlighted in green.
The Big Black QR is designed so that it is impossible to assemble it incorrectly. The QR will not clickclosed unless correctly assembled.
Two points to check when closing are 1) that the chickenloop attachment ring is correctly seated inside
the main assembly and 2) that you have not twisted the depower lines between the external cuff and main
assembly prior to attempting to close the cuff. If the pin is correctly positioned and the cuff will not close,
simply push the cuff upwards and untwist the depower lines.
6
Laser Etched 3D grip:
The 09 Best Bar has a completely new Laser etched 3D grip. This dual
density EVA foam grip is 'etched' by a high power laser that melts away
the top layer of the EVA to reveal the colored layer beneath. This creates a
uniquely ridged and profiled 3D construction that enhances rider comfort
and improves the tactile quality of the bar.
The 09 bar retains the popular intended finger ridge layout and squared off
back surface, allowing you to feel which way round your bar is without ever
having to look at it.
2-Piece Stainless Bar Bushing:
For 09 we have modified the bushing alignment to remove any wear hotspots and increase your depower
line lifespan. The 316 grade chromed steel bushing mates up perfectly with the top of the new Big Black
QR giving you the most solid unhooked chickenloop for easy un-hooking and re-hooking
Flying lines 22m+3m:
For 09 we have selected a 700lb breaking strain high tenacity line to help all your kites turn as fast as
possible and to give you the maximum handling feedback at all times.
Front Line OSR Handles:
The 09 bar has dual front-line landing handles above the trim strap. These handles are primarily intended
to be used as grab handles when landing the kite on the beach.
Beginner riders who do not require the spinning front line function of the trim strap mounted swivel can attach their leash
directly to one of the front line handles, connecting the other end of the leash around the spreader bar hook on their
harness. Always ensure the handles are disconnected from their Velcro retaining tabs before attaching the leash.
Dual Depower Line with Stopper Ball:
Having dual depower lines that run through the bar enables the use of a
simple and effective adjustable stopper ball. This allows a rider to limit bar
travel according to personal preference for maximum depower, and also
allows the rider to freely un-spin the bar without the kite going into autosafety.
The dual centre lines increase durability and the entire depower rope, from
stopper knot to bypass leash ring, can be swapped out quickly and easily without the need to replace the
entire chickenloop assembly. Replacement stopper balls will be available as spares and should be
replaced whenever the depower lines are swapped.
The depower rope can also be shortened by tying an additional knot at the chickenloop, allowing C-kite riders to reduce
total bar throw in line with the depower characteristics of their chosen kite.
Handlepass/Bypass Leash:
The 09 Best Bar comes equipped with a high quality handlepass/bypass
leash. This leash clips to the bottom of the dual depower line and activates
full depower by shortening the depower rope whenever the bar is dropped.
Riders wishing to perform handlepass maneuvers and stay directly
leashed to the tubing of their chickenloop, bypassing this depower/safety
functionality, may wish to upgrade to a heavier duty leash.
Warning: When attached directly to the chickenloop, the maximum depower of the kite - if the bar is dropped from the
riders grip - will be limited solely by the position of the stopper ball on the depower line. In this situation, the kite can
remain partially powered and out of the riders reach.
7
Rear Line OSR Handles:
The 09 bar retains the rear line OSR handles for landing your kite on the
beach, or for emergency use if you snap a front flying line. The chickenloop
mounted leash attachment point remians the primary safety system.
Attaching your leash to a rear line OSR handle and to the front of your harness can
result in line tangles after performing kiteloops and spins. The 09 Best harnesses are
designed with a single strut spreader bar hook that will allow you to retain the option to
spin your bar.
All carbon bar construction:
The 09 SLE bar retains its all carbon construction with an oversized center bulge and 2 piece stainless
bar bushing system. A new carbon core weave makes the 09 lighter and stronger than ever before.
Double fix Bar End:
The 09 SLE bar has a double fixing bar end design with maximum overlap
between bar end and the bar itself. This is stronger and more durable than
a single point fixing.
Above Trim-Strap Swivel:
Placing the swivel above the depower strap maximizes the available bar travel and depower beneath the
trim strap, helping you to keep in control as the wind picks up. A new high load swivel arrangement with
extra wide line attachment points maximizes the line loading to keep your front lines untangled and twist
free.
EVA Foam Bar End Bumpers:
Riding unhooked and performing unhooked kiteloop and handlepass tricks
places increased pressure on the sides of your hands.
Soft Eva bar end insert bumpers provide a soft contact point between your
hand and the bar, reducing abrasion and increasing your comfort levels.
Setup Options and Pre-flight checks:
Before you rig your bar to your kite for the first time, please check each and every knot and line connection on your bar.
Though these are fully assembled at the factory, it is possible for lines to loosen and knots to slip during transit. Please
ensure that you cinch any knots up tightly and check that the depower rope termination knot, inside the chickenloop, is
tight and has sufficient spare line exposed beneath the knot.
QR safety considerations:
Best Kiteboarding advises that riders always use a secondary safety attachment to their kites, in addition to being hooked
into the chickenloop via the spreader-bar hook. The handlepass/bypass leash is provided for this purpose. Activating the
'Big Black ' chickenloop QR mechanism when not using a safety leash will result in the rider becoming completely
disconnected from the kite.
Riders should note that completely releasing the kite should only be considered as an absolute last option, and should be
reserved only for situations where continuing to be connected to their kites puts themselves and others around them at
greater risk than having an out-of-control kite tumbling up the beach. You may lose your kite, but that is preferable to
possible permanent injury.
8
Discussion of leash attachment points for riders of varying skill levels
_Beginner riders who require maximum emergency depower of their kites may prefer to use a different
leashing point than intermediate and advanced riders. For beginner riders, we recommend connecting the
handlepass/bypass leash to the front of your harness and to one of the front line OSR handles.
Before connecting your leash to an OSR handle you must detach the handle from its Velcro retaining tab.
The handle must hang down from the flying line freely and under its own weight. Your safety leash may
not function correctly if the OSR handle remains connected to the Velcro tab. The safety leash must be
clipped directly into the webbing loop and never clipped into the steel ring attached to the
webbing loop.
When connecting to a front line OSR handle your leash should pass from the front of your harness,
behind the bar and trim strap and then clip into the webbing loop on one of the OSR handles.
We do not recommend leashing to a rear line OSR handle. These are only intended as an emergency measure should you
ever snap a front line or be unable to untangle a front line twist.
_Intermediate and advanced riders who value steering control and easy relaunchability over the ability
to completely 'flag' their kites via their safety leashes should clip their bypass/handlepass leashes into the
leash attachment ring positioned in the center of the chickenloop.
This position allows the rider to regain maximum control of their kite at all times while allowing them to
shed 80% of the kite's power in an emergency by unhooking and dropping the bar or by firing off the Big
Black QR. Dropping the bar activates the dual-depower line function.
Handlepass/Bypass Leash Use and Assembly:
The component parts of the handlepass/bypass leash QR are detailed
in the image left. Before using your bar for the first time, please take
the time to familiarize yourself with these parts and the safe activation
and reassembly of the QR collar.
Always check the safe function of your leash QR before using it on the
water. Failure to check your safety equipment could result in injury to
yourself or others around you.
Activation of the Leash QR:
Sliding the red plastic QR collar away from the karabiner will activate the internal QR mechanism. This
action will completely separate you from your kite if you are already unhooked from the chickenloop.
Only consider this as a last course of action in situations where remaining attached to your kite is likely to
be more dangerous to yourself and bystanders than releasing the kite completely.
Handlepass/Bypass Leash QR Reassembly:
When activated, the QR mechanism splits into two separate parts. These are shown in detail on the
previous page. To refit the QR, slide the tip of either side of the ‘flip/flop pin’ through the ‘grey rope loop’
and then flip the pin over by ninety degrees to catch the loop.
Gently slide the QR collar upwards and over the tip of the ‘flip/flop pin’, then push the QR collar home
until it rests snugly against the ‘tension adjuster’ as shown in the previous image above.
Warning: do not modify the QR mechanism with the addition of any materials or modification of any components as this
will reduce the functionality of the system and may put the rider at increased risk.
9
Self launching and self landing:
For a detailed discussion of how to land and launch your kite, please refer to the product manual for each
individual kite as launching and landing tips may vary with each different style of kite.
Where do I go for extra information?
Your local Best Kiteboarding retailer has been trained in all aspects of the products they sell and can help
you with any queries you may have regarding all Best Kiteboarding products. You may also contact Best
Kiteboarding customer support via our website. For any general questions about using Best Kiteboarding
products, or to chat with other kitesurfers and to find out all the latest info about everything Best
Kiteboarding, visit the website http://www.bestkiteboarding.com or log onto the online user forums at
http://forum.bestkiteboarding.com
Request for additional information and updates to the product manuals should be sent to
[email protected]
10