1
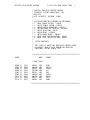
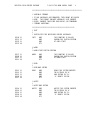
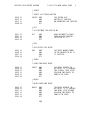
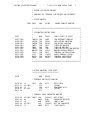
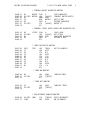
ATTENTION
Know Your Computer and Be Sure You Are Using the Correct Software
SWTPC has offered, or is now offering, three types of 6809
computers. In order to make SWTPC supplied software work correctly it is
necessary to recognize what type of computer you have. Below is a
description of each of the three types and some of the characteristics
of each. The nomenclature for the motherboard of each type of computer
is printed on the motherboard for easy identification.
/09
The /09 computer is any SWTPC 6809 computer which uses an MP-B or
MP-B2 motherboard.
This computer uses the single port MP-S serial
interface and the MP-L and MP-LA parallel interfaces. This computer can
have up to 56K of 4K, 8K, 16K and 32K memory boards. Its chassis RESET
button is on the right side of the front panel.
69A and 69K
The 69A and 69K computers use the MP-B3 motherboard. The 69A and
69K are identical except that the A is factory.assembled and the K is
the kit version. Each interface port in this type computer requires 16
addresses and uses the MP-S2 serial and MP-L2 parallel interface boards.
This computer can have up to 56K of 4K, 8K, 16K and 32K memory boards.
Its chassis RESET button is on the left side of the front panel.
S/09
The S/09 computer uses the MP-MB motherboard. Each interface port
in this computer requires 16 addresses and uses the MP-S2 serial and
MP-L2 parallel interfaces.
This computer also contains a standard
parallel output port and an integral interrupt timer on the MP-ID board.
The S/09 can use up to 384K of 128K memory array boards. Its chassis
RESET button is on the left side of the front panel.
Be Sure To Use The Correct Software
Although the /09, 69A, 69K and S/09 computers are all basically the
same, small differences in I/O port assignments, speed, features and
memory types dictate that certain programs, such as printer drivers,
function differently on the various models. After booting the system
diskette, FLEX will automatically configure the operating system as
completely as it can to certain initial values of speed, CPU type, etc.
A special utility (SBOX) has been supplied to examine and change the
initial values and computer type. After booting the supplied diskette,
this utility should be run to be sure that ALL of the displayed
characteristics match EXACTLY with the computer being used.
Any
necessary changes can be made using the SBOX utility. This will usually
be necessary only on 109 computers and 69A/69K computers operating at 2
MHZ.
SWTPC MODIFICATION--APPLICATION NOTICE
AN #113
Product: FLEX 2.6 DOS
Date: February 26, 1980
Configuring FLEX 2.6 for Computers with MP-B3 Motherboards
(69A, 69K computers, not S/09 Computers)
FLEX 2.6 may incorrectly auto configure on computers with MP-B3
motherboards by indicating the presence of an internal interval timer.
This can be checked by running the SBOX utility contained on the FLEX
2.6 disk. If the utility responds with:
-- Interval Timer = Yes
then the SBOX utility must be used to set the Interval Timer response to
NO. This must be done even if the system has an optional MP-T interrupt
timer plugged on to the system. The timer configurator of the SBOX
utility is concerned with the presence of the 6840 type timer which is
standard on S/09 computers rather than the optional MP-T timer board.
S/09 computers are the only ones at the time of this writing that should
respond with "Interval Timer = Yes" response.
To set the Interval Timer response to NO, enter the following:
SBOX,TIMER=NO
The SBOX command will change and confirm that the timer parameter
has been properly set.
+++SBOX
SWTPC Configurator -- Version 2.1
-- Memory Size = __K
-- I/O Port Size = 16
-- CPU Clock Rate = 1 MHz
-- Power Line Frequency = __Hz
-- Extended Addressing = No
-- Interval Timer = No
-- Real Time Clock = No
-- Upper Case Only = Yes
If the Interval Timer parameter is not properly set as outlined
above the P command and printer spooling will not function correctly.
- 1 -
General Notes
Technical Systems Consultants, Inc.
GENERAL NOTES
This section contains suggestions on getting FLEX™ 9.0 up on your system
and on compatibility with your existing hardware and software.
This
manual assumes you already have a working disk system and are familiar
with the basics of floppy disk systems such as proper disk handling
techniques, inserting and removing disks from the drives, etc.
One important point should be made in regard to getting FLEX "up and
running".
You receive only one disk and it is crucial that you protect
this disk with your life. If you take the following steps, you might
save yourself a lot of headaches and additional expense:
1) Write-protect the FLEX disk before you ever insert it into a drive.
Consult your disk system hardware manual or the FLEX User's Manual
for details on write-protecting a disk.
2) Boot up the FLEX system and once running copy all files from the
original FLEX disk to a new disk. Next perform a LINK command to
FLEX.SYS on this new disk.
3) Now remove the original FLEX disk and store it in a safe place. It
should never be used again unless you wipe out all the new FLEX
disks you make and need to repeat this procedure. Use the new FLEX
disk you have made for all future disk work.
FLEX™ is a trademark of Technical Systems Consultants, Inc.
-1-
FLEX General Notes
HARDWARE REQUIREMENTS
This section discusses the hardware requirements for running FLEX 9.0.
This version is setup for th6 Southwest Technical Products Corporation's
disk systems: the MF-68 or MF-69 5-inch minidiskette, the DMAF1 or DMAF2
8-inch diskette, and the CDS-1 Winchester disk unit.
Memory Requirements
The FLEX disk operating system itself resides in the range of $C000 to
$DFFF. This means you will need 8K of memory starting at $C000.
You
should be certain your particular system can accept memory in this
region.
You must also have "User Memory" (RAM) starting at location $0000 and
running continuously up from there. The more user memory you have in
your system the better off you will be. This is because you will be
able to run larger Programs and because software which works with files
that are larger than memory can hold (such as the editor or sort/merge)
will operate more efficiently and quickly.
Although FLEX resides at
$C000, certain of its commands utilize the lower end of this user RAM
space. A minimum of 12K of RAM is required for such purposes.
Monitor ROM
As sold, this version of FLEX requires the S-BUG monitor ROM from SWTPc
(or equivalent).
FLEX 9.0 has its own internal terminal I/O routines,
so S-BUG's are not used. These routines assume an ACIA at location
$E004. S-BUG is required, however, for setting up interrupt vectors.
There are two exceptions to this ROM requirement. The first is that the
interrupt vectors need not be set if no program will use interrupts.
Note that many programs such as printer spooling, the SWTPc Editors,
etc., do make use of interrupts. Thus if you did not require printer
spooling or editing you would not require any monitor ROM at all except
for booting the system up and to jump to when exiting FLEX. The second
exception is to make use of the user adaptable version of FLEX which is
supplied on disk along with the standard version. See 'Adapting FLEX to
Custom Monitors' for details.
Printer Spooling
FLEX 9.0 Version 2.6 supports printer spooling which allows you to list
a file (or files) on a line printer at the same time as you perform
other FLEX operations such as editing, assembling, running BASIC, etc.
In order to do this, FLEX requires an S/09 computer system, or an MP-T
interrupt timer board on I/O port #5 for /09, 69/A and 69/K computer
systems.
-2-
FLEX General Notes
DISK COMPATIBILITY
Disks created under 6809 FLEX 9.0 are compatible with those created
under 6800 FLEX 1.0 on the 8" drives or 6800 FLEX 2.0 on the 5" drives.
The reverse is also true, meaning that FLEX 9.0 can read disks created
by one of those 6800 FLEX systems. This means
that transferring text
files will require nothing more than copying with the COPY command. In
fact it is not even necessary to put the files on a new disk.
As long
as a disk is being used for work files only (no disk command files) it
may be used interchangeably.
The one place where the disks are different is in the bootstrap loader
which the NEWDISK command places on track 0 when a disk is initialized.
Obviously the loader must be different for 6800 and 68C9. This simply
means that a disk initialized with the 6809 NEWDISK command cannot be
used to boot 6800 FLEX and vice versa.
The new double-density system is an exception to all the above.
It
cannot be used to read disks created by the original 6800 single-density
svstem. Any disks, however, created as single-density with the new
double-density version of NEWDISK (done by answering 'N' to the prompt
'Double-Sided Disk?') can be read on either a single or double density
system. This is because the new double-density NEWDISK writes FF's in
certain gap areas whereas the old single-density NEWDISK wrote 00's.
The single-density controller board (which uses the Western Digital
1771) can read either type, but the double-density board (which uses the
Western Digital 1791) can only read the type with FF's.
SOFTWARE COMPATIBILITY
6809 object code is NOT at all compatible with 6800 object code. This
means you cannot run binary command files from a 6800 system on a 6809
system. Since 6809 FLEX can read a 6800 FLEX disk and vice versa you
must be careful not to execute a 6800 command in a 6809 system and
again, vice versa.
Where the 6809 and 6800 ARE compatible is in the source code. Thus, if
you have the source listing for a 6800 program on disk, it can be
reassembled by the 6809 assembler to produce executable 6809 object
code. Of course if the program calls any routines from FLEX, these
addresses will have to be changed since 6809 FLEX resides at $C000 (6800
FLEX is at $A000).
This is usually a matter of simply changing all
occurrences of '$A' to '$C' and all '$B' to '$D' with the editor.
-3-
FLEX General Notes
ADAPTING FLEX
The FLEX 9.0 disk supplied has two copies of the FLEX object code.
One
is called FLEX.SYS and is ready to boot up with SWTPc disk hardware.
The second is called FLEX.COR which represents the CORe or main body of
FLEX.
It differs from the bootable form of FLEX in that it does not
have any terminal or disk I/O routines built in. This allows the user
to modify these I/O drivers, if desired, to produce a customized version
of FLEX. Note that in order to produce this customized version you must
have FLEX up and running so you will need the bootable version
(FLEX.SYS). The customized terminal and disk I/O routines are supplied
in two packages. We will discuss them separately and then examine how
to add them onto FLEX.COR to produce a new, customized, bootable version
of FLEX.
The CUSTOM I/O DRIVER PACKAGE
This package allows the user to alter the functioning of the terminal
I/O and the functioning of printer spooling.
Nine routines and two
interrupt vectors are set up in this package. There is a space reserved
for these routines beginning at location $D370 and ending at $D3E6. The
address of these 11 items must be setup in a jump table found at
locations $D3E7 thru $D3FB. A copy of the Custom I/O Driver Package
used to produce FLEX.SYS is included at the end of the General Notes
section. Use it as a guide for writing your own.
A description of each routine and vector follows.
INCH
The address of the input character routine should be placed at $D3FB.
This routine should get one input character from the terminal and return
it in 'A' with the parity bit cleared.
It should also echo the
character to the output device. Only 'A' and the condition codes may be
modified.
OUTCH
The address of the output character should be placed at $D3F9. This
routine should output the character found in 'A' to the output device.
No registers should be modified except condition codes.
STAT
The address of the STAT routine should be placed at $D3F7. This routine
checks the status of the input device. That is to say, it checks to see
if a character has been typed on the keyboard. If so, a Not-Equal
condition should be returned. If no character has been typed, an Equal
to zero condition should be returned. No registers may be modified
except condition codes.
TINIT
The address of the terminal initialization routine should be placed at
$D3F5. This routine performs any necessary initialization for terminal
I/O to take place. Any register may be modified except 'S'.
-4-
FLEX General Notes
MONITR
This is the address to which execution will transfer when FLEX is
exited. It is generailly the reentry point of the system's monitor ROM
The address should be placed at $D3F3.
TMINT
The address of the timer initialization routine should be placed at
$D3F1. This routine performs any necessary initialization for the
interrupt timer used by the printer spooling process. Any register may
be modified except 'S'.
TMON
The address of the timer on routine should be placed at $D3EF. This
routines "turns the timer on" or in other words starts the interval IRQ
interrupts. Any registers execpt 'S' may be modified.
TMOFF
The address of the timer off routine should be placed at $D3ED. This
routine "turns the timer off" or in other words stops the interval IRQ
interrupts. Any registers except 'S' may be modified.
IRQVEC
The IRQ vector is an address of a two byte location in RAM where FLEX
can stuff the address of its IRQ interrupt handler routine.
In other
words, when an IRQ interrupt occurs control should be transferred to the
address stored at the location specified by the IRQ vector.
This IRQ
vector location (address) should be placed at $D3EB.
SWIVEC
The SWI3 vector is an address of a two byte location in RAM where FLEX
can stuff the address of its SWI3 interrupt handler routine. In other
words, when an SWI3 interrupt occurs control should be transferred to
the address stored at the location specified by the SWI3
vector. This
SWI3 vector location (address) should be placed at $D3E9.
IHNDLR
The Interrupt Handler routine is the one which will be executed when an
IRQ interrupt occurs. If using printer spooling, the routine should
first clear the interrupt condtion and then jump to the 'change process'
routine of the printer spooler at $C700. If not using printer spooling.
this routine can be setup to do whatever the user desires. If it is
desirable to do both printer spooling and have IRQ's from another device
(besides the spooler clock), this routine would have to determine which
device had caused the interrupt and handle it accordingly. The address
of this routine should be placed at $D3E7.
-5-
FLEX General Notes
The CUSTOM DISK DRIVER PACKAGE
This package supplies all the disk functions required by FLEX.
are eight routines in all:
READ
WRITE
VERIFY
RESTORE
DRIVE
CHECK
QUICK
INIT
WARM
There
Reads a single sector
Writes a single sector
Verifys a single sector
Restores the head to track 0
Selects the desired drive
Checks a drive for a ready condition
Same as CHECK but with no delay
Initializes any necessary values
Does any Warm Start initialization
These routines and what is required of them are decribed in the Advanced
Programmer's Guide in the section titled 'DISK DRIVERS'. There is a
jump table which contains the address of all these routines at $DE00.
This table is as follows:
DE00
DE03
DE06
DE09
DE0C
DE0F
DE12
DE15
DE18
JMP
JMP
JMP
JMP
JMP
JMP
JMP
JMP
JMP
READ
WRITE
VERIFY
RESTOR
DRIVE
CHECK
QUICK
INIT
WARM
Immediately following this jump table there is a space for the disk
driver routines. In the general case this space would start at $DE1B
and run through $DFFF. In the SWTPc system with S-BUG installed, that
entire space is not available due to the fact that S-BUG uses RAM in the
area of $DFA0 to $DFFF for variables and stack. Thus the driver routine
area is limited in this case to $DE18 through $DF9F.
The actual source listings for the SWTPc drivers are not included, but a
skeletal Custom Disk Driver Package is included at the end of this
section which should assist you in writing your own package.
PUTTING THE CUSTOM FLEX TOGETHER
Once you have written and assembled a Custom I/O and Custom Disk Driver
packages, you are ready to append them to the core of FLEX (FLEX.COR) to
produce a new, bootable version. This is done with the APPEND utility
if FLEX, but before we get into that there is a very important point
which must be covered.
*** IMPORTANT ***
-6-
FLEX General Notes
The copy of FLEX on disk is much like any other standard binary file.
IT MUST HAVE A TRANSFER ADDRESS IN ORDER TO WORK! It is also important
to note that unlike other binary files FLEX can have ONLY ONE transfer
address and it MUST BE THE LAST THING IN THE FILE! The simplest way of
getting that transfer address into the file is by use of the END
statement in the assembler. We recommend you put a transfer address on
the END statement of the Custom I/O Driver Package and make sure it is
the last thing in the final FLEX file.
Assuming you have put a transfer address
Package with an end statement of the form:
on the Custom I/O Driver
END $CD00
You can now create a new version of FLEX by appending the custom disk
drivers and custom I/O drivers onto FLEX.COR. You should use the APPEND
command for this purpose as shown:
+++APPEND FLEX.COR DRVRS.BIN CUSTOMIO.BIN NEWFLEX.SYS
This command assumes the object file you created for the Custom Disk
Drivers is called DRVRS.BIN and the Custom I/O Drivers are in a file
called CUSTOMIO.BIN.
The new, custom version of FLEX is called
NEWFLEX.SYS. In order to boot up this NEWFLEX.SYS you must link it with
the LINK command (see the FLEX User's and Advanced Progammer's Manuals).
The command would be of the form:
+++LINK NEWFLEX.SYS
The disk containing your newly made and linked FLEX can now be booted
with the normal boot, procedure.
-7-
SKELETAL DISK DRIVER PACKAGE
7-18-79 TXC 6809 XASMB
*
*
*
*
*
SKELETAL 6809 DISK DRIVER PACKAGE
TECHNICAL SYSTEMS CONSULTANTS, INC.
BOX 2574
WEST LAFAYETTE, INDIANA 47906
*
*
*
*
*
*
*
*
*
*
*
*
*
*
*
*
*
THE
1.
2.
3.
4.
5.
6.
7.
8.
9.
PAGE
1
DRIVER ROUTINES PERFORM THE FOLLOWING
READ SINGLE SECTOR - DREAD
WRITE SINGLE SECTOR - DWRITE
VERIFY WRITE OPERATION - VERIFY
RESTORE HEAD TO TRACK 00 - RESTORE
DRIVE SELECTION - DRIVE
CHECK READY - DCHECK
QUICK CHECK READY - DQUICK
COLD START INITIALIZATION - DINIT
WARM START INITIALIZATION - DWARM
SYSTEM CONSTANTS
THIS SPACE IS WHERE ANY NECESSARY EQUATES MIGHT
BE PLACED, SUCH AS DISK CONTROLLER REGISTER
LOCATIONS, SECT0R LENGTH, ETC.
******************************************************
DE00
ORG
$DE00
* JUMP TABLE
DE00
DE03
DE06
DE09
DE0C
DE0F
DE12
DE15
DE18
7E
7E
7E
7E
7E
7E
7E
7E
7E
DE23
DE28
DE2D
DE31
DE35
DE39
DE3F
DE1B
DE1F
DREAD
DWRITE
DVERFY
RESTOR
DRIVE
DCHECK
DQUICK
DINIT
DWARM
JMP
JMP
JMP
JMP
JMP
JMP
JMP
JMP
JMP
READ
WRITE
VERIFY
RST
DRV
CHECK
QUICK
INIT
WARM
*******************************************************
SKELETAL DISK DRIVER PACKAGE
7-18-79 TXC 6809 XASMB
PAGE
2
********************************************************
* VARIABLE STORAGE
*
*
*
*
IF ANY VARIABLES ARE REQUIRED, THEY MIGHT BE PLACED
HERE. THIS MIGHT INCLUDE VARIABLES LIKE CURRENT
DRIVE, CURRENT TRACK FOR EACH DRIVE, OR TEMPORARY
STORAGE LOCATIONS.
************************************************
* INIT
*
* INITIALIZES THE NECESSARY DRIVER VARIABLES.
DE1B
DE1C
DE1D
DE1E
12
12
12
39
INIT
NOP
NOP
NOP
RTS
THIS ROUTINE IS CALLED
DURING FMS INITIALIZATION
AT COLD START
* WARM
*
* WARM START INITIALIZATION
DE1F
DE20
DE21
DE22
12
12
12
39
WARM
NOP
NOP
NOP
RTS
THIS ROUTINE IS CALLED
DURING FMS INITIALIZATION
AT WARM START
* READ
*
* READ ONE SECTOR
DE23
DE24
DE25
DE26
DE27
12
12
12
12
39
READ
NOP
NOP
NOP
NOP
RTS
READS THE SECTOR POINTED
TO BY TRACK IN 'A'
AND SECTOR IN 'B'.
'X' POINTS TO FCB.
* WRITE
*
* WRITE ONE SECTOR
DE28
DE29
DE2A
DE2B
DE2C
12
12
12
12
39
WRITE
NOP
NOP
NOP
NOP
RTS
WRITES THE SECTOR POINTED
TO BY TRACK IN 'A'
AND SECTOR IN 'B'.
'X' POINTS TO FCB.
SKELETAL DISK DRIVER PACKAGE
7-18-79 TSC 6809 XASMB
PAGE
3
* VERIFY
*
* VERIFY LAST TRACK WRITTEN
DE2D
DE2E
DE2F
DE30
12
12
12
39
VERIFY
NOP
NOP
NOP
RTS
THE SECTOR JUST
WRITTEN IS VERIFIED.
NO PARAMETERS ARE SUPPLIED.
* RST
*
* RST RESTORES THE HEAD TO 00
DE31
DE32
DE33
DE34
12
12
12
39
RST
NOP
NOP
NOP
RTS
HEAD RESTORED TO TRACK
ZERO ON DRIVE POINTED
TO BY FCB AT 'X'.
* DRV
*
* DRV SELECTS THE DRIVE.
DE35
DE36
DE37
DE38
12
12
12
39
DRV
NOP
NOP
NOP
RTS
THE DRIVE NUMBER FOUND
IN FCB POINTED TO BY 'X'
IS SELECTED.
* CHECK
*
* CHECK FOR DRIVE READY
DE39
DE3A
DE3B
DE3C
DE3D
DE3E
12
12
12
12
12
39
CHECK
NOP
NOP
NOP
NOP
NOP
RTS
THE DRIVE POINTED TO
BY FCB AT 'X' IS CHECKED
FOR A READY STATE AFTER
DELAYING FOR DRIVES TO
COME UP TO SPEED.
* QUICK
*
* QUICK CHECK FOR READY
DE3F
DE40
DE41
DE42
DE43
DE44
12
12
12
12
12
39
QUICK
NOP
NOP
NOP
NOP
NOP
RTS
END
THE DRIVE POINTED TO
BY FCB AT 'X' IS CHECKED
FOR READY STATE WITHOUT
DELAYING FOR DRIVES TO
COME UP TO SPEED.
CUSTOM I/O DRIVER PACKAGE
7-18-79 TSC 6809 XASMB
PAGE
1
* CUSTOM I/O DRIVER PACKAGE
*
* CONTAINS ALL TERMINAL I/O DRIVERS AND INTERRUPT
*
* SYSTEM EQUATES
C700
EQU
$C700
CHANGE PROCESS ROUTINE
*******************************************************
*
*
* I/O ROUTINE VECTOR TABLE
*
*
*
ORG
$D3E7
TABLE STARTS AT $D3E7
*
*
*
IHNDLR FDB
IHND
IRQ INTERRUPT HANDLER
*
SWIVEC FDB
$DFC2
SWI3 VECTOR LOCATION
*
IRQVEC FDB
$DFC8
IRQ VECTOR LOCATION
*
TMOFF FDB
TOFF
TIMER OFF ROUTINE
*
TMON
FDB
TON
TIMER ON ROUTINE
*
TMINT FDB
TINT
TIMER INITIALIZATION ROUTINE *
MONITR FDB
$F814
MONITOR RETURN ADDRESS
*
TINIT FDB
INIT
TERMINAL INITIALIZATION
*
STAT
FDB
STATUS
CHECK TERMINAL STATUS
*
OUTCH FDB
OUTPUT
TERMINAL CHAR OUTPUT
*
INCH
FDB
INPUT
TERMINAL CHAR INPUT
*
*
*
*******************************************************
D3E7
DEE7
D3E9
D3EB
D3ED
D3EF
D3F1
D3F3
D3F5
DEF7
DEF9
D3FB
CHPR
D3CB
DFC2
DFC8
D3C4
D3BD
D3A7
F814
D370
D39C
D38B
D37D
* ACTUAL ROUTINES START HERE
******************************
D370
ORG
$D370
* TERMINAL INITIALIZE ROUTINE
D370
D372
D376
D378
D37C
86
A7
86
A7
39
13
9F D3E5
11
9F D3E5
INIT
LDA
STA
LDA
STA
RTS
#$13
#$11
RESET ACIA
[ACIAC]
CONFIGURE ACIA
[ACIAC]
* TERMINAL INPUT CHARACTER ROUTINE
D37D
D381
D383
D385
D389
A6
84
27
A6
84
9F D3E5
01
F8
9F D3E3
7F
INPUT
LDA
ANDA
BEQ
LDA
ANDA
[ACIAC]
#$01
INPUT
[ACIAD]
#$7F
GET STATUS
CHARACTER PRESENT?
LOOP IF NOT
GET THE CHARACTER
STRIP PARITY
CUSTOM I/O DRIVER PACKAGE
7-18-79 TSC 6809 XASMB
PAGE
* TERMINAL OUTPUT CHARACTER ROUTINE
2
D38B
D38D
D391
D393
D395
D397
D39B
34
A6
84
27
35
A7
39
02
9F D3E5
02
F8
02
9F D3E3
OUTPUT
OUTPU2
PSHS
LDA
ANDA
BEQ
PULS
STA
RTS
A
[ACIAC]
#$02
OUTPU2
A
[ACIAD]
SAVE CHARACTER
TRANSMIT BUFFER EMPTY?
WAIT IF NOT
RESTORE CHARACTER
OUTPUT IT
* TERMINAL STATUS CHECK (CHECK FOR CHARACTER HIT)
D39C
D39E
D3A2
D3A4
D3A6
34
A6
84
35
39
02
9F D3E5
01
02
STATUS
PSHS
LDA
ANDA
PULS
RTS
A
[ACIAC]
#$01
A
SAVE A REG.
GET STATUS
CHECK FOR CHARACTER
RESTORE A REG.
* TIMER INITIALIZE ROUTINE
D3A7
D3AA
D3AC
D3AE
D3B0
D3B2
D3B4
D3B6
D3B8
D3BA
D3BC
BE
86
A7
86
A7
86
A7
A6
86
A7
39
D3E1
FF
84
3C
01
8F
84
84
3D
01
TINT
LDX
LDA
STA
LDA
STA
LDA
STA
LDA
LDA
STA
RTS
TMP1A
#$FF
0,X
#$3C
1,X
#$8F
0,X
0,X
#$3D
1,X
GET PIA ADDRESS
* TIMER ON ROUTINE
D3BD 86
D3BF A7
D3C3 39
04
9F D3E1
LDA
STA
RTS
#$04
[TMPIA]
TURN ON TIMER
* TIMER OFF ROUTINE
D3C4 86
D3C6 A7
D3CA 39
8F
9F D3E1
LDA
STA
RTS
#$8F
[TMPIA]
TURN OFF TIMER
* IRQ INTERRUPT HANDLER ROUTINE
D3CB A6
D3CF 7E
9F D3E1
C700
IHND
STA
JMP
[TMPIA]
CHPR
RESET INTERRUPTS
GO TO SPOOLER
CUSTOM I/O DRIVER PACKAGE
7-18-79 TSC 6809 XASMB
PAGE
* ACIA AND PIA ADDRESS FOR SUPPLIED ROUTINES
D3E1
D3E1 E012
D3E3 E005
D3E5 E004
TMPIA
ACIAD
ACIAC
ORG
$D3E1
FDB
FDB
FDB
$E012
$E005
$E004
TIMER PIA ADDRESS
ACIA DATA REG. ADR.
ACIA CONTROL REG. ADR.
* END STATEMENT HAS FLEX TRANSFER ADDRESS!
END
$CD00
3