1
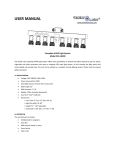
P a g e |1
Thank you for purchasing the Novopro RGBW LED SCRIM
This user manual will help you to understand the features and operations of the LED
curtain quickly and correctly, so please spend a few minutes to read through this
information.
Please ensure care is taken when folding, packing and unpacking the LED scrim to
avoid damaging the connections and components.
Due to continuous product developments, please check for the latest updated
version of this product manual at: www.novopro.co.uk
Image above shown fitted to the Novopro SDX booth
Manual V1.1
Straps
120CM
290CM
Please read the following Safety Notes as well as those in the User Manual carefully
before connecting, installing, operating or maintaining this product.
The contents of this Novopro RGBW LED Scrim package are:
1x LED Scrim
1x Controller
1x Power cable
2x Spare LED (RED)
2x Spare LED (GREEN)
2x Spare LED (BLUE)
2x Spare LED(WHITE)
1x Novopro carry bag
please ensure care is taken when folding/packing the LED scrim to avoid damaging the
connections and components.
. Safety Notes
1. After receiving the Novopro LED Scrim, please open the packing carton to check the
goods and all other accessories are consistent with the packing list and in good condition. If
anything is found to be missing or damaged by transportation, please contact your place of
purchase as soon as possible.
2. This LED Scrim is for indoor use only!
3. It should not be exposed to rain, moisture, water or any other liquids.
4. The Scrim should be kept away from sources of heat or ignition to protect against fire.
5. This item should be protected from shock, vibration, impact and dust in order to keep it in
good working condition. Also please take great care when folding/unfolding cloth so that no
undue strain is put on the internal wiring, this will ensure trouble free operation for the life of
the cloth.
6. LED Scrim controller must be installed in a location with adequate ventilation to prevent
overheating.
7. The connection, installation, operation and maintenance of LED Scrim should only be
attempted by competent person.
8. Make sure no ventilation slots in the controller are blocked.
9. Avoid walking on or pulling the LED Scrim with excessive force to keep the internal
cables & connections in order.
10. Electrical connection must be carried out by qualified person.
11. Make sure the voltage and frequency of the power supply match the power
requirements of this device.
12. Always connect this product to a grounded circuit to avoid the risk of electrocution.
13. Do not connect LED Scrim to any dimmer circuitry.
14. Make sure the power cord is not crimped or damaged.
15. Never pull out the plug by pulling or tugging on the cord.
16. Never operate this product with the covers removed.
17. Always disconnect this product from the power supply before cleaning or attempting
any maintenance work.
18. Never suspend this product on any moving apparatus and always use the
hanging/mounting straps supplied.
19. The maximum ambient temperature is 40℃, Do not operate this product at higher
temperatures.
20. In case of any serious operation problem, stop using this product immediately and
contact your place of purchase.
Warning:
Any damages caused by the non-observance of this manual or any unauthorised
modification to this product will not be covered by the warranty.
Important:
Please observe the wiring colour coding of your country if connecting this product to the
mains with anything other than the mains cable provided
Note: Make sure this product is connected to the earth properly.
. Advantages of the Novopro RGBW LED Scrim:
1.
2.
3.
4.
5.
SMD LEDs are small and bright.
They emit a pure colour and give long life.
Cloth material is soft, smooth, lightweight, flexible & can be folded.
The Fire retardant velvet material protects against fire.
Easy connection, installation and transportation.
1. Product Description
This Led Scrim is made with high brightness SMD LED’s and use fire retardant velvet cloth.
The controller has 17 patterns , and supports 8 channels of DMX.
The LED Scrim also comes equipped with a sound activation mode, and the ability to
choose and run your favourite program with a simple press of a button without the need for
a DMX-512 controller.
The cloth has 2 layers of smooth velvet sewn together with wool. There are many Velcro
straps fitted around the cloth using our industrial machines to enable it to be hung without
the risk of the material tearing – but care and attention must still be used!
Fitted with a standard UK mains plug, just connect to the mains, turn on the controller and
choose and run your favourite program.
2. Product Specification
Voltage: Input Voltage: AC90V-240V, 50/60Hz, 25W/150W, 3A/2A
Output Voltage: DC 12V/3A, DC12V/12.5A
Fuse: 2A
Power consumption: 30W~150W
Lamp: SMD LEDs
Life:50,000 hours
DMX channel: 8 ch
Digital Screen in the controller
Control system: DMX / Sound Active / Auto run
Number of programs: 17
Led colour: Red, Green, Blue,White
Cloth colour: Black
Overview (1) LED Scrim:
Note: Grommets have been replaced with high quality Velcro straps on recent models
Overview (2) Controller:
Digital Display
Down
UP
Enter
Fun
Power In
Switch
DMX In/Out
Curtain Input
Overview (3) Controller Description
Button
FUN
Function
Function or Menu
ENTER
Display menu or set the selected menu as the function you
need
UP
Scroll up the menu or increase the number value of the
function you selected
DOWN
Scroll down the menu or decrease the number value of the
function you selected
Overview (4) Menu Options
Menu
Function
)
PU--.
Program (01- 17
SP--.
Program speed ( 01 =fast through to 20 =slow )
Addr.
DMX Address
A001
DMX Address (001 - 512)
Sond.
Sound active
All.
All lights on
(5) Controller Operation
Installation:
(1) After receiving the new LED Scrim, unpack everything and check for any damage and
that all accessories are as per the packing list.
(2) Carefully unfold the LED Scrim.
(3) Hang the LED Scrim on the booth with Velcro straps along the top and down both sides.
(4) Connect all the electrical parts such as power cables and control leads as per diagram.
(1) Signal Cable Connection:
There is a Signal cable with a 5pin plug at the back of each curtain. Connect this Signal
cable to the controller and then lock the nut on the plug. If using several curtains then you
need to connect the controllers together using 3pin shielded DMX Signal Cable.
(2) Power Cable Connection:
Before connecting the controller to the mains please make sure the voltage supply is
AC90V-260V 50Hz-60Hz.
(3) Disassembly/packing into the bag:
(1) Turn off & disconnect power cable
(2) Disconnect signal cable
(3) Unfasten the Velcro straps around the LED Scrim
(4) Carefully fold the LED Scrim store away.
*IMPORTANT* please ensure care is taken when folding/packing the LED scrim to
avoid damaging the connections and components.
Ⅴ. Program List
1. Program List
Program List
Program NO.
RGB/W LED Scrim
Program 1
Colour chase
Program 2
All colour fade mode
Program 3
All colour flash mode
Program 4
Single colour strobe mode
Program 5
All on strobe mode
Program 6
Red On
Program 7
Green On
Program 8
Blue On
Program 9
White On
Program10
Red + Green On
Program11
Red + Blue On
Program12
Green + Blue On
Program13
Red + White On
Program14
Red strobe
Program15
Green strobe
Program16
Blue strobe
Program17
White strobe
Do note that speed [SP..] adjustment can be made when using the above programs,
SP01=fastest mode, SP20=slowest mode.
2. DMX Address Setting
DMX Address Setting
( Based on the controller with 16 channels )
No.
Address SET
No.
Address SET
1st
1
4th
49=1+48
2nd
17=1+16
5th
65=1+64
3rd
33=1+32
6th
81=1+80
3. DMX Channels Function
DMX Channels Function
Channel NO.
RGBW LED Scrim
Controller Data
CH 1
Dimmer
0~255 (dark~bright)
CH 2
Strobe
0~255 (slow~fast)
CH 3
Red dimmer
0~255
CH4
Green dimmer
0~255
CH 5
Blue dimmer
0~255
CH 6
Yellow dimmer
0~255
CH 7
Automatic program
0~255(P1-P17)
CH 8
Speed
0~255
. Replacement of the LED’s
1. Turn off the power supply
2. Disconnect the power cable and signal cable
3. Open the zipped fastener at the side of led curtain
4. Disconnect the wires between the LED’S
5. Take out the LED holder from the cloth observing the “+” & “-“ marks
6. Get the replacement PCB board with LED’s and connect to cloth observing correct
polarity (“+” & “-“)
7. Insert the lamp holder into the hole made on the cloth
8. Connect the power cable and signal cable and then turn on the power for testing
9. If the LED does not light then please double check all the connections
10. Close the zipped cloth again and all ready to go!
There are a full range of accessories and other related products available for the SDX booth,
please check out the Novopro website for more information.
All Novopro products are thoroughly QC checked prior to dispatch but should you have any
queries or questions then please contact your place of purchase or contact us at:
[email protected]
Novopro is a trade only supplier and only supply wholesale to trade resellers.
Novopro products are designed and engineered in the UK and manufactured in China.
• Email: [email protected] • Web: www.novopro.co.uk
Due to continuous product developments & improvements, specifications and appearance are subject to change.
© Copyright Novopro Ltd 2013. E&OE.