1
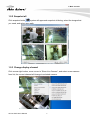
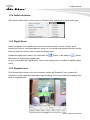
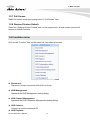
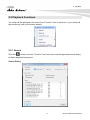
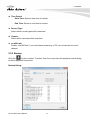
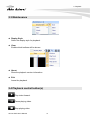
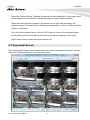
SecuGuard Mini
CMS
Central Monitoring System
for CoreNVR 9/16
User’s Manual
1
Table of Contents
Table of Contents
1.
Main Console ..............................................................................................................1
1.1 Screen Division .................................................................................................................2
1.2 NVR List .............................................................................................................................3
1.3 Group List...........................................................................................................................5
1.4 PTZ panel...........................................................................................................................6
1.5 Operation with sub-screen ..............................................................................................7
1.5.1 Switch display channel position in division sub screen ............................................ 7
1.5.2 Snapshot all .......................................................................................................................................... 8
1.5.3 Change display channel ............................................................................................................... 8
1.5.4 Switch divisions .................................................................................................................................. 9
1.5.5 Digital Zoom ......................................................................................................................................... 9
1.5.6 Snapshot one ...................................................................................................................................... 9
1.5.7 Full Screen .......................................................................................................................................... 10
1.5.8 Restore Division Default ............................................................................................................. 10
2.
1.6 Function menu.................................................................................................................10
1.7 Maintenance menu ......................................................................................................... 11
1.8 NVR Management Dialog..............................................................................................13
1.9 NVR Channel Management Dialog..............................................................................15
1.10 Group Management Dialog ...........................................................................................17
1.11 Group Channel Management Dialog ...........................................................................18
1.12 NVR Remote UI control Dialog.....................................................................................19
Playback ....................................................................................................................21
2.1 Screen Division ...............................................................................................................22
2.2 Playback Functions ........................................................................................................23
2.2.1 Search .................................................................................................................................................... 23
2.2.2 Backup ................................................................................................................................................... 24
2.2.3 Convert To AVI .................................................................................................................................. 25
2.2.4 Audio ....................................................................................................................................................... 26
2.2.5 Snapshot (Snapshot all) ............................................................................................................. 27
2.2.6 Information Setting ......................................................................................................................... 27
2.3
2.4
2.5
2.6
2.7
Maintenance ....................................................................................................................28
Playback control button(s).............................................................................................28
Operation with sub-screen ............................................................................................29
Motion Search .................................................................................................................31
Sequential Search ..........................................................................................................32
i
AirLive CMS User’s Manual
Table of Contents
2.7.1 Define search time period: ........................................................................................................... 33
2.7.2 Start search and rollback: ............................................................................................................. 34
2.7.3 Detail window for snapshots: ...................................................................................................... 34
2.7.4 Preview mode of search result:................................................................................................. 34
AirLive CMS User’s Manual
ii
1. Main Console
1
1. Main Console
This is the main control panel of CMS, to provide live stream preview, system setup,
playback, snapshot, and PTZ controls.
Please Switch control panel at here.
1
AirLive CMS User’s Manual
1. Main Console
1.1 Screen Division
You could switch screen division by these ways as below.
z Division Menu:
Click on “Division” on the menu bar, and select the new division that you need.
z Division Buttons:
Click on the division button to switch new division.
Single Channel
4 Division
6 Division
9 Division
16 Division
32 Division
64 Division
Full-Screen
z Popup Menu of sub-screen:
Click mouse right button on the sub-screen, and select a new division form the
“Division” sub-menu.
AirLive CMS User’s Manual
2
1. Main Console
1.2 NVR List
List NVR and their cameras, you could connect them or go to NVR setting page from here.
z Sort NVR List:
Click on the sort button, and select a sort rule form then menu.
z NVR Management:
Go to the “NVR Management” Setting page.
3
AirLive CMS User’s Manual
1. Main Console
z Sub Menu of NVR List:
z
Connect:
Connect to the selected NVR to preview live streaming.
z
Playback:
Bring the playback application up.
z
Remote UI Control:
Bring up the remote NVR’s UI control dialog.
z
Configuration Detail:
Bring up the IE browser to setting with NVR.
z
Sort NVR List:
Sort the NVR List by name or type and ID.
z
Management:
Go to the “NVR Management” Setting page.
z
Disconnect:
Disconnect between NVR.
AirLive CMS User’s Manual
4
1. Main Console
1.3 Group List
List Groups and their cameras, you could connect them or go to Group setting page from
here.
z Sort Group List:
Click on the sort button, and select a sort rule form then menu.
z Group Management:
Go to the “Group Management” Setting page.
z Sub Menu of Group List:
5
AirLive CMS User’s Manual
1. Main Console
z
Connect:
Connect to the selected Group to preview live streaming
z
Playback:
Bring the playback application up.
z
Sort Group List:
Sort the Group List by name or type and ID.
z
Management:
Go to the “Group Management” Setting page.
z
Disconnect:
Disconnect with Group.
1.4 PTZ panel
z Pan /Tilt:
Move PTZ camera direction by click direction buttons.
to make camera return home position.
Click
Move the thumb to left to make slower, move to right to make move faster.
AirLive CMS User’s Manual
6
1. Main Console
z Tour:
Select a tour setting from combo box, and click “go” button to start tour, click “Stop”
button to stop tour.
z Preset:
Select a preset position from combo box; camera will move to preset position after click.
z IRIS:
Adjust camera’s IRIS setting, or set it to auto.
z Focus:
Adjust camera’s focus setting, or set it to auto.
z Zoom:
Zoom-in or zoom-out focus camera.
z Pan:
Begin camera auto pan or stop.
1.5 Operation with sub-screen
Click mouse right button and select the operation from popup menu, some functions
have quick link button on main console, and you could call the functions from
buttons too.
1.5.1 Switch display channel position in division sub screen
In “Switch Window” status (
), you could hold mouse left button on a channel, and drag it
to another channel, these two channels will switch position each other.
7
AirLive CMS User’s Manual
1. Main Console
1.5.2 Snapshot all
Click snapshot button
, system will approach snapshot all dialog, select the images that
you need, and select save path.
1.5.3 Change display channel
Click mouse right button, move cursor to “Show Live Camera”, and select a new camera
form list, the current channel will change to selected camera.
AirLive CMS User’s Manual
8
1. Main Console
1.5.4 Switch divisions
Click mouse right button, move cursor to “Division” item, and select a new division type.
1.5.5 Digital Zoom
Switch to digital zoom enable status, and scroll mouse wheel in focus channel, scroll
forward for zoom-in, scroll backward for zoom-out, you could hold mouse left button on the
channel, and then move cursor to move the display area
Enable the digital zoom status, you could click on
button, it will switch to
button,
that means in digital zoom enable now.
Or you could select the “Digital zoom” item on the popup menu, to enable or disable digital
zoom.
1.5.6 Snapshot one
Click mouse right button on the focus channel, select the “Snapshot” item, system will
snapshot current image and approach snapshot dialog, you could modify the snapshot then
save to assigned path.
9
AirLive CMS User’s Manual
1. Main Console
1.5.7 Full Screen
Switch full screen mode from popup menu’s “Full Screen” item.
1.5.8 Restore Division Default
Select the “Restore Division Default” item on the popup menu, all sub screen channel will
restore to default channels.
1.6 Function menu
Click on the “Function” item on the menu bar, and select a function.
z Disconnect:
Disconnect current connection with NVR or Group.
z NVR Management:
Approach the NVR Management setting dialog.
z NVR Channel Management:
Approach the NVR’s channels Management setting dialog.
z NVR Connect:
Connect to current selected NVR.
z NVR Playback:
AirLive CMS User’s Manual
10
1. Main Console
Approach current selected NVR’s Playback.
z NVR Remote UI Control:
Approach the Remote UI Control dialog with current selected NVR.
z NVR Configuration detail:
Connect to NVR’s web service via IE browser.
z Group Management:
Approach the Group Management setting dialog.
z Group Channel Management:
Approach the Group’s channels Management setting dialog.
z Group Connect:
Connect to current selected Group.
z Group Playback:
Approach current selected Group’s Playback.
z User Management:
Approach the User Management setting dialog.
1.7 Maintenance menu
z Login / Logout:
Login the system or Logout with current login user.
z Options:
- Language: Switch current displayed language from list.
11
AirLive CMS User’s Manual
1. Main Console
-
System Backup: Backup CMS setting files to assigned path.
-
System Restore: Restore backup setting file from assigned path.
z Display Style:
Switch current display style from list.
z View:
Select which toolbar items will show or hide.
z About:
Show the CMS’s “About” information.
z Exit:
Leave the CMS.
AirLive CMS User’s Manual
12
1. Main Console
1.8 NVR Management Dialog
Management NVR’s setting at here.
z Search:
Key in the search filters to “ID”, “Name”, and “IP” fields, then click the “Search” button,
system will display the search result in “NVR List” table.
If you have many NVR, maybe you should set filter to find out the NVR that you need to
management.
If you search without and filter rule, system will show all NVR from database.
13
AirLive CMS User’s Manual
1. Main Console
z NVR List:
Display search result with filter, select a NVR from list to modify NVR’s settings.
-
Select all: Click “Select All” button will select all NVR in the list.
-
Unselect all: Cancel all selected NVR in the list.
-
Delete: Click “Delete” button will remove all selected NVR from database.
z Configuration:
-
ID: Key in NVR’s ID, or click on “Auto Generate” button to get a random ID.
-
Name: Key-in the NVR’s Name.
-
UID: The User ID for login NVR.
-
PWD: Key-in the password to login NVR, if you need confirm password by current
string, you could check the “Show” check box.
-
IP: Key-in the NVR’s IP address.
-
HTTP Port: Key-in the NVR’s HTTP port number, default is 80.
-
RTSP Port: Key-in the NVR’s RTSP port number, default is 554.
-
Playback Port: Key-in the NVR’s Playback port number; only SecuGuard need set
this port, default is 8866.
-
Connect Type: Select a connection type form the combo box.
-
NVR Type: Select the NVR type from the combo box.
-
Remark: Key-in the remark about this NVR.
-
Add button: After key-in all NVR’s information, click “Add” button to add to
database, the NVR ID must be exclusive.
AirLive CMS User’s Manual
14
1. Main Console
-
Update Button: After modify selected NVR’s information, click “Update” button to
save new setting to database.
-
Camera Button: Approach NVR Channel Management Dialog.
1.9 NVR Channel Management Dialog
z Camera List:
-
Synchronization Button: Synchronize the camera setting between CMS and
NVR.
-
Channel List table: List all cameras of current NVR.
-
Select All Button: Select all cameras in the list.
-
Unselect All Button: Unselect all cameras in the list.
-
Delete Button: Delete all selected camera in the list.
15
AirLive CMS User’s Manual
1. Main Console
z Setting:
- ID: Display NVR’s ID.
-
Name: Display NVR’s Name.
-
Camera: Set the camera’s number of NVR.
-
Camera Name: Set the Camera’s name.
-
Camera Type: Select the camera’s type from combo box, the different camera type
will display different icon in main console.
-
Model Name: Set the camera’s model name.
-
Enable Status: Enable or disable this camera, CMS will connect the camera if is
enabled, otherwise not.
-
Low Bit-rate: Enable “Low bit-rate” will get smaller streaming data, otherwise not.
You should enable it for get better performance.
-
Remark: Set the camera’s description.
-
Add Button: After key-in all cameras’ setting, click the Add button to add it to
database.
-
Update Button: After modify the setting of current camera, click the “Update”
button to save to database.
AirLive CMS User’s Manual
16
1. Main Console
1.10 Group Management Dialog
Management Group’s setting at here.
z Search:
Key in the search filters to “ID”, “Name” fields, then click the “Search” button, system will
display the search result in “Group List” table.
If you have many groups, maybe you should set filter to find out the Group that you need
to management.
If you search without and filter rule, system will show all Group from database.
z Group List:
Display search result with filter, select a Group from list to modify Group’s settings.
-
Select all: Click “Select All” button will select all Groups in the list.
Unselect all: Cancel all selected Groups in the list.
Delete: Click “Delete” button will remove all selected Groups from database.
17
AirLive CMS User’s Manual
1. Main Console
z Configuration:
-
ID: Key in NVR’s ID, or click on “Auto Generate” button to get a random ID.
-
Name: Key-in the NVR’s Name.
-
Remark: Set the Group’s description.
1.11 Group Channel Management Dialog
z Camera List:
-
Channel List table: List all cameras of current Group.
-
Select All Button: Select all cameras in the list.
-
Unselect Al
-
l Button: Unselect all cameras in the list.
-
Delete Button: Delete all selected camera in the list.
AirLive CMS User’s Manual
18
1. Main Console
z Setting:
-
ID: Display Group’s ID.
-
Name: Display Group’s Name.
-
NVR ID: Click the “…” button to select a exist NVR, and the selected NVR ID will
display in this filed.
-
Camera: Click the “…” button to select an existed NVR’s camera, and the selected
camera number will display in this filed.
-
Remark: Set the camera’s description.
-
Add Button: After key-in all settings, click the Add button to add it to database.
-
Update Button: After modify the setting of current camera, click the “Update”
button to save to database.
1.12 NVR Remote UI control Dialog
You could configure NVR’s display UI at CMS, to be like a TV wall function.
z Division:
Switch NVR’s division by click the “1”,”4”,”9”,”16” button.
19
AirLive CMS User’s Manual
1. Main Console
z Full Screen:
Enable full screen by check the “Full Screen” check box.
z UI Style:
Select a UI style form the “UI Style” combo box.
z Camera:
1. Click on the division widow to select a focus channel.
2. Select a new camera number from “Camera” combo box.
3. The focus channel’s camera number will become the selected number.
z Restore Division Default button:
Reset the division windows to default camera number.
z Submit button:
After you finish UI setting, click the “Submit” button to submit setting to the NVR, NVR
will change style soon.
AirLive CMS User’s Manual
20
2. Playback
2
2. Playback
Playback is providing history record file(s)’s search, playback, and convert file format,
backup period time functions.
z NVR Playback:
Select “NVR playback” from menu bar, or click right button on NVR and select
“Playback” from popup menu.
If you are select NVR playback from menu bar, you should select a NVR to playback
from search NVR dialog.
z Group Playback:
Select “Group playback” from menu bar, or click right button on Group and select
“Playback” from popup menu.
If you are select Group playback from menu bar, you should select a Group to playback
from search Group dialog.
21
AirLive CMS User’s Manual
2. Playback
2.1 Screen Division
You could switch screen division by these ways as below.
z Division Menu:
Click on “Division” on the menu bar, and select the new division that you need.
z Division Buttons:
Click on the division button to switch new division.
Division 1 button.
Division 4 button.
Division 6 button.
Division 9 button.
Division 16 button.
Division 32 button.
Division 64 button.
Full-Screen button.
z Popup Menu of sub-screen:
Click mouse right button on the sub-screen, and select a new division form the
“Division” sub-menu.
AirLive CMS User’s Manual
22
2. Playback
2.2 Playback Functions
You could call the playback’s functions from “Function” item of menu bar, or you could call
the function by click on the button directly.
2.2.1 Search
Click the
button or select “Function” item from menu bar will approach search dialog
to define playback time period.
Search Dialog
23
AirLive CMS User’s Manual
2. Playback
z Time Period:
- Start Time: Select a start time for search.
-
End Time: Select an end time for search.
z Record Type:
Select which record types will be searched.
z Camera:
Select which cameras will be searched.
z Low Bit rate:
Enable “Low Bit Rate” if you need faster streaming, or PC can not decode too much
channel.
2.2.2 Backup
Click the
button or select “Function” item from menu bar will approach search dialog
to define playback time period.
Backup Dialog:
AirLive CMS User’s Manual
24
2. Playback
z Time Period:
- Start Time: Select a start time for Backup.
-
End Time: Select an end time for Backup.
z Record Type:
Select which record types will be Backup.
z Camera:
Select which cameras will be Backup.
z Save To:
Select a path for output backup files.
2.2.3 Convert To AVI
Click the
button or select “Function” item from menu bar will approach search dialog
to define playback time period.
Convert Dialog:
25
AirLive CMS User’s Manual
2. Playback
z Time Period:
- Start Time: Select a start time for Convert.
-
End Time: Select an end time for Convert.
z Record Type:
Select which record types will be Convert to AVI.
z Camera:
Select which cameras will be Convert to AVI.
z Save To:
Select a path for output Converted files.
2.2.4 Audio
Click
button, or select “Audio” item from menu bar, and select audio mode from the
sub menu.
z Mute:
Mute the audio output.
z Live Audio:
Play the live audio, not the playback audio.
z Playback Audio:
Play the current playback audio.
AirLive CMS User’s Manual
26
2. Playback
2.2.5 Snapshot (Snapshot all)
Click
button or select “Snapshot” item from menu bar, system will snapshot all
channels, and show them on the snapshot dialog.
Check the picture’s check box that you need, and select a path to save these images.
You could save these pictures to Jpeg or bitmap format.
2.2.6 Information Setting
Setting for the information on the playback channel, enable the item means it will show on
the channel when playback.
You could click
button to get “Information Setting” menu too.
27
AirLive CMS User’s Manual
2. Playback
2.3 Maintenance
z Display Style:
Select the display style for playback.
z View:
Enable which toolbars will be shown.
z About:
Show the playback version information.
z Exit:
Leave the playback.
2.4 Playback control button(s)
Play video forward.
Pause playing video.
Stop playing video.
AirLive CMS User’s Manual
28
2. Playback
Play video backward.
Seek to previous frame when on pause mode.
Seek to next frame when on pause mode.
Change playback speed.
You could move the slider bar thumb at below to change current playback time.
2.5 Operation with sub-screen
Click the mouse right button on the sub-screen, and then you could select these items to
operate sub-screen.
z Show Playback Camera:
Change current channel to another camera.
29
AirLive CMS User’s Manual
2. Playback
z Division:
Switch sub-screen division mode.
z Remove Camera Display:
Remove current channel from playback list.
z Digital zoom:
Enable or disable digital zoom mode.
z Snapshot:
Snapshot current channel, and you could modify the snapshot picture from snapshot
dialog.
z Full Screen:
Switch to Full screen or normal mode.
z Restore Division Default:
Reset all channel in division to default camera.
z Motion Search:
Approach the motion search dialog. Please refer to the “Motion Search” chapter
z Sequential Search:
Approach the Sequential search dialog. Please refer to the “Sequential Search” chapter
AirLive CMS User’s Manual
30
2. Playback
2.6 Motion Search
Click mouse right button on the channel which you want to do motion search, and then
select the “Motion Search” from the popup menu.
z Define motion search area:
- Add: Click the “Add” button then drag a rectangle area where you want to check.
The search area will overlay a transparent red mask.
-
Delete: Define a rectangle area on the image first, then click “Delete” button to
remove the region that was defined.
-
Default: Click the “Default” button to select full image for motion detection.
Enable the “Show Search Image” to display the searching video sequence or un-check
this box to only show the image once the event found.
Enable the “Show Detect Mark” to display the detect result on the image by pink
rectangles.
Select the “Sensitivity” to define the sensitivity of detection. The higher value means the
event will be triggered easier.
31
AirLive CMS User’s Manual
2. Playback
Select the “Detect Interval” to define the interval of motion detection. If set longer value,
means system will use less CPU computing power to check motion detection.
When the event has been triggered, the window on the right side will display the
triggered image. If the event is not matched your expectation, click the “Continue” button
to search next event.
If you found the matched event, click the “OK” button to return to the playback panel,
and all playing channels will be synchronized to the same timestamp of the event.
Click Cancel button to abort this motion search job.
2.7 Sequential Search
Click mouse right button on the channel which you want to do sequential search, and then
select the “Sequential Search” from the popup menu.
AirLive CMS User’s Manual
32
2. Playback
z Quick start with sequential search:
1. Choose sequential search channel and time period.
2. Select two images from these sequential pictures by clicking on the images, and then
click the “Search” button.
3. Repeat this procedure until time period into one second resolution.
4. Click “Detail picture” button to approach snapshot images dialog.
5. Select these snapshot images, and save them to assigned folder.
2.7.1 Define search time period:
We need to define time period for the sequential search task. We could define time period
by two ways and the selected time period will display on the upper left corner.
1. Select two images from these sequential pictures to define search time period.
Click on the image to select it and click it again to un-select it.
Un-Selected
Selected
2. Or drag on the time line to define search time period directly.
Start time
End time
z Blue bar:
The time period of selected images for sequential search.
z Green transparent bar:
New time period to be searched.
33
AirLive CMS User’s Manual
2. Playback
2.7.2 Start search and rollback:
After defined search time period, and then click the “Search” button to display next search
result.
Click “Pre search” button for rollback to previous search result.
2.7.3 Detail window for snapshots:
The dialog will display small snapshot images by search result. In case you need bigger
image of snapshots, you could enable “Show Detail Window” to get a resizable window for
display the detail snapshot.
You could move the detail window and resize it to get bigger preview image size.
2.7.4 Preview mode of search result:
You could define the preview mode of search result by these parameters below.
z Time Split:
Define the number to divide the search time period equally, and take a snapshot at
beginning of each part.
z Division:
Select the display division mode of search result.
z Switch page buttons:
In case the search result couldn’t display within one page, then these buttons will be
enabled. Click these buttons to switch the pages of snapshot.
AirLive CMS User’s Manual
34