1
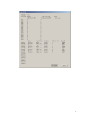
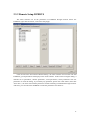
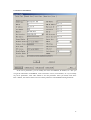
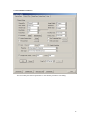
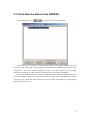
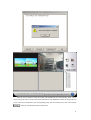
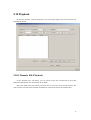
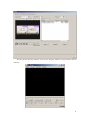
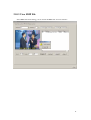
User Manual of Client Software
for
Embedded DVRDVS
(Version 1.4)
1
Index
Version Description...........................................................................................................................3
Chapter 1 Client Software Installation..............................................................................................6
1.1 Notice..................................................................................................................................6
1.2 Installation...........................................................................................................................7
Chapter 2 Client Software Operation................................................................................................9
2.1 System Login ......................................................................................................................9
2.2 Main Interface Description ...............................................................................................10
2.3 System Configure..............................................................................................................12
2.3.1 Surveillance Setup..................................................................................................12
2.3.2 Remote Setup DVRDVS........................................................................................18
2.3.3 Local Setup ............................................................................................................27
2.3.4 User Management ..................................................................................................28
2.4 Network Preview...............................................................................................................29
2.4.1 Audio Preview........................................................................................................29
2.4.2 Multi-Window Preview..........................................................................................30
2.4.3 Change Preview Window Number.........................................................................31
2.5 Capture Preview Image .....................................................................................................32
2.6 Client Network Record .....................................................................................................33
2.6.1 Client Auto Record.................................................................................................33
2.6.2 Client Manual Record ............................................................................................33
2.7 Client Receive Alarm From DVRDVS .............................................................................34
2.8 Voice Talk..........................................................................................................................36
2.9 Client Log .........................................................................................................................37
2.10 Playback ..........................................................................................................................38
2.10.1 Remote File Playback ..........................................................................................38
2.10.2 Local File Playback..............................................................................................40
2.10.3 View BMP File.....................................................................................................42
2.10.4 Remote Playback by Time ...................................................................................43
2.11 Remote PTZ Control .......................................................................................................44
2.12 Remote Video Parameters Control..................................................................................45
2
Version Description
Version1.4:
Version1.4 client software is matched with version1.4 firmware of embedded DVRDVS.
There are following new features corresponding with version1.4 firmware:
1. Support remote setup http port for embedded DVRDVS;
2. Support remote setup sub stream for embedded DVRDVS. Version1.4 firmware can
support dual streams: main stream and sub stream;
3
3. At client end, you can select main stream or sub stream network preview.
4. Support remote setup 4 private mask areas for embedded DVRDVS. Version1.4
firmware can support setup 4 private mask areas while old firmware can only support 1
private mask area;
4
5. Support remote setup maximum 128 PTZ preset number.
5
Chapter 1 Client Software Installation
1.1 Notice
The display adapter in the PC must support the color switch and zoom of the image. The
display adapters we have test are ATI Rage128、Radeon LE、Radeon 7000 above,nVidia TNT2
Model64、nVidia TNT2 Pro,Geforce2 Mx、Mx200、Mx400,Geforce4 Mx420、Mx440 above
etc.
Please set the pixel of monitor as 1024*768, and the font as small one. Please refer to the
following pictures:
6
1.2 Installation
Double click the client setup software named “HcNetClientSetup(V1.4).exe”, the client
software can be installed automatically. After the network client software is installed, you can find
the client software named “HcNetClient”as following:
7
8
Chapter 2 Client Software Operation
2.1 System Login
Double the network client software named “HcNetClient”, a user login dialog will appear:
Please input the user name and password. The default username and password are both
“super”. After you input the correct user name and password, press “OK” button, you can enter
into the main interface:
You can modify the user name and password in the “System Conf.” dialog. Please refer to
corresponding section.
9
2.2 Main Interface Description
The main interface is divided into the following parts:
1. Network preview window:
2. Network preview window number selection:
3. Function icons:
10
4. Function buttons:
5. Status lamps:
Preview and client record status
DVRDVS alarm status
For preview and record lamp, each lamp represents one preview window.
For DVRDVS alarm lamp, each lamp represents one DVRDVS.
11
2.3 System Configure
Click the icon named “System Conf.”, you can enter into the system setup dialog as
following:
2.3.1 Surveillance Setup
In the surveillance setup dialog, you can add, delete, remote control and remote setup
DVRDVS.
2.3.1.1 Add DVRDVS (Digital Video Record/Server)
Click “Add DVR” button, following dialog will popup:
12
Enter the parameters of the DVRDVS to be managed. Input the name, the IP address of the
DVRDVS, the name and password of the DVRDVS administrator, the number of monitoring
channels for the DVRDVS, the Multicast group address of the DVRDVS, the network port
number of this DVRDVS and the server type one after another. Multicast group address is a
D-Category IP address in the range of 224.0.0.0 to 239.255.255.255. The Multicast group address
set at the client end must be consistent to the Multicast group address in the DVRDVS’s own
parameter. Setup can be omitted if the Multicast is not adopted in the network protocol. Channel
Num is the channel numbers the DVRDVS has.
The default user name and password of DVRDVS is “admin” and “12345”. After you press
“OK” button, client software will connect with this DVRDVS, register and get an ID. After that,
client software will communicate with DVRDVS using this ID. This ID is dynamic assigned by
DVRDVS.
After you add a new DVRDVS, you will return surveillance setup dialog.
13
This HcNetClient software can only manage 16 DVRDVS units. We also provide SDK
(Software Development Kit) and demo client source code to help you develop your individual
client software.
2.3.1.2 Cycle preview sequence
First enable the “Cycle Play” option in the Local Setup dialog. Please refer to Chapter 2.3.2.
In the surveillance setup dialog, you can select the channels of DVRDVS in the left tree box, click
“>>” button to move that channel to the right box. The channels in the right box are the channels
you want to cycle preview.
14
In the right box, select one channel, you can use “Up” and “Down” button to change the
camera preview sequence. Also you can use “<<” button to move the channel back left tree box.
2.3.1.3 Delete DVRDVS
In the surveillance setup dialog, you can select one DVRDVS, click the “Del DVR” button to
delete the selected DVRDVS.
2.3.1.4 Reboot DVRDVS
Select one DVRDVS, click “Reboot” button, you can remote reboot the DVRDVS.
2.3.1.5 Upgrade DVRDVS
Select one DVRDVS, click “Upgrade” button to enter into the upgrade dialog. In the upgrade
dialog, select the correct firmware file, the client software can send the firmware file to DVRDVS
through network.
2.3.1.6 Log info (for DVR)
For our Embedded Digital Video Record, there is local log file. This log file is saved on the
HDD, and can be view through network.
15
2.3.1.7 Remote Key (for DVR)
For DVR, the client software can simulate the front panel of DVR.
2.3.1.8 DVR Status
The client software can get the work status of DVRDVS.
16
17
2.3.2 Remote Setup DVRDVS
The client software can set the parameters of DVRDVS through network. Select one
DVRDVS, right click the mouse, a sub menu will popup.
Click the sub menu item named “Remote Setup”, the client software will connect with that
DVRDVS, get all parameters and display on the client software. In this remote configure dialog, it
includes server parameters, channel parameters, serial parameters, alarm parameters and user
parameters. In each sub dialog, if you modify any parameter, please click “OK” button, then click
“Save Para.”, the client will send the parameters of that sub dialog to DVRDVS through network.
After that, you can reboot the DVRDVS to make the parameters into effective.
18
2.3.2.1 Server Parameters
In the server parameters, you can modify the name of DVRDVS, IP address, etc. Also you
can get the information of DVRDVS, such as firmware version, serial number, etc. If you modify
any server parameters, click “OK” button to save the parameter. After you finish, click “Save
Para.” Button, the client software will save all the parameters into DVRDVS through network.
19
2.3.2.2 Channel Parameters
You can modify the channel parameters in the channel parameters sub dialog.
20
Motion Detection Alarm Setup:
In the channel parameters setup dialog, enable “Motion Detect Alarm” check box, click the
“Setup” button on the right side, you can enter into motion detect alarm setup dialog:
In the motion detect alarm setup dialog, you can set motion detection area, sensitivity, trigger
channels, motion alarm response and work schedule.
If you setup the motion area, select effective motion sensitivity, enable “Upload to Center”
response option. In the work schedule, when there is motion alarm happened, embedded
DVRDVS will send alarm information to client software. Please refer to chapter2.7 for receiving
alarm information.
21
22
2.3.2.3 Serial Parameters
In the serial parameters sub dialog, you can setup the RS-232 and RS-485 port of DVRDVS.
The RS-485 port is used for PTZ control. For Embedded DVR, you also can use the “PTZ” menu
to setup. For Embedded DVS, you have to use the client software to remote setup.
23
2.3.2.4 Alarm Parameters
In the alarm parameters sub dialog, you can setup the external alarm input and alarm output
relationship. For Embedded DVR, there are 8/16 external alarm input and 4 relay output. For
Embedded DVS, there are 4 external alarm input and 2 relay output.
In the alarm parameters setup dialog, you can select one alarm input, enable “Alarm Input”
check box and click “Setup” button on the right side, you can enter into “alarm input” setup
dialog:
24
25
2.3.2.5 User Parameters
This sub dialog is to setup the user for DVRDVS. For our DVRDVS, the default user is
“admin”, the default password is “12345”. You can only modify the password, and can not delete
it. You can add other 15 users and define their rights by yourself.
26
2.3.3 Local Setup
In the local setup dialog, there are many options.
2.3.3.1 Client Play Mode
Cycle Play: If you enable cycle play option, the client software will preview the channel real
time image according to the sequence. Please refer to chapter 2.3.1.2 about sequence setup. You
can input the cycle time interval. The default value is 20 seconds.
Use Hard Decoder: If you install the hardware decode card (DS-4002MDI) and enable this
option. The software will use the decode card to preview the real time image and output analog
video signal. You can use the analog video signal to built remote TV wall. Hardware decoding will
not cost much PC CPU resources.
In default, the client software will use the PC CPU to uncompress the video image. We call it
as soft decode. In the case, if you want to decrease the PC CPU usage, you can select whether
throwing B frame when the image is being decoded.
2.3.3.2 Client Record Mode
When the image is being decoded, you can save the real time image in local client hard disk.
2.3.3.3 Other
Here you can enable the option to check the DVRDVS system time if you want. You can
setup the path to download the record files in DVR, save pictures, etc.
27
2.3.4 User Management
This dialog is used to setup the users for operating this client software. You can find the
default user is “super”.
28
2.4 Network Preview
In the main interface, after you add DVRDVS, you can find the DVRDVS will be list on the
right down tree.
Select one preview window, double click the channel you want to preview, the client software
will connect with corresponding DVRDVS, get the real time image and display in the window.
You can find the lamp in the left down corner will be turned into green.
2.4.1 Audio Preview
Select one preview window, right click the mouse button, a sub menu will be appeared:
Click the “Open Audio” item, the click software will start to play the audio of the mixed
stream. Only one stream audio can be played. You must close the audio if you want to preview the
audio of other windows.
29
2.4.2 Multi-Window Preview
In the right menu, if you click “Multiwindows” item, the main interface will be in
multi-windows mode as following. You can return back if you double click the software.
30
2.4.3 Change Preview Window Number
Above the tree, there are several icons for preview window number. You can click any icon to
change the preview window number.
31
2.5 Capture Preview Image
In network preview mode, you can capture the real time preview image into BMP file. Select
one active preview window, click the
button, the current preview image can be saved
as BMP file.
32
2.6 Client Network Record
2.6.1 Client Auto Record
In the “System Conf.” Dialog, there is “Local Setup” sub dialog. In this dialog, if you enable
“Auto” record option and setup correct schedule. When you start network preview, if it is in
schedule, the client software will start to record. Please note if the client software is in “Cycle
Play” mode, the auto record function is not effective.
2.6.2 Client Manual Record
If the client software is not set as “Auto” record mode, you can manual record the real time
image. Select one active preview window, click the
button to start recording. If it is
recording, you can click record button to stop recording.
Either in Auto record or Manual record status, you can find the lamp in the left down corner
will be turned into red.
33
2.7 Client Receive Alarm From DVRDVS
In the main interface, click
butt, following dialog will be popup:
In this dialog, you can create or cancel the alarm transfer tunnel with DVRDVS. After you
create the tunnel, when there is alarm happened in DVRDVS, the DVRDVS will send the alarm
information to this client software through the tunnel. The client software gets the alarm
information and popup one alarm window to display the real time image of DVRDVS.
In the main interface, there are 16 lamps to display the alarm status of DVRDVS. One lamp
is for one DVRDVS. After you create the alarm transfer tunnel, the corresponding lamp will be
turned into green. When the client software receives the alarm information, the corresponding
lamp will be turned into red.
34
After the client software create the tunnel with DVRDVS, the corresponding lamp will be
turned into green and can receive the alarm information from DVRDVS. When the client software
receives the alarm information, the corresponding lamp will be turned into red. You can click the
button to read the detail alarm information.
35
2.8 Voice Talk
In the main interface, click
button.
Select the DVRDVS you want to talk, then click “Start”. The client software will connect
with DVRDVS. If voice dialogue is successful, the “Voice” button will be turned into read. You
can click the red “Voice” button to stop talking.
36
2.9 Client Log
In the main interface, click
button, the following logo dialog will be popup.
In this logo dialog, you can get all the event information that client software met. For
example, when the client software gets the alarm information from DVRDVS, you can read the
detail information in this log dialog.
37
2.10 Playback
In the main interface, click the “Playback” icon in the upper right corner. You will enter into
the playback dialog.
2.10.1 Remote File Playback
In the “Remote File” sub dialog, you can remote search the recorded file in the DVR,
download and playback the recorded file in the DVR.
Select the DVR name and channel, input the start an end time, click “Search” button. The
click software will search the matched recorded files in the DVR, and list the matched files.
38
In the list box, all matched files in remote DVR can be list here.
39
In the list box, you can select the file. Click the
button to remote playback the selected
file. Also you can click the “Download” button to down load the selected file.
2.10.2 Local File Playback
In the local file sub dialog, you can search the files saved in the client PC.
You can playback any file you select.
40
We also provide file play software. You can use file play software to play back the files in
client PC.
41
2.10.3 View BMP File
In the BMP Search sub dialog, you can search the BMP files saved in client PC.
42
2.10.4 Remote Playback by Time
At client PC end, you can remote playback by file, also playback by time.
In the sub dialog, select the DVR name and channel. Input the time you want to start
playback. Click the arrow play button. The DVR will search the image that matched the required
time and send the image to client. You can save the image in local client PC.
43
2.11 Remote PTZ Control
In the main interface, click the “Pan/Tilt” icon. Pan/Tilt/Zoom interface will be appeared.
You can remote control the PTZ connected with DVRDVS. Please make sure the RS-485 is setup
correctly. For Embedded DVR, in PTZ menu, you can setup the PTZ parameters. For Embedded
DVS, you can remote setup the serial parameters (refer to 2.3.2.3).
Select one active preview window and press the Pan/Tilt/Zoom control button. The client
software will send PTZ control commands to DVRDVS. The DVRDVS will find the PTZ type
and send the detail PTZ control commands to RS-485 port. The corresponding PTZ will get the
control commands and start moving.
44
2.12 Remote Video Parameters Control
In the main interface, click the “Video Para.” icon, the video adjust interface will be
appeared.
Select one active preview window, then control the sliders. The client software will send the
new channel video parameters to the corresponding DVRDVS.
45