1
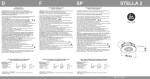
Deckenlift compact2 80 / Ceiling lift compact2 80 für Daten- und Videoprojektoren / for data and video projectors Nr. 7466 000 150 Deckenlift compact2 120 / Ceiling lift compact2 120 für Daten- und Videoprojektoren / for data and video projectors Nr. 7466 000 151 Installations- und Bedienungsanleitung Installation manual D GB 02.2015 D Inhaltsverzeichnis 1. Sicherheitshinweise und Allgemeine Beschreibung 2. Gerätebeschreibung 2.1 Technische Daten 2.2 Lieferumfang 2.3 Zubehör 2.4 Teilebezeichnung und Zeichenerklärung 3. Montage Deckenlift compact2 3.1 Vorbereitungen für Deckenmontage 3.2 Verschiedene Montagearten 3.3 Einbauort bestimmen 3.4 Montage an feste Geschoss-Decke 3.4.1 3.5 Bohrschablone Montage in abgehängte Decke 4. Elektrischer Anschluss 4.1 Anschluss an Programmiereinheit 4.2 Montage des Projektors 4.2.1 Projektoranforderungen 4.2.2 Projektor einsetzen 4.2.3 Projektor ausrichten 4.3 Montage der Deckenabschlussplatte 4.4 Demontage der Deckenabschlussplatte im Notfall (nur für geschulte Fachkräfte) 4.5 Einstellungen der Endlagen des Lifts 4.5.1 Programmiereinheit Standard für Selve und Becker 4.5.2 Programmiereinheit Elektronik für Selve 4.5.3 Programmiereinheit für Rojaflex 4.6 Einstellung der Deckenabschlussplatte 4.7 Elektrischer Anschluss der Steuerung 4.8 Sicherheitsabschaltung 5. Wartung und Pflege 6. Fehlersuche 7. Abmessungen und Maßskizze 8. CE-Konformitätserklärung 2 Sicherheitshinweise und Warnungen • Dieses Gerät kann von Kindern ab 8 Jahren und darüber sowie von Personen mit verringerten physischen, sensorischen oder mentalen Fähigkeiten oder Mangel an Erfahrung und Wissen benutzt werden, wenn sie beaufsichtigt oder bezüglich des sicheren Gebrauchs des Gerätes unterwiesen wurden und die daraus resultierenden Gefahren verstehen. Kinder dürfen nicht mit dem Gerät spielen. Reinigung und Benutzer-Wartung dürfen nicht von Kindern ohne Beaufsichtigung durchgeführt werden • Gerät nach Erhalt auf Transportschäden untersuchen. • Der Deckenlift ist ausschließlich für den Gebrauch mit Projektoren in trockenen Räumen geeignet. • Der Deckenlift darf nur von autorisierten und geschulten Fachkräften montiert oder repariert werden. Vor der Montage bitte diese Montage- und Einbauanleitung ganz lesen, sowie die Sicherheitshinweise genau beachten! • Für den Betrieb des Gerätes gelten in jedem Falle die örtlichen Sicherheits- und Unfallverhütungsvorschriften sowie die länderspezifischen Bestimmungen für Schulungs- und Konferenzräume. • Bei Ausfahren des Deckenliftes ist der Gefahrenbereich abzusichern. • Die Deckenkonstruktion muss an der Einbaustelle mind. das 4-fache der Gesamtlast von Deckenlift und Projektor tragen können. Das verwendete Befestigungsmaterial muss bautechnisch zugelassen sein. • Bei sämtlichen Arbeiten am Deckenlift ist darauf zu achten, dass keine losen Teile (z. B. Werkzeuge) im Lift zurückgelassen werden, die herabstürzen können. • Unfallgefahr: Körperteile nicht in bewegliche Teile (z. B. Scherengitter) bringen. Es können ernsthafte Verletzungen (z. B. Quetschungen) auftreten. • Brandschutz beachten: Es dürfen keine brennbaren Stoffe in der Nähe des Deckenliftes vorhanden sein. • Der Deckenlift ist ca. 26 kg schwer. Sehen Sie für die Montage in der Decke entsprechende Sicherheitsvorkehrungen und Arbeitshilfen vor (z. B. Arbeitsbühne, Absturzsicherung). • Der Stromanschluss an eine 230 V-Anlage darf nur von einer Elektro-Fachkraft (lt. VDE 0100) vorgenommen werden. • Die Anlage muss an das Stromnetz durch eine Schaltvorrichtung mit allpoliger Trennung und Kontaktöffnung von mind. 3 mm angeschlossen sein, um die Anlage spannungsfrei zu schalten (lt. VDE 0700). • Vor allen Wartungsarbeiten die Anlage zuerst vom Netz trennen. • Der Betrieb des Liftes ist nur unter Aufsicht zulässig, egal mit welcher Steuerungsart er betrieben wird. Hauptschalter in Sichtweite zum Gerät installieren, um beaufsichtigtes Ein- bzw. Ausfahren des Liftes zu gewährleisten. • Für die Auswahl des Montagestandortes muss darauf geachtet werden, dass der Deckenlift mit dem Projektor außerhalb der Kopfhöhe (2,5 m), sowie nicht über Verkehrswegeflächen angebracht wird, sodass eine Kollision mit Personen ausgeschlossen ist. • Schäden durch Gewaltanwendung, falsche Handhabung oder Verkabelung, sowie dadurch entstandene Folgeschäden fallen nicht unter die Garantieleistung. • Bitte diese Anleitung für späteren Gebrauch aufbewahren. Achtung: Das Seil wickelt sich im Normalbetrieb konstruktionsbedingt immer einlagig auf der Seiltrommel auf. Bitte kontrollieren Sie vor der ersten Inbetriebnahme, dass das Seil in jedem Fall einlagig und ohne Überkreuzungen aufgewickelt ist. Im Falle einer Überkreuzung fahren Sie den Lift ganz heraus und vorsichtig wieder ein. Vorsicht, Einzugsgefahr am bewegten Lift durch die Seile an der Motorwelle! WARNUNG: Verletzungsgefahr durch Quetsch- / Scherwirkung an der Liftmechanik bei laufendem Lift • Greifen Sie bei fahrendem Lift nie in die Liftmechanik. • Für die Montage des Projektors den Lift von der Stromversorgung trennen. • Sämtliche Wartungs- und Montagearbeiten nur bei ausgeschaltetem Lift durchführen Bestimmungsgemäße Verwendung • Die Kindermann Deckenlifte sind elektromechanische Liftsysteme mit Scherenmechanik, vorzugsweise zum Heben und Senken von Datenprojektoren in Konferenz- und Medienräumen. • Die Maschinen sind geeignet um Datenprojektoren aus einer Ruheposition in eine Nutzposition und zurück zu bewegen. Ab einer gewissen Montagehöhe wird zusätzlich eine Wartungsposition unterstützt. 3 1. Allgemeine Beschreibung Flacher Deckenlift für alle gängigen Daten-Video-Projektoren, geräuscharme Laufbewegung mit Scherengelenkmechanismus, Projektor-Netzkabel vorinstalliert, Spiralschlauch für sichere Kabelführung der Datenleitungen. Der Antrieb erfolgt über einen Einphasen-Kondensatormotor (230 V~/50 Hz) mit einem 3-stufigen, wartungsfreien Planetengetriebe und verfügt über eine elektronische Abschaltung. Eine elektromechanische Scheibenbremse sorgt für genaues Anhalten. Die volle Bremskraft wird beim Ausschalten oder Stromausfall sofort erreicht. Die Einstellung der beiden End-Positionen erfolgt durch eine optionale Programmier-Einheit. 2. Gerätebeschreibung 2.1. Technische Daten Farbe: Lift pulverbeschichtet, matt-weiß (RAL 9003) Einbautiefe: Compact2 80: bei Gerätebreiten (inkl. Kabel) unter 41 cm: 6,5 cm + Projektorhöhe, aber mindestens 12 cm; bei Gerätebreiten (inkl. Kabel) von 41 cm bis max. 58 cm: 13 cm + Projektorhöhe Compact2 120: bei Gerätebreiten (inkl. Kabel) unter 41 cm: 9 cm + Projektorhöhe, aber mindestens 14 cm; bei Gerätebreiten (inkl. Kabel) von 41 cm bis max. 58 cm: 15 cm + Projektorhöhe Projektorbefestigung: Universelle Projektor-Halterung Ausfahrbarer Hub: Compact2 80: bis 80 cm Compact2 120: bis 120 cm Gewicht des Lifts: (ohne Projektor) Compact2 80: 24 kg Compact2 120: 26 kg Max. Projektorengröße: 58 x 56 cm, inkl Raum für Anschlüsse Max. Projektorengewicht: 20 kg Stromversorgung: 230 V~, 50 Hz Platzbedarf an Rohdecke: 70 x 75 cm Deckenausschnitt: 60 x 60 cm Deckenabschluss: 7466 000152 Deckenabschlussplatte mit T-Profil-Einlegrahmen, bzw. 7466000153 Deckenabschlussplatte Standard - (nicht im Lieferumfang enthalten) 2.2 Lieferumfang 4 Der Deckenlift wird zum sicheren Transport im eingefahrenen Zustand geliefert und kann sofort montiert werden. Zum Lieferumfang gehören: ein Kabel-Spiralschlauch für Signal- und Steuerleitungen zum Projektor, vier höheneinstellbare Abhänger-Sätze zur Befestigung der Deckenabschlussplatte, sowie vier Schraubensätze zur Projektorbefestigung. Als Montagehilfe ist eine Bohrschablone 1:1 beigelegt. Das bauseitige, für die jeweilige Deckenkonstruktion zugelassene Montagematerial ist nicht im Lieferumfang enthalten! 2.3 Zubehör ➡➡ 7466 000 152 Deckenabschlussplatte mit T-Profil-Einlegerahmen, zur Verkleidung und Integration des Deckenausschnittes (600 x 600 mm). Farbe: pulverbeschichtet matt-weiß (RAL 9003). ➡➡ 7466 000 153 Deckenabschlussplatte Standard, zur Abdeckung des Deckendurchbruches. Blechplatte (640 x 640 x 1 mm) mit Schrauben; Farbe: pulverbeschichtet matt-weiß (RAL 9003). ➡➡ 7466 000100 Programmiereinheit Standard für Selvemotoren, mit 4-adriger Anschluss-Leitung zum Rohrmotor / 230V~ Schukostecker; zum Einstellen der Endlagen des Liftes. ➡➡ 7466 000101 Programmiereinheit Elektronik für Selvemotoren, mit 4-adriger Anschluss-Leitung zum Einstellen der Endpositionen (Komfortausführung). ➡➡ 7466 000110 Programmiereinheit Elektronik für Rojaflexmotoren, mit 4-adriger Anschluss-Leitung zum Rohrmotor / 230V~ Schukostecker; zum Einstellen der Endlagen des Liftes. ➡➡ 7466 000112 Programmiereinheit Elektronik für Beckermotoren, mit 4-adriger Anschluss-Leitung zum Rohrmotor / 230V~ Schukostecker; zum Einstellen der Endlagen des Liftes. ➡➡ 7466 000 016 Sicherheitsschalter, mechanischer Schalter 230 V~, 10 A, für Stromabschaltung des Projektors bei eingefahrenem Deckenlift, bzw. Statussensor für Mediensteuerung („Deckenlift eingefahren“). Endstellung einstellbar. ➡➡ 7466 000 019 Gewindestangenset mit Versteifungswinkel, verdeckte Montage des Deckenliftes an der festen Geschossdecke, bei nicht tragenden Zwischendecken. Lieferumfang: 4 Gewindestangen M8, Länge 100 cm, 2 Versteifungswinkel, weiß; mit allen Schrauben, Muttern, Scheiben, Federringen; ohne bauseitiges Montagematerial. ➡➡ 7466 000 022 Metallverkleidung, für Sichtanbringung des Liftes unter der festen Decke, 4-teilig, Höhe ca. 35 cm, Farbe weiß (RAL 9003). ➡➡ 5699 000 020 Funk-Fernbedienung, Handsender und Empfänger für die Fernsteuer-Nachrüstung elektrischer Antriebe mit Rohrmotor. ➡➡ 5699 000 021 IR-Fernbedienung, Handsender und Empfänger für die Fernsteuer-Nachrüstung elektrischer Antriebe mit Rohrmotor. ➡➡ 5699 000 022 Motorsteuergerät mit Kontakteingängen, für Mediensteuerung über 2 potentialfreie Relais-Kontakte. ➡➡ 5944 000 001 Schlüsselschalter, 230V~ für Auf-/Ab-Steuerung. ➡➡ 5944 000 002 Drehschalter/-taster, 230V~ für Auf-/Ab-Steuerung , Aufputz, alpinweiß. ➡➡ 7444 000 441 Taster Auf/Ab Konnect alu, zum Auf/Ab Fahren des Liftes (benötigt Motorsteuergerät 5699000022). ➡➡ 7449 000 441 Taster Auf/Ab Konnect flex, zum Auf/Ab Fahren des Liftes (benötigt Motorsteuergerät 5699000022). ➡➡ 7466 000 012 Kugelgelenk, mit langen Spinnenbeinen für große Projektoren. 5 2.4 Teilebezeichnung und Zeichenerklärung 1 3b 3a 11 2 9a 6 5a 4 8 10 7 9 5b 10 4 13 12 1 Befestigungsrahmen mit Montagebohrungen (Maße siehe Bohrschablone Abschnitt 3.4) 2 Motor mit Seilzug 3a Anschlussdose für Elektroanschluss 3b Motorkabel (Nullleiter blau, Phase Drehrichtung AB schwarz, Phase Drehrichtung AUF braun, Schutzleiter PE grün/gelb) 4 Sicherheitsschaltung Seilspannung 5a Kabel-Spiralschlauch mit Projektor-Netzkabel und Kabel zu den beiden Sicherheitsschaltern 5b Kabel-Spiralschlauch mit Projektor-Signal und -Steuerleitungen 6 2 Scherenpaare für 80 cm Hub (Compact2 80) 3 Scherenpaare für 120 cm Hub (Compact2 120) 7 Variabel einstellbare Montagebrücke; ummontierbar, je nach Projektorgröße 8 Projektorhalterung mit Justagemöglichkeiten 9 Projektorspinne mit vier beweglichen Armen sowie Gewindeabstandsbolzen 9a Vier Schraubensätze M3/M4/M5/M6 mit U-Scheiben 10 Winkel für Befestigung der Trageseile am Tragrahmen 11 3 x 4 höheneinstellbare Abhänger (2-10 cm, 11-19 cm, 20-28 cm) für Deckenabschlussplatte 12 T-Profil-Einlegrahmen zur Integration des Deckenausschnittes 13 Deckenabschlussplatte Standard, zur Abdeckung des Deckendurchbruches 6 3. Montage Deckenlift compact2 3.1 Vorbereitungen für Deckenmontage Der Deckenlift sollte an einer tragfähigen Deckenkonstruktion befestigt werden. Bitte besorgen Sie sich hierfür das entsprechende Befestigungsmaterial im Fachhandel. Gewinde-Durchmesser sollte M8 sein, unbedingt Stahldübel bei Betondecken bzw. Holzschrauben bei Holzdecken verwenden. Legen Sie die Befestigung mit einer 10-fachen Sicherheit aus. Die Deckenkonstruktion muss mindestens das 4-fache des maximalen Gewichtes von Lift und Projektor (4 x 50 kg) tragen können. Die Oberfläche der Massivdecke sollte glatt und sauber sein, damit im Betrieb keine Partikel auf Deckenlift und Projektor fallen können. Dämmstoffe sind mit PE-Folie abzudichten. Es empfiehlt sich, in der Decke einen Kasten um den Einbauort anzufertigen, der bei offenem Lift gegen Einblicke und Staub schützt. Zu einer zusätzlichen Revisionsklappe in der Decke wird geraten. Am Einbauplatz ist es von Vorteil, eine 3-fach Steckdose 230 V~ für Projektor und Zusatzgeräte zu montieren. Diese sollte über einen Hauptschalter allpolig abschaltbar sein. Weiterhin sind alle nötigen Bild- und Audiokabel sowie Projektor-Steuerkabel unter Beachtung der gängigen Verlege-Richtlinien zu verlegen. Die Beschreibung der elektrischen Anschlüsse für den Elektroinstallateur erfolgt in Abschnitt 4. 3.2 Verschiedene Montagearten Der Lift benötigt einen Deckenausschnitt von mindestens 60 x 60 cm. Der Deckenausschnitt kann später in den optionalen T-Profilrahmen eingelegt werden. Die für den Einbau erforderliche Mindesteinbautiefe muss in der Decke vorhanden sein. Die Montagebrücke 7 ist bei Auslieferung für “Montage eines Projektors innerhalb der Brücke“ montiert. A B Maximaler Raum für Projektor innerhalb der Montagebrücke beträgt 41 x 54 cm (AxB). Mindesteinbautiefe beträgt 6,5 cm + Projektorhöhe, wenigstens aber 12 cm (Compact2 80). Mindesteinbautiefe beträgt 9 cm + Projektorhöhe, wenigstens aber 14 cm (Compact2 120). Projektoren bis zur max. Größe 58 x 56 cm (Ax B), werden unterhalb der gedreht-montierten Montagebrücke 7 montiert. Maximaler Raum für Projektor unterhalb der Montagebrücke beträgt 58 x 56 cm. Mindesteinbautiefe beträgt 13 cm + Projektorhöhe (Compact2 80). Mindesteinbautiefe beträgt 15 cm + Projektorhöhe (Compact2 120). 7 3.3 Einbauort bestimmen Vor dem Öffnen der Decke ist der genaue Montageort zu prüfen, am besten mit einer Testprojektion des vorgesehenen Projektors an der vorgesehenen Stelle, da Objektivtoleranzen oder Druckfehler in Bildgrößentabellen nicht völlig auszuschließen sind. Gehen Sie bei der Bestimmung des Montage-Standorts des Lifts davon aus, dass die Vorderkante des Lifts im mittleren Zoom-Bereich Ihres Projektors liegt und das Objektiv lotrecht auf die Mittelachse der Leinwand ausgerichtet ist. Am Einbauort sollten im Umfeld von 0,5 m keine heißen Rohre verlaufen. 3.4 Montage an feste Geschoss-Decke Entfernen Sie rund um den Einbauplatz ausreichend die Zwischendecke, um für die Installation genügend Platz zu schaffen. Beiliegende Bohrschablone mit Klebeband am Einbauort fixieren, die angezeigten Löcher 1 bis 6 bohren, Schablone entfernen, Schrauben 1 bis 4 vormontieren, aber noch nicht ganz eindrehen. Den Deckenlift aus der Verpackung entnehmen, über Schlüssellöcher 1 bis 4 im oberen Rahmen einhängen und sicherstellen, dass der Lift nicht herunterfallen kann. Nun alle Schrauben 1-6 einschrauben und fest ziehen. Die übrigen Bohrungen sind nur ersatzweise nötig. Bitte sicherstellen, dass der Lift nach der Montage waagrecht hängt. 3.4.1 Bohrschablone 659,5 524,8 256,3 2 424 Kabeleinlass 6 4 3 Deckenausschnitt 600 8 Deckenausschnitt 600 Kabeleinlass 5 Projektionsrichtung 626 1 12,5 3.5 Montage in abgehängte Decke Wird der Deckenlift nicht direkt auf die feste Geschossdecke geschraubt, benötigen Sie zur Abhängung das Gewindestangenset mit Versteifungswinkel (7466 000019). Für eine stabile, wackelfreie Konstruktion sind zusätzliche Verstrebungen der Gewindestangen vorzusehen. Beachten Sie, dass vor Abhängung mit 4 Gewindestangen unbedingt zuerst die beiden Versteifungswinkel a am oberen Rahmen des Liftes montiert werden müssen. a 4. Elektrischer Anschluss Der Antriebsmotor des Deckenliftes besteht aus einem reversierbaren Rohrmotor (wie bei einem Rollladen) mit eingebauten Endschaltern, Bremse und Getriebe. Der Anschluss an das Netz darf nur durch eine zugelassene Elektrofachkraft erfolgen. Verwenden Sie niemals defekte oder beschädigte Geräte. Vergleichen Sie vor der Montage die Angaben auf dem Leistungsschild mit denen des örtlichen Netzes. Führen Sie alle Montage- und Anschlussarbeiten im spannungslosen Zustand durch. Die Spannungsversorgung des Projektors erfolgt über die werkseitige Verkabelung im Kabel-Spiralschlauch 5a an der bauseits installierten, schaltbaren Steckdose. 4.1 Anschluss an Programmiereinheit Führen Sie das vierpolige Motorkabel 3a zur Schalterdose und schließen Sie es zunächst an die Programmiereinheit nach den folgenden Schaltbildern an. Schaltplan Programmiereinheit Netz PE N L Netz Schalter für Projektor Schalter zur Seilspannungsüberwachung blau blau schwarz schwarz braun gelb/grün braun gelb/grün Projektor Deckenlift Programmiereinheit 7466 000 100 (Selve) 7466 000 101 (Selve) 7466 000 110 (Rojaflex) 7466 000 112 (Becker) Anschlussdose Deckenlift 9 4. Fahren Sie den Rollladenmotor samt Rollladen nun so weit hoch, bis fast der gewünschte Endpunkt erreicht ist und drücken Sie die Setztaste. Möchten Sie noch feinjustieren, halten Sie einfach die Setztaste gedrückt. Der Endpunkt wird an der Stelle festgelegt, an der Sie die Setztaste wieder loslassen. Der Rollladenschlussstab sollte von außen noch sichtbar sein. Stromlaufplan Programmiereinheit 5. Hat der Rollladen die gewünschte Hubhöhe erreicht, ist die Einstellung abgeschlossen. 6. Lassen Sie nun den Rollladen zur Probe mehrmals komplett auf- und abrollen. Stoppt der Rollladenschalter an den eingestellten Endpunkten, ist die Endschaltereinstellung beendet und der Rollladenkasten kann geschlossen werden. Sicherheits- Abzweigdose Bitte beachten Sie, dass die Endschalter des Antriebes nurbauseits ordnungsgemäß funktionieren, wenn blau der Antrieb korrekt und ganz in die Welle eingebaut ist! gn/ge grün/gelb grün/gelb schwarz braun schwarz Bitte beachten Sie, dass der Antrieb mit einem Thermoschutzschalter versehen ist und es sein kann, dass der Antrieb abschaltet, weil er nach blau blau ist der Motorblwieder betriebsbereit. einigen Fahrten eine hohe Temperatur erreicht hat. Nach ca. 15-20 Minuten Abkühlzeit 7. Verändern der Endpunkte Verfahren Sie wie bei Punkt 2 und 4. Netz Normalbetrieb Kabel zwischen Abzweig- und br sw Schalterdose mittels Einstellkabel (separat erhältlich) mind. 6-adrig (z. B. NYM 7x1,5mm2) Beachten Sie bitte, dass je nachdem ob der Motor links oder rechts im Rollladenkasten eingebaut wurde, die Richtungstasten für Auf und Ab vertauscht sein können. Ändern Sie dann den Anschluß der Drehrichtungsadern L1 und L2 (braun/schwarz). Motor br sw bl gr/ge Schließen Sie zunächst den Rollladenmotor, 1. Anschlussklemme Schalterdosegemäß nebenstehendem Anschlußplan, an das Jarolift-Einstellkabel an. von Prog.-Einheit für Taster/ 7466 000 100 Fixieren Sie nun den unteren Schalter Endpunkt indem Sie zunächst die „Programm“-Taste am 2. oder 7466 000 101 Einstellkabel 2 Sekunden langbauseits betätigen und Anschlussdose am Lift danach die „AB“-Taste des Einstellkabels für 2 Sekunden. Der untere Endpunkt ist nun gesetzt. Betriebsanzeige 2s Programm drücken Auf II O I Motorkopf 1 1 2 2 1 I 2 O Programm Ab 2s Programmiereinheit Rojaflex 7466 000 110 grün/gelb grün/gelb schwarz schwarz braun braun blau blau ®™ Programmiereinheit Selve Standard 7466 000 100 Ab drücken Netz Programmierbetrieb Programmiereinheit Becker 7466 000 112 4 Fahren Sie den Lift in die voreingestellte, untere Endlage und verlegen Sie die Signal- und Steuerleitungen zum Projektor in analoger Weise zu Scherenseite 5a an den Scheren 5b . Alle Zuleitungen zum Lift, bzw. Projektor, werden durch Öffnungen am oberen Metallrahmen 1 vorgenommen. Verwenden Sie nur flexible Kabelsorten. Die erforderliche Kabellänge innerhalb des Deckenliftes ist etwa 2,5 m, bzw. 3,6 m (Compact2 120). Nutzen Sie den mitgelieferten Kabel-Spiralschlauch und befestigen Sie die Kabel mit Kabelbindern an den vorgesehenen Befestigungspunkten der Scheren so, dass ein Quetschen oder Erfassen der Zuleitungen durch die Bewegung des Liftes für immer ausgeschlossen wird. Achtung: Die Schaltergarnitur ist nicht für die dauerhafte Bedienung geeignet, sondern nur für die Inbetriebnahme vorgesehen. Hinweis: Sollte der Motor bei der Auf-/Abfahrt aufgrund einer Blockierung vorzeitig abschalten, so ist es möglich diese Blockierung durch kurzes Fahren in die Gegenrichtung freizufahren und durch erneutes Auf-/Abfahren die gewünschte Endlage einzustellen. 4.2 Montage des Projektors 4.2.1 Projektoranforderungen Drei oder vier Gewindebuchsen (M3, M4, M5 oder M6 ) an der Unterseite mit einem Befestigungsbereich zwischen 75 und 370 mm, max. Projektor-Gewicht 20 kg. Eine Befestigung mit nur 3 Tragearmen ist möglich. 4 x Schraubensatz mit entsprechenden Beilagscheiben M3, M4, M5, M6 sind beigepackt. Als Werkzeuge zur Projektormontage benötigen Sie: ➡➡ 1 x Schraubendreher ➡➡ 1 x Innensechskant Nr. 3 ➡➡ 2 x Gabelschlüssel 10 mm 4.2.2 Projektor einsetzen • Die Projektorspinne 9 mit vier Tragearmen und Gewindeabstandsbolzen ist am Projektorhalter 8 eingehängt und kann nach Lockern der beiden Schrauben a (Abb. 1) durch die Schlitze der Montagebrücke 7 seitlich abgenommen und auch wieder eingehängt werden (Abb. 2). • Mit den Gewindeabstandsbolzen können Sie unterschiedliche Höhenlagen der Gewindebuchsen Ihres Projektors ausgleichen. • Lockern Sie mit 2 Gabelschlüsseln 10 mm die Verschraubung b der Projektorspinne (Abb. 2). 10 • Legen Sie Ihren Projektor mit der Unterseite nach oben auf eine weiche Unterlage (Abb. 3). • Stellen Sie fest, welcher der Schraubensätze 10 zu den Gewindebuchsen Ihres Projektors passt und befestigen Sie damit die Projektorspinne durch die vier Abstandsbolzen. Setzen Sie dazu beidseitig die passenden U-Scheiben ein. Es müssen mindestens 3 Gewindegänge eingeschraubt werden. Keine Kleber oder Schmiermittel verwenden. Wenn die Montage nicht richtig ausgeführt wird, kann der Projektor herunterfallen. Dabei besteht die Gefahr von Verletzungen oder Unfällen. • Sind die Befestigungsschrauben für die Gewindebuchsen Ihres Projektors zu lang, verwenden Sie bitte zusätzliche U-Scheiben, um Beschädigungen im Gerät zu vermeiden. • Ziehen Sie die Verschraubung b der Projektorspinne an. Hängen Sie die fertig montierte Einheit in den Projektorhalter 8 der Montagebrücke 7 ein. Sichern Sie die Verbindung durch Fixieren der beiden Schrauben durch die Schlitze der Montagebrücke. Hinweise: Der Projektorhalter 8 kann bei Bedarf an 6 verschiedenen Positionen montiert werden: Links, mittig, rechts, sowie versetzt. Dazu die Verschraubung des Projektorhalters lösen. Achten Sie beim Versetzen darauf, dass die Schrauben der Projektorspinne von oben erreichbar bleiben. Die Montagebrücke 7 kann nach Lösen der vier Schrauben links und rechts abgenommen und bei Bedarf gedreht werden, wenn der Projektor nicht in die Montagebrücke passt (Abb. 4) und die erforderliche Einbautiefe in der Decke vorhanden ist. Abb. 1 Abb. 2 Abb. 3 Abb. 4 8 b a 7 9 4.2.3 Projektor ausrichten Der an der Montagebrücke hängende Projektor kann durch leichten Kraftaufwand gedreht, sowie um ca. ± 20° geneigt werden. Um Trapezverzeichnungen des projizierten Bildes zu vermeiden, sollte der Projektor genau waagrecht und lotrecht zur Leinwand justiert werden. Am Ende der Montage des Deckenliftes sollte die Ausrichtung des Projektors zur Leinwand durch Anziehen der Schraube 10 mm am Projektorhalter 8 mit einem Gabelschlüssel gesichert werden. 4.3 Montage der Deckenabschlussplatte Die optionale Deckenabschlussplatte (7466000 153) wird über die vier verstellbaren Abhänger 11 an den Lift geschraubt. Wählen Sie, je nach erforderlicher Länge, die passenden Abhänger. Durch Lockern der Winkelschienen kann die Abschlussplatte in der Höhe verstellt werden. Die Schrauben zunächst nur leicht handfest anziehen. Festziehen erst nach Endlagen-Einstellung (Abschnitt 4.5). 11 Die optionale Deckenabschlussplatte mit T-Profil-Einlegerahmen (7466000152) zur Einlegung des Deckenausschnittes (600 x 600 mm, max. Dicke 15 mm, max. Gewicht 4 kg) wird nach Abbildung montiert. Es empfiehlt sich bei der Montage, an die entsprechenden Stellen der Abhänger 11 im Deckenausschnitt zusätzlich vier Bohrungen von 5-6 mm Durchmesser vorzusehen, welches Sie von unten mit einem Blindstopfen verschließen können, damit die Platte im Notfall von unten abgenommen werden kann. 4.4 Demontage der Deckenabschlussplatte im Notfall (nur für geschulte Fachkräfte) Lässt sich bei Stromausfall oder einem technischen Fehler der eingefahrene Lift nicht mehr herausfahren, kann man durch Demontage der Deckenabschlussplatte Zugang bekommen. Vorsicht, dass die Platte nicht unkontrolliert herunterfällt. Nun kann eine Fehleranalyse bei abgeschraubter Deckenplatte durchgeführt werden. Durch Aushängen der beiden Trageseile kann der Lift um etwa 20 cm manuell herabgelassen werden. Vorsicht: Den Lift von unten entlasten und sichern. Die beiden Winkel 10 für Befestigung der Trageseile am Tragrahmen von unten lösen (Schrauben M4), die Winkel nach oben bewegen und aushängen. Der Lift kann nun um 20 cm herabgelassen werden, bis die Trageseile wieder sichern. 10 Der Monteur kann nun die Verschraubung der Projektorhalterung oder der Montagebrücke lösen und den Projektor ausbauen. Nach einer weiteren Fehleranalyse könnte auch der Rohrmotor gewechselt werden. Wenden Sie sich für weitere Hinweise bitte an den Kundendienst. 4.5 Einstellungen der Endlagen des Lifts Ab Werk wurden 2 Endlagen voreingestellt: Endlage 1 Lift ist eingefahren Endlage 2 Lift ist ausgefahren Zur Programmierung neuer Einstellungen benötigen Sie die externe, optionale Programmiereinheit Standard (7466 000 100) bzw. Elektronik (7466 000 101) für Selve, (7466000110) für Rojaflex oder (7466000112) für Becker. 12 4.5.1 Programmiereinheit Standard für Selve und Becker Installieren Sie die Einheit entsprechend des Stromlaufplans in Abschnitt 4.1. Beachten Sie die farbliche Übereinstimmung der Installationsleitungen mit der Motorleitung. Stellen Sie die Stromverbindung erst nach der Installation her! Einstellung der Endlagen: 1. Mindestens 6 Sek. Taste E 2 auf der Programmiereinheit bestätigen. Der Antrieb springt in den Einstellmodus. Kurzes Anhalten nach Anlauf signalisiert den Einstellmodus! 2. Untere Endposition (Projektionsstellung) durch Betätigen der Taste 1 anfahren. 3. Mindestens 3 Sek. Taste E 2 betätigen. Die untere Endposition (Projektionsstellung) ist gespeichert. 4. Obere Endposition vorsichtig durch Betätigen der Taste 1 anfahren (Ruhestellung, der Lift ist eingefahren). Vorsicht: nicht gegen mechanische Anschläge fahren! 5. Mindestens 3 Sek. Taste E 2 betätigen. Die obere Endposition (Ruhestellung) ist gespeichert. 6. Nach der Einstellung sollte ein Probelauf vorgenommen werden. Hält der Deckenlift an den eingestellten Endpositionen, ist die Einstellung erfolgreich durchgeführt worden. Im Programmierbetrieb erhält der Motor seine Spannungsversorgung ausschließlich über den Schukostecker der Programmiereinheit. Es darf keine weitere L- oder N-Leiter Verbindung zum Netz vorliegen (Kurzschlussgefahr!). Hinweis zum Becker-Motor: Gegebenenfalls ist die Schalterstellung am Motorkopf zu ändern/zu prüfen. Beachten Sie hierzu die beiliegende Anleitung des Motors 4.5.2 Programmiereinheit Elektronik für Selve Installieren Sie die Einheit wie im Stromlaufplan gezeichnet. Zur Einstellung der Endpunkte folgen Sie der Bedienungsanleitung auf der Einheit. Im Programmierbetrieb erhält der Motor seine Spannungsversorgung ausschließlich über den Schukostecker der Programmiereinheit. Es darf keine weitere L- oder N-Leiter Verbindung zum Netz vorliegen (Kurzschlussgefahr!). 4.5.3 Programmiereinheit für Rojaflex ohne Funkemfänger Installieren Sie die Einheit (7466 000 110) entsprechend des Stromlaufplans in Abschnitt 4.1. Beachten Sie die farbliche Übereinstimmung der Installationsleitungen mit der Motorleitung. Stellen Sie die Stromverbindung erst nach der Installation her! Einstellung der Endlagen: 1. Untere Endposition (Projektionsstellung) durch Betätigen der Taste 1 anfahren. 2. Fixieren Sie den unteren Endpunkt indem Sie zunächst die Taste 2 an der Programmiereinheit für 2 Sek. betätigen und danach die Taste 1 für 2 Sek. Die untere Endposition (Projektionsstellung) ist gespeichert. 3. Obere Endposition vorsichtig durch Betätigen der Taste 1 anfahren (Ruhestellung, der Lift ist eingefahren). Drücken Sie nun für 2 Sek. die Taste 2 an der Programmiereinheit und danach die Taste 1 für 2 Sek. Die obere Endposition (Ruhestellung) ist gespeichert. 4. Nach der Einstellung sollte ein Probelauf vorgenommen werden. Hält der Deckenlift an den eingestellten Endpositionen, ist die Einstellung erfolgreich durchgeführt worden. Im Programmierbetrieb erhält der Motor seine Spannungsversorgung ausschließlich über den Schukostecker der Programmiereinheit. Es darf keine weitere L- oder N-Leiter Verbindung zum Netz vorliegen (Kurzschlussgefahr!). 4.6 Einstellung der Deckenabschlussplatte Im eingefahrenen Zustand soll die Abschlussplatte bündig mit der Unterkante Fertigdecke abschließen. Eine Methode ist, die Schrauben der Abhänger der Abschlussplatte nur leicht handfest anzuziehen, die obere Endlage voreinzustellen und anzufahren und dann die Deckenplatte mit der Hand bündig gegen die Unterkante der abgehängten Decke zu drücken. Anschließend den Lift ein Stück herunterfahren und die Schrauben festziehen. Auch die Schraube b am Projektorhalter 8 nun mit einem Gabelschlüssel anziehen. 13 4.7 Elektrischer Anschluss der Steuerung Hinweise zur Steuerung: • Taster/Schalter und Steuerungen dürfen keinen gleichzeitigen Auf- und Ab-Befehl ermöglichen, dies führt zu einem Defekt der Anlage. Bitte verwenden Sie nur mechanisch oder elektrisch verriegelte Schalter/Taster! • Die Pausenzeit beim Wechsel der Richtung muss mindestens 0.5 Sek. betragen, andernfalls können induzierte Spannungsspitzen den Motor zerstören. • Rohrmotore sind für den Kurzzeitbetrieb (ca. 4 Min.) ausgelegt. Wenn der Antrieb bei Probeläufen und im Betrieb überhitzt, erfolgt eine Abschaltung durch den Thermoschutz. Lassen Sie den Motor in diesem Fall ca. 15 Minuten abkühlen. • Prüfen Sie, ob beide Zugseile gleiche Länge haben, sowie straff und gleichmäßig auf der Welle des Antriebmotors laufen. • Es ist darauf zu achten, dass der Projektor im Betrieb nur im ausgeschalteten und abgekühlten Zustand eingefahren wird. • Wird die Steuerung automatisch von einer Mediensteuerung übernommen, ist die Programmierung der Mediensteuerung entsprechend durchzuführen und die Sicherheitshinweise sind zu beachten. Die Steuerung des Liftes kann erfolgen über: 1. Drehschalter-/Taster Auf/Ab (5944 000 002) 2. Schlüsselschalter (5944 000 001) 3. Funk-Fernbedienung (5699 000 020) 4. IR-Fernbedienung (5699 000 021) 5. 2 Relaiskontakte einer Mediensteuerung und Motorsteuergerät (5699 000 022) Nach Einstellung der Endanschläge müssen Sie die jeweilige externe Programmiereinheit wieder abklemmen und den Motoranschluss gemäß dem folgendem Anschlussplan vornehmen. Schaltplan Installation Schalter/Taster Stromlaufplan Installation Schalter/Taster Sicherheitsschalter Abzweigdose bauseits blau gn/ge grün/gelb grün/gelb blau blau bl schwarz braun br schwarz Netz Kabel zwischen Abzweig- und Schalterdose mind. 6-adrig (z. B. NYM 7x1,5mm2) sw Motor Schalterdose für Taster/ Schalter bauseits Anschlussdose am Lift Wandschalter/-taster z. B. 5944 000 002 Hinweis: Achten Sie bei der Leitungsverlegung Schalter/Taster (Auf/Ab) zum Lift darauf, dass an der Verbindungsstelle die Motorsteuerleitungen nicht vertauscht werden! (Braun= Auf, Schwarz= Ab). Es dürfen nur zugelassene Kabel mit Schutzleiter verwendet werden. Die Parallelschaltung von mehreren Rohrmotoren (Deckenlift, Motorleinwand…) ist nicht erlaubt. Verwenden Sie für solche Fälle ein Trenn-Relais mit separaten Kontakten für jeden Antrieb. 4.8 Sicherheitsabschaltung Der Deckenlift ist mit einer Sicherheitsabschaltung ausgerüstet. Der Rohrmotor stoppt automatisch, wenn der Lift beim Ablauf auf ein Hindernis stößt und das Zugseil entlastet wird, oder er von unten angehoben wird. 14 5. Wartung und Pflege Der Deckenlift ist mindestens jährlich auf Sicherheit und Zuverlässigkeit zu untersuchen: Kontrolle der beweglichen Teile, Stahlseile, Kabelverbindungen und Befestigungen. Insbesondere die Stahlseile sind auf Litzenbruch, Knicken, starke Abnutzung, Gleichlauf der Stahl-Trageseile und sonstige Beschädigungen zu sichten. Beschädigte Teile sind sofort auszutauschen! 6. Fehlersuche ➡➡ Lift reagiert nicht auf AUF oder AB, keine Funktion •Mikroschalter der Seilüberwachung prüfen: beide Mikroschalter am Trageseil müssen durch das gespannte Trageseil gedrückt sein. •Lift über Endstellung gefahren, so dass die Scheren maximal geöffnet und Trageseile lose sind; Lift zurückfahren, bis Seile straff sind; Mikroschalter drücken. •Antrieb wird im Betrieb überhitzt, Abschaltung durch Thermoschutz; den Motor ca. 15 Minuten abkühlen lassen (nur Kurzeitbetrieb von ca. 4 Min. möglich). •Bremsen blockieren (Antrieb brummt): Informieren Sie den Kundendienst. •Eingefahrener Lift kann nicht mehr herausgefahren werden: Demontage der Deckenabschlussplatte, prüfen ob der Lift durch Hochfahren über die obere Endstellung (Fehler) mechanisch verklemmt ist. Durch Ziehen am Lift und Geben des AB-Befehles, mechanische Verklemmung lösen. Obere Endlage neu programmieren. ➡➡ Laufrichtung ist falsch •Steuerleitungen sind vertauscht: Netztrennung herstellen und Steuerleitungen zum Motor tauschen. 7. Abmessungen und Maßskizze • Raum für Projektor innerhalb der Montagebrücke: 41 x 54 cm (BxL) • Raum für Projektor unterhalb der Montagebrücke: 58 x 56 cm (BxL) • Projektorgewicht: max. 20 kg • Erforderlicher Deckenausschnitt: 600 x 600 mm • Maß X = 0 bis bis 280 mm • Erforderliche Kabellänge innerhalb des Deckenlifts 7466000150: ca. 2 m (7466 000 151 ca. 3 m) 5ü 6,3 25 ,8 4 52 be 54 r all es 0 ) 42 4 7 11 X 62 6 6 0 ü 76,5 be ra lle s) (69 (54 7466000150: eingefahren min 120 ausgefahren max 920 Hub 800 7466000151: eingefahren min 120 ausgefahren max 1340 Hub 1200 ) es all r be 5 ü 734 (74 7 69 ,5 9 65 ) 5,5 lles 57 er a üb 90 (55 0 Ü 540 be ra lle s) (5 15 8. CE-Konformitätserklärung 16 17 GB Table of contents 1. General features 2. Specifications 2.1 Technical data 2.2 Scope of delivery 2.3 Accessories 2.4 Legend 3. Mounting of ceiling lift compact2 3.1 Preparation for ceiling mounting 3.2 Different ways of mounting 3.3 Choosing the installation place 3.4 Mounting on real ceiling 3.4.1 3.5 Stencil for drilling Mounting on false ceiling 4. Connection to mains 4.1 Connection to programming unit 4.2 Mounting the projector 4.2.1 Prerequisites of the projector 4.2.2 Inserting the projector 4.2.3 Adjusting the projector 4.3 Mounting the ceiling cover plate 4.4 Taking off the ceiling cover plate in an emergency (only for trained staff) 4.5 Adjusting the stop positions of the lift 4.5.1 Programming unit Standard for Selve and Becker 4.5.2 Electronic programming unit for Selve 4.5.3 Programming unit for Rojaflex 4.6 Adjusting the ceiling cover plate 4.7 Mains connection of the control unit 4.8 Safety power cut 5. Maintenance 6. First aid in case of malfunctions 7. Dimensions and illustrations 8. CE certificate 18 Safety instructions • This unit can be operated by children over 8 years or other inexperienced persons if they are supervised or have been instructed about the safe use of the lift and are able to understand the hazards resulting from its operation. Cleaning or servicing the lift must not be done by children. • Check the unit for damages caused by transport. • The ceiling lift is only suitable for projectors and indoor use. • Only authorized and competent staff are allowed to mount or repair the ceiling lift. It is indispensable to read the installation manual carefully and to heed the safety instructions! • When operating the lift observe the local safety rules and the specific regulations of your country for lecture or conference rooms. • During operation of the lift, the danger area must be secured. • The construction of the ceiling must hold at least four times the weight of the projector and the ceiling lift. Only certified fixing material must be used. • Whenever people work on the lift, they must not leave any objects (e.g. tools) back that could fall down . • Danger of accident: Keep away from the movable parts (e.g. the concertina elements). You could suffer serious injuries. • Do not keep inflammable materials close to the lift. • The lift weighs ca. 24 kg. Take suitable safety measures when mounting the lift (e.g. a working platform, a prop). • Only an electrician is allowed to connect the lift to the mains (230 V, VDE 0100). • When connecting the unit to the mains a relais that separates all the wiring and whose gap between the contacts is at least 3 mm must be installed in between in order to reach a complete power cut (VDE 0700). • Unplug before maintenance works. • The operating of the lift must always be supervised no matter how it is controlled. Install the main switch in sight distance of the device in order to be able to observe the lift when it is in operation. • When choosing the installation place make sure that the minimum distance between the lift in its lowest position and the floor is not less than 2.5 m and that persons walking around do not collide with the unit. • Damages due to vandalism, wrong handling, false wiring and ensuing consequences are not covered by the warranty. • Please keep this manual for later use. Caution: Due to the construction the rope is normally wound up one-ply on the drum. Before switching the lift on for the first time make sure that the rope lies one-ply on the drum and does not intersect. In case of an intersection lower the lift completely and let it cautiously move upwards again. Caution, danger of being caught by the ropes on the motor shaft when the lift is in operation! WARNING: Danger of being squashed by the concertina mechanism when the lift is in operation • Never touch the mechanical parts when the lift is moving. • Before mounting the projector disconnect the lift from the mains. • Carry out installation and maintenance only when the lift is switched off Application • The Kindermann ceiling lifts are electro-mechanical units with a concertina mechanism to raise or lower data/video projectors in conference and media rooms, i. e. to move them from a sleeping position into the projection mode and back. • If mounted in a higher ceiling, the unit features an extra maintenance position. 19 1. General features Extremely flat ceiling lift for all customary data/video projectors. Low noise movements with concertina mechanism, pre-installed power supply, spiral cable guide for safe power and data supply. The lift is powered by a single-phase condenser motor (230 V~/50 Hz) via a 3-gear maintenance-free planetary transmission and features an electronic safety switch. An electro-mechanical disc break allows exact stops. In case of a power blackout or when switching the unit off the full breaking power is available immediately. Adjusting the two stop positions can be simply done with the help of a programming unit (optional accessory 7466000100 or 7466 000101. 2. Specifications 2.1. Technical data Colour: Lift powder-coated matt white (RAL 9003) Installation measurements: Compact2 80: if widths ot the unit (incl. cable) < 41 cm: 6,5 cm + height of projector, but minimum 12 cm; if widths ot the unit (incl. cable) between 41 cm and max. 58 cm: 13 cm + height of projector Compact2 120: if widths ot the unit (incl. cable) < 41 cm: 9 cm + height of projector, but minimum 14 cm; if widths ot the unit (incl. cable) between 41 cm and max. 58 cm: 15 cm + height of projector Projector mounting: Universal projector mount Lifting range: Compact2 80: up to 80 cm Compact2 120: up to 120 cm Weight of the lift: (without projector) Compact2 80: 24 kg Compact2 120: 26 kg Max. projector size: 58 x 56 cm, incl. space for connections Max. projector weight: 20 kg Power supply: 230 V~, 50 Hz Minimum size of ceiling: 70 x 75 cm Ceiling cutout: 60 x 60 cm Ceiling plate: 7466 000152 Ceiling plate with T-profile mounting frame, resp. 7466000153 ceiling plate Standard - (not delivered) 2.2 Scope of delivery 20 For safe transport the ceiling lift is delivered in lifted condition. It can be mounted immediately. Supplied with flexible spiral for guiding the signal and control cables to the projector, four height-adjustable mounting kits for fixing the ceiling plate, and four sets of screws for fastening the projector. A stencil for drill-holes (1:1) is included. The certified fixing material for your ceiling construction is not supplied! 2.3 Accessories ➡➡ 7466 000 0152 Ceiling plate with T-profile, for invisible mounting, integration of the ceiling cutout (600 x 600 mm) in the lift. Colour: powder-coated matt white (RAL 9003). ➡➡ 7466 000 153 Ceiling plate standard version, for covering the ceiling cutout. Metal plate (640 x 640 x 1 mm) with screws; colour: powder-coated matt white (RAL 9003). ➡➡ 7466 000100 Programming unit standard, with 4-pin connection cable / 230V~ schuko plug; for programming the stop positions. ➡➡ 7466 000101 Electronic programming unit, for more convenience, with 4-pin connection cable, for programming the stop positions. ➡➡ 7466 000110 Programming unit electronic for Rojaflex motors, with 4-pin connection cord / 230V~ Schuko plug, for adjusting the end positions. ➡➡ 7466 000112 Programming unit electronic for Becker motors, with 4-pin connection cord / 230V~ Schuko plug, for adjusting the end positions. ➡➡ 7466 000 016 Mechanical safety switch, 230 V~, 10 A, for switching off the power supply of the projectors when lift is in upward position, resp. status sensor for media control („lift up“). Stop position adjustable. ➡➡ 7466 000 019 Extension set with stabilizers, for the concealed mounting of the ceiling lift on the real ceiling (if the false ceiling can‘t hold the weight). Supplied with 4 threaded extension poles M8, length 100 cm, 2 stabilizers, white; with all screws, nuts, washers, rings; without additonal mounting material. ➡➡ 7466 000 022 Metall casing, for visible mounting of the lift on the real ceiling, 4 parts, height ca. 35 cm, colour white (RAL 9003). ➡➡ 5699 000 020 Radio remote control, sender and receiver for remote-controlling motorized lifts. ➡➡ 5699 000 021 IR remote control, sender and receiver for remote-controlling motorized lifts. ➡➡ 5699 000 022 Motor control unit, with 2 relay inputs . ➡➡ 5944 000 001 Key switch, 230V~ für for up/down control. ➡➡ 5944 000 002 Up/down switch , 230V~ , 2-pin, white, on-wall mounting. ➡➡ 7444 000 441 Button up/down Konnect alu, for moving the lift up and down (needs motor for control unit 5699000022). ➡➡ 7449 000 441 Button up/down Konnect flex, for moving the lift up and down (needs motor for control unit 5699000022). ➡➡ 7466 000 012 Joint, with long spider arms for large projectors. 21 2.4 Legend 1 3b 3a 11 2 9a 6 5a 5b 4 8 10 7 9 10 4 13 12 1 Mounting frame with drill-holes (dimensions see drilling stencil paragraph 3.4) 2 Motor with winch 3a Power socket 3b Motor cable (earth: blue, phase direction down: black, phase direction up: brown, safety: green/yellow) 4 Safety switch for tight rope 5a Spiral cable guide with projector mains cable and connection cables to the two safety switches 5b Spiral cable guide with projector signal and control cables 6 Two concertina elements with lifting range of 80 cm (Compact2 80) Three concertina elements with lifting range of 120 cm (Compact2 120) 7 Adjustable cross bar for mounting the projector, can be adapted to the projector size 8 Adjustable projector mount 9 Four movable carrying arms with distance bolts 9a Four sets of screws M3/M4/M5/M6 with washers 10 Mounting plate for fixing the carrying ropes on the frame 11 3 sets of four height-adjustable extension arms (2-10 cm, 11-19 cm, 20-28 cm) for ceiling plate 12 T-profile frame for integrating the ceiling cutout 13 Ceiling plate standard for covering the ceiling cutout 22 3. Mounting the ceiling lift compact2 3.1 Preparations for ceiling mounting Make sure that the construction of the ceiling is suitable for permanently holding the projector and the ceiling lift. Provide the necessary fixing material in special stroes. Use screw dimensions (M8) and steel plugs for concrete ceilings resp. suitable screws for wooden ceilings. The construction of the ceiling should hold at least four times the maximum weight of the projector and the lift (4 x 50 kg). The surface of the real ceiling should be even and clean to keep the lift and the projector clear of any dirt particles. Insulation material should be wrapped up with PE foil. It is recommended to build a box around the projector garage to protect against dust and to conceal the open space above the false ceiling when the lift is down. An additional maintenance flap in the ceiling would help. It is ideal to mount a triple mains socket (230 V~) in the projector garage for the projector and additional units. The wiring should be deactivated via a mains switch. All the required video and audio cable as well as projector control cables have to be fixed according to standard regulations. The specifications of the electrical connections for the electrician follows in paragraph 4. 3.2 Different ways of mounting The lift needs an opening in the ceiling of at least 60 x 60 cm. The cutout can be inserted into the optional T-profile frame. The required minimum installation depth must be guaranteed. On delivery the cross bar 7 is adapted to mounting a projector within. A B Maximum space for projector within the cross bar: 41 x 54 cm (AxB). Minimum installation depth: 6.5 cm + projector height, at least 12 cm (Compact2 80). Minimum installation depth: 9 cm + projector height, at least 14 cm (Compact2 120). Projectors up to a maximum size of 58 x 56 cm (AxB), must be mounted below the rotated cross bar 7 . Maximum space for projector below the cross bar: 58 x 56 cm. Minimum installation depth: 13 cm + projector height (Compact2 80). Minimum installation depth: 15 cm + projector height (Compact2 120). 23 3.3 Choosing the installation place Bevore opening the ceiling the proper installation place must be tested, ideally with the help of a test projection, as lens tolerances or misprints in picture size charts can happen. When deciding about the proper position of the lift, take into account that the front bar of the lift lies half way between the zoom range of the projector and the lens is directed towards the centre axis of the screen in a right angle. There should be a safety distance of 0.5 m between the installation place and any hot water pipes. 3.4 Mounting on real ceiling Remove sufficient parts of the false ceiling around the installation place. Fix the supplied stencil for drilling with adhesive tape to the proper place, drill the holes 1 to 6 as indicated, remove the stencil, premount screws 1 to 4 but do not tighten them. Take the ceiling lift out of its packaging, hang up the upper frame at the screws 1 to 4 and make sure that the lift can‘t drop. Now insert the other screws and tighten them all (1 to 6). Remaining drillings are alternatively only. Make sure that the lift is in horizontal position after mounting. 3.4.1 Stencil for drilling 659,5 524,8 256,3 2 424 Kabeleinlass 6 4 3 Deckenausschnitt 600 24 Deckenausschnitt 600 Kabeleinlass 5 Projektionsrichtung 626 1 12,5 3.5 Mounting on false ceiling If the ceiling lift is not mounted directly on a real ceiling the extension set with stabilizers is needed (7466000019). To guarantee a sturdy construction additional props may be necessary. Attention: Before mounting the extension set the two stabilzers a on the upper frame of the lift. a 4. Connection to mains The motor of the ceiling lift is a reversal single phase condensor motor, similar to the ones used for shutters, with integrated electronic stop switches, brake and transmission. Connection the unit to the mains must only be done by an electrician. Never use damaged devices. Before mounting the lift check the specifications on the lable with thoses of the local power supply. Do all mounting and maintenance works with the power supply switched of. The projector is connected to the mains via the provided wiring through the spiral cable guide 5a to the mains socket of the projector garage (see 3.1). 4.1 Connection to programming unit Guide the 4-pin motor cable 3a to the socket and connect the programming unit according to the following circuit diagram. Circuit diagram programming unit Mains PE N L Mains Switch for projetor Switch for control of safety rope blue blue black black brown yellow/green brown yellow/green Projector Ceiling lift Programming unit 7466 000 100 (Selve) 7466 000 101 (Selve) 7466 000 110 (Rojaflex) 7466 000 112 (Becker) Power socket ceiling lift 25 4. Fahren Sie den Rollladenmotor samt Rollladen nun so weit hoch, bis fast der gewünschte Endpunkt erreicht ist und drücken Sie die Setztaste. Möchten Sie noch feinjustieren, halten Sie einfach die Setztaste gedrückt. Der Endpunkt wird an der Stelle festgelegt, an der Sie die Setztaste wieder loslassen. Der Rollladenschlussstab sollte von außen noch sichtbar sein. Wiring diagram programming unit 5. Hat der Rollladen die gewünschte Hubhöhe erreicht, ist die Einstellung abgeschlossen. 6. Lassen Sie nun den Rollladen zur Probe mehrmals komplett auf- und abrollen. Stoppt der RollladenSafety an denswitch eingestellten Endpunkten, ist die Endschaltereinstellung beendet und der Rollladenkasten kann geschlossen werden. Splitter Bitte beachten Sie, dass die Endschalter des Antriebes nur (building) ordnungsgemäß funktionieren, wenn blue der Antrieb korrekt und ganz in die Welle eingebaut ist! gr/ye green/yellow green/yellow black brown black Bitte beachten Sie, dass der Antrieb mit einem Thermoschutzschalter versehen ist und es sein kann, dass der Antrieb abschaltet, weil er nach blue blue ist der Motorblue einigen Fahrten eine hohe Temperatur erreicht hat. Nach ca. 15-20 Minuten Abkühlzeit wieder betriebsbereit. 7. Verändern der Endpunkte Verfahren Sie wie bei Punkt 2 und 4. Mains Cable between splitter and socket standard operation br black at least 6-pin mittels Einstellkabel (separat erhältlich) (e. g. NYM 7x1.5 mm ) 2 Beachten Sie bitte, dass je nachdem ob der Motor links oder rechts im Rollladenkasten eingebaut wurde, die Richtungstasten für Auf und Ab vertauscht sein können. Ändern Sie dann den Anschluß der Drehrichtungsadern L1 und L2 (braun/schwarz). Motor br black blue gr/ye Schließen Sie zunächst den Rollladenmotor, gemäß nebenstehendem Anschlußplan, an 1. clamp Connection Socket Jarolift-Einstellkabel an. of programmingdas unit for switch/ 7466 000 100 Fixieren Sie nun den unteren socket Endpunkt indem Sie zunächst die „Programm“-Taste am 2. or 7466 000 101 Einstellkabel 2 Sekunden langbuilding betätigen und Socket / lift danach die „AB“-Taste des Einstellkabels für 2 Sekunden. Der untere Endpunkt ist nun gesetzt. Operation signal 2s Programm drücken Auf II O I 2 Motorkopf 1 1 2 1 I 2 O Programm Ab 2s Programming unit Rojaflex 7466 000 110 grün/gelb grün/gelb schwarz schwarz braun braun blau blau ®™ Programming unit Selve Standard 7466 000 100 Mains Media controlled operation Ab drücken Programming unit Becker 7466 000 112 4 Lower the lift down to the pre-programmed bottom position and insert the signal and control cables to the projector into the spiral cable guides 5a / 5b . along the concertina elements. All the wiring to the lift resp. projector goes through the openings on the upper metal frame 1 . Only use flexible cables. The required cable length within the unit varies between 2.5 m and 3.6 m (compact2 120). Fix the spiral cable guide with the help of the clips to the concertina elements so that the wiring can‘t be damaged by the up and down movements of the lift. Caution: The switch is not suitable for permanent operation but only for moving the lift up and down. Note: If the motor switches off before the lift has reached the end position, it is possible to overcome the locking by shortly reversing the movement of the lift and then readjusting the end position. 4.2 Mounting the projector 4.2.1 Prerequisites of the projector Three or four drill-holes (M3, M4, M5 or M6) on the bottom, distance between the drill-holes between 75 and 370 mm. Max. weight: 20 kg. Mounting with only 3 carrying arms is possible. Supplied with 4 sets of screws with washers M3, M4, M5, M6. Required tools: ➡➡ 1 x screw driver ➡➡ 1 x Allen key No. 3 ➡➡ 2 x spanners 10 mm 4.2.2 Inserting the projector • The projector spider 9 with four carrying arms and distance bolts are attached to the projector holder 8 and can be taken off sidewards (illustration 1), after loosening the two screws a through the slots of the cross bar 7 and can be attached again likewise (illustration 2). • With the help of the distance bolts you can even out different levels of the drill-holes in the projector bottom. • Loosen the centre screw b of the projector spider with the 2 spanners 10 mm (illustration 2). • Put your projector upside down on a soft surface (illustration 3). 26 • Find out the proper set of screws 10 that fit into the drill-holes of your projector and fasten the carrying arms with the four distance bolts. Use the suitable washers on both sides. Attention: At least 3 distance bolts must be inserted. Do not use any glue or grease. If the mounting is not done correctly, the projector can drop. Danger of accidents or injuries. • If the distance bolts are longer than the drill-holes of your projector, use additional washers to avoid damages of your unit. • Fasten the centre screw b of the carrying arms. Hang the pre-mounted unit into the projector holder 8 on the cross bar 7 . Secure the connection by fastening the two screws through the slots of the cross bar. Hints: If necessary the projector holder 8 can be mounted in 6 different positions: left, centre, right, or set aside. Loosen the screws of the projector mount. If you change the position, make sure that the screws on the projector spider can be reached from above. After loosening the four screws the cross bar 7 can be taken off to the left or to the right or rotated if the projector does not fit onto the cross bar (illustration 4). Ill. 1 Ill. 2 Ill. 3 Ill. 4 8 b a 7 9 4.2.3 Adjusting the projector The projector hanging from the cross bar can be easily rotated resp. tilted by ca. ± 20°. In order to avoid a distortion of the projected image, the projector should be exactly adjusted horizontally and vertically. When the mounting of the ceiling lift is finished, the exact position of the projector to the screen should be secured by fastening the 10 mm screw on the projector mount 8 with a spanner. 4.3 Mounting the ceiling cover plate The optional ceiling cover plate (7466 000 153) is attached to the lift via the four adjustable extension elements 11 . Choose the suitable elements according to the required length. After loosening the extension elements the height of the cover plate can be adjusted. Fasten the screws only slightly at first and do not tighten them before adjusting the stop positions of the lift (paragraph 4.5). 27 The optional ceiling cover plate with T-profile frame (7466000152) or inserting the ceiling cutout (600 x 600 mm, maximum thickness 15 mm, maximum weight 4 kg) will be mounted according to the illustration below. When mounting we recommend to provide additionally four holes of 5-6 mm to the corresponding locations of the hangers 11 in the ceiling cut, which can be sealed from below with a dummy plug, that the plate in an emergency can be removed from below. 4.4 Taking off the ceiling cover plate in an emergeny (only for trained staff) If the lift can‘t be lowered in case of a power cut or a technical problem, you can get access to the unit by taking off the ceiling cover plate. Take cake care that the plate does not drop in an uncontrolled way. Now the problem can be analysed. After disengaging the two carrying ropes the lift can be manually lowered by 20 cm. Attention: Secure the lift with a prop. Procedure: Loosen the two mounting plates 10 to which the carrying ropes are attached (screws M4), move them upwards and disengage them. Now the lift can be lowered by 20 cm until it is secured by the carrying ropes again. 10 Now the screws of the projector holder and the cross bar can be loosened for taking out the projector. In the same maintenance position the condensor motor could be exchanged, too. Contact our service team for further instructions. 4.5 Adjusting the stop positions of the lift The lift is delivered with two preprogrammed stop positions: Stop position 1 Lift is in sleeping position Stop position 2 Lift is in projection mode To programme new positions use the optional programming unit Standard (7466000100) resp. Elektronic (7466000101) for Selve, (7466 000110) for Rojaflex or (7466000 112) for Becker. 28 4.5.1 Programming unit Standard for Selve and Becker Install the unit according to the attached circuit diagram (paragraph 4.1). Make sure that the colours of the installation cables are identical with the colours of the motor cable. Connect with the mains only after completing the installation! Adjusting the stop positions: 1. Press button E 2 for at least 6 seconds. The motor switches into adjustment mode. A short stop after the start indicates the adjustment mode! 2. Drive to the bottom end position (projection position) by pressing button 1 . 3. Press button E 2 for at least 3 seconds, the bottom end position (projection position) is set. 4. Drive carefully to top end position by pressing button 1 (home position, the lift is up). Attention: Do not let the lift crash against the ceiling construction! 5. Press button E 2 for at least 3 seconds. Top end position (home position) is set. 6. After adjusting the unit you should make a test drive. If the ceiling lift stops at the programmed end positions, the programming has been carried out correctly. Attention: During the programming the voltage is exclusively supplied via the mains plug of the programming unit. There must not be any other electrical connection to the mains (danger of short circuit!). Note: Becker motor Programming position Switch Programming button Operating button Delete position Rotation arrows If necessary, the position of the switch on the motor head must be checked or changed. See attached motor manual. 4.5.2 Electronic programming unit for Selve Install the unit as shown in the circuit diagram. For adjusting the stop positions follow the instructions in the user manual of the unit. Attention: During the programming the voltage is exclusively supplied via the mains plug of the programming unit. There must not be any other electrical connection to the mains (danger of short circuit!). 4.5.3 Programming unit for Rojaflex without radio receiver Install the unit (7466 000 110) according to the attached circuit diagram (paragraph 4.1). Make sure that the colours of the installation cables are identical with the colours of the motor cable. Connect with the mains only after completing the installation! Adjusting the stop positions: 1. Lower end position (projection mode) by pressing button down 1 . 2. Adjust the lower end position by pressing the programming button 2 for 2 seconds and then button down 1 for 2 seconds. The lower end position (projection mode) is set. 3. Drive carefully to top end position by pressing button up 1 (home position, the lift is up). Now press the programming button 2 for 2 seconds and then button up 1 for 2 seconds. The top end position (sleeping position) is set. 4. After adjusting the unit you should make a test drive. If the ceiling lift stops at the programmed end positions, the programming has been carried out correctly. Attention: During the programming the voltage is exclusively supplied via the mains plug of the programming unit. There must not be any other electrical connection to the mains (danger of short circuit!). 4.6 Adjusting the ceiling cover plate When the lift is in its upper position the cover plate should be level with the surface of the false ceiling. One method is to fasten the screws of the extension elements on the cover plate only slightly, to adjust the upper stop position, to move the lift upward into this position and to press the ceiling cover plate manually against the surface of the false ceiling. Afterwards lower the lift again and tighten the screws. Also the screw b on the projector holder 8 must be secured with a spanner. 29 4.7 Mains connection of the control unit Safety instructions: • The switches and controls must not enable simultaneous up and down commands. This would damage the unit. Only use mechanical or electrical switches! • There must be an interval of more than 0.5 seconds between an up and down command. Otherwise high voltage could damage the motor. • Condensor motors are suitable only for short time operaqtion (approx. 4 minutes). If the motor is overheated during a test drive or when in operation, it is switched off automatically.In such a case let the motor cool down approx. 15 minutes. • Check whether the two carrying ropes are of the same length and are wound up tightly and orderly on the shaft of the motor. • Make sure that the projector is brought in upward position only after it has been switched off and has cooled down. • If the lift is operated by a media control, the programming of the media control must be done likewise and the safety instructions must be observed. The lift can be controlled via: 1. Switch/button up/down (5944 000 002) 2. Key switch (5944 000 001) 3. Radio remote control (5699 000 020) 4. IR remote control (5699 000 021) 5. 2 relays contacts of a media control system and a motor control unit (5699 000 022) After adjusting the stop positions you must disconnect the external programming unit and connect the wiring of the motor according to the following circuit diagram. Circuit diagram installation of switches/buttons Mains Wiring diagram installation of switches/buttons Safety switch Mains Splitter building Projector switch Splitter Switch for rope control blue gn/ye green/yellow green/yellow blue blue bl black brown br black blue blue black Switch button Mains Cable between splitter and socket at least 6-pin (e. g. NYM 7x1.5 mm2) black black brown brown Motor yellow/green Projector Ceiling lift yellow/green Power socket ceiling lift socket Socket for button/ switch (building) Socket on lift Wall switch/button e. g. 5944 000 002 Attention: Make sure that the wiring of the motor control is not mixed up (brown=up, black=down) when inserting the cables for the switch/button (up/down)to the lift. Use only certified protected cables. Attention: The parallel wiring of several condenser motors is not allowed (ceiling lift, electrical screen...). In such a case use a splitter with separate inputs for each motor. 4.8 Safety power cut The ceiling lift is equipped with a safety power cut. The condenser motor stops automatically, if the movement of the lift is obstructed and the carrying rope is no longer under tension. 30 5. Maintenance The safety and reliability of the ceiling lift must be checked at least once a year. The check comprises all mechanical parts, steel ropes, cable connections, screws. Especially the steel ropes must not be worn out, broken or bent. The two carrying ropes must run freely and simultaneously and should be free of any other damages. Damaged parts must be exchanged immediately! 6. First aid in case of malfunctions ➡➡ Lift does not react to UP or DOWN command, no function •Check the micro switch of the rope control: both micro switches on the carrying rope must be inserted in the tightened rope. •Lift beyond the stop position so that the concertina elements are extremely opened and the carrying ropes are loose: move the lift back until the ropes are tightened; press the micro switch. •Motor overheated in operation, power cut via thermo switch; let the motor cool down for approx. 15 minutes (only short time operation of 4 minutes possible). •Brakes are blocked (motor makes noises): Contact the service team. •Lift in upward position cannot be lowered again: Take off the ceiling plate, check if the lift was moved above the upper stop position (error) and was blocked. Try to pull down the lift while giving the DOWN command, to loosen the mechanical blockage. Programme the upper stop position anew. ➡➡ UP and DOWN mixed up •Control cables are mixed up: Separate the unit from the mains and exchange the wiring. 7. Dimensions and illustrations • Space for projector within the cross bar: 41 x 54 cm (BxL) • Space for projector below the cross bar: 58 x 56 cm (BxL) • Projector weight: max. 20 kg • Required ceiling cutout: 600 x 600 mm • Measure X = 0 bis bis 280 mm • Required cable length within the ceiling lift 7466000150: ca. 2 m (7466 000 151 ca. 3 m) 6,3 25 ,8 4 52 be 54 r all es 0 ) 42 62 6 0 ü 76,5 be ra ll 5ü 6 4 7 11 es ) X (69 (54 7466000150: eingefahren min 120 ausgefahren max 920 Hub 800 7466000151: eingefahren min 120 ausgefahren max 1340 Hub 1200 s) lle ra e b 5 ü 734 (74 7 69 ,5 9 65 ) 5,5 lles 57 er a üb 90 (55 0 Ü 540 be ra ll es ) (5 31 8. CE certificate 7466000 150/7466000151 D/GB 2015-02/842 130 Änderungen vorbehalten / Subject to alterations Printed in Germany Kindermann GmbH · Mainparkring 3 · D-97246 Eibelstadt · E-Mail: [email protected] · www.kindermann.com