1
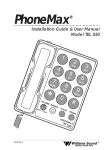
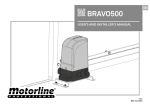
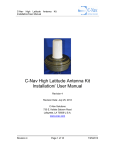
MULTIMEDIA CONTROLLER
USER MANUAL
VERSION:V2.0
INTRODUCTION
Thank you for choosing the company's multimedia
controller.To make you use the equipment better,we
suggest you read the user manual carefully before
installation.
Special Tips
1.During the controller work,It is strictly prohibited
to pull out of every part of the thermal inserted
(Can cause controller artificial damage or get an
electric shock)
2.This controller is microchip intelligent switch
design.Under the thunder or not use for long
time,please switch off the power.
3.This controller has strong electricity,In case of
electric shock it is strictly prohibited privately
machine maintenance without the authorization from
technology center.
4.Waterproof function of the product is not
available,water-drop or splash both can result in safe
function failure, it’s not allowed to place any object
on the equipment.
CONTENTS
..................................................................................................................
CONTENTS
CONTENTS..................................................................................................................
..................................................................................................................33
................................................................................. 4
Chapter 1 Product Introduction
Introduction.................................................................................
..................................................................................................
1.1 Function Brief
Brief..................................................................................................
..................................................................................................44
...............................................................................................
1.2 Product features
features...............................................................................................
...............................................................................................66
.......................................................
13
CHAPTER 2 Prepare work before installation
installation.......................................................
.......................................................13
Chapter 3 Installation
................................................................................................
Installation................................................................................................ 14
................................................................................... 14
3.1 Connect the projector
projector...................................................................................
........................................................................... 15
3.2Serial connection definition
definition...........................................................................
................................................................................. 16
3.3 Connect electric screen
screen.................................................................................
..............................................
18
Chapter 4 Learning the projector control command
command..............................................
..............................................18
...................................................... 18
4.1 Install a serial port learn software code
code......................................................
........................................................ 23
4.2 Start a serial port learn software code
code........................................................
.............................................................
24
4.3 Uninstall serial learn software code
code.............................................................
.............................................................24
......................................................................
25
4.4 Infrared remote control study
study......................................................................
......................................................................25
.................................... 27
Chapter 5 The multimedia controller common operations
operations....................................
Chapter 6 Performance index and technical parameters
.......................................
28
parameters.......................................
.......................................28
.............................................................
28
6.1 Technical parameters of Model 500
500.............................................................
.............................................................28
.................. 30
Chapter 7 Attention and common problem troubleshooting methods
methods..................
..................................................................................
31
Chapter 8 Product declaration
declaration..................................................................................
..................................................................................31
..................................................................................................... 31
8.1 Packing list
list.....................................................................................................
.........................
32
Appendix HEX (HEX) code and character code cross-references
cross-references.........................
.........................32
Chapter 1 Product Introduction
This control system adopt microprocessor communication
technology and system integration technology,will central
control the device in accordance with the actual needs of
the users.On the design ,it embodies the concept of
"Application First,Technic Oriented",fully for the sake of
users,at the meantime of ensure the system has good
stability,compatibility and simply the
operation,effectively resolve the varies complex problems
in the teaching and improve the efficiency.The desire of
the appearance of the products is
compact and
elegant,powerful and easy to use,let it rapidly become the
favourite products in education area and best choice for
multimedia devices.
1.1 Function Brief
Multimedia Controller can achieve the following function
in the platform of multimedia educational.
A.Delay power off to protect the projector
When switching off the controller,the multimedia
controller will turn off the projector
automatically,let the lamp bulb step into the condition
of standby cooling,cut off the power of projector and
multimedia controller in 0-3 minutes(the time can adjust
by yourself needed),extending the life of projector and
making the handle easy.
B.Easily switch between input signal.
Easily switch the signal of desktop,laptop,DVD player,VCR
out
to
projector,monitor,launder
according
to
multimedia controller
C.Centralized control and management for the multimedia
classroom devices
Built-in control circuit can control the electric power to
the screen and a variety of devices;Built-in digital
volume model can control the output volume.Some models
also have the computer switches, and remote network
control function (as described in the sixth chapter on
performance indicators and technical parameters)
D.Offer a variety of fast interfaces, highlight the
connection hub
Multifunction of front panel reserved power socket, VGA
interface, network, USB, MIC, stereo interface easily
connected to a variety of audio-video equipment
1.2 Product features
1.Easy to operate,stable and fast
2.Professional mass production, stable and reliable
quality, competitive price with high quality
3.Advanced program to update the chip to ensure functional
renew
4.Built-in digital volume adjustment, adjust the volume
more easily
5.Reservation networks, microphones, interfaces such as
USB, notebook, stereo, which greatly facilitate the use
6.Delayed shutdown function can extend projector lamp life
7.Some models support for computer and network remote
control switch machine (as described in the sixth
chapter
on
performance
indicators
and
technical
parameters).
1.3 The picture of front-panel diagram for model
500
Description:
(1)Three pieces of projector controller button:basic
actions for controlling the projector(p.s:only take use
of
the
button
after
learning
the
control
code"RS232",please refer to the code software guide)
(2)Two pieces of volume controller button:can regulate the
volume directly
(3)VGA signal button and 3 pieces of indicator lamp:be used
to select the VGA input signal source,switch the signal
among visualizer,desktop and laptop.
(4)Video switch button and 2 pieces of indicator light:to
select the audio and video signal input source,switch
the signal between DVD and other devices
(5)Power:control the system.press ‘ - ’ to turn on,the
multimedia controller will start up and the curtain drop
down automatically .On the other side,press ‘O’ to
delay shutdown automatically
(6)AC output:220V
(7)Network:can be used by the laptop
(8)USB
(9)Laptop
(10)Stereo
(11)MIC
1.4 The picture of back-panel diagram for model
500
Description:
(1)USB
(2)Network
(3)RS232
(4)Curtain power
(5)Projector power
(6)AC 220V input
(7)Projector VGA
(8)Visualizer VGA input
(9)Monitor VGA
(10)Computer VGA input
(11)Output
(12)Input
1.5 The picture of front-panel diagram for model
600
Description:
1)Power:control the system.press ‘ | ’ to turn on,the
multimedia controller will start up and the curtain drop
down automatically .On the other side,press ‘O’ to
delay shutdown automatically
2)AC output:220V
3)2 pieces of projector controller button:basic actions
for controlling the projector(p.s:only take use of the
button after learning the control code"RS232",please
refer to the code software guide)
4)2 pieces of curtain controller
5)Two pieces of volume controller button:can regulate the
volume directly
6)Computer POWNER ON/POWER OFF
7)VGA signal button and 3 pieces of indicator lamp:be used
to select the VGA input signal source,switch the signal
among visualizer,desktop and laptop.
8)Video switch button and 2 pieces of indicator light:to
select the audio and video signal input source,switch
the signal between DVD and other devices
9)Network:can be used via the laptop
10)USB
11)Laptop
12)Stereo
13)MIC
14)Video 3
1.6 The picture of back-panel diagram for model
600
Description:
1)USB
2)Network 1
3)RS232
4)Network 2
5)Computer controller
6)Curtain power
7)Projector power
8)AC 220V input
9)Audio 3 output
10)Audio 3 input
11)Projector output
12)Visualizer VGA input
13)Monitor VGA
14)Computer input
15)Output
16)Input
CHAPTER 2 Prepare work before
installation
1.First prepare for a power cord(reserve a three-core
standard socket),and to guarantee good grounding.
2.Lifting well the projector.Line well in advance between
the
projector
and
multimedia
controller:video
cable,power cord,VGA,serial port control lines each
with one root
3.Arranged well in advance of electric power cable and
ensure that there are enough of the screen length to
connect multimedia controller
4.Stage ready to place the multimedia controller,or
Cabinet,if the multimedia controller you want to embed
to
your
desktop,go
to
the
"specifications
performance parameters" find open size.
and
Chapter 3 Installation
3.1 Connect the projector
1.Plug the projector power cable to the back panel of the
multimedia controller"projector" interface.
2.VGA cable multimedia controller"VGA projector"
interface and VGA input on the projector.
3.Connect video cables to the multimedia controller video
output and video signal input port on the projector
4.Serial cable multimedia controller"RS-232"and projector
control serial port,this machine is configured with a
2-D89 female head 232 line consisting of a root if
you have special requirements,please contract us to
connect serial line for position in advance,connection
method please refer to the following.
3.2Serial connection definition
The picture of 232 serial connection definition of Multimedia Controller
The connection order of multimedia controller RS-232 and
projector RS-232:when the multimedia controller is for
sending(TXD), the projector is for receiving(RXD),when
multimedia controller port is for receiving(RXD),the
projector is for sending(TXD).When multimedia controller
is grounding connection(GND),projector is also in the
condition of grounding connection.(GND)
The projector always has three forms of connection:one is
standard port with 9 pins,one is round port with 8 pins,and
one is standard port with 15 pins
a.The port of 9 pins :N0.2 pin is for signal receiving(the
projector of Panasonic is the NO.3) ,NO.5 is for
grounding connection
b.The port of 8 pins:NO.1 is for signal receiving(the
projector of BENQ is NO.7),NO.4 port is for grounding
connection
c.The port of 15 pins:NO.13 is signal receiving,NO.10 is
grounding connection
For details,please consult the specification of the
projector used by check.
3.3 Connect electric screen
Multimedia controller provides internal power supply of
the electric projector screen socket.The socket within the
AC 220V voltage power,you can directly drive electric
screen.Please use the dedicated electric curtain when
connecting electric screen connector
Because the multimedia controller internal power supply to
curtains,take note of the following when connecting
electric curtain.
1.Verify when connecting electric curtain control in
power.
2.If after powering the screen upward,and shut down the
screen,you can swap lifting power cord.
3.Multimedia controller for electric curtain outlet has
power AC 220V,electric curtain does not accept any power.
Chapter 4 Learning the projector control
command
4.1 Install a serial port learn software code
The demands of system
1.PentiumⅡ or advanced
2.With RS-232 port
3.50MB hard disk space
4.D-ROM or DVD-ROM driver
5.Windows XP / Windows7
Please as the system administrator login
Put the CD into the computer driver and it will set up
automatically,if no menu of installation,please
right-click the optical driver,click the first item,and
run automatically.If also do not run automatically,please
click the root file
.
Click
Click
to close the menu
to review manual
If you can not open the manual,please
click
Click
to install PDF
to start the software
Click the next
Click the "Agree" to next step
Click the name and the company name to next step
If you want to change the installation file,please click
the "change" or just click the "next".
Please select the shortcut folder,and click the "next"
If you want to change the setting,click "back" if no reject
for the setting,please click the
"next"
Click "finish" to finish the installation
4.2 Start a serial port learn software code
Tip:Before starting the software,make sure that control
the serial port and the computer serial port is properly
connected and open the power
Click the icon of software
,it will check the
controller corrected with the PC properly or not
automatically.It will have notion if the connection is not
correct or does not open control switch.
Please check the connection,and open the controller,click
to homepage.click
also can login to
homepage,but can not guarantee the function,please try not
to use the demo mode.
Detailed instruction,please click the "help" menu.
4.3 Uninstall serial learn software code
Step:1.Starting 2.All programs 3.click the icon of
uninstall 4.click "next" 5.click "finish"
Finish the uninstall.
4.4 Infrared remote control study
Before taking control of remote device,must study for the
relevant devices by infrared control code.It will take
control only after studying.
1.Please check that it has fitting with infrared
firstly.This function is matching function,if
necessary,please contact us
2.Please always press the projector button before starting
the controller,then open the controller,and stay for
this condition for more than 5 seconds.The indicator
lighter will remain lit and the machine enter infrared
codes.
3.Pressed the relevant function button,like the panel of
"on"
4.Using the remote controller of relevant device(like the
project’s?),aiming at the right side of machine's
infrared receiving port.Press the relevant function
button(like the panel of "on" in the projector),the
panel indicator will flash for a while and mean it is
studying the code,later on this panel will have the
function of "on"
5.Repeat the step of 3 and 4,finish the study of other
function.
6.After studying all,please power on the machine and reset
it.
7.Aiming at the projector receiver mouth by the infrared
emission,press"on" to check the studying is successful
or not.
Chapter 5 The multimedia controller
common operations
1.Power on:press the button of "power on",the
projector,projector screen and multimedia controller
start to work.
2.Power off:press ‘O’,multimedia controller can delay
to shutdown for 0-3minutes.
3.The control of projector:the button on the panel can take
the use of control of projector,like "on" is turning on the
bulb,"off" is turning off the bulb, "signal" is switching
different signal for projector.
4.The control of projector screen:press the button of "up"
or "down" to control the projector screen
5.Control the volume:press “+”or“-”to control the
volume
Chapter 6 Performance index and technical
parameters
6.1 Technical parameters of Model 500
Appearance:cuboid
Size: 226mm*105mm*110mm
The size of holes: 208mm*90mm
Input power:AC200V~240V 50/60Hz
Video input: 2 in 2 out
Audio input: 3 in 2 out
VGA input: 3 in 2 out
Microphone: 1 in
USB/NET:1 in 2 out
Power consumption: ≤6W
Operating environment temperature: -10℃ ~65℃
220V AC OUTPUT:
NOTT BOOK POWER: 1 out
Projector screen cover: 1 out
Projector power: 1 out
232 Serial port parameters:
Baud rate: 9600、19200、38400、115200
Check bit: none,odd,even
Data bits: eight location
Stop bits: one location
Effective communication range: 20 meters
Infrared interface: 1 way
6.2 600Ⅰmultimedia controller technique parameters
Case appearance:
Cuboid integration case
Case size :
227mm*117mm*123mm
The hole size in the desk:
216mm*106mm
Input power supply:
AC200V~240V 50/60Hz
Video input and output:
3 in 2 out
Audio input and output:
4 in 3 out
VGA input and output:
3 in 2 out
Microphone input:
1 in
Internet input and output :
Power consumption:
Working temperature:
1 in 1 out
≤6W
-10℃ ~65℃
220V interflow output:
Laptop power supply:
1 out (output power <2KW,linking
high-power equipment is not allowed)
Screen supply power:
is available)
1 out (controling up and down
Projector powersupply :
1 out (support software
configuration to delay power off for 0-3 minutes)
232 serial port parameters:
Baud rate:
9600、19200、38400、115200
Check bit:
none,odd,even
Data bits:
8 bits
Stop bit :
1 bit
Effective communication range: 20 Meters
Computer control:
Infrared interface:
1 way
1 way(time-sharing control
with 232)
USB interface:
USB secret key:
Dustproof panel:
1 in 1 out (pass through)
1 way(optional)
(optional)
Ⅱmultimedia controller technique parameters
6.3 600
600Ⅱ
Case appearance:
Case size:
Cuboid integration case
227mm*117mm*123mm
The hole size in the desk: 216mm*106mm
Input power supply:
AC200V~240V 50/60Hz
Video in out
3 in 2 out
Audio in out:
4 in 3 out
VGA in and out :
3 in 2 out
Microphone in:
1 in
USB/NET:
1 in 1 out
Power consumption:
≤6W
Working temperature:
-10℃ ~65℃
220V interflow out:
Computer power supply:
1 out (out power <2KW,linking
high-power equipment is not allowed)
Screen supply power:
1 out (controling up and down
is available)
Projector power supply :
1 out (support software
configuration to delay power off for 0-3 minutes)
232 serial port parameters
Baud rate:
9600、19200、38400、115200
Check bit:
none,odd,even
Data bits:
8 bits
Stop bit:
1 bit
Effective communication range: 20 Meters
Laptop USB,whiteboard USB:
Computer control:
both 1 way
1 way
Infrared interface :1 way(time-sharing control with 232)
USB secret key:
1 way(optional)
Dustproof panel:
(optional)
Chapter 7 Attention and common problem
troubleshooting methods
Equipment in the design and manufacture to ensure your
personal safety,please observe the following when using
and maintaining the basic principles.
1.when the power is off ,the machine is also in
charged.Non-professional maintenance personnel shall not
be free to open the devices.Thunderstorm weather or when
not be in use for a long time,turn off the power.
2.Maintain good ventilation to avoid much high temperature
damage to the machine.
Chapter 8 Product declaration
8.1 Packing list
GK-500 packing list
Dear users, open the boxes, please firstly carefully check
the above components completed
1.One
CD
2.One Garantee card
3.One Screen power output interface
4.One RS-232 Line
5.One AC-POWER line
600Ⅰpacking list
1. Application disk
1 piece
2. Guarantee card
1 piece
3. Communication cable(232 cable)
1 piece
4. Alternating current power cable
1 piece
5. DB9 hole plug with infrared launch tube
1 piece
6. Control computer using 3.5 joint
7.Output interface of screen power
8. Secret key
1 piece
1 piece(optional)
600Ⅱpacking list
1.Application disk
1 piece
2. Guarantee card
1 piece
3. Communication cable
1 piece
4. Alternating current power cable
1 piece
5. DB9 hole plug with infrared launch tube
1 piece
6. Control computer using 3.5 joint
1 piece
7. Secret key
1 piece(optional)
8.2 Important Statements
Product specifications are subject to change without prior
notice, we reserve the right to the interpretation of
product change
Appendix HEX (HEX) code and character
code cross-references
ASC
ASCⅡ
0
1
2
3
4
5
6
7
8
9
A
B
C
D
E
F
G
H
I
J
K
R
S
T
O
P
Q
U
V
W
X
Y
HEX
30
31
32
33
34
35
36
37
38
39
41
42
43
44
45
46
47
48
49
4A
4B
52
53
54
4F
50
51
55
56
57
58
59
ASC
ASCⅡ
Z
a
b
c
d
e
f
g
h
i
j
k
m
n
o
p
q
r
s
t
u
v
w
x
y
z
M
N
enter
space
L
l
HEX
5A
61
62
63
64
65
66
67
68
69
6A
6B
6D
6E
6F
70
71
72
73
74
75
76
77
78
79
7A
4D
4E
0D 20
20 20
4C
6C