1
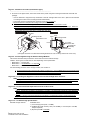
Notice of Alterations
User’s
Manual
Model DX102/DX104/DX106/DX112
DAQSTATION DX100
Please make the following alterations to the User's Manual IM04L01A01-01E (see underlined text).
Page ii “Safety Precautions”
···········································································································
The following general safety precautions must be observed during all phases of operation. If the DX100 is used in
a manner not specified in this manual, the protection provided by the DX100 may be impaired. YOKOGAWA
Electric Corporation assumes no liability for the customer’s failure to comply with these requirements.
Please use this instrument as a mesurement category II (CAT II) instrument.
This instrument is for indoor use only.
Page iv “MODEL”
Model code
Suffi code
Description
External storage medium
-1
-2
-3
-5
Floppy disk
100MB Zip disk
ATA flash memory card
250MB Zip disk
Page v “Standard Accessories”
Number
Part Name
Part Number/Model
Q’ty
Notes
3
Mounting bracket
B9900BX
2
For panel mounting (except for /H5[ ] model)
8
External storage medium A1053MP
1
A1056MP
1
B9968NL
1
100MB Zip disk, included only when the medium
suffix code for external storage medium is “-2.”
250MB Zip disk, included only when the medium
suffix code for external storage medium is “-5.”
ATA flash memory card (32-MB CF card +
adapter, capacity and model of the CF card may
vary) included only when the suffix code for the
external storage medium is “-3.”
Page vi “Optional Accessories (Sold Separately)”
Number
Part Name
Part Number/Model
Q’ty
2
Zip disk
A1053MP
A1056MP
1
1
7
Mounting bracket
B9900BX
2
Notes
100 MB
250 MB
Page 1-16 “Saving Data to the External Storage Media”
External Storage Media
Various data can be saved to the following storage media:
• 3.5” floppy disk (1.44 MB, 2HD)
• Zip disk (100 MB or 250 MB)
• ATA flash memory card (4 MB to 440 MB): The size varies depending on the memory card that you are using.
Page 2-3 “Installation Location”
Install the instrument indoors, in a location that meets the following conditions. See also the normal operating
conditions described in section 14.7, “General Specifications.”
···········································································································
Do not install the DX100 in the following places:
• Outdoors
• In direct sunlight or near heat sources
···········································································································
Yokogawa Electric Corporation
IM 04L01A01-01E-53 1/2
for IM 04L01A01-01E 5th Edition
Page 2-4 “Installation Procedure (Panel Mount Type)”
···········································································································
2. As shown in the figure below, mount the DX100 to the panel using the mounting brackets that came with the
package.
• Use two brackets to support the top and bottom or the left and right sides of the case. (Remove the seal that
is covering the holes for the mounting brackets beforehand.)
• The proper torque for tightening the mounting screws is 0.7 to 0.9 Nm.
• Mount the DX100 to the panel according to the procedure below.
• First, attach the two mounting brackets and temporarily fasten the attachment screws.
• Next, fix the DX100 in place by tightening the attachment screws with the appropriate torque. When the
DX100 is approximately perpendicular to the panel as you fasten the screws, press the mounting bracket
against the case so that they are in contact with each other.
Screw temporarily
Fix in place
Panel
Panel Case
Mounting bracket
Mounting bracket
Attachment screw
Front
In contact
with each other
Torque driver
(flat blade)
Attachment screw
(The figure shows the case when the mounting brackets are used on the top and bottom of the case.)
Page 3-5 “3.3 Inserting/Removing the External Storage Medium”
This section describes the procedures to insert and remove the external storage
medium. Three types of media can be used depending on the specification.
• Model DX1∗∗ -1: Floppy disk
• Model DX1∗∗ -2 or Model DX1∗∗ -5 : Zip disk*1
• Model DX1∗∗ -3: ATA flash memory card
For the handling procedure of the storage medium, see section 2.1.
*1. For the handling procedure of the storage medium, see section 2.1. Only 100 MB Zip disks can be used with model
DX1∗∗ -2. With model DX1∗∗ -5, 250 MB and 100 MB Zip disks can be used. However, 100 MB Zip disks must be
formatted using quick (logical) formatting rather than normal (physical) formatting.
Page 7-25 “7.14, Setting the Brightness of the Screen and the Backlight Saver Function”
Note
The degradation of the brightness and the discoloration of the screen (become yellowish) tend to progress faster as
the brightness is set higher. Extended use at an unnecessary high setting should be avoided. It is also
recommended that the backlight saver be used.
Page 13-5 “13.4, Recommended Replacement Periods for Worn Parts”
Note
• The LCD replacement period indicates the half life of the brightness when the brightness is set to the factory default
setting. The half life is shortened as the brightness is set higher. The deterioration of brightness varies depending on
the condition of use, and its determination is subjective. Consider these facts for determining the actual replacement
period.
• The color of the LCD may become yellowish as time elapses. The discoloration tends to progress faster as the
brightness is set higher.
Page 14-5 “14.3 Data Storage Specifications”
External storage medium:
Selectable from:
1) 3.5-inch floppy disk (2HD, 1.44 MB)
2) PCMCIA ATA flash memory card (4 to 440 MB), or CF card (32 to 512 MB,
adapter required)
3) Zip disk (100 MB or 250 MB)
IM 04L01A01-01E-53 2/2
for IM 04L01A01-01E 5th Edition