1
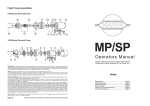
READ ALL INSTRUCTIONS BEFORE OPERATING EQUIPMENT
User Manual for Models:
JS1
|Air Operated Acid and
Neutralizer Foam Unit|
READ ALL INSTRUCTIONS BEFORE OPERATING EQUIPMENT
09162014
USER MANUAL: AIR OPERATED ACID AND NEUTRALIZER FOAM UNIT
READ ALL INSTRUCTIONS BEFORE OPERATING EQUIPMENT
Specifications:
Air Operated Double Diaphragm Pump Options:
Hose .....................50 feet reinforced hose, 3/4 inch I.D
P56..............Flojet polypropylene body with Santoprene
diaphragm
(15 meters reinforced hose, 3/4 inch I.D.)
Foam output.........20 to 45 gallons/minute
(75 to 170 liters/minute)
Foam output distance... 25 to 30 feet (7 to 9 meters)
Requirements:
Compressed air 40 to 80 PSI (3 to 5 bar) with 5 to 10 CFM
(141.64 to 283.28 l/min)
Chemical requirements: follow all instructions from
chemical manufacturer.
P56V............ Flojet polypropylene body with Viton
diaphragm
P56K............ Flojet polypropylene body with Kalrez
diaphragm
Acceptable Products: Alkaline cleaners, Caustic cleaners,
Sanitizers, and Acids.
* D-Limonene and peracetic acid may only be used with
Kalrez pump
* Chlorine may only be used with Viton or Kalrez pump
DO NOT USE: All hydrocarbons
WARNING
CAUTION
Avoid Personal Injury
Avoid Equipment Damage
1. Always wear protective clothing, gloves, and
eye wear while operating unit.
1. Only use clean and dry air. Air must be filtered and
free of moisture or pump life will be diminished. If
needed, install air dryer before unit.
2. Avoid contact of cleaning agent with skin and
eyes. If contact occurs, see SDS sheet for
further first aid measures.
3. Follow safety instructions of chemical
manufacturer (SDS).
4. After each use, relieve all remaining pressure
in the system by unplugging the air line from
the unit and opening the discharge ball valve
to prevent accidental discharge.
2. Do not use air lubricator before the unit.
3. Be sure to flush the unit with fresh water for 5
minutes when switching from an alkaline to an acid
or an acid to an alkaline.
4. Do not exceed a fluid temperature of 110oF (43oC).
5. After relieving the pressure from the unit,
store the unit with the ball valve in the closed
position.
6. Never point the discharge wand at anyone.
USER MANUAL (MODELS: JS1) Page 2 of 6
09162014
USER MANUAL: AIR OPERATED ACID AND NEUTRALIZER FOAM UNIT
READ ALL INSTRUCTIONS BEFORE OPERATING EQUIPMENT
Inside View - Control Box
P56-BRKT
PB16138
PL16138
HBBEL1438
NV14Y
PB16138-LATCH
P56
20756103B
NIP1414
R25
AG100
BA25
NIP1414
HB14P
40 3
20
2
1
0
CV38-AP
HHPB1214
60
4
5
80
HB5638
6
bar
0 100xkPa 7
0
10
psi
BVB14
AFR25
ABR25
HBBEL1814
PW32
HB1238
HV34
PN1238
PBFT-PP
HB3434
H34-50
HB1234
HBELF3838
HV50-3
SHW-3
SSHH-F
FV2
USER MANUAL (MODELS: JS1) Page 3 of 6
09162014
USER MANUAL: AIR OPERATED ACID AND NEUTRALIZER FOAM UNIT
READ ALL INSTRUCTIONS BEFORE OPERATING EQUIPMENT
Parts List
ITEM NUMBER DESCRIPTION
PBFT-PP
MOUNTING FEET FOR POLYBOX - PB16138 POLYPROPYLENE
PL16138
CONTROL BOX LID - POLYPROPYLENE - 16x13x8 HINGED LOCKABLE LID
PW32
3/4in BLACK POLY PRO X 32in - FPTOE & MPTOE SCH.80
R25
AIR REGULATOR - SILVER COLOR - 1/4fpt TWO PORT
1/8fpt TWO PORT
R25DT
CLEAR TUBING FOR R25 DRAIN
S1034FHL
10 X 3/4 PHIL FLAT HI-LO THRD SCREW 18-8
20756103B
Polypro G57 Air Port x HB Straight, w/ Viton o-ring
ABR25
METAL AIR BOWL for R25
AFR25
AIR FILTER for R25
AG100
1.5in DRY MODEL 20 DUAL SCALE GAUGE
BA25
MALE/FEMALE ADAPTER 1/4 X 1/4
BVB14
AIR INLET VALVE - VA BRS 025-4F4F-BT, NICKEL
CV38-AP
WHITE PVC CHECK VALVE 3/8 BARBS - HASTELLOY
SPRING - TEFLON BALL
EC14-2
OETIKER CLAMP 13.8
SHW3
3in LONG COATED WEIGHT
FV2
FOOT VALVE, VITON, BLUE
SSC34
WORM GEAR CLAMP, S/S (.75-1.25)
FWLG14
.569 ID X 1.28 OD X .08 THICK FLAT WASHER SS 18-8
SSC38
WORM GEAR CLAMP, S/S (.25-.63)
H14B
1/4in BLUE GENERAL SERVICE HOSE
SSC38
WORM GEAR CLAMP, S/S (.25-.63)
H34-50
50ft OF 3/4in REPLACEMENT HOSE
SSHH-F
S.S. LASER CUT HOSE HANGER - FLAT STOCK
H34B
3/4in BLUE GENERAL SERVICE HOSE
T5
1/2 POLY TEE
H38B
3/8in BLUE GENERAL SERVICE HOSE
WMS14
14 X 1 1/4 HEX W/H SMS SLOTT, S/S
HB1234
1/2in MPT X 3/4in HOSE BARB
WMS14A
5/16 X 1 1/2 STRAIGHT PLASTIC ANCHOR
HB1238
1/2in MPT X 3/8in HOSE BARB
HB14P
1/4in BRASS HB AIR FITTING /G57/P56 HB3434
POLY HOSE BARB 3/4in X 3/4in
HB5638
HOSE BARB FOR P56 PUMP
HBBEL1438
3/8 BRASS HOSE BARB X 1/4 PIPE ELB
HBBEL1814
1/8 MPT X 1/4 HOSE BARB BRASS 90DEG
HBEL1238
HOSE BARB ELBOW 1/2 X 3/8
HHPB1214
HEX HEAD POLY REDUCER BUSHING 1/2in X 1/4in
HONEYCOMB
PCTV1212.75 Hexacomb Panel
HV34
3/4in POLY BALL VALVE
HV50-3
3-WAY POLY BALL VALVE 1/2in Seals are
HV50-3-BRKT
SS BRACKET FOR HV50-3
NIP1414
1/4 BRASS NIPPLE
NV14Y
FLOW CONTROL VALVE
P56
5700 SANTO PUMP
P56-BRKT
PUMP BRACKET- STAINLESS STEEL
P56-BRKT-SCREW
HI LO SCREW FOR RETAINING P56-BRKT
PB16138
POLYPROPYLENE CONTROL BOX - WORKING DIMS
16x13x8 - PUMP MOUNT
PB16138-GSKT
NEOPRENE GASKET 0.220 INCH ROUND CORD STOCK
- 61.125 INCHES
PB16138-LATCH
LATCH FOR PB16138
PB16138-PIN
STAINLESS STEEL HINGE PIN FOR CONTROL BOX
PB16138 - 1/8 x 4 3/4 x 1/2inches
USER MANUAL (MODELS: JS1) Page 4 of 6
09162014
USER MANUAL: AIR OPERATED ACID AND NEUTRALIZER FOAM UNIT
READ ALL INSTRUCTIONS BEFORE OPERATING EQUIPMENT
Safety Instructions:
1. Always wear safety goggles and protective gloves while
operating foam unit.
2. Avoid contact of cleaning agent with skin and eyes.
3. If contact occurs, see SDS sheet for further first aid
measures.
4. After use, relieve all remaining pressure in the system
by unplugging the air line from the unit and opening
the ball valve (HV34) until all pressure is released.
5. Never point the discharge wand at anyone.
6. Be sure to flush the unit with fresh water for 5 minutes
when switching from an alkaline to an acid or an acid
to an alkaline.
Installation Instructions:
1. Read all instructions before installing the foam unit.
2. Remove all parts from box.
3. Select desired area to mount the control box. We
recommend that the control box is mounted 6 feet or
less from the floor.
4. Mount the control box using the screws provided.
Note: When drilling holes for the plastic anchors
provided with the screws, use a 5/16 inch drill bit.
5. Mount the SSHH-F in a convenient location using the
screws and anchors provided.
6. Attach the discharge hose (H34-50) to the hose barb
(HB1234) securing it with a hose clamp.
7. Attach a 3/8inch I.D. air line from your air compressor
to the hose barb on the outside of the control box.
USER MANUAL (MODELS: JS1) Page 5 of 6
Operation Instructions:
1. Follow all instructions from chemical manufacturer. Fill
the drums with pre-mixed solution.
2. With the ball valve (HV34) in the closed position,
slowly open air inlet valve (BVB14).
3. Slowly open ball valve(HV34).
4. Adjust the needle valve (NV14Y) to desired wetness or
dryness of foam following the steps below:
a. Close needle valve (NV14Y) completely in clockwise
direction.
b. Open needle valve (NV14Y) in counter-clockwise
direction 3 complete turns.
c. Continue to open needle valve in ¼ turn increments
allowing 30 seconds between adjustments until
proper consistency of foam is achieved.
After Use Instructions:
1. It is recommended to run a gallon of fresh water
through the unit after each use. With the ball valve
(HV34) open, run the unit until the gallon of water
has gone through the unit and discharged out the
discharge hose.
2. Close air inlet valve (BVB14) and relieve any remaining
pressure in the system by having the ball valve (HV34)
in open position.
3. Close the ball valve (HV34) when all the pressure is
relieved from the system.
Maintenance:
To keep your foam unit operating properly, periodically
perform the following maintenance procedures:
1. Check the air pump for wear and leaks.
2. Replace filter in regulator as needed.
3. Check the suction tube and screen for debris and clean
as needed.
4. Drain compressor tank on a regular basis to ensure
proper operation of pump.
09162014
USER MANUAL: AIR OPERATED ACID AND NEUTRALIZER FOAM UNIT
READ ALL INSTRUCTIONS BEFORE OPERATING EQUIPMENT
Troubleshooting Instructions:
1. Check for proper air pressure on air gauge (AG100).
The recommended air pressure is 50 to 60 psi (3.45
to 4.14 bar). The maximum air pressure is 90 psi (6.21
bar).
2. Check metal air bowl (ABR25) for debris such as water,
oil, or rust particles. Clean by unthreading the air bowl
(ABR25) from the air regulator (R25).
3. Check for plugged strainer (FV2). Replace strainer (FV2)
if necessary. Strainer (FV2) must be used.
4. If the needle valve (NV14Y) is open too far the pump
(P56/P56K/P56V) will cycle improperly due to lack of
air pressure, if this occurs, reset needle valve (NV14Y)
as described in operation instruction #4.
5. Make sure proper foaming chemical and concentration
is being used.
6. If air passes through the pump (P56) without cycling,
replace the pump (P56).
7. If foam solution backs up into the air bowl (ABR25),
the check valve (CV38-AP) needs to be replaced.
8. If foam comes out wet, no matter where the needle
valve (NV14Y) is positioned, the check valve (CV38-AP)
may need to be replaced.
USER MANUAL (MODELS: JS1) Page 6 of 6
9. If the unit foams at a reduced pressure:
a. Check the air compressor supplying the unit. If the
pressure is less than 40 PSI, turn the foam unit off
until the compressor can catch up.
b. Check the air gauge (AG100), to ensure the air
supply is 60 psi (4.14 bar) or above. If the air gauge
(AG100) is more or less than 60 psi (4.14 bar),
adjust the pressure by turning the knob on the
top of the air regulator (R25). The maximum air
pressure is 90 psi (6.21 bar).
c. If both, a and b, are okay, the stainless steel mixing
mesh could be plugged. Remove and clean it by
following the instructions below:
i. Be sure the foam unit is not plugged into an air
supply and be sure to relieve all stored pressure
in the unit by having the ball valve (HV34) in the
open position.
ii. Remove the hose barb (HB1234) from the tee
(T5).
iii. Remove the screen and the mixing mesh from
inside the tee (T5).
iv. Clean any particles from the mixing mesh and
the screen.
v. Replace the mixing mesh and then the screen
into the back of the tee and screw the hose barb
back into the tee. It is recommended to use a
pipe thread sealant when reinstalling the hose
barb (HB1234) into the tee (T5). If the mixing
mesh has a lot of foreign particles in it, make
sure the strainer (FV2) is still in place.
09162014