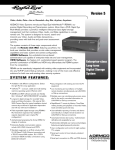
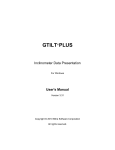
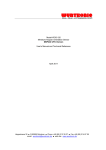
1
Tolteq Directional
Maintenance Manual
500768 A
April 2015
Intellectual Property Notice
Tolteq is a trademark of Tolteq Group, LLC. Other trademarks may be used in this document.
Tolteq disclaims any proprietary interest in any trademark other than its own.
If this guide is distributed with software, firmware, and hardware that includes an end-user
agreement, this guide, as well as the software, firmware, or hardware described, is furnished
under license and may be used or copied only in accordance with the terms of such license.
Except as permitted by any such license, no part of this guide may be reproduced, stored in a
retrieval system, or transmitted, in any form or by any means, electronic, mechanical, recording, or otherwise, without the prior written permission of Tolteq Group, LLC.
Please note that the content in this guide is protected under copyright law, even if it is not distributed with software, firmware, or hardware that includes an end-user license agreement.
The content of this guide is furnished for informational use only, is subject to change without
notice, and should not be construed as a commitment by Tolteq Group, LLC. Tolteq Group,
LLC assumes no responsibility or liability for any errors or inaccuracies that may appear in the
informational content of this guide.
ii
Table of Contents
1 Welcome
i
2 Introduction
2
3 Tools, Parts, and Drawings
3
Tools, Equipment, and Materials
3
Directional Components and Parts
9
Centralizer Drawing and Parts
11
4 Maintenance Tasks
iii
12
Run Diagnostics Check
13
Download Log Data
16
Reset Odometer and Erase Log Data
18
Disassemble the Directional Module
20
Disassemble Centralizer
25
Clean/Inspect Electronic Components
28
Clean/Inspect Other Components
33
Reassemble the Centralizer
36
Reassemble Directional Module
38
Final Reassembly
42
© 2015 Tolteq Group, LLC. All rights reserved.
1 Welcome
Welcome to the Maintenance Manual for Tolteq Directional module.
This manual provides a list of the recommended tools, equipment, and materials needed for
maintenance of this module, in addition to drawings of the tool and maintenance procedures.
This manual is written in the exact order that you should perform maintenance on your module. It will take approximately one hour to complete the procedures.
Before you Begin:
Before using tools or equipment. please read, understand, and observe all safety information
and instructions contained within this manual and listed on safety decals located on the tool
assembly and other equipment. Please wear listed protective gear when required.
All tools, materials, and equipment manufactured and supplied by Tolteq Group, LLC are
designed to be used by qualified and trained personnel only.
Contact:
For general information:
1205 BMC Drive
Cedar Park, TX 78613
512-331-4241
For documentation feedback and questions:
[email protected]
For technical support:
[email protected]
General support: 8:00 AM – 5:00 PM CST, Monday through Friday.
Critical Issue support: 24/7, 1-512-220-1614.
i
2 Introduction
The Tolteq® TruCourse Directional module is a complex electromechanical assembly that
includes sensor electronics that help detect and transmit the location of the wellbore position
in terms of azimuth, inclination, and toolface by measuring the intensity of the magnetic and
gravity fields and the dip angle.
Typically, this module is part of a tool string that includes other sensors and devices that relay
the downhole data to the surface in real time. The module's main benefits include:
l
Assisting the directional driller in reaching the proposed target area
l
Providing data retrieval and analysis after the job is completed (using the onboard
memory)
l
Measuring and recording the intensity of earth’s magnetic field and calculating the
azimuth, using magnetometers and accelerometers
2
3 Tools, Parts, and Drawings
This section provides the following:
l
List of tools, parts, and materials
l
Directional components drawing and parts
l
Centralizer components drawing and parts
Tools, Equipment, and Materials
The following tools, equipment, and materials are required to perform maintenance on the
Tolteq Directional module. All items can be ordered from Tolteq.
Part #
900013
Image
Details
Tool Tracker Package
500456: Quick Start Guide
200008: Cable, Tool Tracker,
Interconnect Adapter
101582
Laptop with power cord (Win
7/64 bit)
Installed with TruCourse Surface
System and Tool Tracker 3 software
600160
O-ring picks
100513
O-ring, AS-018 (1)
(Centralizer)
3
Chapter 3 – Tools, Parts, and Drawings
Part #
101541
Image
Details
O-ring, AS-215 (2)
(Electronics)
100214
O-ring, AS-217 (10)
(Centralizer) - 3
(Electronics) - 7
100124
O-ring, AS-220 (2)
(Centralizer) - 1
(Dir. Housing) - 1
100004
O-ring, AS-318 (4)
(Electronics)
600276
Wrench, Allen, 7/64", T-Handle
(ball point hex key)
100496
Screw, SHCP, #6-32 x .50" Lg.,
(12)
4
© 2015 Tolteq Group, LLC. All rights reserved.
Chapter 3 – Tools, Parts, and Drawings
Part #
100487
Image
Details
Thread protector cap, 1-9/16"10
100520
Centralizer (SureMate) thread
protector cap, 1.5625-10
600124
Spanner wrench, 1.875"
600122
Barrel wrench, 1.875"
600274
Vise bushing plates, 1.875"
600371
600371 - Air compressor
600372
600372 - Pneumatic accessory
kit
100933
V-Block (2)
© 2015 Tolteq Group, LLC. All rights reserved.
5
Chapter 3 – Tools, Parts, and Drawings
Part #
Image
Details
100389
MWD tool stand (optional) (2)
600252
Apron, industrial
600286
Clean repair trays (2)
600291
Safety glasses
600373
Gloves, chemical resistant, neoprene, lined, med, pair
600290
6
Gloves, latex, medium
© 2015 Tolteq Group, LLC. All rights reserved.
Chapter 3 – Tools, Parts, and Drawings
Part #
Image
Details
100392
Contact cleaner
600077
Lubricant, O-ring, sealant
100931
Loctite, #246, Blue, Thread
Locker
N/A
Isopropyl Alcohol
N/A
Diagonal Pliers (snips) or Side
Cutter
N/A
Pen, permanent marker
© 2015 Tolteq Group, LLC. All rights reserved.
7
Chapter 3 – Tools, Parts, and Drawings
Part #
100419
N/A
Image
Details
Rags, box
Sink with dish washing liquid
soap
N/A
600346
Wire brush
Solvent Parts Washer
Before use, consult operator booklet, instructions under washer lid,
and Material Safety Data Sheet
(MSDS) that comes with your
solvent.
8
© 2015 Tolteq Group, LLC. All rights reserved.
Chapter 3 – Tools, Parts, and Drawings
Directional Components and Parts
The electronics parts of Directional module are shown in the image below highlighting the different O-rings needed for each part. The O-rings are the only item that you should replace.
You will not need to access the inside of these electronics parts. If the Directional electronics
fail, contact Tolteq to return them for replacement.
All parts are available from Tolteq:
Part #
Description
Qty
100487
Thread Protector Cap, 1-9/16"-10
1
101182
Directional Housing
1
100520
SureMate Thread Protector Cap, 1.5625-10 STUB ACME
1
900216
Directional Electronics
1
200056
Sensor Pack, NOV
1
900215
Adapter 15 MDM to Snubber
1
101379
Clamshell Retainer
2
100496
Screw, SHCP, #6-32 x .38" LG.
8
100513
AS-018 O-ring
1
101541
AS-215 O-ring
2
© 2015 Tolteq Group, LLC. All rights reserved.
9
Chapter 3 – Tools, Parts, and Drawings
Part #
10
Description
Qty
100214
AS-217 O-ring
6
100124
AS-318 O-ring
4
© 2015 Tolteq Group, LLC. All rights reserved.
Chapter 3 – Tools, Parts, and Drawings
Centralizer Drawing and Parts
The image below shows the components of the Centralizer, highlighting the different O-rings
used.
All parts are available from Tolteq:
PART #
DESCRIPTION
900214
TruCourse Centralizer
1
100513
O-ring, AS-018
1
100229
O-ring, AS-213
4
100214
O-ring, AS-217
3
100124
O-ring, AS-220
2
© 2015 Tolteq Group, LLC. All rights reserved.
QTY.
11
4 Maintenance Tasks
The maintenance tasks for the Tolteq Directional Module are as follows:
1. Run diagnostics check
2. Download log data
3. Erase log data and reset the odometers
4. Disassemble the Directional Module
5. Disassemble the Centralizer
6. Clean and inspect electronic components
7. Clean and inspect other components
8. Reassemble the Centralizer
9. Reassemble the Directional Module
10. Final reassembly
12
Chapter 4 – Maintenance Tasks
Run Diagnostics Check
Checking Directional diagnostics validates that the Surface System is reading from the tool,
affirming that the tool is functional.
Tools/Items needed:
l
Laptop installed with Surface System and Tool Tracker software
l
Tool Tracker cable
l
Tool uphole end concentric connector
Procedure:
1. On the TruCourse laptop, connect the USB end of the Tool Tracker cable.
2. Connect the other end of the Tool Tracker cable to the concentric connector on the
uphole end of the tool.
3. Open the TruCourse Surface System application.
4. From the Menu panel, select Shop Utilities > Shop Diagnostics.
13
© 2015 Tolteq Group, LLC. All rights reserved.
Chapter 4 – Maintenance Tasks
5. If not already displayed, select the Directional tab.
6. Select the type of cable from the Select Tool Cable drop-down list. If you do not see
the correct cable type, click the Refresh button and try again.
7. Click the Diag | OFF button a to turn diagnostics on, and to verify that data
populates in the various fields of the Directional diagnostics page.
8. Close the Diagnostics page in TruCourse, and leave the Tool Tracker cable
connected so that you can download log data using Tool Tracker.
© 2015 Tolteq Group, LLC. All rights reserved.
14
Chapter 4 – Maintenance Tasks
15
© 2015 Tolteq Group, LLC. All rights reserved.
Chapter 4 – Maintenance Tasks
Download Log Data
Tolteq recommends downloading log data after every job. Downloading and analyzing job
files provides a capability to assess tool performance, identify required maintenance actions,
and safeguard against tool abuse and loss of data.
Note: Refer to the Tool Tracker User Manual for additional information about Tool
Tracker.
Tools/Items Needed:
l
TruCourse Tool Tracker USB cable
l
Laptop installed with Tool Tracker software application
Procedures:
1. Connect the TruCourse Tool Tracker cable to the laptop and Directional module.
2. On the TruCourse laptop, open Tool Tracker.
3. When prompted to download log data, click OK.
4. When the download is complete, an analysis of the downhole job displays onscreen.
Look through the tabbed options on the Tool Tracker History screen for indicators of
potential damage to the tool from temperature, shock/vibration, and power.
© 2015 Tolteq Group, LLC. All rights reserved.
16
Chapter 4 – Maintenance Tasks
5. All downloaded data is automatically saved to the default directory. To save the data
to another location, click the Save toolbar button.
Note: Keep the Tool Tracker cable connected to your laptop and to the module for
the next procedure.
17
© 2015 Tolteq Group, LLC. All rights reserved.
Chapter 4 – Maintenance Tasks
Reset Odometer and Erase Log Data
As with any electronic device that stores data, the storage capacity of modules in the Tolteq
tool string are not infinite. The more data stored on a tool, the longer it takes to download
data after a job. Also, log data will begin to write over older log data if the storage capacity is
reached.
Tolteq recommends erasing log data after downloading and saving data from each job. Your
company's operating procedures may also call for resetting one or both of the odometers
after each job to help narrow the focus when analyzing tool wear or problems.
Tools/Items needed:
l
Tool Tracker USB cable
l
Laptop installed with Tool Tracker software application
Procedure - To Reset Odometer:
1. The Tool Tracker cable should still be connected to the laptop from the previous
procedure. If not, connect the cable to your laptop and to the module.
2. If not already open, launch the Tool Tracker application.
3. From the toolbar on the bottom of the screen, select the History button.
4. At the top of the History screen, select the Operational History tab.
5. At the bottom of the screen, select either (Reset Odometer 1 or Reset Odometer
2).
© 2015 Tolteq Group, LLC. All rights reserved.
18
Chapter 4 – Maintenance Tasks
6. When the confirmation window opens, click Yes.
Procedure - To Erase Log Data:
Note: This procedure is highly recommended after each job to speed up download
times, improve tool performance, and prevent log data from overwriting previouslyrecorded log data.
1. From the toolbar on the bottom of the screen, select the Erase button.
2. When the confirmation window opens, click Yes.
3. Disconnect the Tool Tracker cable from the laptop and the Directional module.
19
© 2015 Tolteq Group, LLC. All rights reserved.
Chapter 4 – Maintenance Tasks
Disassemble the Directional Module
After you have checked diagnostics and downloaded data, you need to disassemble the module and inspect the concentric connectors on each end of the module.
Tools/Items needed:
l
Vise
l
Vise bushing plates
l
1.875" barrel wrench
l
O-ring pick
l
Diagonal pliers
l
Isopropyl Alcohol
l
Contact cleaner
l
V-blocks
l
Repair tray
Procedure:
1. Place the module on V-blocks and remove the thread protector caps.
2. Fasten the downhole end of the Directional module in the vise so that the Centralizer
is completely out of the vise.
© 2015 Tolteq Group, LLC. All rights reserved.
20
Chapter 4 – Maintenance Tasks
3. Using the barrel wrench, loosen the Centralizer from the Directional housing, and
unscrew the Centralizer from the housing.
4. Carefully pull the Electronics assembly out of the Directional housing and place it on
V-blocks.
Note: Keep the Electronics assembly on a parallel plane to the barrel when removing it from the housing, and support the Electronics so the uphole and downhole connections do not bind from the weight while moving the assembly.
21
© 2015 Tolteq Group, LLC. All rights reserved.
Chapter 4 – Maintenance Tasks
5. Using the O-ring pick and diagonal pliers, cut the O-rings off of the clam shell
retainers on the Centralizer connection, and remove the retainers. Place components
on a repair tray.
© 2015 Tolteq Group, LLC. All rights reserved.
22
Chapter 4 – Maintenance Tasks
6. Firmly grasp the snubber in one hand, and the Centralizer in the other, and
disconnect the Centralizer from the electronics assembly.
7. Check each concentric connector on the electronics assembly and the centralizer for
signs of excessive wear or damage.
Undamaged Concentric Connector
Damaged Concentric Connectors
23
© 2015 Tolteq Group, LLC. All rights reserved.
Chapter 4 – Maintenance Tasks
Note: If any of the connectors are damaged, contact Tolteq to have the item(s)
repaired.
© 2015 Tolteq Group, LLC. All rights reserved.
24
Chapter 4 – Maintenance Tasks
Disassemble Centralizer
For this procedure, the Centralizer should already be disconnected from the module and resting on V-blocks.
Tools/Items needed:
l
O-ring pick
l
Diagonal pliers
l
Repair tray
Procedure:
1. Using the O-ring pick and diagonal pliers, remove and discard the AS-217 O-ring
from the split-retaining ring, then remove the split retaining ring from the Centralizer
shaft on the downhole end. Place components on a repair tray.
2. Pull the threaded ring off of the Centralizer shaft, and use the O-ring pick and
diagonal pliers to remove and discard the O-rings (AS-220 and AS-217) from the
threaded ring. Place components on a repair tray.
25
© 2015 Tolteq Group, LLC. All rights reserved.
Chapter 4 – Maintenance Tasks
3. Pull the rubber fin off of the Centralizer shaft. Place components on a repair tray.
4. Using the O-ring pick and diagonal pliers, remove and discard all O-rings from the
Centralizer shaft:
l
AS-217
l
AS-220
l
AS-213 (4)
l
AS-018
© 2015 Tolteq Group, LLC. All rights reserved.
26
Chapter 4 – Maintenance Tasks
27
© 2015 Tolteq Group, LLC. All rights reserved.
Chapter 4 – Maintenance Tasks
Clean/Inspect Electronic Components
The electronics assembly in the Directional module includes three primary components:
l
Directional electronics
l
Sensor pack
l
Snubber adapter
Caution: Electronic assemblies should not be immersed in water.
Tools/Items needed:
l
AS-318 O-rings (Sensor pack)
l
AS-217 O-rings (Directional electronics and MDM Adapter Snubber)
l
O-ring pick
l
Diagonal pliers
l
Allen wrench, 7/64", T-Handle hex key
l
Screws 6-32 x.50" Lg (12)
l
Loctite 246
l
Clean repair tray
l
Contact cleaner
l
Clean rags
Procedure:
1. Spray the Electronics assembly with contact cleaner and wipe it down with a clean
rag.
© 2015 Tolteq Group, LLC. All rights reserved.
28
Chapter 4 – Maintenance Tasks
2. Check the O-rings on all three components for tears, excessive wear, or other
damage. If any O-rings are damaged or show noticeable signs of wear, replace them
with new O-rings.
3. Check the elastomer saddles and cone on both ends of the Directional electronics
and Snubber adapter for tears or damage.
Note: If any of the elastomer fittings or connectors are damaged, contact Tolteq to
have the item(s) repaired.
29
© 2015 Tolteq Group, LLC. All rights reserved.
Chapter 4 – Maintenance Tasks
4. Verify that the MDM connections are still tight between the components.
If any of the connection points are loose, do the following:
a. Remove and discard the screws from both sides of the connections using a 7/64
in. hex key Allen Wrench.
b. Carefully separate the components (electronics, sensor pack, or snubber), and
inspect the MDM connectors for damage.
© 2015 Tolteq Group, LLC. All rights reserved.
30
Chapter 4 – Maintenance Tasks
c. If the connectors are in good condition, use isopropyl alcohol and contact
cleaner to clean out any Loctite residue from the screw holes.
d. Fasten the components back together using new screws 6-32x.50" Lg with Loctite
246 applied to the screws.
31
© 2015 Tolteq Group, LLC. All rights reserved.
Chapter 4 – Maintenance Tasks
© 2015 Tolteq Group, LLC. All rights reserved.
32
Chapter 4 – Maintenance Tasks
Clean/Inspect Other Components
Cleaning module parts includes using solvent and soapy water on mechanical parts, and air
pressure and clean rags for drying. If possible, use a Solvents Parts Washer so that liquid that is
contaminated from cleaning the tools is disposed of properly. As parts are cleaned and dried,
place them on a clean repair tray.
Tools/Items needed:
l
Wire brush
l
Latex and chemical resistant gloves
l
Apron
l
Solvent Parts Washer with solvent
l
Sink with dish washing detergent
l
Clean repair tray
l
Contact cleaner
l
Clean rags
l
Air compressor and kit
Caution: Electronic assemblies should not be immersed in water.
Procedure:
1. Put on chemical-resistant gloves and an apron.
2. Wash the following mechanical parts with solvent, then soapy water:
33
l
Module: clamshell retainers
l
Centralizer: split-ring retainer, rubber fin, and threaded ring
© 2015 Tolteq Group, LLC. All rights reserved.
Chapter 4 – Maintenance Tasks
3. Rinse mechanical parts and dry them using clean rags and compressed air.
4. Spray the Centralizer shaft with contact cleaner and wipe it down with a clean rag.
© 2015 Tolteq Group, LLC. All rights reserved.
34
Chapter 4 – Maintenance Tasks
5. Once all parts are clean and dry, look for indentions, deformation of profile,
significant changes to the inner or outer diameters, and cracks or friction lines.
Replace parts that are damaged or excessively worn.
35
© 2015 Tolteq Group, LLC. All rights reserved.
Chapter 4 – Maintenance Tasks
Reassemble the Centralizer
Before reassembling the Centralizer, ensure that components are clean and you have all of the
required O-rings.
Tools/Items needed:
l
AS-018 O-ring (1)
l
AS-213 O-rings (4)
l
AS-217 O-ring (3)
l
AS-220 O-ring (2)
l
Lubricant
l
O-ring pick
Procedure:
1. Place new O-rings on the Centralizer, as shown below:
2. Lubricate the (4) AS-213 O-rings, and slide the rubber fin all the way onto the shaft.
© 2015 Tolteq Group, LLC. All rights reserved.
36
Chapter 4 – Maintenance Tasks
3. Slide the threaded ring onto the shaft.
4. Place the split-retaining ring in the groove next to the threaded ring, and attach an
AS-217 O-ring to lock it in place.
37
© 2015 Tolteq Group, LLC. All rights reserved.
Chapter 4 – Maintenance Tasks
Reassemble Directional Module
For this procedure, you will attach the Centralizer to the Electronics assembly, then install the
assembly in the Directional housing.
Tools/Items needed:
l
AS-215 O-ring (2)
l
O-ring pick
l
Lubricant
Before procedure:
l
If the directional housing is not already clamped in the vise, do so before installing
the assembly in the Directional housing.
l
The Centralizer and Electronics assembly should be supported on V-blocks before
they are connected.
Procedure:
1. Place a clamshell retainer AS-215 O-ring on each j-latch end of the Centralizer and
Snubber in preparation to secure the retainers in place.
© 2015 Tolteq Group, LLC. All rights reserved.
38
Chapter 4 – Maintenance Tasks
2. Grasp the shank of the Centralizer in one hand, and the Snubber on the Sensor Pack in
the other hand, and connect the two components together with the j-latch.
3. Attach the clamshell retainers over the j-latch, and move the two AS-215 O-rings into
place to secure them.
39
© 2015 Tolteq Group, LLC. All rights reserved.
Chapter 4 – Maintenance Tasks
4. Lubricate all O-rings on the electronics assembly and the AS-217 O-rings on the
uphole end of the Centralizer.
5. Carefully lift and slide the electronics into the Directional housing until the threads
of the centralizer meet the threads of the housing.
Note: The internal components need to be on an even plane with the housing when
installing them so that the Centralizer O-rings do not hang up on the housing
© 2015 Tolteq Group, LLC. All rights reserved.
40
Chapter 4 – Maintenance Tasks
threads and roll off their positions. Do not force the components through the housing. If you feel resistance during the installation, back the Centralizer off a little and
adjust the plane before going forward again.
6. Turn the Centralizer shank by hand until it is inserted all the way in the Directional
housing.
41
© 2015 Tolteq Group, LLC. All rights reserved.
Chapter 4 – Maintenance Tasks
Final Reassembly
Before tightening the Centralizer connection and attaching the thread protector caps, check
the system once again for proper functionality.
Tools/Items needed:
l
Laptop installed with TruCourse Surface System and Tool Tracker software
l
Tool Tracker cable
l
Barrel wrench
l
Permanent marker
l
Uphole and downhole thread protector caps
Procedure - Diagnostics Check
1. On the TruCourse laptop, connect the USB end of the Tool Tracker cable.
2. Connect the other end of the Tool Tracker cable to the concentric connector on the
uphole end of the tool.
3. Open the TruCourse Surface System application.
4. From the Menu panel, select Shop Utilities>Shop Diagnostics.
© 2015 Tolteq Group, LLC. All rights reserved.
42
Chapter 4 – Maintenance Tasks
5. If not already displayed, select the Directional tab.
6. Select the type of cable from the Select Tool Cable drop-down list. If you do not see
the correct cable type, click the Refresh button and try again.
7. Click the Diag | OFF button a to turn diagnostics on, and to verify that data
populates in the various fields of the Directional diagnostics page.
43
© 2015 Tolteq Group, LLC. All rights reserved.
Chapter 4 – Maintenance Tasks
8. When done with the diagnostics, close the program.
Procedure - Final reassembly
1. Disconnect the Tool Tracker cable, and tighten the Centralizer connection to 350 ftlbs of torque using the barrel wrench.
2. Use a permanent marker to draw a line perpendicular to, and across, the Centralizer
connection on the downhole end of the module.
3. Write the letter "T" next to the line indicating the module was torqued.
© 2015 Tolteq Group, LLC. All rights reserved.
44
Chapter 4 – Maintenance Tasks
4. Attach, then hand-tighten, the uphole and downhole thread protector caps on the
module.
Note: Before the module is fully ready for the field, you need to do a flow test with
the Directional module using the TruCourse Surface System software. Since this
requires Surface System hardware, you will do this as part of the Surface System maintenance. However, the maintenance done on the Directional module in this section
must be completed before doing the flow test.
This completes the maintenance of the Tolteq Directional module.
45
© 2015 Tolteq Group, LLC. All rights reserved.