1
Gigaset A140/A240 / GBR / A31008-M1643-L101-1-7619 / Wyoming.fm / 16.08.2005
1
Gigaset A140/Gigaset A240 english
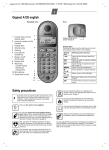
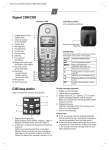
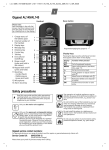
Handset A14
Base
Handset A24
5
4
1
1 Charge status of the
battery pack
2
2 Internal number of the
handset
3 Display keys
4 Talk key/
3
Handsfree Key
(Gigaset A240 only)
5 Directory key
4
6 End call and
5
On/Off key
7 Ringer on/off
6
(press and hold)
8 keypad lock
(press and hold)
9 Recall key
7
- Confer (Flash)
8
- Dial pause
9
(press and hold)
10
10 Microphone
11
11 Speed dial list key
1
Register/Paging key
(page 5/page 6)
V
22-35
Þ Ü INT MENU
Display keys:
Pressing the keys launches whichever function
that appears above them in the display.
Display
icon
Þ
W
$
Fit only the approved rechargeable battery
pack! Never use a conventional (non-rechargeable) battery pack as this could damage your
health and cause injury. Use the battery pack as
directed in this manual (page 7).
The operation of medical appliances may be
affected. Be aware of the technical conditions
within the particular environment (e.g. doctor's
practice).
The handset may cause an intrusive 'hum' in
hearing aids. Do not hold the handset against
your ear while it is ringing (incoming call).
u
Move cursor to the left/right.
ß
Backspace deletes one character at
a time.
Confirm menu function or store an
entry.
INT
MENU
and s
and v
OK
Do not install the phone in a bathroom or
shower room as the handset and base are not
splash-proof. (page 7)
Read this manual and the safety precautions carefully before use. Explain their contents to your
children, and the potential hazards associated
with using the telephone.
Only use the mains unit supplied.
t
Open the last number redial list
(page 4).
Open the calls or network mailbox
list (page 4).
Open the list of registered handsets (page 5).
Open main menu/submenu.
Scroll up/down, or adjust volume.
Ü
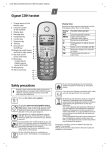
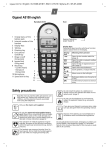
Safety precautions
Function when pressed
Do not use the telephone in environments
subject to explosion hazard (e.g. auto paint
shops).
ƒ
If you give your Gigaset to someone else, make
sure you also give them the operating manual.
All electrical and electronic products should be
disposed of separately from the municipal
waste stream via designated collection facilities
appointed by the government or the local
authorities. This crossed-out wheeled bin symbol on the product means the product is covered
by the European Directive 2002/96/EC. The correct disposal and separate collection of your old
appliance will help prevent potential negative
consequences for the environment and human
health. It is a precondition for reuse and recycling of used electrical and electronic equipment. For more detailed information about disposal of your old appliance, please contact your
city office, waste disposal service or the shop
where you purchased the product.
Gigaset A140/A240 / GBR / A31008-M1643-L101-1-7619 / Wyoming.fm / 16.08.2005
2
Do not pollute the environment. Emergency numbers cannot be dialled if the keypad lock (page 3) is activated!
Not all of the functions described in this manual are available in all countries.
Place the cover on the battery compartment as
shown in the diagram, then push it up until it snaps
into position.
Setting up the telephone for use
Step 1: Connecting the base
Opening the battery cover
1
2
Connect the phone jack with the phone cord 1
and the mains units (230 V) with the power cord
2 as shown. Place the cords in the cord recesses.
The two cords must be plugged in at all times.
◆ Use only the mains unit supplied (see the bottom of the base).
◆ If you ever purchase another phone cord from a
store, ensure that the phone conductors are correctly connected: 3-4 connection of the telephone
conductors/EURO CTR37.
Step 2: Setting up the handset
Fitting the battery pack
◆ Fit the plug into the socket.
◆ Insert the battery (see diagram below).
◆ Place the battery leads in the cable guides.
Press down on the battery cover below its upper
end and slide the cover down.
W
◆ Place the battery leads in the cable
guides so that the battery cover cannot
catch on the leads and damage them
when it is closed.
◆ Only insert the recommended rechargeable battery pack, i.e. never use a
normal battery pack as this could damage
your health and cause injury.
◆ Never use non-Siemens battery chargers as this could damage the battery pack.
◆ Only place the handset in the base/
charging cradle that is intended for it.
Step 3: Registering the handset to the
base and charging the battery pack
Place your handset in the base with the display
facing forwards. The handset will now register
automatically to the base. For procedure see
page 5.
Charging the battery pack
Closing the battery cover
To charge the battery pack, leave the handset in
the base for approx. ten hours. The battery pack is
now fully charged. The charge status of the battery
pack is correctly displayed only after uninterrupted
charging/discharging. Therefore you should not
interrupt the charging process.
Charging is electronically controlled to prevent
overcharging. The battery pack heats up during
charging; this is normal and not dangerous. After
a time the charge capacity of the pack will
decrease for technical reasons.
You must set the date and time to ensure that the
times of calls are logged correctly (page 10). Your
telephone is now ready to use.
Gigaset A140/A240 / GBR / A31008-M1643-L101-1-7619 / Wyoming.fm / 16.08.2005
3
Activating/deactivating the handset
Muting
Press the 'end call' key a and hold.
If you place a deactivated handset in the base station or charger, it will automatically activate.
You can mute you handset when making external
calls. The caller hears a on hold melody. You do not
hear your caller either.
Press the display key INT. The call is 'held' (on hold
melody).
To cancel the function: Press a briefly.
Activating/deactivating the keypad lock
You can "lock" the keys on the handset to protect
the keypad against inadvertent activation.
To activate: press the hash key R and hold.
The display shows the icon Ø.
To deactivate: press the hash key R and hold.
The keypad lock deactivates automatically when
you receive a call and activates again after the call.
When the keypad lock is active you cannot even
call emergency numbers!
Making calls
Making external calls/Ending a call
External calls are calls using the public telephone
network.
~ (Enter the number) c.
The number is dialled. (Or you can first press c
[dial tone] and then enter the number.) During the
call you can adjust the earpiece volume with t
and s.
End the call/cancel dialling:
Press the end call key a.
You can automatically insert a network provider
prefix before any number (see Menu Tree, PRESELECT, page 10).
¢
Answering a call
Handsfree (Gigaset A240 only)
If you want to swtich to handsfree mode after you
have dialled the number, press and hold the talk
key c. As long as the handsfree mode is activated
the talk key c lights up continuously. During a
call you can switch between earpiece and handsfree mode by pressing the talk key c. To adjust
the volume press t or s.
Using the directory and other
lists
Directory and speed dial list
These two lists are used in the same way.
To open the directory: Press h.
To open the speed dial list: Press C.
Directory: Can store up to 20 numbers and associated names.
Speed dial list: Can store up to 8 numbers (12 digits max.), e.g. private phone numbers, prefixes of
network providers ("Call-by-Call") etc.
Press the h or C key to open the required list
then press MENU. The following functions are
available:
Your handset rings and you wish to take the call:
Press the talk key c.
If "Auto Answer" is active (page 6) just lift the
handset out of its base/charging cradle.
EDIT ENTRY
Add/edit number and use to
dial
NEW ENTRY
Save new phone number
SHOW ENTRY
Show/edit number
Calling Line Identification
DELETE
Delete a single entry
When you get a call, the caller's number will be displayed on your handset; the caller's name will be
displayed if it is stored in the directory .
Requirements:
1 You have asked your network provider for the
caller's number (CLIP) to be displayed on your
handset screen.
2 The caller has asked the network provider for
his number to be identified (CLI).
The display shows
if you have not requested
CLIP, WITHHELD if the caller has withheld CLI, or
UNAVAILABLE if it has not been requested.
Clear the list: h/C
¢MENU¢L ¢OK.
Gigaset A140/A240 / GBR / A31008-M1643-L101-1-7619 / Wyoming.fm / 16.08.2005
4
Storing a number in the directory/speed dial list
h/C¢ MENU ¢ NEW ENTRY
~OK
Enter phone number and confirm.
~OK
Directory: Enter name and confirm.
Speed dial: Enter the digit of the
required speed dial key (2–9), then
enter the name and confirm.
a
Press and hold (back to idle status).
Table for text/numerical entry: see page 7.
Cursor control: see page 1.
Dialling with the directory
h
~
Enter the first letter of the name.
s
If there is more then one entry,
select the name.
c
Press the talk key.
Example: Press key I long
¢c.
Last number redial list
This list contains the five last dialled numbers.
Þ (open the list)
MENU.
The following functions are available:
¢
EDIT ENTRY
COPY TO DIR
Clear the list: Þ
Add/edit number and use to
dial
Store number in directory
¢MENU¢L ¢OK.
Dialling a number
You can select a number from the last number
redial list:
Þ
Select an entry
c.
¢
Press the display key Û to open the caller list and
network mailbox list (see Menu Tree, page 10).
Calls list: The numbers of the last 30 missed calls
are stored.
When the phone is in idle status, new missed calls
are indicated by a flashing Û .
Example of how the calls list appears:
CALLS 02/08
Number of old, read entries
Number of new entries
Opening the calls list and selecting an entry
Open the directory.
Speed dialling
Calls list/Network mailbox list
¢
You can view entries you have already read.
Û
s CALLS
Open calls list.
OK
Confirm.
The last incoming call is displayed.
Select entry.
s
Using the calls list
¢
¢
Û
Select an entry (see above)
MENU.
The following functions are available:
DELETE
Delete an individual number
COPY TO DIR
Store a number in the directory. Enter name
TIME
Establish date and time of a call
STATUS
Read or not read
DELETE LIST
Delete complete calls list
Calling back a caller from the calls list:
Û
Select an entry
c.
¢
¢
Gigaset A140/A240 / GBR / A31008-M1643-L101-1-7619 / Wyoming.fm / 16.08.2005
5
Registering and de-registering
handsets
You can register up to four handsets on your base
station.
A Gigaset A14/A24 handset that is not yet registered on a base is registered automatically. Other
handsets must be registered manually.
Automatic registering:
Gigaset handset A14/A24
Internal calls
Internal calls are no-cost calls to other handsets
that are registered to the same base.
Press the display key.
Your own handset is marked "<".
INT
either ...
Call a single handset:
Enter number of handset,
e.g. 2.
~
Any Gigaset A14/A24 handset that is not registered
to a base can be registered automatically. To register a handset for the first time, place it in the base
with the display facing forward. Registering takes
about 1 minute; a number of icons flash in the display. The handset is automatically assigned the
next available internal number (1–4). This number
appears in the top left of the display after successful registering, e.g. "2". If all of the internal numbers 1 to 4 are used up (i.e. four handsets have
been registered), handset number 4 is de-registered and overwritten.
Manual registering:
Gigaset handset A14/A24
¢
Using several handsets
¢
1. On the handset: MENU
REGISTER HS
enter your system PIN (default is 0000)
OK.
The display shows REGISTER HS during the registration procedure.
2. On the base: Within 60 sec. of entering the system PIN, press the register/paging key on the front
of the base (page 1) and hold for approx. 3 sec.
The registration process starts.
¢
Manual registering: Other handsets
Other handsets are registered as follows:
1. On the handset: Start to register your handset
as described in its operating instructions.
2. On the base: Press the register/paging key on
the front of the base (page 1) for approx. 3 sec.
The registration process starts.
De-registering handsets
You can de-register your Gigaset A14/A24 from the
base station as follows
INT
Select handset
MENU
¢
¢
¢
DE-REG H/SET ¢ OK¢
Enter the system PIN (default is 0000) ¢ OK ¢
DE-REGISTER? ¢ OK ¢ a.
The internal number disappears from the de-registered handset. Handsets that have not been deregistered retain their internal number.
or ...
Calling all handsets:
Press the star key.
P
... then
Ending the call:
Press the end call key.
a
Internal conference/Call connecting
You are in conversation with an external caller.
To confer:
INT (the external caller hears the on hold melody)
Select a handset
c (confer with internal number).
End: MENU
GO BACK
OK.
You are reconnected with the external caller.
Or to connect the call:
INT
Select a handset
c (announce the
call if required)
a Press the end call key.
You can also press the end call key a immediately (without announcing the call). If the internal
number does not answer or is busy the call will
come back to you automatically.
¢
¢
¢
¢
¢
¢
¢
Barging in on an external call
You are conducting an external call. An internal
caller can 'barge in' on your call and join in the conversation (everybody hears a beep). Requirement:
The BARGE IN function is activated.
Activating/deactivating internal barge-in
¢
MENU
BASE SET
BARGE IN (‰ = on).
¢ ADD FEATURES ¢
Internal barge-in
The display shows LINE IN USE. You wish to barge
in on the call.
c Press the talk key.
You are connected. Everyone hears a signal tone.
The display shows LISTENING IN.
End: a Press the end call key.
Gigaset A140/A240 / GBR / A31008-M1643-L101-1-7619 / Wyoming.fm / 16.08.2005
6
If one of the internal callers presses the end call
key a, a signal tone sounds. This does not affect
the connection between the other handset and the
external caller.
Looking for a handset ("paging")
If you have mislaid your handset you can page it
with the help of the base. To do this, briefly
(2 seconds max.) press the register/paging key on
the front of the base (page 1). All handsets will
ring at the same time.
End paging: Briefly press the registration/paging
key (on the base) or the talk key c on any handset.
i
Pressing the registration/paging key for
more than 2 seconds puts the base into
registration mode. The handsets will not
ring in this case.
Handset settings
Changing the display language
You can view the display texts in different languages.
MENU
O2
Select language
(e.g. digit combination Q1 for German):
¢
Q
Q
Q
Q
Q
1
2
I
4
5
¢
German
English
French
Italian
Dutch
Q
Q
Q
Q
L
M
N
O
Spanish
Portuguese
Turkish
Greek
Activating/deactivating Auto Answer
When you get a call you can simply lift the handset
out of the base or charger without having to press
the talk key c.
To activate: MENU
O 1 1.
To deactivate: MENU
O 1 Q.
¢
¢
Activating/deactivating battery
warning tone
If this function is activated, a beep sounds in idle
status when the battery pack is almost flat.
To deactivate: MENU
O 4 Q.
To activate: MENU
O 4 1.
¢
¢
Resetting the handset
Restoring the factory settings of the handset will
not affect entries in the directory, the calls list or
the speed dial list or the handset's registration to
the base.
MENU
¢ OI ¢ RESET ? ¢ OK.
Base station settings
Changing pause after line seizure
You can change the length of the pause that is
inserted between pressing the talk key c and
sending the number:
MENU
NO1L
The digit for the current
pause length flashes: 1 = 1 sec.; 2 = 3 sec.;
3 = 7 sec.; 4 = 2.5 sec.
Enter digit
OK.
¢
¢
¢
¢
Changing the pause after the Recall key
(dial pause)
You can change the length of the dial pause if your
PABX requires this (refer to the operating instructions of the PABX):
MENU
NO12
The digit for the current
pause length flashes: 1 = 800 ms; 2 = 1600 ms;
3 = 3200 ms
Enter digit
OK.
¢
¢
¢
¢
To insert a dial pause: press S for 2 seconds. A "P"
appears in the display.
Version: 16.08.2005
A 3 1 0 0 8 - M1 6 4 3 - L 1 0 1 - 1 - 7 6 1 9
Issued by
Information and Communication mobile
Haidenauplatz 1
D-81667 Munich
© Siemens AG 2004
All rights reserved. Subject to availability.
Right of modification reserved.
Printed in Germany. Siemens Aktiengesellschaft
http://www.siemens.com.
Gigaset A140/A240 / GBR / A31008-M1643-L101-1-7619 / Wyoming.fm / 16.08.2005
7
!
Appendix
Contact with liquid
Character set chart
If the handset has come into contact with liquid:
1 Switch the handset off and remove the battery pack immediately.
2 Allow the liquid to drain from the handset.
3 Pat all parts dry, then place the handset with
the battery compartment open and the keypad
facing down in a dry, warm place for at least
72 hours (not in a microwave, oven etc.).
4 Do not activate the handset again until it is
dry.
When it has fully dried out you will normally be
able to use it again.
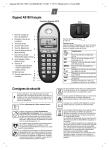
Press the required key the number of times indicated.
Q
1
1x
2x
3x
4x
5x
6x
+
0
-
|
?
_
Space
1
R
# (appears in display as j)
P
*
/
(
)
,
Specifications
Questions and answers
Power consumption
In ready status: approx. 2 Watt. During charging:
approx. 3 Watt. During a call: approx. 2 Watt.
General specifications
Standard
Range
Mains unit
Operating temperature
Dimensions/Handset
Dimensions/Base
Weight/Handset
Weight/Base
Re-chargeable battery
pack
Battery pack re-order
number
Battery pack capacity
Charging time
Calling time
Standby time
DECT and GAP (compatible)
up to 300 m outdoors,
up to 50 m indoors
230 V ~/50 Hz
+5 °C to +45 °C
154 x 59 x 29 mm (L × W × H)
87 x 129 x 89 mm (L x W x H)
approx. 127 g
(including battery pack)
approx. 121 g
NiMH, 2xAAA Pack
V30145-K1310-X359,
A5B00075178739
550 mAh
approx. 10 hours in base,
approx. 5 hours in charging
shell
approx. 10 hours
approx. 170 hours (7 days)
Care
Wipe the base station and handset with a damp
cloth or an antistatic wipe. Never use a dry cloth!
This can cause static!
If you have any queries about the use of your telephone, go to
www.siemens.com/gigasetcustomercare
for assistance 24/7. The table below contains a list
of common problems and possible solutions.
Problem
Cause
Solution
Nothing
The handset is not Press the end call
appears in the switched on.
key a for approx.
display.
5 seconds or place
the handset in the
base.
Charge/replace the
Battery pack is
battery pack (page 2).
flat.
No response The keypad lock is Press the hash key R
to key press, activated.
for approx. 2 sec
"HOLD KEY"
(page 3).
appears in the
display.
Move the handset
The handset is
No wireless
connection to outside the range closer to the base.
the base, dif- of the base.
The handset is not Register the handset
ferent icons
(page 5).
registered.
flash in the
Check the power conThe base is not
display.
nector at the base
switched on.
(page 2).
Cords not routed Check cord routing
(page 2).
correctly
Gigaset A140/A240 / GBR / A31008-M1643-L101-1-7619 / Wyoming.fm / 16.08.2005
8
Service (Customer Care)
Authorisation
We offer you support that is fast and tailored to
your specific needs!
Our Online Support on the Internet:
www.siemens.com/gigasetcustomercare
This site can be accessed at any time wherever
you are. It will give you 24/7 support for all our
products. It also provides interactive troubleshooting, a list of FAQs and answers plus operating
instructions for you to download.
You will also find frequently asked questions and
answers in the Questions and Answers section of
this user guide.
Your Gigaset is intended for operation in your
country, as depicted on the underside of the base
station and the packaging. Country-specific conditions have been taken into account. The CE mark
certifies conformity of the device with the essential
requirements of the R&TTE directive.
For fast and dependable assistance with any
repairs or guarantee/warranty claims, contact our
Service Centres.
Service-Center United Kingdom:
08705 334411
You will be given personal advice about our range
of products on our Premium Hotline:
United Kingdom:
0906 9597555
0.75 £/minute
Please have your receipt ready when calling.
Replacement or repair services are not offered in
countries where our product is not sold by authorised dealers.
Excerpt from the original declaration:
"We, Siemens AG, declare, that the above mentioned
product is manufactured according to our Full Quality
Assurance System certified by CETECOM ICT Services
GmbH in compliance with ANNEX V of the R&TTE-Directive
99/5/EC. The presumption of conformity with the essential
requirements regarding Council Directive 99/5/EC is
ensured.
Senior Approvals Manager"
The Declaration of Conformity (DoC) has been signed.
In case of need, a copy of the original DoC can be made
available via the company hotline.
Gigaset A140/A240 / GBR / A31008-M1643-L101-1-7619 / Wyoming.fm / 16.08.2005
9
Guarantee Certificate United Kingdom
Without prejudice to any claim the user (customer)
may have in relation to the dealer or retailer, the
customer shall be granted a manufacturer's Guarantee under the conditions set out below:
◆ In the case of new devices and their components exhibiting defects resulting from manufacturing and/or material faults within
24 months of purchase, Siemens shall, at its
own option and free of charge, either replace
the device with another device reflecting the
current state of the art, or repair the said
device. In respect of parts subject to wear and
tear (including but not limited to, batteries, keypads, casing), this warranty shall be valid for
six months from the date of purchase.
◆ This Guarantee shall be invalid if the device
defect is attributable to improper treatment
and/or failure to comply with information contained in the user manuals.
◆ This Guarantee shall not apply to or extend to
services performed by the authorised dealer or
the customer themselves (e. g. installation,
configuration, software downloads). User manuals and any software supplied on a separate
data medium shall be excluded from the Guarantee.
◆ The purchase receipt, together with the date of
purchase, shall be required as evidence for
invoking the Guarantee. Claims under the Guarantee must be submitted within two months of
the Guarantee default becoming evident.
◆ Ownership of devices or components replaced
by and returned to Siemens shall vest in Siemens.
◆ This Guarantee shall apply to new devices pur-
chased in the European Union. For Products
sold in the United Kingdom the Guarantee is
issued by: Siemens plc, Information & Communication Mobile Devices. Siemens House,
Oldbury, Bracknell, RG12 8FZ.
◆ Any other claims resulting out of or in connection with the device shall be excluded from this
Guarantee. Nothing in this Guarantee shall
attempt to limit or exclude a Customers Statutory Rights, nor the manufacturer's liability for
death or personal injury resulting from its negligence.
◆ The duration of the Guarantee shall not be
extended by services rendered under the terms
of the Guarantee.
◆ Insofar as no Guarantee default exists, Siemens
reserves the right to charge the customer for
replacement or repair.
◆ The above provisions does not imply a change
in the burden of proof to the detriment of the
customer.
To invoke this Guarantee, please contact the Siemens telephone service. The relevant number is to
be found in the accompanying user manual.
Gigaset A140/A240 / GBR / A31008-M1643-L101-1-7619 / Wyoming.fm / 16.08.2005
10
Menu tree
Your phone has an extensive range of features.
These are offered in the form of menus.
With the phone in the idle status, press MENU
(open menu), scroll to the required function and
then press OK to confirm your choice.
1
SEL SERVICES
1-1
WITHHOLD NO
1-2
CALL WAITING
1-3
RINGBACK OFF
1-4
CALL DIVERT
To return to idle status: press key a long.
There are two ways in which you can access a function:
◆ Scroll with keys t and s,
◆ Key in the appropriate digit combination,
e.g. MENU I 1 2 to set the time.
Select services are functions provided by your network provider.
You can only use these services if you have requested them from
your network provider. Your network provider can supply further
information about these functions.
When you have chosen a select service, do not hang up until after
the confirmation tone from the phone network.
The following select services are available during the call when you press the MENU display key: RINGBACK, ACCEPT,
REJECT, EXTN CALL, END CALL, CONFERENCE, END CONF.
2
3
AUDIO SET UP
BASE SET
2-2
RINGER
5 level settings + "Crescendo" + OFF
2-3
MELODY
10 selectable melodies
3-1
DATE/TIME
3-1-1
DATE SET
Input format: DDMMYY
3-1-2
CLOCK SET
Input format: HHMM
3-1-3
CLOCK MODE
Select 12 or 24 hour clock
3-2
SYSTEM PIN
Change system PIN (default is 0000)
3-3
BASE RESET
Restore factory settings (system PIN does not change, handsets are
still registered)
3-4
ADD FEATURES
3-4-1
DIAL MODE
3-4-2
TBR
3-4-3
BARGE IN
3-5-1
PRESELECT NO
3-5
4
ANS MACHINE
4-1
PRESELECT
Select between TONE and PULSE
Use s to select the setting
Activate/deactivate the function
Network provider prefix to be inserted
automatically before any dialled
number.
MAILBOX
MAILBOX --> Store the number of the network mailbox for fast access (for dialling,
press the 1 key and hold in idle status).
Network mailbox: Your service provider's answering machine; must be ordered separately. The network mailbox list can be displayed if your network service provider supports
this function and the mailbox has been defined for fast access.
5
REGISTER HS