1
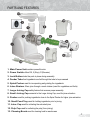
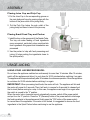
Slow Juicer
KSJ 1501
INSTRUCTION MANUAL
1
CONTENTS
Introduction.................................................................................................................. 3
Important Safeguards................................................................................................... 3
Package Contents-Unpacking....................................................................................... 6
Parts And Features....................................................................................................... 7
Assembly...................................................................................................................... 8
Usage-Juicing............................................................................................................. 10
Storing Juice-Tips - Fruit / Vegetable Juicing Table..................................................... 11
Troubleshooting.......................................................................................................... 13
Warranty..................................................................................................................... 14
2
INTRODUCTION
Maximize the beneficial nutrients in your fresh fruit and vegetable juices!
Extract the absolute best nutritional and taste benefits of juiced fruits and
vegetables with the dual-stage extraction power.
The gentle low-rpm juicing process delivers even more of the essential
nutrition from every last drop of juice.
•220-240V / 50Hz / 150W
•Features large feeding tube
•Slow speed, high juice extraction
keeps the nutrients intact
•Powerful 150 Watt motor with long
continuous work time
•Stainless steel strainer for more
fruits & vegetables juices
•Features reverse function for smooth
operation
•Safety feature protects the unit from
overheating
•Easy to clean parts
•Include juice and pulp collection cup
IMPORTANT SAFEGUARDS
Before using the electrical appliance, the following basic precautions should
always be followed including the following:
1. Read all instructions.
2. Close supervision is necessary when the appliance is operated near children. Do not allow
children to use this appliance.
3. Before use, check that the voltage of wall outlet corresponds to the one shown on the rating plate.
4. Do not operate any appliance with a damaged cord or plug or after the appliance
malfunctions, or is dropped or damaged in any manner. Return appliance to the nearest
authorized service facility for examination, repair or electrical or mechanical adjustment.
3
5. If the supply cord is damaged it must be replaced by the manufacturer or an authorized
service agent or a qualified technician in order to avoid a hazard.
6. Do not let cord hang over edge of table or hot surface.
7. Do not immerse plug, cord or housing into water due to the risk of electric shock.
8. Before use, please check if the power cord, the plug, the juice strainer, the spiral pusher and
any other part is damaged. If any of the parts is damaged, stop using the appliance. Do not
try to repair it yourself.
9. Before connecting to the power supply make sure that the juicing body, the spiral pusher,
the juicing body cap and all other parts have been properly assembled.
10. The use of accessories not recommended by the manufacturer may cause injuries to persons.
11. Do not operate the appliance for other than its intended use.
12. When not in use, before putting on or taking off parts and before cleaning - unplug the
appliance from the outlet.
13. Avoid contact with moving parts while in use to prevent injury and/or damage to the
appliance.
14. To avoid injury, never put hands or sharp objects into the feeder tube or touch the spiral
pusher when the appliance is running. Keep your face away from the feeder tube.
15. Cut food ingredients down to pieces big enough to fit through the feeder tube of the juicing body.
When processing vegetables or fruits, remove all the cores, hard seeds, thick skin or shells.
16. When feeding a food ingredient, do not use a lot of force to push the food down.
17. After juicing some vegetables and fruits, staining may occur on the juice strainer, juicing
body cap, spiral pusher and other accessories. It is normal and will not affect taste.
18. Do not leave the appliance switched on continuously for more than 10 minutes. After
10 minutes, switch off the appliance and allow it to cool down for 20-30 minutes before
switching it on again.
19. The appliance will stop automatically after 20 minutes of continuous operation. Allow the
appliance to cool down for 20-30 minutes before switching it on again.
20. Never feed food by hand. Always use food pusher.
21. Do not use fingers to scrape food away from discharge disk while appliance is operating.
Small bruise may occur.
22. Prior to using the device, always check to ensure that all parts are properly assembled.
For correct placement of parts, please refer to ASSEMBLY section.
23. Do not disassemble the parts of the appliance immediately after use until both the motor
and the Spiral Pusher have stopped and the power supply has been disconnected.
4
24. This appliance is not intended for use by persons (including children) with reduced physical,
sensory or mental capabilities, or lack of experience and knowledge, unless they have been
given supervision or instruction concerning use of the appliance by a person responsible
for their safety. Children should be supervised to ensure that they do not play with the
appliance.
25. Do not use in outdoors.
26. Do not move the appliance when in use.
27. Unplug from main power socket when not in use.
28. Servicing and repair should only be conducted by a qualified technician.
29. Do not clean the appliance with any abrasive cleaning agents or steel wool.
30. Do not submerge the main unit in water.
31. Do not sterilize any accessories of the appliance using hot water with a temperature higher
than 176°F (80°C) or a microwave oven. The unit may get overheated, deformed and
damaged.
32. When processing hard foods, the motor will lock. The appliance will tick and the motor will
pause for 2 seconds. Then it will work in reverse for 5 seconds (to release food that is stuck)
before coming to a stop. In this case, the appliance can begin to run again after the switch is
moved to the “0” position and then to ON position
33. When the motor locks, stops and cannot automatically reverse, switch off the power switch
and put it on the “0” position. Press the “R” button of the power switch to discharge the
food ingredients in the appliance and finally press the “ON” button of the power switch for
normal use of the appliance. If the motor is still locked, it is suggested to remove the food
ingredients in the spiral pusher before continue to use the appliance.
SAVE THESE INSTRUCTIONS
FOR HOUSEHOLD USE ONLY.
Do not attempt to repair the appliance. Contact a qualified service technician.
A short power supply cord is provided to reduce the hazards resulting from entanglement or
tripping over long cord.
Do not use extension cord as it can be pulled on by children causing the unit to tip over.
5
PACKAGE CONTENTS-UNPACKING
PACKAGE CONTENTS
• Main Power Unit (Power Base)
• Feeder Tube
• Spiral Pusher
• Juice Strainer
• Large Juicing Cap
• Small Juicing Cap
• Pusher
• Small Food Tray
• Juice Cup
• Pulp Cup
• Cleaning Brush
UNPACKING - BEFORE FIRST USE
Unpack the unit and all parts and remove all packaging materials. Before using the unit for the
first time, wipe the surface of the main power unit with damp cloth. Rinse all parts (not the Main
Power Unit) in warm soapy water prior to use. Dry all parts thoroughly.
WARNING: Do not immerse the unit, cord or plug in water or any other liquid.
Do not use abrasive cleansers.
6
PARTS AND FEATURES
1. Main Power Unit-contains powerful motor
2. Power Switch-offers ON, 0 (Stop), R (Reverse)
3. Lock Button-locks the parts in place during assembly
4. Feeder Tube-food ingredients are fed through the tube to be processed
5. Spiral Pusher-used for incorporating and grinding the ingredients
6. Juice Strainer- filters juice through a mesh strainer (used for vegetables and fruits)
7. Large Juicing Cap-safety feature that ensures proper assembly
8. Small Juicing Cap-connects to the Large Juicing Cap, used for juice extraction
9. Pusher-used for pushing ingredients close to the Spiral Pusher for higher juice extraction
10. Small Food Tray-used for holding ingredients prior to juicing
11. Juice Cup-used for collecting the extracted juice
12. Pulp Cup-used for collecting the pulp (from juicing)
13. Cleaning Brush-used for cleaning hard to reach areas
7
PARTS AND FEATURES
ASSEMBLY
UNIT ASSEMBLY:
Attaching Feeder Tube
1. Attach the Feeder Tube to the Main body.
2. Align the notches of the Feeder Tube to the
openings on the Main Body.
3. While pushing the Feeder Tube in, rotate it
counterclockwise until you hear a snap. To take
the Feeder Tube off, press and hold the Lock
button and rotate the Feeder Tube clockwise.
Attaching Spiral Pusher
Align the metal rod of the Spiral Pusher with the
opening in the Main Body.
Push it in. If the Spiral Pusher will not go in all the
way, slightly rotate it and try again.
Attaching Juicer Strainer (for juicing)
With the wide opening first, align the notches on the
Juicer Strainer to the openings in the Feeder Tube.
Push it in.
8
ASSEMBLY
Attaching Large Juicer Cap (for juicing)
While pushing the Large Juicer Cap into the Feeder
Tube, align the notches on the Large Juicer Cap to
the openings in the Feeder Tube.
Turn the Juicer Cap counterclockwise.
Attaching Small Juicing Cap (for juicing)
Push the Small Juicing Cap into the Large Juicer Cap,
aligning the notches on the Large Juicer Cap to the
openings in the Small Juicing Cap.
Turn the Small Juicing Cap counterclockwise until the
triangle mark on the Large Juicer Cap matches up with
the “2” position on the Small Juicing Cap.
Small Juicing Cap
9
PARTS AND FEATURES
ASSEMBLY
Placing Juice Cup and Pulp Cup
1. Put the Juice Cup in the corresponding groove on
the main body and have its opening align with the
bottom of the juice outlet of the juicing body.
2. Put the Pulp Cup below the pulp outlet of the
juicing body and have it close to the juice cup.
Placing Small Food Tray and Pusher
1. Install the tray on the upper end of the Feeder Tube.
The tray can make feeding of food ingredients
more convenient, particularly when small-particle
food ingredients like grapes and strawberries are
processed.
2. Use the pusher to help with food processing and
juicing (it helps pushing the ingredients closer to
the spiral pusher).
USAGE-JUICING
USING YOUR JUICER/PROCESSOR:
Do not leave the appliance switched on continuously for more than 10 minutes. After 10 minutes,
switch off the appliance and allow it to cool down for 20-30 minutes before switching it on again.
The appliance will stop automatically after 20 minutes of continuous operation. Allow the appliance
to cool down for 20-30 minutes before switching it on again.
IMPORTANT: When processing hard foods, the motor will lock. The appliance will tick and
the motor will pause for 2 seconds. Then it will work in reverse for 5 seconds (to release food
that is stuck) before coming to a stop. In this case, the appliance can begin to run again after
the switch is moved to the “0” position.
When the motor locks, stops and cannot automatically reverse, switch off the power switch
and put it on the “0” position. Press the “R” (Reverse) button of the power switch to discharge
the food ingredients in the appliance and finally press the “ON” button of the power switch
for normal use of the appliance. If the motor is still locked, it is suggested to remove the food
ingredients in the Spiral Pusher before continuing to use the appliance.
10
Juicing:
1. Connect the unit to the power supply. Please note that the unit has a three pin plug. Do not
modify the plug in any way. Only use in the appropriate wall outlet. Make sure the switch is in
OFF position (0) before the power supply is connected. Make sure you have installed the Small
Juicing Cap for juicing. Please refer to p. 6 for Assembly.
2. Wash vegetables and fruits, cut them into pieces small enough to fit through the Feeder Tube
and put them on the Small Food Tray. When processing vegetables or fruits, remove all the
cores, hard seeds, thick skin or shells.
3. Press the ON switch located in the back of the unit. Due to risk of electric shock, do not touch
the power switch with wet hands. The unit will run for approximately 10 minutes.
4. Place food ingredients inside the Feeder Tube and use the Pusher to push the food ingredients
down. Do not push the food ingredients forcefully, use firm pressure. IMPORTANT: Never feed
food by hand. Always use Pusher. Never put fingers or other objects into the Feeder Tube.
5. If the pulp cup or the juice cup get full, turn the unit OFF, disconnect the power supply and
remove the pulp or pour the juice before continuing to use the appliance.
6. Once the juicing is finished and there is no more juice flowing out of the juice outlet, switch
the unit OFF and disconnect the power supply. Do not take the Juice Cup away from the juice
outlet until both the Spiral Pusher and the Juice Strainer have completely stopped. NOTE: To
preserve the nutrients in the juice, it is highly recommended to drink the extracted juice right away.
STORING JUICE-TIPS - FRUIT/VEGETABLE JUICING TABLE
STORING YOUR JUICE
You may juice your fruits and vegetables and store them in the refrigerator for future consumption.
The longer the juice is stored in the refrigerator, it starts losing vitamins and nutrients. If you have to
store juice, make sure to place it into the airtight container, preferably glass. If you choose to freeze
juice, use freezer safe containers. Do not store or freeze juice for a period longer than 1 month.
JUICING TIPS
• Choose only fresh vegetables and fruits as they contain more juice. The best fruits/vegetables
for juicing are pineapples, beets, celery stalks, apples, cucumbers, spinach, melons, tomatoes,
oranges, grapes, etc.
• Newly extracted apple juice will quickly turn brown. Add a couple of drops of lemon juice to slow
down the process.
• Leaves and leaf sticks (such as lettuces) may be put into the juicer for juice extraction.
• It is not necessary to peel thin skin of vegetables or fruits if the skin is thin. The skin of vegetables
and fruits like oranges, pineapples and raw beets is thick and needs to be removed. The seeds
of citrus fruits should be removed because they will make juice bitter.
11
• During the apple juice extraction, the concentration of the apple juice depends on the type
of the apples used. If apples with more juice are used, the extracted juice will be clearer.
Therefore, please choose the type of the apples used for juice extraction according to the juice
concentration you want.
• The nutrients of common vegetables and fruits are given in the table below.
FRUITS/VEGETABLES
VITAMINS
Apple
Vitamin C
Apricot
Rich in dietary fiber and containing Vitamin K
Beet
A good source of folic acid, dietary fiber, Vitamin C and K
Blueberry
Vitamin C
Brussel Sprouts
Vitamins C, B, B6 and E, folic acid and dietary fiber
Cabbage
Vitamin C, folic acid, K, Vitamin B6 and dietary fiber
Carrot
Vitamins A, C and B6 and dietary fiber
Celery
Vitamin C and K
Cucumber
Vitamin C
FRUITS/VEGETABLES
VITAMINS
Fennel
Vitamin C and dietary fiber
Grape
Vitamins C and B6 and K
Kiwi
Vitamin C and K
Melon
Vitamins A and C, folic acid and dietary fiber
Nectarine
Vitamins C and B3, K and dietary fiber
Peach
Vitamins C and B3, K and dietary fiber
Pear
Dietary fiber
Pineapple
Vitamin C
Raspberry
Vitamins C, Fe, K and Mg
Tomato
Vitamins A, C and E, dietary fiber and folic acid
CLEANING:
WARNING: Do not immerse the Main Power Unit, cord or plug in water or any other
liquid. Do not use abrasive cleansers. The unit is NOT dishwasher safe.
• Before cleaning the appliance, move the switch to the OFF position and disconnect the
power supply.
• Clean the unit immediately after each use. This greatly simplifies the cleaning process.
12
1.Remove the Pushing Rod and the Small Food Tray.
2.While pressing the Lock/Unlock button, turn the Feeder Tube assembly clockwise (with Spiral
Pusher and Large Juice Cap still attached) to remove it.
3.Next disassemble the Feeder Tube assembly by taking off the Small Juicing, Noodle or Meat
cap first. Then take off the Large Juicing Cap, Juice Strainer or Squeezer (depending on what
you were using) and Spiral Pusher.
4.After juicing some vegetables and fruits, staining of the Juice Strainer, the Juicing Body Cap,
the Spiral Pusher and other accessories may occur. It is normal.
All parts except the Main Power Unit can be washed with a mild soap solution. Do not use
abrasive cleansers.
DO NOT SUBMERGE THE MAIN POWER UNIT, CORD OR PLUG IN WATER
OR ANY OTHER LIQUID.
• Wipe the Power Base with a soft damp cloth. Do not place in dishwasher. Certain foods can
discolor the container and the accessories. Rub it gently with a soft cloth or sponge.
TROUBLESHOOTING
PROBLEM
CAUSE
SOLUTION
The unit is connected
to the power supply
and is turned on, but
fails to work
The plug may not be in
good contact with the
wall outlet.
- Unplug the unit and plug it back in.
- Try another wall outlet.
- Call customer service, or take the unit to a
nearest repair service for examination. Never try
to fix it yourself.
There is a bad smell
coming from a motor in
a first few uses.
This is normal.
The smell will go away
after a few uses.
If you continue having this problem after several
times, call customer service, or take the unit to a
nearest repair service for examination. Never try
to fix it yourself.
The appliance stops
during use
- The voltage is too low
- The unit has too many
food ingredients inside
the Feeder Tube
-The appliance was on
for too long
- Check if the voltage is too low
- Turn the unit off, unplug it and remove the extra
ingredients
- It is a normal occurrence. The unit will resume
working after some time (safety feature).
The unit operates with
a lot of noise
- The Spiral Pusher
and the Juice Strainer
have not been properly
assembled
- The motor in the Main
Power Unit is damaged
- Re-assemble the Spiral Pusher and the Juice
Strainer, ensure proper fit
- Call customer service, or take the unit to a
nearest repair service for examination. Never try
to fix it yourself.
If you experience any other problems, please call our Customer Service at 1800-425-7722 for further assistance.
13
WARRANTY
This product comes with a warranty of 12 months from the date of purchase as specified on
the warranty card. This is against all defective material or workmanship. In the event of a
defect, Future Value Retail Limited or Koryo Authorized Service centre undertakes to repair
the set, free of charge, during the warranty period.
In the event of a defect developing in the product, contact Future Value Retail Limited or
Koryo Authorized Service centre and provide information about the defect, the model
number and serial number of the product.
THIS WARRANT Y IS VOID IF
1. The completed warranty card is not presented to the authorised personnel at the time of
servicing of the product.
2. The product is not operated according to the instructions given in the user manual.
3. Defects are caused by improper or reckless use.
4. Modifications or alterations have been made to the product or if the product has been
tampered with,in any manner whatsoever.
5. Repairs to the product are carried out by anyone other than an authorised company
representative.
6. For defects other than faulty parts or workmanship such as damage due to lightning,
abnormal voltage, spillages, dust, accidental damage, etc.
7. The serial number is deleted or altered.
8. Used for any non–domestic purpose.
OTHER TERMS AND CONDITIONS
1. Repairs or replacement will be carried out either by a Future Value Retail Limited
authorised customer care centre or by a representative.
2. All expenses incurred in collecting the unit(s) or part(s) thereof from the Customer Service
Centre, as well as any other expenses and incidentals will be borne by the customer.
3. Whilst the company will make every effort to carry out repairs at the earliest, it is
made expressly clear that the company is under no obligation to do so in a specified
period of time.
4. The company or its authorised customer centre reserves the right to retain any part(s)
or component(s) replaced at its discretion, in the event of a defect being noticed in the
equipment during the warranty
14
WARRANTY CARD
WARRANTY CARD
THIS CARD IS VALID ONLY IF IT IS FILLED IN COMPLETELY, SIGNED AND
STAMPED BY THE DEALER ON DATE OF PURCHASE
MODEL NO
:
CUSTOMER NAME
:
SERIAL NO :
ADDRESS:
PHONE NO
:
RESIDENCE :OFFICE :
INVOICE/CASH BILL NO :
DEALER’S STAMP
DATE OF PURCHASE :
CUSTOMER SIGNATURE :
* For service request kindly contact Customer Care Centre at : 1800-425-7722, 080-26577722
* Please mail in queries to [email protected]
15
Also Available
Microwave Ovens
Mixer Grinder
Split Air Conditioner
Induction Cook-Top
Juicer Extractor
Window Air Conditioner
OTG
JMG
Geysers & Heaters
Electric Cooker
Hand Blender
Room Heaters
Electric Kettle
Steam & Dry Iron
Immersion Heater
Pop-Up Toasters
Hair Dryer
Ceiling Fan
Sandwich Makers
Air Fryer
TPW Fan
Slow Juicer
Vacuum Cleaner
Emergency Light
Electric Pressure Cooker
Imported by:
Future Value Retail Limited
Tower C, 9th Floor, 247 Park, L.B.S. Marg,
Vikhroli (West), Mumbai - 400 083,
Maharashtra, India.
www.koryoworld.com