1
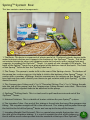
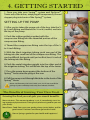
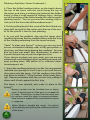
SPRING SYSTEM
OWNER’S MANUAL
CONGRATULATIONS!
We here at Bright Agrotech are so happy that you chose our product. We’re a small
family-owned business in Laramie, Wyoming, and it is our goal to give you the best product possible. We love the equipment
that we’ve developed, and we hope
that you will too.
Thanks for buying our products and
supporting American Agriculture, and,
if you’re ever in the area of Laramie,
Wyoming, give us a holler.
Sincerely,
The Bright Agrotech Team
CONTENTS
1. Overview
System Overview
2. About Bright Agrotech
3. Box Contents: What’s in the Box?
ZipGrowTM Tower Box
SpringTM System Box
4. Getting Started
Basic Assembly
Setting Up the Pump
Addint the Nutrient Solution
Filling the Basin & Installing the Irrigation Tubing
5. Planting a ZipGrowTM Tower
First Planting
6. Running & Maintaining the
System
7. Crops
What Can I Grow?
What Should I avoid?
8. Replanting
9. Troubleshooting
10. Additional Applications
Grow Flowers
Go Aquaponic
Sell Produce
Go Organic
Play Around
11. Staying Safe
Warnings and Cautions
*For the purposes of this instructional guide,
the SpringTM system shown is white. Your
SpringTM will likely be of a different color*
PLEASE READ ENTIRE USER’S MANUAL BEFORE YOU USE OR OPERATE THE SPRINGTM
1. OVERVIEW
SYSTEM OVERVIEW
The SpringTM system consists of a ZipGrowTM tower, the Spring
basin and lid, as well as an irrigation system. Using patented
ZipGrowTM towers, the SpringTM is a little vertical farm, allowing
users to grow vertical, hydroponic crops right out of the box.
The ZipGrowTM tower is held in place by the specially designed
SpringTM basin and SpringTM lid. The system is weighted with
the nutrient solution.
A pump in the basin pumps this solution up through an irrigation line to the top of the tower, where it trickles down through
the special Matrix Medium and plant roots.
The system can be run constantly or on a timer, and needs
minimal maintenance.
The SpringTM is a product designed to help everyone garden,
regardless of experience or ability.
Please read though this manual completely to better understand how
the Spring operates.
ABOUT BRIGHT AGROTECH
2. ABOUT BRIGHT AGROTECH
Bright Agrotech is a small business founded on the high plains
of Laramie, Wyoming. A family owned and operated business,
Bright Agrotech has been farming aquaponically (organic
hydroponics combining aquaculture and hydroponics) using
ZipGrowTM towers for seven of years, and recently decided to
present ZipGrowTM towers to the masses in the form of The
SpringTM.
The SpringTM represents years of farming experience and
scientific research, as well as our own blood, sweat, and tears.
It’s also made possible by incredible support of our family,
friends and surrounding community.
Bright Agrotech has always felt that the future of farming rests
in the hands of small, local farmers serving local markets.
Developing this product is one step closer to the future we want to see.
Thanks for supporting Bright Agrotech and the future of farming!
1
3. BOX CONTENTS
WHAT’S IN THE BOX?
Your SpringTM system comes in two boxes
- one containing the ZipGrowTM tower,
and the other containing the SpringTM
basin, lid and other components.
ZipGrowTM Tower Box:
The ZipGrowTM tower consists of
three components:
1. The Tower Housing
This is the white plastic
housing that squeezes the
black Matrix Medium. It is
made from safe, durable
plastic. The housing has a
hole at the top of it in the
rear of the housing, for
anchoring the tower
during planting. The side
1.
of the tower with the gap
is the front.
2. The Matrix Medium
This is the coarse black fiber inside
the housing. It typically comes in two
pieces per tower, although it can be
cut into smaller pieces and folded to
use in the tower.
3.
2.
3. The Wicking Strip
This is the gray felt strip in the top of
the tower. These strips are designed to be placed between the folded halves of the Matrix Medium. These strips wick nutrient solution
to the plant roots, and are very helpful when you are first getting
started.
Matrix Media: Sustainable and Productive
Bright Agrotech’s Matrix Media is a spun fiber produced from recycled PET-1
plastic water bottles. This lightweight fiber media provides ample amounts of
biological surface area which, in addition to providing a strong anchor for
your plants to hold on to, it also ensures excellent solids filtration and
maximium yields from your favorite crops.
2
SpringTM System Box:
This box contains several components:
1.
3.
5.
2.
4.
6.
1. The Basin: The basin is composed of a basin and a lid. The basin’s sturdy design holds
water/nutrient solution and supports the bottom of the ZipGrowTM Tower. The lid has
an inverted design to return any dripping water to the basin, with a central hole and
supports to support the ZipGrowTM Tower. It is made of safe, durable LDPE plastic. The
back of the SpringTM basin has a plug placed at the bottom rear of the basin. The front
of the SpringTM basin lid has the “Spring” label on it.
2. The Pump: The pump is made to fit in the rear of the SpringTM basin. The bottom of
the pump has suction cups on it to help it stick to the bottom of the SpringTM basin. It
comes with a number of fittings that are unnecessary for setting up the SpringTM system, but may be useful should you choose to get creative with your SpringTM system
down the road.
3. The Compression Fitting and ½” to ¾” Threaded Fitting: The ½” to ¾” fitting threads
into the top of the pump, and the Compression Fitting threads onto that. These two
pieces allow the irrigation tube to be attached to the pump.
4. ZipGrowTM Pulling Hook: This is a tool used to pull medium into and out of the
ZipGrowTM Tower.
5. Nutrient Solution: This is a bottle of starter solution for your SpringTM system.
6. The Irrigation Tube: One end of this tubing is forced into the top of the compression
fitting. The irrigation weight will fit in the other end. This tubing will be pulled through
the hold in the lid of the SpringTM basin and run up to the top of the tower.
7. Irrigation Weight (Not Pictured): This is a special zinc weight that pushes into
the end of the irrigation tubing. It is used to weight the end of the tubing so
that it will be secure when pushed into the medium at the top of the ZipGrowTM
3
4. GETTING STARTED
1. Once you take your SpringTM system and ZipGrowTM
Tower out of the boxes, emptying all components, thread
stopper plug into basin of the SpringTM system.
SETTING UP THE PUMP
2. After you’ve taken the pump out of the box, take the ½
to ¾ inch fitting and thread the ½ inch (smaller) end into
the top of the pump.
3. Push the rubber gasket provided with the
compression fitting into the threaded portion of the
compression fitting.
1
2
3
4. Thread the compression fitting onto the top of the ½
to ¾ inch fitting.
5. With the black irrigation tubing, push one end of the
tubing into the small end of the compression fitting. This
can be difficult, but push until you’ve fit at least ¼ inch of
the tubing into the fitting.
4
6. Push the metal irrigation weight into the other end of
the irrigation tubing. This will fit into the top of the tower.
7. Press the pump down against the bottom of the
SpringTM basin near the plug at the rear.
5
8. Pull the pump cord through the hole in the back of the
SpringTM basin.
Water and Electricity don’t mix! Make sure you do not over fill the
SpringTM System and keep water away from electrical outlets.
The Benefits of Growing Your Own Food:
7
Growing the food you eat gets you several benefits:
More nutrients: The moment produce is cut, it immediately starts losing important phytonutrients. Eating fresh produce is good for you and
your family!
More flavor: Food from your own garden always tastes better, and for
good reason. Freshness and flavor go hand-in-hand!
4
Grow a SpringTM garden for your health and happiness!
8
9
ADDING THE NUTRIENT SOLUTION
9. Using a tablespoon, measure out six tablespoons of the
supplied fertilizer in the SpringTM box.
10. Fill the SpringTM basin with water to the top of the
pillar that holds the base of the tower.
10 11. Pull theTMirrigation tube through the hole in the lid of
the Spring system, then put the lid tightly on the basin.
Now it’s time to plant your ZipGrowTM tower.
11
6
1
5. PLANTING A ZIPGROWTM TOWER
1
2
1. Drive a screw into the top of your planting bench with a
head that is 3/8” or smaller.
2. Place your ZipGrowTM Tower on the bench, with the
anchor hole in the back of the ZipGrowTM Tower over the
screw.
3. Take the pulling hook and pull the two medium halves
out of the housing by pushing the “hook” of the pulling
hook into the gap near the bottom of the tower. Pull the
medium out. Repeat to pull out the piece of medium
above it.
Find out why ZipGrowTM Towers are so productive!
3
Check out our blog!
www.verticalfoodblog.com
5
Planting a ZipGrowTM Tower (Continued...)
4
4. Place the folded medium halves on the bench above
the top of the tower with the crook facing the top of
the tower, and place a wicking strip between the folded
halves so that a small amount of wicking strip is sticking
out of the bottom of the folded media (the side facing the
planting bench). *You do not want the wicking strip to
stick out of the front side of the medium insert.*
5. Put the pulling hook in the crook of the first folded medium half, and pull it a few inches into the top of the tower. At this point it is time to start planting.
5
6. As you pull the medium strip into the tower, place
seedlings between the two medium halves with the stem
of the seedling extending from the tower housing.
*Note* To plant your SpringTM system, you can use seed,
but we recommend starting seeds in Jiffy peat pellets or
plug trays and then transplanting the seedlings. You can
also use bare-root plants (like strawberries) or plants in
6-packs that you buy at your local garden store.
If you choose to plant your own seeds, you can use any
commercial seed starting product including coconut coir,
peat, potting mixes, Jiffy pellets (#7s), rockwool cubes,
vermicompost, etc.
6
7. Space the seedlings however you like (we recommend
standard row spacing for most crops) as you pull the medium piece into the tower. Pull the medium strip all the
way down to within 1” of the bottom of the tower housing. Repeat procedure with the second strip, pulling it
down until it butts against the first strip.
The tower is now planted, and ready to place in the
SpringTM.
SpringTM systems can be knocked over in heavy
winds, if leaned upon or if the basin is not kept full
of water. Protect your system from the wind, and
do not lean upon the tower to prevent accidents.
Keep the basin topped off to ensure that the tower
is supported.
Matrix Media is durable but rough. Use gloves
when planting and pulling the media into and out
of the tower.
6
7
1
INSTALLING THE TOWER INTO THE SPRINGTM
1. Pick the tower up off of the planting bench. Place the
bottom of the tower in the hole in the lid of the SpringTM.
The tower should easily slip into the hole until it comes
to rest on the pillar inside of the SpringTM basin. At this
point, push the tower lightly towards the rear of the
Spring and force the base of the tower down until it seats
in the indentation in the SpringTM pillar. You should feel it
push into the hole in the pillar. It’s a tight fit, but it should
hold the base of the tower tightly.
2
2. At this point, the tower should be seated in the
SpringTM, with the irrigation tubing rising out of the indentation in the rear riser on the lid of the SpringTM. Pull
the irrigation tubing up to the top of the tower, and push
the weight through the anchor hole in the back of the
Tower. Using your fingers, force the irrigation weight between the folded halves of Matrix Medium so that it is
pressed against the top of the
Wicking strip between the folded medium halves.
3. Use the suction cup provided with the
SpringTM system to secure the irrigation
tubing to the back of the tower.
3
4. Take the cord from the pump that is
threaded through the plug-hole in the back of the
SpringTM System, and plug it in.
Your SpringTM system is now running.
For Assembly instructions for SpringTM system light stands,
please see the instructional sheet shipped with that product.
SpringTM systems can be knocked over in heavy
winds, if leaned upon or if the basin is not kept full
of water. Protect your system from the wind, and
do not lean upon the tower to prevent accidents.
Keep the basin topped off to ensure that the tower
is supported.
7
6. RUNNING & MAINTAINING THE SYSTEM
Your SpringTM system can be used for many years without replacing any of the major parts.
We believe in producing durable products that will be useful in the long term. However,
there is some general maintenance that must be done to keep the system in good health.
Topping Off: Every few days check the water level in the SpringTM system. To do this, turn
off the pump and remove the irrigation tube and weight from the ZipGrowTM tower. Then
remove the tower from the SpringTM. Place it on the ground or lean it against a wall while
you check the basin. If the water level has fallen below the top of the support pillar, use
some pre-mixed solution to top the system off, or fill it to the top of the pillar. Then replace
the tower and irrigation tube, and turn the pump back on.
Mixing Solution for “topping off:” To mix the solution for topping off your SpringTM, simply
mix 1 tsp of the supplied fertilizer per gallon of water. Mixed solution can be stored for
several months.
Solution Replacement: Every two weeks, it is recommended that you drain the solution
and replace it with freshly mixed solution. To do this, either take the irrigation line out of
the top of the tower and place it in a drain or receptacle for the solution, or if you’re growing in a place where it’s possible, simply remove the drain plug in the back of the Spring
and
allow the solution to drain onto your lawn or garden. Remove the pump from the basin
and remove the filter and filter housing. Rinse the pump filter out to remove any accumulated solids.
Refill the basin as per the instructions for filling your Spring system for the first time.
This solution can be a great fertilizer for your lawn or gardensimply pour the solution around the base of the plants you
wish to fertilize.
Overview:
Fill with solution mixed at 2 tsp fertilizer/gallon of water (6
Tbs/basin).
Top off with solution mixed at 1 tsp fertilizer/gallon of water.
Drain the system every two weeks and replace the solution.
Maintenance:
Every month, give your SpringTM system a good rinse. If solids
or algae are accumulating in the basin, scrub it and rinse it
with clean water. Clean your pump filter by rinsing in clean
water. Make sure your system is leak and clog free.
Cleaning the Matrix Medium: Every few growth cycles it is
recommended that you clean your Matrix Media (unless
you’re growing aquaponically). Simply hang the medium on a
clothes line, or some other place to dry. Once the medium is dried, flex it to break up the
organic matter inside of it. After flexing it for a while, spray it out with a hose and replant.
8
7. CROP VARIETIES
WHAT CAN YOU GROW?
Just about everything will grow in a SpringTM system, however, some crops grow better
than others. Try to stick to the crops that traditionally have their produce above the soil.
Greens:
•
•
•
•
•
•
•
Lettuces
Kales
Chards
Mustard Greens
Collard Greens
Bok Choy
Etc.
Herbs:
•
•
•
•
•
•
•
Basils
Chives
Rosemary
Oregano
Mint
Cilantro
Etc.
Fruiting Plants:*
•
•
•
•
•
•
Strawberries
Tomatoes
Cucumbers
Melons
Eggplant
Etc.
* Growing fruiting plants requires a different nutrient solution.
Larger vining crops like tomatoes will require some extra support as they reach maturity.
WHAT WON’T GROW AS WELL
Root crops are just about the only thing that won’t grow
very well in the SpringTM system because of the way
the Matrix Media is designed. We would recommend
not growing:
•
•
•
Carrots
Potatoes
Onions
•
•
•
Dr. Storey after harvesting two huge
heads of lettuce from ZipGrowTM
Towers.
Beets
Turnips
Parsnips
IT’S HARVEST TIME!
ARE YOU READY?
Once your SpringTM system is up and running, you’ll be growing a
lot of amazing, fresh food. Make sure you’ve got what you need to
harvest your SpringTM!
You’ll find a great pair of Precision Pruners, the same
pruners we use in our commercial
greenhouse on our website!
Simply scan the QR code or
visit www.ziprow.com for more!
Redeem our special “Thank You” coupon code for 15% off an
amazing pair of pruners and harvest away!
Be safe! Please use gloves when harvesting!
9
8. REPLANTING
Some crops can be grown for a very long time while being harvested from often.
However, some crops must be replaced after each harvest. In either case, the tower
will have to be replanted eventually.
1. To replant, simply remove the insert, and pull apart the folded medium.
2. The “root ball” should be stuck to one side of the insert. Grab the root ball and pull
it off of the medium. There will always be remnants of roots left in the medium, and
this is fine. These roots will break down over time and can be removed later.
If you’re using organic methods such as aquaponics or vermiponics, it is not necessary to remove these roots at all. In these instances, redworms and bacteria can be
used to remove the root matter.
3. Once the root ball is removed, place the medium halves back together with the
wicking strip between them, and plant the insert using the same methods as you
originally used to plant the tower.
It is helpful to many users to flip the insert so that the portion of the insert facing
the front of the tower in the previous cycle faces the rear of the tower when it is
replanted.
9. TROUBLESHOOTING
If you run into trouble with your SpringTM System,
head over to our website for a complete FAQ and troubleshooting guide.
www.zipgrow.com
10
10. ADDITIONAL APPLICATIONS
OTHER FUN THINGS TO DO WITH A SPRINGTM SYSTEM
1. Grow flowers! Flowers grow very well in SpringTM systems, and often form
beautiful pillars of color that make great displays.
2. Go aquaponic! Ditch the nutrient solution and
use fish as your nutrient source. SpringTM
systems were designed so that they could
function as small aquaponic systems or be daisy-chained together to form a sump system for
established aquaponic systems.
3. Sell produce! SpringTM systems were
designed not just for folks interested in starting a hydroponic garden, but also for
producers interested in selling live produce at market. Take your ZipGrowTM tower
and SpringTM system to your local market and sell the produce that you grow!
4. Go organic! ZipGrowTM towers are designed to handles solids, unlike most other
hydroponic systems. This means you can use nutrient sources with high solids
content. Using ZipGrowTM towers you can use aquarium effluent, compost teas,
vermicompost teas, as well as other high-solids nutrient sources. Experiment and
have fun! *Note* Using high solids solutions can lead to increased clogging in the
irrigation line, so be prepared to trouble shoot more often.
5. Play around! SpringTM systems and ZipGrowTM
towers are being used around the world as an inexpensive way to grow vertically. Build a living
wall, or a green privacy screen. Build a biofilter
for your pond or your graywater, or use towers to
cool your house passively.
There are few limits to what can be done simply
and easily with ZipGrowTM towers, SpringTM
systems and support hardware. We want to
support you in your endeavor, so let us know if
you have any questions on any of these applications!
The sky’s the limit!
OTHER IDEAS
For more creative ideas check out our videos on YouTube!
Mint growing in a SpringTM system!
www.youtube.com/user/BrightAgrotechLLC
11