1
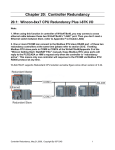
Chapter 20: Controller Redundancy
20.1: Wincon-8xx7 CPU Redundancy Plus I-87K I/O
Note:
1. When using this function in controller of W-8x47/8x46, you may connect a cross
ethernet cable between these two W-8x47/8x46’s “LAN2” port. Then you don’t need a
Ethernet switch between them. (refer to Appendix F to Enable LAN2)
2. One or more PC/HMI can connect to the Modbus RTU slave RS485 port of these two
redundancy controllers at the same time (please refer to section 20.4). If setting
Modbus RTU slave ports in COM5 to COM14 of the W-8x47/8x46(Appendix G of the
“Wincon Getting Start: ISaGRAF PAC” manual), these Modbus RTU slave ports will
reply to the PC/SCADA or HMI’s request only when the controller is “redundancy
active”. This means only one controller will response to the PC/HMI via Modbus RTU
RS485 protocol at any time.
W-8x47/8x37 supports Redundant CPU solution as below figure since driver version of 3.24.
Operations principle:
1. Two Wincons can use its COM3:RS485 to connect to one group of RS-485 remote IOs. The
IO can be the I-87K4/5/8/9 extension base plus many I-87K IO modules or the I-7000 series
remote IO. (Please refer to Chapter 6 for description of remote I/O)
2. All outputs should be configured as RS-485 remote outputs, while inputs can locate at
slot 1 through slot 7 (I-8K or I-87K IO modules) or configured as RS-485 remote inputs.
3. At least one I-7000 or I-87K Remote IO should be connected in COM3:RS485.
4. At run time, only the Redundant Msater controller handles the RS485 command of the
remote I/O. The slave controller just standby.
5. When Master controller is dead, the slave controller will take over the control to remote IO.
6. If Master is alive again, it will take back the control of remote IO .
7. The synchronous data is exchanged via the ethernet cable between the Master & slave
controller. If you are using Wincon-8x47 (Wincon that has two ethernet ports), it is better to use
one cross cable to link from Master controller’s LAN2 port to Slave controller’s LAN2 port.
8. Redundant change over time <= 500ms , Data sychronization time <= 75ms.
Example program:
Wdemo_18 for both Master (IP=10.0.0.103) & Slave (IP=10.0.0.104) controller.
The program in the Master and Slave controllers are identical (wdemo_18). Please DO NOT
re-compile this project if you just change the Link-Setup setting, or the project’s CRC value in
Master and Slave may be different (Master & Slave ‘s project must be the same one)
Please DO NOT re-compile this project if you just
change the Link-Setup setting.
If you re-compile the project, you need to re-download
the same project to Master AND Slave.
Please connect “rdn” in the IO connection window first as below. Please set the correct Master
IP address and Slave IP address. For W-8x47, it is better to use IP address of the “LAN2” port.
Please set “Remote_IO_type” to 1 if the remote IO is I-87K and I-7000 RS485 IO (At least one
Remote IO should be connected in COM3:RS485 when type=1). (type 2 is reserved for
future Modbus TCP/IP IO, not available before June.30,2006)
Type 1 : I-87K and I-7000 RS485 I/O
Type 2 : reserved for future usage.
The boolean input channel return True if this
controller take the control of remote IO.
The integer input channel in “M_or_S” indicate this
controller is 1:Master or 2:Slave or 0:IP Error.
The two digital Inputs
indicate which IP is active
to communicate to the
other redundancy
controller.
Setting “Master_IP2” & “Slave_IP2” will make the W8x47/8x46 work continuously even when the ethernet
cable of IP1 is break or damaged. The redundancy
system will automatically switch to the “OK route” if
enable the “Master_IP2” & “Slave_IP2”. The route can
be
Master_IP1 to Slave_IP1
Master_IP1 to Slave_IP2
Master_IP2 to Slave_IP1
Master_IP2 to Slave_IP2
In the project , please must place the I-87xxx function blocks and the I-7xxx function blocks on
the top. The second program should be “RDN_Data” which call the RDN_xx functions at the
first PLC scan cycle.
All Remote IO function blocks should be placed on the top
.
The second program should be “RDN_Data” which call the
RDN_xx functions at the first PLC scan cycle.
All redundant synchronous data should be set in the first PLC scan cycle by using the following
functions. However not necessary for the digital inputs & analog inputs in slot 1 to 7 or in the
RS-485 I-7K & I-87K IO ,they are automatically updated. Only the output and other important
internal data should be set as synchronous data.
RDN_B( Boolean_variable_name )
RDN_F( REAL_variable_name )
RDN_N( Integer_variable_name )
RDN_T( Timer_variable_name )
For example,
if RDN_init then (* RDN_init is decalred with a initial value of "True" *)
RDN_init := False ; (* only do it once *)
(* Please set Output channels of I-7000 & I-87K IO as synchronous data *)
(* Not necessary for Input channels of I-7000 & I-87K IO ,they are automatically updated *)
TMP := RDN_B(OUT_1) ;
TMP := RDN_B(OUT_2) ; (* Boolean *)
TMP := RDN_B(OUT_3) ;
TMP := RDN_B(OUT_4) ; (* TMP & RND_init is declared as Boolean internal variable *)
TMP := RDN_B(OUT_5) ;
TMP := RDN_B(OUT_6) ;
TMP := RDN_B(OUT_7) ;
TMP := RDN_B(OUT_8) ;
(* set other synchronous data by using rdn_b(bool), rdn_n(integer), rdn_f(real), rdn_t (timer) *)
TMP := RDN_N(Mode) ; (* Integer *)
TMP := RDN_F(Real1) ; (* Real *)
TMP := RDN_T(Timer1) ; (* Timer *)
TMP := RDN_B(B1) ; (* Boolean *)
end_if ;
.
0.2: Wincon-8xx7 CPU Redundant Plus I-87K I/O &
Modbus RTU Devices
Note: When using this function in controller of W-8x47/8x46, you may connect a cross
ethernet cable between these two W-8x47/8x46’s “LAN2” port. Then you don’t need a
Ethernet switch between them. (refer to Appendix F to Enable LAN2)
The W-8x47/8x37 Redundant CPU solution can also support Modbus IO device as below. At
least one I-7000 or I-87K Remote IO should be connected in COM3:RS485
Please place Mbus_xxx function blocks on the third position as below. Please refer to Chapter
8 for using Modbus RTU devices.
Please place Mbus_xxx function
blocks on the third position
Note: Please refer to Appendix E of “Wincon Getting Started: ISaGRAF PAC” manual for
setting COM5 to COM14 in the I-8142/8144 RS-485 expansion board.
And please connect “mbus” or “mbus_asc” in the IO connection windows.
Specify which RS-485 port is for
linking to Modbus RTU devices.
COM5 to COM14
Note:
1. Redundant solution doesn’t support Modbus RTU device in RS-232 ports since RS-232 is
one-to-one connection (Two Wincon can not link to one Modbus RTU device by RS-232)
2. The Modbus device can be RTU or ASCII format listed as section 8.3.
3. Multi-ports Modbus IO can also work in redundant solution. Please refer to section 8.
20.3: Wincon-8xx7 CPU Redundant Without I/O
Note: When using this function in controller of W-8x47/8x46, it is better to connect a
cross ethernet cable between these two W-8x47/8x46’s “LAN2” port. Then you don’t
need a Ethernet switch between them. (refer to Appendix F to Enable LAN2)
W-8x47/8x37 supports Redundant CPU solution without I/O as below.
Redundant Master
Ebus (via Ethernet)
W-8xx7 or
7188EG or
I-8x37
Redundant Slave
The two redundant Wincon should be set as Ebus Slave.
One of the other W-8xx7 or 7188EG or I-8x37 must set as
Ebus Master. Others set as Ebus Slave.
Operations principle:
1. Two redundant Wincons should be set as “Ebus Slave”
2. At run time, only the Redundant Msater controller can handle the command coming from the
SCADA system.
3. When Master controller is dead, the slave controller will take over the command handling
from the SCADA system.
4. If Master is alive again, it will take back the control .
5. The synchronous data is exchanged via the ethernet cable between the Master & slave
controller. If you are using Wincon-8x47 (Wincon that has two ethernet ports), it is better to use
one cross cable to link from Master controller’s LAN2 port to Slave controller’s LAN2 port.
6. Redundant change over time <= 100ms , Data sychronization time <= 75ms.
20.4: Connecting PC/HMI to Modbus RTU RS485 ports
PC or HMI (with RS-485 Modbus RTU Master protocol supported, for example, Touch 506L)
can link to the COM5 to COM14 RS-485 Modbus RTU slave port of the two redundancy
controllers at the same time as below. Only the redundancy Active one will reply to the
PC/HMI at any time. Please refer to Appendix E & G of the “Wincon Getting Start: ISaGRAF
PAC” manual for setting up the Modbus RTU slave ports at COM5 to COM14.
Only the Active controller will reply to the PC or HMI via RS485 Modbus RTU protocol.
Appendix E: Using Expansion RS-232 or 485 or 422
Wincon can expand 10 more COM ports in its slot 1 to 5 by using below modules:
i-8112 : 2-channel RS232
i-8114 : 4-channel RS232
i-8142 : 2-channel RS422/485
i-8144 : 4-channel RS422/485
i-8142i : 2-channel isolated RS422/485
Before user can use them, please configure them By “Wincon utility” first.
Please plug them in slot 1 to 5 and then run “Wincon utility” – “Com” , then click on “New Card
Wizard” and then “Slot Scan” and then click on “Save new Module” and Reset the Wincon.
After the configuration succeed. The COM port No. for the expansion board is COM5 to
COM14 in the ISaGRAF definition.
The relation between WinCE and ISaGRAF definition for COM10 to COM14 is
WinCE
MSP1:
MSP2:
MSP3:
MSP4:
MSP5:
Pin assignment of
(D1+ = RS485+ , D1- = RS485-)
ISaGRAF
COM10
COM11
COM12
COM13
COM14
i-8142/8144/8142i
i-8112/8114
(RS232’s signal GND is Pin 4 or 7)
Note:
1. Please refer to section 8.4 of ISaGRAF User’s Manual for multi-ports Modbus Master.
2. Please refer to Appendix A.4 of ISaGRAF User’s Manual for COM_OPEN, COM_READ, …
functions to read write COM ports.
11
Appendix G: Setup More Modbus RTU Salve Ports
The Wincon-8xx7/8xx6 can setup up to five Modbus RTU slave ports in COM2 or COM3 or in
COM5, COM6, COM7 COM8 (multi-serial ports in slot 1 or 2, refer to appendix E) since the
driver version of 3.25.
Note:
1. Modbus RTU slave port 1 can be COM2 or COM3 which can be set on the "Wincon's
monitor" by mouse (refer to appendix A.2).
2. User may enable 2nd , 3rd , 4th or 5th Modbus RTU slave port in COM5 , COM6 , COM7 or
COM8 only. (No support other COM port number)
3. Before using this function, please make sure COM5 , COM6 (or COM7 , COM8) does exist
and well configured. (refer to appendix E)
4. Via 2nd, 3rd, 4th or 5th Modbus RTU slave port, user may use ISaGRAF to Debug/Set_val
to the controller, however user can not Stop/Download/Update the ISaGRAF program.
5. To Debug/Set_val/Stop/Download/Update the ISaGRAF program, please use Ethernet port
(or Modbus RTU slave port 1, COM2 or COM3 if enabled). COM5 to COM8 is not for ISaGRAF
to Stop/Download/Debug.
How to setup ?
Please connect “Rtu_slav” in the ISaGRAF IO connection window as below. Re-compile the
project and download to the Wincon via Ethernet (or first Modbus RTU port if it is enabled)
The 4-ch boolean
inputs indicate the
related port is well
enabled or not.
True: Enable Ok.
False: disabled.
RTU_Slave_Port2 ~ 5 defines the COM Port
number to enable. Value can be 0, 5, 6, 7, or 8.
Value of 0 means not enable it.
Baud rate setting can be 600, 1200, 2400,
4800, 9600, 19200, 38400, 57600, 115200