1
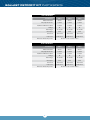
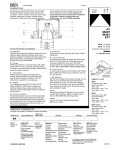
Installation & Maintenance Guide
ballast retrofit
kits
Item #
Product Description
420211 Ballast Kit T5HO 24W x 2 Lamp
420213
Ballast Kit T5HO 39W x 2 Lamp
420215
Ballast Kit T5HO 54W x 2 Lamp
420212
Ballast Kit T5HO 24W x 4 Lamp
420214
Ballast Kit T5HO 39W x 4 Lamp
420216
Ballast Kit T5HO 54W x 4 Lamp
w w w . a q u a t i c l i f e . c o m
ballast retrofit kit
Thank you for purchasing an AquaticLife™
Ballast Kit for use with your aquarium!
We know you value quality and innovation and will be pleased with this product’s performance.
We encourage you to take a few minutes to become familiar with
this manual and note items that apply to your particular model.
For additional information, please visit www.aquaticlife.com.
Your purchase includes a coupon on the side of the box.
Save Life Rewards™ point coupons from Aquatic Life products and redeem them for free
merchandise at www.aquaticlife.com. This is our way of saying thank you for your loyalty
This symbol indicates “Warnings” that are essential in order
to protect against injury to people or damage to equipment.
This symbol indicates “Notes” that are specific instructions
on how to operate, control, adjust or maintain the units.
This symbol indicates “TIPS” that are intended to offer helpful
advice for a better user experience.
Copyright © Aquatic Life, LLC
All rights reserved.
No part of this document may be reproduced, stored in a retrieval system, or transmitted in any
form or by any means without the prior written consent of Aquatic Life, LLC.
Aquatic Life, LLC
Commerce, CA 90040
Toll-Free US only: (888) 548-3480
Outside the US: 1-818-768-6943
[email protected]
Check us out on...
2
safety instructions
WARNING
To guard against injury, basic
precautions should be observed,
including the following:
NOTE
DO NOT POSITION HID LAMPS
DIRECTLY OVER AQUARIUM FRAME
BRACES
A) READ AND FOLLOW ALL SAFETY INSTRUCTIONS.
B) DANGER – To avoid possible electric shock, special care should be taken since water is employed in the use of aquarium equipment.
For each of the following situations, do not attempt repairs by yourself; return the appliance to an authorized service facility for service or
discard the appliance:
1) If the appliance falls into the water, DON’T reach for it! First unplug it and then retrieve it. If electrical components of the appliance get
wet, unplug the appliance immediately. (Non-immersible equipment only)
2) If the appliance shows any sign of abnormal water leakage, immediately unplug it from the power source. (Immersible equipment only)
3) Carefully examine the appliance after installation. It should not be plugged in if there is water on parts not intended to be wet.
4) Do not operate any appliance if it has a damaged cord or plug, or if it is malfunctioning or has been dropped or damaged in any manner.
5) To avoid the possibility of the appliance plug or receptacle getting wet, position aquarium stand and tank to one side of a wall-mounted
receptacle to prevent water from dripping onto the receptacle or plug. A “drip loop," shown in the figure below, should be arranged
by the user for each cord connecting an aquarium appliance to a receptacle. The “drip loop" is that part of the cord below the level of
the receptacle, or the connector if an extension cord is used, to prevent water traveling along the cord and coming in contact with the
receptacle. If the plug or receptacle does get wet, DON’T unplug the cord. Disconnect the fuse or circuit breaker that supplies power to
the appliance. Then, unplug and examine for presence of water in the receptacle.
C) Close supervision is necessary when any appliance is used by or near children.
D) To avoid injury, do not contact moving parts or hot parts such as heaters, reflectors, lamp bulbs, and the like.
E) Always unplug an appliance from an outlet when not in use, before putting on or taking off parts, and before cleaning. Never yank cord to
pull plug from outlet. Grasp the plug and pull to disconnect.
F) Do not use an appliance for other than intended use. The use of attachments not recommended or sold by the appliance manufacturer
may cause an unsafe condition.
G) Do not install or store the appliance where it will be exposed to the weather or to temperatures below freezing.
H) Make sure an appliance mounted on a tank is securely installed before operating it.
I) Read and observe all the important notices on the appliance.
J) If an extension cord is necessary, a cord with a proper rating should be used. A cord rated for less amperes or watts than the appliance
rating may overheat. Care should be taken to arrange the cord so that it will not be tripped over or pulled.
K) For added safety, the appliance must be plugged into a receptacle controlled by a GFCI (ground fault interrupter) circuit breaker. Device
must be properly connected to a grounded three-prong receptacle.
L) This appliance is intended FOR HOUSEHOLD USE ONLY.
M) This Light Fixture is required to be used over a covered aquarium. A glass top or protective barrier is required to minimize the fixture's
exposure to water.
N) SAVE THESE INSTRUCTIONS
TWO-POLE OUTLET
Two-Pole Receptacle
A
Temporary
Adaptor
Rigid Ear
(Grounding Means)
GROUNDING
INSTRUCTIONS
This appliance should be
grounded to minimize the
possibility of electric shock.
Grounding Setup
This appliance should be grounded to minimize the possibility of
electric shock. This appliance is equipped with an electric cord having
an equipment grounding conductor and a grounding type plug. The
plug must be plugged into an outlet that is installed and grounded in
accordance with all appropriate codes and ordinances.
This appliance is for use on a normal 120-volt circuit, and has a
grounding plug that looks like the plug illustrated below.
TWO-POLE OUTLET
Two-Pole Receptacle
B
Temporary
Adaptor
Grounding Outlet
Screw
Grounding Plug
Grounding Tab
Grounding Pin
A temporary adaptor which looks like the adaptor illustrated in (A)
may be used to connect this plug to a two-pole receptacle as shown
in (A) if a grounded outlet is not available.
A temporary adaptor should only be used until a grounded outlet can
be installed by a qualified electrician.
GROUNDING INSTALLATION
The green-colored rigid tab extending from the adaptor must be
fastened to a permanent ground such as a grounded outlet box.
1.Plug temporary adaptor into two-pole outlet. (B)
2. Insert screw through rigid tab on temporary adaptor and into
grounded outlet box. (C)
3
FRONT VIEW
Grounding
Plug
Grounded Outlet
Box Cover
Grounding
Tab
C
ballast retrofit kit installation
required for installation
1. Philips #2 Screwdriver
The Aquatic Life Ballast Kit is shipped with the Lamp Sockets already attached to the ballast,
so no wiring is required. The kit also includes the Lamp Clips needed to mount the lamps.
The Ballast Kit uses color coded wires near the Lamp Sockets to prevent the wrong Lamp
Sockets from being used with each other. The colors are black and red for the two lamp Ballast Kit. The four lamp Ballast Kit use black, red, yellow and blue.
Lamp Clips
NOTE: If the surface you are mounting the Lamp Clip to is less than 3/4”
thick, you will need to use shorter
screws to mount the Lamp Clip.
Each Lamp Clip is secured to the mounting surface using a 5/8" Wood
Screw. It is recommended that the Lamp Clips are centered at the following distances to work best with optional Aquatic Life reflectors:
+
+
NOTE: These distances are best
for optional AquatiLife Reflectors.
If positioned wider or shorter than
recommended mounting of Lamps or
Relfector my have problems.
24" lamps – The Lamp Clips should be centered 19.25"/49cm apart
36" lamps – The Lamp Clips should be centered 31.125"/79cm apart
48" lamps – The Lamp Clips should be centered 42.875" /109cm apart
Lamp Socket Attachment
Each Lamp Socket is color coded (color band located near the Lamp Socket) and the
same colored Lamp Socket MUST be used with the same lamp. If the Lamp Sockets are
not matched correctly, the Ballast will not operate correctly and could fail. Match the black
Lamp Sockets together and the red Lamp Sockets together. If using the four lamp Ballast
Kit match the yellow with yellow and the blue with the blue when attaching the Lamp
Sockets to the lamps.
When attaching the Lamp Sockets to the lamp, look inside the Lamp Socket to view the
holes for lamp pin placement. This will help when inserting the lamp into the Lamp Socket.
Gently insert the lamp into the Lamp Socket. You should feel the pins slide into the holes
of the Lamp Socket. If you do not feel the pins inserting into the Lamp Socket, remove and
try again. The lamps can only be inserted into the Lamp Sockets one way.
NOTE: Notice the silver band of
the lamp pressed against the Lamp
Socket inside the protective covering.
The lamp is fully seated when the silver band located at the end of the lamp meets with the
internal white plastic of the Lamp Socket. This is visible through the top of the Lamp Socket.
4
ballast retrofit kit installation
Mounting the Lamp
After the Lamp Sockets are secured and the Lamp Clips are in place, the lamp can be
inserted into the Lamp Clips. Gently place the lamp into the top opening of the Lamp Clip and
press the lamp into the Lamp Clip. You should feel the Lamp Clip start to open. The lamp will
“snap” into the Lamp Clip and the lamp should now be secure.
NOTE: Two Lamp Clips are required
for each lamp.
If using the lamps with the optional reflectors it would be best to mount the reflectors to the
lamps prior to mounting the lamps into the Lamp Clips. Optional reflectors will increase light
output.
Ballast Housing
The Ballast Housing is able to be mounted in a vertical position (screws needed) via the wall
mount openings on the bottom of the Ballast Housing. It can also be placed flat on a stable
surface.
WARNING: The Ballast Housing
is not waterproof. Do not spray or
submerge the Ballast Housing. Keep
away from splashing or direct contact
with water.
Silicon Socket, Lamp and Ballast housing
The lamps, Lamp Sockets and Ballast Housing can be cleaned with a moist cloth removing
buildup that may develop over time.
NOTE: A glass top or protective barrier is required to minimize the lamps
exposure to water.
Lamp replacement
Depending on the type of aquarium inhabitants, the lamps may need to be replaced every 9 to
18 months. It is best to review the requirements for your animals prior to replacing the lamps.
Consult your local store or supplier for a recommendation for frequency of replacement.
To remove and replace lamps, follow the Lamp Socket Attachment instructions.
5
WARNING: Unplug the fixture from
the power supply and allow cooling
for 15 minutes before changing
lamps. Lamps generate heat, and
require time to cool.
ballast retrofit kit parts/specs
Two-Lamp Models
Item Numbers:
420211
420213
420215
Ballast Part Number:
470020
470071
470072
Lamp Clips with Screws:
included
included
included
Installation & Maintenance Guide:
included
included
included
24
39
54
120 Volt AC
120 Volt AC
120 Volt AC
Wattage:
Rated Voltage:
Rated Cycle:
60Hz
60Hz
60Hz
Power Cord:
1 M / 3.28 ft
1 M / 3.28 ft
1 M / 3.28 ft
Lamp Cords:
2.5 M / 8.2 ft
2.5 M / 8.2 ft
2.5 M / 8.2 ft
Dimensions without lamp sockets:
33 x 8.9 x 5.7 cm / 13 x 3.5 x 2.25 in
four-Lamp Models
Item Numbers:
420212
420214
420216
Ballast Part Number:
470020
470071
470072
Lamp Clips with Screws:
included
included
included
Installation & Maintenance Guide:
included
included
included
24
39
54
Wattage:
Rated Voltage:
120 Volt AC
120 Volt AC
120 Volt AC
Rated Cycle:
60Hz
60Hz
60Hz
Power Cord:
1 M / 3.28 ft
1 M / 3.28 ft
1 M / 3.28 ft
Lamp Cords:
2.5 M / 8.2 ft
2.5 M / 8.2 ft
2.5 M / 8.2 ft
Dimensions without lamp sockets:
6
33 x 8.9 x 5.7 cm / 13 x 3.5 x 2.25 in
REGISTRATION & WARRANTY
Registering Your Product(s) With Aquatic Life
When you purchase an Aquatic Life product, you will find a Warranty Registration Card accompanying
the product. Please complete this Card and mail it in within 15 days from the date of purchase or register
your product online at www.aquaticlife.com. Some Aquatic Life products will include a Serial Number. To
validate your warranty, the Serial Number must be included for appropriate products.
Product Serial Numbers
Serial Numbers DO NOT contain the letters “UL", “CUL", “CSA", “EN" or “CE". These letters refer to a US,
Canadian and European Standards for that product. If you need help locating the Serial Number for your
product, please visit our website at www.aquaticlife.com or call Aquatic Life at 1-888-548-3480.
Limited Warranty
Aquatic Life, LLC warrants that this Ballast Kit shall be free from defective electrical components and leaks
or cracks due to defects in materials or workmanship for a period of twelve (12) months from the date of
purchase. If a defect is shown, Aquatic Life, LLC will, at Aquatic Life’s sole discretion, either repair or replace the
product without charge. No cash refunds will be made. This warranty is provided solely to the original consumer
purchaser of the product and may not be transferred or assigned.
This warranty does not apply to damage resulting from accident, misuse, abuse, lack of reasonable care,
failure to follow safety and installation instructions, use of the product with non-standard electrical service,
or any other defect not resulting from defects in the electrical components of the product or defects in
materials or workmanship. This warranty will not be effective unless and until the Aquatic Life product is
shown to have been used in accordance with the safety and installation instructions accompanying the
product.
THIS CONSTITUTES AQUATIC LIFE’S ENTIRE WARRANTY AND AQUATIC LIFE MAKES NO OTHER
WARRANTIES, WHETHER EXPRESS OR IMPLIED, WITH RESPECT TO THE PRODUCT. AQUATIC
LIFE, LLC SPECIFICALLY DISCLAIMS ANY AND ALL IMPLIED WARRANTIES, INCLUDING, WITHOUT
LIMITATION, WARRANTIES OF MERCHANTABILITY AND FITNESS FOR A PARTICULAR PURPOSE. IF
AQUATIC LIFE, LLC CANNOT LAWFULLY DISCLAIM IMPLIED WARRANTIES UNDER THIS LIMITED
WARRANTY, ALL SUCH WARRANTIES, INCLUDING WARRANTIES OF MERCHANTABILITY AND
FITNESS FOR A PARTICULAR PURPOSE ARE LIMITED IN DURATION TO THE DURATION OF THIS
WARRANTY.
AQUATIC LIFE IS NOT RESPONSIBLE FOR DIRECT, SPECIAL, INCIDENTAL OR CONSEQUENTIAL
DAMAGES RESULTING FROM ANY BREACH OF WARRANTY OR CONDITION, OR UNDER ANY
OTHER LEGAL THEORY. AQUATIC LIFE, LLC EXPRESSLY DISCLAIMS ALL ALLEGED DAMAGES
FOR LOSS OF MARINE LIFE, PERSONAL INJURY, AND/OR PROPERTY DAMAGE.
Some states and provinces do not allow the exclusion or limitation of incidental or consequential damages
or exclusions or limitations on the duration of implied warranties or conditions, so the above limitations or
exclusions may not apply to you. This warranty gives you specific legal rights, and you may also have other
rights that vary by state or
province.
Aquatic Life, LLC shall not have any obligations under this warranty unless the owner notifies Aquatic Life,
LLC in writing of any alleged defect(s) within 30 days of discovery of the defect(s). Any notice to Aquatic
Life, LLC must be delivered by United States or electronic mail to the following address:
U.S. Mail
Aquatic Life, LLC
2416 W. Victory Blvd, #136
Burbank, CA 91506
Electronic Mail: [email protected]
Aquatic Life, LLC shall be allowed a reasonable period of time to investigate any warranty claim and
to perform any testing Aquatic Life, LLC deems necessary to determine the cause of the defect. This
warranty shall be interpreted under the laws of the State of California.
7
Aquatic Life, Life Rewards, and
“Bringing the ocean to you, wherever you may be.”
are trademarks of
Aquatic Life LLC
Commerce, CA 90040
www.aquaticlife.com
© Copyright Aquatic Life LLC
P/N 9000425 REV 05/11