1
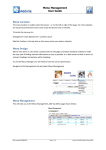
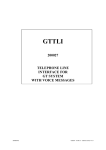
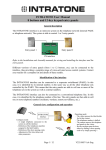
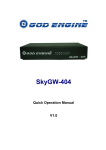
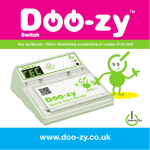
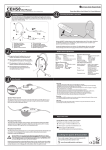
Your Villa intercom has just been fitted in your home
Did you know you can start using the 2 remote controls provided straight away?
If you have bought the '1 callbutton + 9 button keypad' model, did you know it has a
preset code?
Did you also know that thanks to the management web site www.myintratone.com,
you can enjoy all the features of your Villa intercom?
So take some time to read this manual, it's full of positive news!
Main Operation
Here's what happens when someone presses a callbutton on your Villa intercom:
Visio calls on any 3G Visio-compatible phone for video verification: when you pick
up the phone you can see your visitors without them even knowing! If you don't
want to let them in, just hang up. They won't even know you've seen them! Or, if
you want to talk to your visitor: press 0 on your phone (1).
Audio calls on all landlines, GSM, ADSL: in the event of incompatibility with the
Visio mode, or if you are in a place with no 3G network, your Villa intercom will call
you in audio, so pick up and press 0 if you want to speak to your visitor(1),
otherwise hang up.
If you want to open, press 1 and/or 2 on your phone, like your fitter showed you.
Note: On some wired phones, you might need to press the* button first to activate the
voice frequencies. Refer to your phone's User Manual.
Identification of your Villa intercom
You can manage your Villa intercom settings entirely online. To personalise your settings
from any PC or Mac with an internet connection, log on to:
www.myintratone.com
Your Villa intercom Connection ID is simply its phone number; this is the telephone
number of your Villa intercom
Next, click on the 'Connection' button and follow the instructions!
(1):
This feature can be disabled on the management web site by going into the
advanced settings and activating automatic answering.
24/06/11
EN-V232 - 0074 - AC - HV – Final User Guide
Page 1/2
Using the 2 remote controls provided
The 2 remote controls provided with your Villa intercom are already programmed: button 1
(the button marked I) sets off relay 1, while button 2 (the button marked II) sets off relay 2
(refer to the fitting instructions for the cabling and to identify relays 1 and 2). You can test
your installation straight away by checking, for instance, that button 1 opens the entrance
door and button 2 opens the garage door (your fitter will tell you exactly which button on
your remote controls does what).
How do I use my phone to open without being called?
With your Villa intercom, you can also open the entrance door by calling its telephone
number: Enter your phone number on the web site www.myintratone.com in the 'Modify my
remote controls' menu, click on the 'Mobile Key' tab and add your phone number. Simply
call the intercom on that number, and the entrance door will open!
Led indicators on your Villa intercom
No light
Normal non-active mode
LEDs light up for 4
seconds
A call is being made (a button
pressed), the LEDs indicate the
strength of 3G/GSM signal
reception (here level 4)
LED 3 lights up
A call is in progress, the Villa
intercom emits a ringing sound
The resident has answered, and
LEDs 3 and 4 light up the visitor can speak to him or her
(1)
The resident has authorised
LEDs 3, 4 and 5 light
access(2) and the Villa intercom
up
now emits a message 'The door is
open'
(1): The resident has answered and pressed 0 on their phone.
(2): To authorise access for the visitor, you press button 1 and/or 2 on your phone. Using
these buttons gives the same result as pressing button 1 (left) and 2 (right) on the
remote controls.
Does your intercom have a keypad with 9 buttons?
If you have bought the Villa intercom '1 callbutton + 9 button keypad' intercom, it has a
preset code.
Enter the code below on the intercom keypad:
You haven't bought
an intercom with 9
buttons on the keypad
LED 5 'Door' will light up
and access will be authorised.
To modify or delete this code, log on to: www.myintratone.com
24/06/11
EN-V232 - 0074 - AC - HV – Final User Guide
Page 2/2