1
INTRATONE User Manual
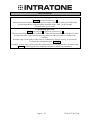
8 buttons and 12-key keypad entry panels
General description
The INTRATONE interface is an intercom system on the telephone network (internal PABX
or telephone network). The system is able to control 1 or 2 entry panels:
PL
PL
Entry panel 1
Entry panel 2
123456789111
PS interface
Refer to the Installation and Assembly manuals for wiring and installing the interface and the
entry panels.
Different versions of entry panels (from 1 to 12 buttons, etc.) can be connected to the
interface, thus providing a complete range of voice-activated access control systems. Contact
your retailer for a complete list and details of these models.
Identification of the interface
The INTRATONE interface can be connected to a corporate switchboard (PABX). In this
case, it is identified by its internal number, in the same way as all the other telephone sets
controlled by the PABX. This means that the entry panels are able to call one or more of the
telephone sets in the system as well as external numbers.
The INTRATONE interface can also be connected to a conventional telephone line. In this
case, it is identified by the telephone number of the line. The entry panels are then able to call
one or more telephone numbers (residents, wardens, remote surveillance, etc.).
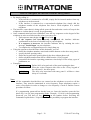
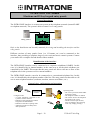
General view: configuration and operation
INTRATONE
interface
Configure mode:
- A single telephone connected to the
system to call the interface
- Definition of the telephones numbers
assigned to the label holders
- Definition of the door opening codes
- Adjustment of the time delays and
other parameters
Page 1 / 12
Operating mode:
- The visitor presses the label holder
for his/her contact.
- The telephone number is dialled.
- The contact answers his telephone
and speaks to the visitor.
- He/she can then open the door,
either by dialling a door opening
code or by simply pressing *.
V232-0037-AA-Eng
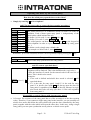
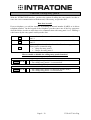
How to adjust the volume of the entry panels
The method of adjusting the volume of the entry panels during communication is
straightforward and does not require any dismantling of the entry panels. To do so:
LEDs (red)
Pushbutton
123456789111
1. On the interface, press the pushbutton for 5 seconds until the LED near the plug-in
memory is switched off.
2. Release the pushbutton and wait 5 seconds until the 2 LEDs associated with the entry
panels flash rapidly.
3. To adjust the volume you need to use the door pushbutton connected to the panel:
a. If no button are connected: Please do a short contact between connector 13 and
14 for the panel no 1 or between connector 23 and 24 for the panel 2.
b. Otherwise press on the corresponding pushbutton of the panel.
4. The entry panel then emits the message: ‘Sound level adjustment’ in series. Each
message is emitted at a different sound level. Four levels are available.
5. The volume is set once you press on the labelled button or on the keypad. Two bips
will confirm the validated level. Then the system resume to normal operation.
How to check that the system is operating satisfactorily
With the INTRATONE interface, it is possible, at any time, to check that the system is
operational. The system incorporates a Test mode for testing that the telephone line is
correctly connected (audible dialling tone) and that the door relay is controlling the opening
of the electric lock or magnet. To test the system, proceed as follows:
1. On the PS interface, remove the small plug-in memory.
2. Wait until the led next to the memory goes off.
3. Stand in front of one of the entry panels and press one of a label holder or on the
keypad key. The system then opens the telephone line for 5 seconds, enabling you to
check that the dialling tone is present.
4. The system releases the telephone line and energises the door opening relay for 5
seconds while emitting the voice message ‘The door is open’.
5. During the test mode, the video relay is energised.
6. Do not forget to plug the memory back into the interface.
Page 2 / 12
V232-0037-AA-Eng
How to configure the interface and the entry panels
•
•
•
•
•
By simply calling it!
o If the interface is connected to a PABX, simply dial its internal number from any
telephone set in the network.
o If the interface is connected to a conventional telephone line, simply dial the
telephone number of the telephone line from a fixed telephone or a mobile
telephone.
The interface, aware that it is being called, opens the line and emits a series of beeps in the
telephone to confirm that it is ready for programming.
Once communication has been established, enter the key sequences on the keypad of the
telephone in order to tell the interface what you want to do:
o Each sequence must begin with # and end with *.
o If the sequence has been correctly interpreted, the interface indicates
confirmation in the form of a double beep in your telephone.
o If a sequence is incorrect, the interface indicates this by emitting the voice
message ‘Invalid input’ on your telephone.
o To complete the configuration process, simply hang up.
Using the sequences described later in this document, you can:
o define the telephone numbers associated with the buttons on the door entry panels;
o specify the door opening codes;
o define the keypad codes opening directly the door without phone call.
o define telephone number that can be called from the 12-key keypad.
o personalise the interface operating parameters: time delays for the relays, types of
pushbutton, etc.
Examples :
o #131#1492* : Define 1492 as keypad code of the panel opening the door.
When the visitor composes this code on the 12-key keypad of
the call panel 1, the door opens.
o #151#10* :
The door relay associated with entry panel 1 will have a time
delay of 10 seconds.
Note:
All the commands described here are entered on the telephone set used to call the
interface. They must be transmitted in voice frequency. Some telephones require a
series of keystrokes in order to change to voice frequency. Check to find the correct
procedure to follow.
If a programming password has already been set: Once the interface opens the line
please key it to get into programming mode. Example : If 1418 is the programming
password, you will have to key #1418* on the handset before accessing the
commands explain below. 2 bips will confirm the possibility to program the interface.
Page 3 / 12
V232-0037-AA-Eng
Programming the telephone numbers for the label holders
1
2
3
4
5
6
7
8
Entry panel 1
Primary
Secondary
telephone no.
telephone no.
Entry panel 2
Primary
Secondary
telephone no.
telephone no.
#101# {tel.no.} * #301# {Tel.no.} * #201# {tel.no.} * #401# {tel.no.} *
#102# {tel.no.} * #302# {tel.no.} * #202# {tel.no.} * #402# {tel.no.} *
Etc…
Etc…
Etc…
Etc…
#108# {tel.no.} * #308# {tel.no.} * #208# {tel.no.} * #408# {tel.no.} *
Additional ring-back no.:
#300# {tel.no.} *
#400# {tel.no.} *
How does it work?
•
•
•
When a label holder is pressed, the interface dials the primary telephone number
associated with this label holder (if no number is defined, nothing happens).
If the called party is on the line (line engaged) or does not reply and if a secondary
telephone number has been defined for this label holder, the interface hangs up and dials
the indicated number; it is then possible to contact the other person via another telephone.
If neither of these calls is successful and if the additional ringback number has been
defined, the interface hangs up and dials the indicated number (Reception for example).
How do I delete a telephone number?
•
Simply by entering a blank number. For example: #301#* deletes the secondary
telephone number for label holder.
Note: The telephone number should consist of between 1 and a maximum of 14 characters.
Programming the 12-key keypad codes
Entry panel 1
#131# {code 1} *
Etc.
#139# {code 9} *
#130# {code 10} *
Entry panel 2
#231# {code 1} *
Etc.
#239# {code 9} *
#230# {code 10} *
The codes consist of 1 to 8 characters and end
by key * of the keypad.
If the visitor composes a code known on the
12-key keypad of entry panel, the door will open.
Exemple
•
•
#131#1418* define the keypad code 1418 for the call panel n°1.
To get in the guest will dial 1418* on the 12-key keypad of the call panel no. 1.
How do I delete a keypad code ?
•
Simply by entering a blank code. For example: #133#* deletes the keypad code of the
entry panel 1.
Page 4 / 12
V232-0037-AA-Eng
Opening the door by the called party
How does the called party open the door to the visitor?
•
Simply by entering * on his telephone!
and if I want to use codes to secure the door opening procedure?
Entry panel 1
#121# {code 1} *
The codes consist of 1 to 4 characters (from 0 to 9999). 10 codes are
#122# {code 2} * available. Each of them opens entry panel 1, independently of the
#123# {code 3} * label holder which initiated the call.
#124# {code 4} * To define 1418 in code 1, enter #121# 1418 *
#125# {code 5} * To define 23 in code 2, enter #122# 23 *
#126# {code 6} * The called parties can then enter 1418* or 23* on the keypad of
#127# {code 7} * their telephone in order to open the door controlled by entry panel
#128# {code 8} * No. 1.
#129# {code 9} * To delete a code, simply enter a blank code.
For example: to delete code 2, enter #122#*
#120# {code 10} *
Remember: If no code is defined, the door can be opened by simply pressing the * key.
Entry panel 2
#221# {code 1} *
These codes only open the door for entry panel 2.
Etc.
and if I want to open both door?
1 indicates that only the codes for the entry panel from which the call
originates will be analysed. This is the default mode (single door).
0 tells the interface to search for the entered code in the two lists of
codes. This is double door mode.
Examples:
• If no code is defined and double door mode is selected, * will
#505# {0 or 1} *
open both doors.
• If 1 is the code for entry panel 1 and if 2 is the code for entry
panel 2, in double door mode 1* will always open the door for
entry panel 1 regardless of the origin of the call, whereas in single
door mode this code will only open door 1 if the call originates
from entry panel 1.
Is it possible to control 2 doors with just one entry panel?
•
Of course! The existence of the entry panel has no effect on analysis of the door opening
codes. Therefore, if you connect a single entry panel to the interface, you can certainly use
double door mode and define the codes which will open the door controlled by the entry
panel, together with the codes which will open the other door. In this way, using a single
entry panel, you can open a pedestrian access point or a vehicle access point.
Page 5 / 12
V232-0037-AA-Eng
Configuring the door opening relays and the pushbuttons (PB)
#151# {delay} *
#152# {PB type} *
#251# {delay} *
#252# {PB type} *
Door 1 (entry panel 1)
If the called party grants access to the visitor, the door opening
relay is energised in accordance with the indicated time delay.
Possible range: from 1 to 99 seconds (default value: 5 seconds)
The pushbutton may be the Normally Open or Normally Closed
type.
Possible options: 0 (NC) or 1 (NO) (default setting: 1 for NO)
Door 2 (entry panel 2)
Time delay for door 2
Type of pushbutton for door 2
Activating/deactivating the label holders
#153# {1 or 0} *
#253# {1 or 0} *
Door 1 (entry panel 1)
1: The label holders are operating (default mode).
0: Pressing the label holders has no effect (no call).
Door 2 (entry panel 2)
1: The label holders are operating (default mode).
0: Pressing the label holders has no effect (no call).
Activating/deactivating the 12-key keypad
#142# {1 or 0} *
#242# {1 or 0} *
Door 1 (entry panel 1)
1 : The 12-key keypad is operating. (default mode).
0 : The keypad is deactivated (keypad codes can not open the door).
Door 2 (entry panel 2)
Idem entry panel 1
Configuring communications (common to 2 entry panels)
The indicated prefix will be dialled before each telephone number.
Defines the communication period: this is the maximum period at
the end of which the system suspends communication between the
visitor and the called party. Possible range: from 10 to 240
seconds
(default value: 60 seconds)
#502# {No. of rings} * Defines the number of rings at the end of which the called party is
presumed to be absent. Possible range: from 3 to 30 rings
(default value: 8 rings)
#500# {prefix} *
#501# {comm. p.} *
Page 6 / 12
V232-0037-AA-Eng
Using an external lighting or video system
Using the INTRATONE interface, you can switch on a lighting system, a video system or any
other system which can be activated by means of a dry contact. To do this, simply use the dry
contact provided on terminals 8 and 9 of the main terminal board (refer to the Installation
Manual).
How does it work?
•
•
•
•
In standby mode (no calls in progress), the contact is open.
As soon as a label holder is pressed and a telephone number has to be dialled, the RT
relay is energised, producing a dry contact between terminals 8 and 9. This allows you to
switch on a lighting or video surveillance system, for example.
The relay remains energised during the dialling and communication phases.
It is de-energised after a 2 seconds time delay, when the called party terminates the
conversation.
Using an external clock
With the INTRATONE interface, you have the option of connecting an external clock which
delivers a dry contact during specific time periods (to be defined on the external clock). This
clock must be connected to terminals 6 and 7 of the main terminal board of the interface (refer
to the Installation Manual)). Depending on the status of the external clock, you can then
change the configuration of the entry panels, thus making it possible, for example, to
differentiate between day and night.
How does it work?
•
•
•
When the contact is open, the INTRATONE system operates normally.
When the external clock closes the contact (terminals 6 and 7), the configuration of the
INTRATONE system can be modified.
The possible configurations are:
#506# {choice} *
0: the contact is disregarded. The entry panels operate normally.
1: the label holders and the 12-key keypad are deactivated.
Pressure on the label holders is disregarded (no call).
2: the door opens when a label holder or a keypad key is pressed
(no call).
3: when a label holder is pressed, the common ringback number is
called (and not the telephone number defined for the label
holder). The 12-key keypad is deactivated.
(Default setting 0: the clock contact is disregarded)
Page 7 / 12
V232-0037-AA-Eng
Miscellaneous
Period of inactivity in programming mode
#598# {period of inactivity } *
Maximum period of inactivity (no key pressed on the telephone), at the end of which the
system suspends the communication. Possible range: from 5 to 99 seconds
(Default value: 30 seconds)
Programming password
#599# {password} # {repetition of password } *
The password always consists of 4 characters. When the password has been defined, it must
be entered as soon as the interface has responded, in order to be able to configure the
interface.
Possible range: from 0000 to 9999 (always 4 characters) (Default setting: no password)
To delete the current password: #599##*
Example: if 1418 is the password for the system and if you call the interface, you must enter
#1418* on the keypad of the telephone in order to modify the parameters.
Page 8 / 12
V232-0037-AA-Eng
Function: calling entry panels
With the INTRATONE interface, you have the option of calling the entry panels in order to
enter into voice communication with them and, if necessary, to open the door.
How does it work?
From a telephone, you call the interface by dialling its internal number (PABX) or its direct
telephone number. On the keypad of the telephone you then enter one of the key sequences
described below in order to enter into voice communication with entry panel 1 or 2. Dialling a
code known by the entry panel could open the door.
Instructs the interface to enter into voice communication with entry
panel 1
Instructs the interface to enter into voice communication with entry
panel 2
On the single station, the interface identifies the entry panel with
which you are communicating:
• 1 beep for entry panel 1
• 2 beeps for entry panel 2
#1*
#2*
#0*
How to enable or disable the calling entry panels function?
#154# {1 or 0} *
#254# {1 or 0} *
Platine 1
1 : The calling entry panels 1 is autorised (default mode).
0 : The calling entry panels 1 is not autorised.
Platine 2
1 : The calling entry panels 2 is autorised (default mode).
0 : The calling entry panels 2 is not autorised.
Page 9 / 12
V232-0037-AA-Eng
How to reset the system
CAUTION: The reset procedures delete all the parameters (telephone number, door opening
codes, etc.) and settings (time delays, etc.). Following the reset the INTRATONE interface
reverts to its factory configuration. To perform a reset, proceed as follows:
1.
2.
3.
4.
On the PS interface, press the pushbutton for 5 seconds until a first LED goes out.
Release the button, then press it again for 5 seconds until the second LED goes out.
Release the button, then press it again for 5 seconds until the third LED goes out.
This initiates the reset process and all the previously programmed data are lost. The
general operating parameters then revert to their default values.
What is the usage for the plug-in memory?
This memory stores all the functional data of the system: Door time delay, type of pushbutton,
primary and secondary telephone number, etc…
In case of interface failure, this memory will help you retrieve instantly operational data:
1. Get a new interface from your retailer
2. Replace the faulty interface.
3. Plug-in the memory into the new interface.
4. Switch on the power: Back to business as usual!
Page 10 / 12
V232-0037-AA-Eng
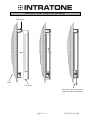
23
Wall square fixation
Ø5
25
204
240
Wall
square
9.5
90
120
Page 11 / 12
V232-0037-AA-Eng
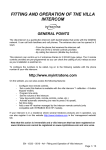
Indications for the setup of the call panels
Wall square
Wall
Call panel
Screwing / unscrewing tools
supplied with the call panel
Page 12 / 12
V232-0037-AA-Eng