1
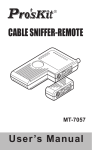
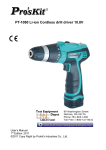
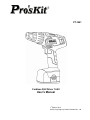
PT-1441
Cordless Drill Driver 14.4V
User’s Manual
1st Edition, 2012
©2012 Copy Right by Prokit’s Industrial Co., Ltd.
PT-1441 User’s Manual
Please read this handbook carefully before using the tool
General Safety Rules
WARNING Read all safety warnings and all instructions Failure to follow all warnings and instructions may
result in electric shock, fire and/or serious injury.
Save all warnings and instructions for future reference
The term “power tool” in the warnings refer to your mains operated (corded) power tool or battery operated
(cordless) power tool.
1) Work area
a) Keep work area clean and well lit. Cluttered and dark areas invite accidents.
b)Do not operate power tools in explosive atmospheres, such as in the presence of flammable liquids,
gases or dust. Power tools create sparks which may ignite the dust or fumes.
c) Keep children and bystanders away while operating a power tool. Distractions can cause you to lose
control.
2) Electrical safety
a) Power tool plugs must match the outlet. Never modify the plug in any way. Do not use any adapter
plugs with earthed (grounded) power tools. Unmodified plugs and matching outlets will reduce risk of
electric shock.
b) Avoid body contact with earthed or grounded surfaces such as pipes, radiators, ranges and
refrigerators. There is an increased risk of electric shock if your body is earthed or grounded.
c) Do not expose power tools to rain or wet conditions. Water entering a power tool will increase the risk
of electric shock.
d) Do not abuse the cord. Never use the cord for carrying, pulling or unplugging the power tool. Keep
cord away from heat, oil, sharp edges or moving parts. Damaged or entangled cords increase the risk
of electric shock.
e) When operating a power tool outdoors, use an extension cord suitable for outdoor use. Use of a cord
suitable for outdoor use reduces the risk of electric shock.
f)
If operating a power tools in a damp location is unavoidable, use a residual current device (RCD)
protected supply. Use of an RCD reduces the risk of electric shock.
3) Personal safety
a) Stay alert, watch what you are doing and use common sense when operating a power tool. Do not
use a power tool while you are tired or under the influence of drugs, alcohol or medication. A moment
of inattention while operating power tools may result in serious personal injury.
b) Use safety equipment. Always wear eye protection. Safety equipment such as dust mask, non-skid
safety shoes, hard hat, or hearing protection used for appropriate conditions will reduce personal
injuries.
c) Avoid accidental starting. Ensure the switch is in the off position before plugging in. Carrying power
tools with your finger on the switch or plugging in power tools that have the switch on invites
accidents.
d) Remove any adjusting key or wrench before turning the power tool on. A wrench or a key left
attached to a rotating part of the power tool may result in personal injury.
www.prokits.com.tw
1
PT-1441 User’s Manual
e) Do not overreach. Keep proper footing and balance at all times. This enables better control of the
power tool in unexpected situations.
f) Dress properly. Do not wear loose clothing or jewelry. Keep your hair, clothing and gloves away from
moving parts. Loose clothes, jewelry or long hair can be caught in moving parts.
g) If devices are provided for the connection of dust extraction and collection facilities, ensure these are
connected and properly used. Use of these devices can reduce dust related ha2ards.
4) Power tool use and care
a) Do not force the power tool. Use the correct power tool for your application. The correct power tool will
do the job better and safer at the rate for which it was designed.
b) Do not(use the power tool if the switch does not turn it on and off. Any power tool that cannot be
controlled with the switch is dangerous and must be repaired.
c) Disconnect the plug from the power source before making any adjustments, changing accessories, or
storing power tools. Such preventive safety measures reduce the risk of starting the power tool
accidentally.
d) Store idle power tools out of the reach of children and do not allow persons unfamiliar with the power
tool or these instructions to operate the power tool. Power tools are dangerous in the hands of untrained
users.
e) Maintain power tools. Check for misalignment or binding of moving parts, breakage of parts and any
other condition that may affect the power tools operation. If damaged, have the power tool repaired
before use. Many accidents are caused by poorly maintained power tools.
f) Keep cutting tools sharp and clean. Properly maintained cutting tools with sharp cutting edges are less
likely to bind and are easier to control;
g) Use the power tool, accessories and tool bits etc., in accordance with these instructions and in the
manner intended for the particular type of power tool, taking into account the working conditions and the
work to be performed. Use of the power tool for operations different from intended could result in a
hazardous situation.
5) Battery tool use and care
a) Recharge only with the charger specified by the manufacturer. A charter that is suitable for one type of
battery pack may create a risk of fire when used with another battery pack.
b) Use power tools only with specifically designated battery packs. Use of any other battery packs may
create a risk of injury and fire.
c) When battery pack is not in use, keep it away from other metal objects, lie paperclips, coins, keys, nails,
screws or other small metal objects that can make a connection from one terminal to another. Shorting
the battery terminals together may cause burns or a fire.
d) Under abusive conditions, liquid may be ejected from the battery; avoid contact. If contact accidentally
occurs, flush with water. If liquid contacts eyes, additionally seek medical help. Liquid ejected form the
battery may cause irritation or burns.
6) Service
Have your power tool serviced by a qualified repair person using only identical replacement parts. This will
ensure that the safety of the power tool is maintained.
www.prokits.com.tw
2
PT-1441 User’s Manual
Special Safety Advice for Cordless Drill
Only plug the Battery Charger in 230V for PT-1441F type and 120V for PT-1441A type mains. Recharge the
Battery only with the provided charger. Before starting any work on walls, floors or similar, make sure that all
power lines in the work area are switched off at the main switchboard. Inspect the proposed drill holes location
for any utility lines (e.g. water, gas, power) before drilling. Use a suitable device such as a metal or electricity
line detecting device. If in doubt contact a qualified electrician or your utility provider. Both tools and
work-pieces can heat up considerably during the drilling operation. Allow a sufficient period of cooling before
handling. Wear appropriate gloves.
Safety Advice for Rechargeable Battery and Charger
Use only the battery provided with the drill or a replacement rechargeable battery from Pro’sKit and the
provided charger. Only plug the battery charger in 230V for PT-1441F type and 120V for PT-1441A type
mains. Protect battery and battery charger from humidity. Do not operate the battery charger outdoors. When it
is not in use and before cleaning and servicing, disconnect the battery charger from the power supply. Take
special care of the battery. Avoid dropping it onto any hard surface and do not subject it to pressure or any other
form of mechanical stress. Keep the battery away from extreme heat and cold. Do not open or attempt to repair
the battery or the battery charger. If any parts are defective, have them repaired by a qualified technician or
send them to our service department for repair. Only charge the battery at an ambient (surrounding air)
temperature between 10ºC and 40ºC. A charged battery can be used to power the machine under ambient
temperature conditions between 0ºC and 50ºC.When not in use, store the battery in a dry place between 10ºC
and 30ºC.
Important! Danger! Never short-circuit the battery or expose it to moisture. Do not store it together with any
metal parts which could short-circuit the contacts. The battery could overheat, start burning or explode.
If any person comes into contact with acid or similar internal fluids or substances contained in the
battery, wash off these substances immediately with plenty of water. If these substances make contact
with the eyes, rinse with plenty of water and visit a doctor immediately.
Do not place the rechargeable battery into fire or water. It can explode. The Rechargeable Battery should not be
discarded to domestic refuse, regardless of whether used or unused. You should return it to a local battery
collection point in accordance with Battery Regulations or return them to us suitably marked “Used Battery”.
www.prokits.com.tw
3
PT-1441 User’s Manual
Technical Data
Model
PT-1441A
PT-1441F
Rated Voltage
DC 14.4V
DC 14.4V
No-load Speed
One Gear Speed: 0-550rpm
One Gear Speed: 0-550rpm
Φ0.8 ~ 10mm
Φ0.8 ~ 10mm
Steel: Ø 6 mm
Steel: Ø 6 mm
Concrete: Ø 8 mm
Concrete: Ø 8 mm
Wood: Ø10 mm
Wood: Ø10 mm
Torque Setting
21 +1Position
21+1 Position
Output torque
7 N.M (MAX)
Range of Drill Bit sizes
Max. Drilling Capacity
Drive (Collet)
Battery
Charging Time
Free running time
Size
Weight (include battery)
Adaptor
7 N.M (MAX)
3/8" (10mm) Keyless Chuck
3/8" (10mm) Keyless Chuck
Ni-Cd 14.4V 1000mAh
Ni-Cd 14.4V 1000mAh
3-5 hours
3-5 hours
40 min. (unload speed)
40 min. (unload speed)
240*230*80mm
240*230*80mm
1.5kg
1.5kg
120V AC 60Hz 18V DC 400mA
230V AC 50Hz 18V DC 400mA
Protection Class II
Complied with EN60335-2-29
Indoor operation only
.Accessory
Screwdriver bits
Bit size
www.prokits.com.tw
14 PCS
6PCS drills: Φ1.5/ 2.5/ 3/ 4/ 5/ 6 mm
1PC extension: 60mm (L)
6PCS: PH1 ; PH2; PZ1 ; PZ2 ;SL 5 ;SL 6 mm (L : 25mm)
1PCS : SL6-PH2
(L : 45mm)
4
PT-1441 User’s Manual
Product Features
Torque
adjustment
Operating
trigger
Forward &
Reverse switch
Battery
Charger
Battery
Release Button
Initial operation
Insertion and Removal of Rechargeable Battery
Ensuring the correct orientation between the battery and the battery compartment, insert the rechargeable
battery into the machine. Do not apply force when inserting the battery. Insertion can be achieved easily and
without resistance. The battery must be inserted completely until the battery retention clips on the sides of the
battery compartment automatically lock it into place. To remove the battery press the battery retention clips and
pulls the battery out of its compartment.
Charging the Battery
The rechargeable battery must be charged before the first use. Only recharge the battery once it is has been
fully discharged, i.e. the performance clearly decreases. Otherwise the battery may not achieve its full capacity
at the subsequent charge.
Important! Only use the provided battery charger for charging the battery. First place the rechargeable battery
into the charging slot in the charger and then connect the charger to the mains. Charging starts automatically.
Remove the battery from the charge after about 5 hours. Always disconnect the charger from the mains before
you remove the battery from the charger.
Inserting Tool Bits
Important! Always remove the battery before you change the drill or screw bit to avoid unintentional starting of
the machine.
The cordless drill has a keyless chuck so you do not need a key to lock the tool bit in place. Make sure that the
drill or screw bit is not skew when it is inserted and the chuck tightened.
Before inserting drill/screw bits open the jaws of the chuck by holding the lower ring of the chuck and turn the
locking ring anticlockwise. Open the chuck until you can insert the tool. Insert the drill/screw bit all the way in
and then holding the lower ring, turn the locking ring in a clockwise direction to firmly tighten it.
To remove the tool hold the lower ring of the chuck and turn the locking ring anticlockwise.
Open the chuck until you can remove the tool
www.prokits.com.tw
5
PT-1441 User’s Manual
Operating Trigger
Use the operating trigger to start the machine and keep holding it for continuous operation.
The rotation speed can be varied by depressing the operating trigger. The more the trigger is depressed, the
faster rotation speed.
To switch the machine off, release the operating trigger
Forward and reverse switch
Important! The machine has to come to a complete stop before the reverse rotation lever can be used;
otherwise the machine may be damaged.
Use the forward and reverse switch to switch between clockwise (normal) and anticlockwise rotation or
vice-versa. With the forward and reverse switch in the central position the operating trigger is locked and
cannot be depressed. Put the forward and reverse switch in the central position before you put the machine
down, to avoid unintentional starting.
Torque adjustment
You can control the maximum torque applied to the drill bit with the torque control knob.
Attention! The torque control knob should only be operated when the machine is not running; otherwise the
machine may be damaged.
To set the drill to the lowest available torque setting, twist the torque control knob until the small arrow on the
drill-housing points to the “1” stamped on the torque control knob. In this position the torque clutch will slip with
light drilling resistance. The higher the number the arrow points to on the torque control knob, the larger the
maximum torque that can be applied before the torque clutch will slip.
To set the machine to maximum available torque twist the torque control knob until the arrow points to the drill
symbol. In this position there is no slip in the torque clutch.
Select a lower torque for insertion/removal of screws to avoid damage to the work-piece (in particular wooden
work-pieces) or to the screw. For drilling select a higher torque setting. Do a test first on an item which is not
your final work-piece and adjust the desired torque accordingly before you start the actual work.
Operation for working
Only use tool bits which can be securely fastened in the chuck and for which the drill has been designed.
1. Drilling
Check whether the drill bit is correctly inserted and tightly fastened before you start the machine. Use properly
sharpened drill bits. Use screwdriver bits that are not overly worn. At the start of each drilling operation select a
lower speed. For large holes drill with a smaller drill bit first and then enlarge the hole using a larger drill bit.
2. Drilling in Wood
For drilling in wood use a wood drill-bit. Protect or fasten the work-piece in a suitable holder. Mark the positions
of the holes to be drilled with a sharp tool or a nail. Do not apply excessive pressure against the work-piece with
the machine.
3. Drilling in Metal
For drilling in metal use a steel drill-bit. Always provide sufficient cooling with suitable non-inflammable coolants.
Protect or fasten the work-piece with a suitable holder. The work-piece should lie flat on the work bench. Mark
the positions of the holes to be drilled with a centre-punch. Do not apply excessive pressure against the
work-piece with the machine. Allow the drill to operate at its normal operating speed.
Important! At the start of drilling select a lower speed to avoid the bit slipping away from the desired holes
location. If the drill-hole is deep, the drill-bit may become jammed in the hole. In this event a high torque could
damage the drill bit or the drill. If the bit becomes jammed, hold the machine firmly and immediately release the
On/Off trigger. Switch to anticlockwise rotation, and use a low rotation speed to remove the jammed drill bit
more easily.
4. Drilling in Plastic
For drilling in plastic use a steel drill and follow the same instructions as for drilling in wood.
www.prokits.com.tw
6
PT-1441 User’s Manual
5. Drilling in Stone, Brick, Masonry or similar
For drilling in walls, stone, masonry etc. use a masonry-bit. Do not put too much pressure on the machine.
Follow the same instructions as for drilling in metal.
6. Using the Drill as a Screw-driver
Before using the machine check whether the screw-bit is inserted correctly. Avoid over-tightening screws,
otherwise the screw head may be damaged or stripping of the threads may occur.
7. Screw Insertion
Set the direction of rotation of the drill to the clockwise direction. Insert the screw-bit into the slot in the head of
the screw. Hold the screw bit perpendicular to the head of the screw, otherwise the screw or the screw head
may be damaged. Press the screw bit against the screw with a constant pressure while driving in the screw.
When the screw is completely screwed in, hold the machine firmly and release the forward & reverse switch,
otherwise the screw or the screw head may be damaged. If the forward & reverse switch is not released
immediately a high torque could also damage the drill bit or the drill.
8. Screw Removal
Set the direction of rotation of the drill to the anticlockwise direction. Insert the screw-bit into the slot in the head
of the screw. Hold the screw-bit perpendicular to the head of the screw, otherwise the screw or the screw head
may be damaged. Press the screw bit against the screw with a constant pressure while removing the screw.
Maintenance and Clean
Attention! Always remove the battery before carrying out any work on the machine.
To clean, always use a dry or moist, but not wet, towel. Many cleaning agents contain chemical substances
which may cause damage to the plastic parts of the machine. Therefore do not use any strong or inflammable
cleaners such as petrol, paint thinner, turpentine or similar cleaning agents.
Always keep air ventilation holes free of dust deposits to prevent overheating.
Service
For more information on PT-1441A / PT-1441F and other products, please visit www.prokits.com.tw.
Certificate Number: TW98/12323QA
©2012 Copy Right by Prokit’s Industrial Co., Ltd. 2011001(C)
www.prokits.com.tw
7