1
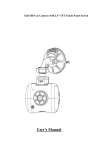
IMPORTANT SAFETY INSTRUCTIONS
WARNING:
TO PREVENT FIRE OR SHOCK HAZARD DO NOT USE THIS PLUG WITH AN EXTENSION CORD,
RECEPTACLE OR OTHER OUTLET UNLESS THE BLADES CAN BE FULLY INSERTED TO
PREVENT BLADE EXPOSURE. TO PREVENT FIRE OR SHOCK HAZARD. DO NOT EXPOSE
THIS APPLIANCE TO RAIN OR MOISTURE.
1. Read these instructions.
2. Keep these instructions.
3. Heed all warnings.
4. Follow all instructions.
5. Do not use this apparatus near water.
6. Clean only with dry cloth.
7. Do not block any ventilation openings. Instal in accordance with the manufactures instructions.
8. Do not install near any heat sources such as radiators, heat registers, stoves, or other apparatus
(including amplifiers) that produce heat.
9. Do not defeat the safety purpose of the polarised or grounding type plug. A polarised plug has
two blades with one wider than the other. A grounding type plug has two blades and a third
grounding prong. The wide blade or the third prong are provided for your safety. If the provided
plug does not fit into your outlet, consult an electrician for replacement of the obsolete outlet.
10. Protect the power cord from being walked on or pinched particularly at the plugs, convenience
receptacles, and at the point where it exits from the apparatus.
11. Only use attachments/accessories specified by the manufacturer.
12. Unplug the apparatus during lightening sorts or when unused for long periods of time.
13. Refer all servicing to qualified personnel. Servicing is required when the apparatus has been
damaged in any way , such as power supply cord or plug is damaged, liquid has been spilled or
objects have fallen into the apparatus, the apparatus has been exposed to rain or moisture, does
not operate normally, or has been dropped.
14.This appliance should not be exposed to dripping or splashing water and no objects filled with
liquids such as vases should be placed on apparatus .
Dripping warning: The products should not be exposed to dripping or splashing and that no objects
filled with liquids, such as vases, shall be placed on the product.
Ventilation warning: The normal ventilation of the product should not be impeded for intended use.
LOCATION OF CONTROLS
NAMES OF CONTROLS
1.
2.
3.
4.
5.
6.
7.
8.
9.
10.
11.
12.
13.
CD PROGRAM BUTTON
CD REPEAT BUTTON
BASS BOOST BUTTON
CD REPEAT INDICATOR
POWER INDICATOR
CD DISPLAY
SPEAKER
CD COMPARTMENT
FM TELESCOPIC ANTENNA
CD DOOR OPEN/CLOSE
FM STEREO INDICATOR
CD PROGRAM INDICATOR
CD SKIP FORWARD BUTTON
14.
15.
16.
17.
18.
19.
20.
21.
22.
23.
24.
25.
CD PLAY/PAUSE BUTTON
CD SKIP BACKWARD BUTTON
CD STOP BUTTON
DIAL SCALE
BAND SELECTOR
TUNING CONTROL
AC SOCKET
FOLDING HANDLE
VOLUME CONTROL
FUNCTION SWITCH
PHONES JACK
BATTERY COMPARTMENT
INTRODUCTION
* Thank you for purchasing this product.
* Please read through these operating instructions, so you will know how to operate your equipment
properly. After you finished reading the instructions manual, put it away in a safe place for future
reference.
CAUTION:
* Do not block the ventilation openings or holes.
* Do not place any naked flame sources, such as lighted candles, on the apparatus.
* When discarding batteries, environmental problems must be considered and local rules or laws
governing the disposal of these batteries must be followed strictly.
* Invisible laser radiation when open and interlock failed or defeated. Avoid direct exposure to beam.
* To prevent fire or shock hazard, do not expose this appliance to rain or moisture.
NOTE:
The manufacturer is not responsible for any radio or TV interference caused by unauthorised
modifications could void the user's authority to operate the equipment.
IMPORTANT FOR LASER PRODUCTS
REPRODUCTION OF LABELS
1.
CLASSIFICATION LABEL, PLACED ON REAR ENCLOSURE
2. WARNING LABEL, PLACED INSIDE THE UNIT
CAUTION: Do not open the unit. There are no user serviceable parts inside the unit; consult all
servicing to qualified service personnel.
Discs for Playback
This system can playback all digital audio CD, finalised digital audio CD-Recordable (CD-R) discs
and finalised digital audio CD-Rewritable (CD-RW) discs. This system can playback CD-DA format
digital audio CD, finalised digital audio CD-R discs and finalised digital audio CD-RW discs.
POWER SOURCE
This unit is designed to be operated on AC/DC.
AC OPERATION
Plug the smaller end of AC power cord into AC jack on unit and the other bigger end into AC wall
outlet. The batteries will be automatically disconnected. For dual voltage version, make sure that the
AC VOLTAGE SELECTOR(located inside battery compartment) is switched to your local voltage.
DC OPERATION
Open the BATTERY COMPARTMENT DOOR. Install 6 pcs UM-2/C size batteries (not included) into
compartment. Please follow correct polarities as indicated.
CAUTION
* Remove batteries if they are flat or not being used for a long period of time.
* Batteries contain chemical substances, so they should be disposed of properly.
BASIC FUNCTION
SWITCHING ON THE UNIT
Set the FUNCTION switch to CD or RADIO.
TO ADJUST VOLUME
Rotate the VOLUME CONTROL clockwise or anticlockwise to increase or decrease volume.
HEADPHONES
For private listening, plug the headphones/earphones (not included) into PHONES jack(3.5 mm
diameter).
CAUTION: Long time listening with headphones/earphones at high volumes may cause harmful
damage to users ears.
USING THE RADIO
TUNING IN RADIO STATIONS
1. Move the FUNCTION switch to RADIO position, the POWER indicator will illuminate.
2. Slide the BAND switch to select the desired wave band: FM, FM ST..
3. Tune to required station by rotating the TUNING KNOB.
4. Adjust VOLUME CONTROL to desired volume level.
5. Extend TELESCOPIC ANTENNA to its full length if you are listening to FM broadcasting.
Note: If the broadcasting program is too noisy when you are listening to FM stereo station,
please slide the BAND switch from FM ST. to FM. The FM STEREO indicator will be on when
you are receiving FM stereo programme.
6. Turn off the radio by switching the FUNCTION switch to "OFF" position
USING THE CD
LOADING A DISC
1. Set the FUNCTION switch to CD position.
2. Open the CD door.
3. Place an audio CD into the tray with the label side facing up.
4. Close the CD door.
The total number of tracks will appear in the display after 5 seconds.
5. To remove the CD, press OPEN to open CD compartment lid, grasp the CD by its edges, and
carefully take it out.
Note:
To ensure good system performance; wait until the disc tray completely reads the disc before
proceeding.
If no disc is loaded into the compartment, or the disc is placed upside down, the display will show
00.
PLAYING A DISC
1. Press PLAY/PAUSE button to start playback.
The playback starts from track 1, PLAY/PAUSE indicator in the right lower corner of the display
illuminates.
To interrupt playback, press PLAY/PAUSE button.
PLAY/PAUSE indicator flashes on and off.
To resume playback, press PLAY/PAUSE button again, PLAY/PAUSE indicator becomes steady
on the display.
2.
To stop playback, press STOP button, The total number of tracks appears in the display.
SELECTING A DESIRED TRACK/PASSAGE
To select a desired track
* Press SKIP/SEARCH FORWARD/BACKWARD button repeatedly in stop mode or during play until
the desired track appears on the display.
* Press PLAY/PAUSE button to start play.
To search for a particular passage during playback( track scanning at high speed)
Press and hold SKIP/SEARCH BACKWARD/FORWARD button to scan the current playing track at
high speed until desired point(passage), then release the button.
Playback will start again from this point.
PROGRAM TRACKS
Programming tracks of disc are possible when playback is stopped. Up to 20 tracks can be stored in
the memory in any order.
1. In stop mode, press PROG button , the
and the PROGRAM indicator will be flashing on
and off on the display.
2. Press CD SKIP/SEARCH FORWARD button to select the first desired track to be programmed.
3. Press PROG button to enter. The display changes to show
flashing.
4. Repeat steps 2 & 3 to store other desired tracks until all tracks are programmed.
5. Press PLAY/PAUSE button to start playback from the first programmed track.
6. Press STOP button to stop program playback.
Note: Program function can only be done in stop mode.
To Erase the Memory(Program)
To clear the program, you may have two ways:
1. Press STOP button when the disc is stopped, or
2. Open the CD compartment lid, program will be erased.
REPEAT
You can play one track or all tracks on the disc repeatedly.
To Repeat a Single Track
1. Press REPEAT button once during play, CD REPEAT indicator will flash on and off.
The current track will be played over and over again till you press STOP button.
2. To cancel repeat play, press REPEAT button twice. CD REPEAT indicator goes off.
To repeat all the Tracks
1. Press REPEAT button twice during play, CD REPEAT indicator becomes steady on, all tracks on
the disc will be played over and over again till you press STOP button.
2. To cancel repeat play, press REPEAT button once. CD REPEAT indicator goes off.
Note: Repeat function also can be done in stop mode.
SPECIFICATIONS
CD SECTION
Channels:
Optical pick-up:
Frequency Response:
RADIO SECTION
Receiving Band:
Tuning Range:
Antenna:
GENERAL
Output Power:
Phones jack:
Power Source:
Power Consumption:
2 channels
3 beams laser
100Hz - 16K Hz
FM-FM ST.
FM: 88 - 108 Mhz
FM Stereo: 88 - 108 Mhz
FM rod antenna
1.2W x 2 (RMS)
3.5mm
AC 230V ~ 50 Hz
DC 9V UM-2/C x 6pcs
13.5W
Note: Specifications are subject to change for continuous improvement without prior notice.