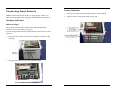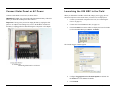
1
HOBO U30 NRC ® (No Remote Communication) User’s Guide © 2008 Onset Computer Corporation. All rights reserved. Onset, HOBO, and HOBOware are trademarks or registered trademarks of Onset Computer Corporation for its data logger products and configuration/interface software. All other trademarks are the property of their respective companies. Onset Computer Corporation 470 MacArthur Blvd. Bourne, MA 02532 Part #: MAN-U30-NRC Doc #: D-11866-A onset® Warnings Contact Information For support, please contact the company that you bought the products from: Onset Computer Corporation or an Onset Authorized Dealer. Mailing Address: P.O. Box 3450 Pocasset, MA 02559-3450 Phone: 1-800-LOGGERS (1-800-564-4377) or 508-759-9500 Fax: 508-759-9100 Hours of Operation: 8 AM to 5 PM ET, Monday through Friday E-mail: [email protected] Main Onset Web site: www.onsetcomp.com If you purchased the products through an Onset Authorized Dealer, you can also refer to www.hobohelp.com for support information. HOBO U30 Station (NRC) User’s Guide i ii HOBO U30 Station (NRC) User’s Guide Maximizing Battery Life.............................................................. 38 Contents Battery Voltage .......................................................................... 39 Warnings ....................................................................................... i Estimating Battery Life without External Power ......................... 40 Contact Information ......................................................................ii Maintaining the Battery .............................................................. 41 Chapter One: Overview ............................................................ 1 Charging a Dead Battery ........................................................... 42 Introduction .................................................................................. 1 Replacing the Battery ................................................................ 43 Key Features ............................................................................... 2 Chapter Five: Maintenance .................................................... 45 HOBO U30 NRC Station Components ........................................ 3 General Maintenance ................................................................ 45 Smart Sensors ............................................................................. 6 Inspecting the HOBO U30 Station ............................................. 46 The Analog Sensor Port (Optional) ............................................. 7 Adding a New Sensor ................................................................ 47 Chapter Two: Initial Setup and Test ........................................ 9 Removing or Replacing Sensors ............................................... 48 Procedure .................................................................................... 9 Testing Smart Sensors .............................................................. 49 Installing the Mounting Plates .................................................... 10 Chapter Six: Troubleshooting .............................................. 51 Connecting Smart Sensors ........................................................ 11 LED Descriptions ....................................................................... 51 Connecting Analog Sensors ...................................................... 13 Problems and Solutions ............................................................. 53 Connecting the Battery .............................................................. 14 Chapter Seven: Connecting the U30 to a Computer ........................................... 15 Specifications ............................................................................. 58 Connecting the U30 to HOBOware Pro ..................................... 16 Time Accuracy ........................................................................... 61 Configuring the Analog Sensor Port .......................................... 18 Memory ...................................................................................... 62 Launching the U30 NRC ............................................................ 21 Power ......................................................................................... 63 Checking the U30 Status ........................................................... 23 Reading Out the U30 NRC ........................................................ 25 Chapter Three: Reference ......................................................... 57 Accessories................................................................................ 64 Appendix C: The Smart Sensor Expander Board......................... 65 Installing the U30 in the Field ........................ 27 Accessing the Secondary Cable Slot ........................................ 65 Procedure .................................................................................. 28 Installing the Expander Board ................................................... 68 Installing Grounding Wire .......................................................... 30 Installing Weatherproof Cable Channel(s)................................. 31 Connect Solar Panel or AC Power ............................................ 35 Launching the U30 NRC in the Field ......................................... 36 Chapter Four: The Battery ...................................................... 37 HOBO U30 Station (NRC) User’s Guide iii iv HOBO U30 Station (NRC) User’s Guide Supplementary Information ............................................................ 71 Warranty .................................................................................... 72 Returns ...................................................................................... 74 Repair Policy .............................................................................. 75 Contacting Technical Support.................................................... 76 HOBO U30 Station (NRC) User’s Guide v vi HOBO U30 Station (NRC) User’s Guide Chapter One: Overview Key Features Introduction Automatic Detection of Smart Sensors The HOBO U30 Station automatically recognizes Smart Sensors; simply plug them in before logging begins. No programming, wiring or calibration is required to set them up. The connections between the Smart Sensors and the logger are digital, ensuring accurate, reliable data collection and storage. The HOBO U30 Station is a data logging system that can be easily reconfigured and adapted to a wide variety of applications. Up to 15 channels of data can be recorded and monitored with HOBOware® Pro software. Optional Analog Sensor Port Contents The HOBO U30 Station can be optionally configured with an Analog Sensor Port, which includes two user-configurable inputs that can accept and provide excitation power to a wide range of Onset and third-party sensors with 0-20 V or 0-20 mA output. The Analog Sensor Port is factory-installed. The HOBO U30 Station package includes: • HOBO U30 Station • Mounting Kit • Grounding Wire • Cable Entry and Sealing Kit • Optional Analog Sensor Port, if ordered • Optional Sensor Expander Board, if ordered See The Analog Sensor Port (Optional) on page 7. Rechargeable Battery The HOBO U30 Station uses a sealed lead-acid battery that can be recharged via a solar panel or AC adapter. This provides continuous power to keep the HOBO U30 Station recording data for years. See The Battery on page 37. HOBO U30 Station (NRC) User’s Guide 1 2 HOBO U30 Station (NRC) User’s Guide HOBO U30 NRC Station Components Component Descriptions Item 1. LED There are three Light Emitting Diode (LED) status indicators. Logging indicates whether the system is currently logging. Alarm indicates if an alarm has been tripped. Sensor active indicates that Smart Sensor network communications are occurring. For more information see LED Descriptions on page 51. 2. Logger The U30 sits inside the outer case. 3. Analog Sensor Port This connector is where the optional Analog Sensor Port is factory-installed. 4. USB port Plug in a USB cable here to connect directly to a computer. 5. Smart Sensor Expansion Board U30 NRC Components HOBO U30 Station (NRC) User’s Guide Description 3 6. Vent This vent allows pressure to equalize inside the enclosure, but does not allow liquid to pass through. NOTE: The pressure inside the case does not match the outside air pressure exactly so a barometric pressure sensor deployed within this case cannot measure the true atmospheric pressure unless it has its own unrestricted vent to the outside. 7. Cable access openings All cables and wires are routed through a protective rubber cable channel placed in this opening. If you are using the optional expander board for additional Smart Sensors, you will need to use both cable access openings. See Accessing the Secondary Cable on page 65. 8. Smart Sensor ports Connect up to five Smart Sensors in these RJ-12 jacks. Use one port to connect the optional expander board for additional Smart 4 HOBO U30 Station (NRC) User’s Guide Sensors. Smart Sensors 9. Battery A 4-volt sealed lead-acid (SLA) battery is located behind the internal enclosure. 10. Battery connector Plug in the 4-volt sealed lead-acid battery here. 11. Ground connector Plug in grounding wire here to ground the system. Systems that are installed on roofs or other exposed locations should be grounded. 12. External power supply Plug in the compatible solar panel or AC adapter here. Important: Always connect or disconnect external power before the battery. Damage may occur if the battery is unplugged before the external power is disconnected. 13. Internal enclosure Smart Sensor Cable Length This provides a second weatherproof housing for the electronics in the HOBO U30 Station. There is no need to ever open this, and opening it will void the warranty. The HOBO U30 Station can work with a maximum total of Smart Sensor cable lengths up to 100 meters (328 feet), as measured from the logger connection point to the electronics embedded in the individual cables. Optional Smart Sensor extension cable lengths must also be included in the total. This limitation applies to Smart Sensor cables only. The lengths of other cables, such as those connected to the Analog Sensor Port or the analog portion of smart sensor cables do not need to be included in this total. Data Channel Limitations The HOBO U30 Station can log up to 15 data channels (not including the internal battery channel). This includes the two channels in the Analog Sensor Port plus each of the Smart Sensor channels (note that some Smart Sensors may have more than one channel). If you have more than 15 channels connected, some of the sensors will be ignored. You should remove any Smart Sensors that will not be used in the deployment, and disable the second channel in the Analog Sensor Port if it is not needed (the first channel cannot be disabled). If you connect a Smart Sensor that has multiple channels (such as temperature and relative humidity), all of its channels will be logged. There is no way to disable them. HOBO U30 Station (NRC) User’s Guide 5 6 HOBO U30 Station (NRC) User’s Guide The Analog Sensor Port (Optional) The Analog Sensor Port is an easy-to-configure, flexible DC signalconditioning option that can be factory-installed in the HOBO U30 Station. This two-channel port can accept, and provide excitation power to a wide range of Onset and third-party sensors with 0–20 V or 0–20 mA output, including devices with 4–20 mA current loop interface, and sensors with 0– 2.5, 0–5, and 0–10 V DC output. The Analog Sensor Port features input protection and signal filtering, as well as delta-sigma A/D conversion and factory calibration. This port features extremely low power operation, resulting in long battery life for unattended data logging applications. Precision electronics provide ±0.25% accuracy from 50 mV to full scale (FS). Sensors connected to this Analog Sensor Port can be configured in HOBOware Pro software. Configuration options include channel names, scaling parameters, and excitation power. If your HOBO U30 Station does not have an Analog Sensor Port and you wish to upgrade to one, contact Onset Computer Corporation for information Functional block diagram Analog Sensor Port Functional Block Diagram HOBO U30 Station (NRC) User’s Guide 7 8 HOBO U30 Station (NRC) User’s Guide Chapter Two: Initial Setup and Test Installing the Mounting Plates Procedure Screw the mounting plates onto the back of the HOBO U30 Station case using a Phillips-head screwdriver. Be careful to orient the plates as shown below so that the screw heads are sunk into the screw holes. Before you take the U30 Station into the field for deployment you should perform some preliminary hardware assembly, configuration, and testing. 1. Access Secondary Cable Slot (page 65) (if applicable) If you ordered a Smart Sensor Expander Board and you will be using those ports now, you must remove the covering on the Secondary Cable Slot. 2. Install Mounting Plates (page 10) 3. Connect Smart Sensors (page 11) and Analog Sensors (page 13). Onset recommends that you test all sensors you plan to deploy with the logger. If you are using the Solar Radiation Shield, set up the Temperature and Temperature/RH sensors. There are several small pieces required to connect these sensors to the shield that could easily get lost in the field. It is strongly recommended you install these sensors in the solar radiation shield before going to the field. 4. Connect Battery (page 14). 5. Connect U30 to a computer (page 15 ). 6. Run HOBOware and select the U30 (page 16). 7. Configure the Analog Sensor Port (page 18). 8. Launch the U30 (page 21). 9. Check the U30 Status (page 23) Installing the mounting plates 10. Readout the U30 (page 25) 11. Repack the logger and sensors for transit. Onset strongly recommends that you use the original packaging when possible because it is custom-designed to protect the weather station and its components. HOBO U30 Station (NRC) User’s Guide 9 10 HOBO U30 Station (NRC) User’s Guide Primary Cable Slots Connecting Smart Sensors NOTE: Connect Smart Sensors before you begin logging with the U30. Smart Sensors plugged in after logging has already begun will be ignored. 1. Run cables for Smart Sensors through the Primary Cable Opening. 2. Plug the cables into the primary Smart Sensor ports. Secondary Cable Slots Before You Begin This procedure assumes that the Smart Sensor Expander Board and connector are already installed. See page 65. If you are using the Smart Sensor Expander Board, connect sensors to those ports first. 1. Run cables for secondary Smart Sensors through the Secondary Cable Opening. 2. Plug the cables into the Smart Sensor Expander Board. HOBO U30 Station (NRC) User’s Guide 11 12 HOBO U30 Station (NRC) User’s Guide Connecting Analog Sensors Connecting the Battery Refer to the sensor documentation for sensor connection details and use the pin out diagram below to connect a two- or three-wire sensor or transducer to the module’s terminals. Connect the built-in battery cable to the battery. NOTE: As long as your battery has adequate charge, you do not need to connect the solar panel or AC adapter for this initial setup/test launch. To make the connection: 1. Loosen the screw for each pin on the connector. 2. Insert the appropriate wire. See Pin Out below. 3. Tighten the screw. Analog Port Pin Out Pin # Function Left Pin # Right Function 1 Shield 1 Shield 2 Channel 1 Signal 2 Channel 2 Signal 3 Channel 1 Return 3 Channel 2 Return 4 Excitation Voltage 4 Excitation Return Connecting the Battery Cables Make sure all wires attached to the Analog Sensor Port are routed through the cable access opening. To fit into the holes in the rubber cable channel, the ideal cable diameter is 0.157 in (4.0 mm). If the cable is too small, build up the diameter using heat shrink. If it is too big and you are using the secondary cable access opening, then place the cable through the left-most hole in the rubber cable channel where the diameter can be up to 0.25 in (6.4 mm). If you are not using the secondary opening or the cable is still too big, then splice on another cable with a smaller diameter to fit through the hole. See the steps later in this section for working with the rubber cable channel. HOBO U30 Station (NRC) User’s Guide 13 14 HOBO U30 Station (NRC) User’s Guide Connecting the U30 to a Computer Connecting the U30 to HOBOware Pro To connect to a computer running HOBOware Pro, plug the “mini-B” end of the USB cable provided into the USB port on the HOBO U30 Station and connect the “A” end to the USB port in your computer. To connect the U30 to HOBOware Pro: 1. Launch HOBOware Pro. 2. From the Device menu select Select Device …. If the device has never been connected to this computer before, it may take some time for the computer to detect the new hardware and report that it has connected successfully. One or more messages will appear, indicating that new hardware has been found. You may also hear a chime. NOTE: Your computer may tell you to reboot before you can use the device. It is not necessary to reboot. HOBO U30 Station (NRC) User’s Guide 15 16 HOBO U30 Station (NRC) User’s Guide 3. In the Select Device pane, click in the circle next to the desired device name and then click OK. Configuring the Analog Sensor Port This topic provides the basic steps for configuring the analog sensor port. See the HOBOware User Guide for complete details. Steps To configure an Analog Sensor Port, perform the following steps: 1. From the Device menu, choose Configure Modules/Ports. When the device is recognized by HOBOware Pro, the status bar at the bottom of the HOBOware Pro window will show the connected device and indicate Ready. The Select Channel to Configure dialog will appear showing all configurable Analog Sensors attached to the U30 Station. You can now begin configuring or monitoring the device. 2. HOBO U30 Station (NRC) User’s Guide 17 18 Click on the + sign to expand the entry and show the channels. HOBO U30 Station (NRC) User’s Guide 3. Select a channel and then click the Configure button. The Configure Channel window appears. NOTE: The default channel names are just place holders. Either channel can be configured to measure voltage or current. For example, both channels can be used to monitor sensors with 4-20 mA output. You can change the name and measurement type of the channel in the Configure Channel pane. 4. Change any configurable parameters as required: Channel Name: You can select Current or Voltage or enter a custom label to represent the type of measurement the sensor is taking. For example if you are connecting a level sensor, you could make the Channel Name Level. Excitation Power: See the HOBOware User Manual for details. Measurement Type: Select desired type corresponding to the sensor output. If you change the default Channel Name make sure you the Measurement Type to match. Scaling Parameters: Select the unit to be scaled and then map values to new units as required. See the HOBOware User Manual for details. 5. Click Configure to send the configuration to the port. The Analog Sensor Port is now configured and you can launch the U30. HOBO U30 Station (NRC) User’s Guide 19 20 HOBO U30 Station (NRC) User’s Guide 2. Launching the U30 NRC 1. Complete fields as required. Description: Enter a description if desired. Click the Launch icon on the toolbar to display the Launch window. Channels to Log: Make sure all of the sensors connected to the logger are visible in the Channels to Log pane. Logging Interval: Choose a logging interval of 10 seconds so that your test will yield enough data to analyze. When you re-launch the logger in the field, you will change this to your desired value for deployment. Launch Options: Select Now. 3. The “logging ok” light on the logger should blink every two seconds during logging. The Launch Logger window appears. HOBO U30 Station (NRC) User’s Guide Click Launch. 21 22 HOBO U30 Station (NRC) User’s Guide 2. Checking the U30 Status 1. Verify Sensor Readings Change the sensor readings by changing the conditions. From the main menu go to Device > Status to open the Status window. For example, if you are measuring temperature, hold the temperature sensor in your hands for a minute or two and verify that the temperature shown in the Current Readings increases. 3. Close the Status window by clicking OK. The Status window appears, showing the status of the logger and the attached sensors. HOBO U30 Station (NRC) User’s Guide 23 24 HOBO U30 Station (NRC) User’s Guide 5. Reading Out the U30 NRC 1. Stop Logging Once you are satisfied everything is working properly, stop the logger by clicking the Stop icon on the toolbar (or from the main menu go to Device > Stop). Click the Readout icon on the toolbar to open the Readout window (or from the main menu go to Device > Readout). After the logger has been stopped, the data remains in the logger until the next launch. 6. You are now ready to deploy the U30 in the field. If you are not deploying the system immediately, disconnect the battery to save battery power. You can also disconnect the sensors for transporting the system to the field. 2. When HOBOware Pro asks if you want to stop the logger before reading out, click Stop. 3. When HOBOware Pro prompts you to save the data file, click Save. 4. Review the data and verify that it is accurate. The graph should reflect the change in conditions that you caused previously. HOBO U30 Station (NRC) User’s Guide Prepare Logger for deployment. 25 26 HOBO U30 Station (NRC) User’s Guide Chapter Three: Installing the U30 in the Field Procedure Tools Required Before you head into the field for installing the U30, use the checklist in Appendix C to make sure you have the necessary tools to set up the logger and tripod in the field. • A notebook computer with HOBOware Pro installed is recommended for launching the U30 after setup. • Bladed screwdriver or chisel • Phillips-head screw driver • Small flat-head screw driver for Analog Sensor Port screw terminals (if applicable) Before You Begin Steps This procedure assumes that you have performed the preliminary hardware setup and configuration and have performed a pre-deployment test (see Chapter 2, page 9). 1. Setup the Tripod. • Wrench or socket driver 2. Mount the U30. • File 3. Install grounding wire (optional) (page 30). • Silicone grease 4. • Plugs for unused cable channel holes Plug all Smart Sensors into the HOBO U30 Station (if not already plugged in) making sure all cables are routed through the cable access opening(s) (page 11). • Grounding wire 5. Connect Analog Sensors to the Analog Sensor Port, if applicable (page 13). NOTE: It may be necessary to build-up the diameter third-party sensors with heat-shrink or electrical tape to match the diameter of the holes in the rubber cable channels and ensure a weather-tight seal. 6. Run the cable for a solar panel or AC adapter through the Primary Cable Slot, but do not connect it yet. 7. Install the weatherproof cable channel (page 31). 8. Connect the battery (page 14). 9. Connect the solar panel or AC adapter (page 35). 10. Verify that the HOBO U30 Station powers up properly. 11. Connect the U30 to a notebook computer (page 15). 12. Connect the U30 to HOBOware Pro (page 16). HOBO U30 Station (NRC) User’s Guide 27 28 HOBO U30 Station (NRC) User’s Guide 13. Configure Launch Settings. Installing Grounding Wire 14. Disconnect the computer from the U30 (make sure you remove the USB cable from the U30). 15. Close the door and snap the hinges shut on the HOBO U30 Station case. Consider using padlocks to secure the case. You should install the grounding wire if you are using the Wind Speed and Direction Smart Sensor (S-WCA-MXXX) or if you are installing the HOBO U30 Station on a roof or in a location with exposure to lightning. The grounding wire may also be helpful in reducing sensor errors when installing the HOBO U30 Station near other radio or electrical equipment or antennas. The system should begin operating as configured. Insert the grounding wire through the opening and plug it into the ground connector. Connect Grounding Wire HOBO U30 Station (NRC) User’s Guide 29 30 HOBO U30 Station (NRC) User’s Guide 2. Installing Weatherproof Cable Channel(s) Hold the channel just below the HOBO U30 Station case (with the channel’s hinged side on the left and the taper facing in). All cables and wires should be routed through the cable access opening at this point. If you are using the Smart Sensor expander board, make sure those cables are routed through the secondary cable access opening. 1. Place Cables in Channel Open the channel and lay the cables and wires into the grooves. NOTE: The solar panel or AC adapter cable must be in the leftmost (larger diameter) groove. Grease the Cable Channel NOTE: Use the small rubber plugs to fill any unused grooves. Center the thick part of the plugs in the groove. Plug ‘tails’ can face in or out. It may be easier to install these after the rubber cable channel has been pushed into the case. Insert the thin part of the plug into the hole and pull to center the thick part of the plug in the channel. Apply a small amount of silicone grease (about the size of a pea) onto your fingertip and then work a light coating into the top, bottom, and two ends (the sides with no holes) of the rubber cable channel. Also put a light coating on the inside of the two halves of the cable channel. Greasing the cable channel Installing Cable Channel HOBO U30 Station (NRC) User’s Guide 31 32 HOBO U30 Station (NRC) User’s Guide 3. 5. Press Channel into Case a) Secure Channel Guide Screw the retaining bars on to the case to secure the channel(s). The bars should be flat against the case. Close the channel, making sure the cables, wires, and any plugs remain in their grooves. Finger-tighten only! Do not use a screwdriver to tighten the thumb screws. You may need a screwdriver to loosen them after time in the field. b) Press the channel into the opening. To reduce the amount of excess cable in the case (especially when several Smart Sensors are connected), gently pull the cables toward you as you press the channel into place. Press the channel in until it is flush with the outside of the case. (When fully seated, the channel will project slightly into the inside of the case.) Retaining bars installed Channel pressed into case 4. If you are using the Smart Sensor expander board, then repeat these steps with the second cable channel. Use the larger plug for the leftmost hole if necessary. HOBO U30 Station (NRC) User’s Guide 33 34 HOBO U30 Station (NRC) User’s Guide Connect Solar Panel or AC Power Launching the U30 NRC in the Field Connect a Solar Panel or AC Power, as shown below. When you launch the U30 NRC in the field, change your Logging Interval and Launch Options to the actual values you want to use in deployment. IMPORTANT: Make sure you run the cable through the Primary Cable Slot before you install the weatherproof cable channel. Important: If at any point you need to unplug the battery, unplug the solar panel or AC adapter first. Damage may occur to the HOBO U30 Station if the battery is unplugged before disconnecting the solar panel or AC adapter. 1. Connect your notebook computer to the U30 (see Connecting the U30 to on page 15). 2. Connect the U30 to HOBOware Pro (see page 16). 3. Click the Launch icon on the toolbar to display the Launch window (or from the Main Menu go to Device > Launch). The Launch Logger window appears. Connecting Solar Panel or AC Power HOBO U30 Station (NRC) User’s Guide 35 36 4. Configure Logging Interval and Launch Options as desired. See the HOBOware Users Manual for details. 5. Click Launch. HOBO U30 Station (NRC) User’s Guide Chapter Four: The Battery Maximizing Battery Life This chapter includes the following topics: Battery life will vary with the following factors: • Maximizing Battery Life - page 38 • Sensor excitation current and warm-up time • Battery Voltage - page 39 • Logging interval (and sampling interval, if applicable) selected • Estimating Battery Life without External Power - page 40 • Number of sensors being used • Maintaining the Battery - page 41 • Operating environment (e.g., temperature) • Charging a Dead Battery - page 42 • Size of the solar panel (if applicable) • Replacing the Battery - page 43 • Quality and quantity of solar light (if a solar panel is installed) Here are some tips to maximize battery life: HOBO U30 Station (NRC) User’s Guide 37 38 • Reduce warm-up time. If you are using excitation voltage, select the shortest warm-up time needed for the sensor. • Ensure that your solar panel gets full sunlight. Solar panels are extremely sensitive to partial shading. Obstructing even a single cell of the panel will result in significant loss of charging power. • Use the sampling interval only if you have sensors that support measurement averaging. • Stay within the normal operating temperature range. While the logger can operate at temperatures of -40 to 60 C (-40 to 140 F) the battery has much better short and long term performance when maintained between -20 and 40 C (-4 and 104 C). The Sealed Lead Acid will self-discharge. The hotter the battery gets, the faster it will self-discharge. At 20 C, the battery loses about 20% of its capacity in 6 months, but at 50C it loses more than 50%. To maximize battery life (no charging) try to locate the logger where the temperatures will not be above 40 C (104F). Very cold temperatures will reduce the self-discharge rate to almost zero, but the effective capacity of the battery will be reduced. Temperatures below -20 C (-4 F) will reduce the effective battery capacity by more than 25%. HOBO U30 Station (NRC) User’s Guide Battery Voltage The normal operating range for the battery is 3.9 to 4.3 volts. If the voltage drops below the normal range, the HOBO U30 Station will change behavior to maximize the remaining voltage until the battery can be recharged. The following chart explains what occurs at various voltage levels. The voltage used in determining behavior is based on a 20-minute average. Battery voltage The battery is being charged. 4.3 volts The battery is fully charged. 3.0 to 3.6 volts Level at which the HOBO U30 Station will perform a safe shutdown and logging will stop. Use the AC adapter to recharge the battery (leave it plugged in for twelve hours). Plug the battery in. Plug the solar panel back in. You may want to do a full readout before re-launching to be sure you have all the data from the logger. Approximately 3.0 volts The following table can be used as a guideline for estimating how long a HOBO U30 Station will run without any source of external power. For these examples, the HOBO U30 Station has up to ten sensors installed and no excitation on the Analog Sensor Port. It is not recommended that the U30 be deployed for longer than 6 months without any charging as the battery may be damaged from sulfation due to the long-term low-voltage state. Typical Run Time The battery is too low to safely be charged with the HOBO U30 Station and may need to be replaced. Connecting the AC adapter at this point will not recharge the battery. To recharge the battery, a separate battery charger will be required. Important: Do not re-launch the logger until the data has been recovered. The logger uses very durable, high-capacity Flash memory. With this memory, data is retained even when the battery runs out of charge. After you replace the battery, attempt to read out the data. If you are still unable to read out the station once the battery has been replaced, contact the vendor that sold it to you. It may be possible to retrieve the logged data. HOBO U30 Station (NRC) User’s Guide The HOBO U30 Station is designed to be used with a power source to keep the 4-volt sealed lead-acid battery charged. Ideally, the power source is always connected and the battery will be constantly trickle-charged. If external power source has stopped supplying power (e.g. there is power failure or the solar panel is covered), the HOBO U30 Station is capable of running from battery power alone for extended periods of time. Details 4.3 to 4.5 volts Estimating Battery Life without External Power 39 Logging Interval 4.5 AHr Battery (S045) 10 AHr Battery (S100) 1 second 1 - 2 months 2 - 3 months 1 minute 4 - 6 months 6 months 5 minutes 6+ months 6 months Estimating battery life when excitation is used must be calculated based upon actual drain (current, duration and logging frequency). If excitation averages more than 1 mA, and charging in the field is not possible, it is recommended that the 10 AHr (S100) battery option be used with the U30. See the Support section at www.onsetcomp.com for additional information on estimating battery life and selecting the correct size solar panel. 40 HOBO U30 Station (NRC) User’s Guide Maintaining the Battery Charging a Dead Battery The rechargeable battery requires an external power source to work properly. The Power section on page 63 explains this in detail as well as how to maximize battery life and how you can expect the HOBO U30 Station to operate at varying voltage levels. In the event the battery is completely dead (less than 3.0 volts and the logger lights do not come on when the battery is connected), you can charge the battery externally with a current limited variable power supply (otherwise you must replace the battery). Hold the battery across a constant voltage source of 4.5 volts with a current limit of 2 Amps. When held at this voltage, the battery will seek its own current level and maintain itself in a fully charged condition. It takes up to 24 hours to fully charge a dead battery. If you are using a solar panel for recharging the battery and there has been a steady decline in battery voltage, you will need to make a change by either reducing power consumption or increasing recharging current. Start by reducing the logging interval and/or excitation current (if you are using it). Try cleaning the solar panel or repositioning it for maximum sunlight. You can also attempt to recharge the battery for 24 hours. Important: If the voltage is still low after attempting to recharge the battery with an AC adapter for 24 hours, then you may need to charge it with a current limited variable power supply or replace it (both tasks are described below) Do not apply more than 4.6 volts absolute maximum to the battery. Do not exceed 2 Amps of current when charging. If the battery gets hot, immediately stop charging the battery. If the battery will not hold charge, it must be replaced. Dispose of the old battery per local regulations. Important: Due to the self-discharge characteristics of this type of battery, it is imperative that you charge the battery for at least 12 hours every six months at minimum, even if you are not actively using the HOBO U30 Station. Otherwise, permanent loss of battery capacity may occur. HOBO U30 Station (NRC) User’s Guide 41 42 HOBO U30 Station (NRC) User’s Guide Replacing the Battery If the battery is completely dead and recharging it is not an option, then follow these steps to replace the battery: 1. Disconnect the AC adapter or solar panel. 2. Disconnect the battery. 3. Unplug all sensors, the USB cable, relay, and grounding wire. 4. Unscrew the antenna cable with a 5/16 inch wrench. 5. Use a Phillips-head screwdriver to remove the four screws at the corners of the clear, inner case. 6. Remove the clear, inner case. 7. Use a Phillips-head screwdriver to remove the two screws that secure the battery. 8. Note the orientation of the battery and then remove it. 9. Install the new battery with the same orientation and reverse the steps to reassemble. 10. Dispose of the old battery per local regulations. HOBO U30 Station (NRC) User’s Guide 43 44 HOBO U30 Station (NRC) User’s Guide Chapter Five: Maintenance Inspecting the HOBO U30 Station This chapter includes the following topics: • General Maintenance - page 45 Periodically perform a visual inspection of the HOBO U30 Station. Verify that the enclosure is free of visible damage, such as cracks, and that it is clean. • Inspecting the HOBO U30 Station - page 46 Check that all cables and wires are: • Adding a New Sensor - page 47 • Free of damage, such as cracks, cuts, and splits. • Removing or Replacing Sensors - page 48 • • Testing Smart Sensors - page 49 Protected in conduit if necessary (exposed cables are prone to being chewed by rodents and should be protected in conduit in locations where rodents are present). • Fastened securely. • Free of corrosion and in good condition. General Maintenance If moisture is visible inside the white enclosure or there is any sign of corrosion on the connectors, spray WD-40® or an equivalent electronics-safe corrosion inhibitor on the connectors. This will displace moisture and prevent additional corrosion. Onset recommends that you periodically visit the HOBO U30 Station to make sure it is operating as expected, data is still being recorded, and to readout its data. Regular maintenance is essential to ensure the accuracy of recorded measurements. Performing regular maintenance checks allow you to: • Verify that the logger is logging data and functioning as you expect • Identify damage • Minimize the impact of any existing damage It is recommended that you wipe off any water on the outside of the HOBO U30 case before opening it. Maintain sensors as recommended in their user manual. Verifying sensor accuracy Onset recommends that you test most sensors for accuracy once a year using HOBOware Pro. For details on verifying sensor accuracy, refer to the documentation included with each sensor. For third-party sensors (even those supplied by Onset), refer to documentation provided by the manufacturer. For a fee, Onset can verify the accuracy of a sensor. It may be possible to recalibrate some sensors. Contact Onset Technical Support for details. Cleaning the HOBO U30 Station The HOBO U30 Station does not require specialized cleaning; however, if it is deployed in a dusty or grimy location, you should wipe it down with a damp cloth occasionally to keep it looking its best. HOBO U30 Station (NRC) User’s Guide 45 46 HOBO U30 Station (NRC) User’s Guide Adding a New Sensor Removing or Replacing Sensors New sensors will only be recognized by the HOBO U30 Station when it is not logging. If you attempt to add a sensor while the logger is recording data, it will be ignored. Logging will continue normally for all other sensors already plugged in. If you remove a Smart Sensor while the HOBO U30 Station is logging, the Logging LED will blink red, and the logger will record erroneous data for that channel and continue logging as normal for the remaining Smart Sensors. This behavior will continue even if you plug the Smart Sensor back in, or if you plug in a new one of the same type. To stop recording erroneous data after removing a Smart Sensor, you will need to stop, readout, and relaunch the HOBO U30 Station. Smart Sensors To add new Smart Sensors: 1. Using HOBOware Pro, stop the logger from logging 2. Readout the data from the logger. If you are replacing a Smart Sensor with a new one of the same type, you will need to re-launch the HOBO U30 Station once the new Smart Sensor is installed. The HOBO U30 Station can continue logging until you stop, readout, and re-launch it with the new Smart Sensor. IMPORTANT: All existing data will be lost when you re-launch the logger. 3. Plug in any new Smart Sensors. 4. Re-launch the logger. You can remove analog sensors from the optional Analog Sensor Port or replace them with new analog sensors of the exact same type in the same channel without having to stop the logger. However, in the case that you are changing the type of sensor, you will need to reconfigure the Analog Sensor Port using HOBOware Pro, which will require you to stop the logger. The new Smart Sensors should start recording measurements. Analog Sensors To add new sensors to the Analog Sensor Port: 1. Connect the HOBO U30 Station to a computer via the USB cable. 2. In HOBOware Pro, select Stop Logging. 3. Readout the data from the logger. IMPORTANT: All existing data will be lost when you re-launch the logger. 4. Connect the new sensors to the Analog Sensor Port. 5. Configure Analog Sensor Port for the new sensor. 6. Re-launch the logger. The new sensors should start recording measurements. HOBO U30 Station (NRC) User’s Guide 47 48 HOBO U30 Station (NRC) User’s Guide Testing Smart Sensors Use HOBOware Pro if you need to verify the accuracy of the Smart Sensors, which is recommended on a yearly basis, or if you need to isolate a Smart Sensor that is generating an error. 1. Connect the HOBO U30 Station to the computer using the USB cable. If it is currently logging, stop logging through HOBOware Pro. 2. Unplug all Smart Sensors if you are troubleshooting an error. You can leave them plugged in if you are not getting any sensor errors and you are just checking them for accuracy. 3. Plug one Smart Sensor back in. From the Launch dialog in HOBOware Pro, check the current reading and make sure it is accurate. Repeat with the remaining Smart Sensors. HOBO U30 Station (NRC) User’s Guide 49 50 HOBO U30 Station (NRC) User’s Guide Chapter Six: Troubleshooting Indicator LED Action What it means but the system has recovered. There may be an intermittent problem. Try checking the Smart Sensors one at a time to make sure they are all communicating. If you find a bad sensor, or if no sensor communicates, contact your Onset Authorized Dealer or Onset Technical Support. This chapter includes the following topics: • LED Descriptions - page 51 • Problems and Solutions - page 53 LED Descriptions Sensor Active Blinking Smart Sensor network communications are occurring. The indicator LEDs can provide helpful clues as to what the HOBO U30 Station is doing, especially when it is not behaving as expected. USB Communication Blinking There is active communication from the HOBO U30 Station to the computer. Analog Sensor Port: Active Blinking green The Analog Sensor Port is making a measurement. Analog Sensor Port: Ex. On Blinking orange Excitation has been turned on for the Analog Sensor Port. The following table defines LED indications. Indicator LED Action What it means Logging Blinking green Indicates the system is currently logging. It blinks every two seconds while the logger is recording data from sensors. Do not add sensors while this indicator is blinking unless you plan to relaunch. If this indicator is not blinking when you believe it should, make sure the HOBO U30 Station has been launched. Blinking red There was a Smart Sensor or Analog Sensor Port communication failure. Investigate this problem immediately. Look for a loose connection, which could cause bad electrical contact with a sensor. If found, remove the offending sensor and check its wires and connector for damage and/or signs of moisture. Blinking orange There was a communication failure, HOBO U30 Station (NRC) User’s Guide 51 Tip The indicators are very faint under direct sunlight. If no indicators appear to be blinking, shield the logger from the light and check the indicators again. 52 HOBO U30 Station (NRC) User’s Guide Problems and Solutions The following chart lists common problems you may encounter with the HOBO U30 Station and solutions. Problem Solution No status indicators are blinking The logger has not have been launched, launch logger with HOBOware. The indicators are very faint under direct sunlight. If no indicators appear to be blinking, shield the logger from the light and check the indicators again. Check the status with HOBOware Pro. Make sure the battery power is not too low. The memory may be full. Read out the logger and relaunch. You may also want to enable Wrap Around When Full so that the HOBO U30 Station can continuously log and overwrite oldest data. See the Launching section. You need to stop logging Connect to the HOBO U30 Station to a USB cable and stop logging with HOBOware Pro. Or, unplug the solar panel or AC adapter and then unplug the battery. You will need to re-launch the logger to resume logging. Too much battery power is being used Make sure the solar panel is large enough for your application and that it is installed properly and functioning. That should provide enough power to recharge the battery during the day. Or, use the AC adapter to recharge the battery. See Maximizing Battery Life on page 38. HOBO U30 Station (NRC) User’s Guide 53 Problem Solution The power has run out Try recharging the battery by connecting the AC Adapter for 12 hours. If the HOBO U30 Station is completely dead (below 3.5 volts) you will need to charge the battery with an external battery charger or power supply or replace it. See page 41 for details. If the battery will not hold any charge (i.e. it quickly fails even after a full 12 hour charge), you may need to replace the battery. Contact your Onset Authorized Dealer or Onset Technical Support. The logger uses very durable, high-capacity Flash memory. With this memory, data is retained even when the battery runs out of charge. Important: Do not relaunch the logger until the data has been recovered. If, the battery cannot be recharged and, you are still unable to read out the HOBO U30 Station, contact the vendor that sold it to you. It may be possible to retrieve the logged data. Only some of the installed sensors are logging Check for a loose connection. If using the Smart Sensor Expander board, make sure it is connected to the built-in Smart Sensor board with the expander cable. Make sure you have not exceeded 100 meters (328 ft) of network cable for all Smart Sensors. Make sure you have not exceeded 15 data channels. Use HOBOware Pro to see a list of all installed sensors and Analog Sensor Ports in the Launch window. The Smart Sensors are listed in ascending order by serial number. If more than 15 data channels are connected, the devices with the higher serial numbers will be ignored and their data will not be recorded. 54 HOBO U30 Station (NRC) User’s Guide Problem Solution Data file contains errors (a value of 888.888) The solution depends on whether the error is intermittent or persistent. Intermittent errors are random and usually single points. They cause the Logging LED to blink orange. Persistent errors are multiple points in a row and cause the Logging LED to blink red. Intermittent errors can occur from a variety of causes such as: RF interference Nearby lightning strikes Moisture on the sensor electronics A loose connection Persistent errors are typically caused by a complete sensor failure, usually resulting from a cut cable, disconnected sensor, faulty extension cable, or sensor housing flooding. The sensor most likely needs to be replaced. Contact your Onset Authorized Dealer or Onset Technical Support. Data file is missing data for a sensor Check that the sensor is properly installed and configured. Remove and reconnect the sensor, and check the status in HOBOware Pro to verify that it can report accurate readings. Make sure it is located at least one foot away from the station case (two feet away if it is the Leaf Wetness Smart Sensor). If you find that it is not communicating, it may be damaged. Contact your Onset Authorized Dealer or Onset Technical Support. Data file cannot be opened In rare circumstances, the data file may have become corrupted. Contact your Onset Authorized Dealer or Onset Technical Support. Device is not found when connected to HOBOware Pro Check USB cable connections. Check the computer’s COM port/USB settings. HOBO U30 Station (NRC) User’s Guide 55 56 HOBO U30 Station (NRC) User’s Guide Specifications Chapter Seven: Reference HOBO U30 Station This chapter discusses the following reference topics: • Specifications - page 58 • Time Accuracy - page 61 • Memory - page 62 • Power - page 63 • Accessories - page 64 HOBO U30 Station (NRC) User’s Guide 57 Normal Operating Range -20 to 40°C (-4 to 104°F) Extended Operating Range -40 to 60°C (-40 to 140°F) Sensor Inputs 5 standard; option to expand to 10 Smart Sensor Compatibility Compatible with most Onset smart sensors, except for the S-BPA, S-TMA and S-THA. See onsetcomp.com for the full list of compatible sensors. Data Channels Maximum of 15 (some sensors use more than one data channel; see sensor manual for details). Expansion Slot One expansion slot is available for factoryinstalled expansion port. Check www.onsetcomp.com for the latest list of options. Local Communication Full Speed USB via USB mini-B connector Dimensions 17.8 H x 11.7 D x 19.3 W cm (7.0 H x 4 .6 D x 7.6 W inches) Weight 2 kg (4 lbs 10 oz) Materials Outer Enclosure: ABS blend with stainless steel hinge pins and bronze inserts Inner Enclosure: Polycarbonate with bronze inserts U-Bolts: Steel with zinc dichromate finish Gaskets: Silicone rubber Cable entry channel: EPDM rubber Cable entry bars: Aluminum with ABS plastic thumb screws Data Storage Memory Nonvolatile flash data storage, 512K bytes local storage Memory Modes Stop when full, wrap around when full Operational Indicators Up to six (depending upon options) status 58 HOBO U30 Station (NRC) User’s Guide HOBO U30 Station lights provide basic diagnostics Optional Analog Sensor Port Specifications Logging Interval 1 second to 18 hours, user-specified interval Input Channels Two, single-ended Battery Type 4 Volt, 4.5 AHr or 10 AHr, Rechargeable sealed lead-acid Field Wiring Rechargeable Battery Service Life Typical 3–5 years depending upon conditions of use. Operation within the extended operating range (but outside the normal range) will reduce battery service life. Two- or three-wire via screw terminals on detachable connector, 16–24 AWG. Replacement detachable connectors: Part of spares kit, Part No. A-FS-CVIA-7P-1 Input Range User-configurable: 0–20 mA DC, 0–20 VDC (suitable for 2.5, 5, 10V sensors) Minimum / Maximum Input Voltage 0 / 24 VDC Minimum / Maximum Input Current 0 / 24 mA DC Minimum Current Source Impedance > 20 KΩ Accuracy ± 0.25% of FSR from 50mV to FSV ADC Resolution 12 bits Excitation Power Switched 12 VDC, up to 50 mA; userselectable warm-up from 5msec to 2 minutes. Time Accuracy 0 to 2 seconds for the first data point and ±5 seconds per week at 25°C (77°F) Environmental Rating Weatherproof enclosure, tested to NEMA 6. (Requires proper installation of cable channel system). Mounting 3.8 cm (1.5 inch) mast or wall mount Enclosure Access Hinged door secured by two latches with eyelets for securing with user-supplied padlocks Sensor Network Cable Length 100 m (328 ft) maximum External Power External power is required. The system optionally accepts the following Onset solar panels (see the next section): SOLAR-1.2W SOLAR-3W SOLAR-6W Alternatively it accepts an AC power adapter: AC-U30 Specification Approval pending HOBO U30 Station (NRC) User’s Guide 59 60 HOBO U30 Station (NRC) User’s Guide Time Accuracy Memory The internal clock in the HOBO U30 Station is set by the time zone when the logger was launched and it will not change after a spring or fall time change. If you want to see the data in HOBOware Pro in the new time, change the time zone offset accordingly when you open the data file. The HOBO U30 Station contains 512K bytes of very reliable non-volatile Flash memory, which retains data even if power runs out. Although the HOBO U30 Station has a rechargeable battery and is designed to be connected to either solar or AC power, the data would still be retained even if it were to run out of power. There are two common sources of errors with time reporting. If Wrap Around When Full is enabled, the oldest data will be overwritten with the newest data and logging will continue indefinitely. • Launch time loss. The HOBO U30 Station may lose up to two seconds when it is launched. This is unavoidable. • Clock drift. The long-term time accuracy is related to ambient temperature. At 25°C (77°F), the worst-case error is ±8 parts per million (PPM), or about 5 seconds per week. The error increases as the temperature deviates from 25°C, as shown in the graph below. At a constant temperature of -20°C, the logger time error could be as much as 35 PPM (21 seconds per week). To keep clock drift within your requirements, periodic relaunches may be required. HOBO U30 Station (NRC) User’s Guide 61 The rate at which the memory will fill up depends on the number and type of sensors connected and the logging interval. This is called the logging duration. Adding sensors decreases the logging duration; increasing the logging interval increases the logging duration. If you open the launch window with HOBOware Pro and select a logging interval, it will provide you with an estimate of when the logger will fill up with the sensor suite that you have installed. (This is just a way to see how long it takes to fill memory. 62 HOBO U30 Station (NRC) User’s Guide Power Accessories The following accessories can be used with the HOBO U30 Station. These accessories can be purchased from an Onset Authorized Dealer, or directly from Onset Computer Corporation. Important: For detailed information on these accessories, including new items that may have been introduced after this manual was printed, refer to www.onsetcomp.com. Due to the self-discharge characteristics of this type of battery, it is imperative that you charge the battery for at least 12 hours every six months at minimum, even if you are not actively using the HOBO U30 Station. Otherwise, permanent loss of battery capacity may occur. Accessory (Onset Part #) 1.2 Watt, 6 Volt Solar Panel Solar Panel for sunny locations and/or (SOLAR-1.2W) locations with low data transfer requirements. The HOBO U30 Station has a 4-volt sealed lead-acid. The battery will start to run down if it is not recharged. Therefore, the system requires either a solar panel or an AC adapter plugged in to ensure the battery does not run too low. Keep in mind that even rechargeable batteries eventually fail, and will not be able to be recharged. With regular usage, the battery should last more than two years. See the next section for details on how to maximize battery life. HOBO U30 Station (NRC) User’s Guide Description 63 AC Adapter (AC-U30) 110–240 V AC, 50/60 Hz AC linear power supply. Output 6 Volts DC, 2 Amp. 5-Input Smart Sensor Expansion Option (S-ADAPT-X5-10) Optional expander that increases the number of Smart Sensor inputs from 5 to 10. 1-to-2 Smart Sensor splitter (S-ADAPT-5) Optional splitter expands one smart sensor port into two. 64 HOBO U30 Station (NRC) User’s Guide 3. Appendix C: The Smart Sensor Expander Board Punch through along the bottom of the knockout and then tap sharply in the middle to break into the opening. Remove the hanging flap. Accessing the Secondary Cable Slot Whether the Smart Sensor Expander Board was installed at the factory, or you are installing one yourself, you must remove the piece covering the Secondary Cable Slot to access the board. You should leave the cover installed until you are ready to use the Expander Board. Remove Flap 4. Peel away any residual material. Steps 1. Make sure the HOBO U30 Station is turned off and all cables are disconnected. 2. Use a hammer and a bladed tool (e.g., screwdriver, chisel) to punch through at the four corners and at the ends of the piece covering the secondary cable bay. Removing residual material Accessing secondary cable slot HOBO U30 Station (NRC) User’s Guide 65 66 HOBO U30 Station (NRC) User’s Guide 5. Installing the Expander Board File any rough edges. For best results, the surfaces in the cable access opening should be smooth so that the rubber cable channel gasket will seal. Before You Begin If you have not already done so, remove the piece covering the Secondary Cable Slot (page 65). Steps 1. Insert a self-tapping screw (supplied) into each end of the expander. 2. Lower expander onto the two standoffs near the bottom of the case. 3. Screw expander into place. NOTE: The contacts of the expander jacks should be nearest to the bottom of case as shown below. CAUTION: Be careful not to trap the battery cable behind the board. Filing rough edges Installing Smart Sensor Expander Board HOBO U30 Station (NRC) User’s Guide 67 68 HOBO U30 Station (NRC) User’s Guide Alternate method 1. Place expander (without the screws) onto the standoffs. 2. Apply a small amount of clear grease (the grease supplied with this kit can be used) at the end of the screwdriver to hold screws while lowering them into place. Attach screw to screwdriver Install Expander Cable 1. Plug one end of the supplied expander cable into the rightmost jack of the expander board. 2. Plug the other end into the rightmost jack of the built-in board. Installing expander cable HOBO U30 Station (NRC) User’s Guide 69 70 HOBO U30 Station (NRC) User’s Guide Supplementary Information Warranty This Chapter includes the following topics: As part of Onset’s ongoing efforts to provide 100% customer satisfaction, our Continuing Engineering Group constantly monitors and evaluates all of our products and software. In the unlikely event any significant defect is found, Onset will notify you. If you find a defect, please e-mail us at [email protected]. • Warranty - page 72 • Returns - page 74 • Repair Policy - page 75 • Contacting Technical Support - page 76 Onset Computer Corporation (“Onset”) warrants to the original end-user Purchaser for a period of one year from the date of original purchase that the HOBO product(s) purchased will be free from defect in material and workmanship. During the warranty period Onset will, at its option, either repair or replace products that prove to be defective in material or workmanship. This warranty is void if the product has been damaged by the Purchaser as a result of improper maintenance, abuse, misuse, mishandling, misapplication, error or negligence of Purchaser, or if there has been an unauthorized alteration, attachment or modification. THERE ARE NO WARRANTIES BEYOND THE EXPRESSED WARRANTY AS PROVIDED IN THIS DOCUMENT. IN NO EVENT SHALL ONSET BE LIABLE FOR LOSS OF PROFITS OR INDIRECT, CONSEQUENTIAL, INCIDENTAL, SPECIAL OR OTHER SIMILAR DAMAGES ARISING OUT OF ANY BREACH OF THIS CONTRACT OR OBLIGATIONS UNDER THIS CONTRACT, INCLUDING BREACH OF WARRANTY, NEGLIGENCE, STRICT LIABILITY, OR ANY OTHER LEGAL THEORY. LIMITATION OF LIABILITY. The Purchaser’s sole remedy and the limit of Onset’s liability for any loss whatsoever shall not exceed the Purchaser’s price of the product(s). The determination of suitability of products to the specific needs of the Purchaser is solely the Purchaser’s responsibility. THERE ARE NO WARRANTIES BEYOND THE EXPRESSED WARRANTY IN THIS DOCUMENT. EXCEPT AS SPECIFICALLY PROVIDED IN THIS DOCUMENT, THERE ARE NO OTHER WARRANTIES EXPRESS OR IMPLIED, INCLUDING BUT NOT LIMITED TO, ANY IMPLIED WARRANTIES OF MERCHANTIBILITY OR FITNESS FOR A PARTICULAR PURPOSE. NO INFORMATION OR ADVICE GIVEN BY ONSET, ITS AGENTS OR EMPLOYEES SHALL CREATE A WARRANTY OR IN ANY WAY INCREASE THE SCOPE OF THE EXPRESSED WARRANTY OFFERED WITH THE SALE OF THIS PRODUCT. HOBO U30 Station (NRC) User’s Guide 71 72 HOBO U30 Station (NRC) User’s Guide INDEMNIFICATION. Products supplied by Onset are not designed, intended, or authorized for use as components intended for surgical implant or ingestion into the body or other applications involving life-support, or for any application in which the failure of the Onset-supplied product could create or contribute to a situation where personal injury or death may occur. Products supplied by Onset are not designed, intended, or authorized for use in or with any nuclear installation or activity. Products supplied by Onset are not designed, intended, or authorized for use in any aeronautical or related application. Should any Onset supplied product or equipment be used in any application involving surgical implant or ingestion, life-support, or where failure of the product could lead to personal injury or death, or should any Onset-supplied product or equipment be used in or with any nuclear installation or activity, or in or with any aeronautical or related application or activity, Purchaser will indemnify Onset and hold Onset harmless from any liability or damage whatsoever arising out of the use of the product and/or equipment in such manner. LEGAL REMEDIES. This warranty gives you specific legal rights. You may also have other rights which vary by jurisdiction. The remedies provided herein are in lieu of all other remedies, express or implied. HOBO U30 Station (NRC) User’s Guide 73 Returns Please direct all warranty claims to the place of purchase. Before returning a failed unit directly to Onset, you must obtain a Return Merchandise Authorization (RMA) number from Onset. You must provide proof that you purchased the Onset product(s) directly from Onset (purchase order number or Onset invoice number). Onset will issue an RMA number that is valid for 30 days. You must ship the product(s), properly packaged against further damage, to Onset (at your expense) with the RMA number marked clearly on the outside of the package. Onset is not responsible for any package that is returned without a valid RMA number or for the loss of the package by any shipping company. Loggers must be clean before they are sent back to Onset or they may be returned to you. Note: For third-party sensors, Onset is acting as a distributor; manufacturer’s warranty and repair/replacement information, if any, is in documentation provided with the sensors. 74 HOBO U30 Station (NRC) User’s Guide Repair Policy Contacting Technical Support Products that are returned after the warranty period or are damaged by the customer as specified in the warranty provisions can be returned to Onset with a valid RMA number for evaluation. Contact Onset for details and pricing. If you have questions about your HOBO logger, contact the company where you purchased it (either Onset Computer Corporation or an Onset Authorized Dealer). Contact information for Onset Computer Corporation is located at the beginning of this manual. Data-Back Service Before calling Technical Support The HOBO U30 Station stores data in non-volatile flash data storage. Onset will, if possible, recover your data to disk. You can evaluate and often solve the problem yourself by taking the following steps: Tune Up Service • Check the Diagnostics and troubleshooting chapter of this guide and online technical support at www.onsetcomp.com. Common problems and solutions are listed in those locations. • Write down the events that led to the problem. • If you contact Technical Support at Onset Computer Corporation or an Onset Authorized Dealer, please indicate that you need technical support for HOBO products. Be prepared to provide the following information: Onset will examine and retest any logger or sensor. ASAP Repair Policy For an additional charge, Onset will expedite the repair of a returned product. - A data file showing any anomalies. This is the most important information you need to provide. - The part number and serial number of the logger and sensors used, and the configuration being used. - The software version number. - Details on the hardware and software configuration of your computer, including the manufacturer, model number, peripherals, and operating system version. - A description of the environment in which the logger and sensors are deployed. - A complete description of the problem or question. With this detailed information, Technical Support can provide a faster and more accurate response. HOBO U30 Station (NRC) User’s Guide 75 76 HOBO U30 Station (NRC) User’s Guide L Index LEDs, 51 A AC Adapter, 5 Accessories, 64 Active LED, 52 Installing, 31 Cable length, 6 Analog Sensor Port, 2, 4, 7, 13 Dead battery, 42 Cable requirements, 13 Functional block diagram, 7 Removing sensors, 48 Specifications, 60 M D Data channels, 6 E Battery, 2, 14 Charging, 42 Replacing, 43 Battery connector, 5 Battery life Maximizing, 38 Without external power, 40 Battery voltage, 39 C Cable access opening, 31 Cable channel, 4 Errors In data file, 55 Cable length, 6 Mounting, 11 Measurement averaging, 38 Plugging in, 11 Memory, 62 Removing, 48 Mounting plates, 10 Replacing, 48 Plugs, 32 Ex. On LED, 52 Testing, 49 Verifying accuracy, 46 Solar panel, 5, 38, 64 R Excitation, 7 Repair policy, 75 Retaining bars, 34 G Returns, 74 Grounding wire, 5 Rubber cable channel, 31 Installing, 30 Rubber plugs, 32 Specifications, 58 Support, 76 T Technical Support, 76 Time, 61 Troubleshooting, 53 H S HOBO U30 Station Sampling interval, 38 Accessories, 64 Sensor active LED, 4, 52 Cleaning, 46 Sensors Data channels, 6 Adding, 47 Maintaining, 45 Power, 63 Connecting to Analog Sensor Port, 13 Specifications, 58 Removing, 48 Troubleshooting, 53 HOBO U30 Station (NRC) User’s Guide Smart Sensors, 2, 4 Maintenance, 45 P Expander cable, 69 B Smart Sensor Ports, 4 Adding, 47 Channels, 6 Alarm LED, 4 Adding sensors, 47 Logging LED, 4, 51 Smart Sensor expander, 68 Server/USB communication LED, 52 Index-1 U USB cable, 15 USB port, 15 W Warm-up, 38 Warranty, 72 Wrap around when full, 62 © 2008 Onset Computer Corporation. All rights reserved. Onset, HOBO, and HOBOware are trademarks or registered trademarks of Onset Computer Corporation for its data logger products and configuration/interface software. All other trademarks are the property of their respective companies. Onset Computer Corporation 470 MacArthur Blvd. Bourne, MA 02532 Part #: MAN-U30-NRC Doc #: D-11866-A HOBO U30 Station (NRC) User’s Guide Index-3